HOLIDAY DONATION DRIVE - SUPPORT MSW - DO YOUR PART TO KEEP THIS GREAT FORUM GOING! (Only 13 donations so far - C'mon guys!)
×


Mike Y
-
Posts
1,552 -
Joined
-
Last visited
Content Type
Profiles
Forums
Gallery
Events
Everything posted by Mike Y
-
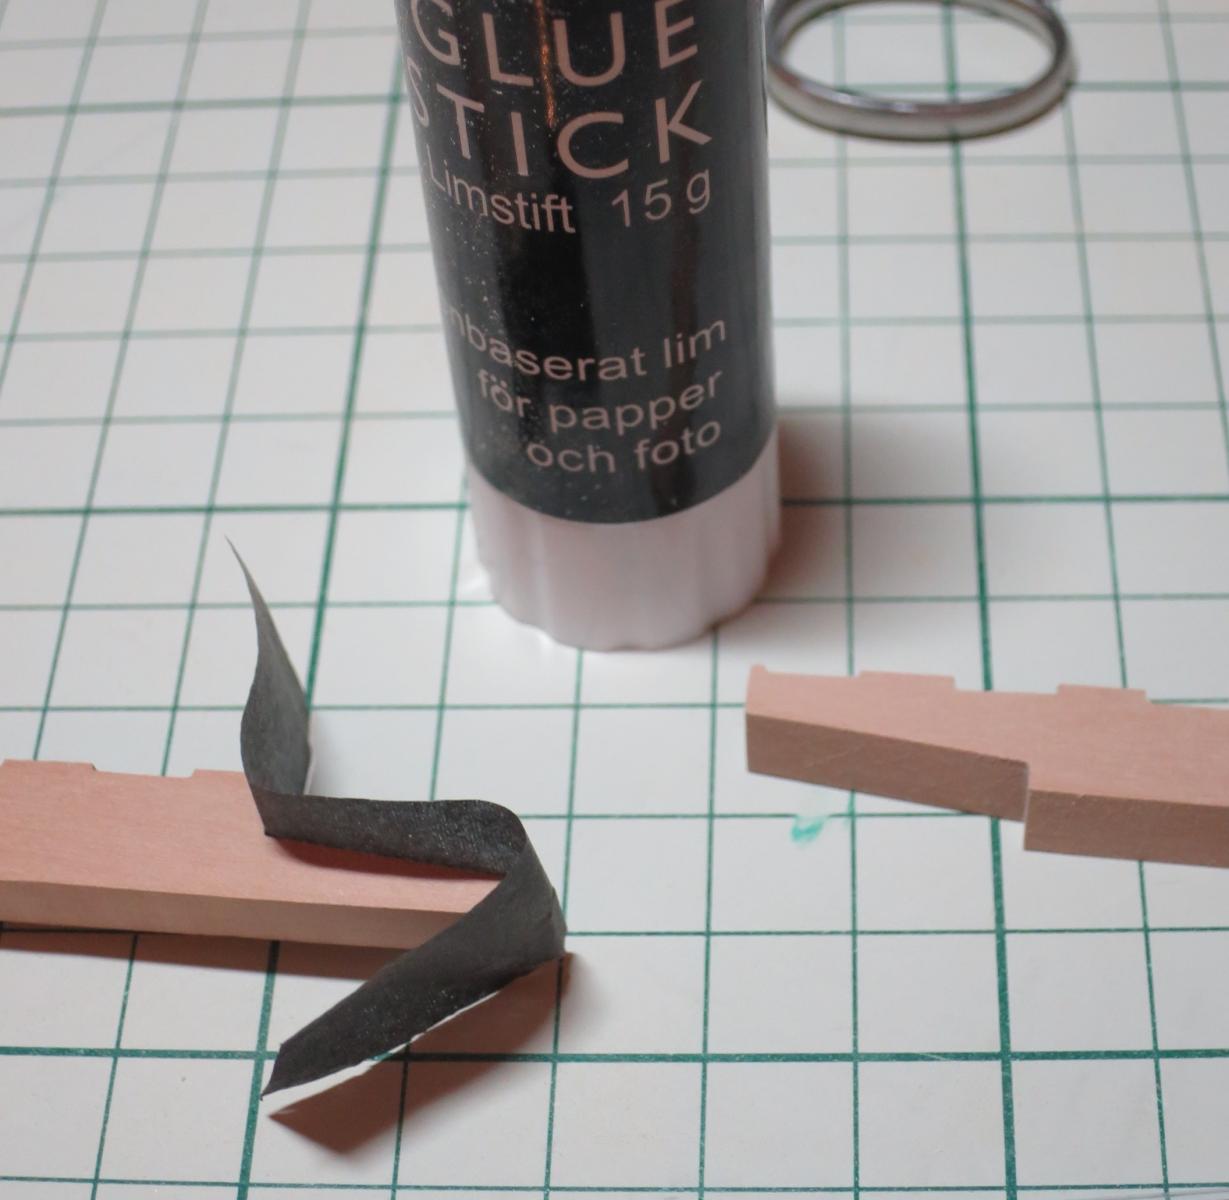
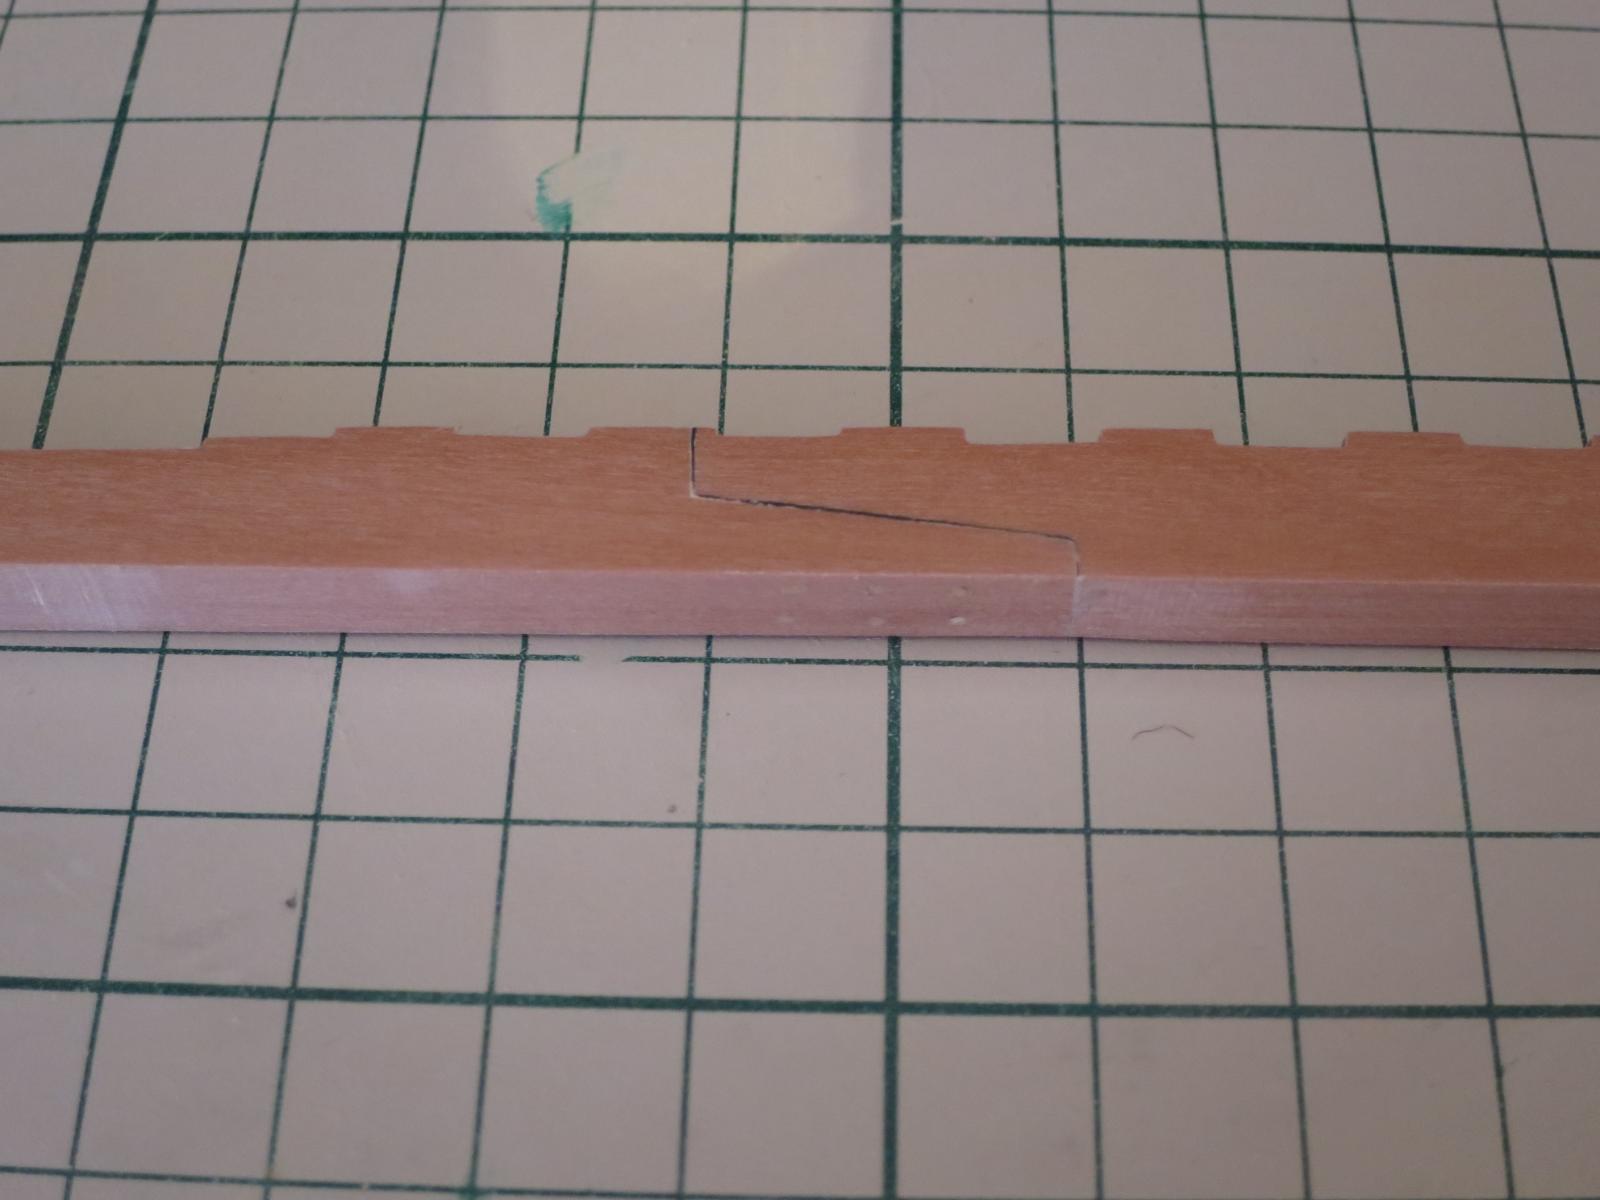
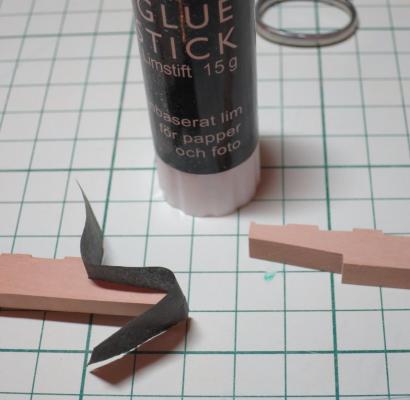
 Alan: hmm, I was sure that I read about the tissue paper method somewhere on MSW Tried it on a scrap wood, works quite well. The paper inside the joint could be perforated and/or cut slightly to improve the glue penetration. But such joint should be definitely reinforced with the treenails. Mark: thanks! There would be some sanding ahead, which should also make the line black line more consistent
- 968 replies
-
- 2
-

-
- hahn
- oliver cromwell
- (and 1 more)
-
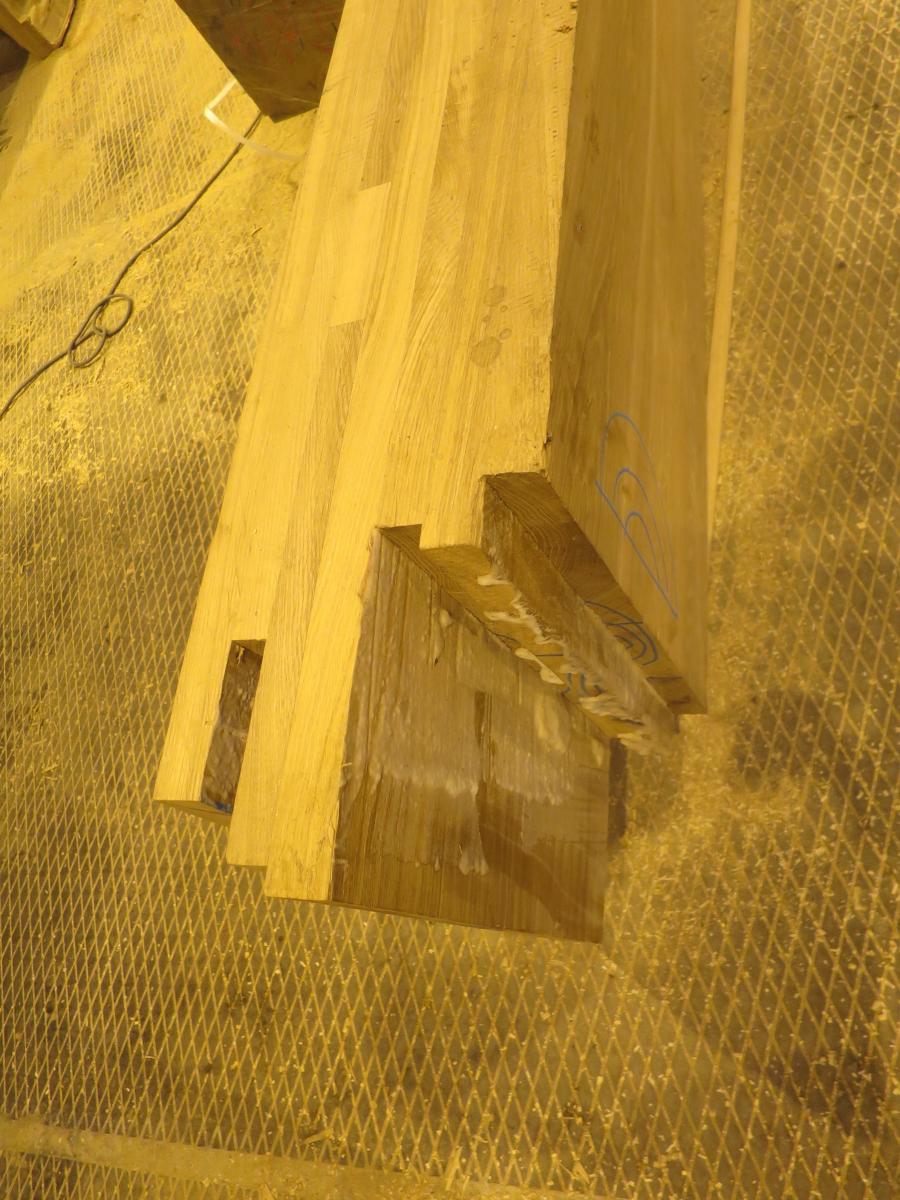
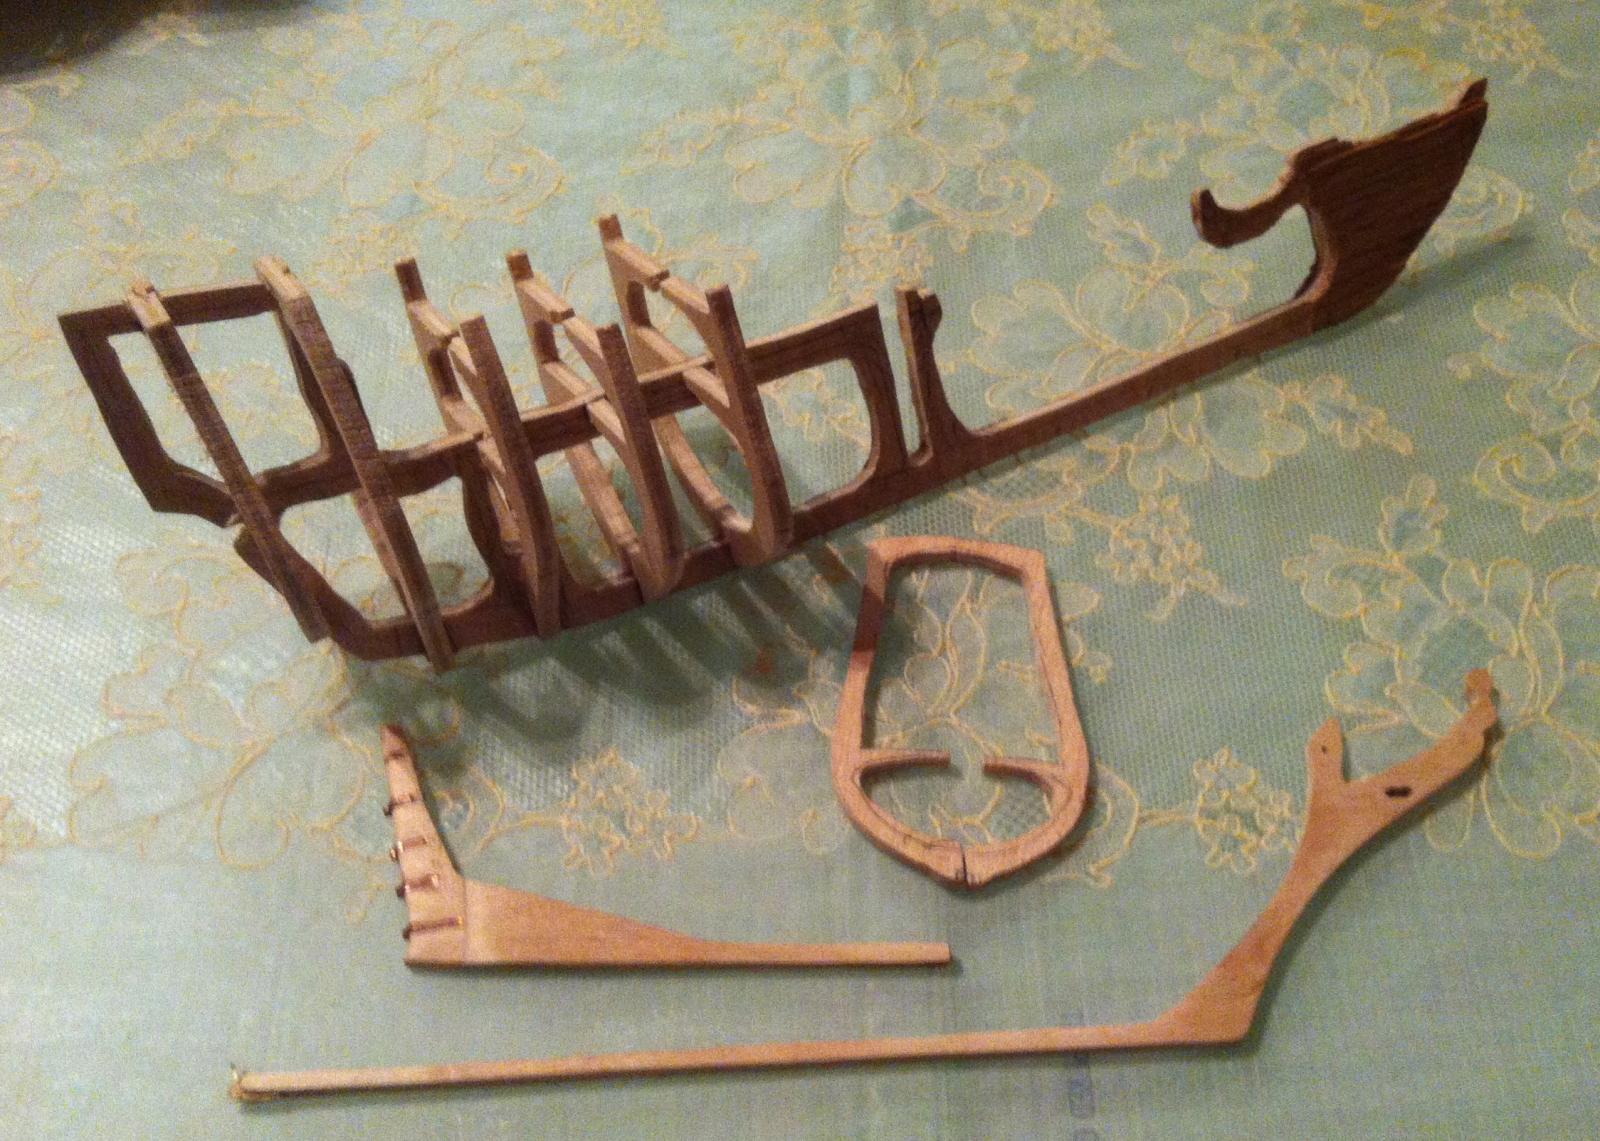
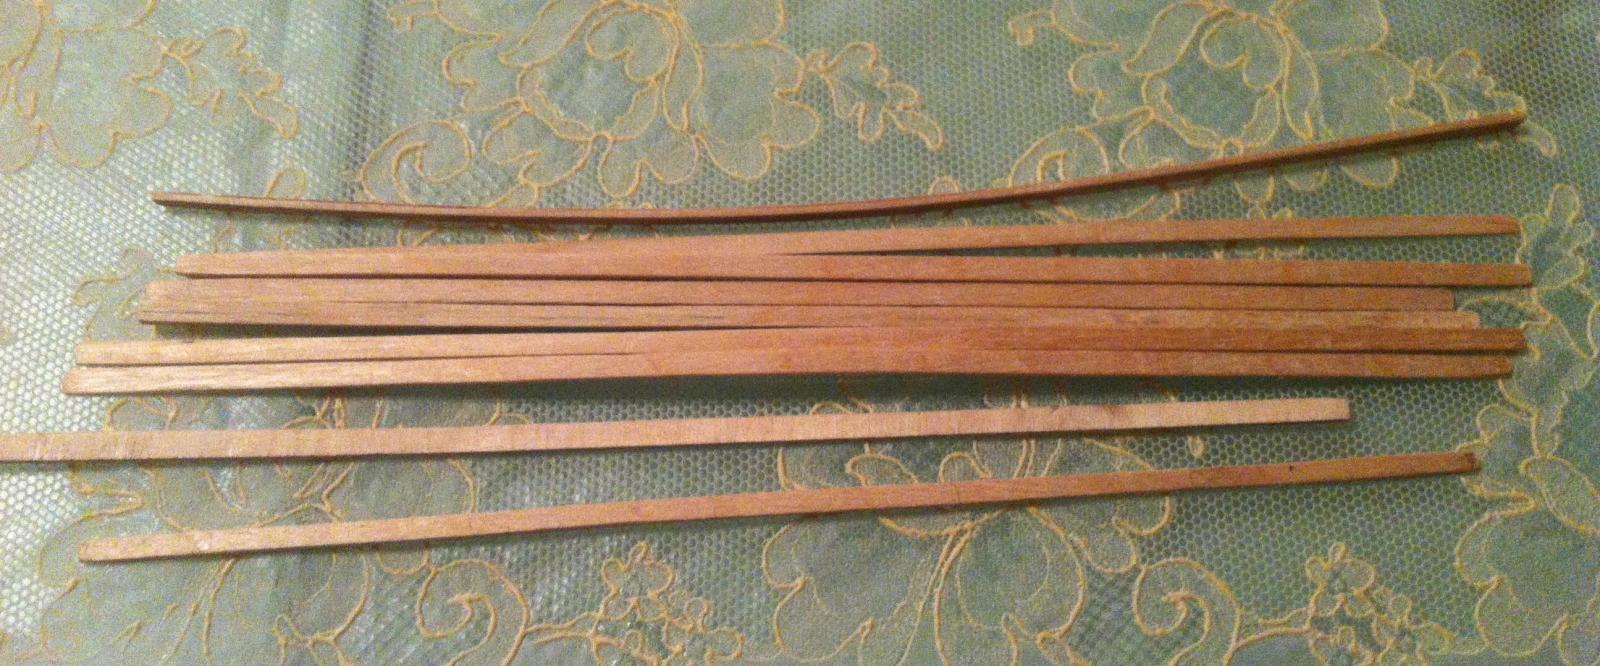
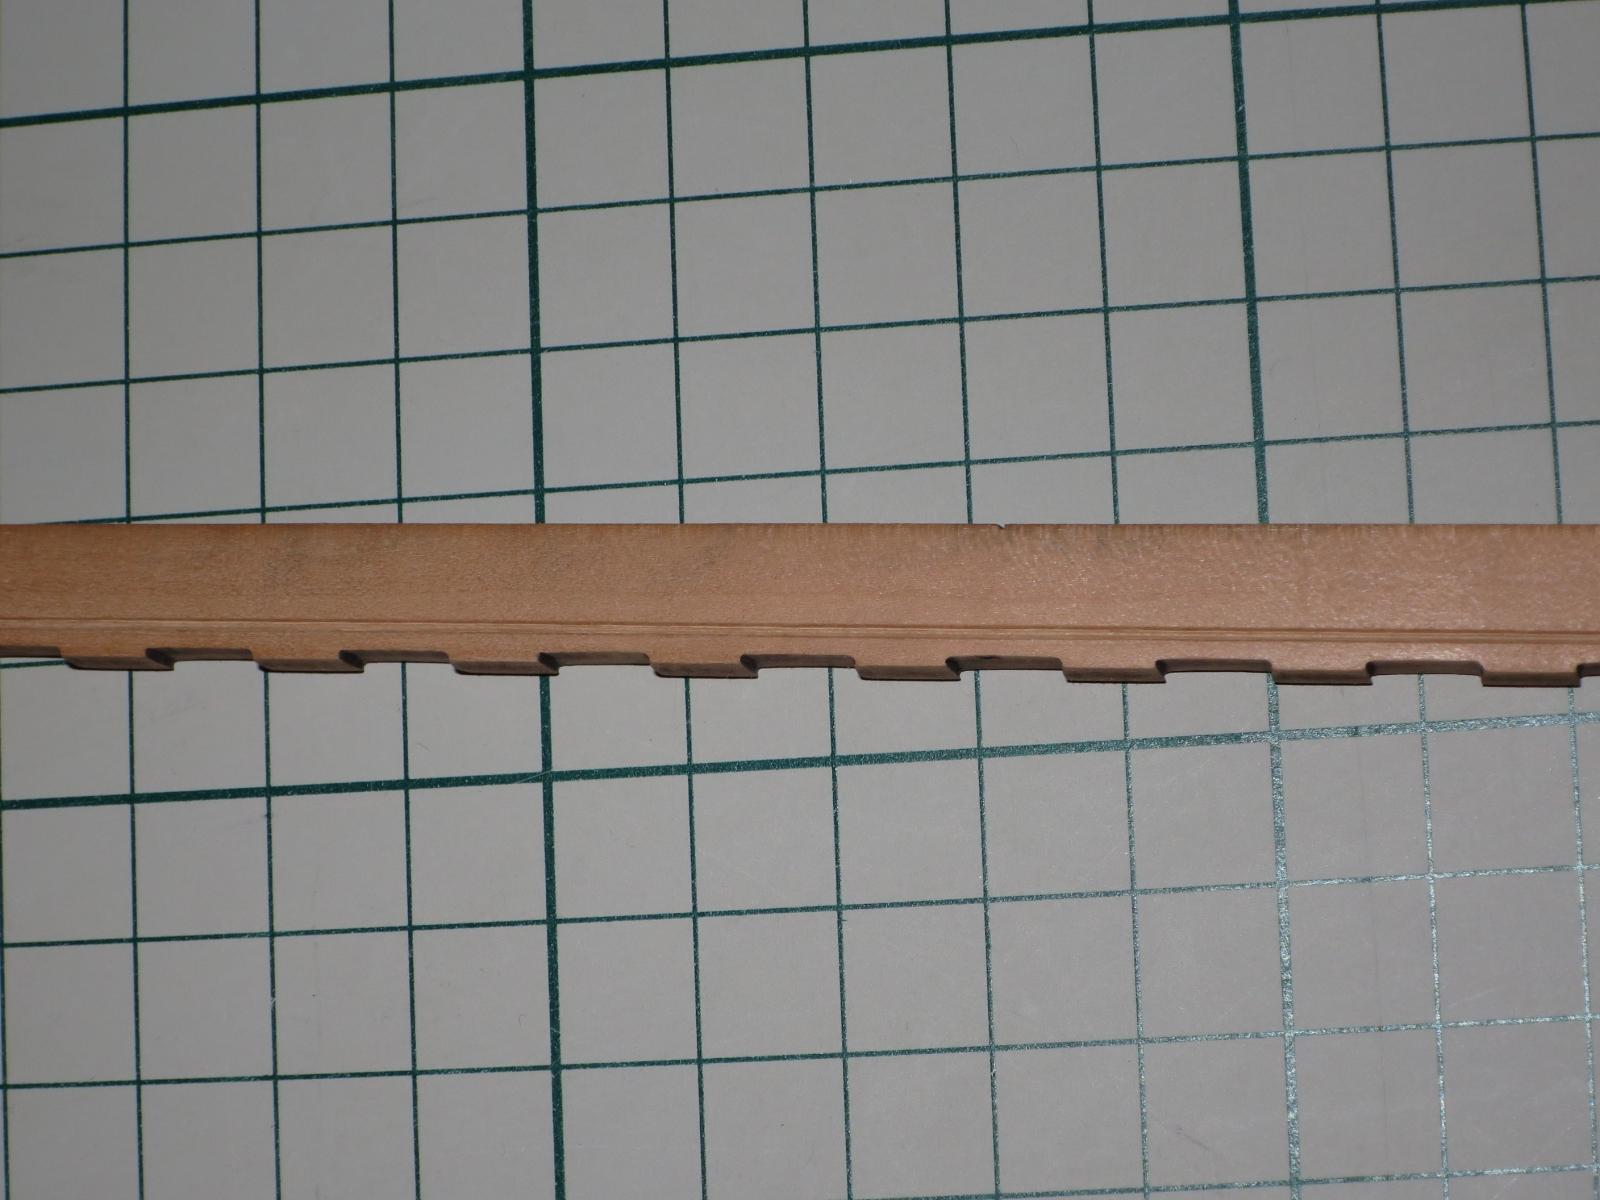
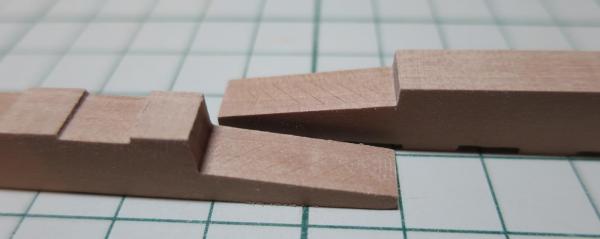
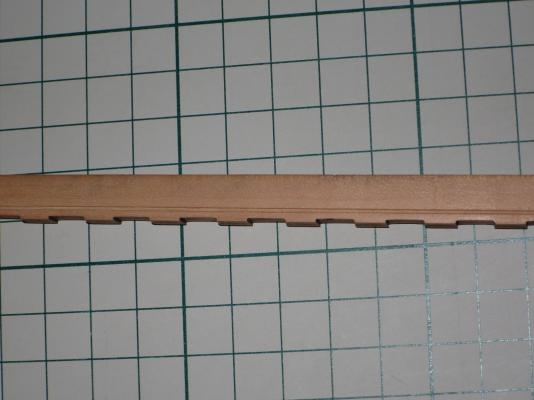
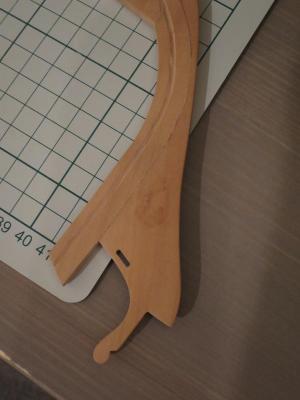
While assembling frames, started the keel assembly (to replace the laser cut keel that I used before). Joint is blackened with a tissue paper. Castello treenails reinforce the joint, because paper makes it a bit weak. The treenails would be completely hidden by the false keel, so they have a purely functional purpose Hope that the paper line would be more accurate after a final sanding.

- 968 replies
-
- 5
-
-
- hahn
- oliver cromwell
- (and 1 more)
-
Received my copy. The book is very very close to "The Sailing Frigate", discussed in http://modelshipworld.com/index.php/topic/8953-the-sailing-frigate-by-robert-gardiner/ Same series, same format. Some models in the book are also the same. But it is a good addition. Definitely a good reading and an overview, but do not expect a very deep description of the ship anatomy. Lots of nice model photos!
-
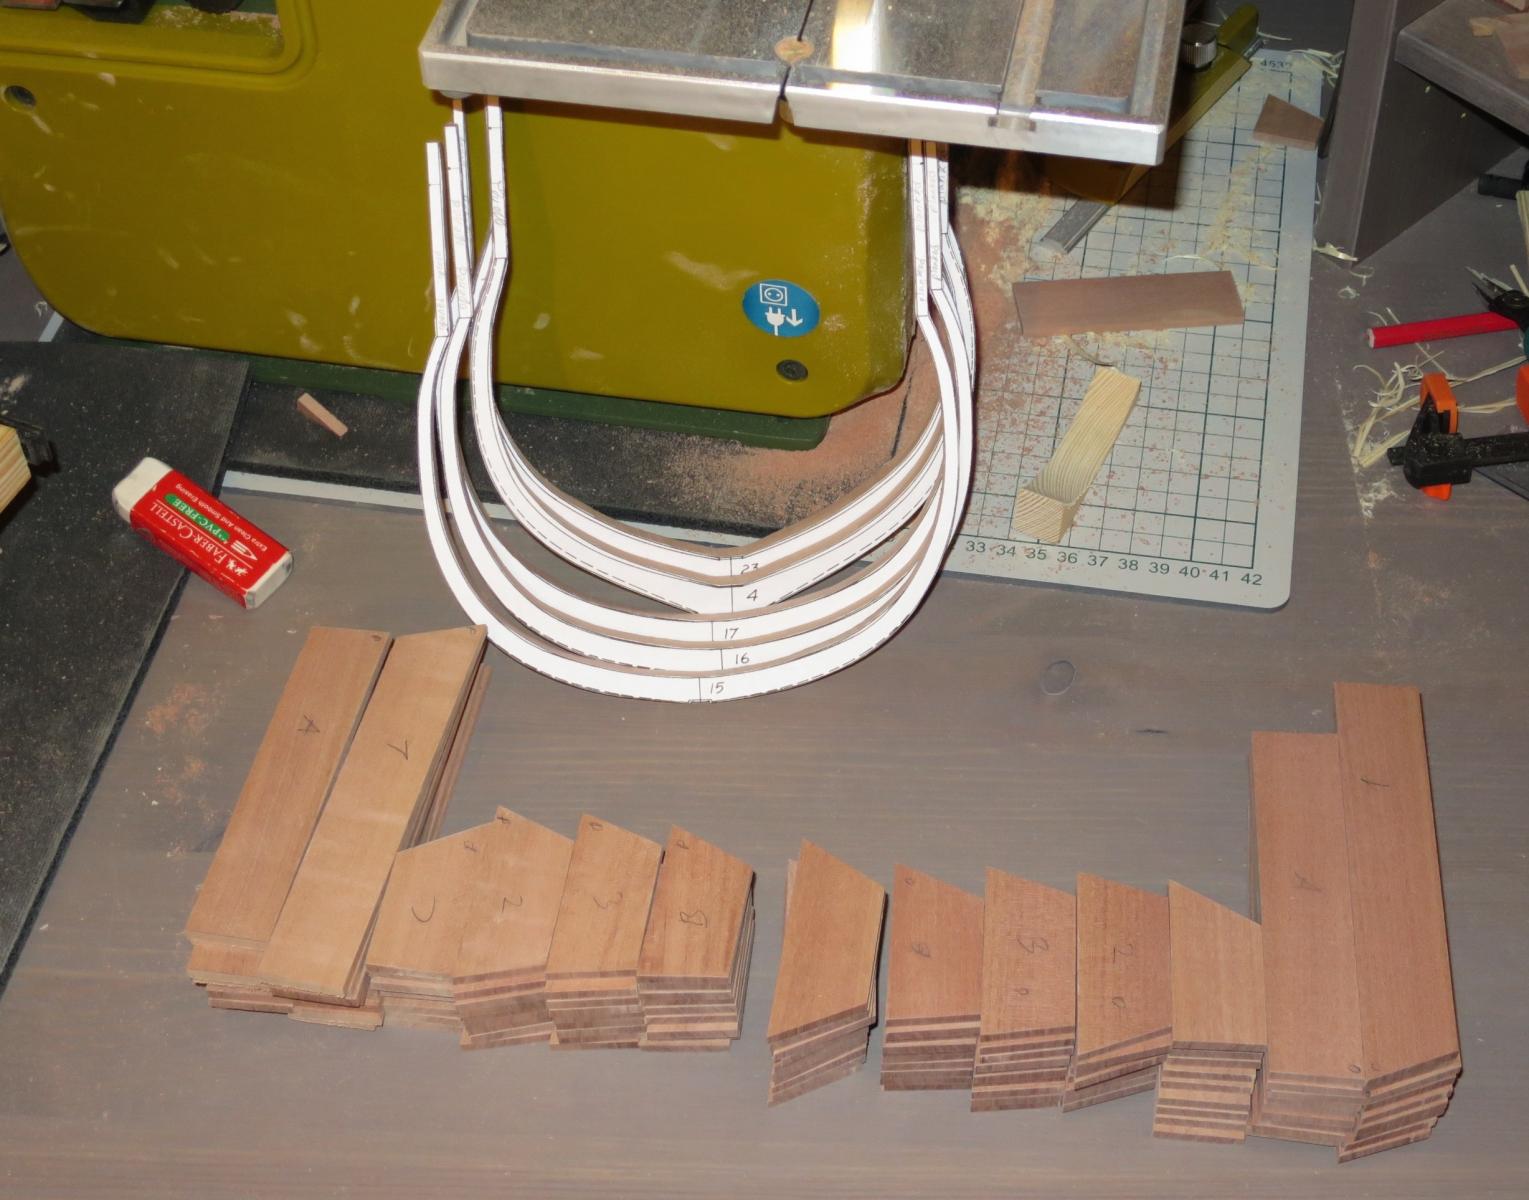
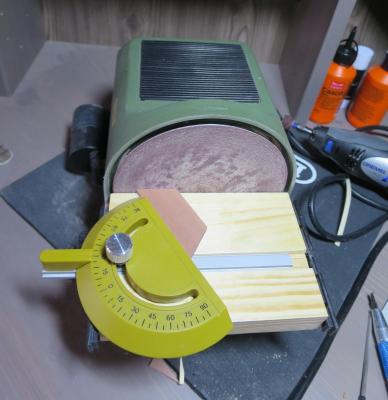
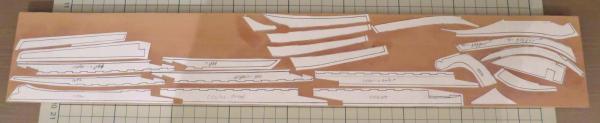
Replaced the table of my disk sander - stock one was nice but not flat - slightly rising right near the disk. It was a problem when shaping the keel parts - they are thin, and sanded on a wrong angle due to skewed table. Did not bothered to contact proxxon for replacement, plus I wanted a smaller gap between the table and the disk. Looks weird, but works pretty well - it is flat at least! Disk sander made a big difference in the frame blank production speed. It takes like 30sec per blank to to set a straight edge with a proper angle. And allows to cut blanks on a bandsaw, freehand, with less accuracy and precision - it does not matter, sander will make it straight anyway. Amazing! It took me just 4 hours to make the next batch of blanks, which would be used for the next 10 frames. (Left side - for planked side, right side - for opened side, finely selected wood pieces)

- 968 replies
-
- 10
-
-
- hahn
- oliver cromwell
- (and 1 more)
-
The set of instructions for that kit finally arrived!
- 968 replies
-
- 11
-
-
- hahn
- oliver cromwell
- (and 1 more)
-
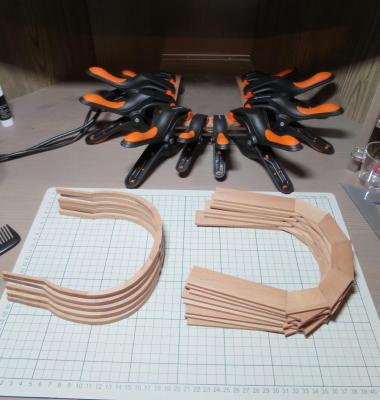
Minor status update. Not so much going on - building frames when I have a time. Just around half of the work is done for a mere 10 frames in that batch The keel structure is roughly cut and shaped, but waiting for TFFM books to arrive before I will fine-fit and assemble it - want to make sure that it would be done correctly, at least on the parts that would be visible.

- 968 replies
-
- 13
-
-
- hahn
- oliver cromwell
- (and 1 more)
-
Oh what? It is done? Ouch... Maybe there is a missing chapter in the book? Please please continue! Ok, just kidding, CONGRATULATIONS! What is your plan for the next build?
-
The hull would be ready in a year or so, would be rigged after launch. Unfortunately it will not have any voyages, will be parked and work as a museum. So far they do not plan to install any engines, pure sail power. It is illegal to operate a fully wooden ship under a russian flag (fire hazard, blah blah). No exception for replicas. There is another replica of frigate of the same period. It was bult by patriots and enthusiasts, but forced to sail outside of russian waters, not allowed to enter them. See https://translate.google.com/translate?sl=ru&tl=en&u=http%3A//ru.m.wikipedia.org/wiki/%25D0%25A8%25D1%2582%25D0%25B0%25D0%25BD%25D0%25B4%25D0%25B0%25D1%2580%25D1%2582_%28%25D1%2584%25D1%2580%25D0%25B5%25D0%25B3%25D0%25B0%25D1%2582%2C_1999%29%23.D0.AE.D1.80.D0.B8.D0.B4.D0.B8.D1.87.D0.B5.D1.81.D0.BA.D0.B8.D0.B5_.D0.BA.D But these guys (Poltava project) are sponsored by Gazprom, one if the most corrupt and powerful structures in the country, so the term "illegal" do not apply to them. Let's see.
- 968 replies
-
- 1
-
-
- hahn
- oliver cromwell
- (and 1 more)
-
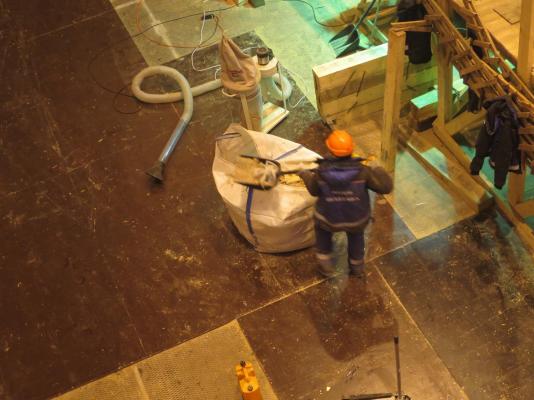
Another way to estimate the size - look on their sawdust bag. Or the sawdust shovel!


- 968 replies
-
- 11
-
-
- hahn
- oliver cromwell
- (and 1 more)
-
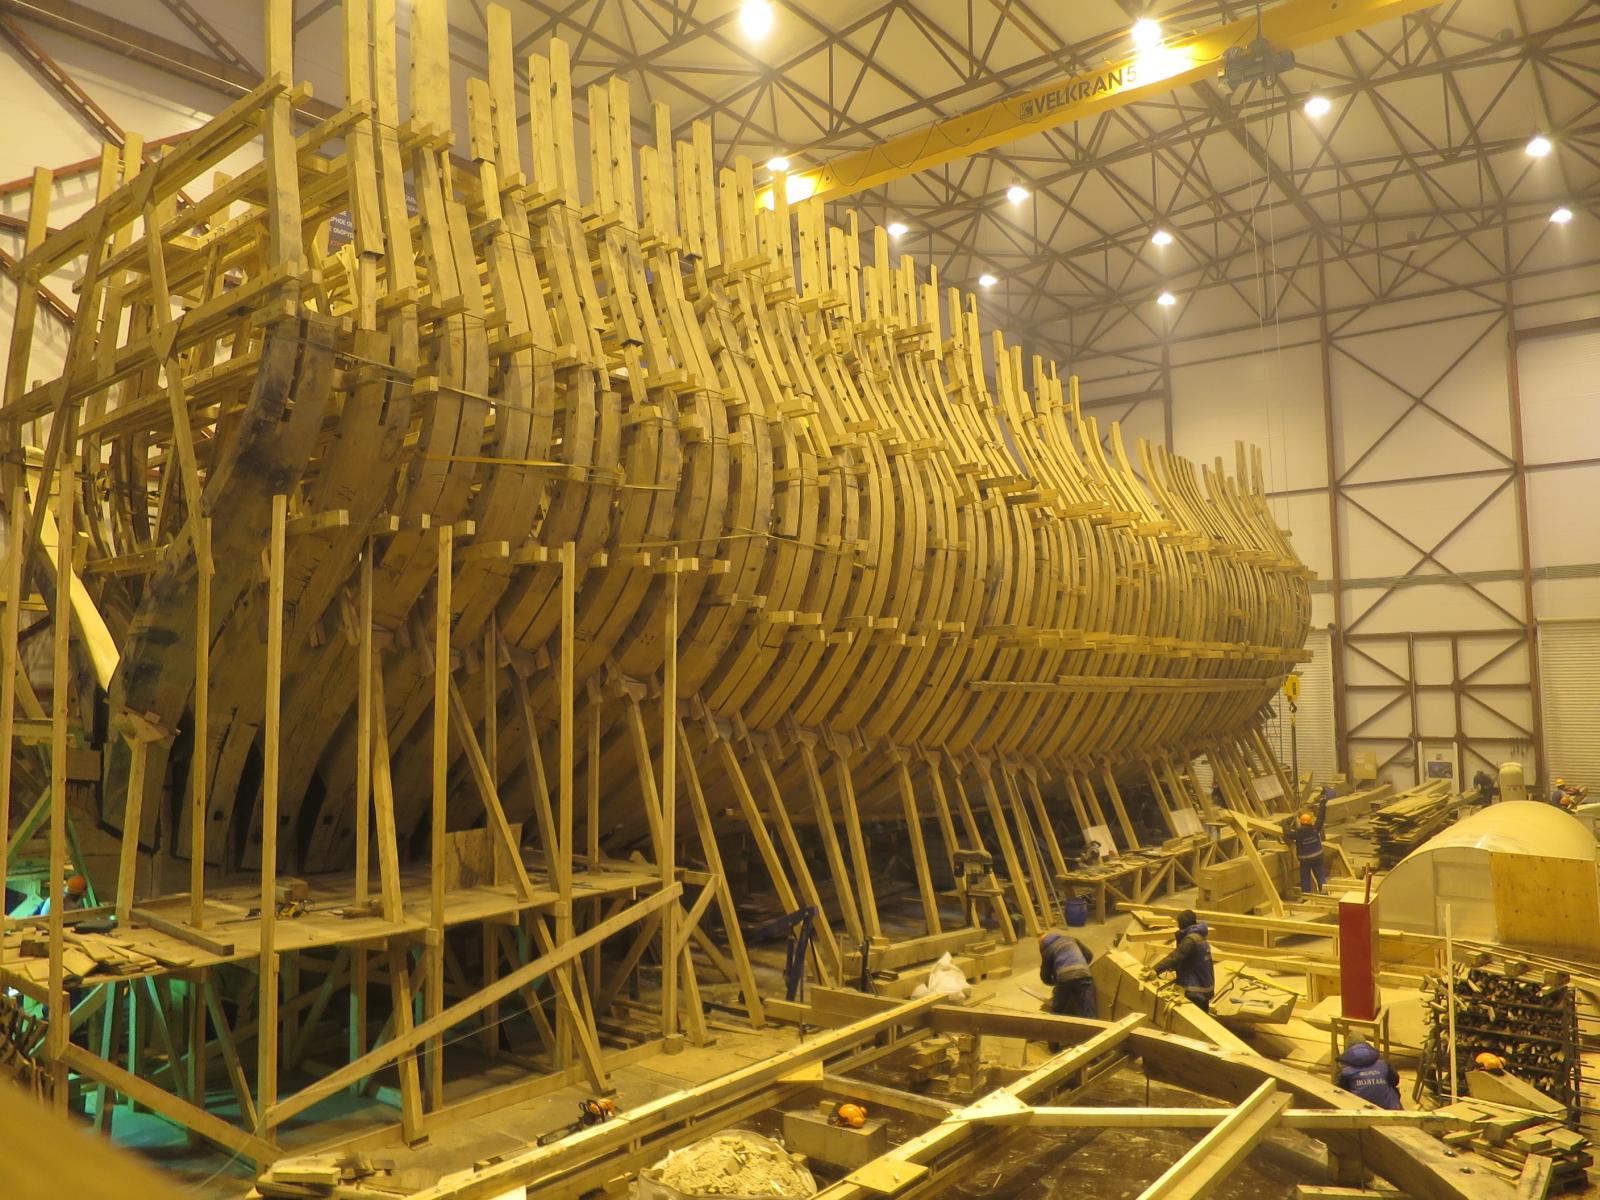
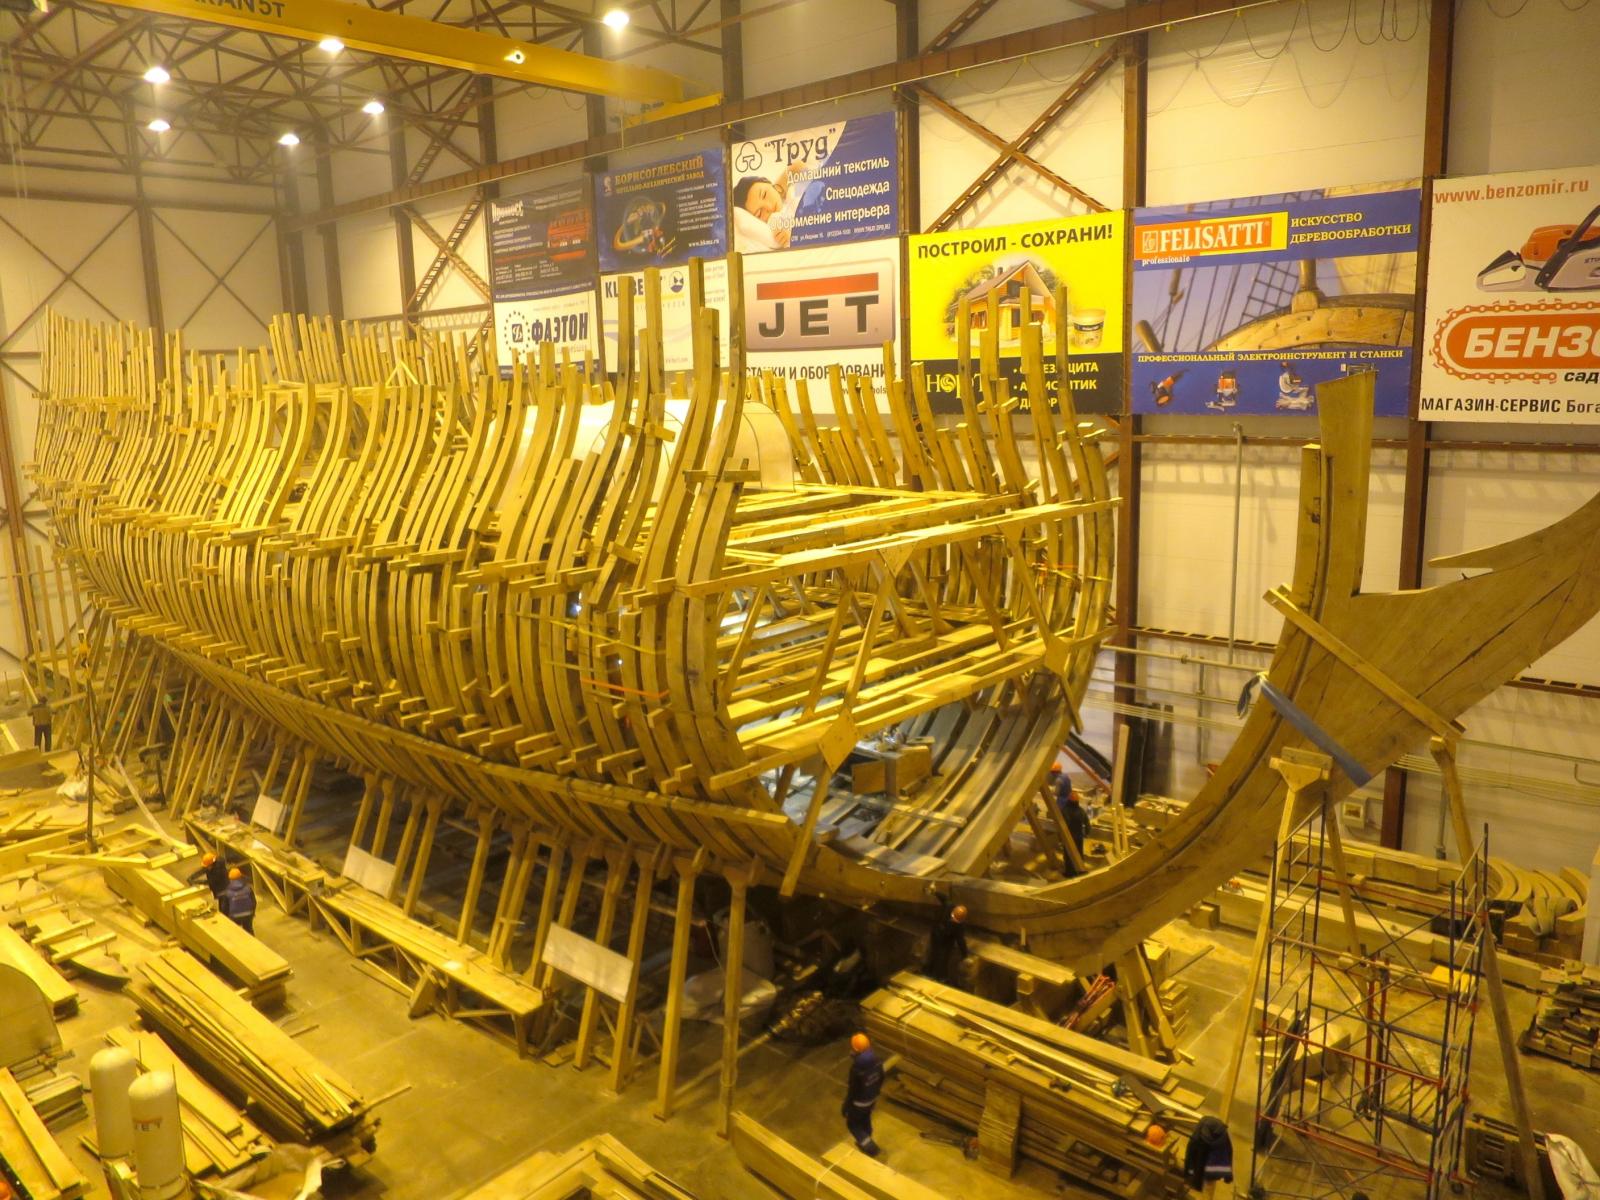
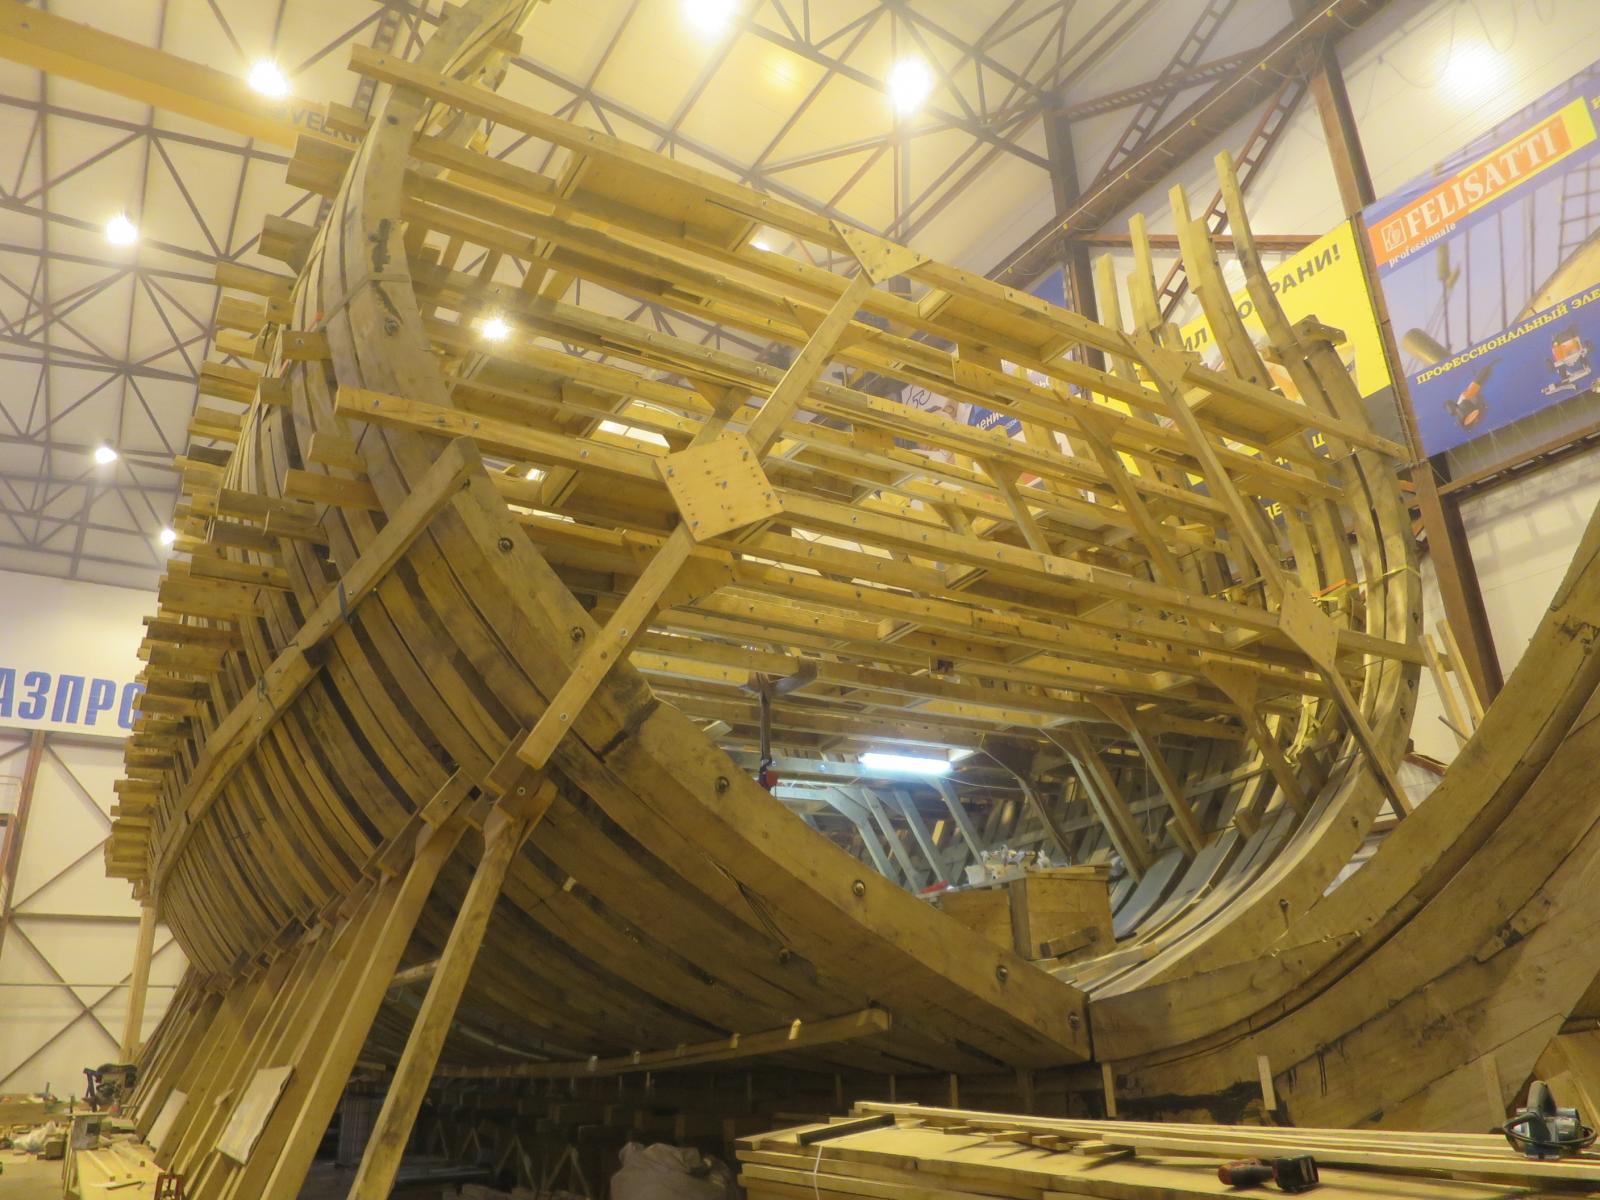
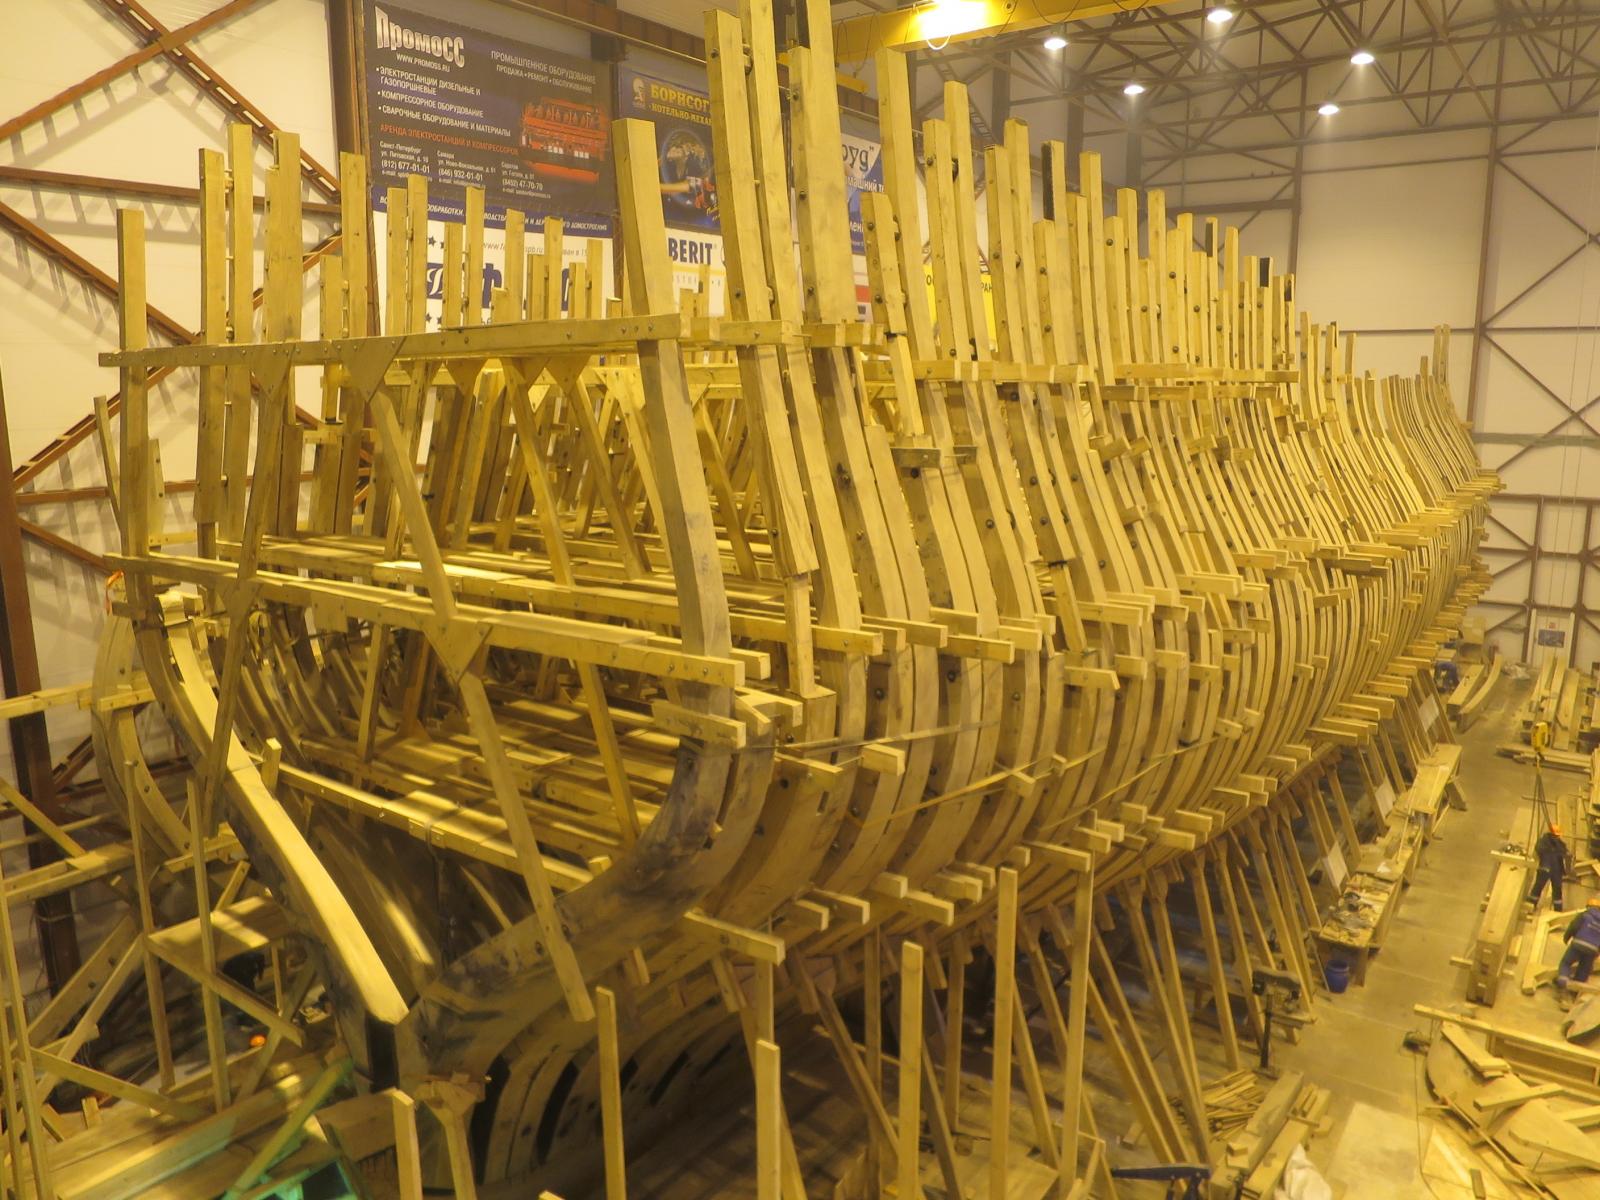
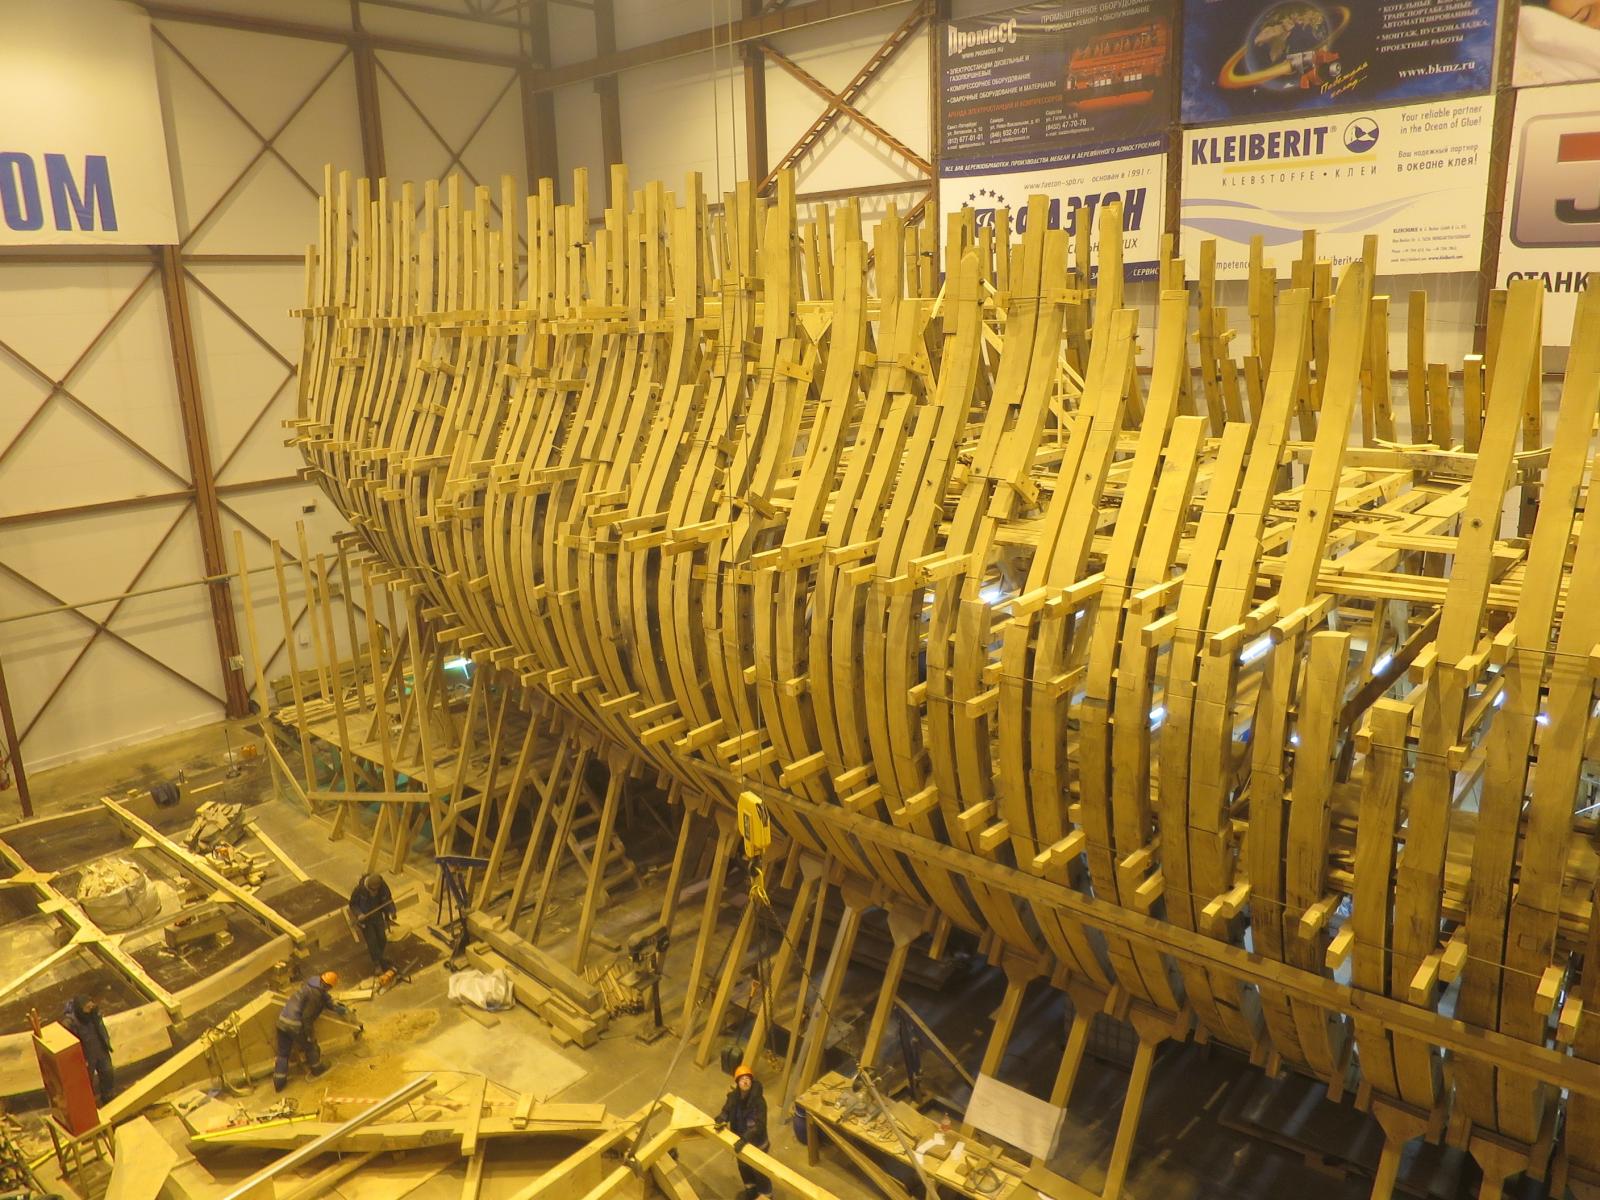
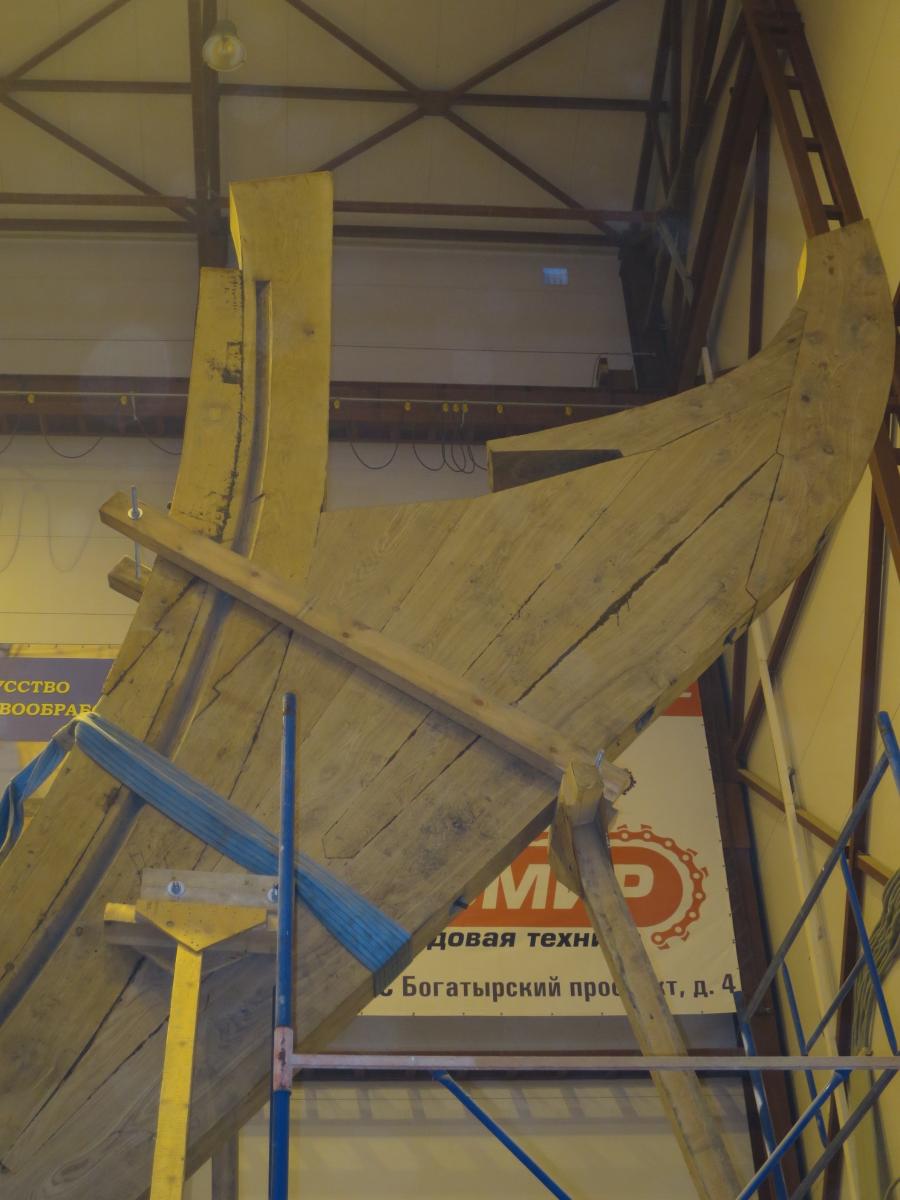
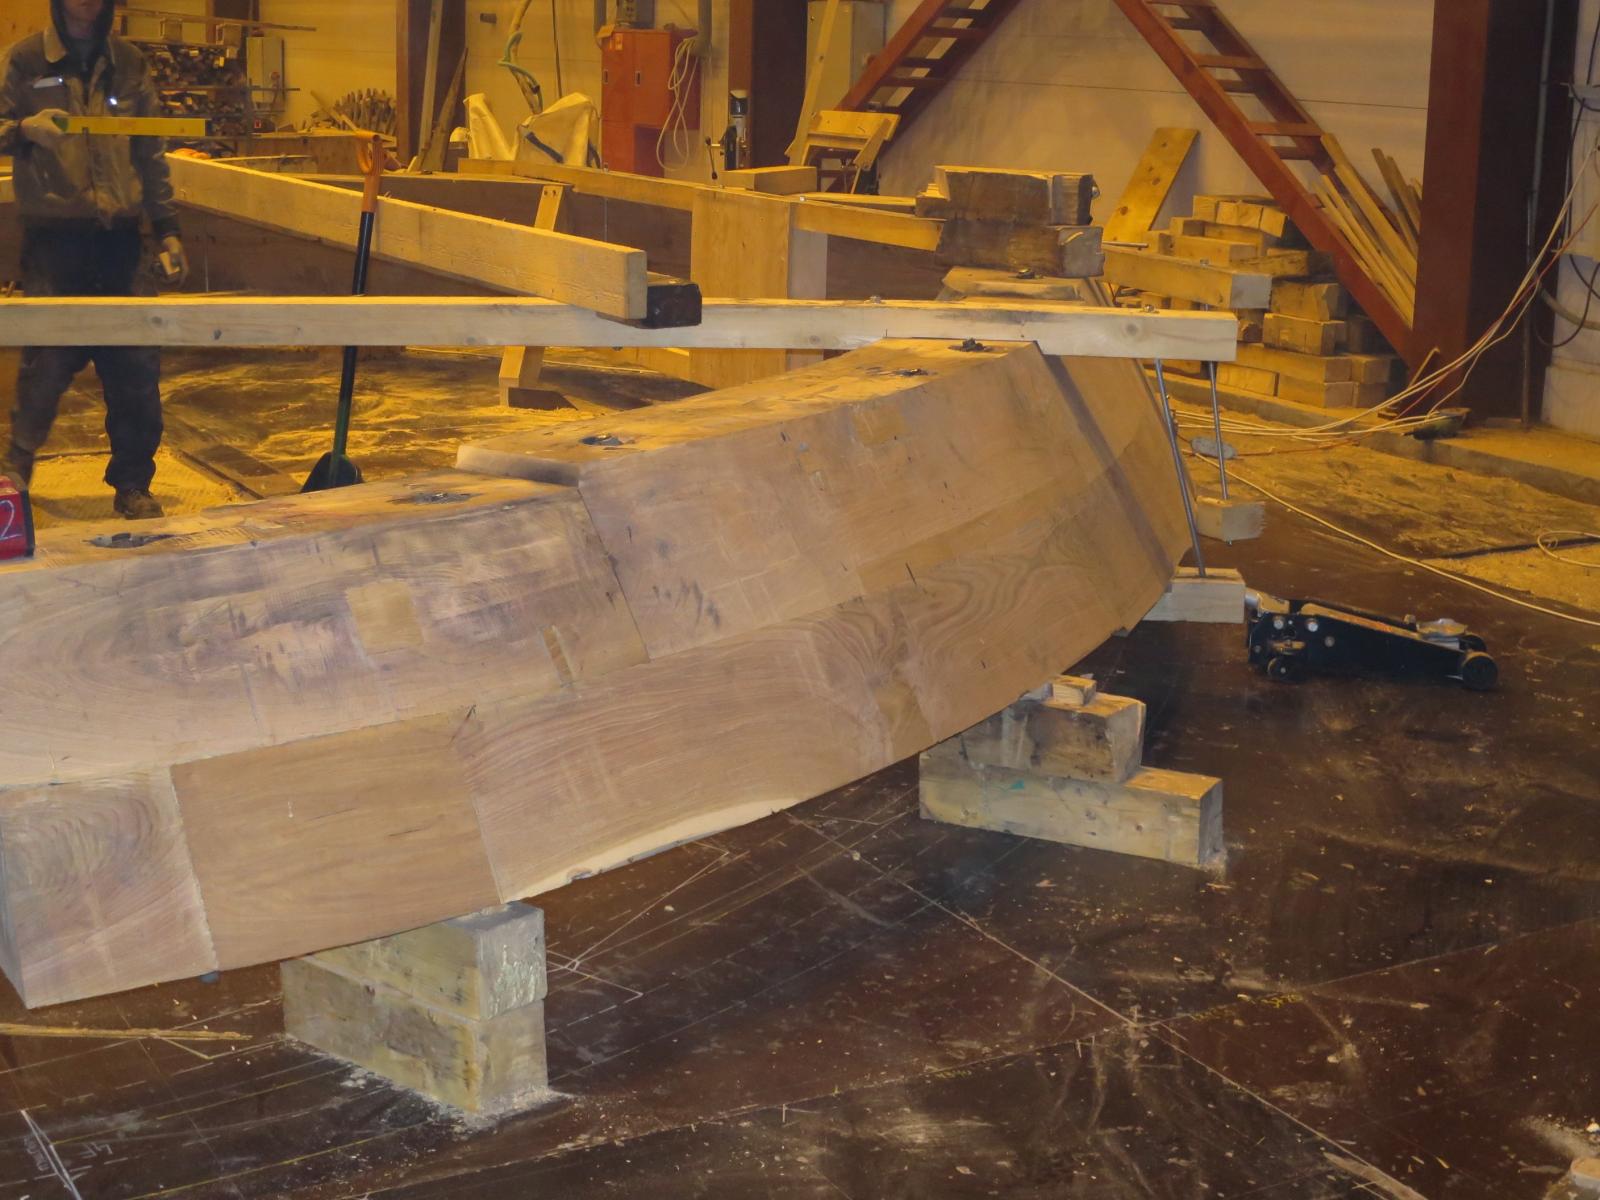
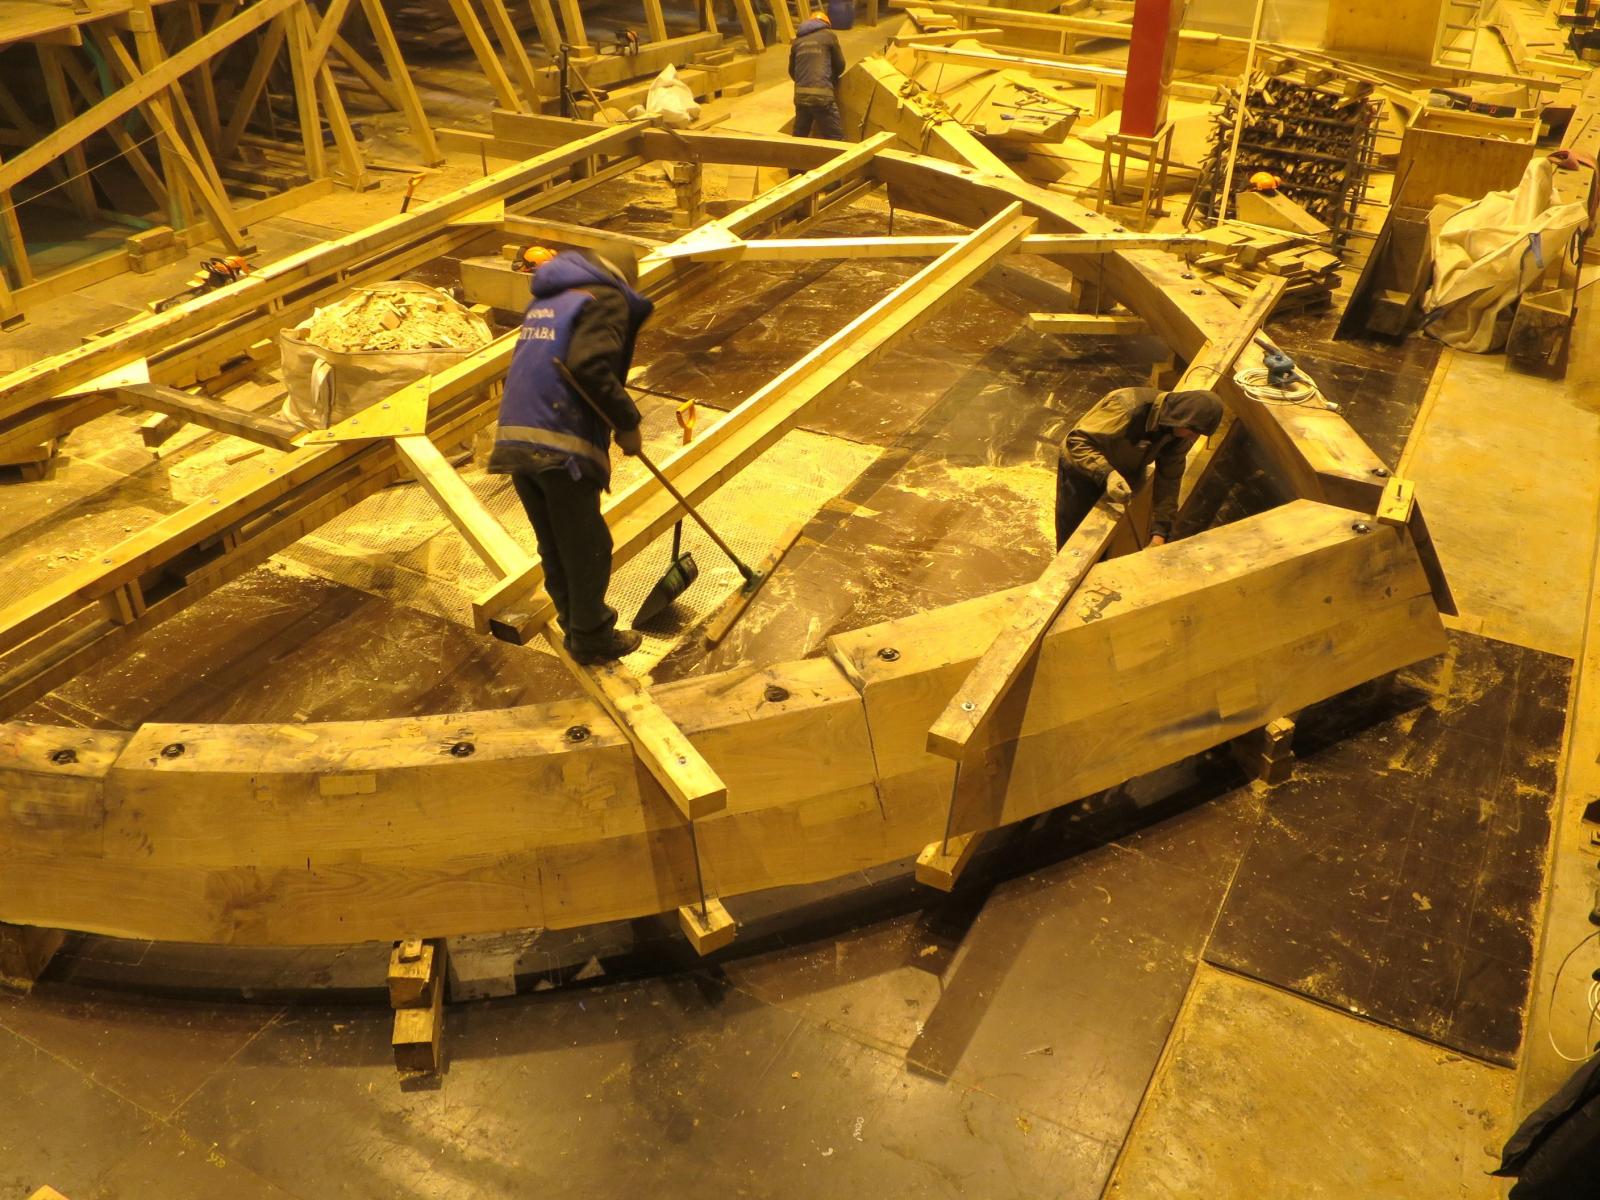
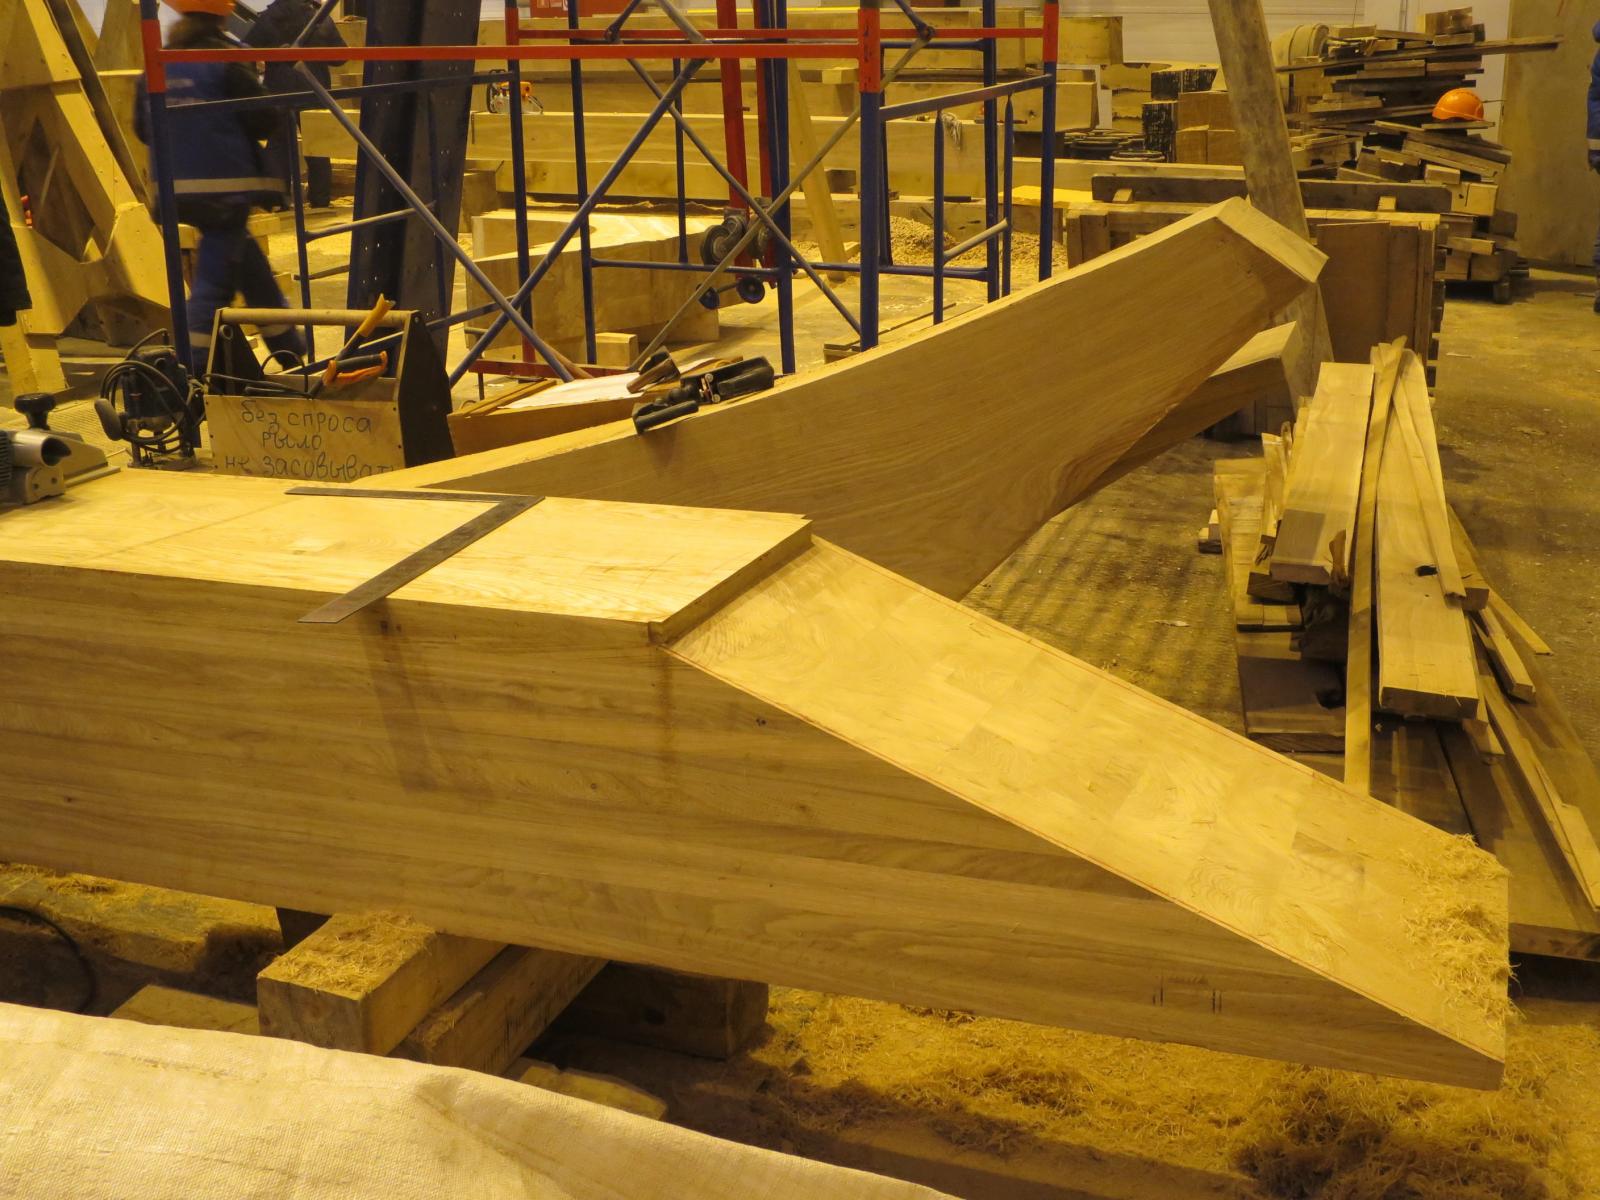
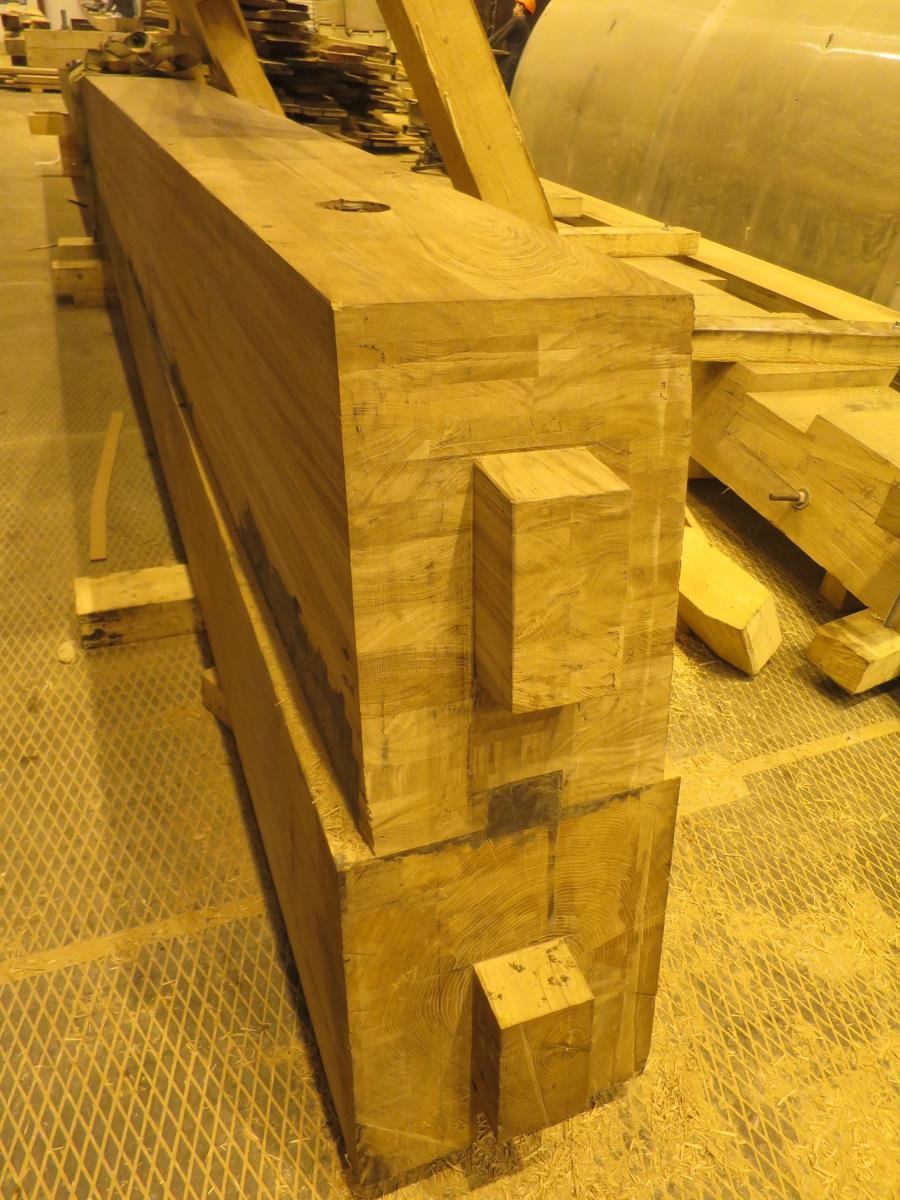
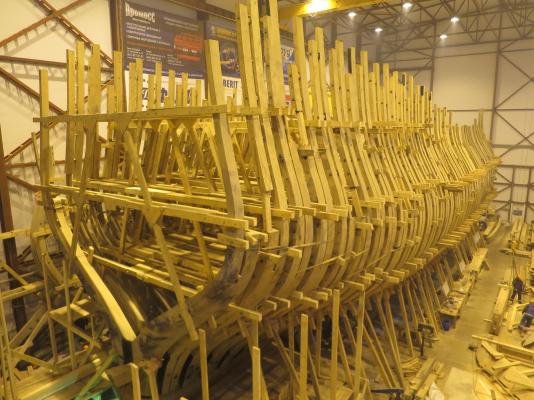
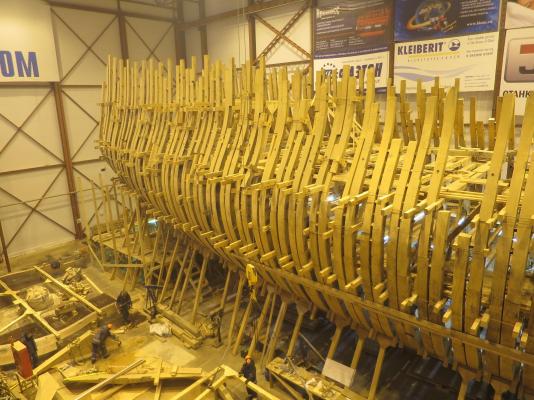
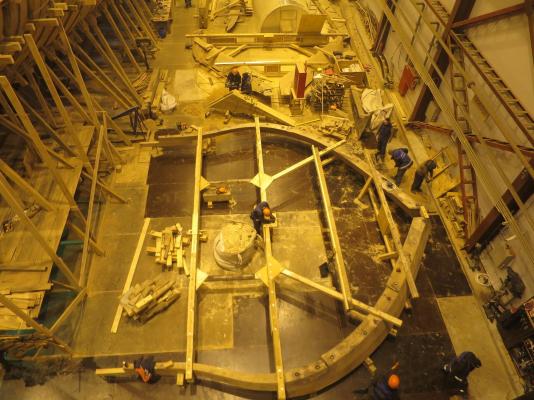
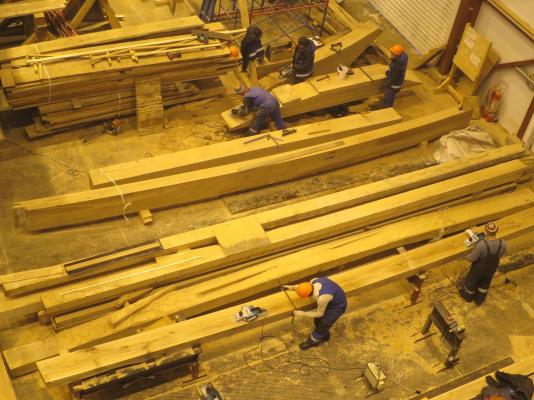
The project is moving really fast - the construction was started just 9 months ago! All carpenters are professionals, and there are around 100 carpenters working on a project 5 days a week (and today was a small weekend shift). The hull is huge! Hard to show the scale on a photos, but just look on how small the people are near that hull:

- 968 replies
-
- 7
-
-
- hahn
- oliver cromwell
- (and 1 more)
-
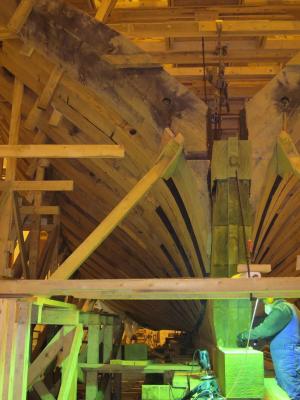
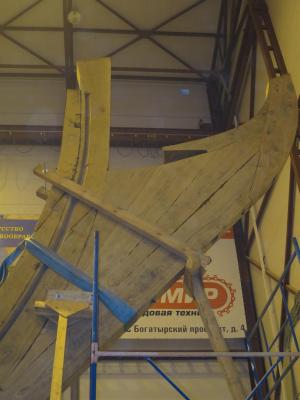
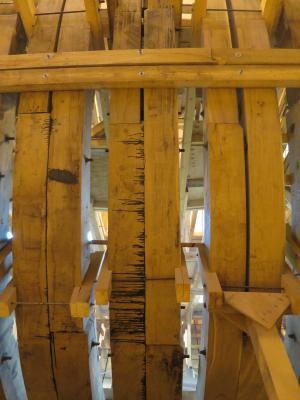
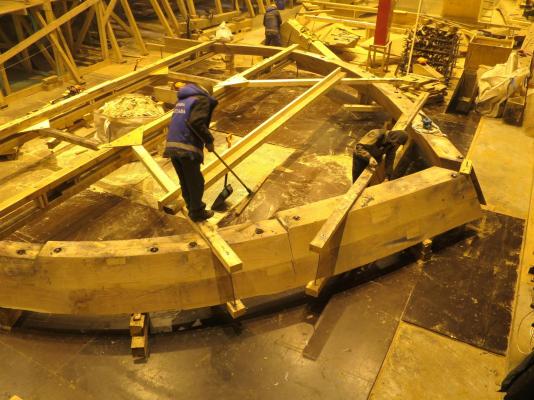
Stem: Sistered frame construction: Frames are lofted and assembled right on a floor, and later fitted to the hull: Joinery:

- 968 replies
-
- 8
-
-
- hahn
- oliver cromwell
- (and 1 more)
-
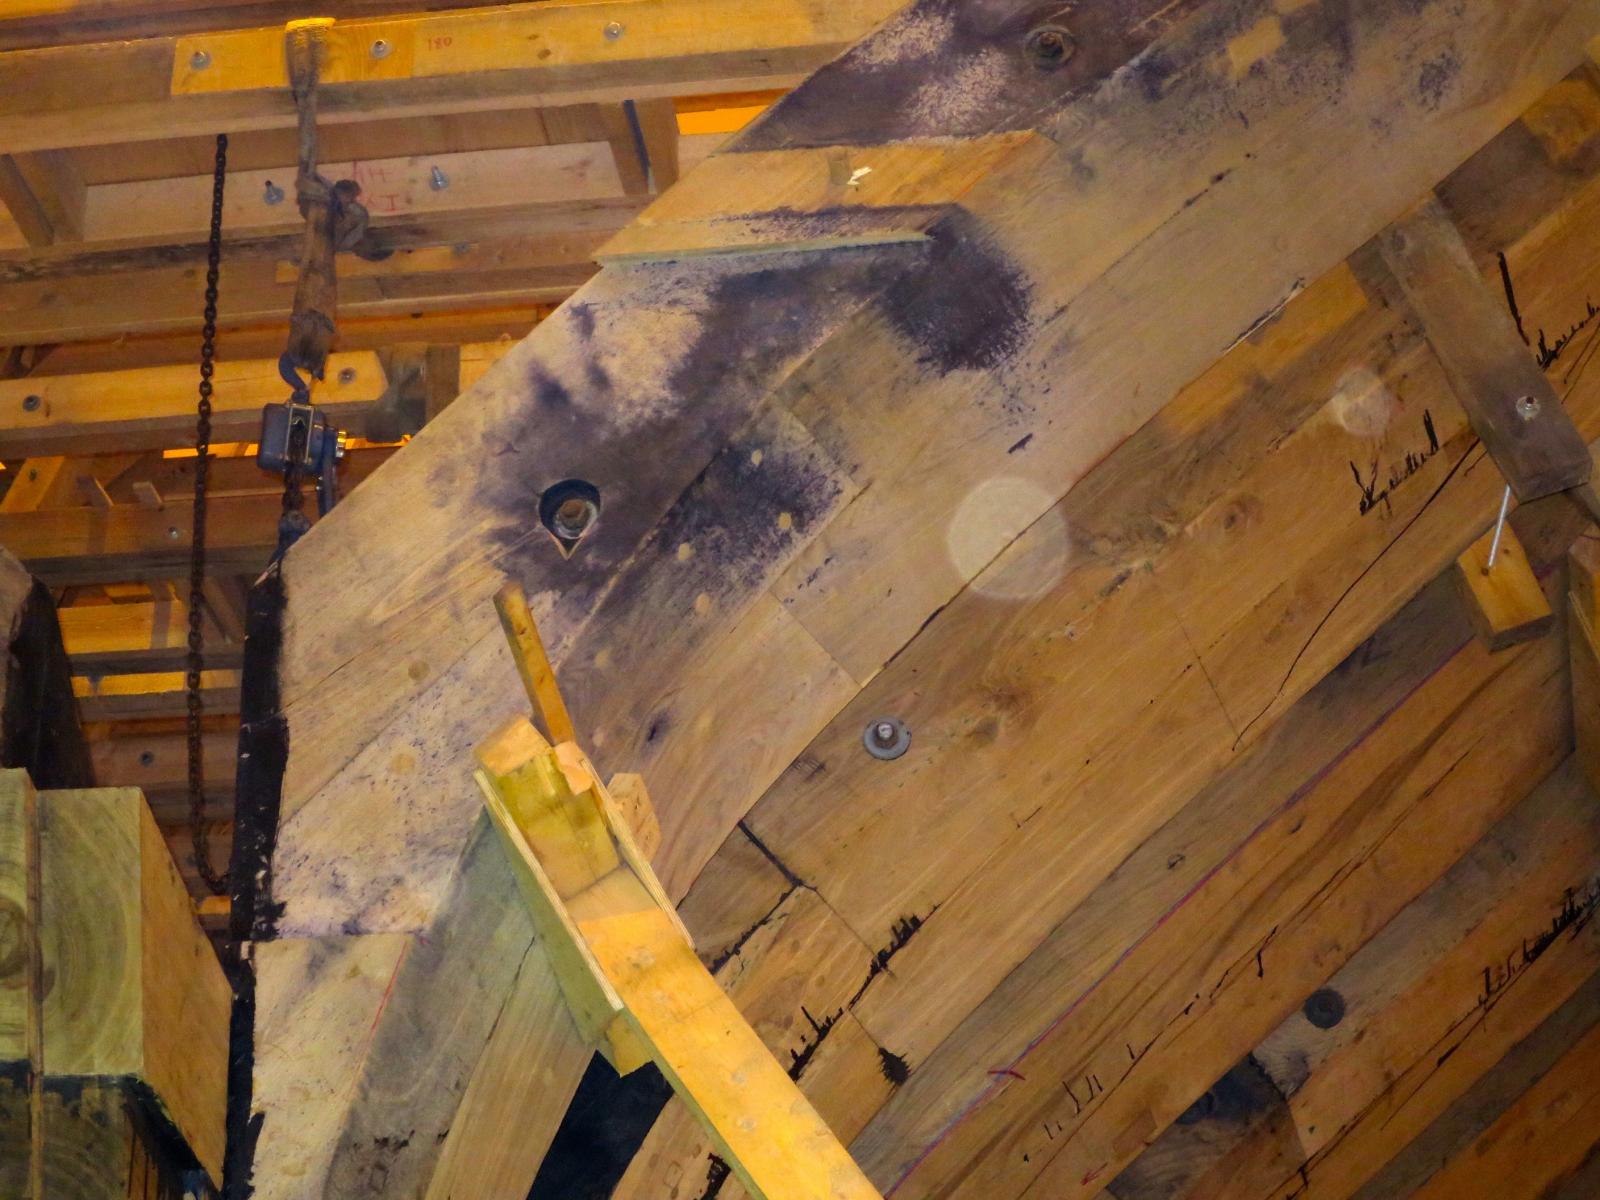
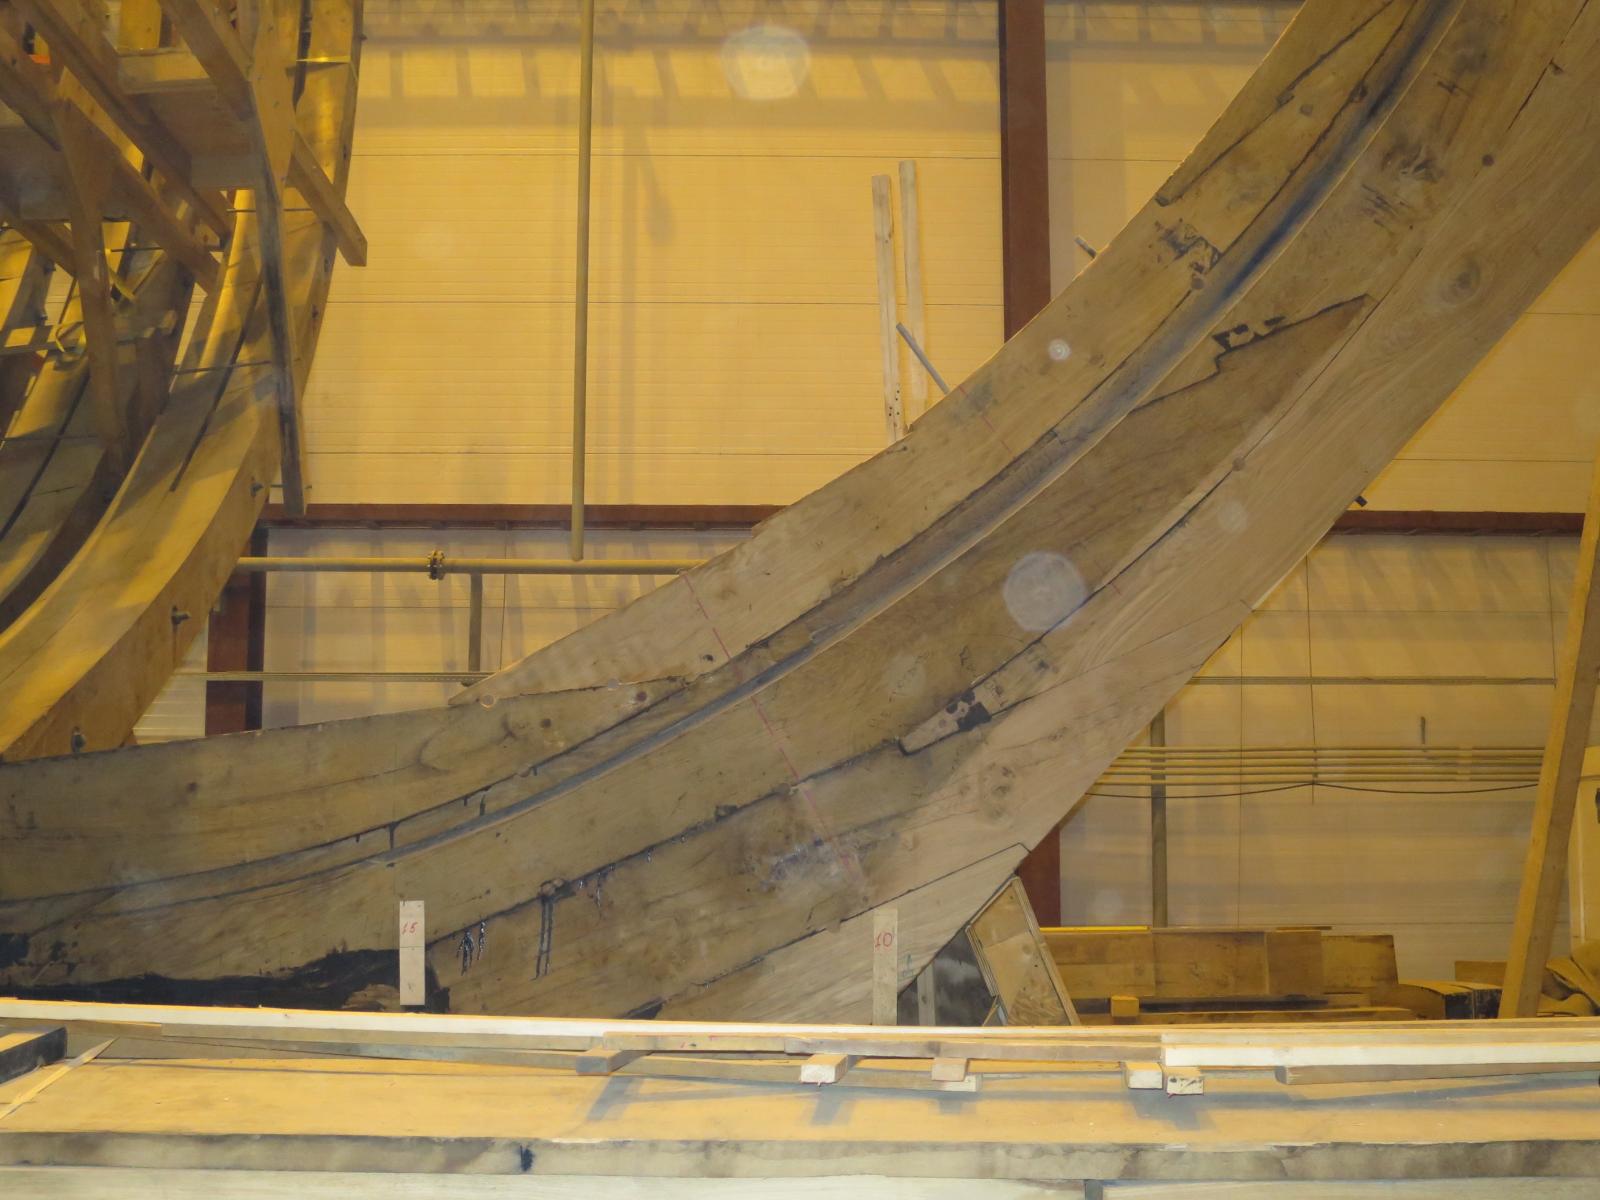
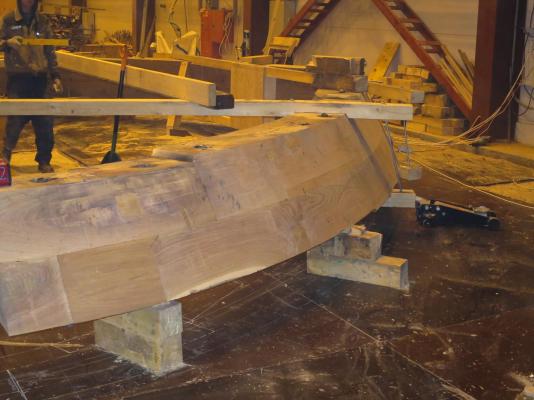
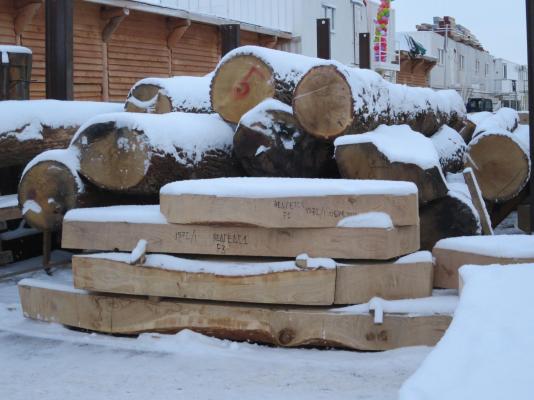
Pardon, just another offtopic Not so much to tell about the build itself, holidays, no time to build... Spending New Year holidays with my parents in St.Petersburg, Russia, where I visited the construction site of 1712 frigate replica, Poltava. Some links: http://poltava1712.ru/node/73 https://twitter.com/Poltavawarship https://www.facebook.com/poltavaship https://www.youtube.com/channel/UCQ-9kJyalp7_pm72J4Yb9_Q The construction is sponsored by the symbol of russian corruption and inefficiency - Gazprom Project has quite a fat funding, and there are around 100 carpenters working on the hull right now. The big hangar here is the place where hull is assembled: Wood storage (oak): Interesting fact that wood is not dried or aged - instead, they make everything just from the "green" wood, but later apply some chemicals to reduce the moisture level and prevent rot. Unfortunately, I could not find out the names of the chemicals. The engineers of the replica faced the same problem as Peter I, the russian emperor who was managing the construction of the original ship. It is extremely hard to find a big enough oak tree in a good condition, without any major defects or rot. The wood for that ship is purchased from a very wide region, basically all european part of russia. To workaround it, some really heavy parts (like keel structure) are assembled using a laminated, multi-layered slabs of wood. It is close to impossible to find an oak of that size nowadays... You can imagine how hard it was to find and process such a wood in 1712! I was surprised that you can laminate and glue a part that will carry such load and weight.


- 968 replies
-
- 5
-
-
- hahn
- oliver cromwell
- (and 1 more)
-
Nope, I got released from the summerhouse, so switched to other stupid teenage activities
- 968 replies
-
- 1
-
-
- hahn
- oliver cromwell
- (and 1 more)
-
The build is going slow so far - had guests, then few trips, had no chance to build for some weeks. But progress is quite boring anyway - producing frame by frame. Found a thing in my parents' basement - a model that I tried to build when I was around 12 years old. Locked in a summerhouse, with some plywood, sandpaper and a manual scroll saw ok, I also had a book and some blueprints. Full scratch, I had no internet at that time, and havent heard of any kits. No modelling societies aither. Looks veeery ugly, but hey, the only tool was a manual scroll saw. Planks were also cut with a scroll saw: draw a straight line, cut the wood, smoothen with sandpaper. If only I can have soooooooo many free time as I had when I was 12...

- 968 replies
-
- 3
-
-
- hahn
- oliver cromwell
- (and 1 more)
-
Ok, got the toy: http://www.proxxon.com/en/micromot/27060.php Thanks everybody for the comments, now making a straight and correctly angled edges is soo easy! And it will definitely help with making a keel parts that tightly fit together

- 968 replies
-
- 6
-
-
- hahn
- oliver cromwell
- (and 1 more)
-
The most silent disk sander
Mike Y replied to Mike Y's topic in Modeling tools and Workshop Equipment
Ok, sanding block is not precise enough, and takes a very long time to sand.. So bought Proxxon 125 disk sander: http://www.proxxon.com/en/micromot/27060.php I am really happy with it, and it is very quiet on a low speed! Surprisingly. I literally used it while my wife and kid were sleeping in a next room. Wow! So I think I answered my own question... It is the cheapest disk sander, and also extremely quiet (on a low speed, that is more then enough for gentle woodwork).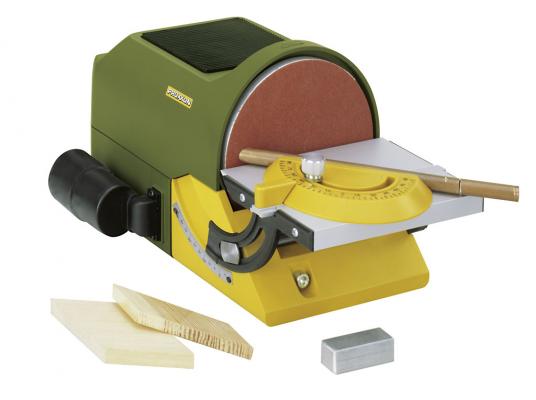
-
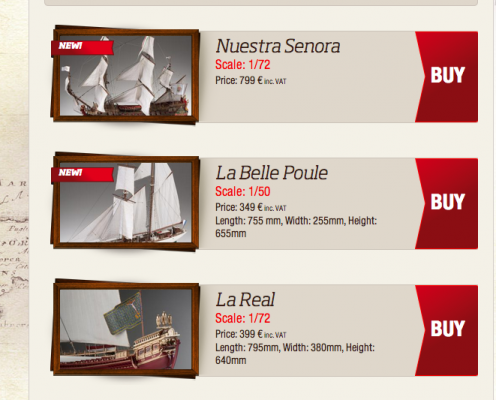
Hi Daniel, Thanks for sharing, those are very interesting kits! Especially pleasing to see such a big selection of Viking ships. Best wishes, hope you will get lots of happy customers here! Minor piece of a feedback: it would be probably better to center photos in catalogue so the hull is in the center. Right now for most models the big part of hull do not fit into the small picture:
-
Very very nice! Especially the pins to put that tricky piece in place
- 55 replies
-
- 2
-
-
- 18th century longboat
- model shipways
- (and 1 more)
-
Thanks Grant, Alan, Brian, Greg and Gary! I was not sure if I really need it, but now after all your feedback - there is no doubt! Looks like I know what to order from Santa this Christmas!
- 968 replies
-
- 3
-
-
- hahn
- oliver cromwell
- (and 1 more)
-
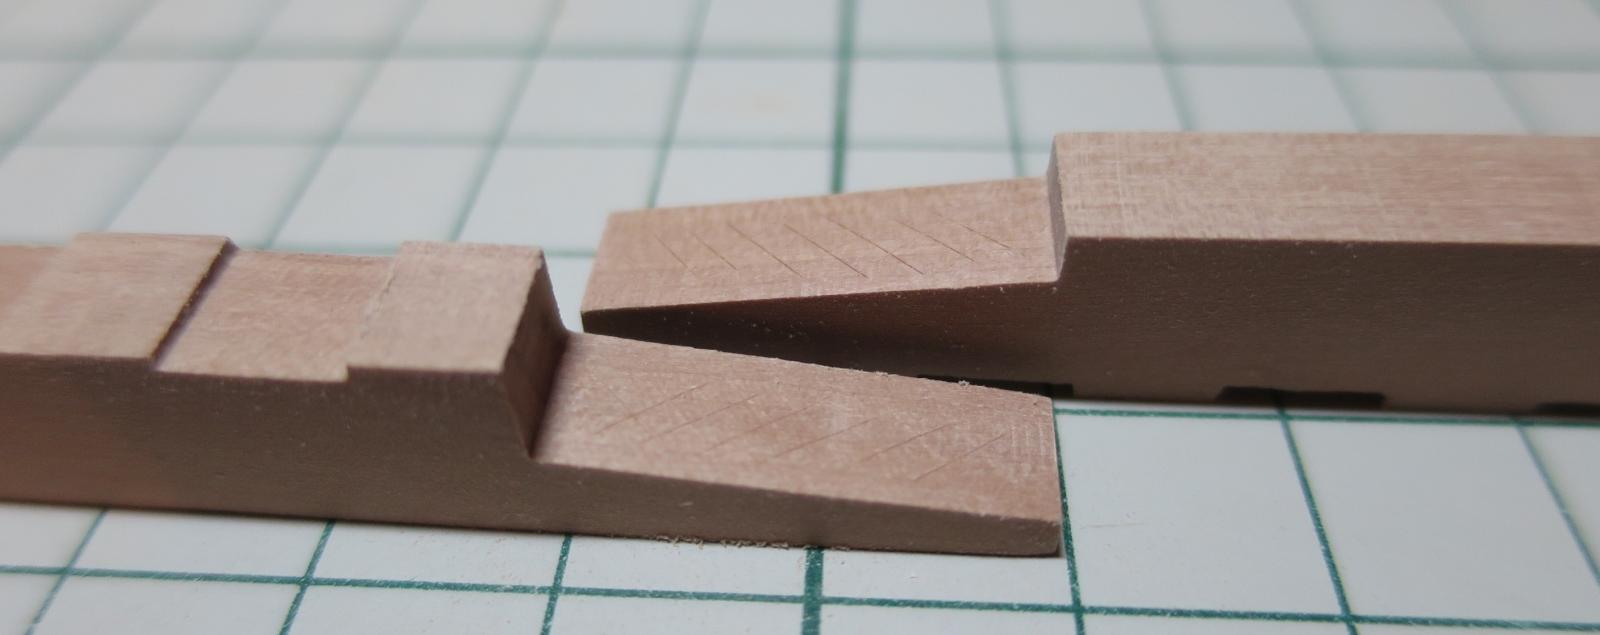
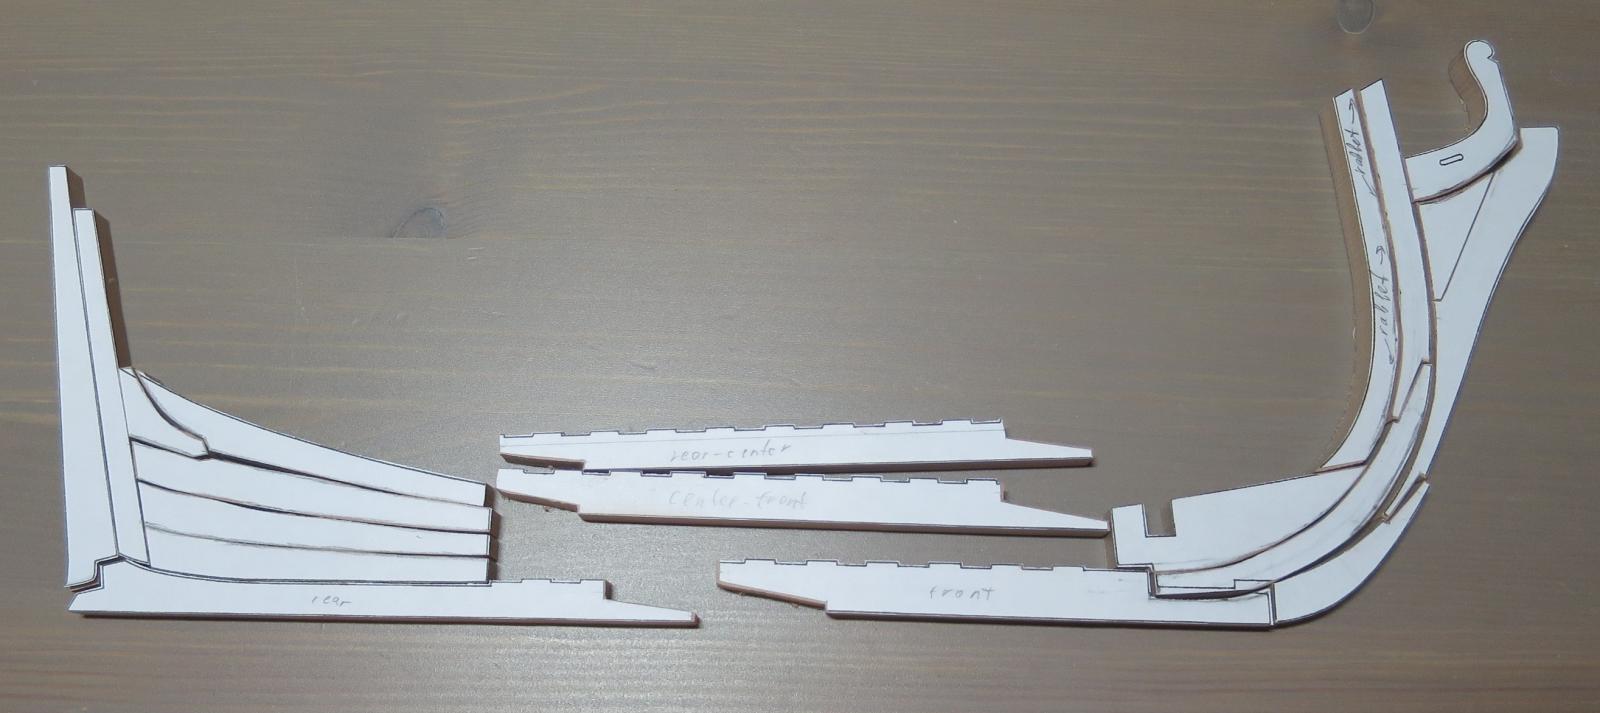
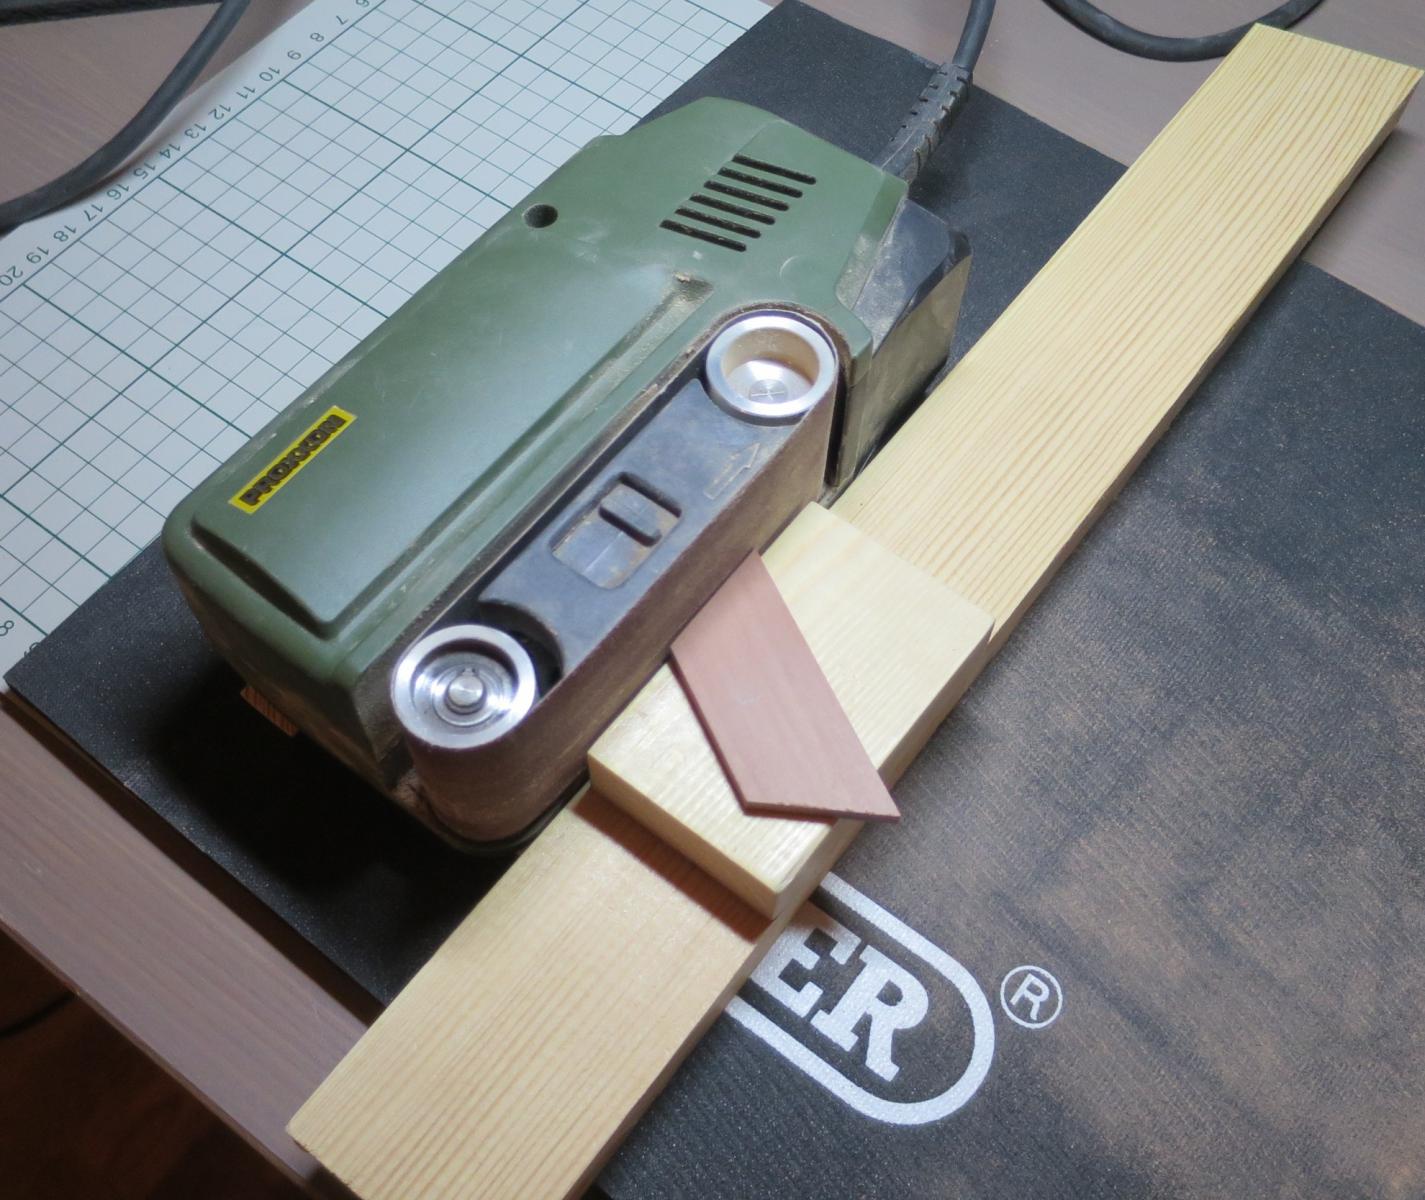
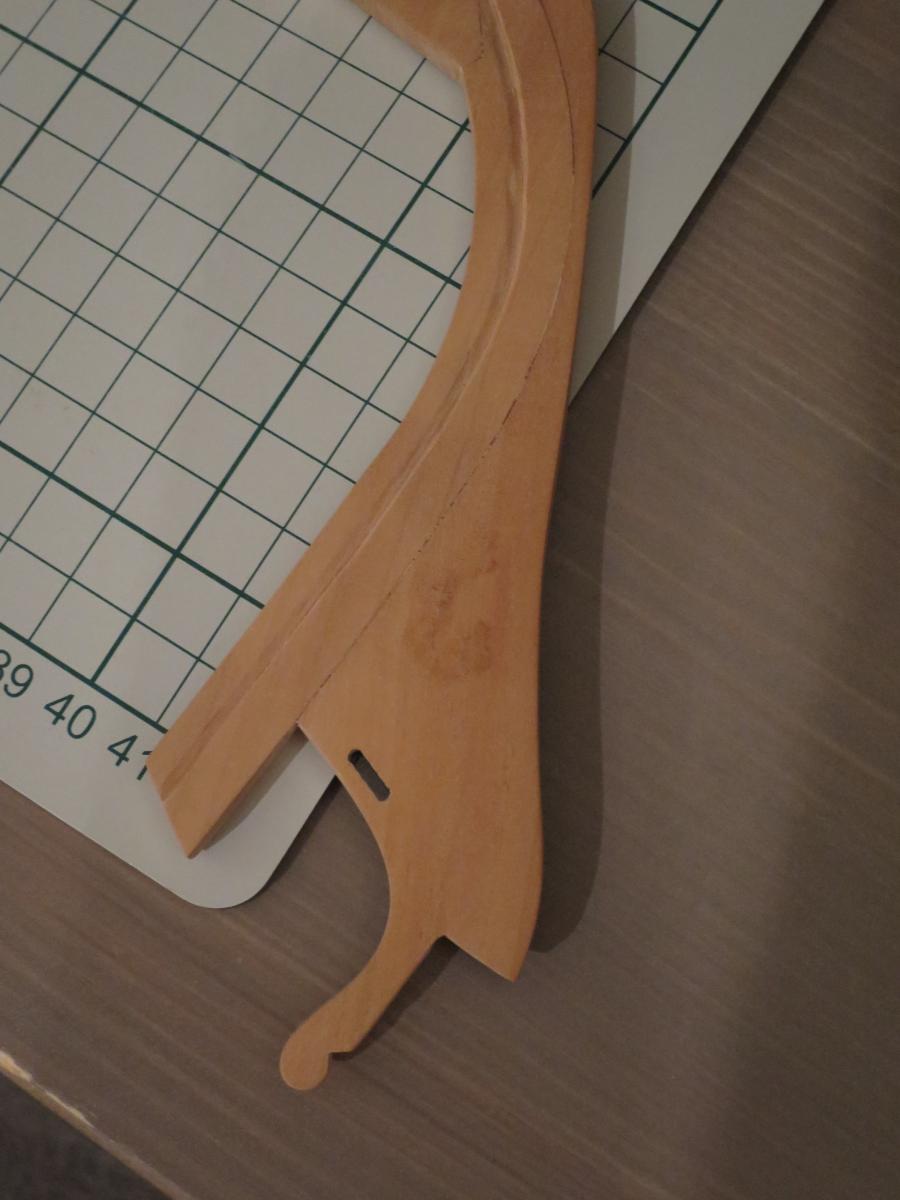
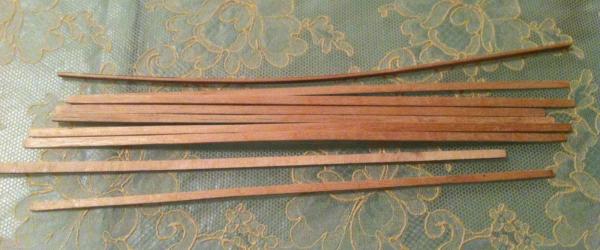
Cutting frames... Using belt sander to make sure that edges of frame blanks are straight. it is not very suitable for that job, but do not want to buy disk sander just for that.. In a meanwhile, looked critically on a laser cut keel. It has some grey spots (that are not dirt, but wood defects) And some funny shaped "stain" inside the wood right on the stem: And more important - it looks too simplistic / unrealistic for my taste. You really can't build a ship with a stern made of two giant pieces of wood. I miss a complex joints, tar simulation using black paper, etc.. Stem would be very visible, and it should be done right. So decided to re-do it using new pear (to match the colour of the frames) Since I had no drawings of keel structure for exactly that ship - I made a mix based on some photos from other build logs, AOTS book about Pandora, etc. Loooots of sanding ahead! Maybe I really need a proper disk sander

- 968 replies
-
- 8
-
-
- hahn
- oliver cromwell
- (and 1 more)
-
Piet, I was missing that impressive log for some reason.. A week ago I found it! Very impressive atmosphere here, and excelent historical / family details. Thank you, enjoyed reading it. It is like a good book! Best wishes with the continuation of the build!
-
Remco, your bet is spot on - after I tried Castello on my previous build (see longboat) - can't use any inferior wood anymore P.S.: next update would be in a few weeks, started a batch of 10 frames
- 968 replies
-
- 1
-
-
- hahn
- oliver cromwell
- (and 1 more)