HOLIDAY DONATION DRIVE - SUPPORT MSW - DO YOUR PART TO KEEP THIS GREAT FORUM GOING! (Only 13 donations so far - C'mon guys!)
×


Mike Y
-
Posts
1,550 -
Joined
-
Last visited
Content Type
Profiles
Forums
Gallery
Events
Everything posted by Mike Y
-
 Toni, thanks for the heads up. Yes, the gunports are fine tuned with the file before installing the sills.
- 968 replies
-
- 4
-

-
- hahn
- oliver cromwell
- (and 1 more)
-
Luckily I have David's "Comet" book and plans, galleries are pretty well covered there. But yes, skipping such "simple" things is a nice surprise for the modeller
- 968 replies
-
- 3
-
-
- hahn
- oliver cromwell
- (and 1 more)
-
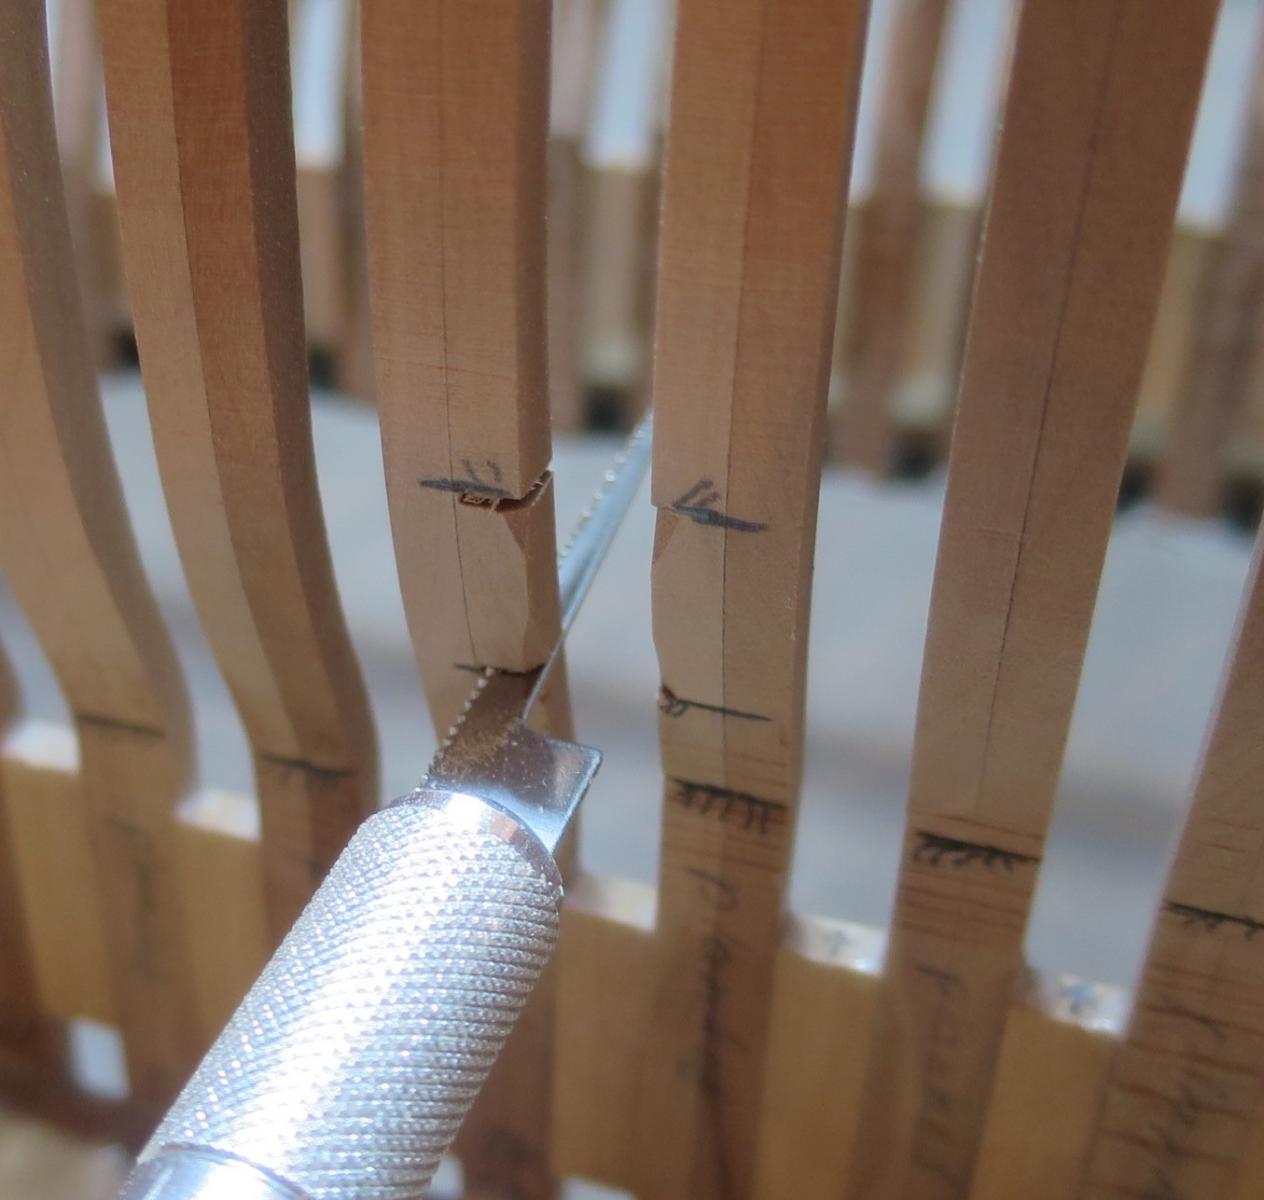
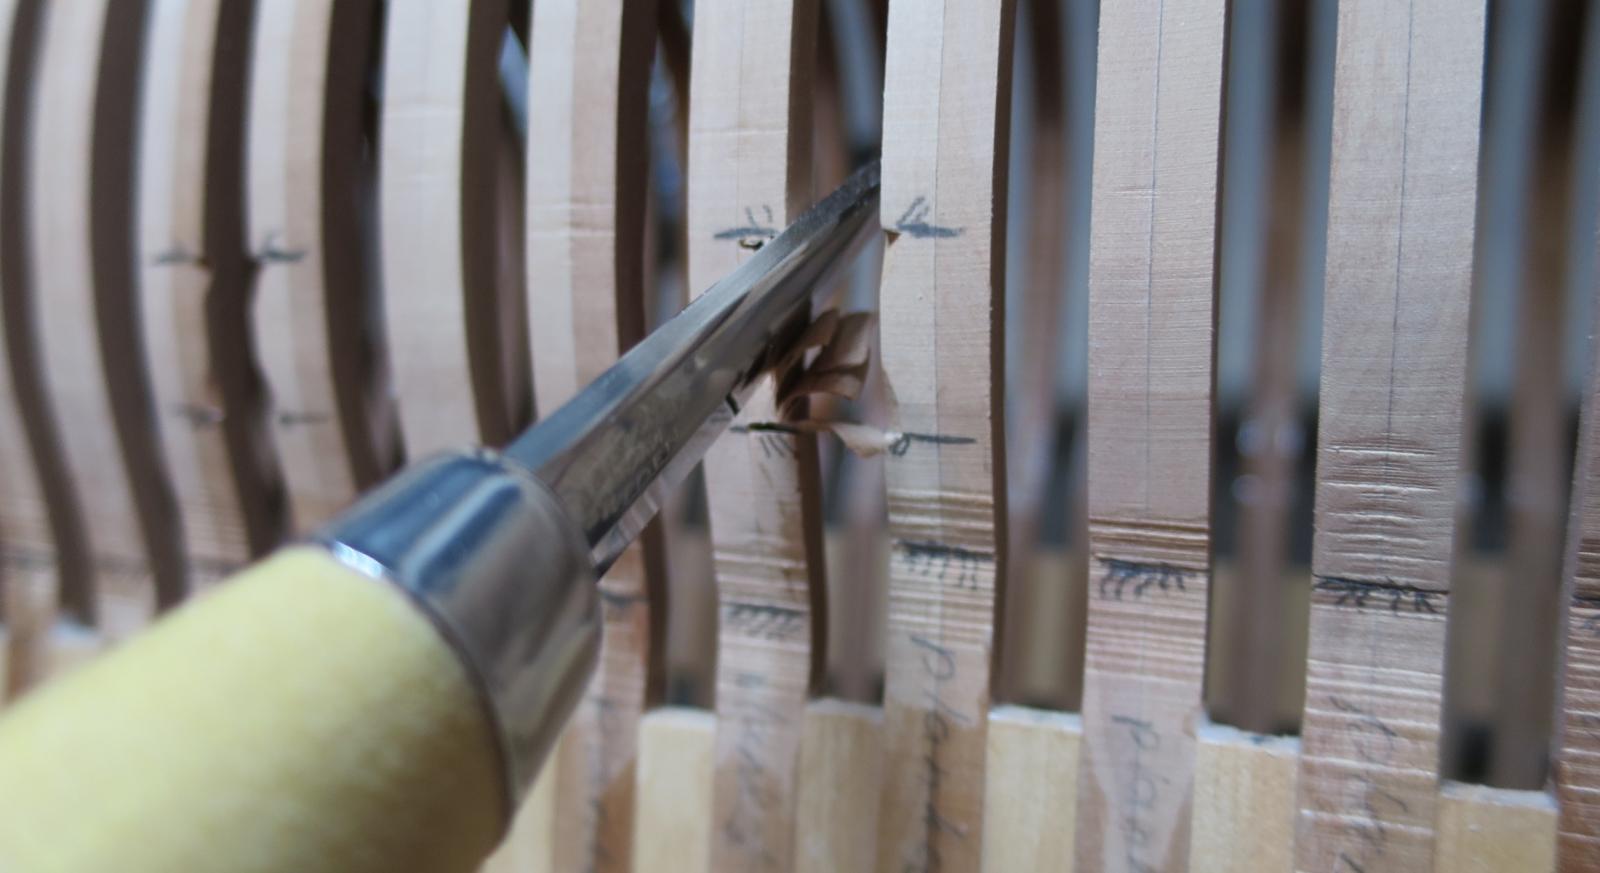
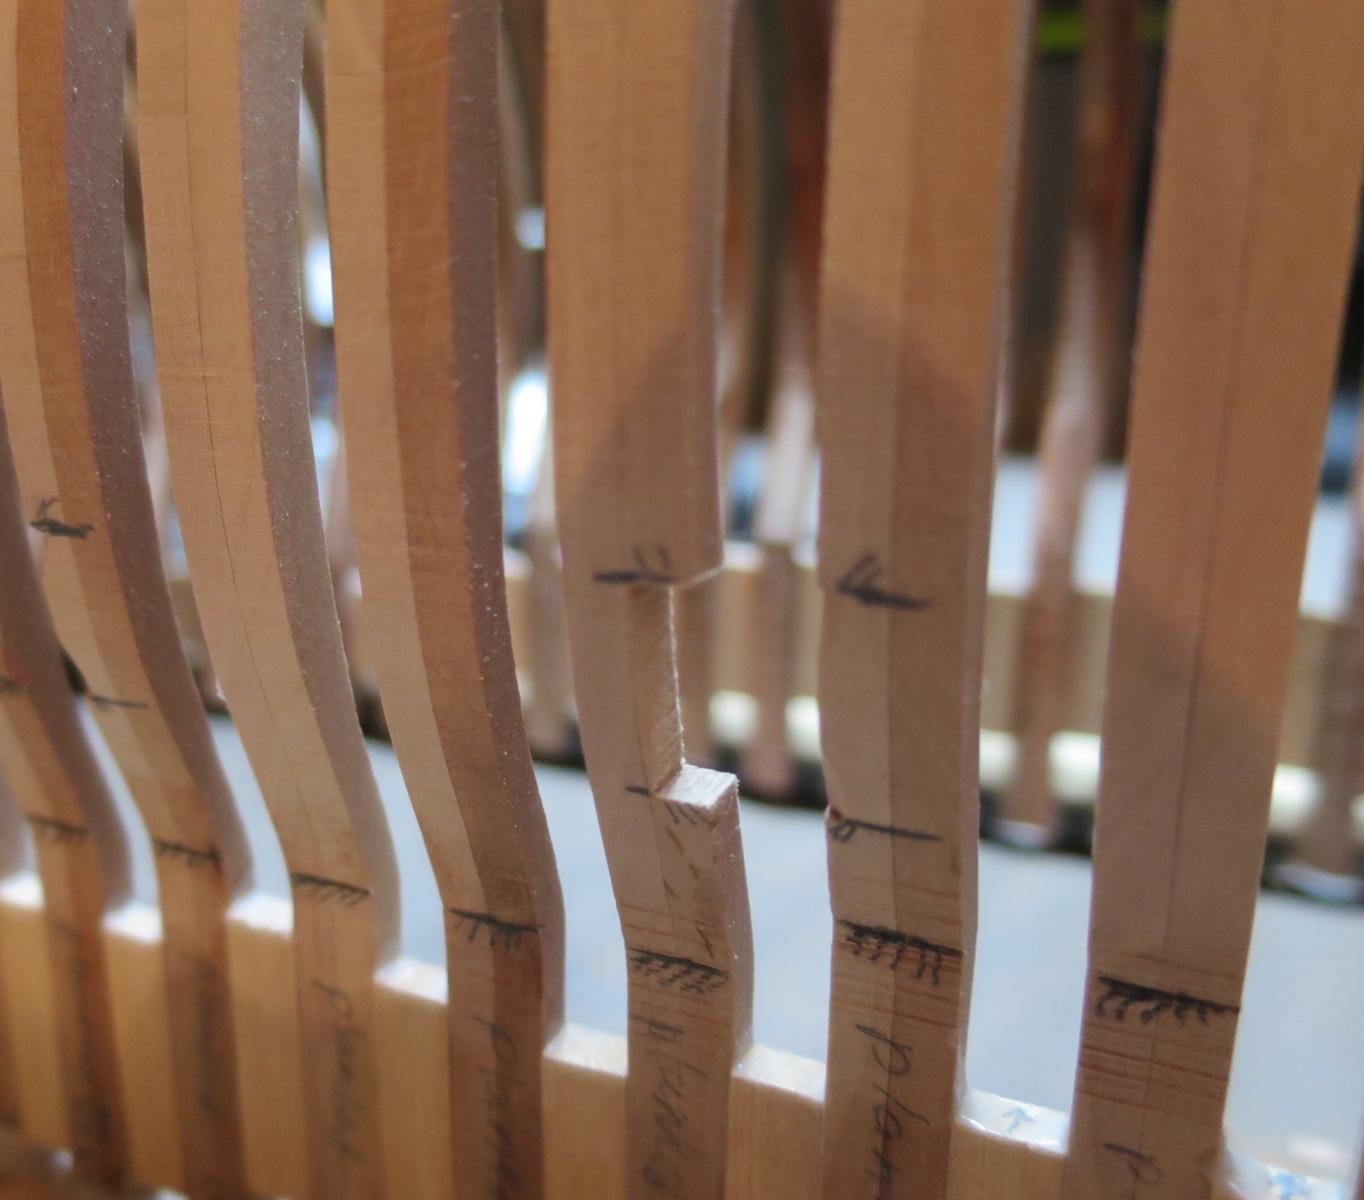
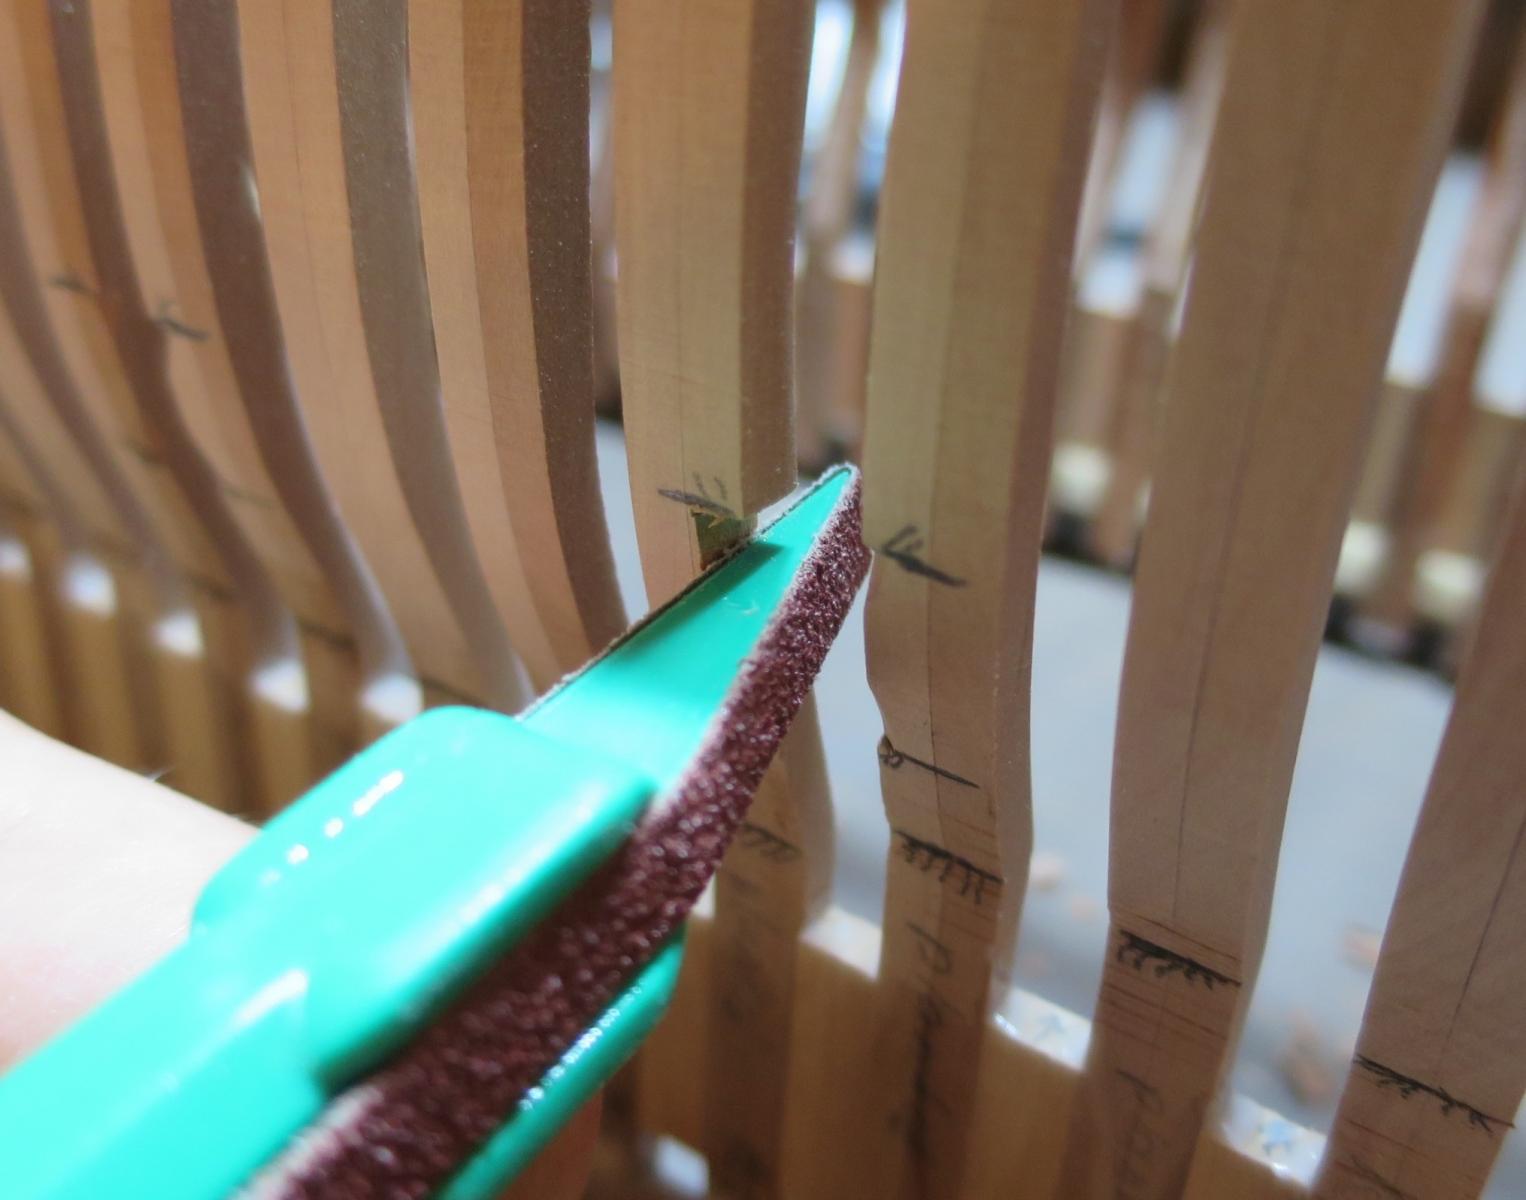
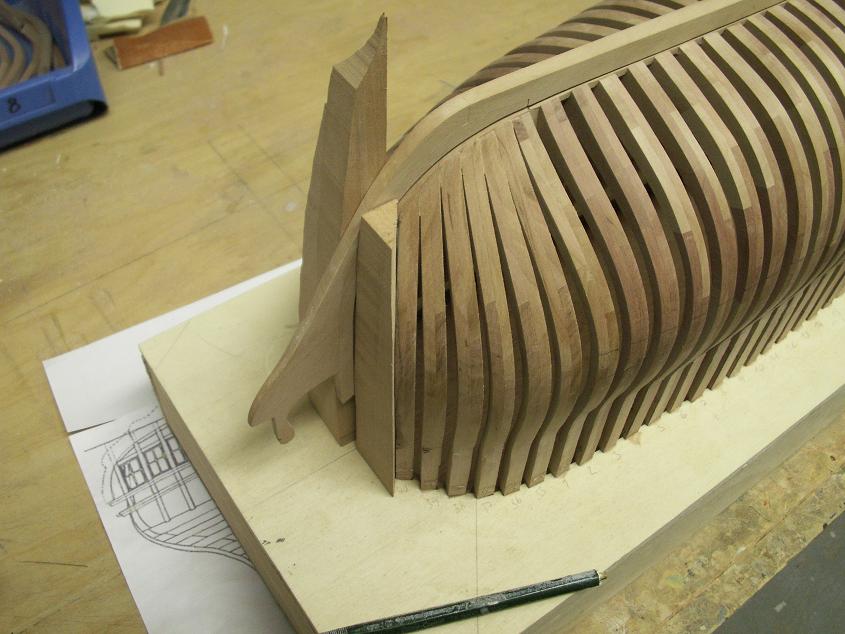
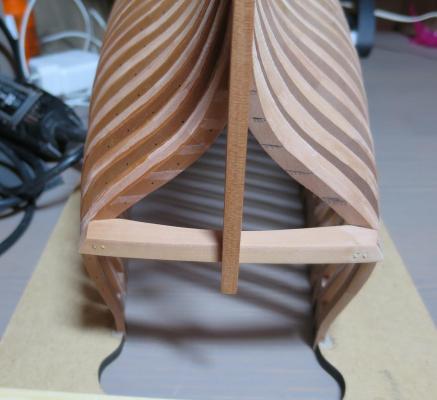
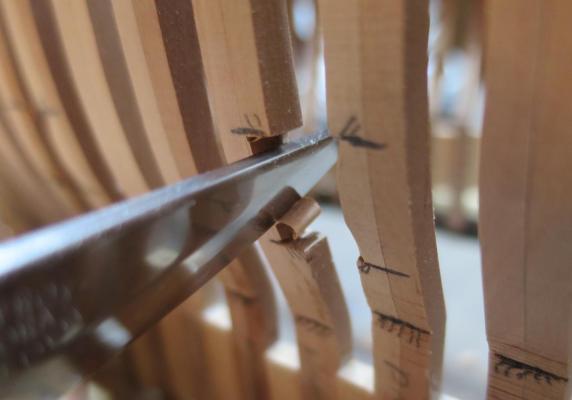
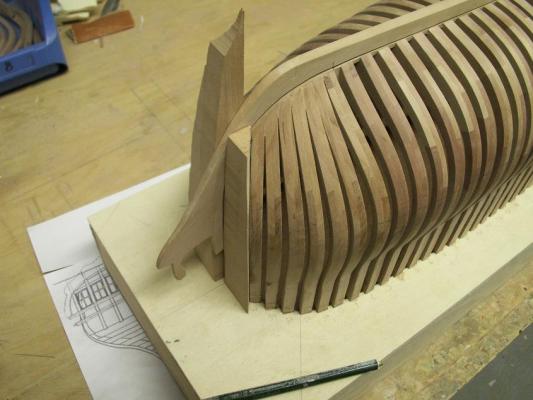
Thanks for likes and comments, it is very encouraging Worked on transom wings today. Hahn plans do not have any lines for wings, except a very rough shape for the top one. So instead of a regular "cut-bevel-sand-apply poly-install" process, was using carboard templates to come up with a proper shape. So far only top wing is installed, others needs to be better fitted. The bevels are small, proper beveling would be done on a hull - the shape is complex, it is difficult to pre-bevel. Thanks to TFFM and various build logs, all the nuances of transom installation are pretty well covered. However, I simplified the joints - instead of cutting slots, just glued wing flat to the last frame. Reinforced with treenails The wing looks much brighter than the frames, strange. I was careful with the wood selection, probably it is due to light exposure of the frame. Hope it will get darker over time! Started cutting the gunports, first on the planked side. The method is simple and is relatively fast, so will share. Sorry if it is too obvious. 1) Make cutoffs using xacto keyhole saw: 2) Remove wood with a sharp knife. It is easy because all cuts are following the grain 3) When close to desired width (in my case - I need to remove exactly half of the frame thickness) - continue with a sanding stick (it is like a file, but faster if using a coarser sand belt) 4) Gunport is ready to be finished with files (sill slots would be are also cut with files, and a square piece of wood helps aligning ports on both sides)


- 968 replies
-
- 16
-
-
- hahn
- oliver cromwell
- (and 1 more)
-
ancre La Belle 1684 by Nenseth - 1:36 scale
Mike Y replied to Nenseth's topic in - Build logs for subjects built 1501 - 1750
1mm should be possible to sand away, either with disk sander or 220 grit sandpaper fixed on the table top with some clamps. I just did it today, needed 4mm and 5mm thickness, but had only 8mm wood sheet -
Patrick, always wanted to ask - do you have some kind of a "group photo" of you models? They are so miniature and you build them so quick, should make an impressive fleet!
-
Yep, I am eagerly waiting for it. Already have a stash of various sanding pads, papers, scrapers, discs, blocks, etc. Will see what is better!
- 968 replies
-
- 3
-
-
- hahn
- oliver cromwell
- (and 1 more)
-
Just another example that would be nice to have table of contents and few pages as a preview. I was buying TFFM completely blindly, the book description is extremely vague. I only knew that "since everybody has such a good feedback - the book is good, whatever is there". But it should definitely increase sales if there would be a better description and some teasers available! Same for plans. I trust that Greg and David made the best, top notch plans. I can assume they will allow me to build a whole model. But it is just assumption based on reputation. But I wonder how many potential buyers turned away, because they are unsure what they will get when buying plans? Ok, probably not that many - if you seriously consider building fully framed model and need plans - you can mail Greg and ask for details
-
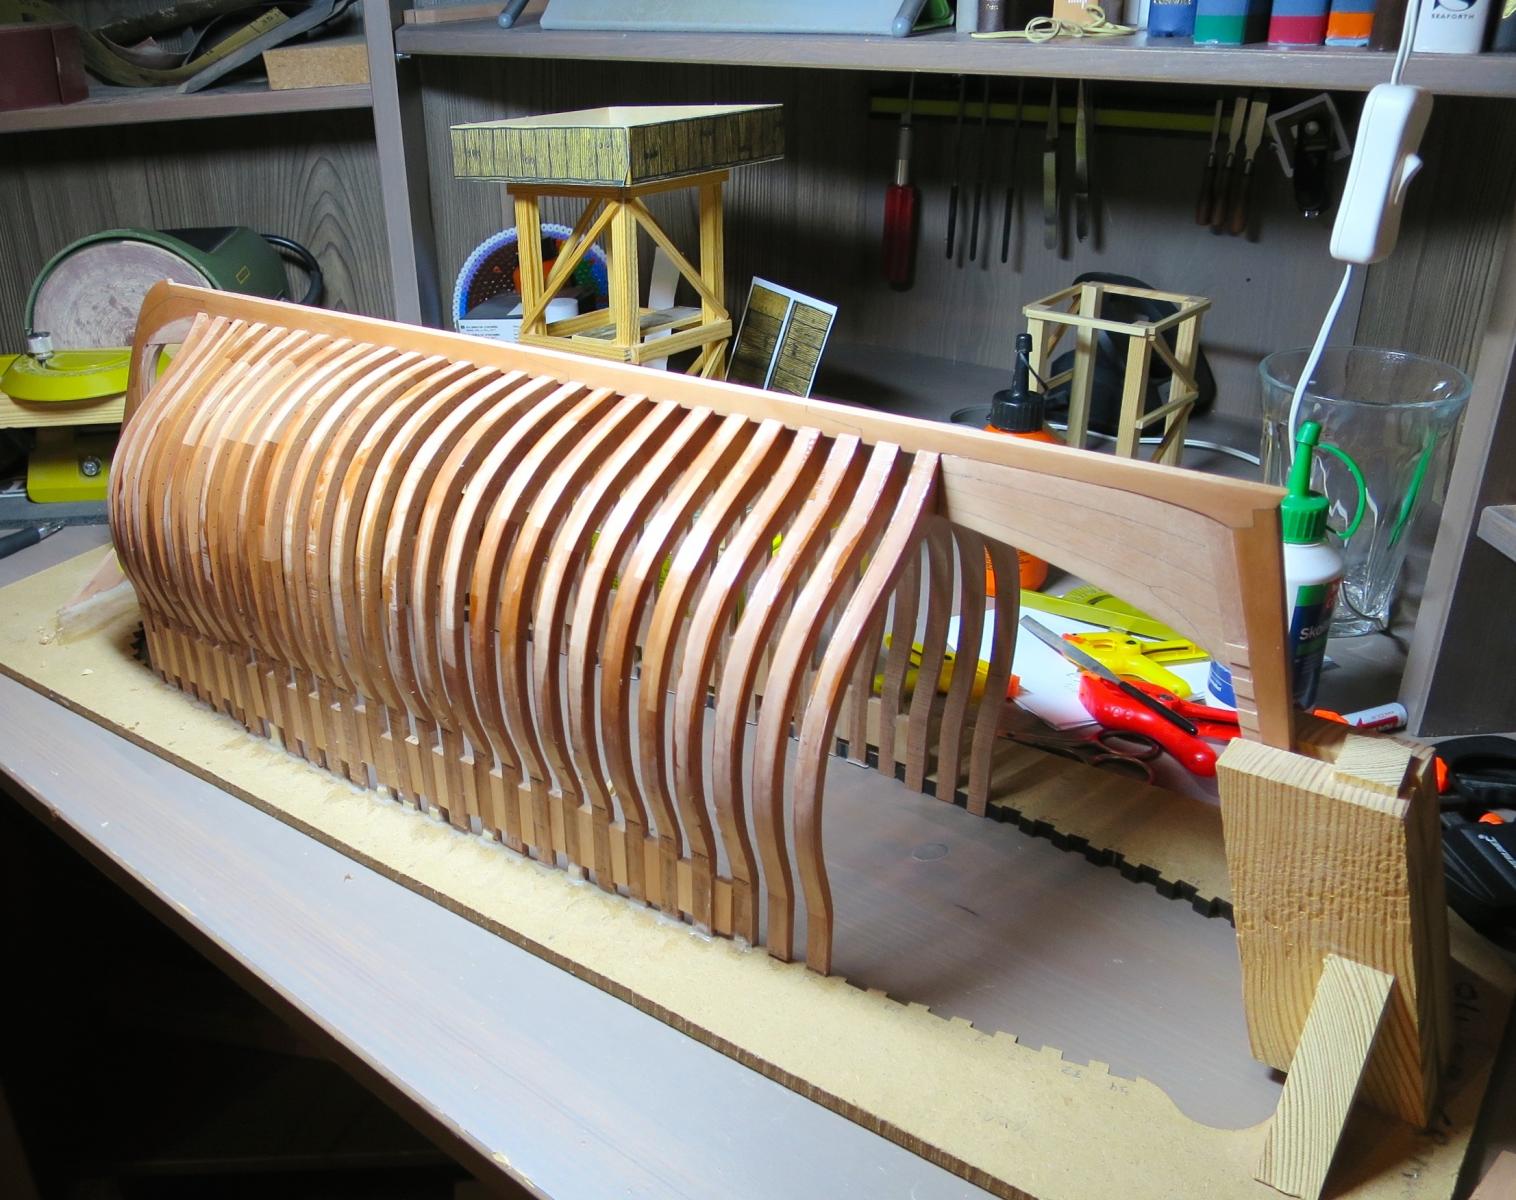
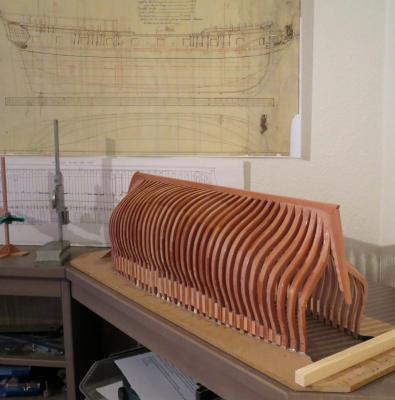
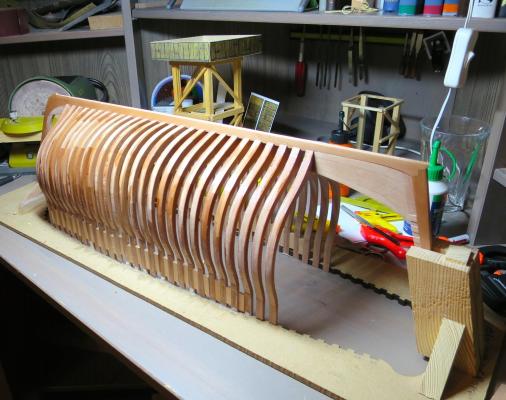
Symbolic milestone - all frames installed! Now need to install that tricky transom frames and wings, something that will represent hawse timbers, and cut the gunports. And then - start the magical process of fairing!
- 968 replies
-
- 22
-
-
- hahn
- oliver cromwell
- (and 1 more)
-
Because you do need hell lot of big, expensive and otherwise useless tools (big bandsaw, big tablesaw, thickness sander). Not everybody have a workshop What is the use for that tools after you finally cut your very local tree into pieces? They will just collect dust. While a perfect quality wood is just a few clicks away. It is smooth, has no defects and do not require any tools to start using it. You only need a small tools that you need for actual modelling. Actual wood selection is frequently done by reading others build logs, and thinking "wow, I also want a wood like that". So instead of saying "swiss pear" or "holly" one can say "that white crisp wood I saw in Remco's buildlog", but it will cause some confusion, isn't it? If a lot of people are willing to pay for "pear,box and holly" instead of buying big tools to cut the wood themselves - that only means that they are not smart enough, and not making a rational choices, of course. And not a real builders, obviously. It is just like building a lego bricks, if you do not cut your own wood out of the log.
-
Dremel 8050 Rotary Tool Recall
Mike Y replied to jhearl's topic in Modeling tools and Workshop Equipment
Contacted European service center, they helped quickly - just "send it to this address with this mail coverstion printed inside the box, so we will know what to do". Got a new dremel in a few weeks, so now I have a double set of accessories and a spare charger John, thanks again for the heads up. I haven't received any malls from Amazon where dremel qas initiallu purchased.. -
Mark, thanks for the scan. No such thing in my plans, guess it is just something for builder to decide It is not a blocking problem, pretty clear how to close that gap, need to select the best alternative and do it.
- 968 replies
-
- 2
-
-
- hahn
- oliver cromwell
- (and 1 more)
-
Druxey, thanks for the note. Hahn framing is quite different in that area, he do not show hawse timbers. It is quite different from a real framing, descibed in TFFM. Simplified for aesthetics Adding just two hawse timbers will look weird, so will try to follow the same style - probably will add one skewed frame, like the most forward frame on the hull right now.
- 968 replies
-
- 2
-
-
- hahn
- oliver cromwell
- (and 1 more)
-
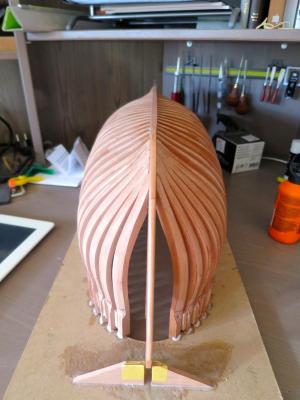
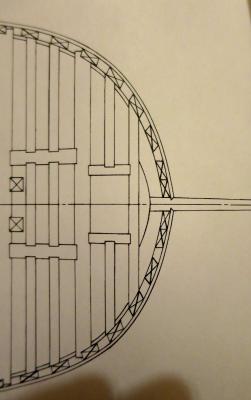
Surprised myself and installed all that weirdly shaped bow frames in just 4 hours. Pretty weird looking gap between the last frame and the stem, looks like a broken tooth. But it is not a mistake, there are only 40 frames in the jig. Need few more to cover the gap. This is how Peter (Mr. Hollom) solved that problem in his build: But I am not sure if it will look good (especially since I will have no wales or planks on one side), and will try to insert one more frame in the middle of that gap or maybe glue it directly to the stem. One of the Hahn's drawings actually show two extra frames, that are not present on a framing plan / jig plan / frame plans. That extra frames are glued to the stem and to each other. Hmmm.... Will try different options to end up with the most even spacing. I truly wonder why Hahn omitted one (or two) extra frames, would make life so much easier.
- 968 replies
-
- 15
-
-
- hahn
- oliver cromwell
- (and 1 more)
-
Looks great! But I am slightly worried about the way it is clamped into the vice - one accidental bump - and the keel will crack It is very handy to clamp it upside down, just glue some scrap wood to the "rails" that you already have, the one that hold the frames together
- 37 replies
-
- 3
-
-
- model shipways
- 18th century longboat
- (and 1 more)
-
ancre La Belle 1684 by Nenseth - 1:36 scale
Mike Y replied to Nenseth's topic in - Build logs for subjects built 1501 - 1750
Space is not a big deal, but time.. Hope you will have enough patience, once most frames are installed - it starts to look like a ship, and that is such a pleasure! -
Proxxon Micro MBS 240/E Band Saw Review
Mike Y replied to Blue Ensign's topic in Modeling tools and Workshop Equipment
Alexandru, proxxon service can send you new plastic for the wheels. Also, try removing the blade, detach the motor belt and rotate wheels by hand - maybe wheel bearings are broken and they glitch from time to time, breaking the blade when one wheel gets stuck. -
They would not be planked! No planks on the nice side. Fully planked "backyard side"
- 968 replies
-
- 3
-
-
- hahn
- oliver cromwell
- (and 1 more)
-
Small status update - frame installation is slowly progressing. Also marked the cutoff points and gun ports. Decided to skip the sweep ports on this model - they really do not look good with Hahn frame spacing - sweep port is narrower than the distance between frames. But I will definitely do them on a next model, that have a correct framing (as in TFFM), not a simplified one. P.S.: careful viewer can mention a magnetic bar in the background, holding some hand tools. Really handy thing! Very happy with it.

- 968 replies
-
- 16
-
-
- hahn
- oliver cromwell
- (and 1 more)
-
Ah, sorry, understood But that is typically done on the hull, when fairing it.
-
Good start! I might be mistaken, but hope that "cleanup sanding" is not to remove the paper? Scraping is much faster, and will keep the surface straight, while sandpaper will round it and smoothen the edges . If you are not using it on a flat surface, though.
-
Yes! Their "miniature" section is amazing. Hope they will extend the miniature tool range
- 968 replies
-
- 4
-
-
- hahn
- oliver cromwell
- (and 1 more)
-
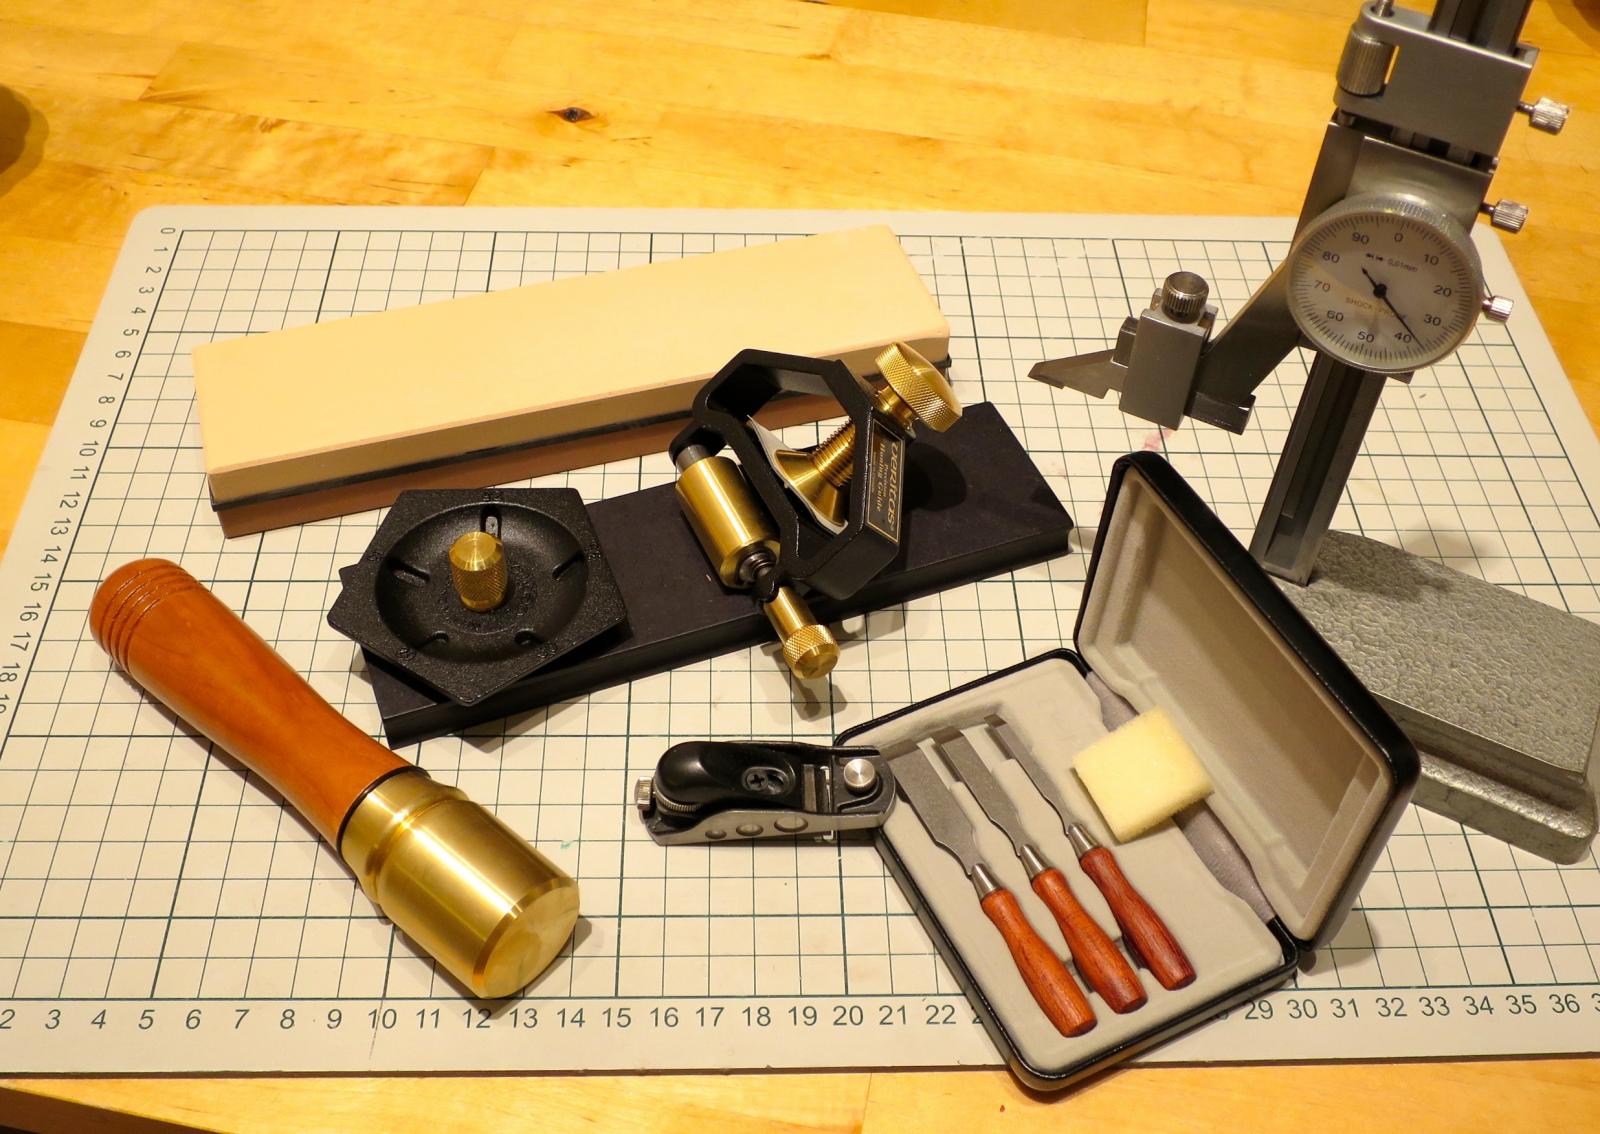
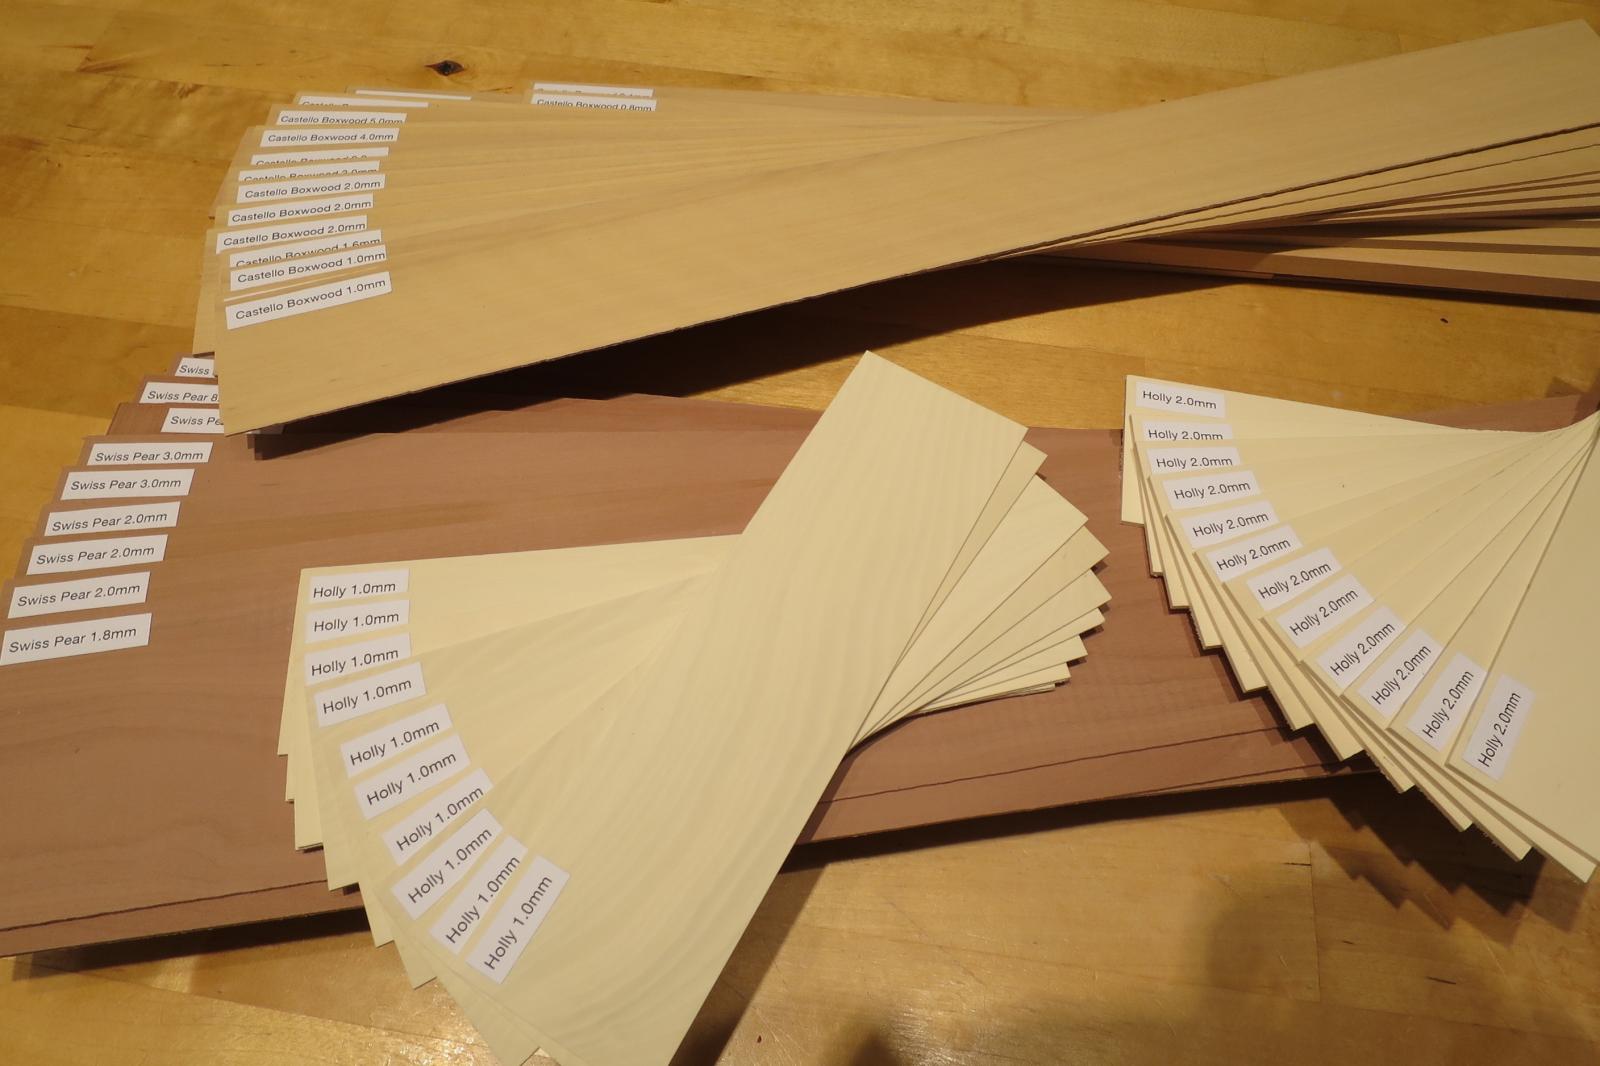
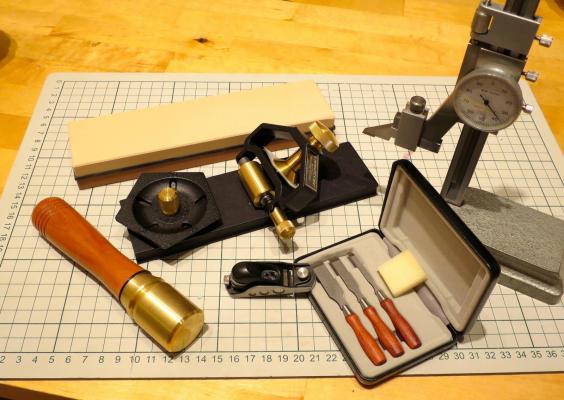
Christmas arrived early this time! Was on a business trip to US, bought a lot of stuff from Lee Valley - miniature chisels, miniature block plane, sharpening system, wetstones, etc. Also grabbed a nice height gauge on ebay, it is more precise than my handmade wooden one. The TSA officers in the airport were quite confused with all that set in my cabin luggage. Especially the height gage and a sharpening system looked really scary on the xray. Spent around 30min explaining that all that things are pretty secure, pff. Already tried chisels and plane with a factory sharpening - wow, they are sharp! Cutting pear like butter. Nice! Wood stash was also refilled - fresh batch of boxwood and pear from Arkowood, and Holly from Crown Timberyard. All of these are perfect! Interesting that box from Arkowood and Hobbymill perfectly match in color, while being produced on a different continents.

- 968 replies
-
- 11
-
-
- hahn
- oliver cromwell
- (and 1 more)
-
Cutting recesses?
Mike Y replied to Redshirt's topic in Building, Framing, Planking and plating a ships hull and deck
Instead of using chisel, it might be easier and safer to cut rough slots using scroll/band saw and finish them with a file. P.S.: yes, my chiseling skills are really bad (so far), but just pointing that there are other easy options too.