HOLIDAY DONATION DRIVE - SUPPORT MSW - DO YOUR PART TO KEEP THIS GREAT FORUM GOING! (Only 13 donations so far - C'mon guys!)
×


Mike Y
-
Posts
1,550 -
Joined
-
Last visited
Content Type
Profiles
Forums
Gallery
Events
Everything posted by Mike Y
-
 Thank you, Antony! Will try not to dissappoint Omega1234, nope, better focus on getting one model done with a better quality. At least, that is the plan so far
- 968 replies
-
- 2
-

-
- hahn
- oliver cromwell
- (and 1 more)
-
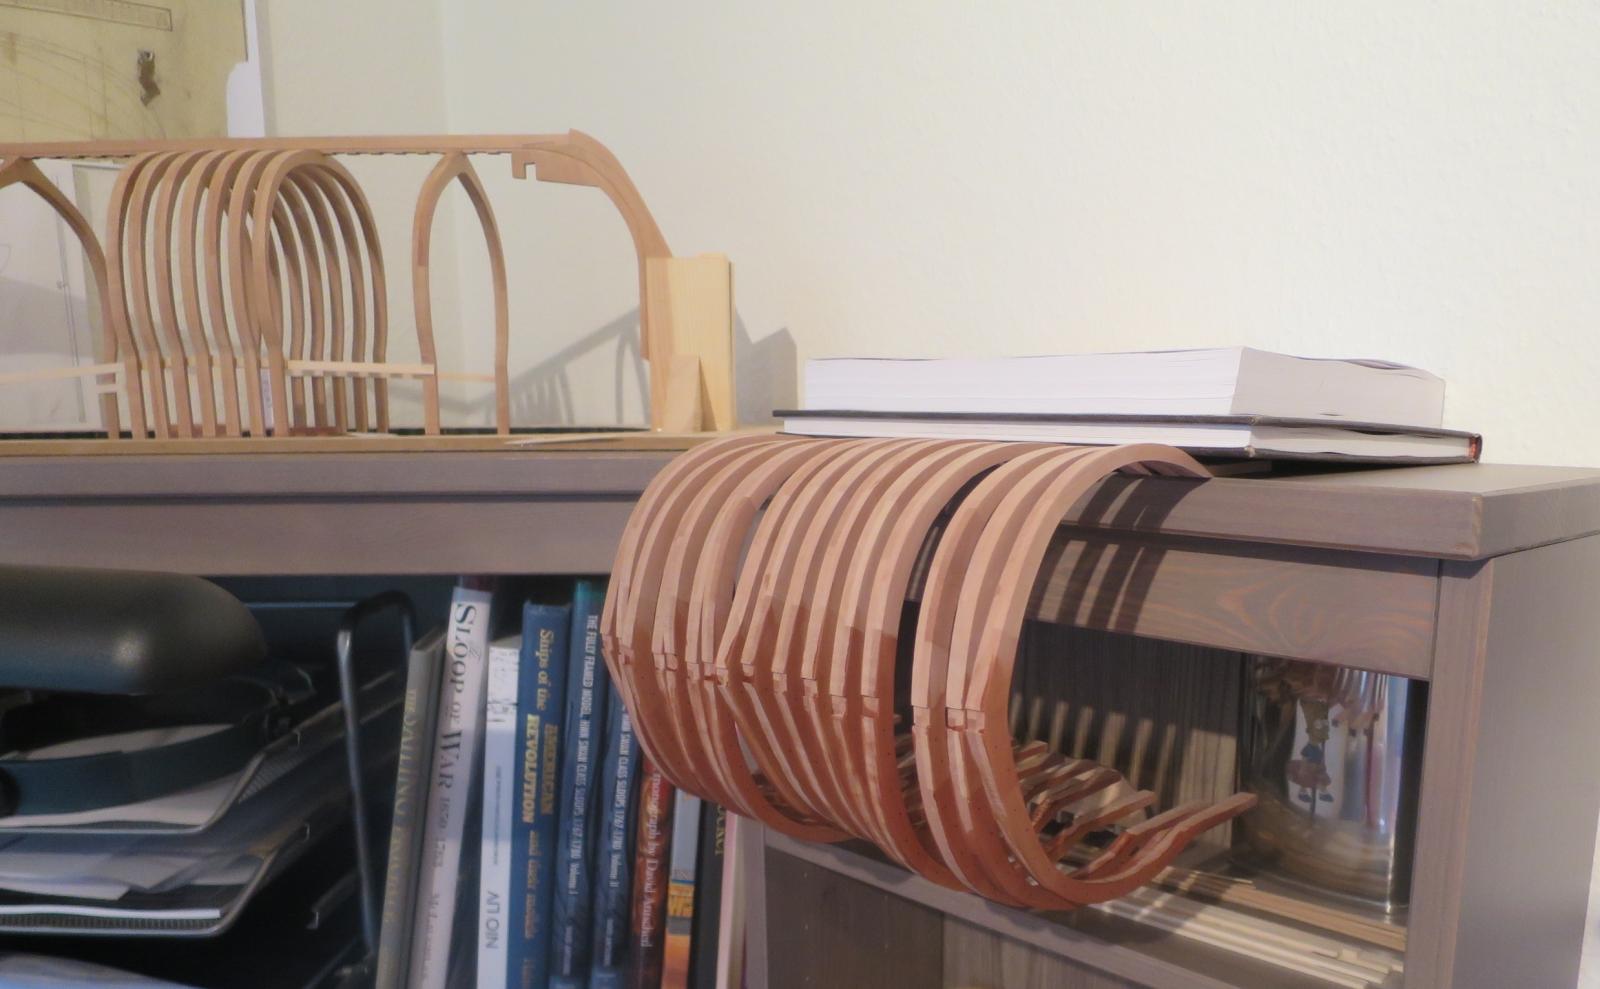
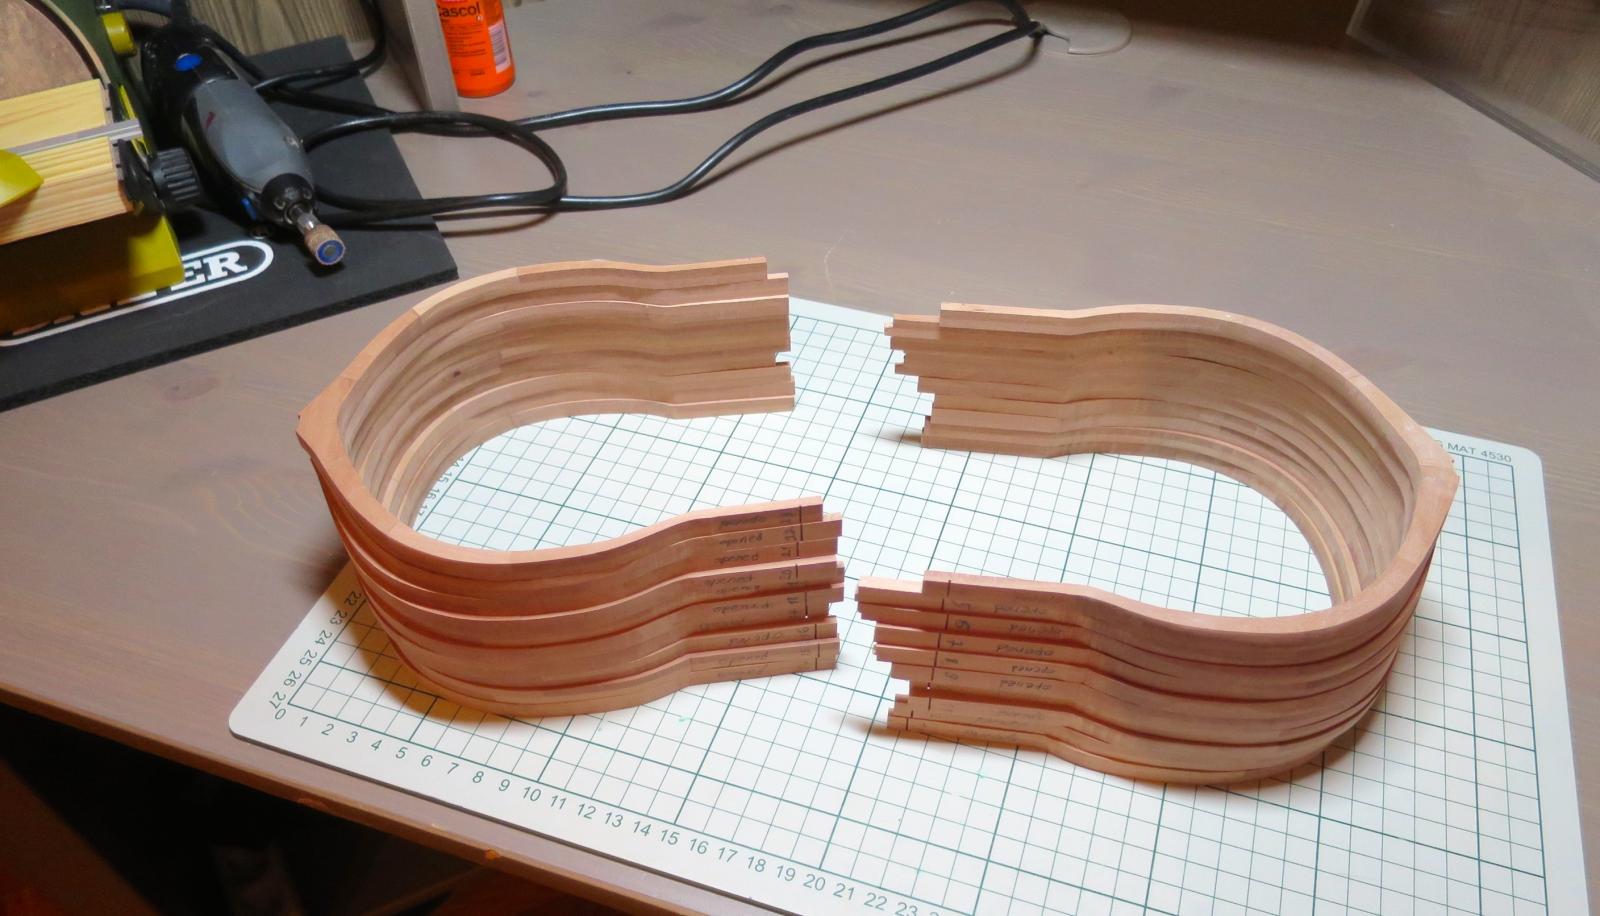
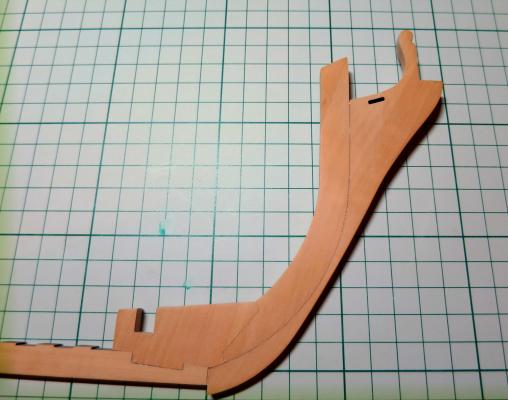
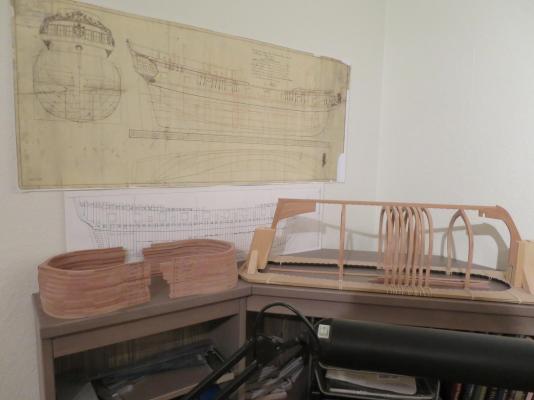
Sanding is finished, dust washed away! Covered all frames with poly, they are drying now. Just realised that I actually have two models now! One made out of "yellow-ish" pear, and the one from the "pink-ish" pear. The yellow one is used as a training model. I am practicing on it to avoid some mistakes on a real model. For example, as you see on a background, I installed 9 frames on a training model - and realised that: a) Not so easy to align frames to 90 degrees in all directions, need to make a jig to set the frames square. Even without gluing frames to the building jig, the construction is rigid enough for fairing, no need to glue in any fillers or spacers. That worried me for a while, because I will have one side fully unplanked, and installing fillers on one side only might cause hull asymmetry.

- 968 replies
-
- 14
-
-
- hahn
- oliver cromwell
- (and 1 more)
-
Jack, Grant - sure, let it be flat! Covered keel and four frames with poly, give it a day to dry
- 968 replies
-
- 1
-
-
- hahn
- oliver cromwell
- (and 1 more)
-
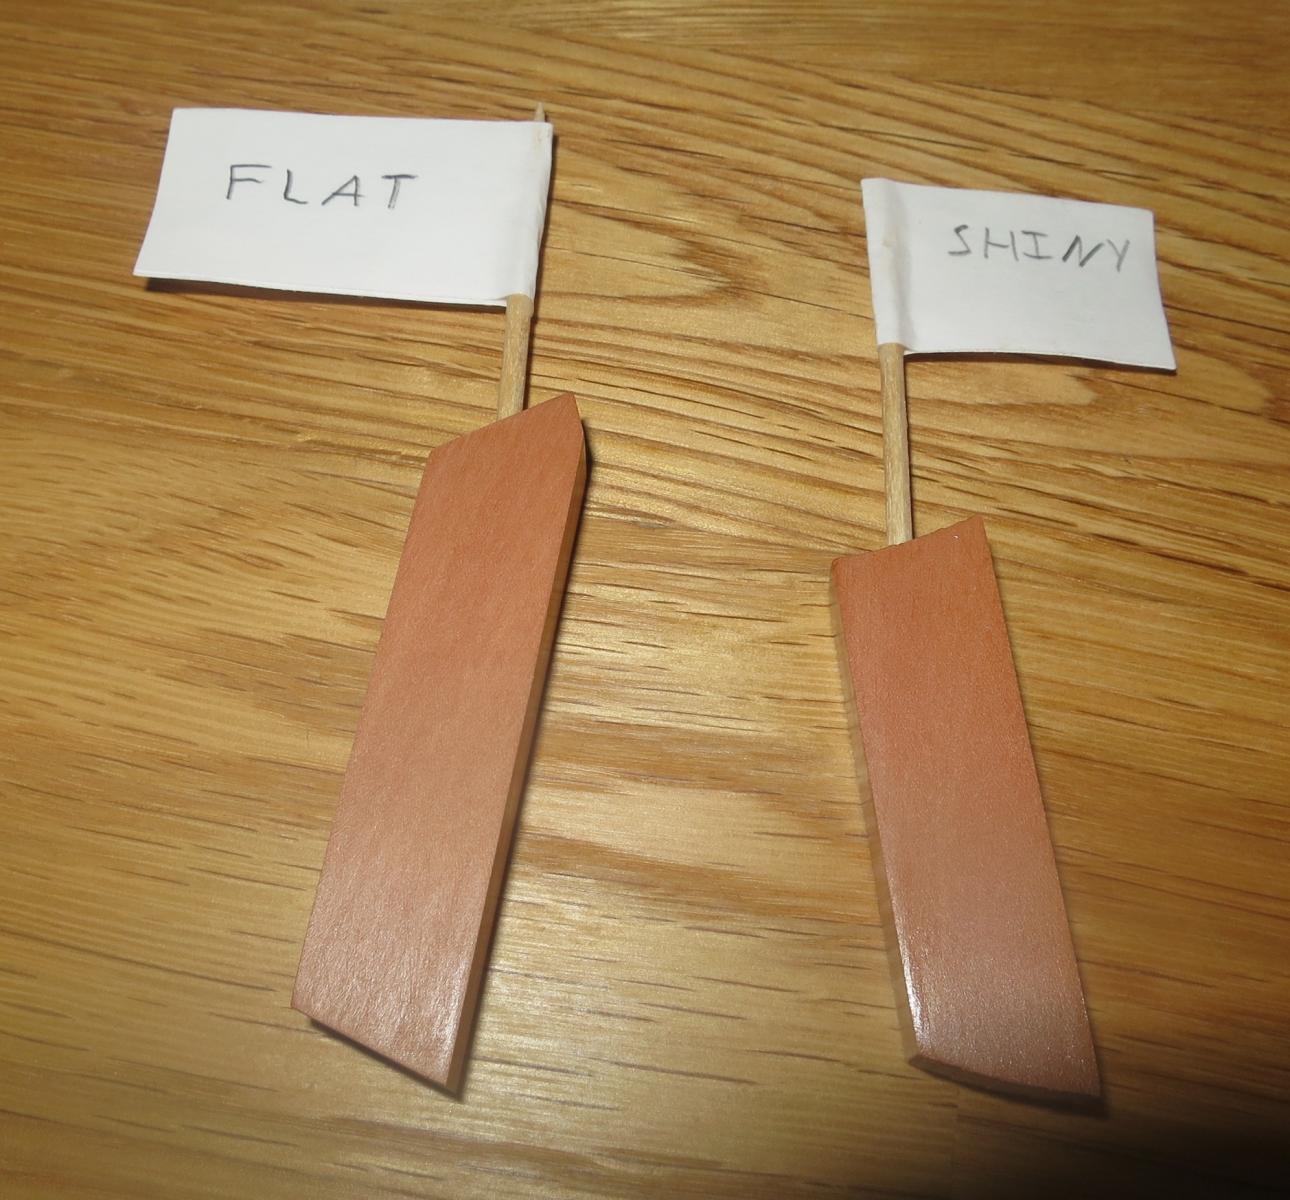
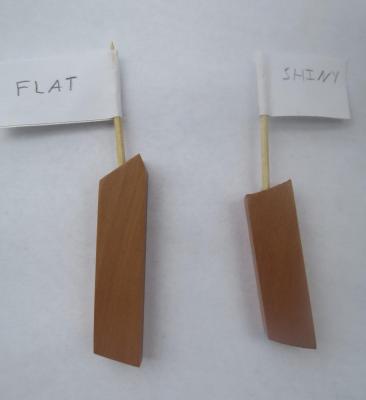
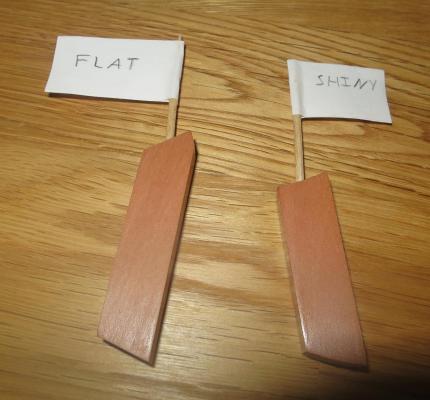
Tested two different types of wipe-on poly. Same producer, one is shiny, one is flat. Test pieces are cut from the same piece of wood, same part of the piece, so without finish they are completely identical. The difference is quite obvious with a real eye, and my camera (and/or photo skills) is not good enough to show it properly Shiny finish is unnaturally shiny, and makes wood look a bit darker. Will go with the flat one, it is barely visible, and preserves the natural color of the wood, while providing some basic protection. Natural light: Flash:
- 968 replies
-
- 5
-
-
- hahn
- oliver cromwell
- (and 1 more)
-
Please do not go away! Your critics is always very welcome! And I have a hard time trying to name different sides of a frame...
- 968 replies
-
- 3
-
-
- hahn
- oliver cromwell
- (and 1 more)
-
Of course, there is a reserve on the outer and inner edges of a frames. I am sanding the other part, "flat" side of a frame, it will not be affected during fairing.
- 968 replies
-
- 3
-
-
- hahn
- oliver cromwell
- (and 1 more)
-
Skeleton finished, will cut the rabbet after covering it with wipe-on poly. In a meanwhile, experimenting with different finishes to find the right one for me. Now sanding the sides of the frames, very stupid process that I was trying to delay as much as possible Aiming to get a consistent 7.4mm thickness to make sure that frames would be properly aligned. Hope to finish it this week, sawdust is covering the table, bleeh! And nobody will see the difference anyway...
- 968 replies
-
- 11
-
-
- hahn
- oliver cromwell
- (and 1 more)
-
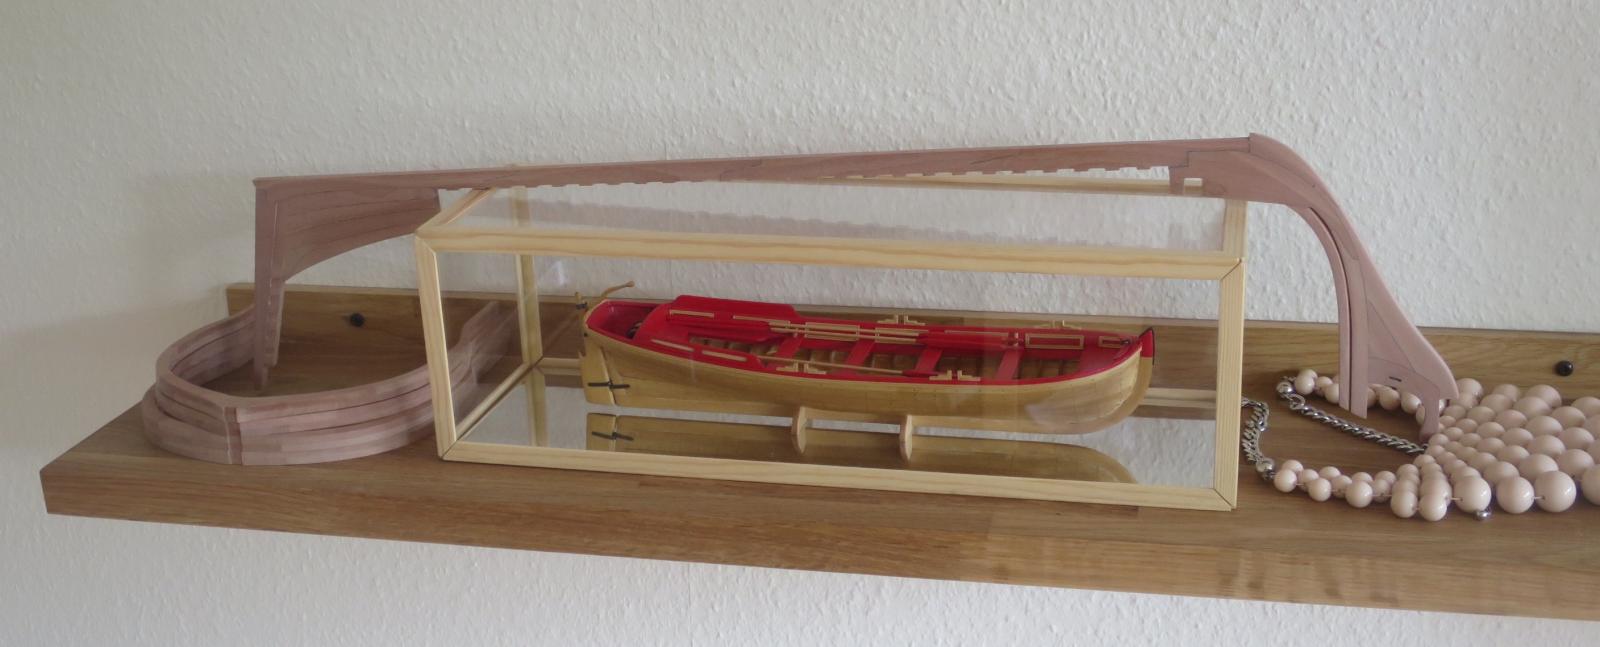
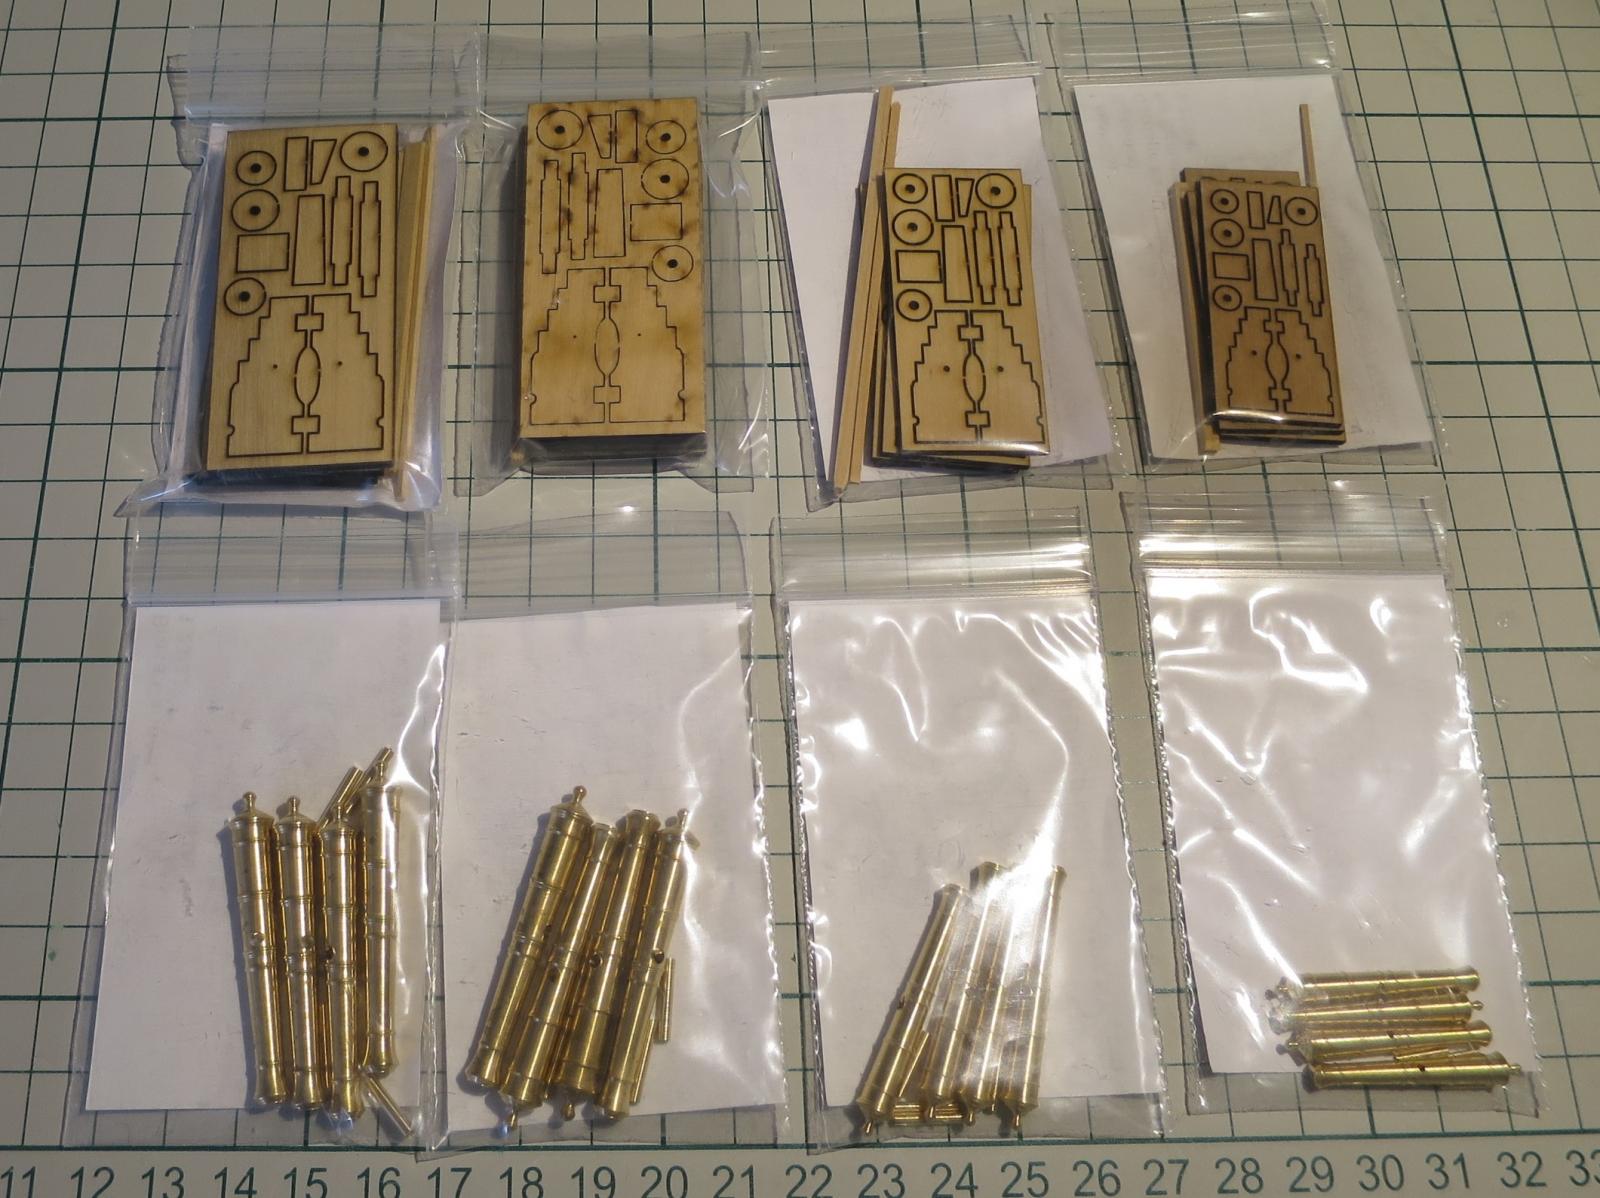
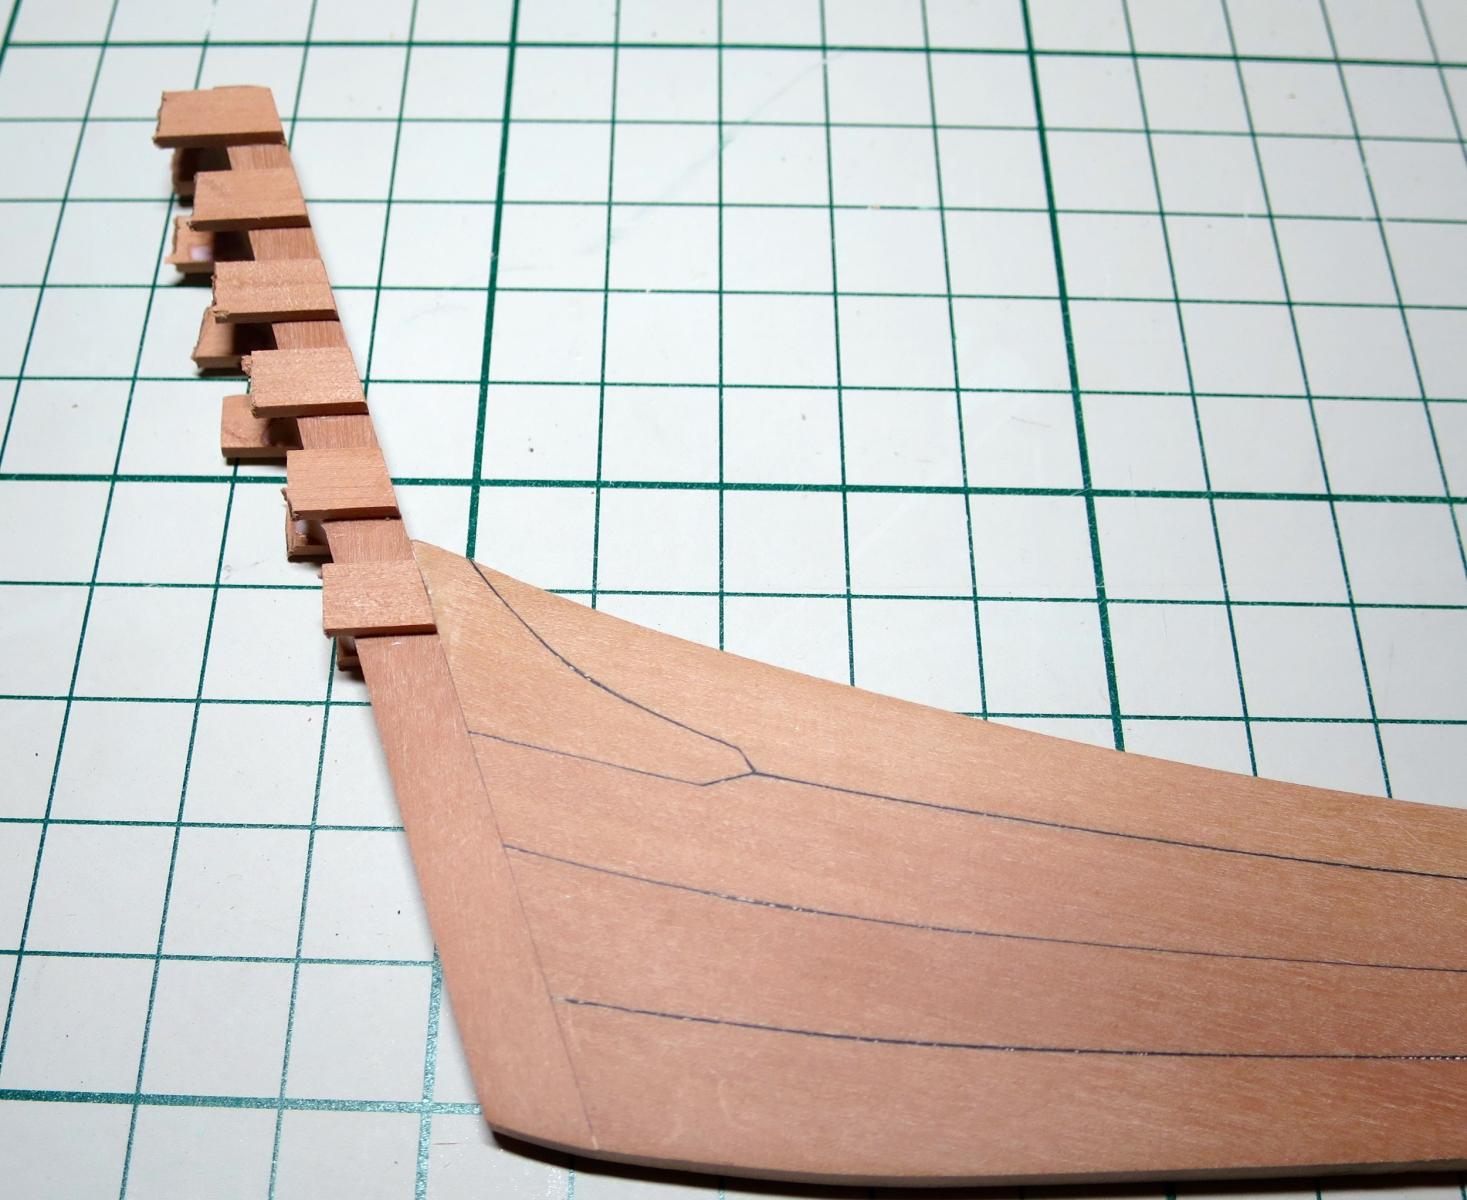
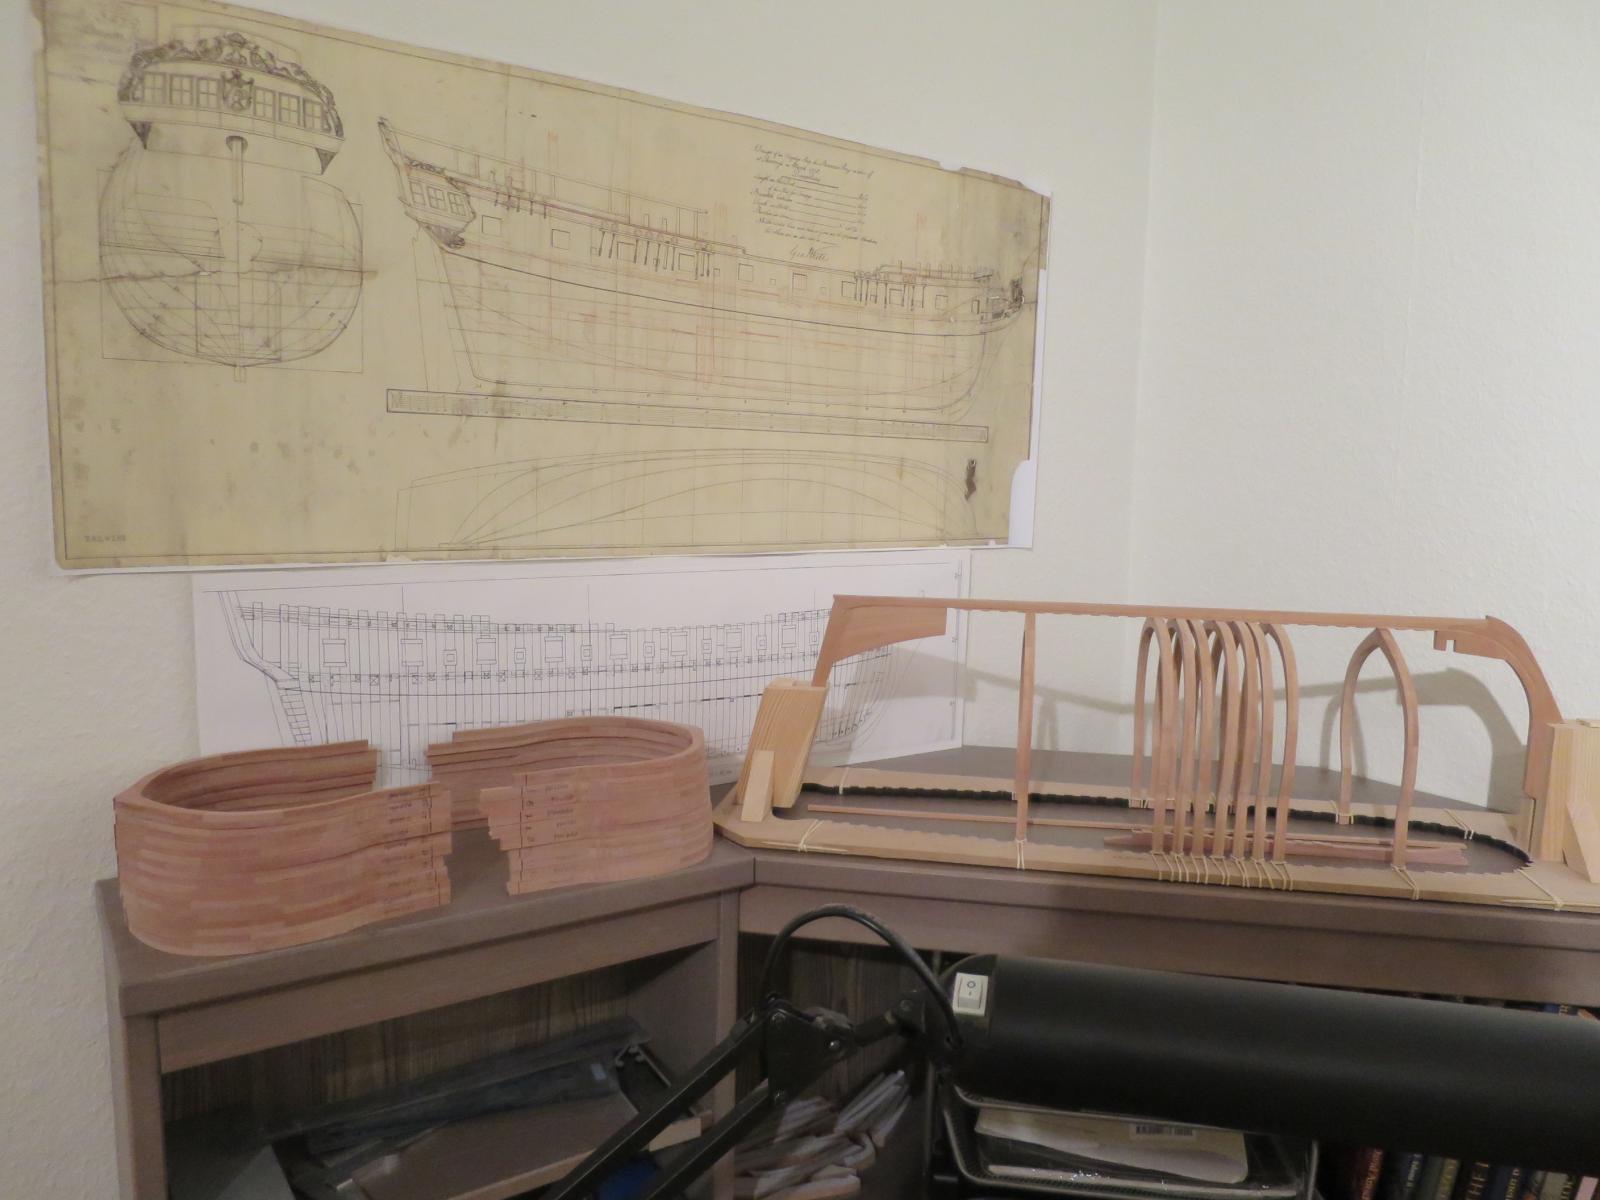
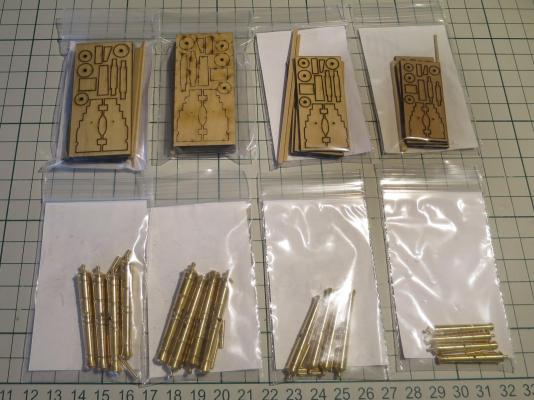
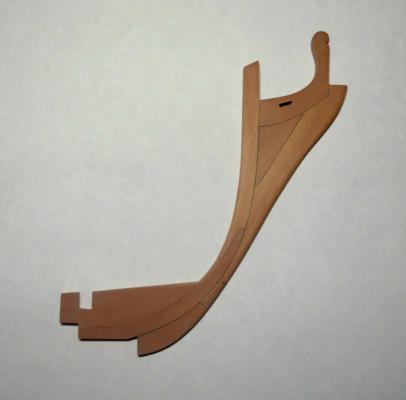
Got distracted with other things - summer is coming, and I suddenly ended up buying a real boat.. Of course it needs maintenance, cleaning, parking, blah blah, so not so much time for a modelling. Got guns and carriages from Syren Ship Models: And working on the stem: Here is the previous version for comparison: As usual, joints are blackened with a tissue paper and reinforced with treenails. Stem is not fully accurate, knee is simplified, but decided to keep it simpler on a first fully framed model. Hope to finish the skeleton during May, and start sanding and mounting 20 midship frames.
- 968 replies
-
- 13
-
-
- hahn
- oliver cromwell
- (and 1 more)
-
Stabilizing a bandsaw (edited by moderator)
Mike Y replied to Nirvana's topic in Modeling tools and Workshop Equipment
Rubber mat might not help - the body of the bandsaw acts like a big resonator... Learned it a hard way -
Proxxon Bandsaw - owner feedback
Mike Y replied to rtropp's topic in Modeling tools and Workshop Equipment
I have that saw, it is actually powerful. I use it instead of a scroll saw, works very wekk. Ripping planks - well, it has enough power, but it has no fence, so how are you going to keep a consistent thickness? -
Thanks everybody for suggestions! Lots of things to look for
-
Thinking of getting some source of compressed air to blow away the dust and sawdust from the details before applying the finish, for example. Is there such thing? There are many kinds of compressors in the market, which one would be useful for such usecase? Maybe the airbrush compressor? I also see the cans with compressed air, are they powerful enough to remove the sawdust? Any ideas are welcome, wiping away the sawdust with a soft cloth does not really work in a tight corners. And I need to clean the model from time to time, can't always store in a case..
-
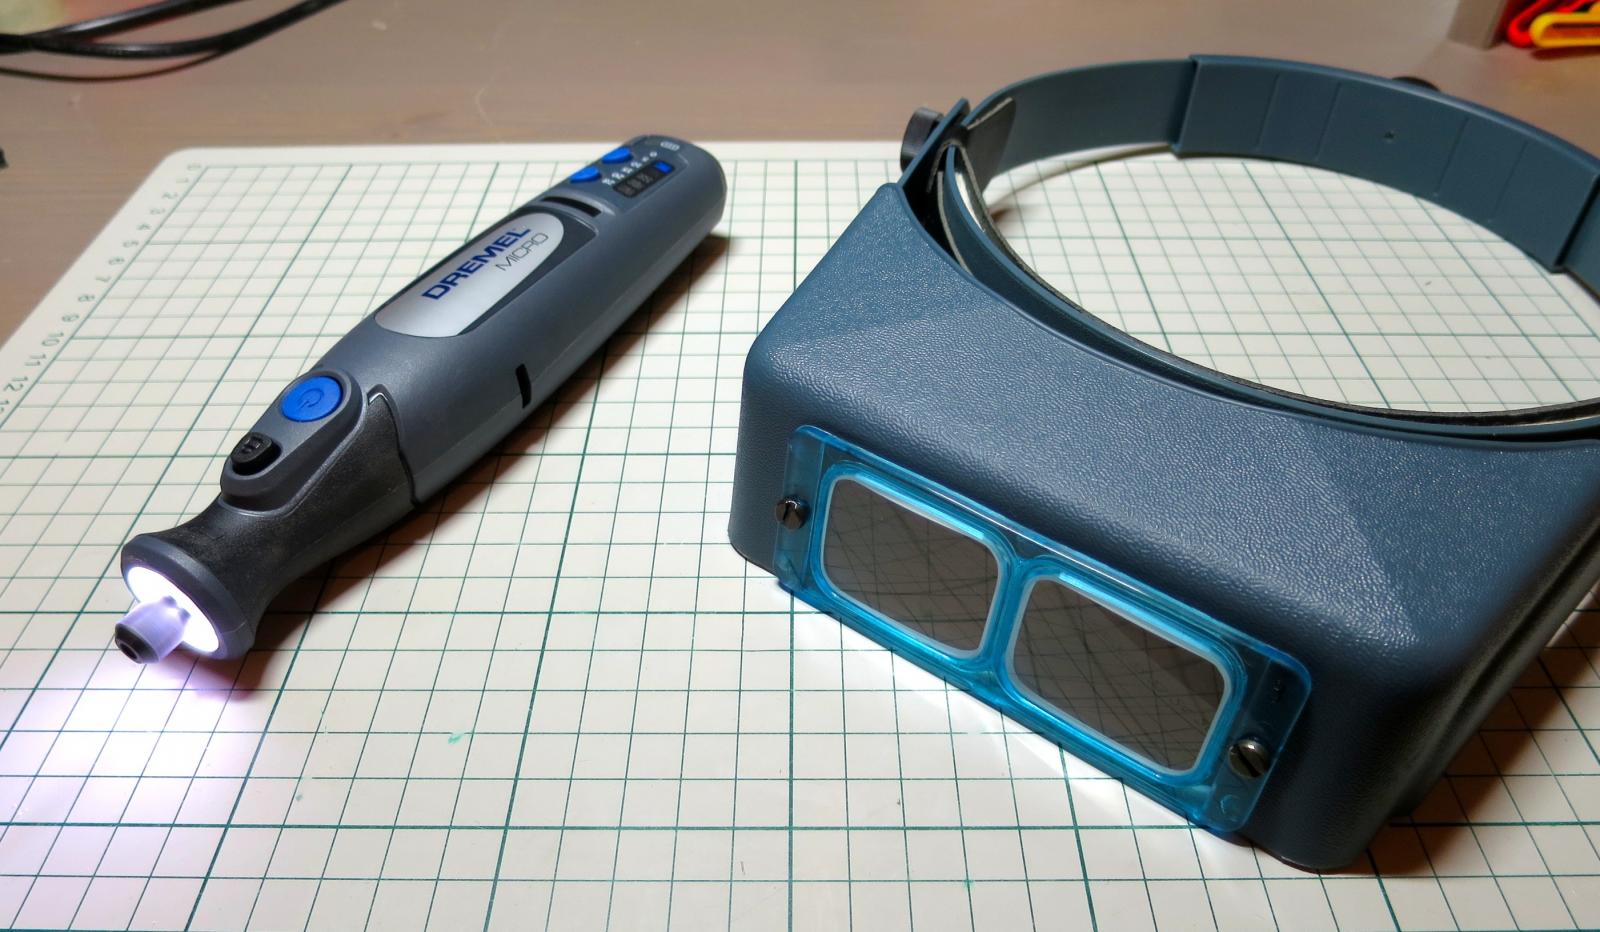
Got some cool stuff for my build today! Hope it will improve the accuracy. Really love the micro dremel - good balance, easy to align to a 90deg angle (I do not have a drill press unfortunately). And on a low speed it is very quiet comparing to a regular dremel - meaning that I can use it while my daughter is trying to fell asleep. And optivisor is beating the expectations - how I managed to live without it before??? Clean view, light on a head, good lenses.

- 968 replies
-
- 7
-
-
- hahn
- oliver cromwell
- (and 1 more)
-
Interesting wood palette, quite unusual! But looks great!
-
HMS Naiad 1797 by albert - FINISHED - 1/48
Mike Y replied to albert's topic in - Build logs for subjects built 1751 - 1800
Aah!.... -
Thanks for a nice words! Jack, found the monofilament on amazon: http://www.amazon.com/Skysper-500M-Fishing-Nylon-Black/dp/B00R71DEF8/ It is the largest I found. Actually wanted something like 0.6. The bigger sizes are around 1.5mm, they are made for tennis rackets. I saw your ebony solution, amazing! But I worry that black ebony dust will make pear around it dirty when I sand the frame. Is that a problem?
-
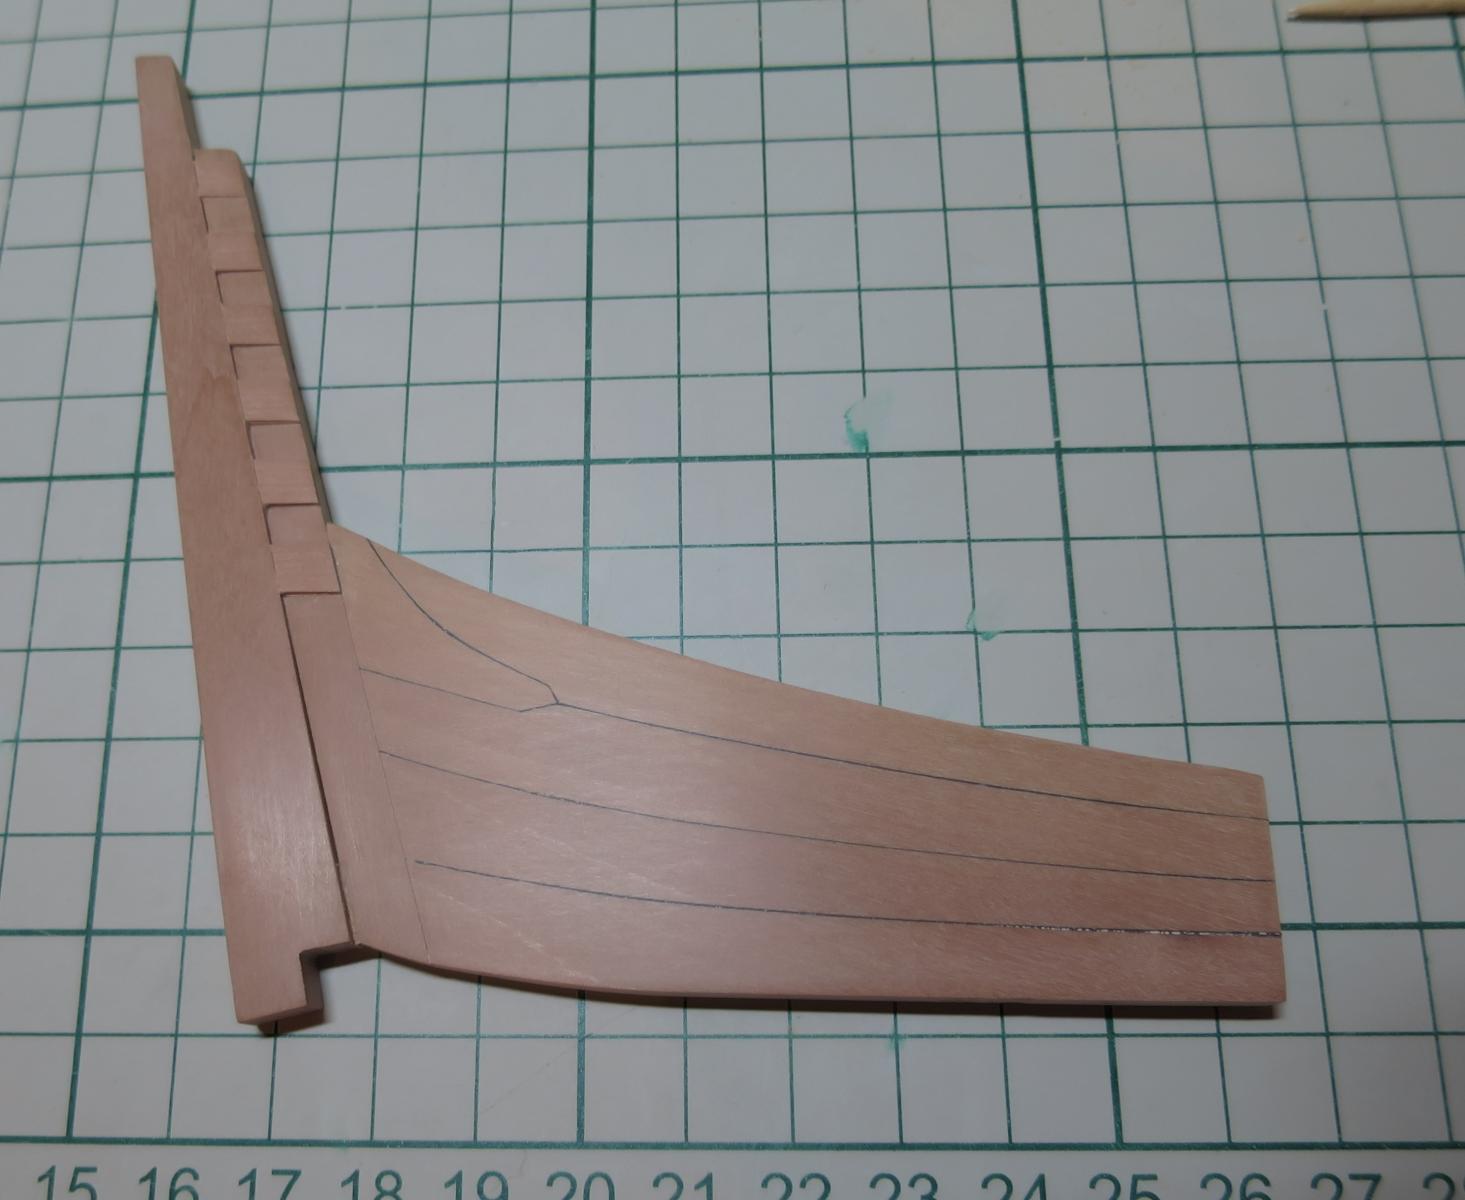
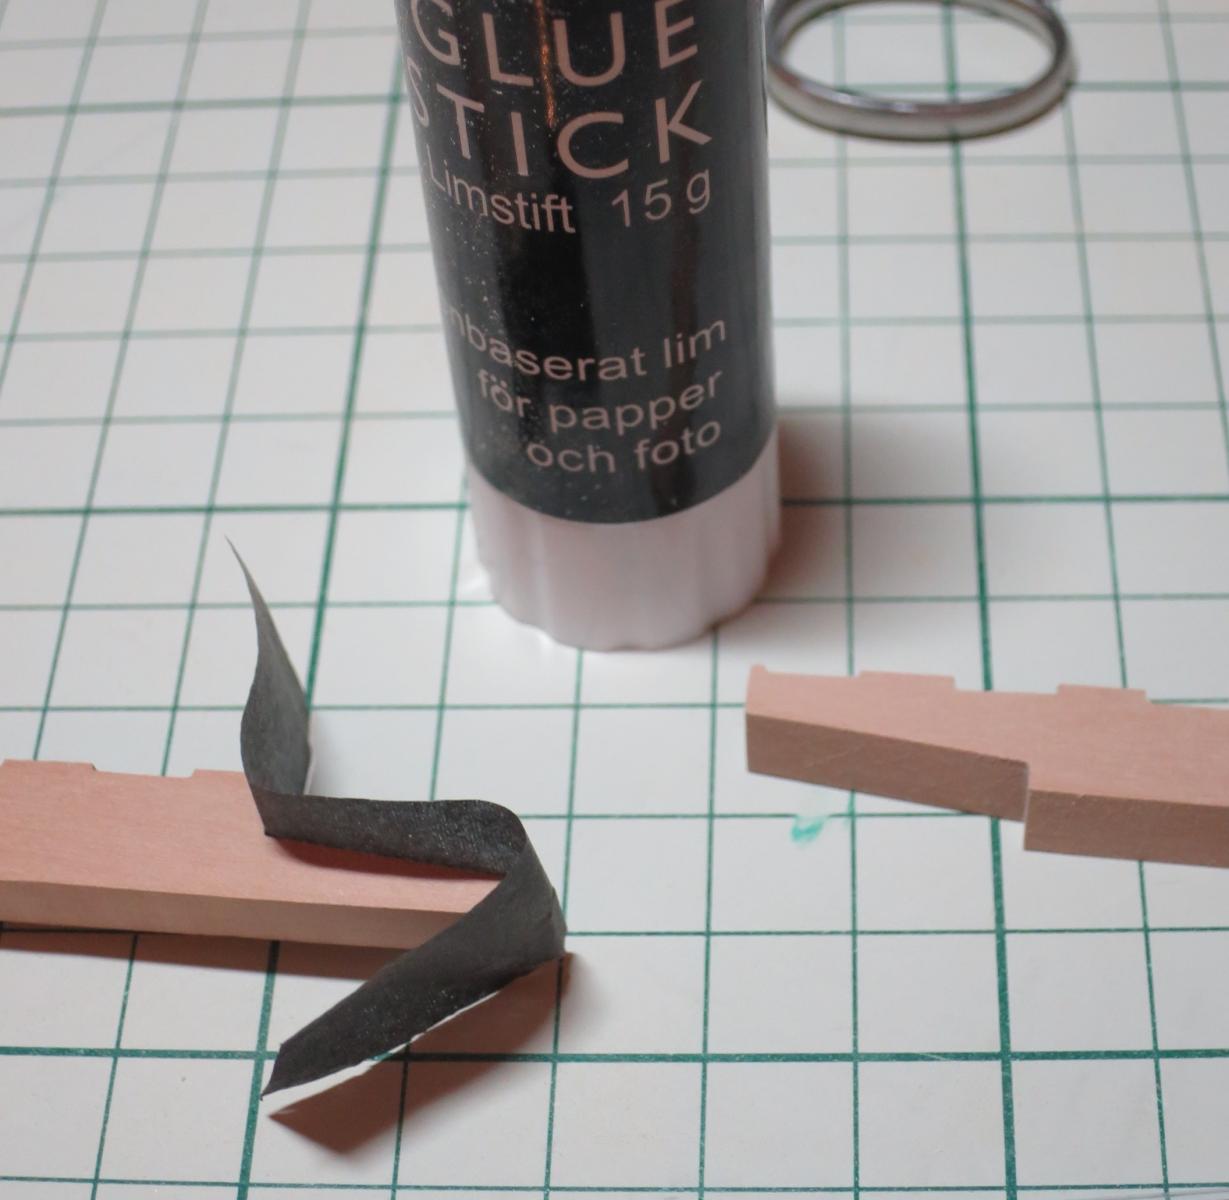
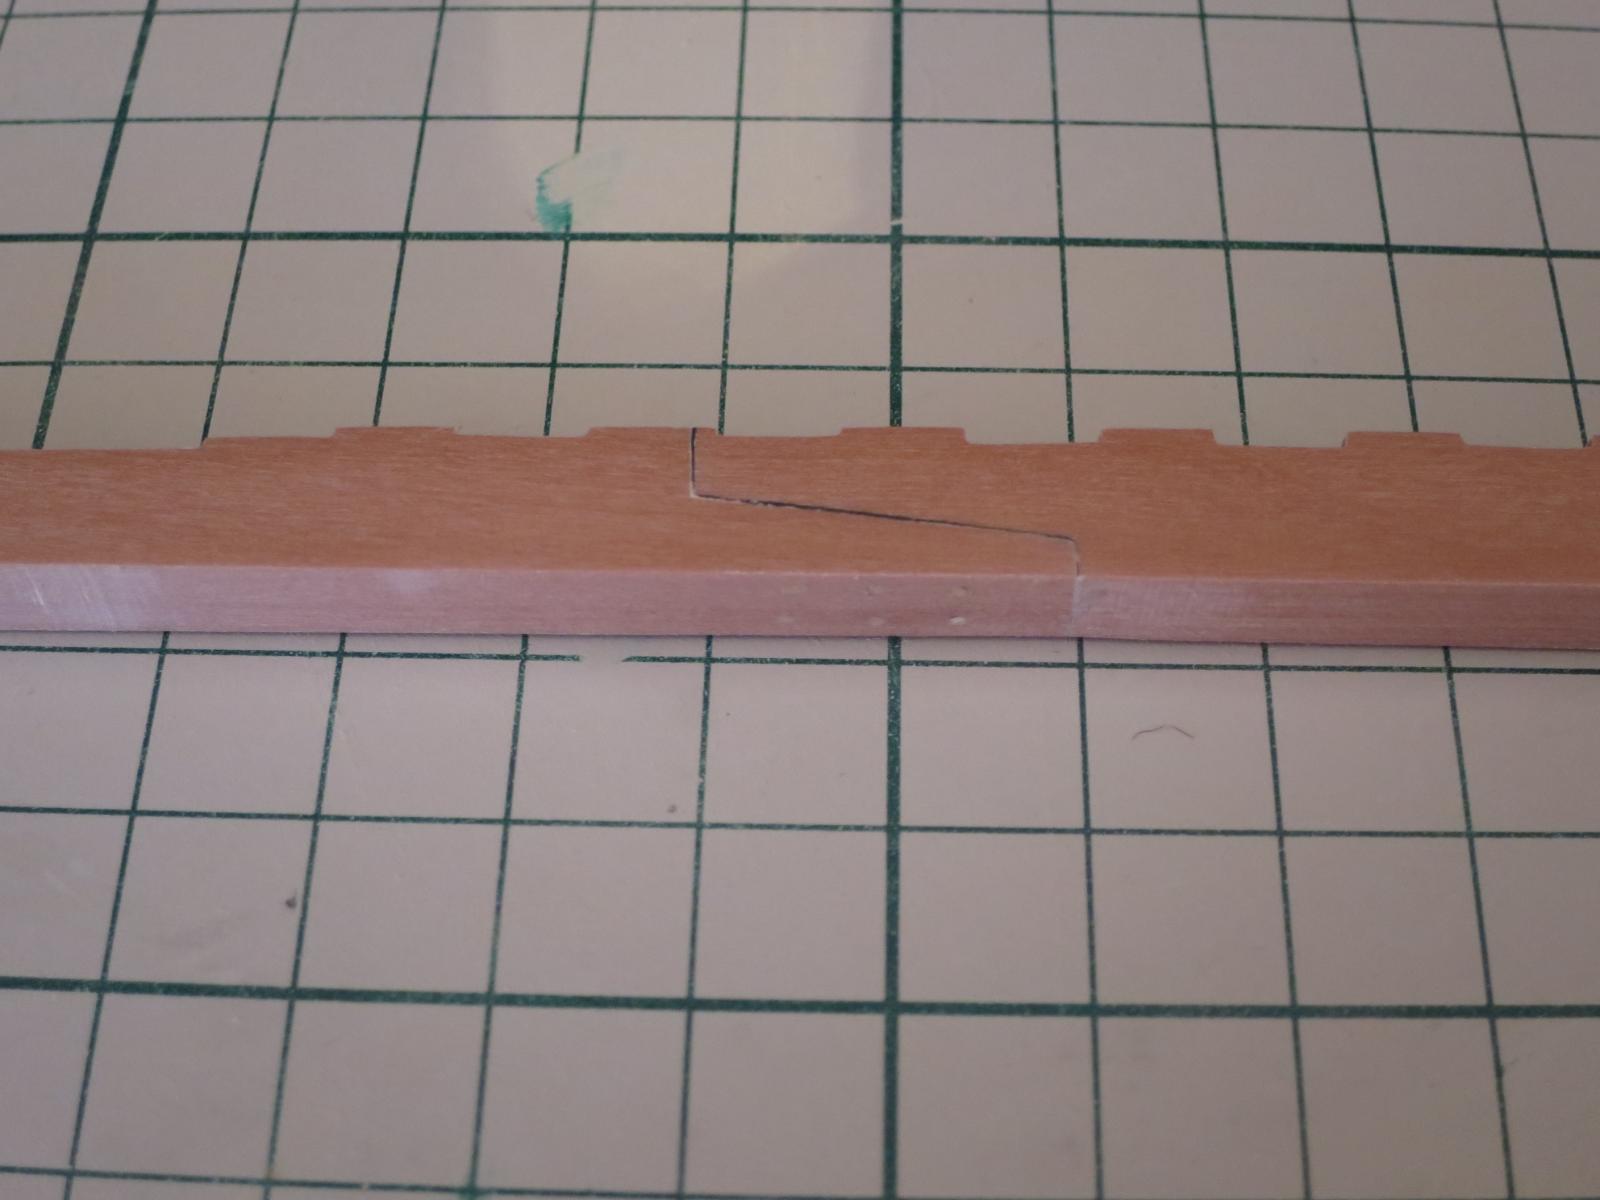
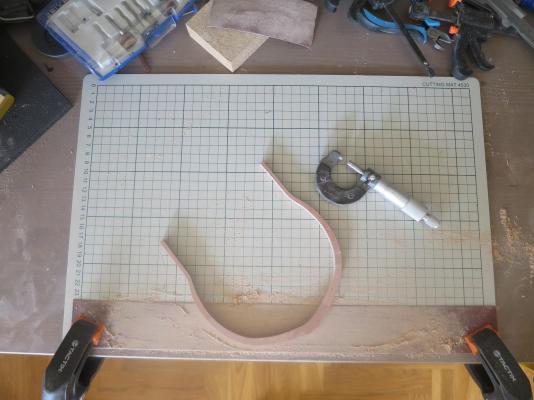
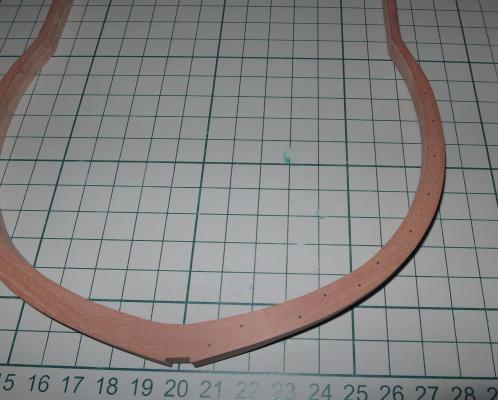
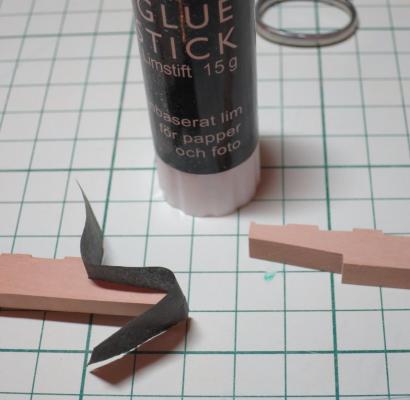
Slowly progressing with the keel / stem / stern assembly. Finished the deadwood and the slots for the wing transoms. Instead of chiseling, made that slots by gluing a wood strips and sanding it down to a smooth surface. (Tar simulation is done with a black paper again). Simulating the iron bolts with 0.5mm black monofilament: It is a little bit not to the scale, should be 0.52mm instead of 0.50 (assuming that original bolts were 1 inch thick). But that is the biggest monofilament I found. Maybe on a next, true replica model will use the real iron bolts (with the heads). But this time - a small simplification. Only one side of a frame has a bolts, because another side would be fully planked anyway. Lots of sanding ahead - need to go through 240 -> 320 -> 400 -> 600 -> 1200 -> 2000 grits to achieve a consistent thickness of a frame and a smooth finish.


- 968 replies
-
- 18
-
-
- hahn
- oliver cromwell
- (and 1 more)
-
The build is sooooo clean and accurate! Bravo! Learning from you.
-
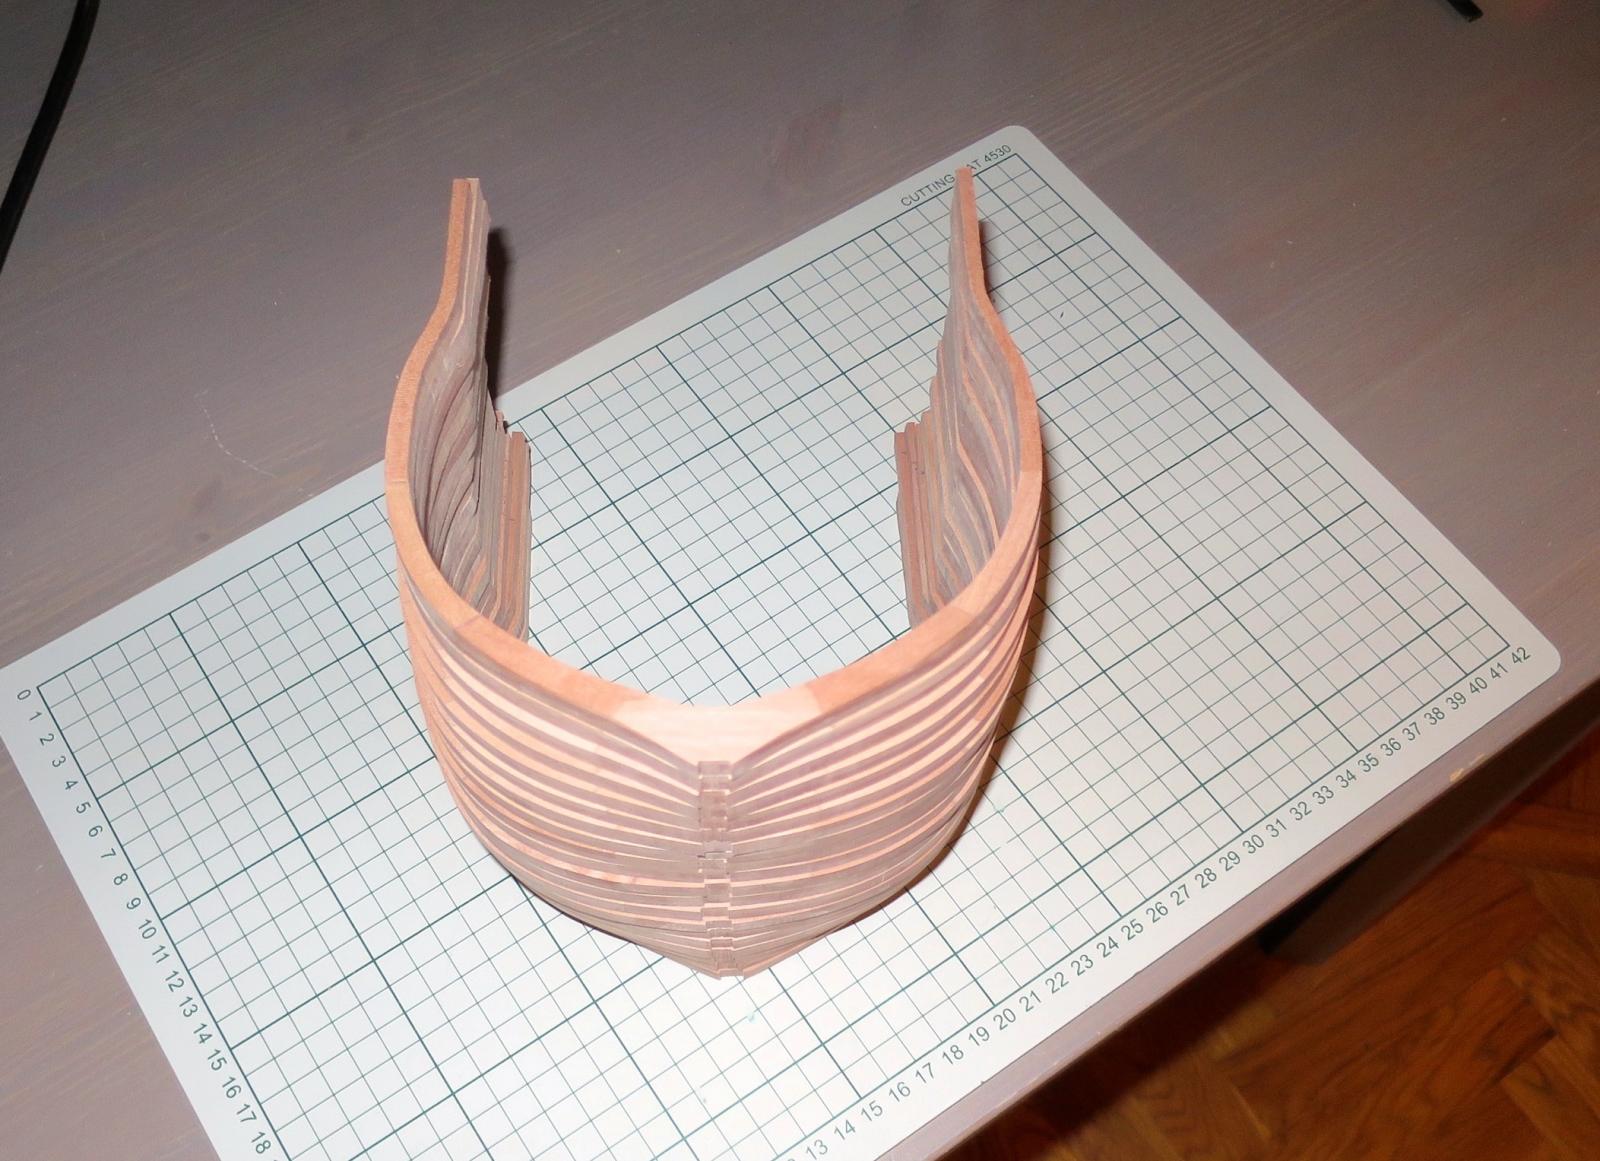
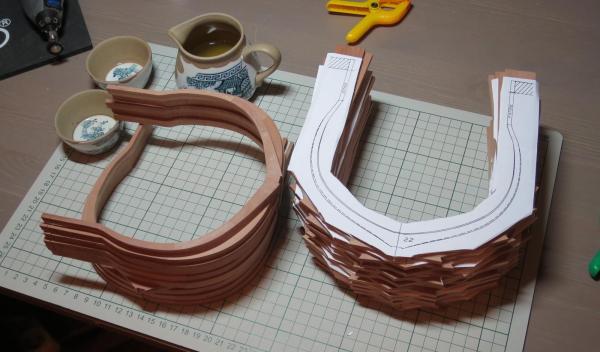
20 midship frames are cut (which makes it 50% of overall frames!): Looks ship-alike! Starting from the midship ones because other frames are much more complex, I can get some skill and experience on an easier midship ones. Overall build status: (the frames I currently have installed on a model would be replaced by the newly produced - they are made out of different wood, more yellow-ish) Next step is nasty, and I am trying to push it down the road - sanding the face of every frame on a sanding board. Produces lots of dust, takes around 20 min per frame.. So will switch to the keel instead, then simulate the iron bolts with monofilament, then...


- 968 replies
-
- 15
-
-
- hahn
- oliver cromwell
- (and 1 more)
-
Looks seriously good! If only I can make a frames like yours...
-
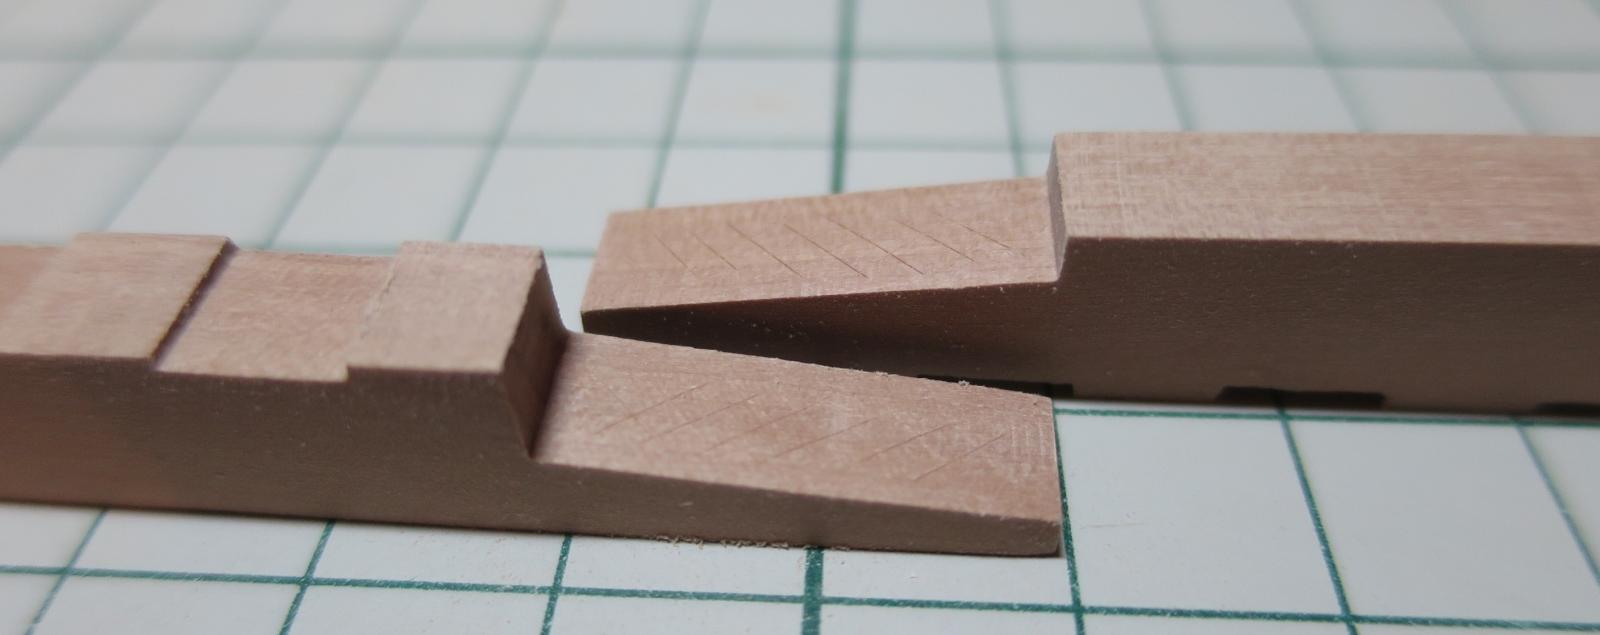
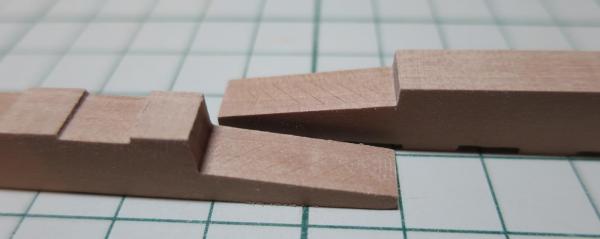
Careful reader mentioned that the joint is cut in a wrong direction - it should be rotated 90deg. Nice catch! But decided to leave it as is - otherwise no point in making such joints, they would be fully invisible.. And making a third version of a keel on a first fully framed model sounds like an overkill, I will never finish it if I go that road Let's call it an artistic touch, like Hahn's frames Toni, thank you for advice! I was looking on your log as a source of many inspirations!
- 968 replies
-
- 4
-
-
- hahn
- oliver cromwell
- (and 1 more)
-
Patrick, wouldn't it bleed following a wood grain? Will try, thanks for the tip!
-
Alan: hmm, I was sure that I read about the tissue paper method somewhere on MSW Tried it on a scrap wood, works quite well. The paper inside the joint could be perforated and/or cut slightly to improve the glue penetration. But such joint should be definitely reinforced with the treenails. Mark: thanks! There would be some sanding ahead, which should also make the line black line more consistent
- 968 replies
-
- 2
-
-
- hahn
- oliver cromwell
- (and 1 more)
-
While assembling frames, started the keel assembly (to replace the laser cut keel that I used before). Joint is blackened with a tissue paper. Castello treenails reinforce the joint, because paper makes it a bit weak. The treenails would be completely hidden by the false keel, so they have a purely functional purpose Hope that the paper line would be more accurate after a final sanding.

- 968 replies
-
- 5
-
-
- hahn
- oliver cromwell
- (and 1 more)