HOLIDAY DONATION DRIVE - SUPPORT MSW - DO YOUR PART TO KEEP THIS GREAT FORUM GOING! (Only 20 donations so far - C'mon guys!)
×


cookster
-
Posts
416 -
Joined
-
Last visited
Content Type
Profiles
Forums
Gallery
Events
Everything posted by cookster
-
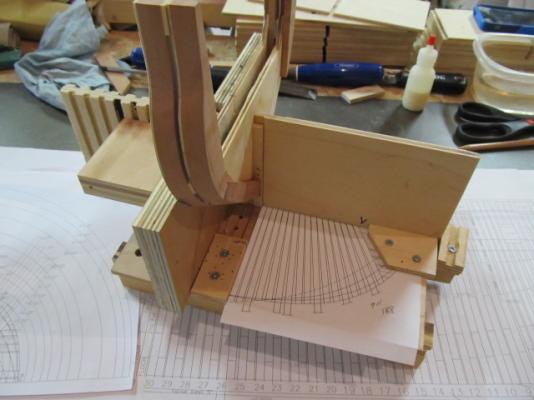
Hi all, I'm back on my Essex build. I took a couple months off, frankly I got burned out. Those pesky cant frames and scarph joints started getting to me. I've been reading some other logs and came across a couple of folks using jigs and a mill to cut similar joints so I've decided to give that a try. I have a sherline mill and haven't even used yet, if you can believe that! I bought it on sale 2 yrs ago and only opened the box once. I just never seemed need to need it until now. i KNOW I will be able to use it extensively later on, once I get past these dang frames... I've been continuing my drawings as well and am looking forward to finally finishing the forward cant frames. I've got to build a jig for the scarph joints, then I can start on more cant frames. I'm looking forward to making some progress again! More pics to come
-
Cutter Cheerful 1806 by rafine - FINISHED
cookster replied to rafine's topic in - Build logs for subjects built 1801 - 1850
Hi Bob, just looking back in on your build. Looking good sir! You're moving right along...- 525 replies
-
- 3
-

-
- cheerful
- Syren Ship Model Company
- (and 1 more)
-
Mobbsie, I don't know about the "I know what I'm doing" bit... I think I've learned just enough to now be considered dangerous. I have studied quite a few build logs and bought more books that I care to admit (VOL 1 of the French 74 gun ship is AMAZing!). I *hope* I'm getting this build close to historical reality, but honestly I'm not sure. I'm a pretty crafty carpenter at full size, so in my mind I think "well I could make that at full size if I had to...." So does that help? Not really - but it makes me feel better anyway.
-
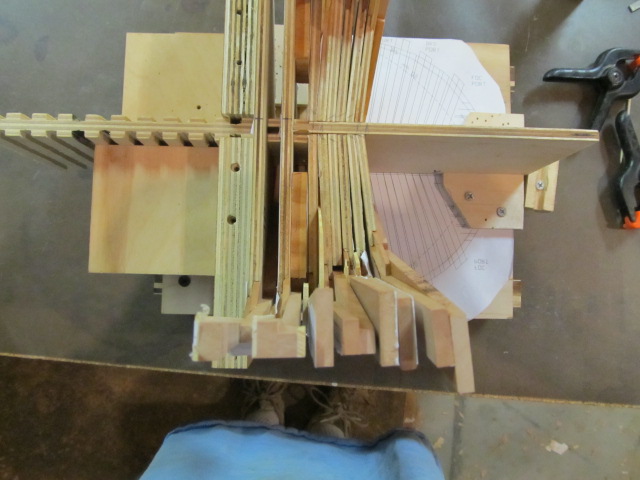
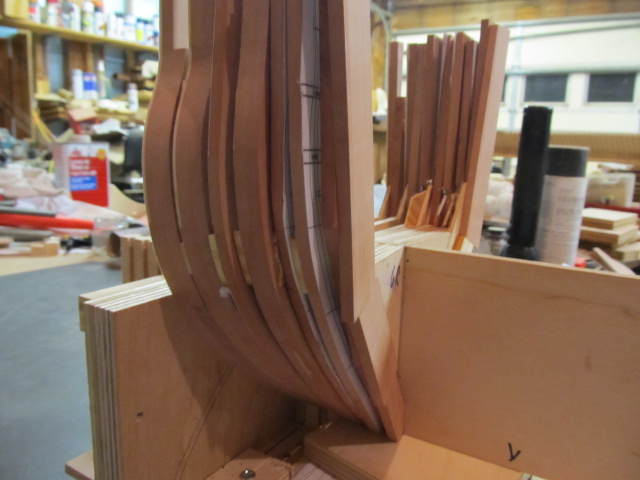
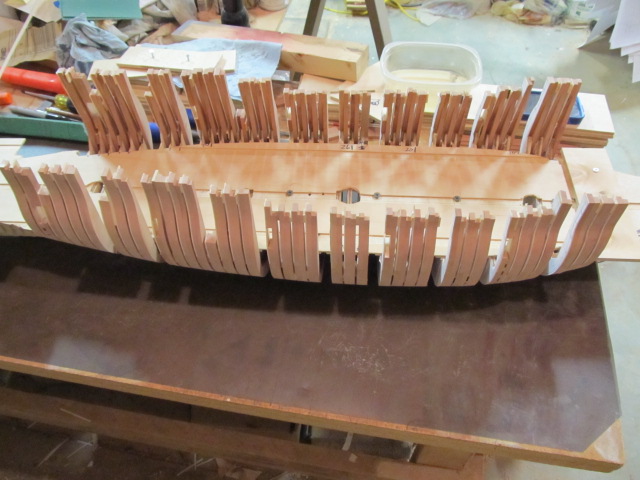
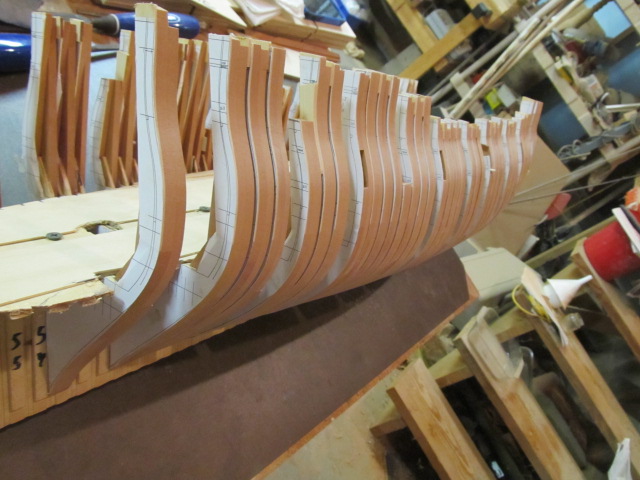
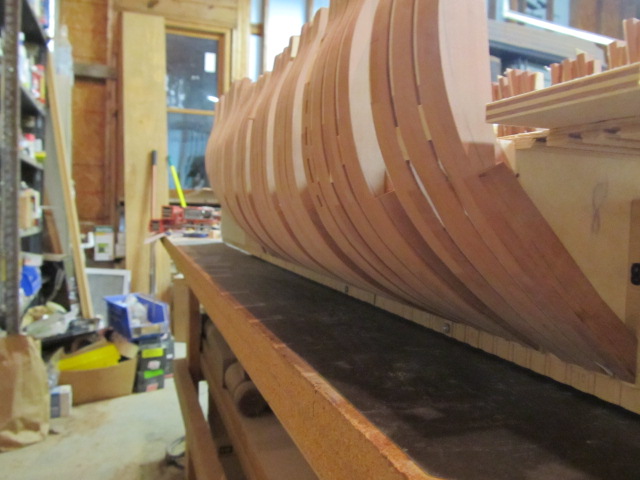
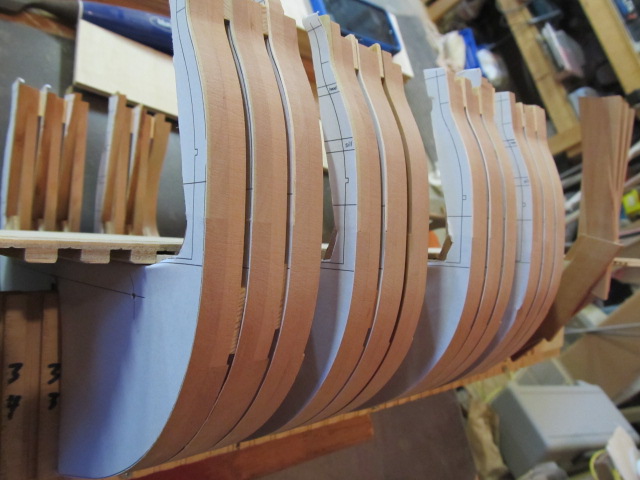
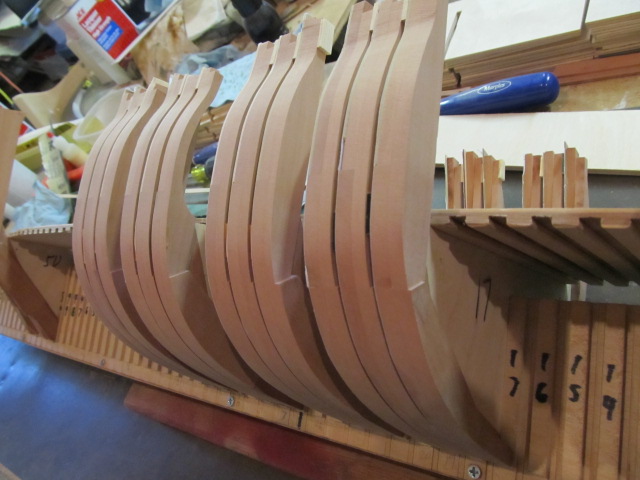
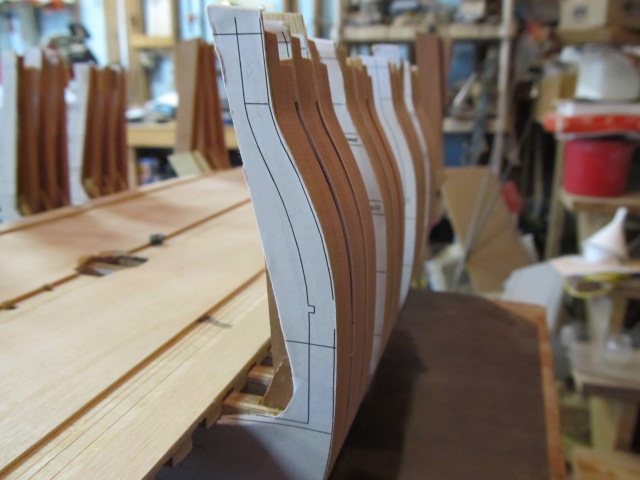
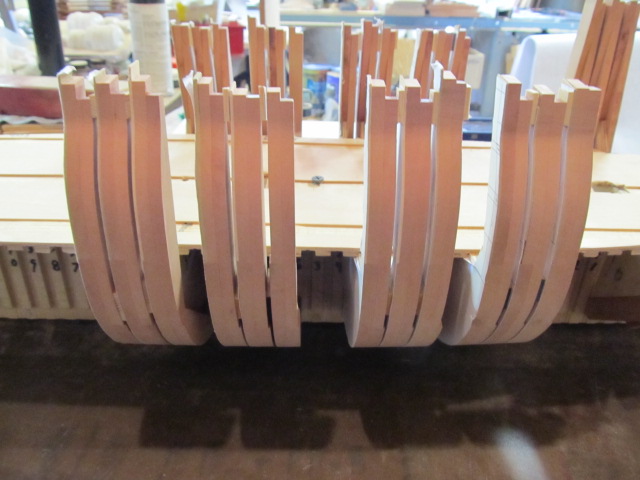
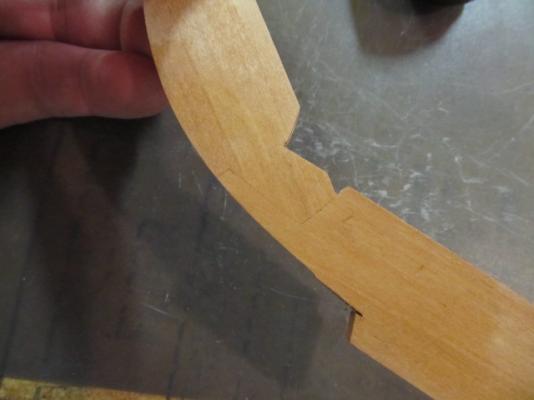
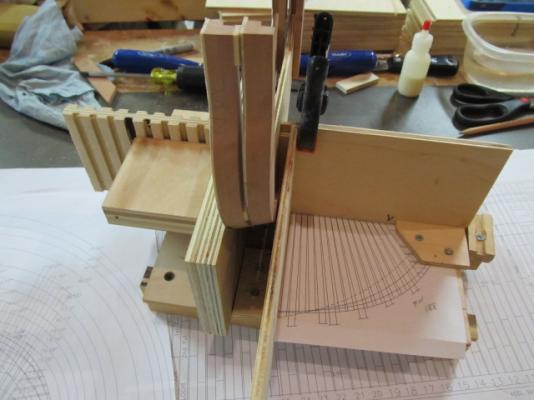
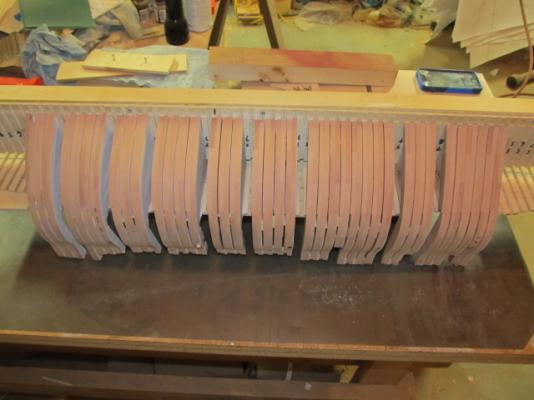
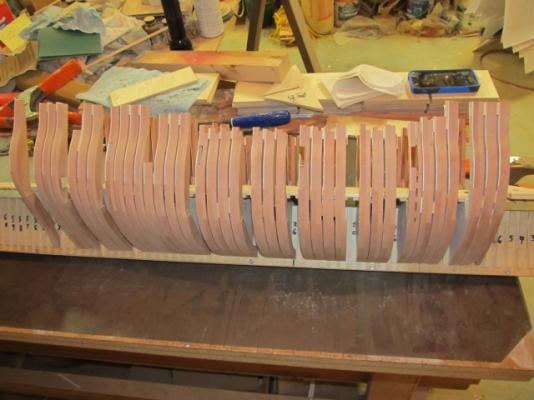
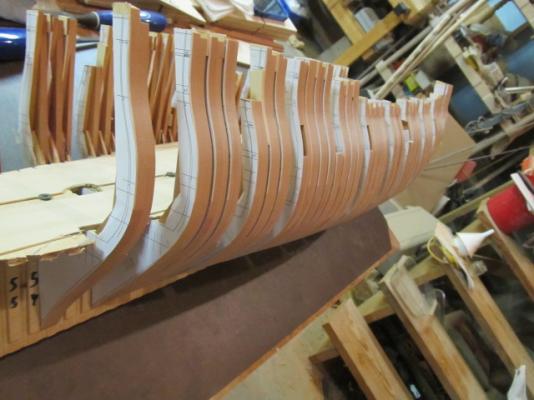
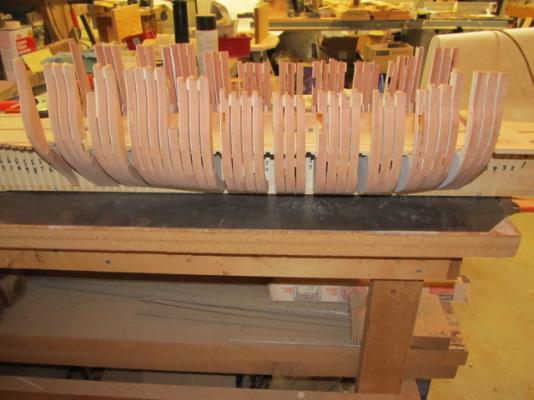
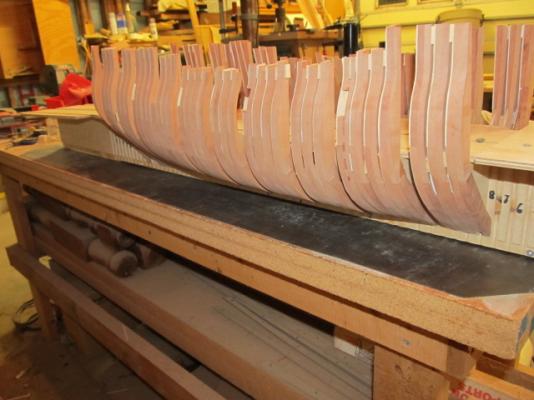
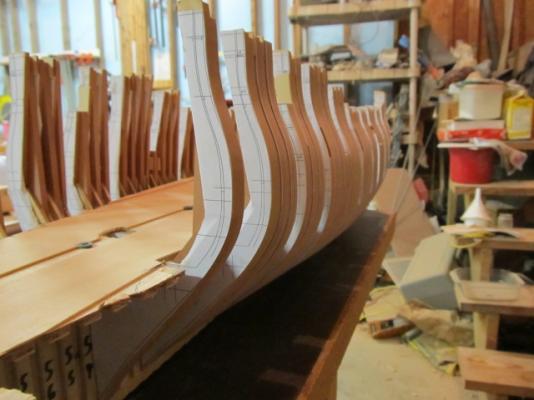
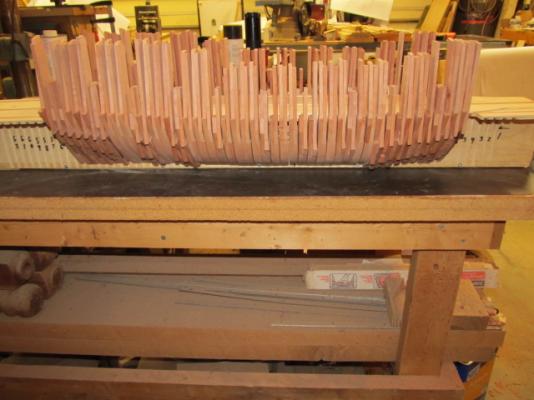
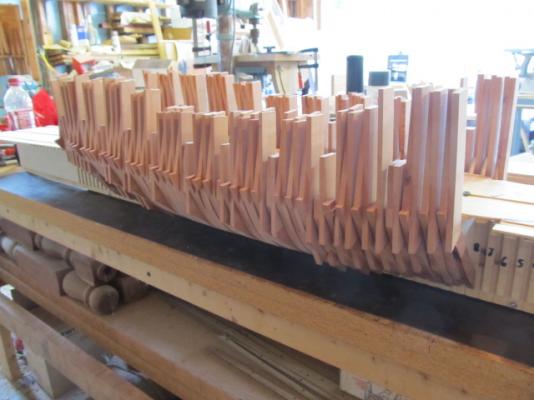
I have made a few cant frames and dry fitted them. I'm still using the hybrid plywood and frame method. I'm using a plan for the cant frame angles to the keel just as the folks that build true POF do. I'm also cutting the matching bevel on the ply at the keel joint. I added brass locating pins to use in placing and removing the frames during dry fitting and rough fairing. I used flat scarphs on the upper frame joints, although I'm not sure my methods duplicate actual practice. At this point I'm going with it, they won't really show anyway. The scarph is a good joint to use to join the single frame timbers (since there is no sistered pieces to join to) I still have quite a few more cants to make so that will take a few weeks at my pace. I added pine wedges to set the angles to the keel. Scarph joint


-
Hi Mobbsie, been a while since I looked it. You're doing great, you're skills look fine to me! The bomb vessel has a unique construction, I couldn't figure out what you were building (the platform for the mortar?) until I saw it finished, then it made sense. Enjoy your scratchbuilding!
- 255 replies
-
- 3
-
-
- granado
- bomb ketch
- (and 2 more)
-
Wow Bob, outstanding! She's a beautiful model - you should be proud!
- 1,477 replies
-
- 2
-
-
- essex
- model shipways
- (and 1 more)
-
Awesome Augie, words aren't enough! Wonderful work as usual!
- 2,191 replies
-
- 2
-
-
- confederacy
- Model Shipways
- (and 1 more)
-
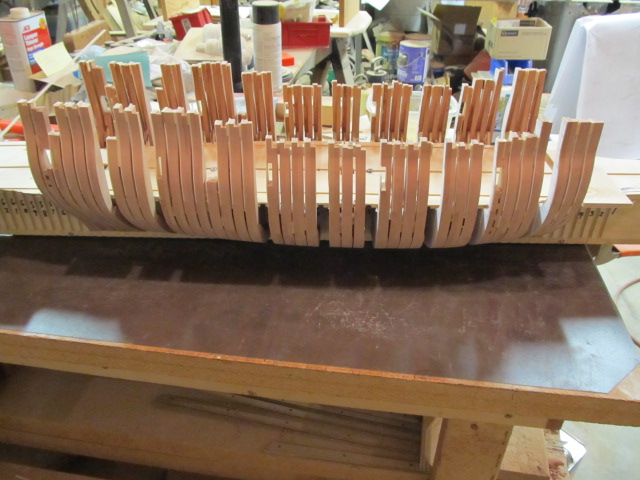
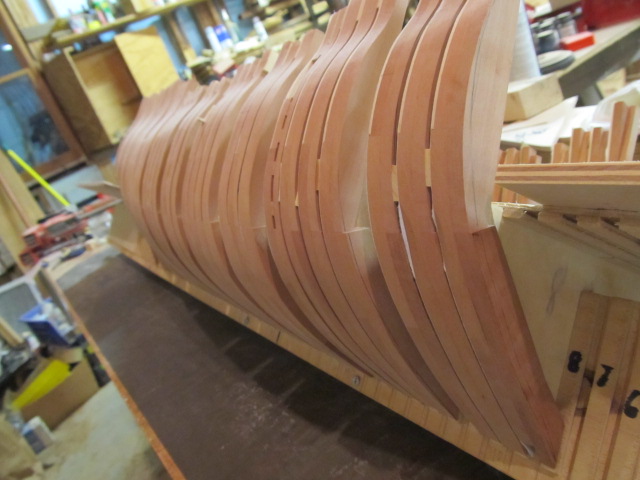
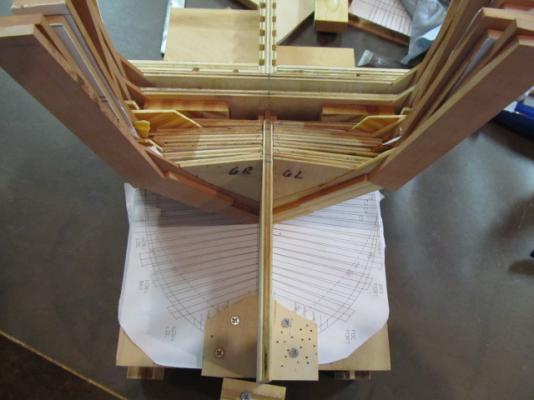
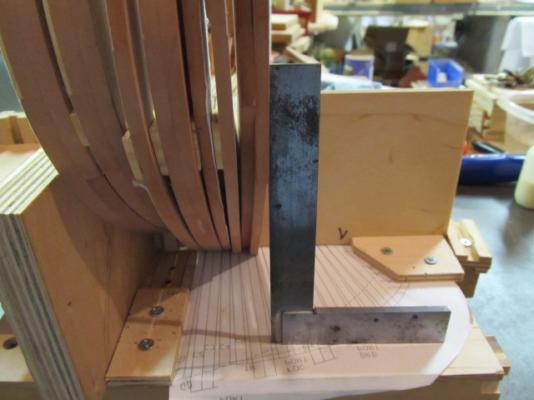
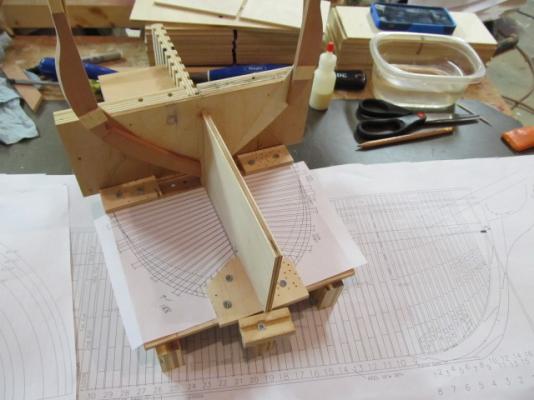
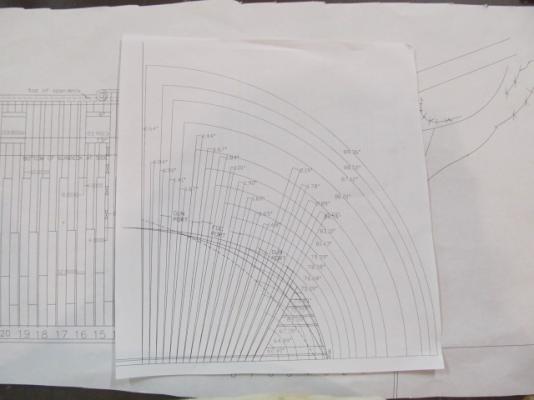
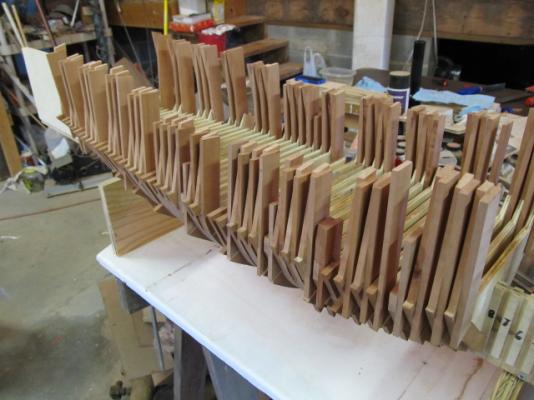
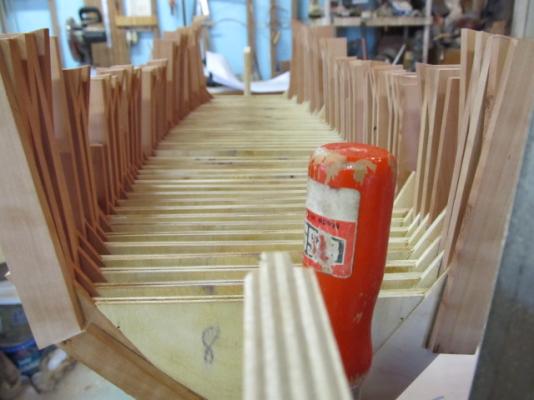
I've finally begun work on the dreaded forward cant frames. Since I did not want to commit this to the model without knowing if my plan would work, I decided to build a jig\mockup to work on this off the model. If everything goes to plan, or even if I have to redo things, once all is good I can transfer the pieces to the model. I hope. I'm still using the plywood bulkhead method. Once I get all the angles and such cut on the ply, then I'll start to add the pear.

-
THE 74-GUN SHIP by Jeronimo
cookster replied to Jeronimo's topic in - Build logs for subjects built 1751 - 1800
Hi Karl, I just ordered these plans and volume 1 of this series. Looking forward to seeing your build! -
Essex - Process and corrections to the new Model Expo Kit
cookster replied to samueljr's topic in Wood ship model kits
Thanks Bob, hope all goes well for Sam! -
Little late to the party, but I finally stopped putting this off and ordered the plans and Vol 1 of the books. Seems I can't help myself.... Whether I'll ever build a French 74, or any 74, who knows? Just reading these should be great fun... And inspirational I need to try my hands at true POF at least once before I kick the bucket one day, just gotta pick the right subject. If I go with an American 74 there's only a few choices, and I'd have to draft my own plans (again...). HMS has plenty of choices in 74's, but then there's plans to find . This book series and plans seems to be complete and contain ALL the info needed to build a fine, detailed model of a '74, all in one place, even if it is a generic subject. Surely with a little work and research it could be made to represent an actual ship.
-
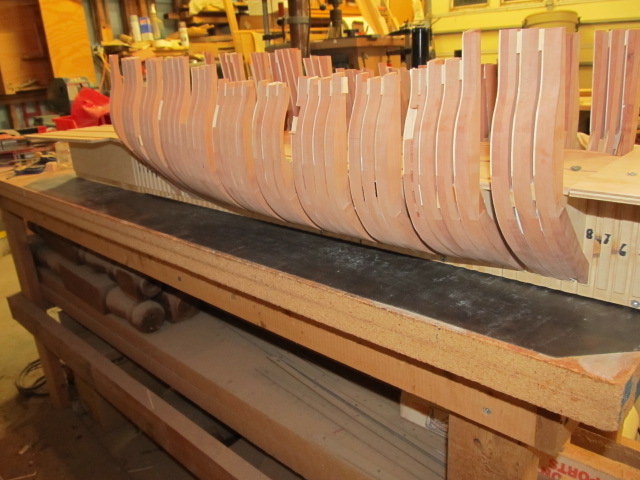
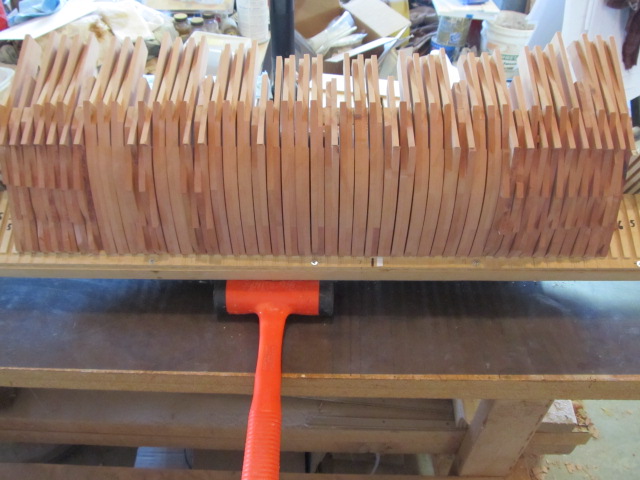
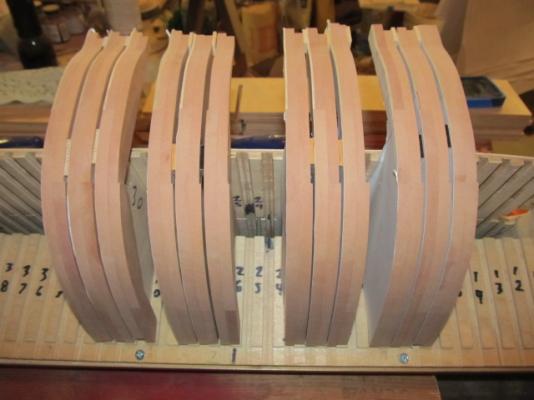
Once quick mention, I edited the first post of this log to show somewhat of a "before and after" of my frame building/design process. Hopefully new readers that come along will see that yes, there is a plan to this madness. And, I've now named my method "The Godzilla Method", or "The Alligator Skin Method". When looking at my frames before I trimmed them that's what they looked like to me... Carry on!
-
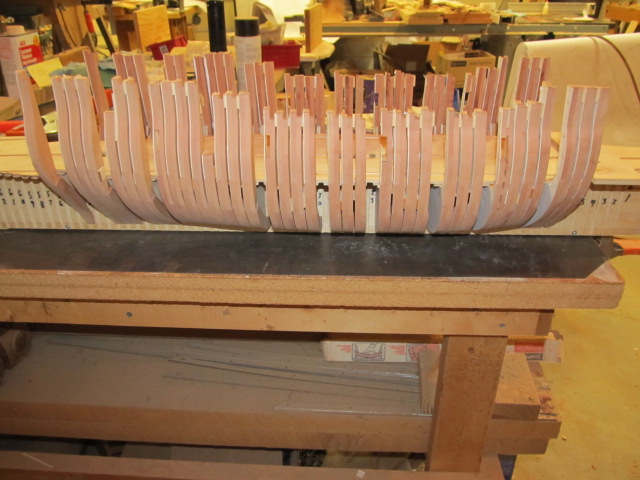
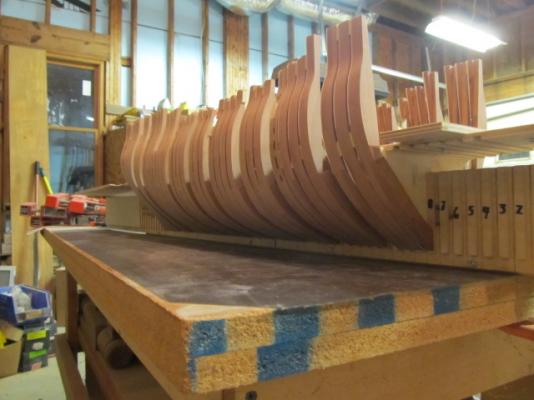
Mark, not sure if the numbers scare Augie or the fact there's so many. Actually, the total # is around 80 once you add in the cant frames - which I'm procrastinating on. I'm even dragging my heels on drawing them, cause once I get them drawn then I have to make them! Thanks Jason, glad to have you on board. Hope you have patience cause this build is S L O W .... Yes it's challenging, but I am enjoying designing and building my Essex. I just hope I don't screw up somewhere down the line and not do her justice.... Here's a couple views of the bottom, and the until now unseen planked (plywood bulkhead side) And yes this proves I did not accidentally grind away any bulkheads...
-
Nice job on those sheaves! Really looking good...
- 2,191 replies
-
- 2
-
-
- confederacy
- Model Shipways
- (and 1 more)
-
Numbers? OK, guess that comment went over my head... Ships' Cat Augie, I can report the shaping task using the grinder came off fine. What would've took me an hour by hand took at most 10 minutes. Love me some power tools.... (insert Tim Allen grunt here)
-
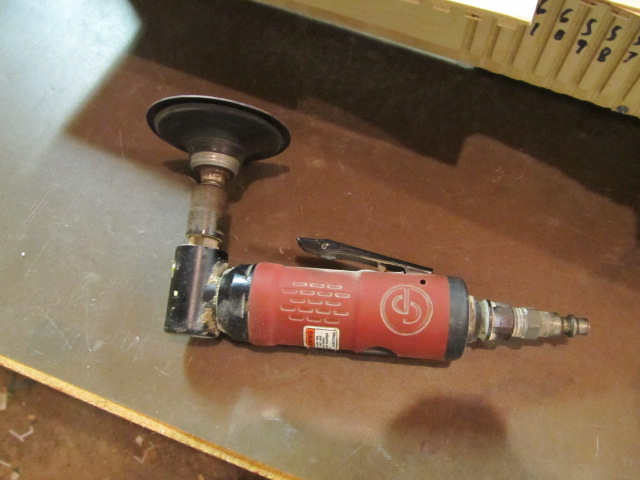
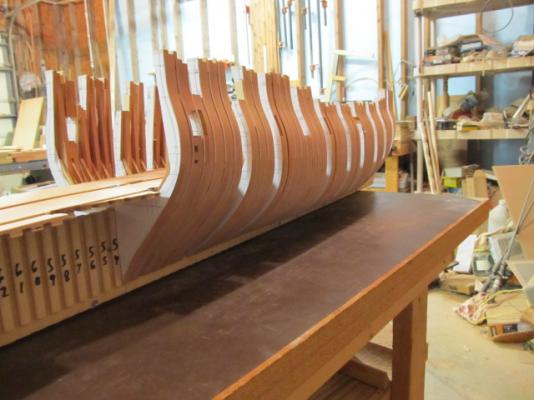
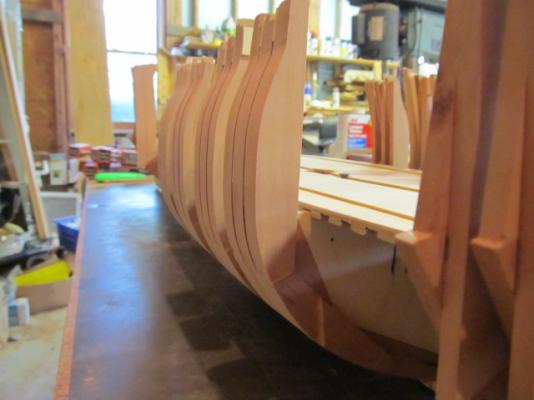
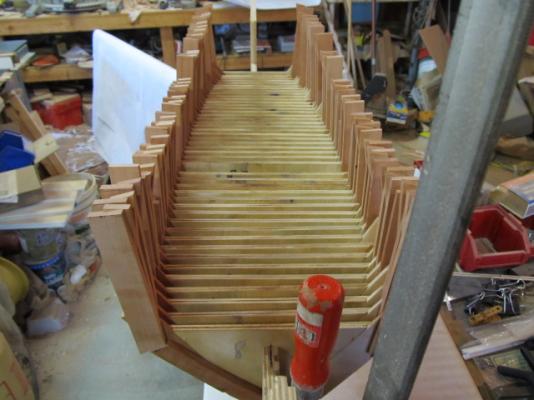
Augie, thanks for correcting my nautical terms. Aye-aye, midships it is. Here's where we are today. All the square frames (except several gunport frames as previously described) are cut and rough faired on the outer face. On to the rest of the gunport frames now. Darn hull is so big it's hard to photograph. I hope these pics give you an idea of what she looks like/will look like. Here's a close up of some of the gunports roughed out, here you can see fillers, spacers, extra blocks and such I've added while fairing. Starting to come together I think. Getting the rest of the gunport frames in and adding a few battens should hopefully show her lines. Now one final thing, sanding the plywood bulkheads on the planked side is really difficult. That plywood I bought is tough! Eats 60 grit paper like candy. So, now that I've reached the areas where a lot of beveling are required (which I've been doing all by hand so far) I'm grabbing this puppy. Yes,, Yes, I know the risk, I recommend you DON'T try this at home unless you really know what you're doing. Oh, and I hope Augie doesn't pass out when he sees this!


-
Mark, she's coming along beautifully! Love the pear planking, and congrats on sticking with the ebony. You seem the be making it work quite nicely! It's a shame you're covering up all that framing though.... (sorry, just had to get that in there )
-
Bob, WOW! That photo one page back (pg 93) is amazing! I guarantee that if I ever get to rigging my Essex your rigging will be my guide. As others have said, thanks so much for ALL your photos and taking the time to document building your model. Amazing!
-
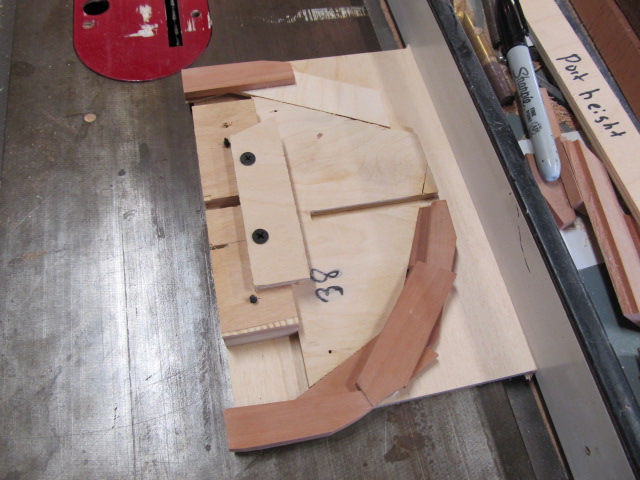
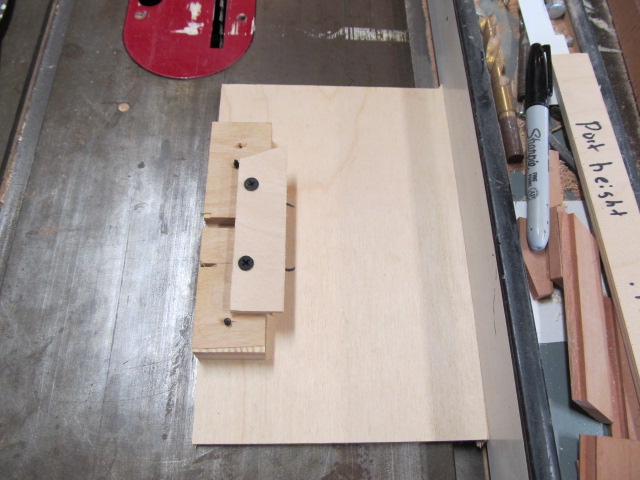
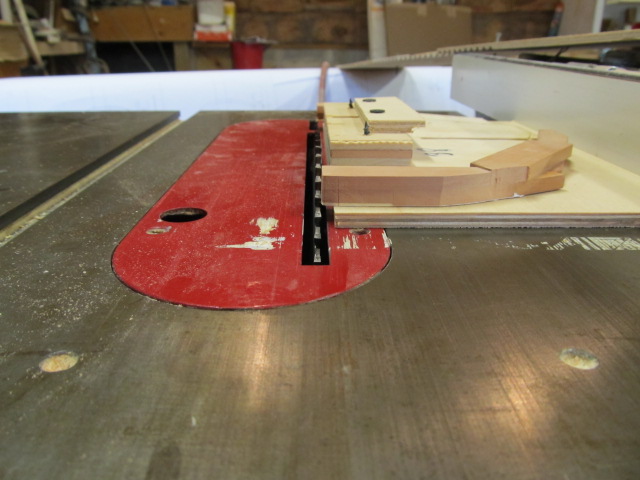
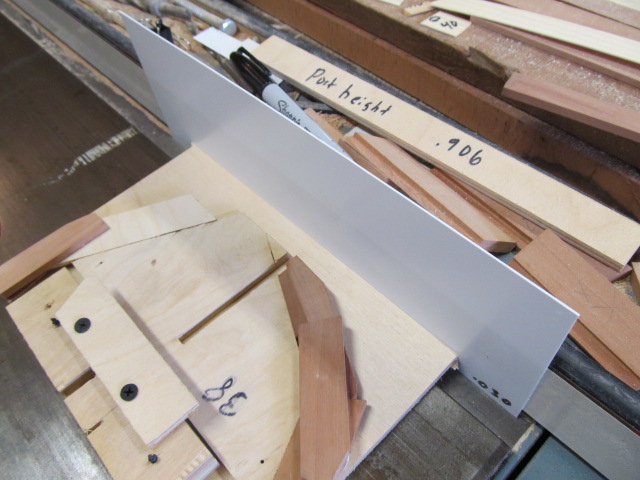
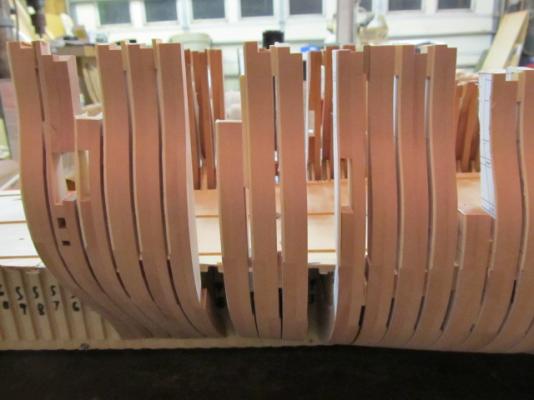
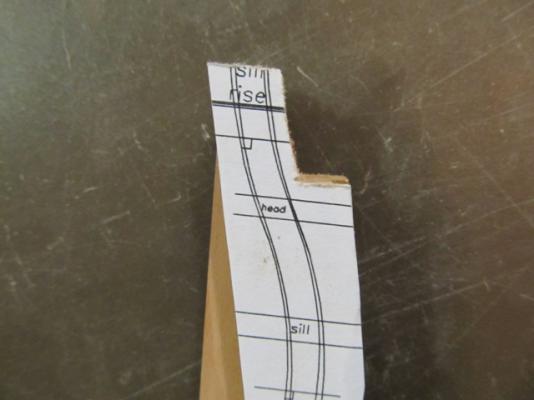
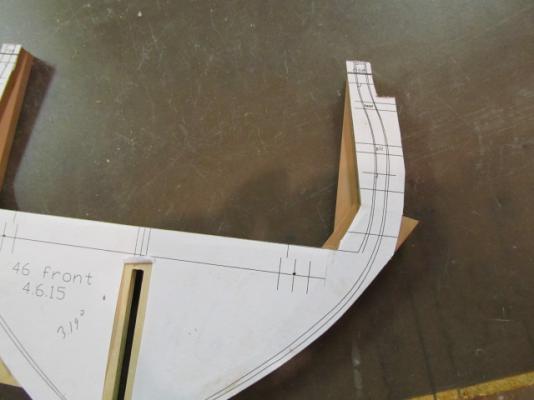
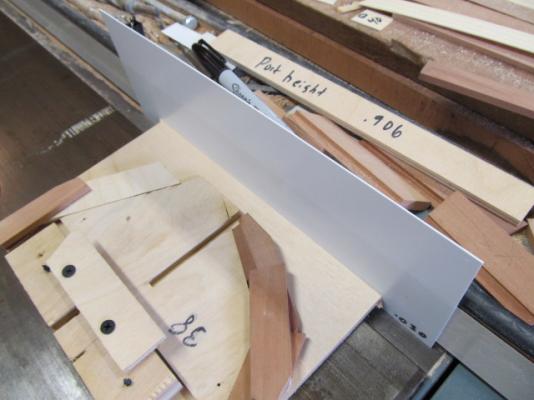
It's been a while since I posted any how I do stuff on this build since there has't been much new going on. Mostly fit, sand, check, sand again and so on. I have taken a bunch of pictures just haven't posted them. I'll go ahead and show cutting the frames for gunport sills. These are some of the trickiest cuts to get right, if I screw up these cuts my gun ports won't be fair and that will bother me a lot. These cuts have to be in line with each other (same height port and starboard), parallel with the keel, and some of them angle with the sheer of the deck. For now I'm only cutting out a few gunport frames, I'll call them "control frames". They're at the ends and middle of the hull so I can double check the remaining ports sills with my frame patterns. I'm checking the fairness of the sills as I go and everything seems OK so far. To cut the gunport frame at the correct height and angle I'm using my table saw. Since I still don't have a Byrnes saw or disk sander, this is the most accurate method I have. I built a sled the frame rides in, and the saw fence sets the distance from the blade. I angle the saw blade, make a test cut, and use a dwg of the angle to double check the blade tilt before making the final cuts. On my frame patterns I have marked the sills, headers, and other needed info. When cutting to the line, I cut long and then come back and trim. To get somewhat accurate amounts of "trim", once I get close to the needed line I use styrene sheets of various thicknesses to get to the final cut. I don't move the fence, I add shims. With the shims I can adjust down to .005" with this method, here I'm using a .030 sheet to get to the final cut line.


-
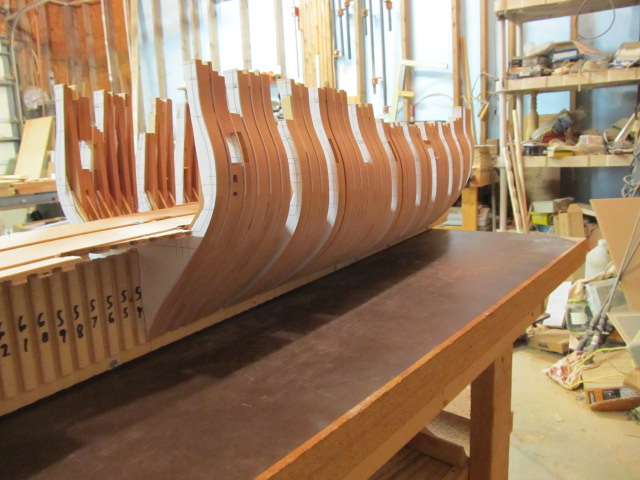
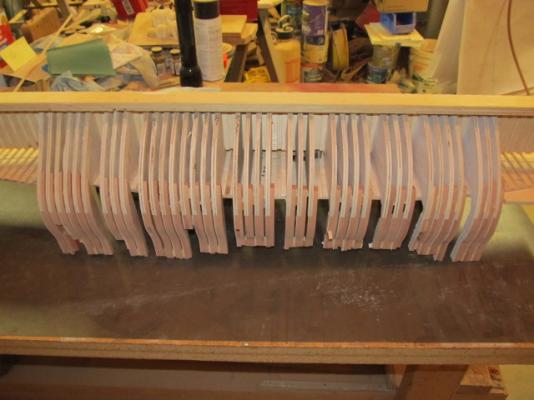
Few pics of where I'm at today, almost have all the square frames done minus several gunport frames, on the outside face. Still have to cut and fair the inside face. See, there really was a ship's hull underneath there....


-
Time for a quick update. First, been a while since I said it but thanks again for all the likes and for looking in. I know this build is very slow and unusual, I hope one day this all pays off. I'm currently cutting and rough fairing the frames and also planning how to handle the forward cant frames. As usual it's a tad bit different.... pics


-
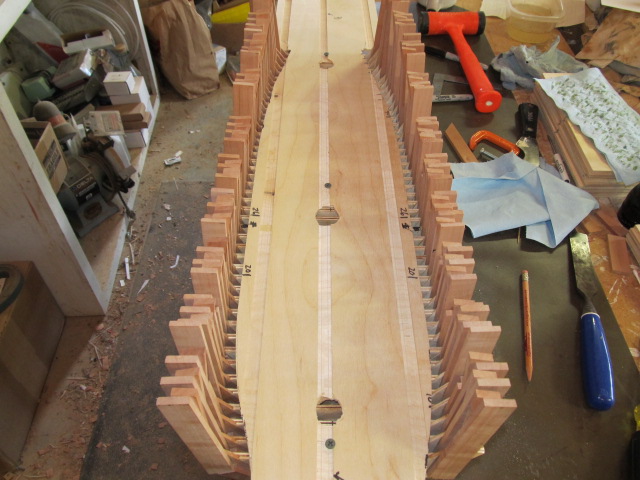
I finally hit a milestone today! All the square frames are made (but not completed yet), and I finally got the deck support platform (not really a false deck) cut and fit. This platform has dados on it's underside that locks the frames in square, sets the frame spacing, provides the base to attach the gundeck supports (yet to be made) and clamps the frames to the canter bulkhead with screws. Glue will be added much later. I can take this assembly apart at will while fairing the frames, etc. Now to finish rough cutting and rough fairing the frames, and to figure out how I'm going to handle the front cant frames....


-
Tom, I just got caught back up on your build. Your transom looks great! Also all the other mods you've made for the 1812 look, especially the gundeck. I wish I'd done that. She's gonna be one fine Conny model for sure, keep it up!
- 1,350 replies
-
- 2
-
-
- constitution
- model shipways
- (and 1 more)
-
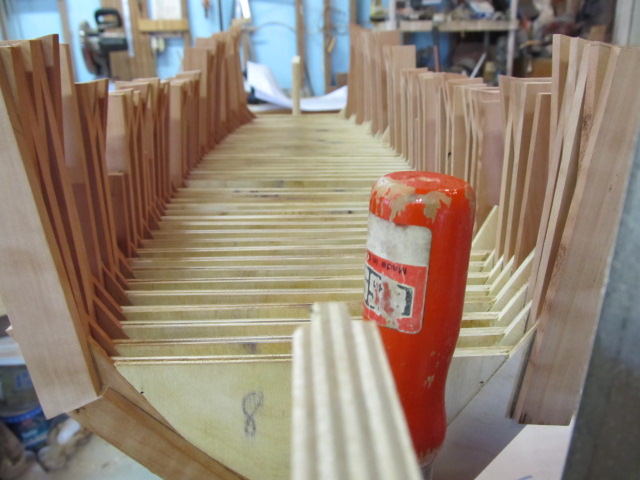
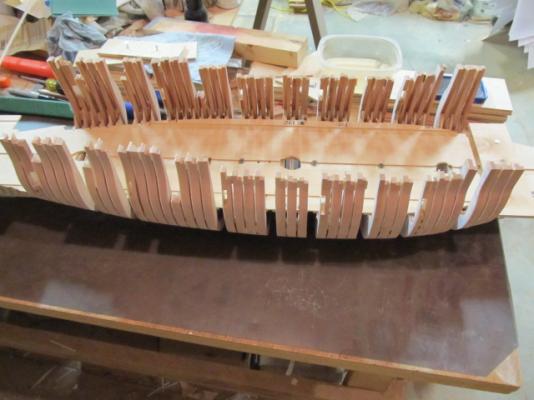
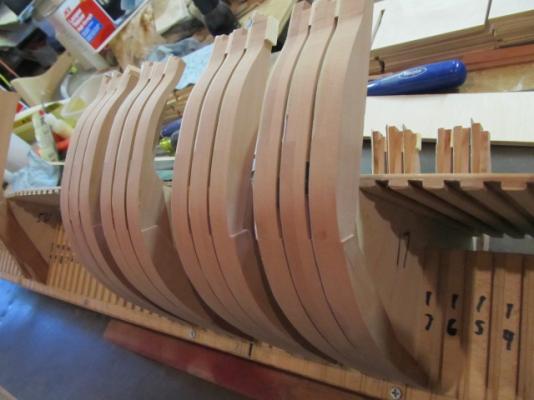
Here's a coupe overall pics. It still looks like alligator skin, and I realize most of you still can see where this is going - but it is coming together. All the frames without gunports are done, I'm now working on the frames that extend into the gunports. My method for those is also a little different (imagine that!) but I think accuracy will be the easiest to obtain the way I plan to do it. Basically I'm making the frames long (extend into the gunport), then will come back and trim them to length once everything is fair. After that I'll make the gunport header and frame extensions as a separate piece, fit it, and fair it. Also keep in mind the top of the plywood bulkheads is not the gundeck level, the gundeck will sit above the bulkheads on spacers. BTW, if there was a contest for most cluttered workshop, I'd be in the running.
-
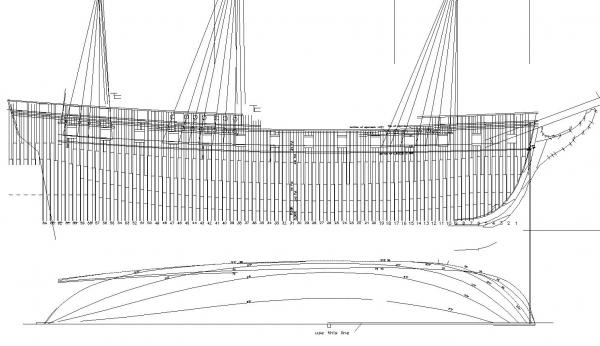
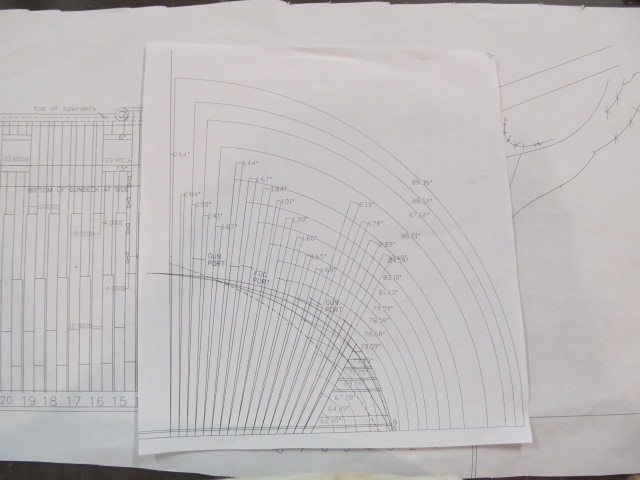
Hi all, quick update. I have some construction photos but I'll post them later this weekend after some more more progress. I can finally show my dwg. It's not finished but is far enough along now where you can definitely tell where I'm headed. My latest efforts have been focused on some nagging details, especially the quarterdeck and forecastle deck port locations. Or more correctly for my 1814 time period, the spar deck. (The quarterdeck and forecastle were joined into one continuous deck with the forecastle deck raised slightly, and upper bullwarks installed in the 1808-09 rebuild). I also finally started drawing the channels, deadeyes and shrouds to check gunport clearance. After all the changes, mistakes, and revisions I've had to make it's starting to all come together on paper, and most everything fits the source drawings. Sometimes I have to "interpret" things, and that makes me nervous, but when cross checking my various source drawings if they all mostly agree that's the best I can hope to achieve. The spar deck ports have been difficult to determine, as there are conflicting sources on there number and placement. Baker's sail plan of 1808-9 shows 6 ports on the quarterdeck, with 1 still fouling a mizzen stay. She was originally built with 5 ports, but that was changed and is indeed a documented fact (yeah for proof !). Josiah Fox and Portia Takakjian both say there were 7 ports but I could find no source to show their placement. I was starting to worry and doubt myself so I reached out to USS Frolick and he pointed me right to the data in "The Frigate Essex Papers", that was right under my nose the whole time! So after feeling stupid for a bit I was able to move forward with confidence. I'm primarily using "The Frigate Essex Papers" and "Anatomy of the Ship Essex" and the drawings contained in both volumes as my research material. I just ordered Chappelle's "History of the American Sailing Navy" and Lees "Masting and Rigging". I've also read through Goodwin's "English Man of War", Longridge's Victory book and Ed Tosti's "Niaid Volume 1". All have provided lots of info and knowledge. I also must again thank USS Frolic (Steve) here on MSW for his invaluable help on details and research! With his help and knowledge I feel like my efforts will result in a somewhat accurate 1814 Essex. Next on my research list is her 1814 armament, Steve is also helping me with that. I'm going to order a couple carronades and long guns soon that I think will work to see if they fit the bill. One last bit of housekeeping, I'm going to go back and edit my first post to show my research details and such, I was waiting until I got far enough along to be knowledgeable enough to do so. Most, if not all, the logs I've seen by the folks who really know what they're doing do this. I should probably copy them on that. Thanks again for the comments and for looking in!