HOLIDAY DONATION DRIVE - SUPPORT MSW - DO YOUR PART TO KEEP THIS GREAT FORUM GOING! (89 donations so far out of 49,000 members - C'mon guys!)
×


EdT
-
Posts
2,214 -
Joined
-
Last visited
Content Type
Profiles
Forums
Gallery
Events
Everything posted by EdT
-
Druxey, I noticed this morning that on my Victory model I located the crojack brace pendants well in from the yardarm - likely based on the rigging notes in Longridge. How soon we forget things. Completely forgotten and the early sources completely overlooked in solving the YA dilemma. Ed
- 3,618 replies
-
- 2
-

-
- young america
- clipper
- (and 1 more)
-
Thanks, Druxey. I do not have that Steel reference and did not think to look in Lever, but there it is. This is how we learn. Rob, you will have to do some research to find a solution to the topsail brace/sail interference. I will be interested in the solution. Apparently crojack sails were not used until the 1840's and then only in certain conditions - like long spells with the wind directly aft. Good luck. Ed
- 3,618 replies
-
- 3
-
-
- young america
- clipper
- (and 1 more)
-
Thanks everyone. Its been great having your comments and support throughout the project and for earlier work as well. Its one of the best parts of this community. Time flies when you are having fun, Greg, but you are right. It goes fast. Druxey, thanks for the input on mizzen braces. Its really so obvious a solution, but like so many good solutions, it needs documentation for authenticity. I never gave this issue a thought until actually running the lines, Then panic, then Underhill to the rescue. May be there in other sources, but haven't found it yet. Ed
- 3,618 replies
-
- 5
-
-
- young america
- clipper
- (and 1 more)
-
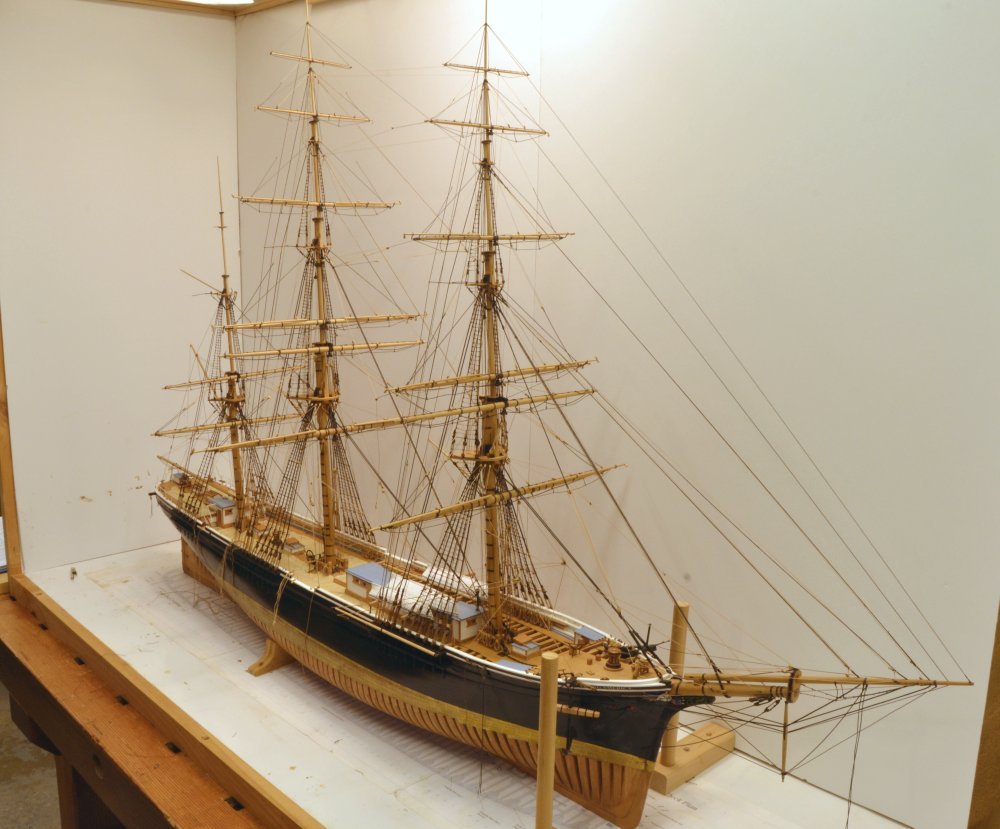
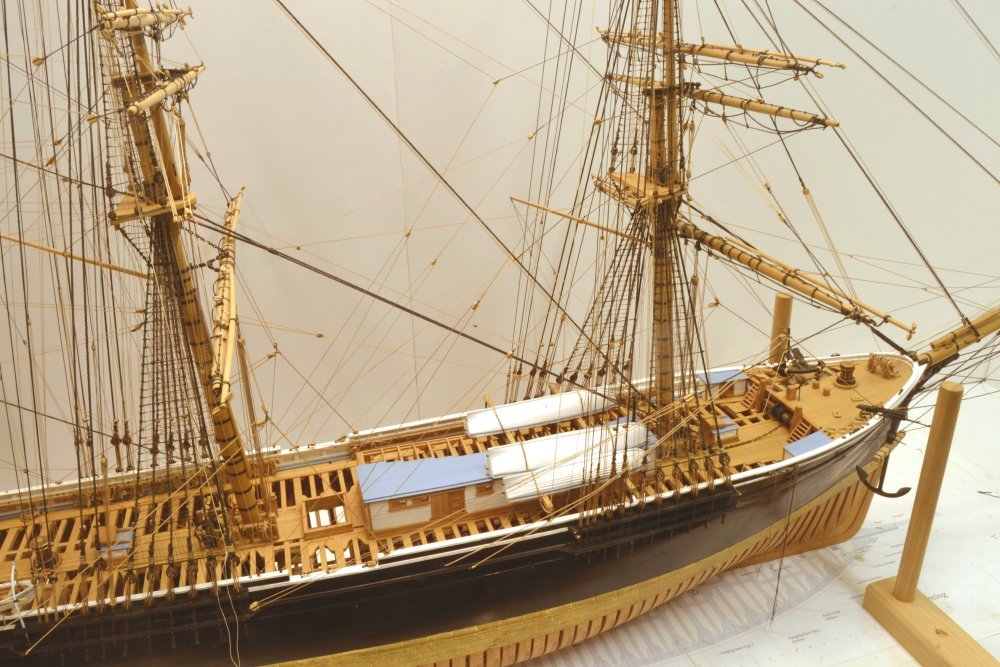
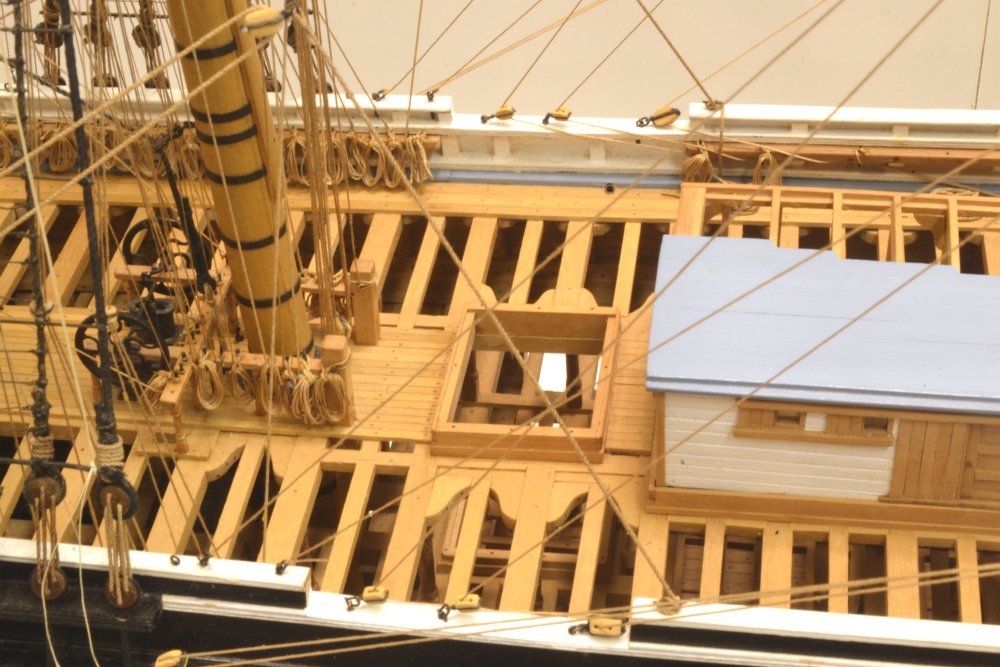
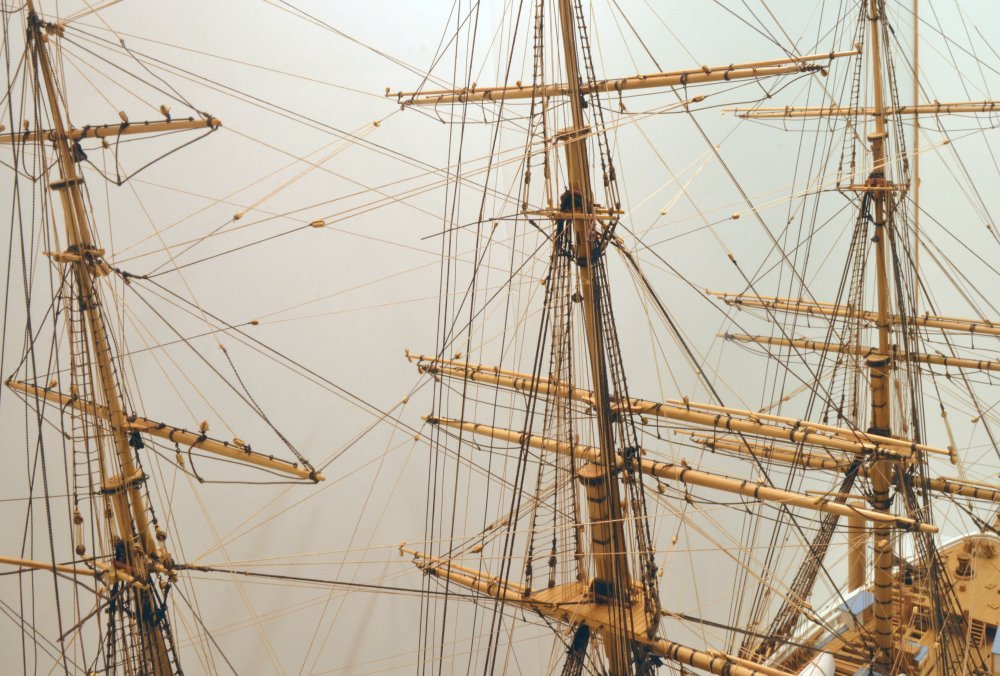
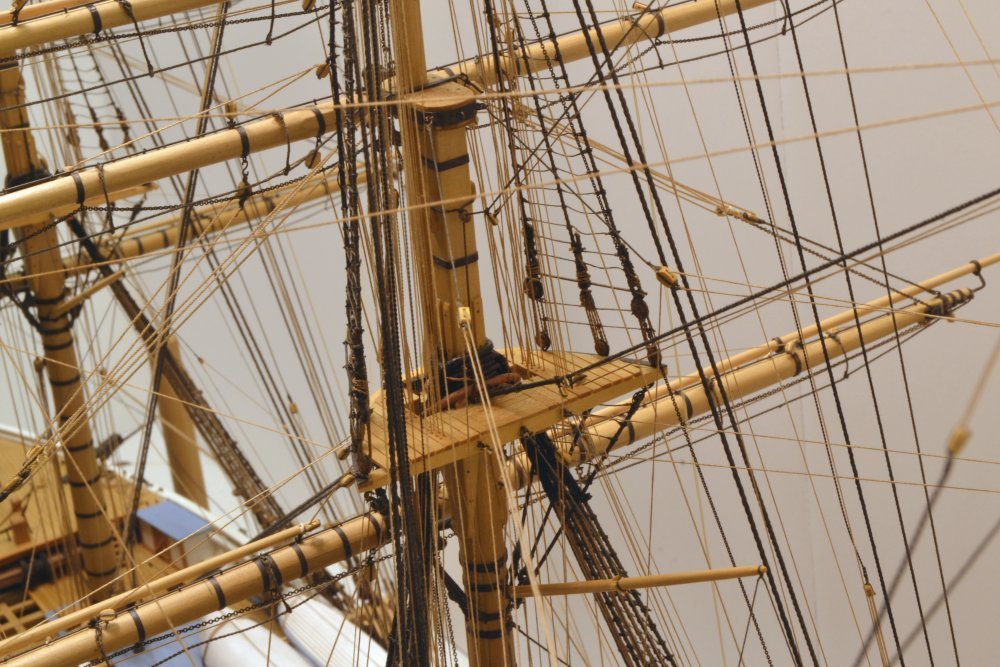
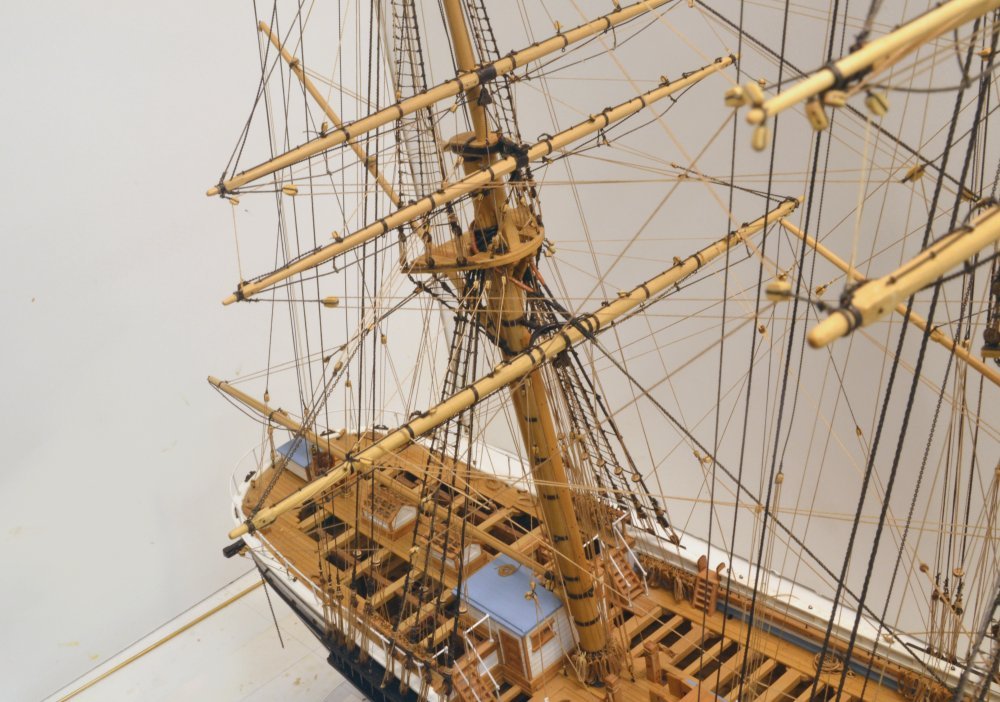
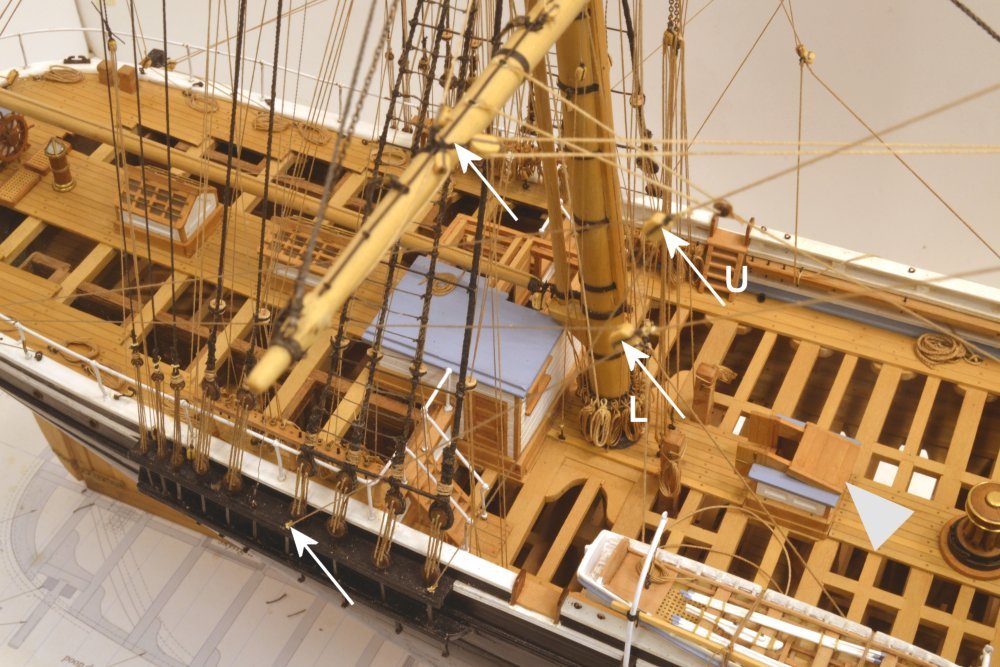
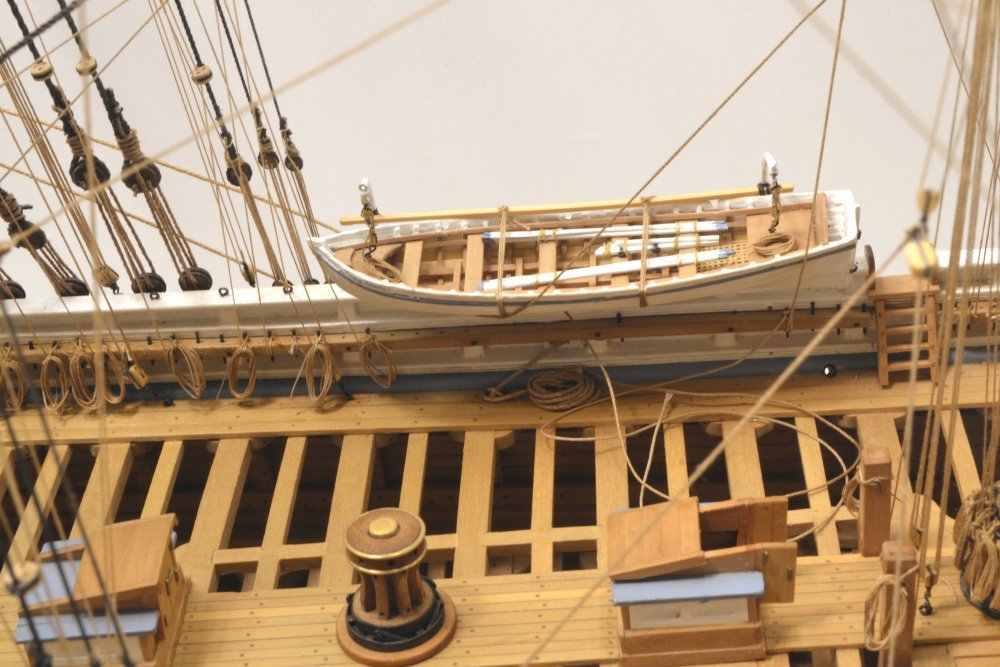
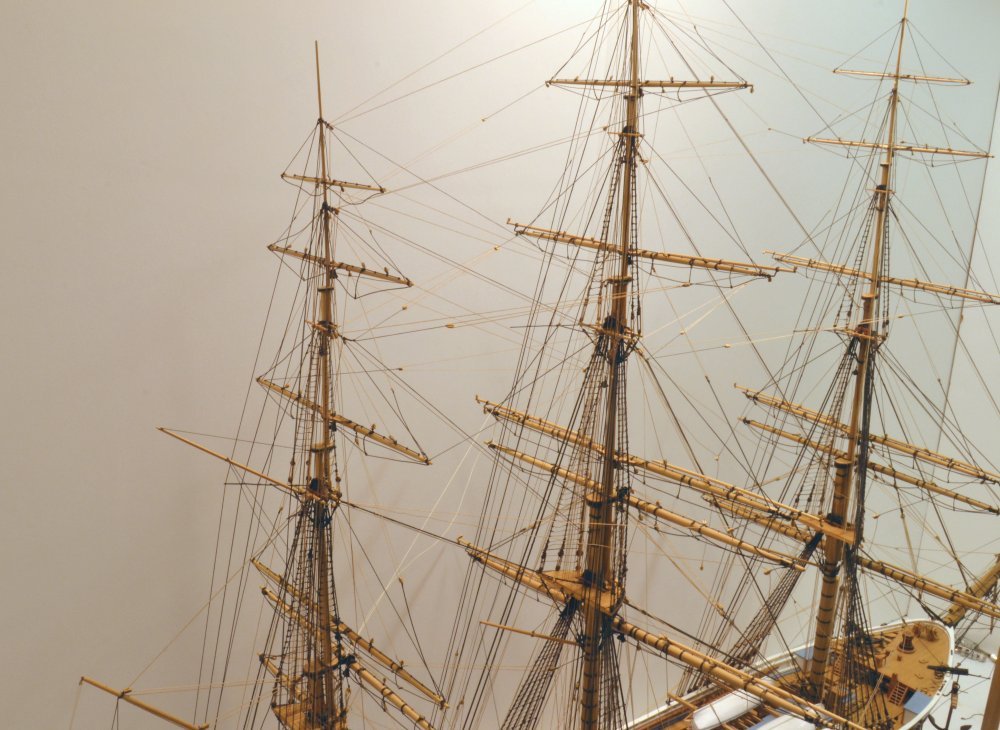
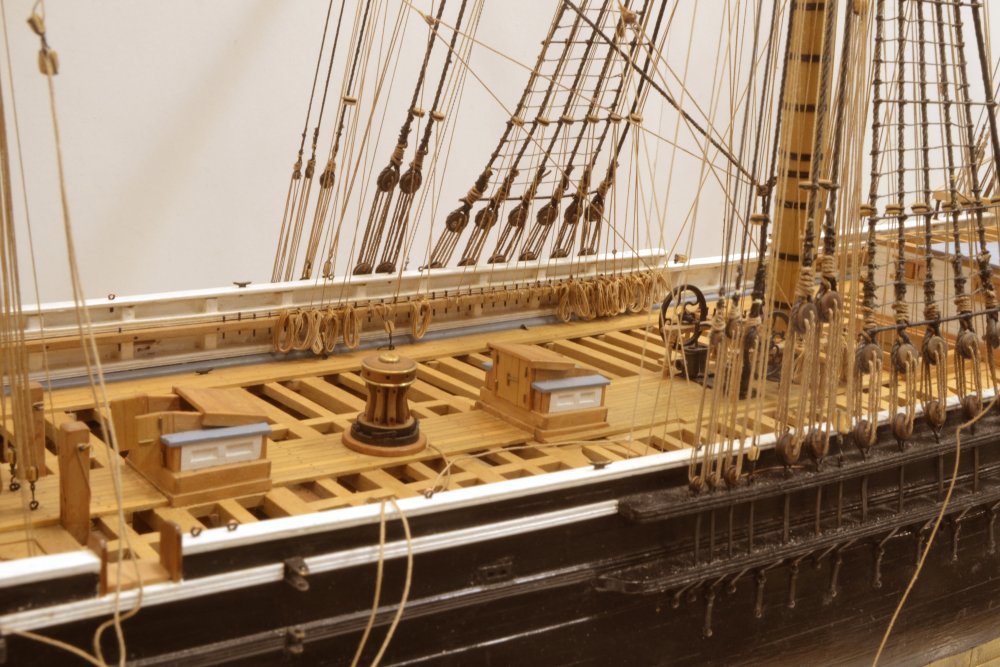
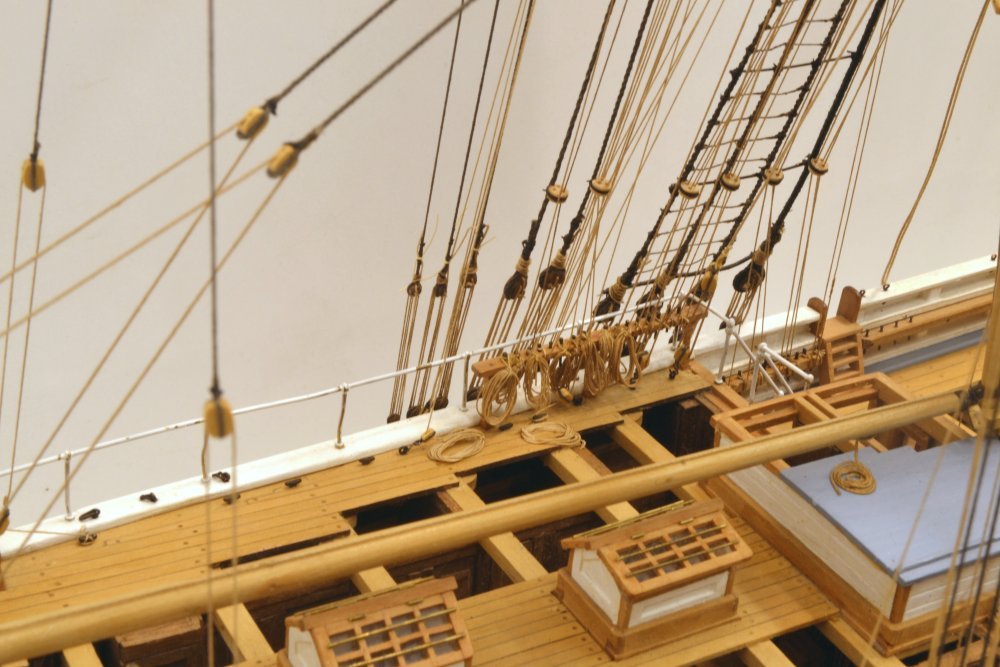
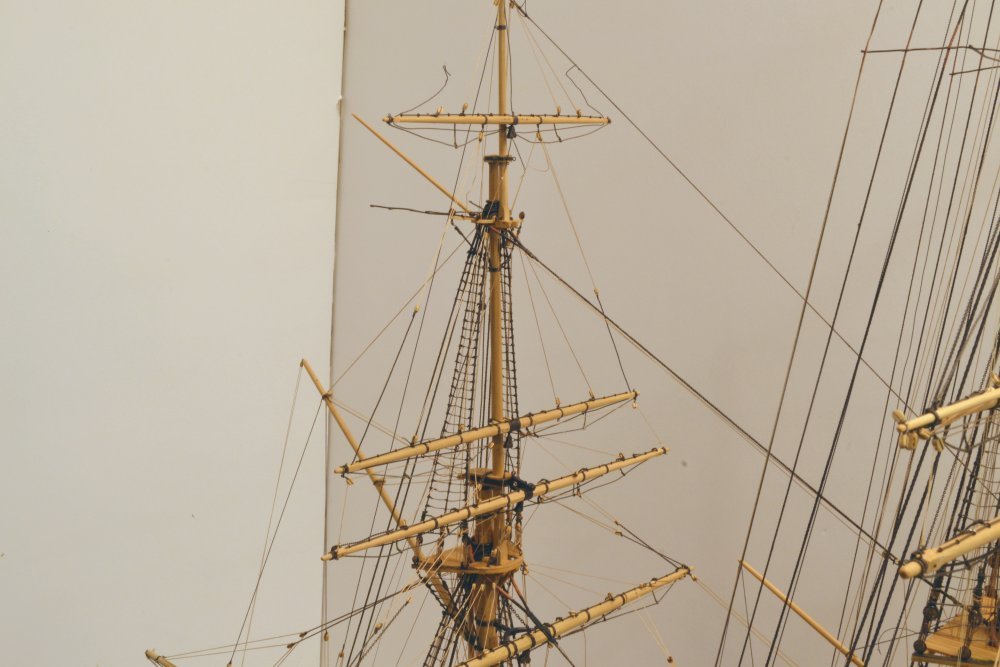
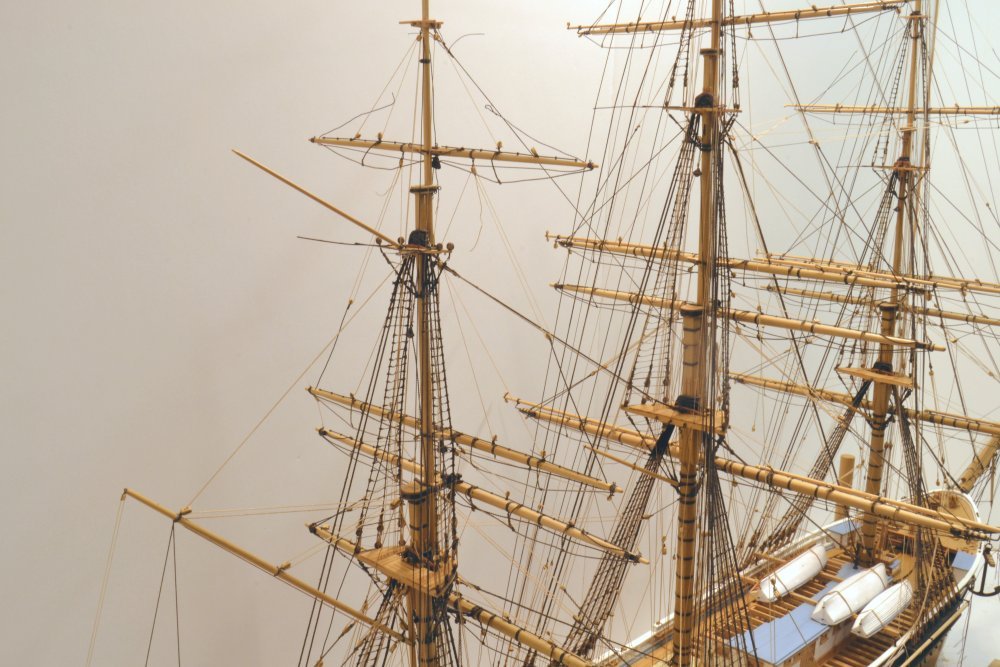
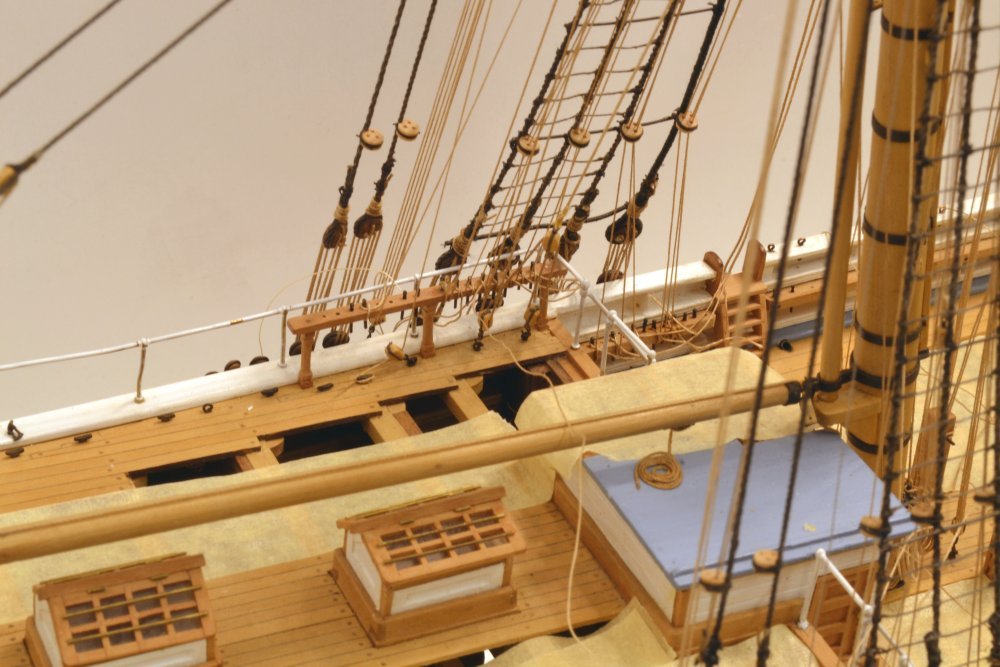
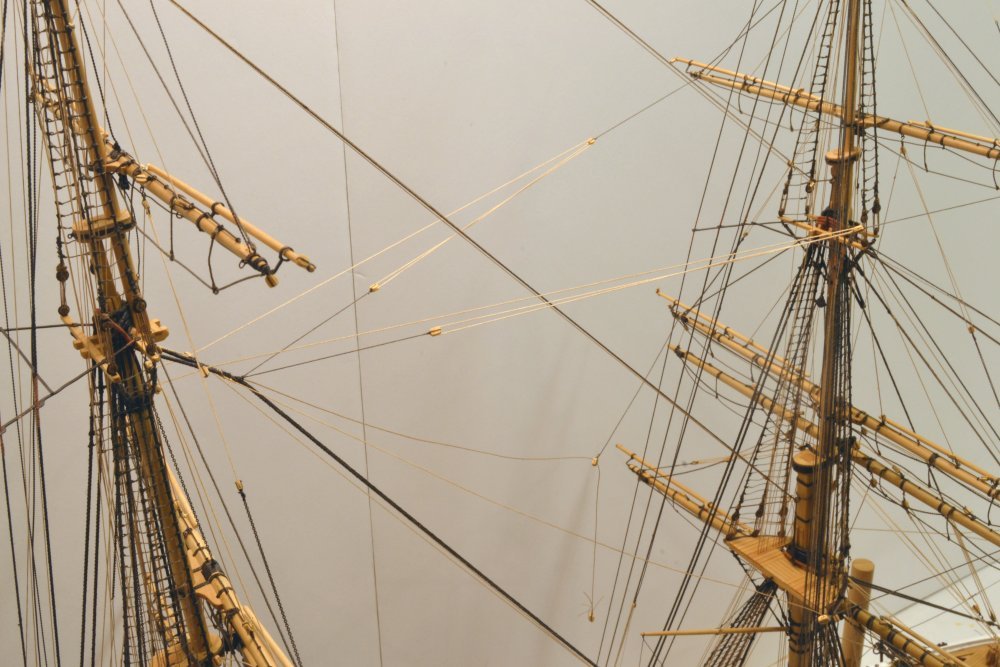
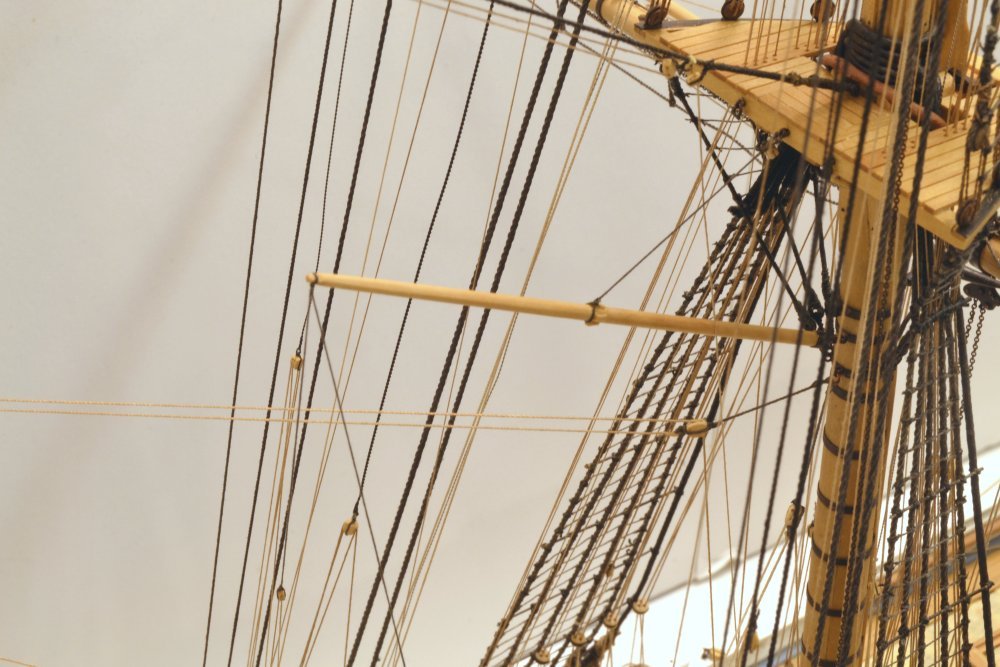
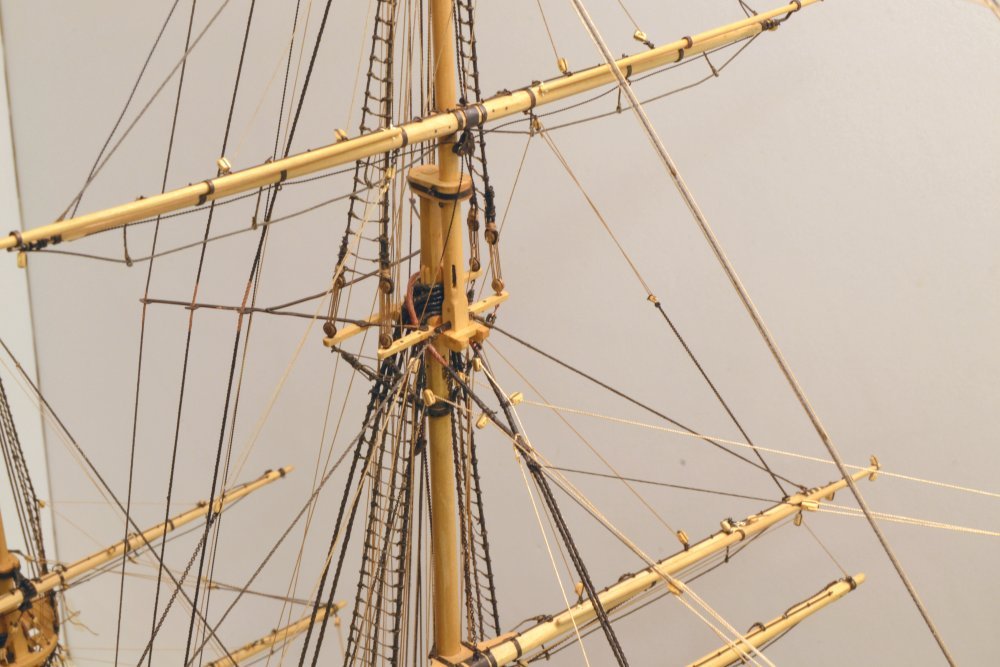
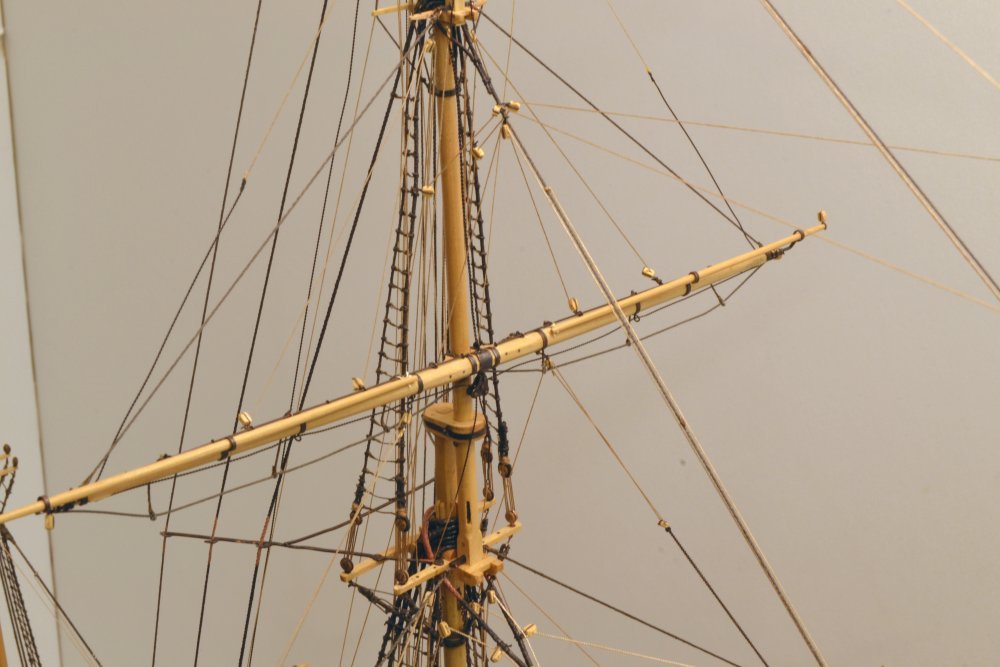
Young America - extreme clipper 1853 Part 322 – Running Rigging Home Stretch After almost 6 years living and breathing Young America, I can finally see the end in sight. Another day or two should see the last lines run and, thankfully, the last rope coils hung. From there it is just a matter of tidying up. Rigging the yard braces has been interesting and enjoyable work. The first picture shows the bracing of the lower three yards on the foremast completed. Braces for the double topsail sails and the fore course were added once there was no further need to get my hands in the space over the cabin – at least that is what I thought. Braces were installed working from top to bottom to keep the lower deck area open – the opposite sequence to all other yard rigging. The falls for these braces run through lead blocks on the main rail amidships as shown in the next picture. The lines are then belayed on the main rail. This opening in the main rail, that replaced the original small entryway, was probably added a year or so after launch when the double topsails were adopted. The entryway was moved aft. Aft of the mainmast things begin to get more interesting. The next picture may be a clue. Upper main braces run aft to lead blocks on the mizzen, while all the mizzen braces run forward to the mainmast before descending to the deck. This is a bit of an access nightmare. The next picture shows the area behind the main masthead where the mizzen topsail braces converge, the uppers to pendants shackled to eyebolts in the cap, the lowers to eyebolts and blocks under the top. Unfortunately I had neglected to install the shackled eyebolts in the cap, so the cap and band had to be drilled and the shackled eyebolts inserted between all this rigging. I hate to admit this. The main upper and lower topsail braces presented an interesting problem that took me about a week to resolve. These and the main braces run aft to blocks on the boomkin and thence to the poop deck. This is pretty much standard clipper practice, and quite evident in the two YA photos. These lines each consist of a yard pendant, a running part that runs from the throat of the mizzen topmast stay through the pendant block, the running end of this is seized to a single block. The falls run through this block to lead blocks on the boomkin. This arrangement is fairly straightforward, except that there is major interference between these lines and the lower mizzen braces that run forward from their yardarms to the main mast. These would also interfere with the mizzen lower sail when set – a lesser problem. Various arrangements were tested. I finally settled on the solution Underhill describes in his book, which involves moving the mizzen lower braces inboard on the yard, allowing the main topsail braces to run clear outboard of these. The relocated crojack braces may be seen in the next photo. The main topsail yards are in the upper right corner but the lines are hard to follow in this picture. The next picture may help. The arrows U and L point to the blocks at the end of the brace running parts for the upper and lower yards respectively. The arrow at the yard points to the relocated crojack brace block. The eye for this has to be on top of the yard so the block will be over the jackstay where it will not interfere with the sail. The arrow at the lower left points to the standing end of the lower brace fall where it is seized to #4 chainplate. The upper fall is seized to chainplate #1 to the right. The next picture shows the lead blocks for the two braces at the boomkin and their belaying cleats on deck. The fall of the main brace will run through a third block at the outer end of the boomkin. The next picture shows the falls running to the boomkin blocks on the port side. This solution is consistent with the photos of the ship and has some documentary support, so I am quite comfortable with it. It leaves the issue of interference with a lower mizzen sail, but I suspect that could be tolerated or circumvented when that sail was used. The last picture shows the cutter slung inboard on the davits, finally, after 3 years in a box. The picture shows the next, and perhaps the last remaining rigging riddle: what to do with the crojack, sheets, tacks and lazy tacks. In the picture the latter two are belayed under the boat, awaiting a more acceptable solution for these idled lines. Next time for that – and for the main yard braces that are still left off for access. Then tidying up. Ed
- 3,618 replies
-
- 46
-
-
- young america
- clipper
- (and 1 more)
-
Thank you, erik - for your comments and for posting the Sorlandet clip.
-
These are great clips, Sailor. thanks for posting. Ed
-
Thanks, again for the comments and questions. Maury, yours is easier so I will answer that first. The answer is: I have no idea. A ome will have to be found for this at some point - a problem for later. Greg, I believe an entire book could be written about what to do with rigging when there are no sails to attach lines to. Writing such a book would require much more knowledge than I possess. The question arises on virtually every running rigging line on a model without sails. Exhaustive examination of as many old photos as I could find, has yielded little in the way of common practice - or attention to any order. I believe much depended on preferences and am not convinced that modern practice is representative of past practice. Also, we need to consider that a big clipper like YA carried a crew of only about 50 (compared to ~800 on a 1st rate or ~300 on a frigate - both with half the sails) - not a lot of manpower to devote to appearance in port. It seems that very much of the modeling is left to our own devices. The specific lines you reference, lower sheets, tacks, clew garnets, and lazy tacks, in my opinion, are the most easily resolved. Since these lines are shackled together to the clew irons on the lower sails, keeping them attached when the sail is unshackled is not too much of a stretch to the imagination. The no-sails configuration to model is another question. I have seen pictures where they are hauled up to the yard by the clew garnets and the sheets left hanging to the deck. Hauling down on the tacks/sheets is also logical, since they may be easily accessed on deck when bending the sail. Pictures of ships in port are usually not portraits of neatness and order that we would like to see on a model. My solution for these is to hold the shackle some distance above the deck and secure all the lines neatly. This is also a convenient way to add downward tension on the model yard. I handle upper yard clews and sheets in the same manner and for the same purpose. In general, I have tried to adopt configurations that leave unattached ends in positions convenient to their eventual use, for example staysail and jib downhauls and halyards tied off together at the base of their stays, bunt and leech-lines stopped at their yard blocks (although these have to be overhauled to the deck to bend lower sails) reef tackle blocks tied off to jackstays, jib and staysail sheets omitted or coiled on deck, bowline bridles tied off to jackstays. I have omitted studdingsail rigging completely except for blocks that I believe would have been permanently attached. I am sure there are many other variations adopted on models - the most frequent seems to be the omission of many lines. Ed
- 3,618 replies
-
- 12
-
-
- young america
- clipper
- (and 1 more)
-
Thanks, everyone. Thanks, Druxey, for the comment on that photo. With that picture I was trying to get the view of the ship shown in the photo taken in San Francisco in the 1860's. Almost got it, but the confines of the workshop and bench height make it difficult. Soon I hope to get it off the bench and into a better setting for whole-ship photos. Pat, there are a number of lines on the model that hook to eyebolts on the channels, specifically the standing legs and tackles on the halyards, also tackle blocks on the fore yard braces. I will discuss the braces for the main double topsail yards and their disagreements with the crojack rigging in the next post. This kept me awake for a couple nights. Ed
- 3,618 replies
-
- 4
-
-
- young america
- clipper
- (and 1 more)
-
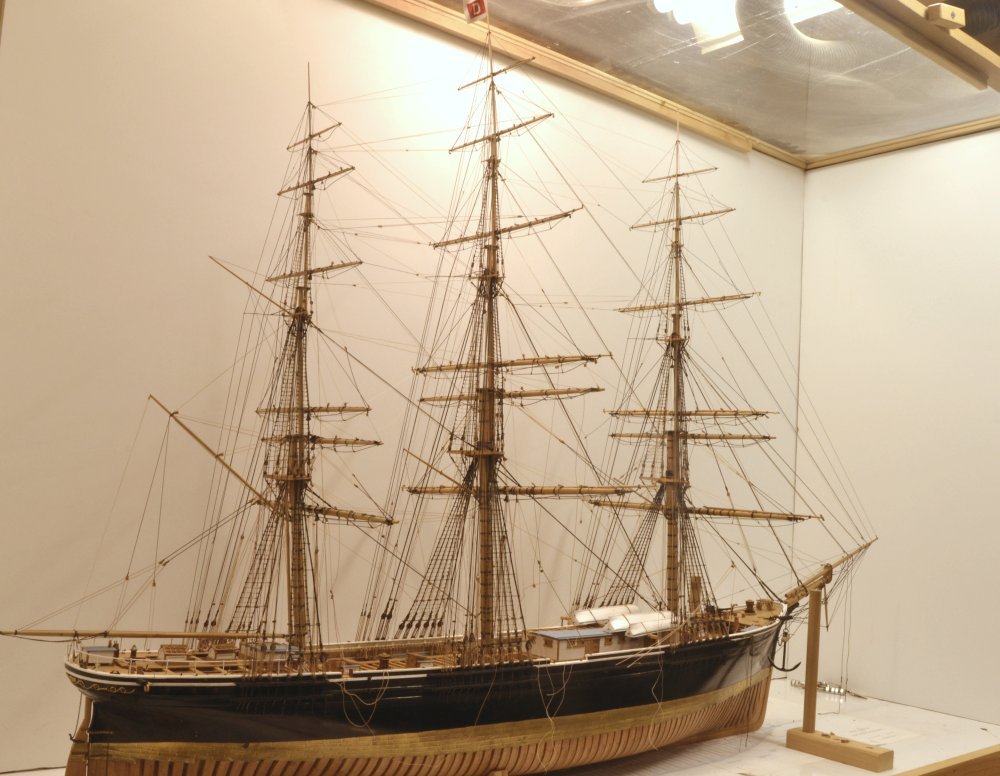
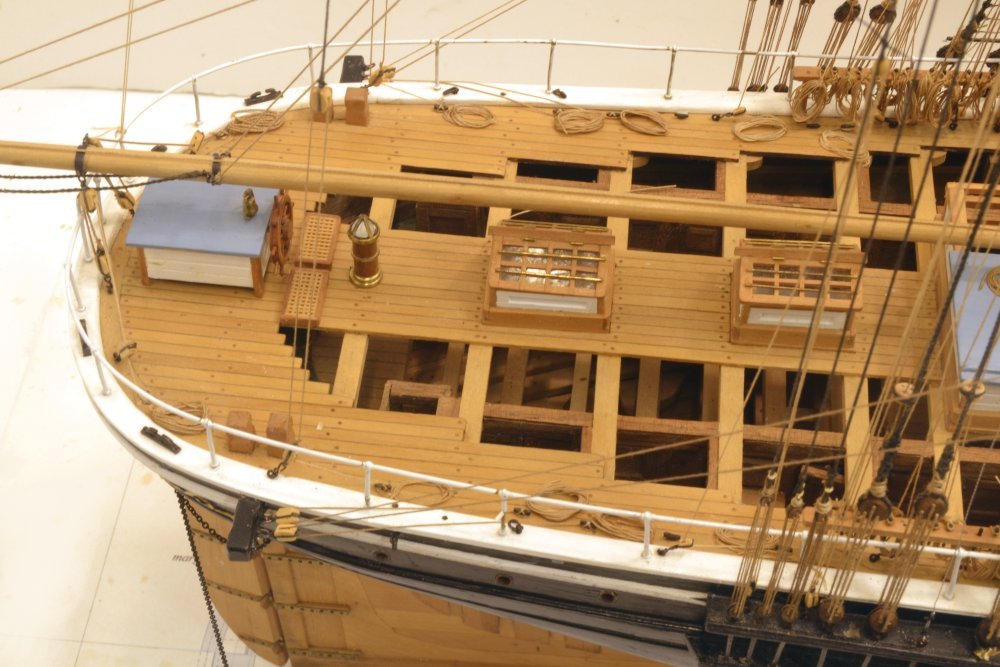
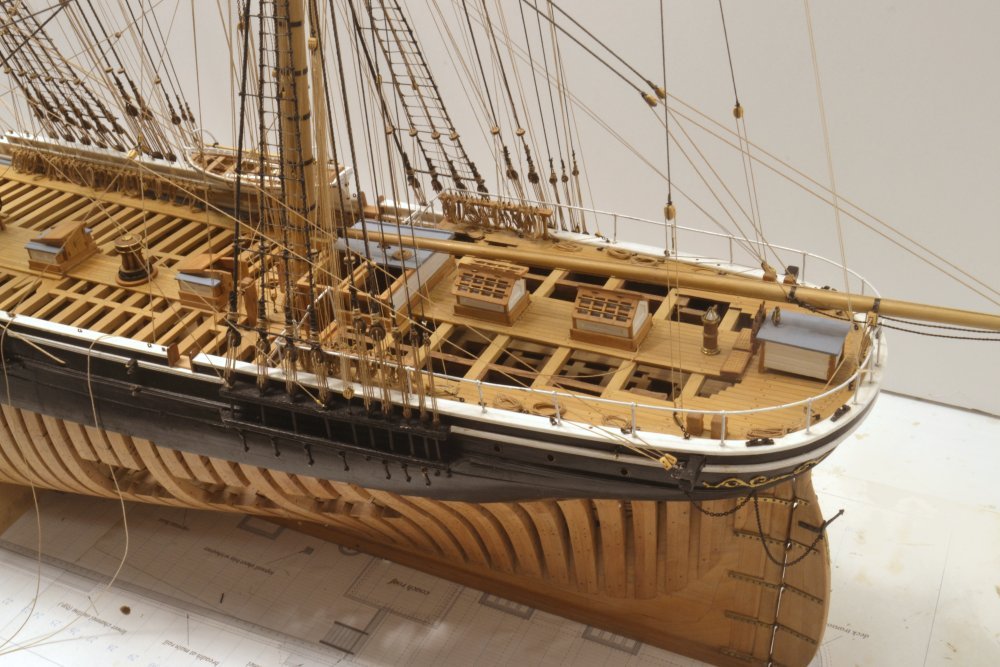
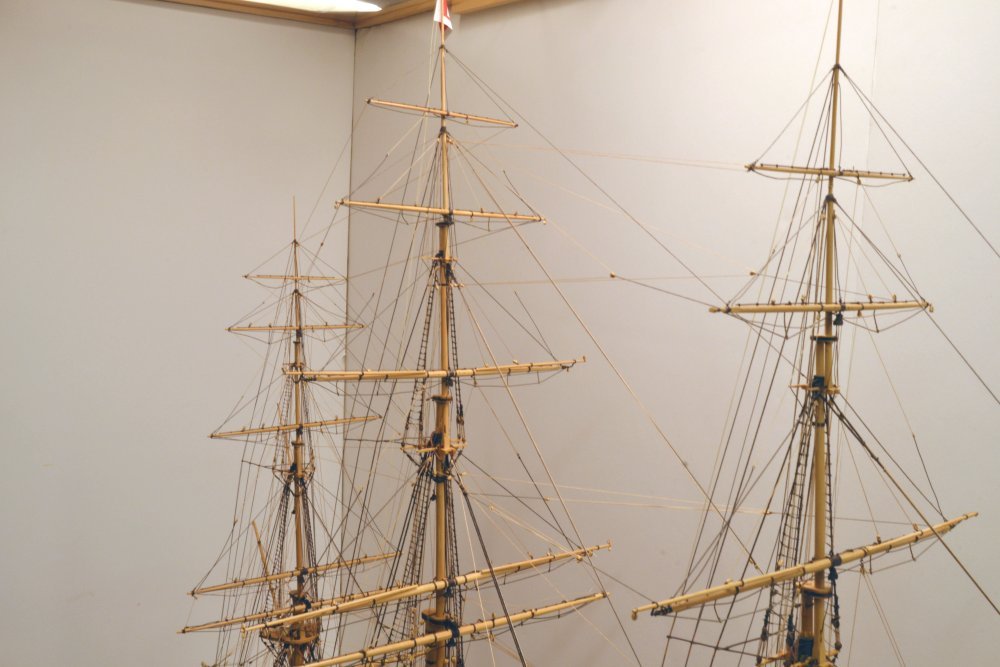
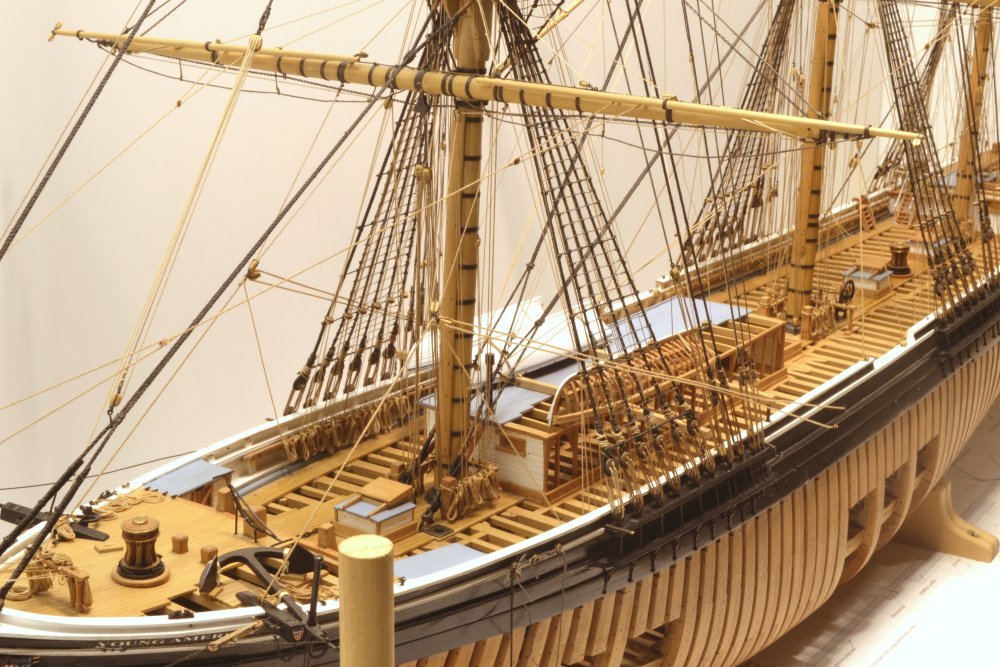
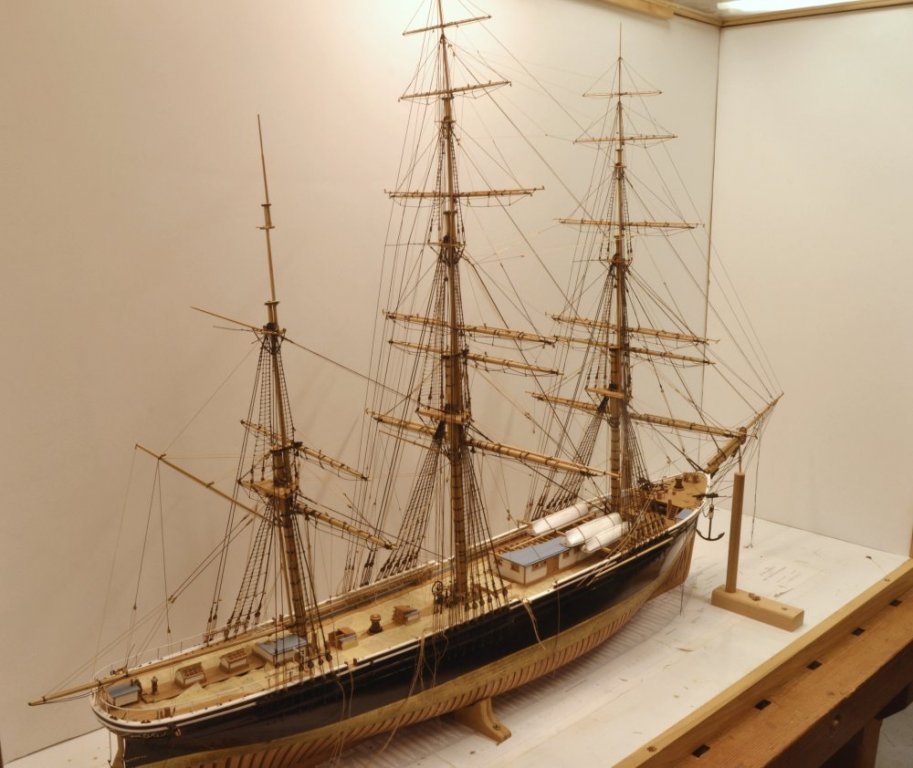
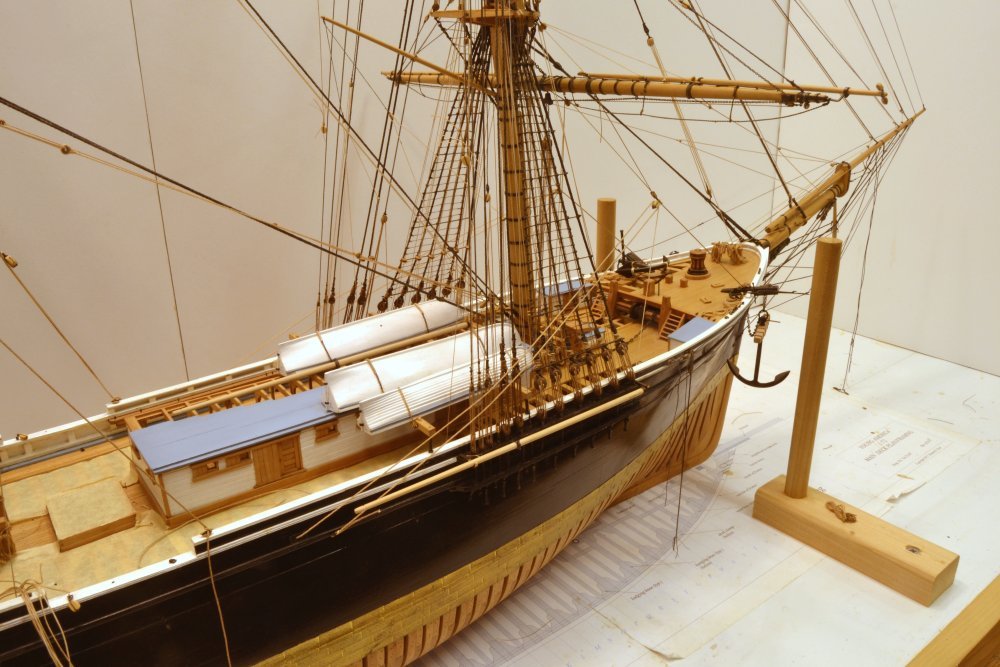
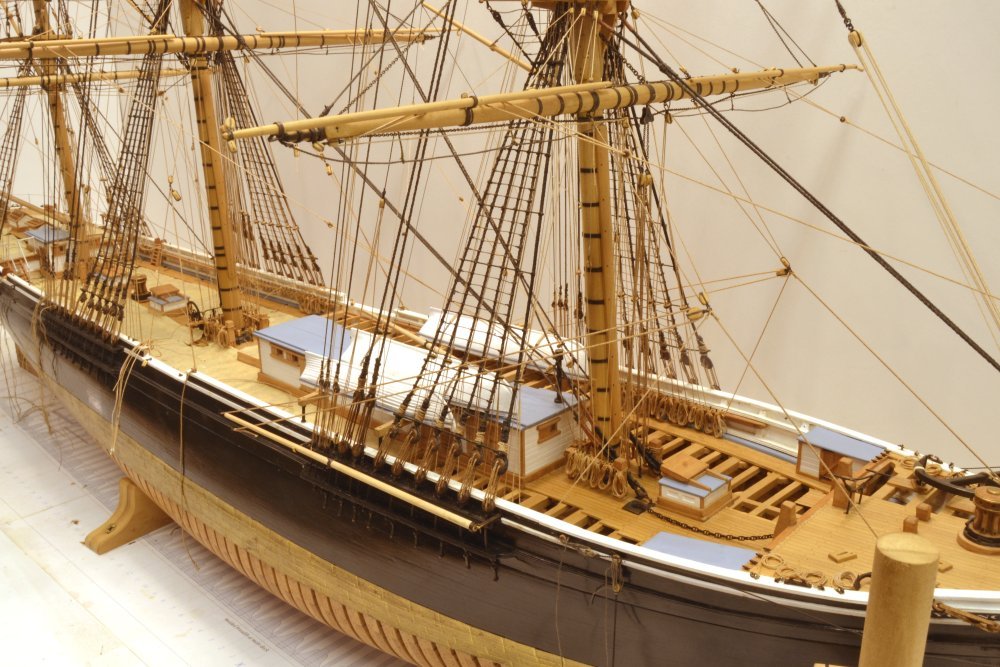
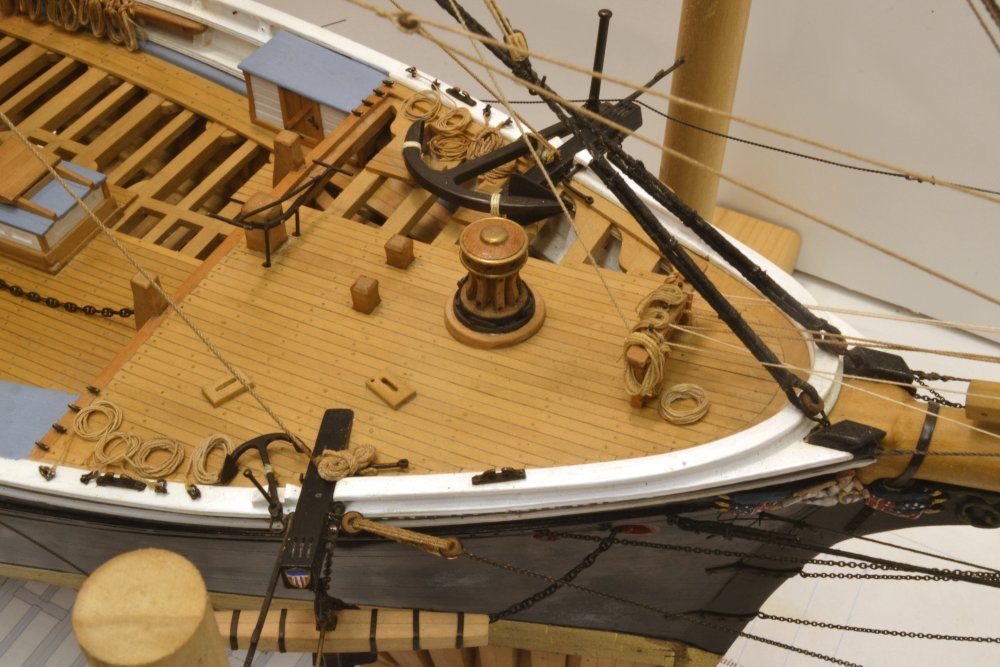
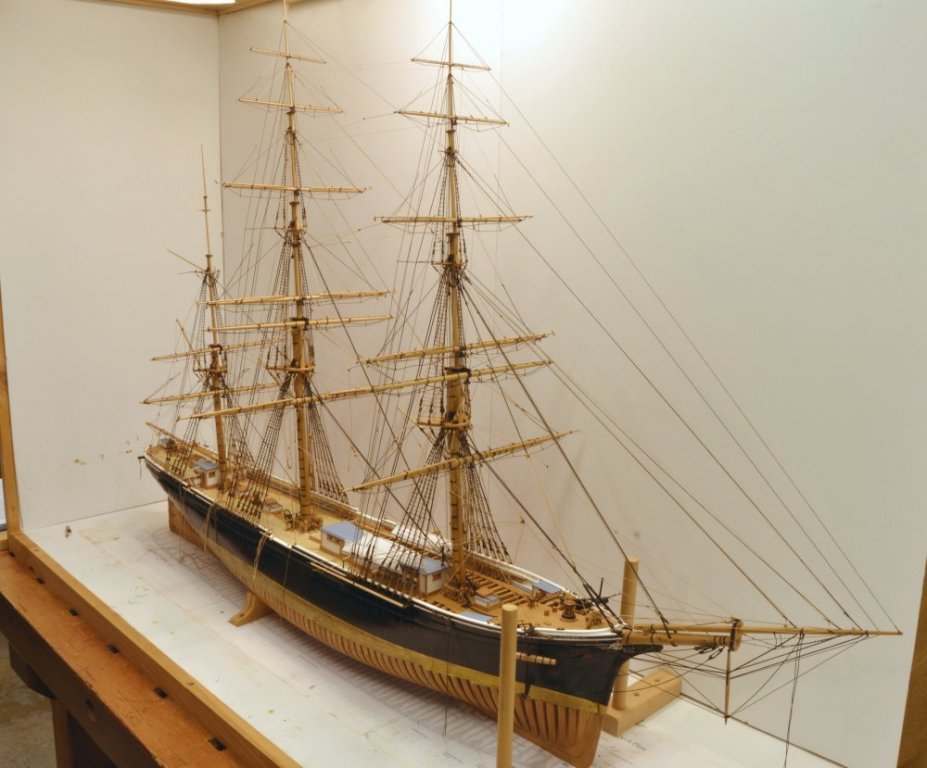
Young America - extreme clipper 1853 Part 321 – Running Rigging Continued Still working on the last 1%. Since the last post in late March, the remaining yards on the mizzen have been installed with their rigging. All yard braces had been left off up to that time because they are obstructive to working near the centerline and to reaching into the model to belay lines at the deck. With the completion of the mizzen yards, work on the braces is now well advanced and other finishing-up work has begun. The first two pictures show the model in its current state. Most of the upper braces have been installed. Because there is still a lot of work to be done at deck level, the braces below the topgallant yards are either left hanging or not started. The next picture shows the array of upper yard braces between the main and mizzen mast. This area is quite congested because the mizzen braces run forward. Fortunately there was no fouling of these lines. I say fortunately, because there is little flexibility in running these lines. The connections at the ends of the yard are, of course, fixed. Lead blocks that direct them downward are also pretty well fixed. Main mast braces need to be clear of mizzen sails at those points, as do their falls to the deck. Also, brace lead blocks need to be roughly positioned at heights midway between the upper and lower positions of their yards, otherwise braces would have to be let go to raise or lower the yards, leaving them free to move about. The next picture shows another view of the upper braces. Completion of work forward has progressed sufficiently to allow the sheets and tacks on the lower fore yard to be permanently belayed, as may be seen in the next photo. The three lines are shackled together with the clew garnets in the absence of sails. The tacks run forward to cleats on the catheads, the sheets run aft outside the shrouds, through the hull to belay on cleats on deck. The lazy tacks are belayed on the first pin of the main pin rails at the side. These lines were used to control the clew of the sail while shifting the load from sheets to tacks or vice versa, especially if disconnecting one or the other. This picture and the last two also show that the masking tape used to keep debris out of the hull has been removed, contributing greatly to the overall appearance. This came up rather easily, requiring adhesive clean-up in just a few spots. The next picture shows the focal point of most of the current work - installing rope coils over the belayed lines. This is fairly tedious work – making the coils, allowing the glue on them to set, then placing them over the pins and adjusting them to hang with some degree of realism. As may be seen, the pin rails are tightly packed. So much for all that careful turning of pin shapes. The last picture shows the really tight spacing on the poop pin rails. As mentioned in early posts, these rails were one of a number of possible solutions for belaying the many mizzen lines. Even with the closely packed pins on this rail and the one just forward of the poop break, several lines have to be cleated on the deck. The next post will continue with work on the braces for the lower three yards on each mast, and the interesting problem of routing those on the main mast to acceptable points aft without fouling the crojack rigging. Stay tuned. Ed


- 3,618 replies
-
- 39
-
-
- young america
- clipper
- (and 1 more)
-
Somehow I missed your post, Sailor - will try to locate the videos - any links? Ed
- 3,618 replies
-
- 2
-
-
- young america
- clipper
- (and 1 more)
-
Hello Mark, Apologies for the delay in responding to your question - busy days. I wanted to look at the belaying plan vs. the rigging list to see if my immediate reaction to the question about general patterns in the rigging were were at least reasonably correct. There is some logic to what at first glance looks like a disorganized tangle. I will stick to running rigging because standing rigging is very straightforward in comparison, and except for hardware changes, fairly constant over time. I cannot address changes over time to running rigging and suggest James Lees work for that. So with those caveats here are some general observations on what seems to be a consistent theme with running rigging on YA and perhaps most clippers in general during that era: Fore and aft sails – jibs and staysails: -Belay on centerline – fife rails, forecastle rail, spider bands – halyards at the after mast, downhauls at the forward mast/bowsprit. -Spanker – boom sheets, vangs, head in/outhauls to tackles at the poop rail, others run down the mizzen mast to spider band. Square sails: -Fife rails and topsail sheet bits belay heavy lines like lower topping lifts, clew garnets, lower and topsail sheets - also lighter reef tackles. -Buntlines and leech lines for all sails belay at the side rails, arranged from forward: lowest to highest, inner to outer. All these pass behind yards along masts through fairleads in the top and on shrouds above their belay points. - Upper yard halyards have channel mounted tackles - falls go straight to pin on side rails - balanced to both sides with gin blacks on large yards, single line to tackles on alternating sides for upper yards. - Lower yard braces run to block arrangements at the side channels and rails, belay on side pin rails between main banks astride masts. -Fore and main upper yard braces run toward blocks at center near after mast then to side rails. Mizzen braces run forward to main. - Belayed lines on main pin rail banks astride masts: fore to aft, lower to upper, inner to outer. - Upper yard halyards have channel mounted tackles - falls go straight to pin on side rails - balanced to both sides with gin blocks on large yards, single line to tackles on alternating sides for upper yards. - Lower yard braces run to block arrangements at the side channels and rails, belay on side pin rails between main banks astride masts. -Fore and main upper yard braces run toward blocks at center near after mast then to side rails. Mizzen braces run forward to main. In general: Belayed lines on main pin rail banks astride masts: fore to aft, lower to upper, inner to outer. It would take a much more knowledgeable person than me, to go beyond these observations. My basis - and the basis for the YA model design - consists of a number of ship-specific belaying plans and some general references. Hope this makes sense and helps address your question. Ed
- 3,618 replies
-
- 6
-
-
- young america
- clipper
- (and 1 more)
-
HMCSS Victoria 1855 by BANYAN - 1:72
EdT replied to BANYAN's topic in - Build logs for subjects built 1851 - 1900
Interesting bit of work, Pat. My first thought about the overhang problem was that perhaps you could rotate and invert the tool holding fixture, putting the Dremel in backwards, to move the axis of the tool closer to the vise, but perhaps you already considered that. Hard to tell from the pic if it would work. I have the Vandalay thickness sander and really like it - robust and well made - with a big motor - saw me through Naiad and YA. Cheers, Ed- 1,013 replies
-
- 3
-
-
- gun dispatch vessel
- victoria
- (and 2 more)
-
A very good question, Mark. Let me give it some thought and try to respond. Evolution over time, except for for hardware and line material _ rope, chain, wire - is a bit outside my range, but there is a clear pattern to organization of the lines that probably made transfer of crew easier from one vessel to another. Will respond later. Ed
- 3,618 replies
-
- 2
-
-
- young america
- clipper
- (and 1 more)
-
Thank you, all. Pat, Vol III is progressing well. Ed
- 3,618 replies
-
- 6
-
-
- young america
- clipper
- (and 1 more)
-
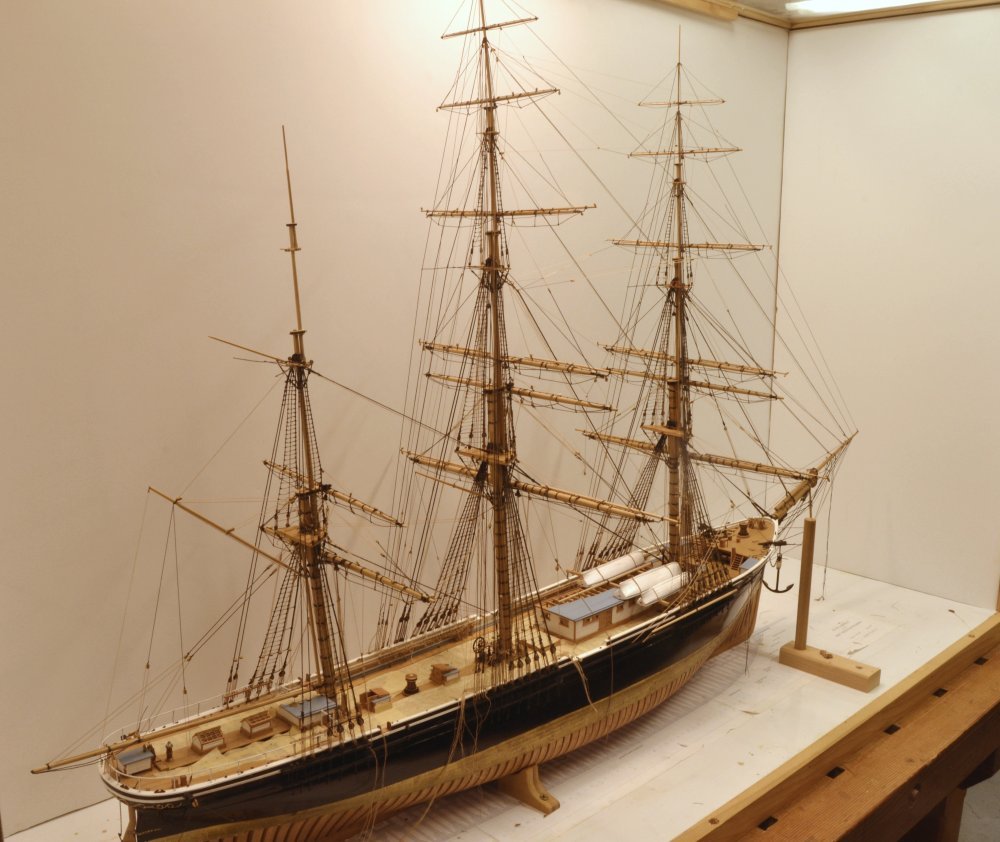
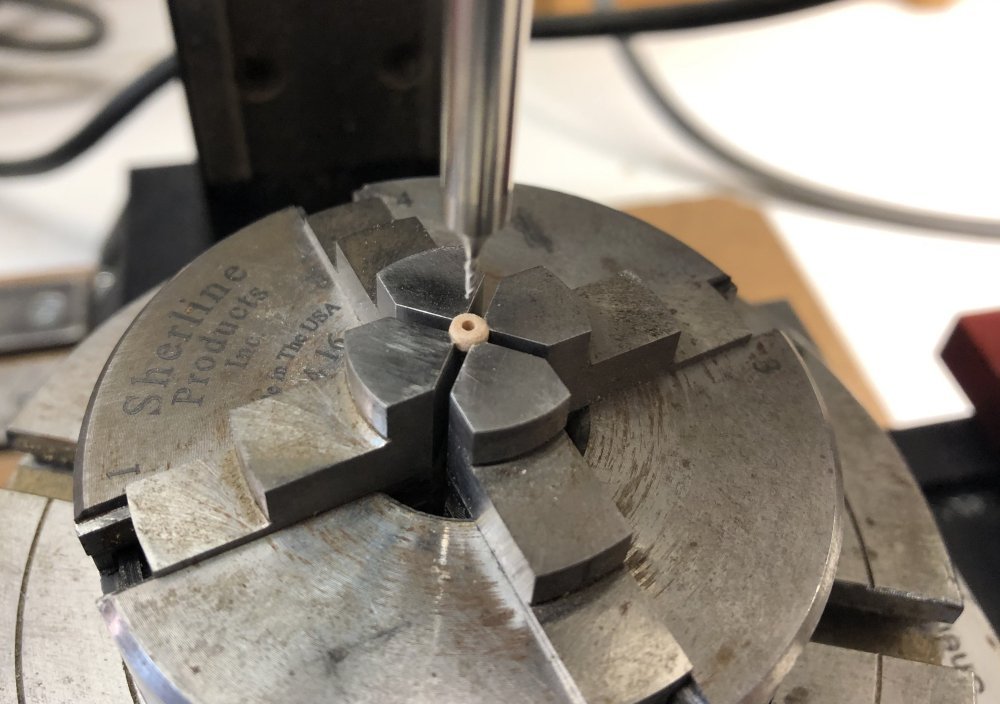
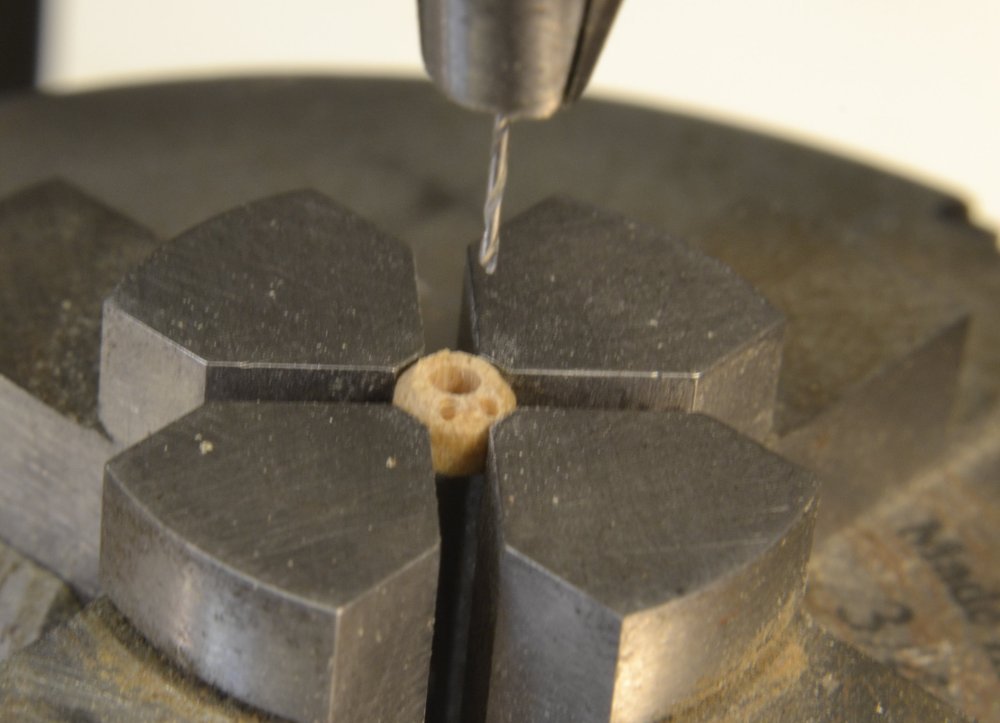
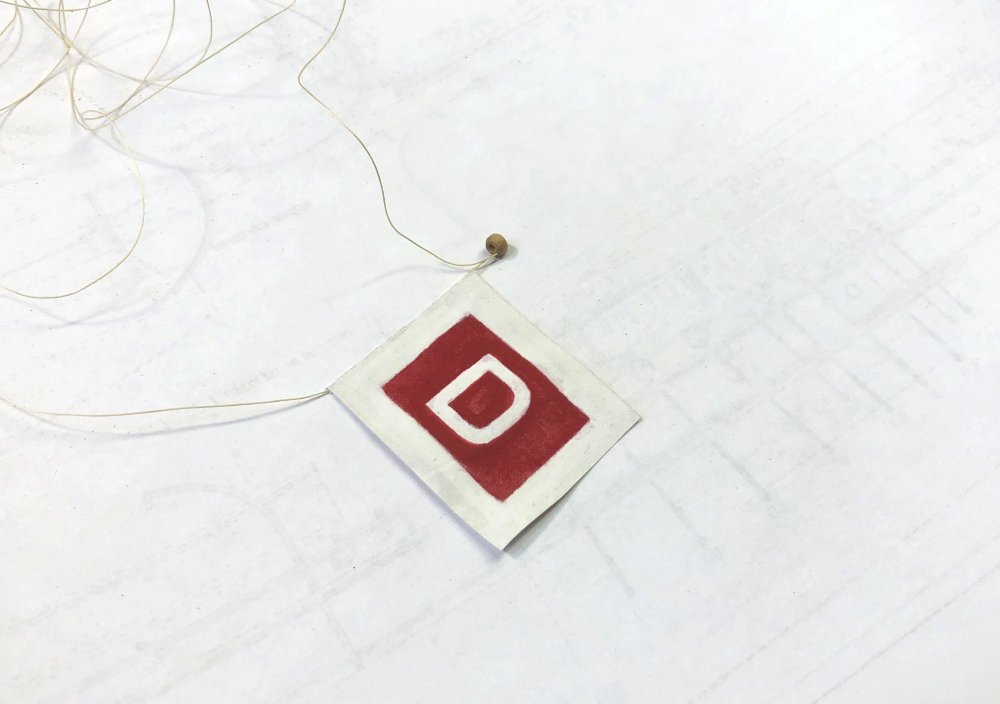
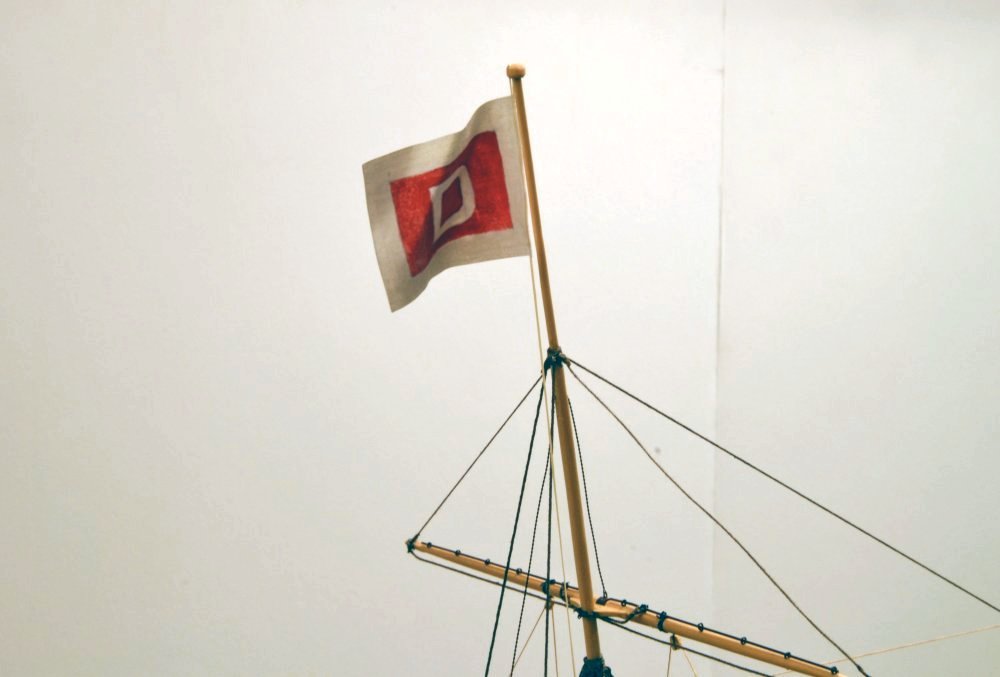
Young America - extreme clipper 1853 Part 320 – Running Rigging Continued The last 1% always seems to be the most difficult to complete – or perhaps its just the most exhausting. It seems like not a lot has gotten done since the last post almost three weeks ago. A fair amount of time was spent adjusting tension on the 60-odd main mast belaying points – a time consuming task – and one that is dangerous for completed work that gets in the way. Not a lot to show for that effort. That is now complete and the pins should be ready for rope coils. Work has also been continuing on the mizzen yards, as shown in the first picture. The upper topsail and the topgallant were installed in the past couple weeks. Below is the view from aft. Below is a picture of the poop deck pin rail about half full and the last main deck rail forward of it – almost full. Installing mast trucks and signal halyards is in progress. In the next picture one of the trucks being bored to fit the its mast pole. The top is left a bit flat so the sheave holes can be drilled without slipping off the side. The next picture shows that work – with a very short bit extension. Below is a picture of the house flag, pre-assembled with its truck and halyard. The flag is painted with thinned acrylic gouache on some very old drafting linen that has had its wax sizing removed by boiling then washing. It is the house flag of the William Daniels Company of New York that owned the ship from its launch in 1853 until 1859, when it was sold to another shipper. The truck will be fitted to the mast pole without glue, held down by the fit and the halyard that runs down to the deck. This will allow it to be removed and replaced – a possibility. The last picture shows it flying from the top of the main mast. Similar trucks with halyards are being fitted to the other masts but without flags at this time. Ed
- 3,618 replies
-
- 44
-
-
- young america
- clipper
- (and 1 more)
-
Looks fantastic, Frank. Clean with beautiful detail. I sometimes envy the larger scale. Bravo. Ed
-
Remarkable, beautiful work. Ed
-
HMCSS Victoria 1855 by BANYAN - 1:72
EdT replied to BANYAN's topic in - Build logs for subjects built 1851 - 1900
Bravo, Pat.- 1,013 replies
-
- 2
-
-
- gun dispatch vessel
- victoria
- (and 2 more)
-
It wasn't a rebuttal, Rob. It was a simple thank you. Ed
-
No fuss, rob. You were correct to pick up that oversight on my part - has been corrected. Ed
- 3,618 replies
-
- 1
-
-
- young america
- clipper
- (and 1 more)
-
Thank you all for the kind words. Micheal, I can only imagine what this would be like with double topgallants as well as the double tops - to say nothing of all the stunsl rigging that I have left off. There is a wonderful order to the lines, provided by the fairleads and the belaying plan. this keeps it generally in order. Fouling problems occur when running lines and crossing them - good eyes would help. The belaying plan I used came from a combination of Crothers's drawings and Underhill - neither had the whole story. I am happy to say there have been few revisions required along the way. There is a logic - probably time-tested - to the layout. As to sequence this has been a learning process. I have a much better grip on it than I did at the start - and I made a number of mistakes in ordering the work. Hopefully others may learn from these through the book. Thank you, Druxey. Mixed feelings - true. Its been a long haul, but not an arduous one. The pace has been comfortable - there are other things in life. Thanks again everyone. Ed
- 3,618 replies
-
- 11
-
-
- young america
- clipper
- (and 1 more)
-
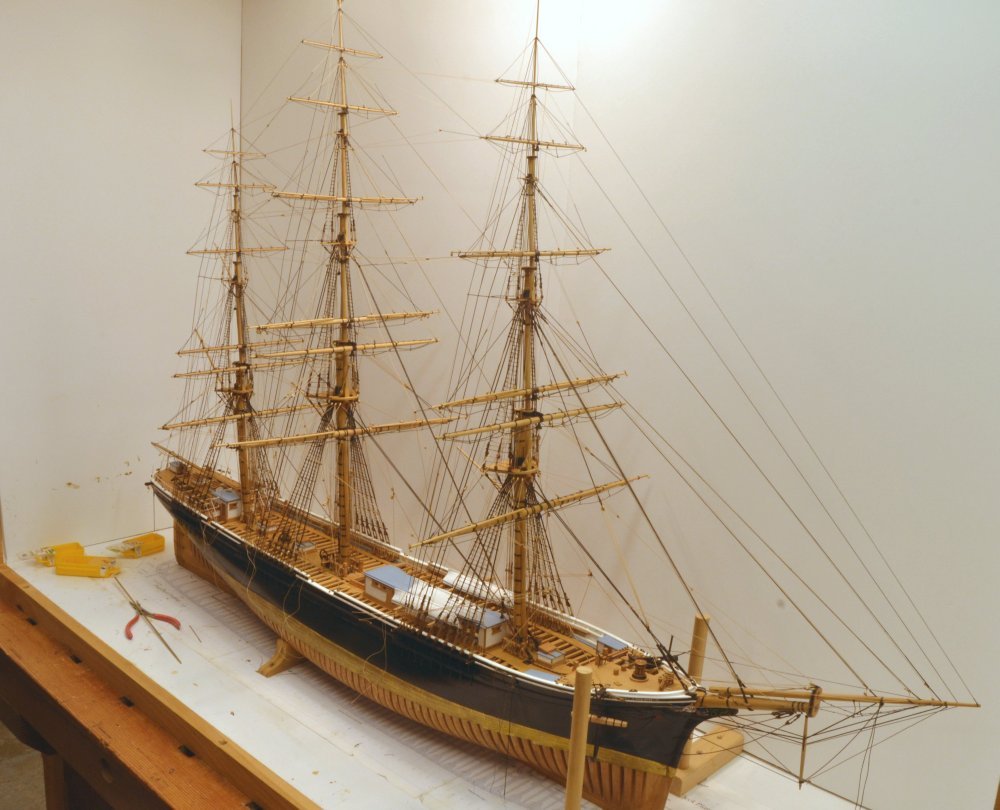
Young America - extreme clipper 1853 Part 319 – Running Rigging Continued I keep looking at the model and thinking that it doesn't look a lot different than it did last month - considering the amount of time being spent on it. All these pictures were taken today after a fairly major cleanup of the work area. The first picture shows most of the model. In the picture the rigging of the foremast is essentially finished except for the lower braces which are deferred for access reasons. On the main mast all the lines are run and belayed at least initially, again except for braces. The mizzen still lacks its four upper yards but these have been made and are ready for rigging. The next picture shows the fore course sheets that were installed this week. Again, these were deferred until now to permit access. These large, 5" lines run from a shackled eyebolt on the outside of the sheer rail, then forward and up through the large block ganged with the clue garnet block, the tack and the lazy tack. Finally they pass back through a bulwark sheave and are belayed to cleats on the deck. The next picture may be clearer. Without sails, the lines drape across the lower shrouds. The tacks are the lines running forward to cleats on the catheads. The lazy tacks angle aft and belay on the first pin on the main rack rails. These were used to control the tack of the sail when the yard was being braced around – between the casting off of the sheet and the belaying of the tack – or vice versa. The starboard tack may be seen belayed to its cleat on the cathead in the next picture. This picture also shows the new lashing between the bullseyes on the martingale stay where it is shackled to the cathead. This outer bowsprit standing rigging suffered damage during nearby work. It should have been deferred. The jibboom guys are still scheduled for replacement. Further aloft, work on the fore upper yard braces has progressed. The next picture shows the topgallant brace tackles between yard and stay pendants. Tension on these will be relieved to normalize the stay. Below this, the fore upper topsail braces have been run except for the falls, which are delayed to permit access to belaying points below. The main spencer gaff has finally been mounted and rigged and is shown in the next picture. The rigging on these consist of one standing lift and two vang pendants with tackles. The tackles and belaying points on the side rails are out of this picture. Rigging of the fore braces gets complex at the heads of the stays as seen in the next picture. The tackle falls run through blocks seized to the stay then through blocks on the shrouds to direct them downwards without fouling. Two sets of braces attach to this stay. One level up it gets even more congested with the two upper sets of braces as well as the staysail halyard block. Finally another view of the full model. The two broken jibboom guy chains may be seen dangling from the boom waiting for replacement in this picture. Approaching endgame. Ed
- 3,618 replies
-
- 52
-
-
- young america
- clipper
- (and 1 more)