popeye the sailor
-
Posts
16,007 -
Joined
-
Last visited
Content Type
Profiles
Forums
Gallery
Events
Everything posted by popeye the sailor
-
 I was going to drop you a link to the Hull Motorboat group, so you can see the model of the St Nectan that a fellow built....but it appears that the site is gone all that is there now is ads........says on the right hand side that the site may be for sale
- 337 replies
-
- 3
-

-
- finished
- mountfleet models
- (and 1 more)
-
wow! you've made some great progress the third tier and pilot house looks great.......nice bit of detail. finding the right mix of people is hard....even for the period it's based on. color and a few adjustments will work in your favor
-
good to see you've started to build her! I've enjoyed trawlers and fishing vessels, so I know you'll have quite a bit of fun unfortunately, I've never built one like your planning, so I'm a bit scant on suggestions. there's so much associated with the helm room and the main cabin, that it might be hard to remove roofs. the only thing I might suggest, is making the windows larger, to let more light in. pleased to follow you anywhere!
- 337 replies
-
- 3
-
-
- finished
- mountfleet models
- (and 1 more)
-
appreciate that gents painting at the moment
-
thanks Ken...........now that I've assembled the cab, I think that cementing the back wall flush with the side walls, will cure a lot of the issues. at the same time, remove those tabs on the side walls, so they don't interfere with the seats. also.....by doing this, it will put that beam {rib} of the roof frame on the inside of the cab, rather than the outside. I have given thought towards drilling new holes for the canvas, a bit higher, so to cloud that issue {although it really doesn't hurt the model too much}. this is the Round 2 model release in 2015.........I have a feeling that they didn't do any retooling on the molds, so the original release may be plagued with the same problems. thanks for the additional grunge tips........I'll include it when I do the rest of the paint
-
second that! nice job with the weathering....looks super wonderful progress! curious about those saws too........they look cool!
-
wow! some really superb progress......the bays look great! well done on the ship's boats too is it possible to paint the hull before stuffing the lower deck in there?
- 345 replies
-
- 4
-
-
- graf zeppelin
- trumpeter
- (and 2 more)
-
I copy and save the image from where I got it, although I have scanned stencils and stuff. I do believe though that photo shop has a much better color spectrum to work with. if I knew better how to adjust the values on colors, I'd likely have a better time with this. the everyday colors aren't much of a problem.....it's the in between colors, like pastels, that are hard to deal with.
-
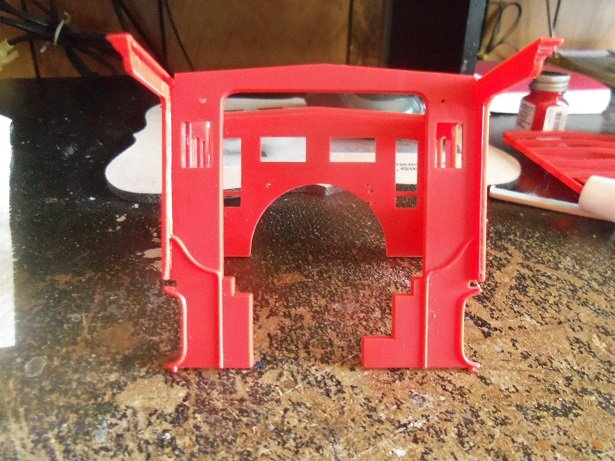
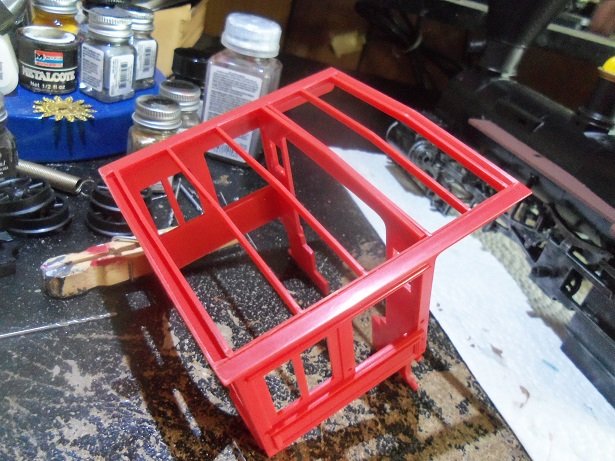
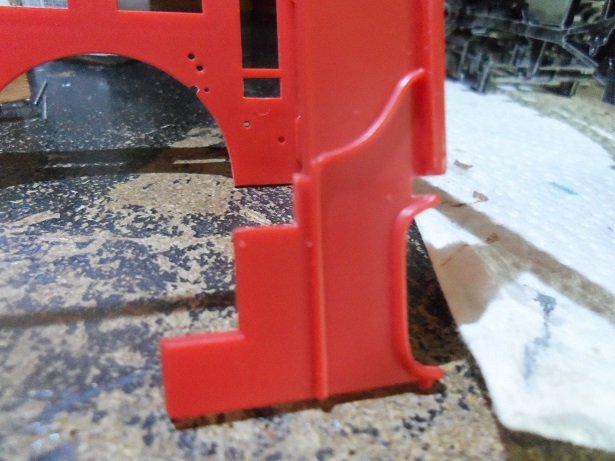
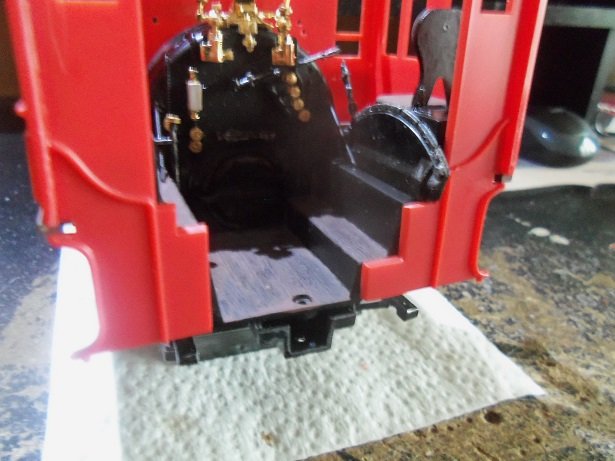
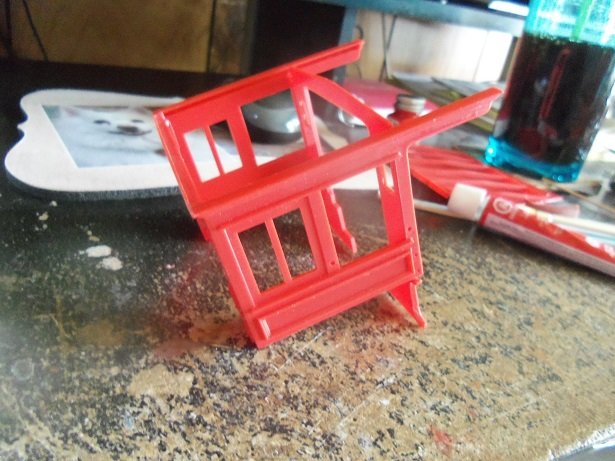
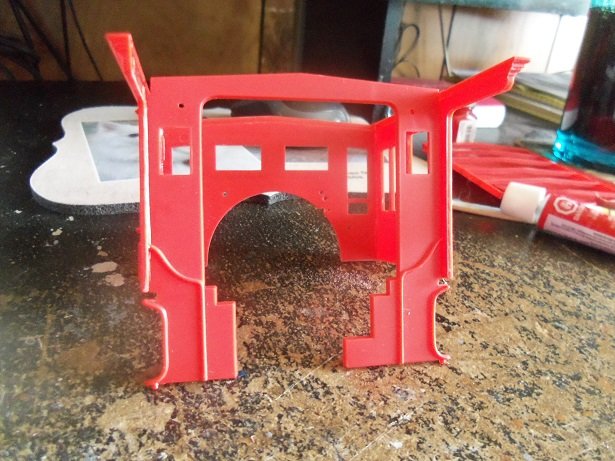
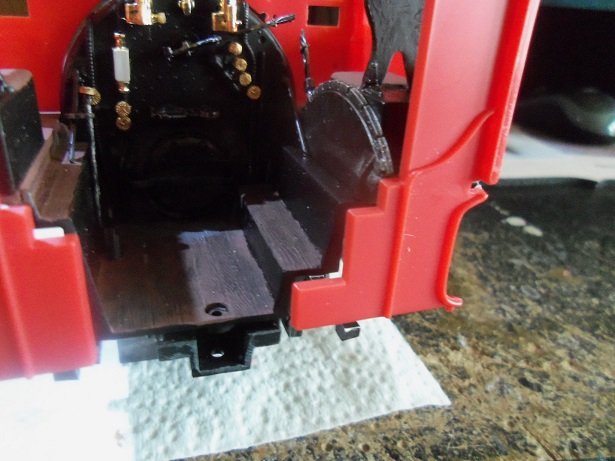
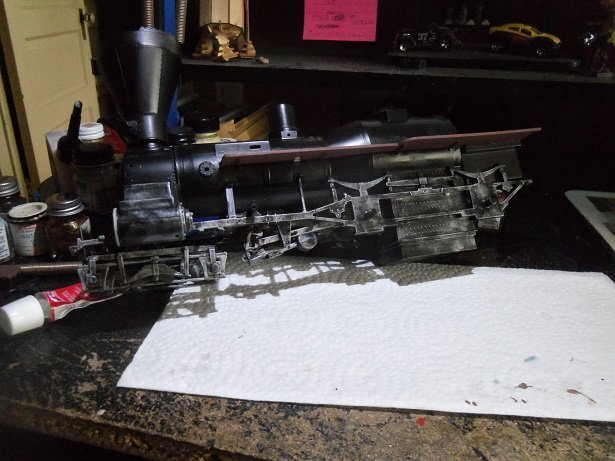
sorry for the delay in my return..........had a big supper.......feel'in fat, took a snooze on the couch. continuing with what I was say'in......the reason I mention altering the assembly of the back wall, is that the amount the cab is off at the rear wall, is less that how much it's off at the front wall. you will gain at least 1/8 of an inch, but you will still need to cut back on that right side third step to cure the rest of the short coming. I find that those two slots for the walkways are tooled too much. in picture three, note where the side walls sit........at the inner edge of the walkway tabs. this means that those slots should only be that deep, judging how the side walls run along the walkway from the front, to the back. the protrusion of the walkway looks about 1/16, running parallel along the cab walls. I went ahead and made those slots larger......now I need to fill them in somehow, or there will be square holes there. so....only as deep as the wall's thickness is required. the half circle at the front wall has been adjusted as well.......I did that when I went to slide it in place earlier. material needs to be removed at both sides where they meet the walkways......it seems more oval, than circular. trim a little at a time equally, until it mates with the walkways....there still will be a gap......can't do anything about it, unless you want to try filling it in. trimming the base of the front wall will cause mismatching with the side walls.......figured I'd warn ya ahead of time about that pitfall. filling it in seems the only remedy.....but I'm not going to worry about it.... I thought back........we all do in cases like this.........to see if we might have goofed up somewhere. the walkways fit in their slots, the floor fits flush along the inner edges of the walkways, the Johnson bar is actually longer that the cab floor {where it locates}.......nope, I don't believe there are mistakes in these areas. ....hate it when stuff like this happens. the roof is in two parts......the framing and the roof itself. to judge if I had made some goof up with the cab, I dry fitted the roof frame to see how it fit. it sits inside the cab opening at the top...... the rear roof molding mates with the side moldings and the fit is pretty good. note where the beam at the rear wall sits......outside the wall. assembling the back wall flush with the side edges, this beam will then be on the inside of the back wall. again, it's all the matter of that 1/8 of an inch. by making this back wall adjustment, I do believe you'll be saving yourself from doing what I'm having to do. the step is trimmed back....... here is a view of the Johnson bar and the tab at the end of the walkway....the two causing the headaches.... after trimming the step until it fit, there is still a short coming with the two 'L' tabs on the walkway, where the front wall locates. the back wall adjustment would have cured this.......it would fit fine. but I chose to remove part of the 'L' and made it an 'I' the outcome is a good one.......the cab fits now. there is only a sliver gap at the base of the back wall......mainly due to slight warpage of the walkways, which can be easily taken care of after the cab is firmly cemented into place. I may remove the rest of those front tabs, now that I know how the cab orients on the walkways. the back wall will now butt up against the floor.......note the gap at the walkway tabs. sorry if I sound like a broken record, but I can't stress this stuff enough......if you want a good fit, this is one of the problems you'll be dealing with. it's not mated...but it will press into place........you can see how the side wall runs along the walkway.....evenly. again......if you flush fit the back wall, you can get away from altering the tabs at the front. the left side fits fine. you can see what looks like gussets at the ends of each step. when I spoke about fitting the Johnson bar, one of these is what it has to fit over. even then, it is too long for the area it fits in......strange it sticks out like this. it is what it is an overhead view showing the typical layout. I'll have to check and see what the interior color should be. just glad all this is over and the cab sits squarely, enclosing the cab area.


- 245 replies
-
- 13
-
-
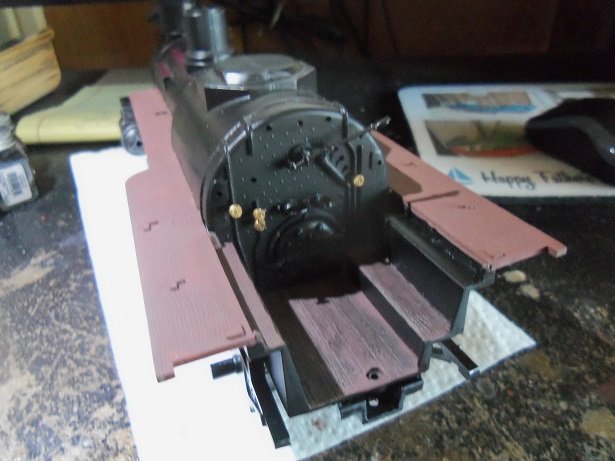
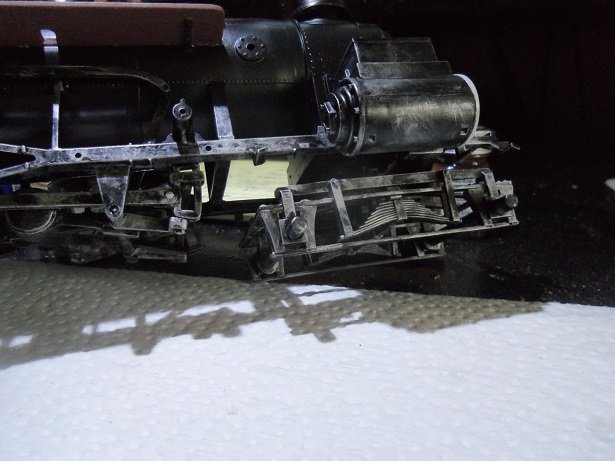
there is a major snafu with the cab it seems.........it doesn't fit correctly. I was going to paint, but figured I'd see how it would go together. the dry fit was fine......until I got to the back wall. the two ears that stick out at the ends of both walkways don't fit in the slots.....the second is the Johnson bar. it sticks out of the cab too far. the back wall is cut into steps from the floor......the second step, where the bar juts out, hits the third step and impedes it from going in place. so, I though to assemble the front and the sides together. note the tab by the left seat......there is one on the right side as well. they appear to be pushing the side walls away from where they should locate. there are the two 'L' shaped tabs on the walkways that are the locators for the front wall. note that both walls stop at the end of those walkway tabs....this is good. the problem lies with the back wall. figuring that the tabs on the walls are for the back wall to locate......I cemented the back wall in place. now.....to cement the Johnson bar into place, there is a slot that the edge of the seat column fit into. this put the end of the bar jutting outside of the cab. the walls stop just above the slots provided for the walkway tabs....these need to be enlarged. the third step on the right side needs to be partially removed, but done so the notching is square. without doing this, the entire box will be off by quite a bit. what I did here to fit the cab walls, was enlarge the two slots and remove part of the third stepping on the right side. this is the lesser of my two evils, since I really don't want to damage anything. in hindsight, the back wall can be fitted flush along the edge of the side walls, the roof line flush with the side wall edges, with the bottom of the walls flush with the slots for the walkways. I'll be back...........
-
thanks for look'in and the kind comments.......should have an update on this one soon I thought that too Mark.......this isn't a street rod. likely, I won't add the horn, but it is funny that they supply one. glad to have you aboard Ken and Jack...I'll try and make it interesting
-
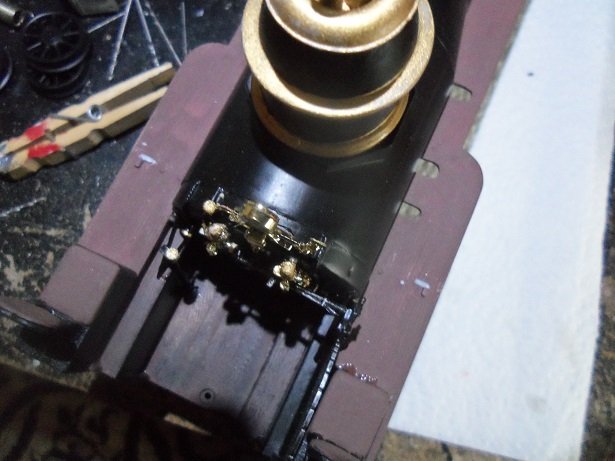
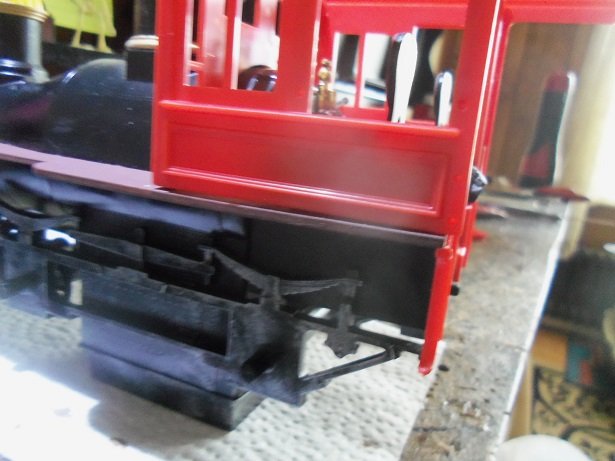
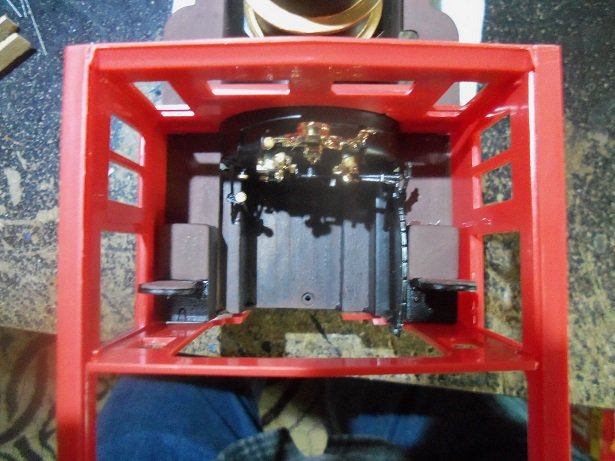
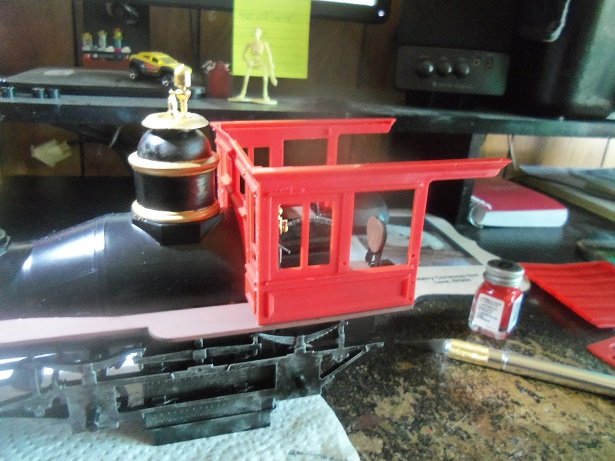
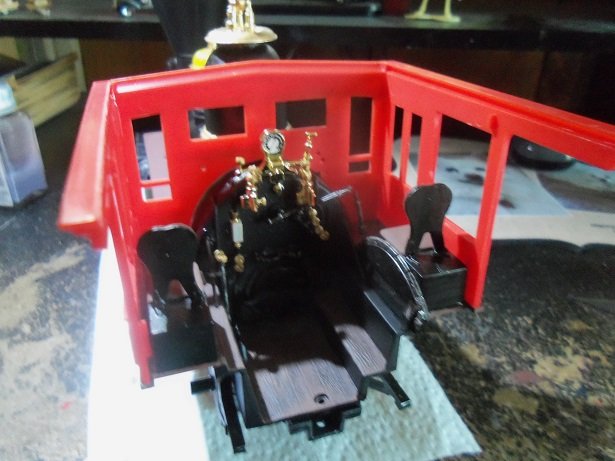
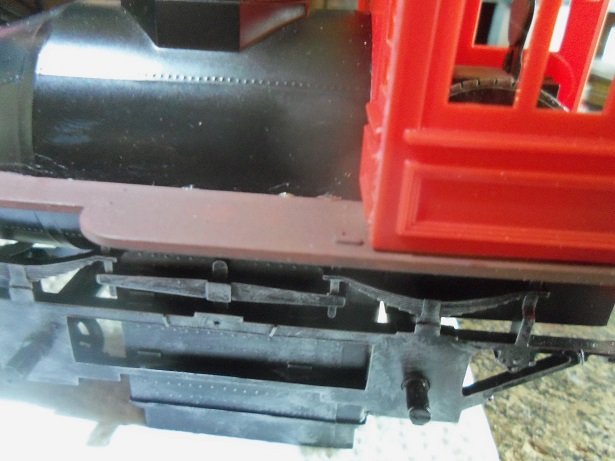
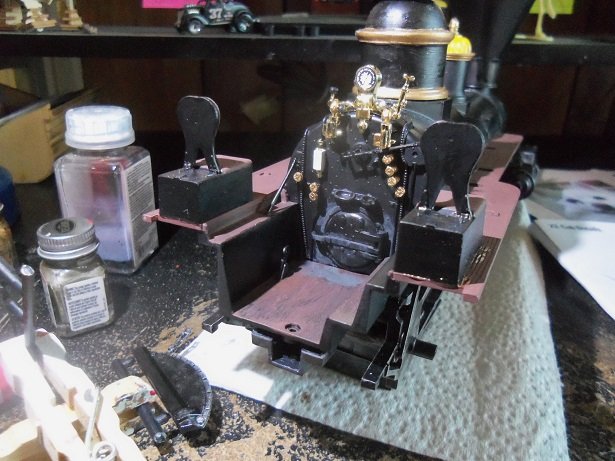
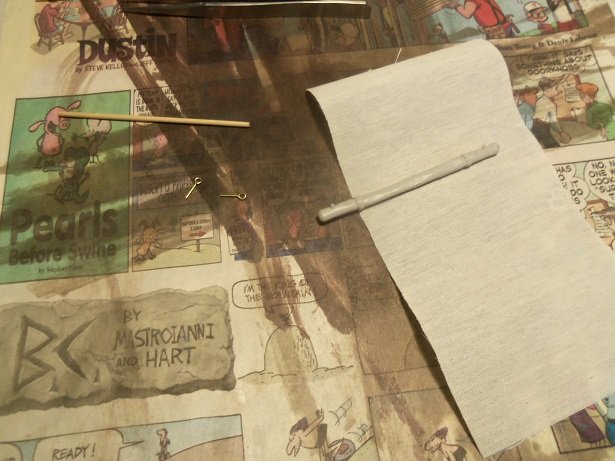
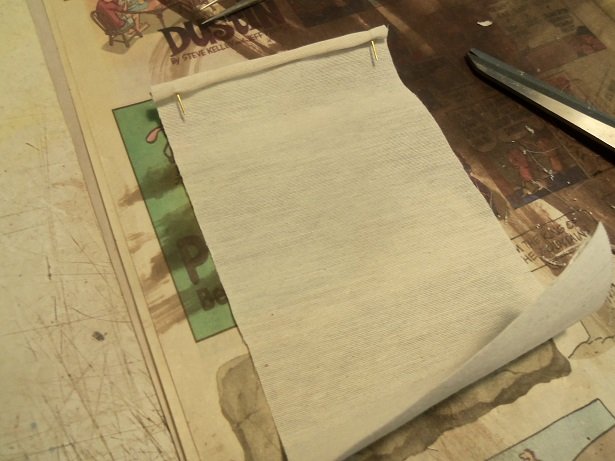
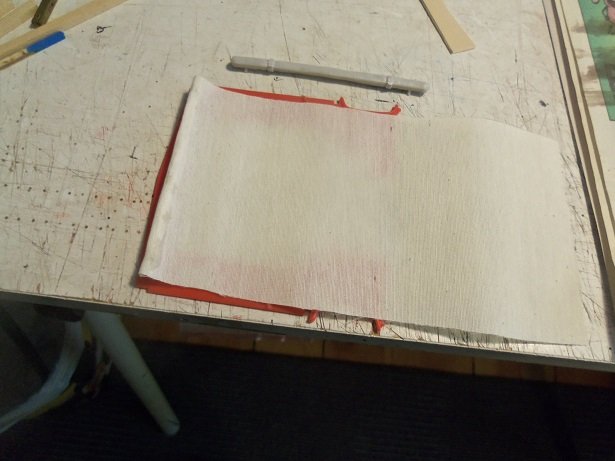
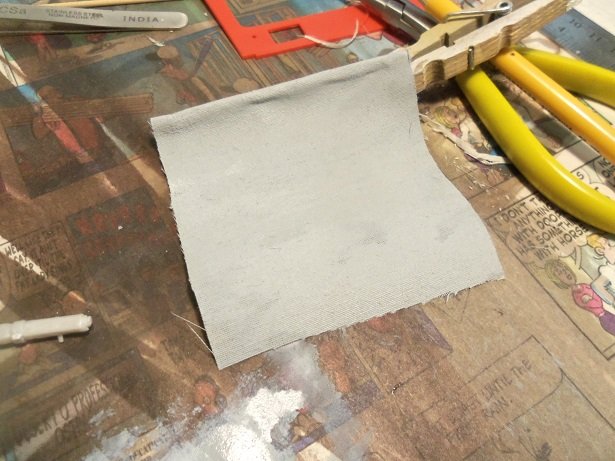
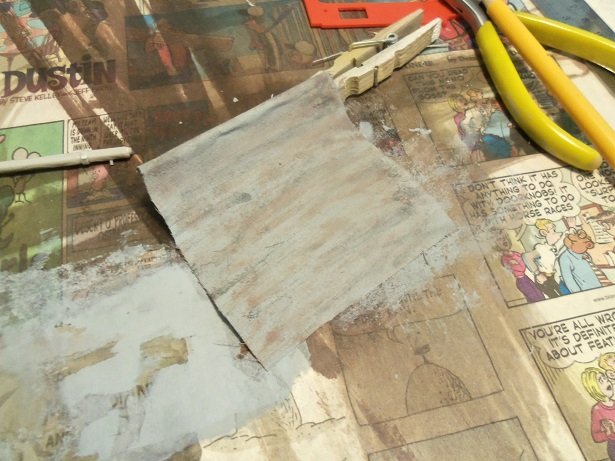
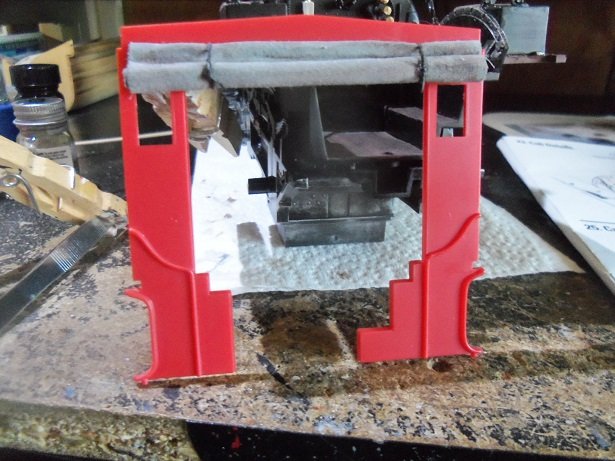
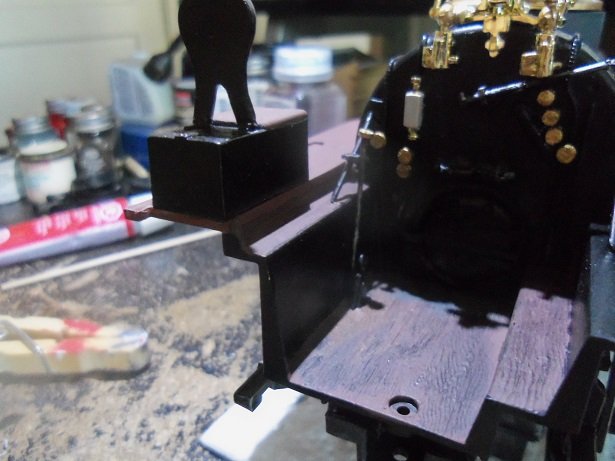
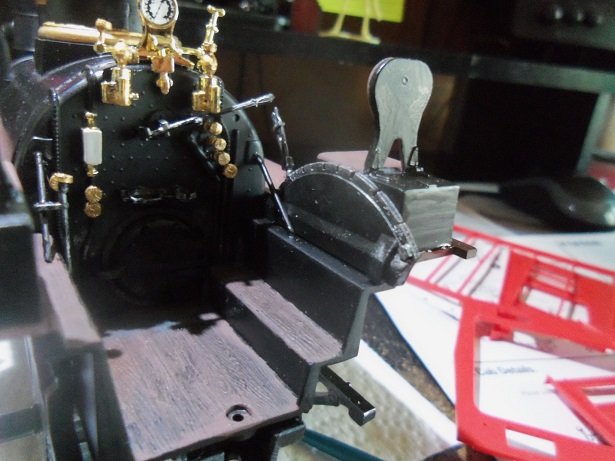
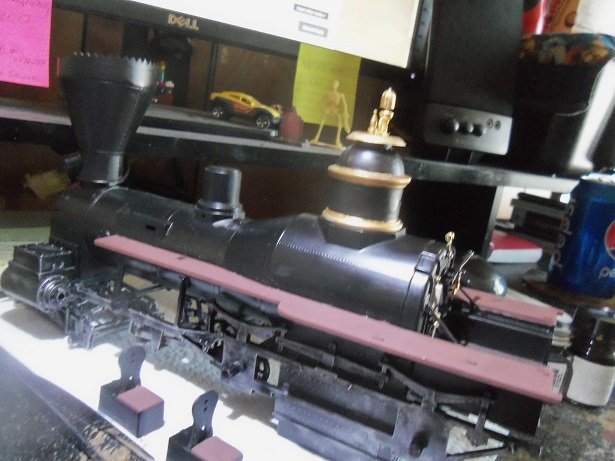
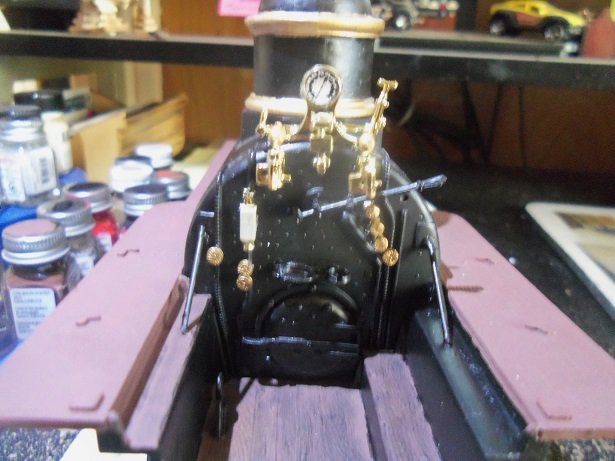
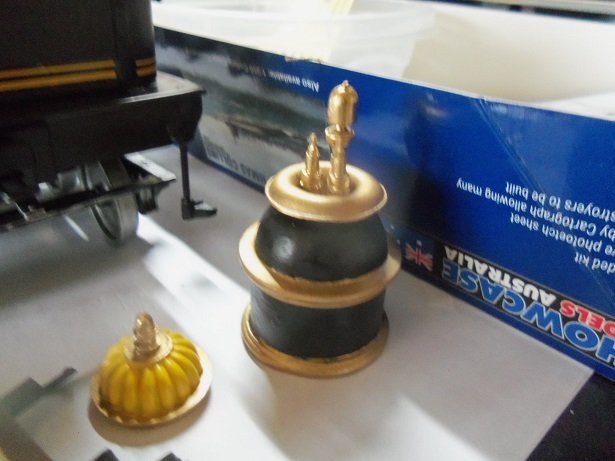
so .....yes, the sand dome is in place......so far, the brightest thing on the loco. some soot was added around the boiler door and on the floor. I'll add a touch of the flat steel a bit later. the seats were added too........the reverse bar on the table has been painted and given a dose of the flat steel. the cab parts are being cleaned up and readied for paint..........but before I do that, I'd better get that canvas door squared away, while it's the easiest. it might be harder to do when the cab is assembled and on the loco. I gathered some stuff together,.......a couple large eye bolts, a short length of really small dowel, and a piece of sail cloth..........this is the cloth that came with the Gothenborg {I still have some....quite a bit actually}. using the plastic roll as a guide, everything was cut to this width. the eye bolts were spread open a bit and slid onto the dowel, spacing them to match the pins that will fasten it to the wall of the cab. I find the plastic one a little illogical...did it go up like a Venetian blind?........did it have a metal or wood spine that it rolled up onto? not enough detail to explain it. anyway........the eye bolts were poked through the cloth at one end and super glued in place. next was to measure and get the length of the door.........it was marked out and the excess was cut off. then, it was painted with Ghost Gray. allowed to dry for a short time, it them got a brown dry brush........and then a soot dry brush {I'm almost out of the soot.......I'd better do the smoke stack before I run out}. it can't be rolled up onto the dowel.........heaven's to overlap!.......I used another piece of the small dowel to roll it up and tie it. when the ropes were trimmed and all was done, the dowel was slid out of the roll. all the while, making sure that the two pins were sticking straight out from the back. here is how it looks in place over the opening. another valve rod and knob was added to the left side of the cab, coming out of the floor near the brake lever. ....and the Johnson reverse bar was added to the right side of the cab. where the gauge is, you might be able to pick out three knobs that I added earlier........I need to find the fourth, but the admiral just cleaned the carpet, and it is likely long gone. I did notice that the dowel I was using looked to be the same diameter.............a sliver of it makes for a dandy knob

-
believe me gents........when all this bathroom stuff is over, I'm washing my hands of the whole sorted mess! lots of crazy movie scenes were had over the latrine........there's the scene in the movie 'Platoon'.........and who can forget the scene in the show M.A.S.H., where Major Hulahahn was exposed I'm glad that there's some movement on the General build.......the sand dome is in place and I've added more to the cab........gett'in ready to box 'er in. the front wall around the boiler is not a perfect fit....I'm not going to risk trimming it.....likely to cause a gap at the roof. I'm currently on the look out for another valve knob too thanks to all who hit the like button! welcome to the log John......it may end up not totally accurate, but I will try my best to make her look good I loved the Disney movie series they used to do.....my favorite was "The Scarecrow of Romney Marsh" ......or "The Adventures of Dr. Syn". my oldest grandson was interested in what I liked as a child {we talked extensively about the old horror classics}........I actually found him a book about Dr. Syn and told him to ask his father to look on you tube for the videos {I have them....most of them I think}. there was "Daniel Boone" and "Davy Crockett"....and of course all the Disney cartoon classics, folks are pay'in out the nose for these days. oh.......and let's not forget "Zorro" I don't recall one of a train though.........Herbie.......Maybe.........even Chitty Chitty Bang Bang 🎬 thanks for the good word Mark! thanks Ken.......I wasn't sure about it.......but it seemed so logical. I see a few places I missed though. I hope I did equally as good on the canvas door............I have enough for another update. and the day isn't even over yet.......although I do have to run out and get a hair cut.
-
hey there Sam.........you must mean my using the paint bottles to weigh down the interior, while it was drying. I was wracking my head thinking 'bout what you were referring to.......it's the only thing I can think of. just me being resourceful I don't believe I've ever tried that with photo shop. when I import something into the decal maker, it's just the image......a single layer. the background is the paper, whether I'm using clear or white. for some decals, I like to use white paper, because the white acts as a backing for the image, and I change the background to match the color I'm painting the model. it's hard to match colors that are in between the normal color spectrum. though I can change the color values, I haven't done it too much, since I don't use it enough. I should take a day and fiddle around with it......use regular printer paper for tests. I do have a photo shop program.......I'm not sure what I have in my computer......I only use it to size down my pictures. but that's what your referring to........the background {and I changed it to that color}. the one big problem I have with this decal program, is that it has a transparency issue. printers only max out at 600 dpi.......a good decal image needs to be more than that. if I were to lay a decal, printed on clear paper, on a darker color, it would disappear or hardly be seen.
-
you got it Sam! but with the stuff that's going on with Uber.....I dunno if I trust 'em thanks for the good word! just think though......if the changes at Wally world get any more weirder.........I'll be out the door. then I'll be look'in for a job. I learn quick .......but the commute would be a killer! thanks for the good word as well CDW.........a two seater.......yea that's weird. all I can think of is check if there was a 'roll' on the other side.......that should be a good enough hint you know........the door #1, door #2 thing ☣️ my son bought me a tee shirt ........Ed trying to empty the RV waste down the sewer. I wore it the night they were showing Christmas Vacation at the cinema. wouldn't ya know it though.......it was sold out
-
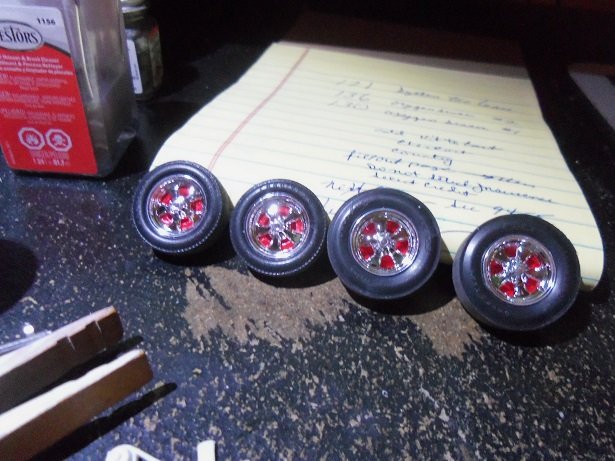
hello Sam........thanks for the good word yea.......I've done this to models in the past. whatever the body color is, that's what I usually paint them. ....but never silver.........it'll kill the concept of the rims thanks for look'in in....enjoy the ride
-
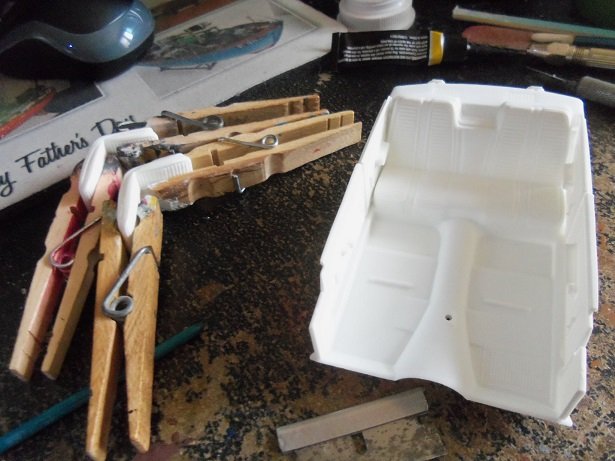
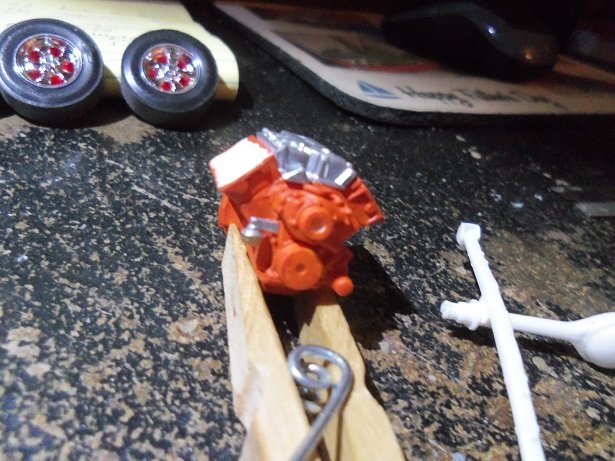
in this session, I continued with the engine and anything that I could assemble that would be painted a single color. the interior will be painted satin black, so the the majority of the bucket was assembled, and the front bucket seats. the back edge of the bucket {up the sides of the back seat} still need to be cemented.......I wanted to insure a snug fit. on the engine went the valve covers, carbs, and the drive belt w/fan and alternator. the alternator had a molded bracket.....a nice touch! I didn't bother to paint the carbs.......the air cleaner will cover them, so they won't be seen. the firewall and radiator panel were dressed out as well, since they too will be a single color. it's the blob in the center . there is the distributor, the coil, the headers, the radiator panel, and the firewall. the master cylinder, the radiator, the charcoal canister and the shroud had already been assembled. a little more was done to the engine......the air cleaner was added and the solenoid on the starter was detailed out, as I have seen in aftermarket parts. so this brings the build up to date, in what I've done so far. I've got to get some satin black.......the flat black I have is just too flat for the interior {underneath is a different story }
-
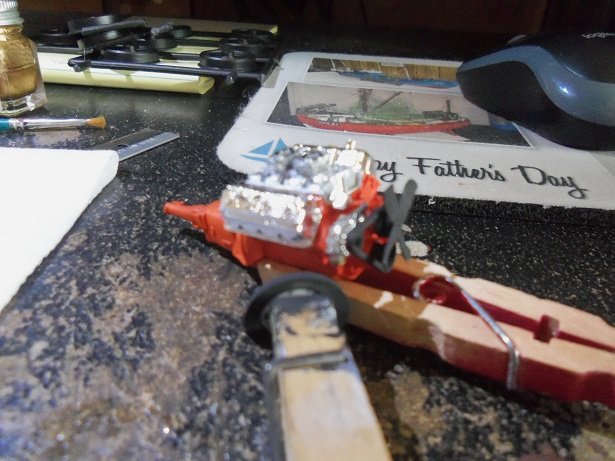
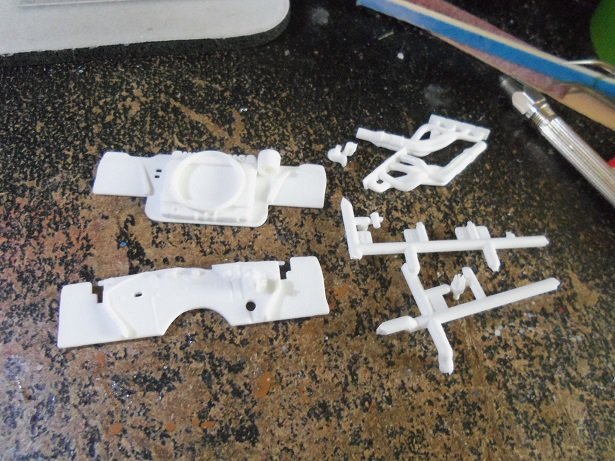
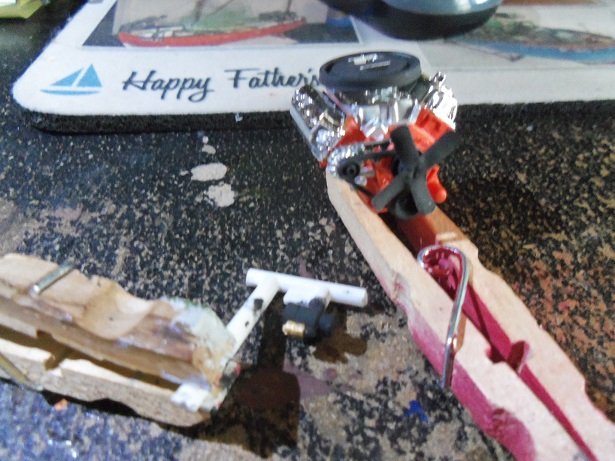
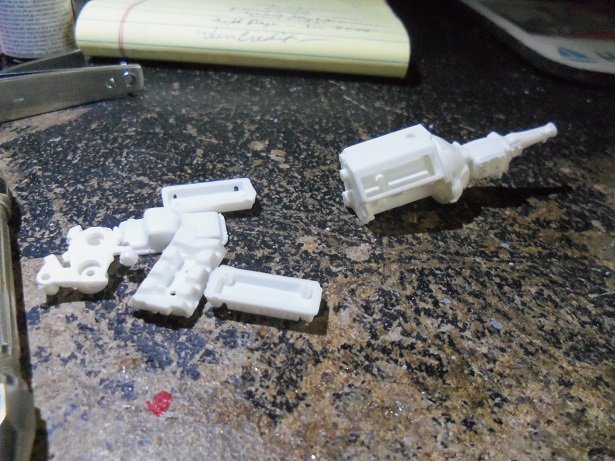
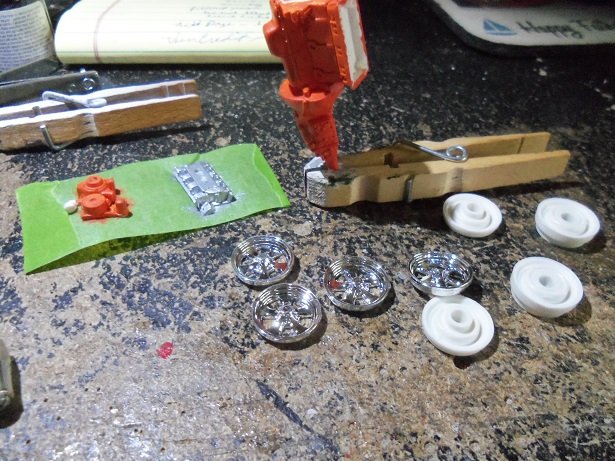
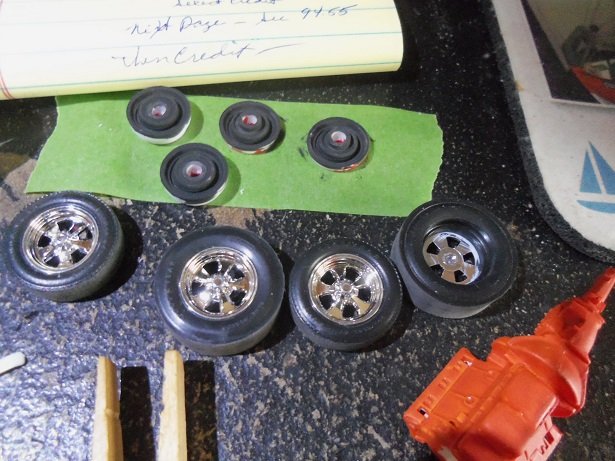
in between finishing the Ford sedan and the General.........the anticipation of receiving the Stagecoach.......and a few other things, I began to mess with this kit a little bit. I have to say.......this is one of Revell's better offerings! it is very well thought out.......the only thing I've found so far, is that there is no instruction placement for the horn there isn't even a locator hole for it. I'll figure it out later........ it starts with the engine.......all the parts were gathered and cleaned up. there isn't much flash to deal with.......basically, squaring thing up. I'm going to follow the paint suggestions in the kit, since it is suppose to be accurate, to depict the car, when it ran in the 1968 winter nationals. I cut the decals in two sections, so I could slip them in the glass bag for safe keeping. I do have one lament......the tires are a hard rubber. the slicks were slightly deformed, having a dip in the centers.........roughing them up was a bit of a chore. if anyone gets this kit, the tires can easily be substituted. you can buy accessory tire sets at most online hobby stores...I have bookmarked quite a few. these parts were laid out too. as you can see, I used the British Scarlet again for the engine color......makes for a very nice orange the rear differential is comprised of three parts......there were assembled prior to painting....haven't painted it yet though. the differential cover is already in place......the pumpkin was added later. the intake and the timing cover is on that strip of tape, being painted. the fuel pump is on the timing cover......I painted it as I have seen aftermarket pumps look like. with the tires roughed up, the backs of the rims were painted flat black. you see a trace of red...... it was my thought........looking at the tires, through the rim slots, you would see white from the backings. since the sides of the car is going to be red, I thought that there should be red in these slots. they look pretty good. the proof will be how they look on the model. the last thing I did in this session, was to assemble the intake and timing cover on the engine.


-
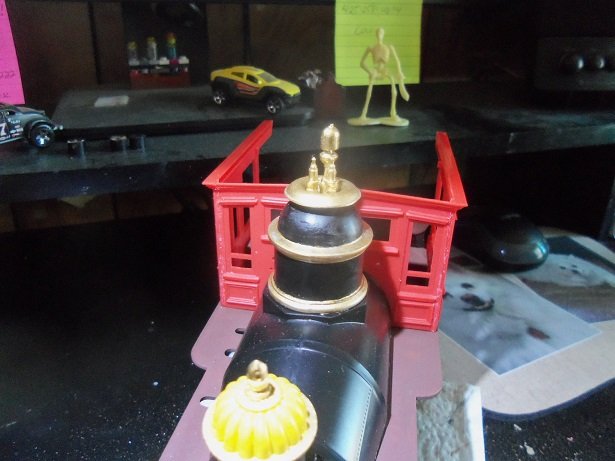
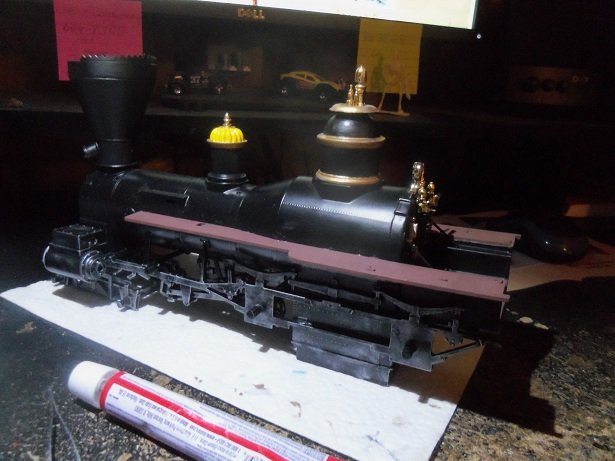
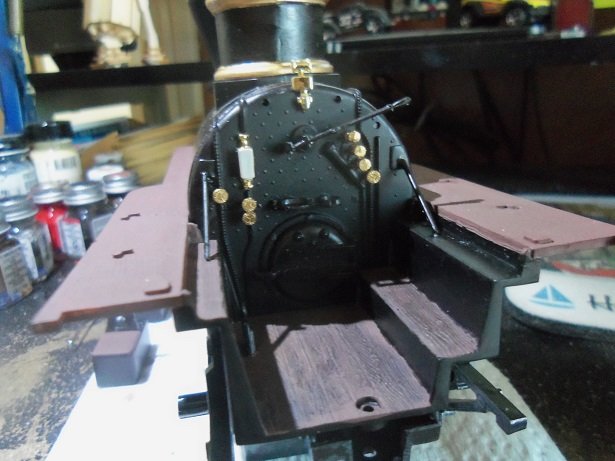
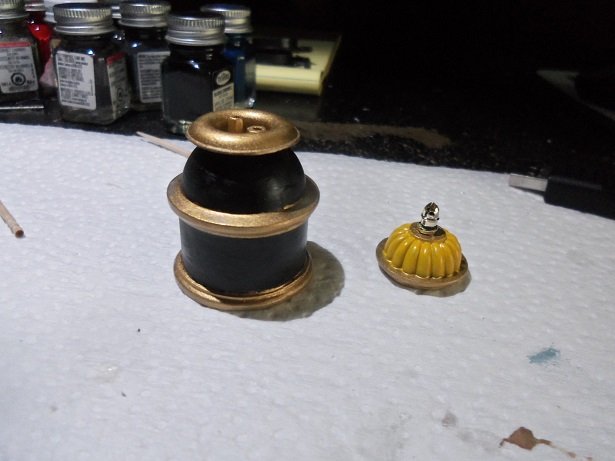
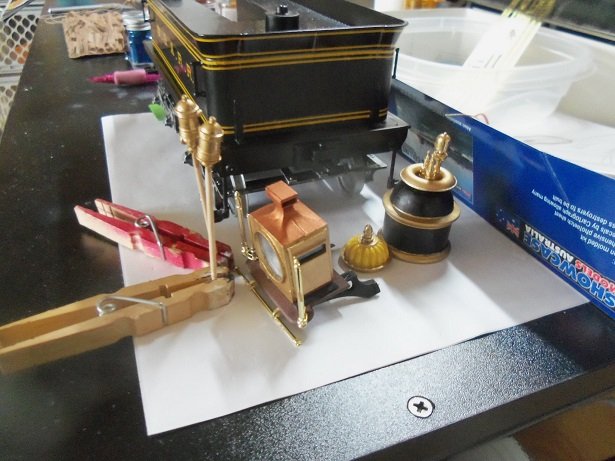
today's update is brought to you by......the letter 'P'.............the campfire roughing it continues after finishing the touch ups to the cab, populating it was the next order of business. now that I have the flat red {and other colors for the next big project}, the cab walls and cow catcher can be painted. I kept with the brass {gold} color for the knobs.....I didn't go nutz. the coupler box was also added. I have one knob that is still MIA........flew off the tweezers and I haven't found it yet...... errrrr, correction......I just found it while talking to you, my ocd kicked in. I thought to use the mouse pad I got for Christmas {Gibbs got it for me}, and I wiped under the shelf that holds my flat screen {clean out the dust kitties}..............and of course, it commenced the search for the knob all over again. I looked down on the carpet under my chair........and there it was........a tiny black speck! Oh JOY!!! adding more parts to the cab....the steam dome was added time to get the seats squared away......they will be needed soon. they are being finished with the paint work...they need their back cushion. there is a water level sight glass.......and the large gauge on top of the boiler. there's still a few more parts to be added before the cab walls go up. I will be adding some grunge around the boiler door and the floor in front of it, before that is done.
- 245 replies
-
- 14
-
-
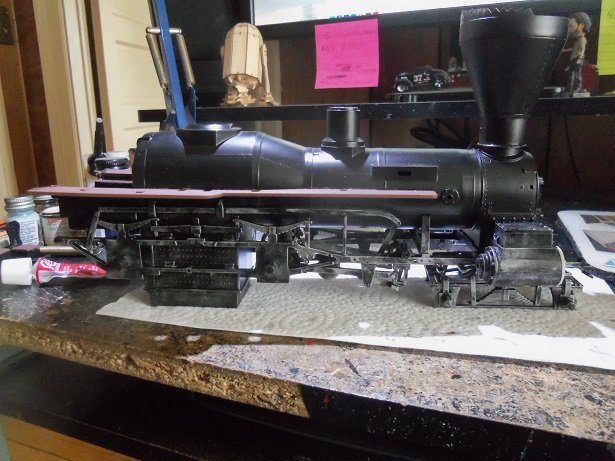
the work week is over........time for another update me thinks I did some work on the General today........a bit nerve wracking though since the landlord decided to redo our bathroom this past week........suppose to carry on till next week sometime. they've already been in there a week.....we're feeling the effects of no toilet and shower. it sucks! the good thing is that our younger son Kevin lives close by.......he gave us a key to their apartment. the landlord was nice though and gave us a porta-potty to use...............yea.......uhhhhhh no....the thing is a pain in the butt! I'll leave it to your imagination, as to what I have to do with it when it needs to be emptied {and please don't think of what was done in "Christmas Vacation" } anywhey..........when I looked in the camera, I found that I hadn't shown Friday's update. so......here it is. the domes are painted now, as I had mentioned earlier. they need to have the rest of their parts installed.......except for the sand dome.......it's already done. the other parts.......well, I should have given them the dip too. cleaning them scarred the heck out of them, let alone the face that I had to assemble them too. so while I was doing that, I though to do the flat steel dry brushing to the pony truck. further thinking about this, I figured that the entire lower part of the loco would likely be the same grimy mess.....so I did the lower length of the loco too. as with the tender trucks, I will be adding other aspects to the grime situation........I haven't done it yet. a few other parts were assembled and touched up.....set aside for future installations. the steam dome is finished and drying.
- 245 replies
-
- 11
-
-
white is probably the worst color to paint.........and on metal no less......... looks really good!
-
look'in awesome ........the size is even more amazing! very well done on the tubing........that looks great too
-
congratz on finishing your Victory...........even the ship's name says it all
- 1,319 replies
-
- 4
-
-
- caldercraft
- Victory
- (and 1 more)