
HOLIDAY DONATION DRIVE - SUPPORT MSW - DO YOUR PART TO KEEP THIS GREAT FORUM GOING! (Only 13 donations so far - C'mon guys!)
×


popeye the sailor
-
Posts
16,007 -
Joined
-
Last visited
Content Type
Profiles
Forums
Gallery
Events
Everything posted by popeye the sailor
-
 glad to hear that you finished the model Hank! she looks absolutely stunning! I will have to look in at the Model ship Forum.....I'm a member there as well. I recently acquired the Tamiya kit of the New Jersey 1:350....... the fellow who was building it past away.....it will need some touching up, but what he did on her looks good. I know that I will never do the level of expertise that you have, but your log will be a great source of information
- 187 replies
-
- 4
-

-
- new jersey
- trumpeter
- (and 2 more)
-
thanks for the good word gents! glad to hear Mark......I won't add the mirrors then {saves me the work}. my thing about the glass Ken, was that it had multiple injection pin marks......thicker than most clear parts, and worst of all, the other clear parts were on sprues that were connected to the middle of the windshield / rear windows {in the center which left a big empty rectangle at the roof} it would have been better, if all the parts were separate, like the vent windows........looking into the car, the molded roof area can be seen and it looks ugly. usually, I will paint these areas, in an effort to hide them somewhat. no matter now........she's off the table.........the General is sitting on my desk now I'm starting to work on the loco........touching up my mistake and will have more on that build soon. again, thanks for following along......it's not a bad kit......it just seems like there was something missing {parts wise, ie the extra parts}. when I get far enough along with the train, I may pull out the Sox & Martin kit........from what I've seen so far, it is really a nice kit. thanks also for the likes it didn't come out as I had planned, but it still was a fun build
-
I see all the pictures as well.........apparently I wasn't getting the notifications that you were posting though. I've been in the forum for a while now....all the logs that I've been following have been highlighted..........but not this one don't mind my other question.....after seeing the engine compartment, there's no way you'd be able to do it. I shouldn't speak too loudly......knowing your level of experience, you'd probably figure a way to do it wonderful model.......the level of detail is through the roof! your truly a master of card
-
is the other spitfire the same scale as the engine? are you planning to install it?
-
she looks fantastic Frank!! figuring things out usually takes most of the time........the irony is, that once you get 'em the way ya want them, it's when your almost done they look good though......some really great work!
-
good to see you Nils..........and you bring the tidings of a new project! I'm in! clinkering is an art in itself........some of us do it without even trying {just don't fare the frame }. kidding aside..........with your experience, you shouldn't have a problem mastering it! looking forward in seeing more of your fine workmanship!
-
Phosphate railroad car by Canute
popeye the sailor replied to Canute's topic in Non-ship/categorised builds
quite a family -
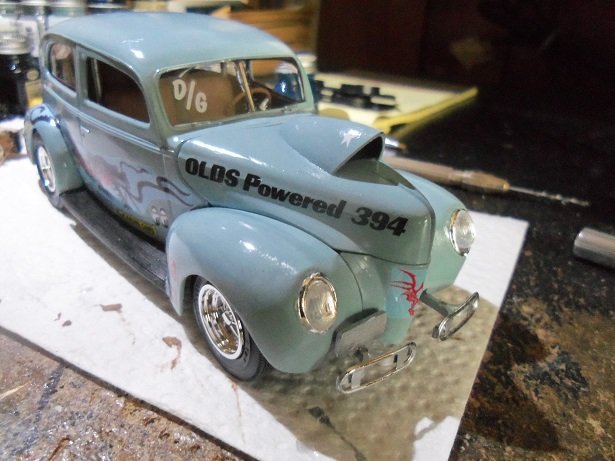
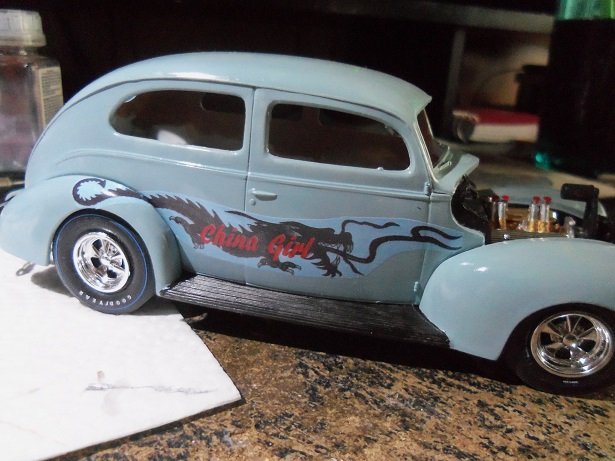
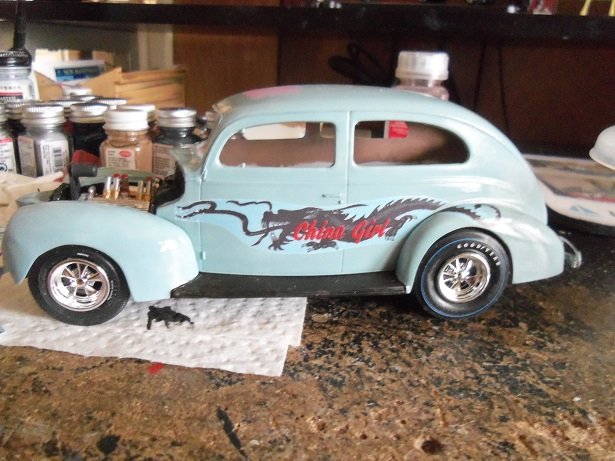
she's ready now! after I finished posting, I added the headlights, the center windshield column, and the tail lights. I also painted the wiper arms and door handles. I even trimmed the tabs for the vent windows.....not gonna add them. I tried to get some shots of the interior. I added the gauges at the last minute.......they were supposed to be under the dash. wher I have them seemed like good a place as any painted the tail lights with some engine red so.......she really is finished. thanks for the good word
- 67 replies
-
- 12
-
-
Phosphate railroad car by Canute
popeye the sailor replied to Canute's topic in Non-ship/categorised builds
with my first wooden ship being non laser cut, I learned to scratch build from the start. a little different than plastic, but not by much. it affords so much more freedom and creativity -
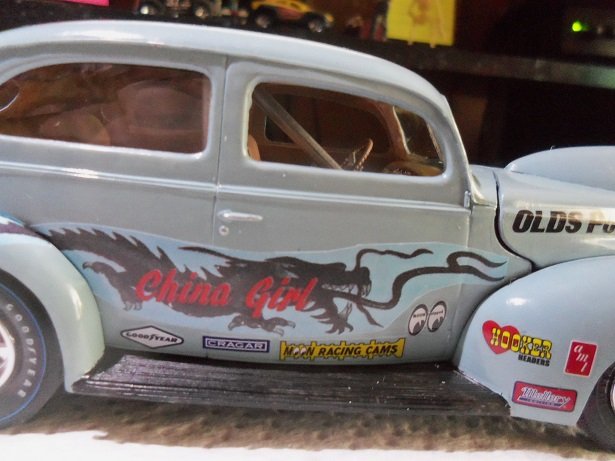
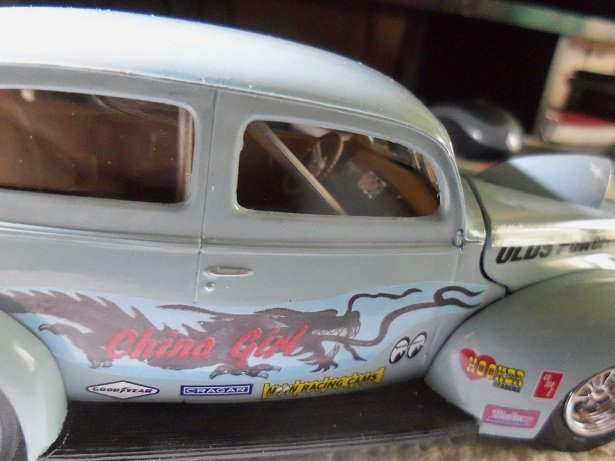
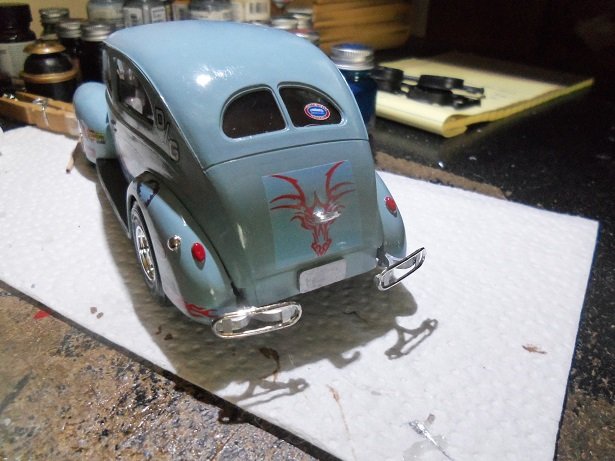
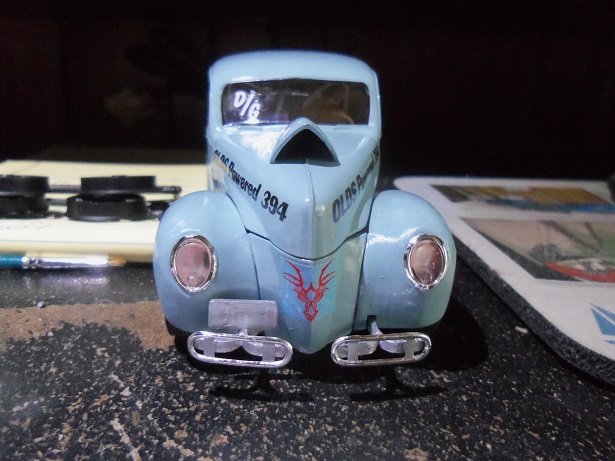
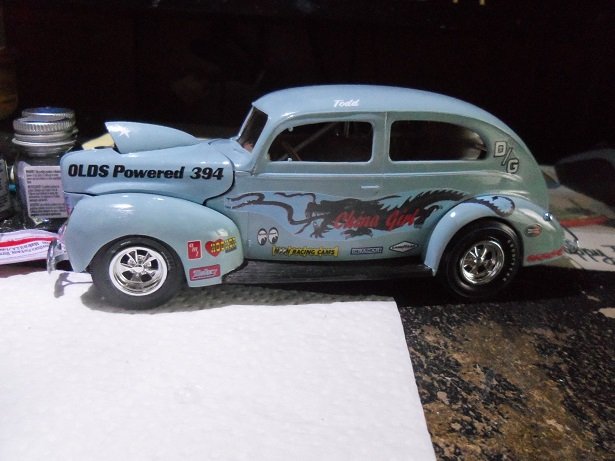
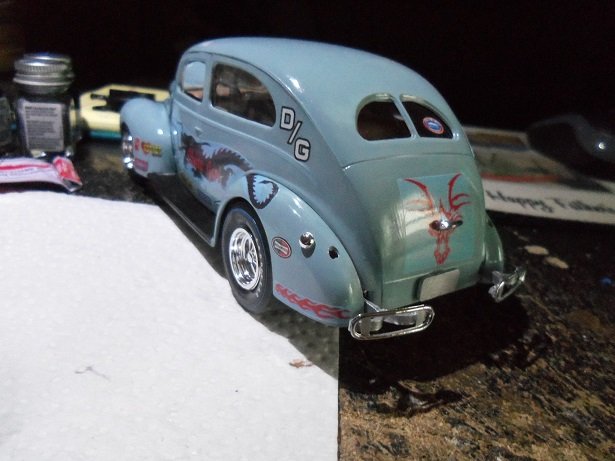
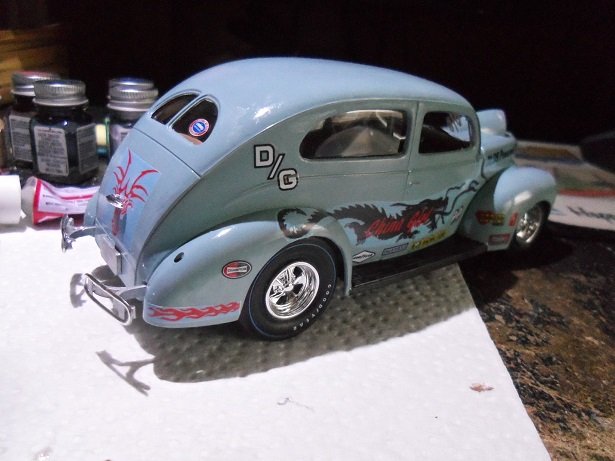
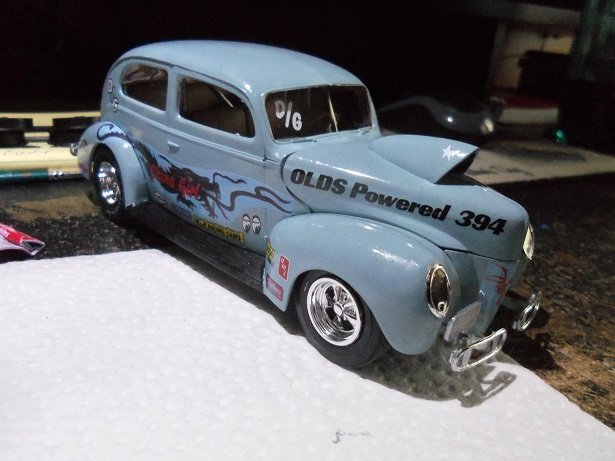
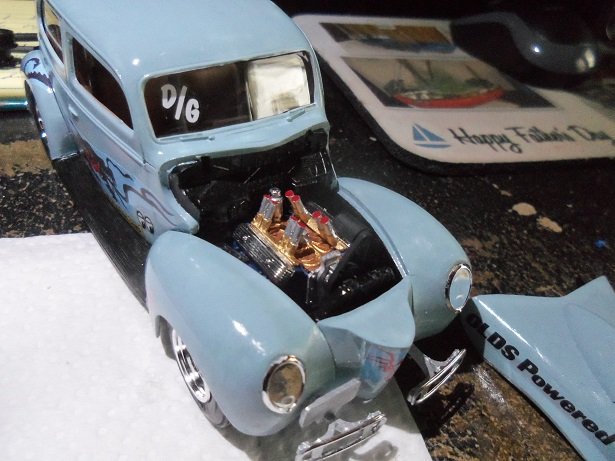
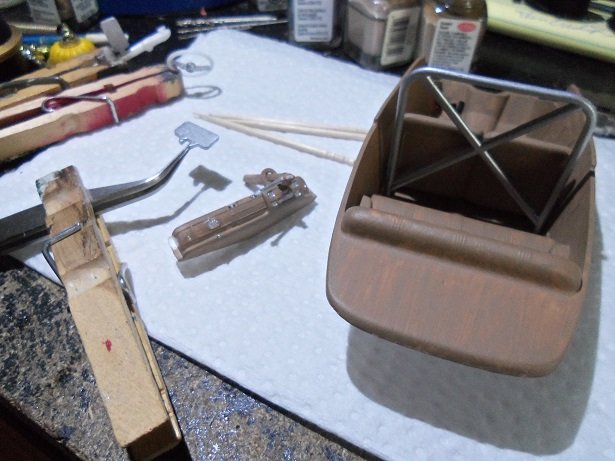
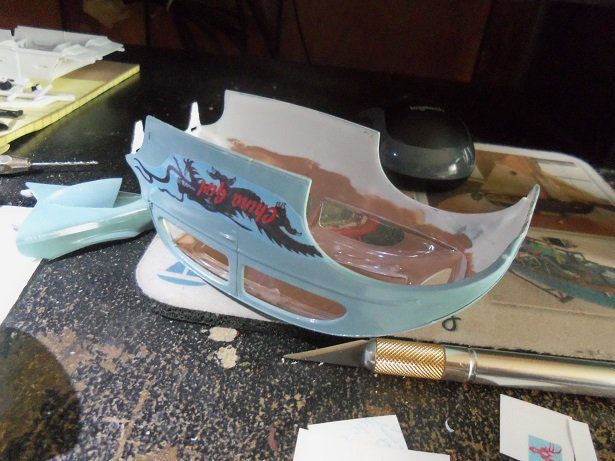
the evening yielded a technically finished model..........only three bits to add to it actually. again..........no side view mirrors! what the hell's up with these companies anyway?!?!?! I haven't added one {two if this was modern times} yet........I can make one easily enough. I spoke of a mural of sorts for the front grille, which is the drag version, according to the instructions. I printed an image of geisha women in full dress........they look really good, but I chose not to use them. I also found a drawn image........looks kinda sexy, but at the size I needed to use, it would have lost some detail. headlight glass is one of the additions I need to make. the center column in the middle of the windshield is another. I didn't get an interior shot........too dark in there here's the driver's side view. I didn't add the vent windows either....should have trimmed the tabs off. taken from the driver's rear, I added the same mural to the trunk lid, accented by the handle {if it was a picture of Jimmy Durante, it would have looked great} . I had flames that I wanted to add.......but in all the milling around with the program, I think I erased them in the program itself! hopefully not the ones that did survive, I was at odds where to put them........so they decorate the bottoms of the rear fenders. the tail light are not in place yet either.....they need to be painted and installed. that's basically it, for the parts left to add. the passenger rear......... the passenger front......... in the beginning, the hood would stay in the raised position. but since I trimmed the hood tabs, it won't now. I'll have to do the hum drum engine view by removing it. the undercarriage.........I had covered the outer interior bucket. no white shows anywhere. and that about covers it.........I'll post additional pictures, once I add the rest of the parts. I'm glad that I was able to pull off most of my ideas, but it misses the mark here and there. made no sense to change what I wanted to do. thanks for following along.......it must have been somewhat interesting.........I haven't had to wake anyone, now that I'm pretty much finished I didn't care for the official video........a tad offensive in my view this one's nicer.

-
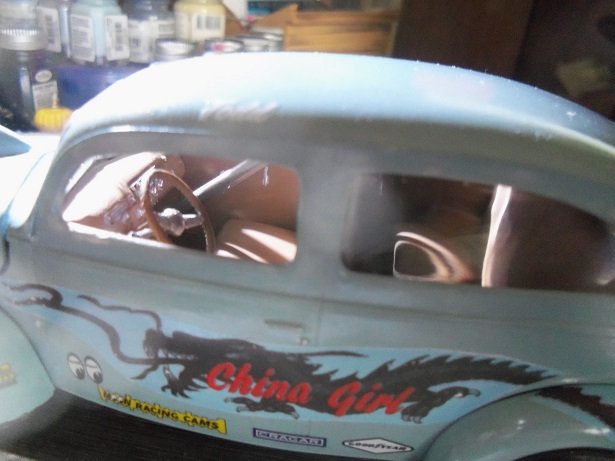
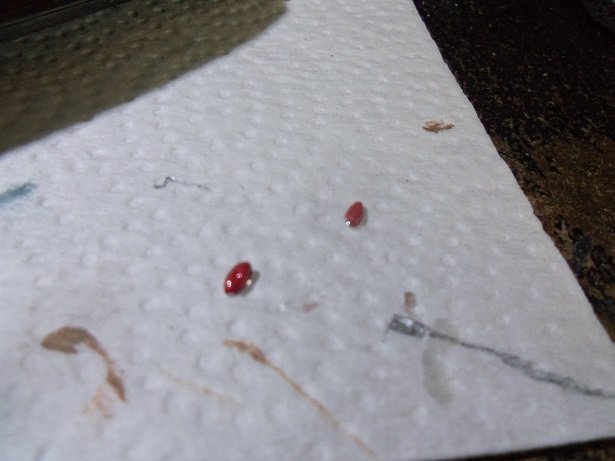
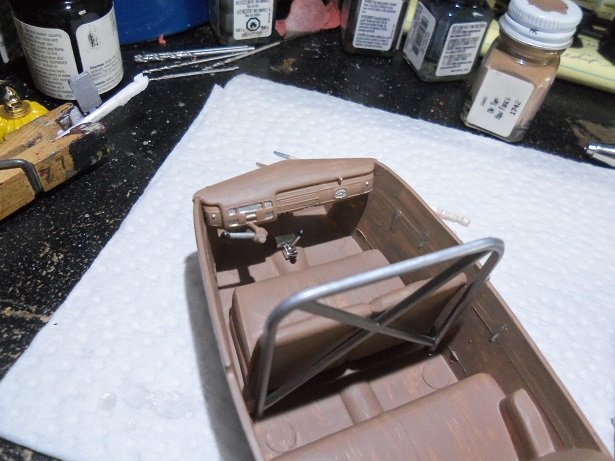
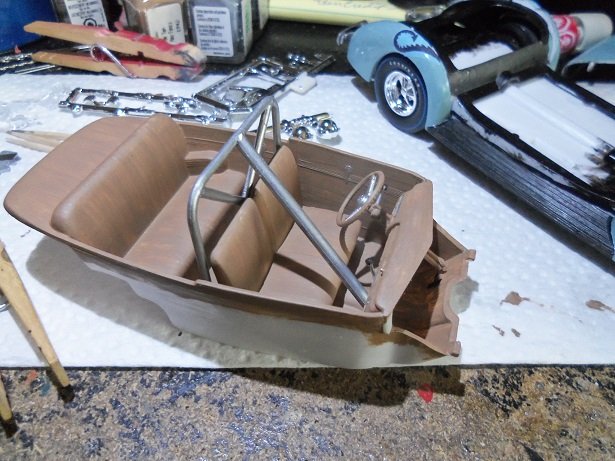
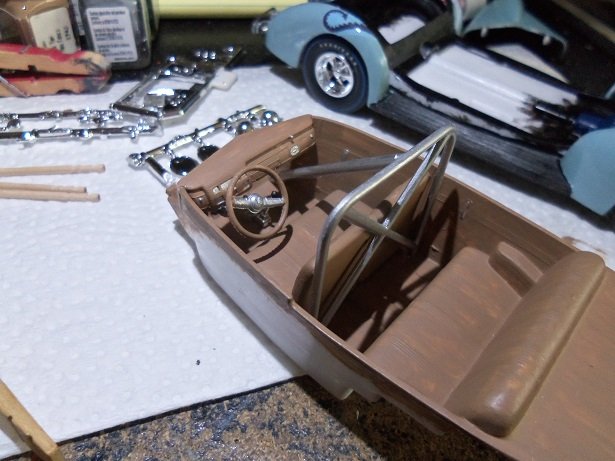
that was an earlier photo..........I had done some work on her yesterday, and into the evening. I started this session bu cementing the roll bar into the interior and painting the dash. the seats have already been cemented in place when I painted it. detail like the pedals and window cranks were also painted. still not totally happy with the roll bar.........it really should have a brace. there is a floor shifter that will be added, but this means that the "three on the tree" has to go. I caught this after I had glued the instrument panel in place. I turned it into a directional lever the shifter is from the 283 small block accessory kit that I had bought when I built the Coke mobile. I added the dragon decal on the passenger side of the car........made sure that both sides matched. the blending between the body and fender is a bit better on this side.......I didn't bother to fix the driver's side {it's only slight and not worth ruining the decal over}. working with the interior, I kept tapping the roll bar..........I couldn't take it any longer. I got some smaller size sprue from the small collection I have and made a brace for it. the glass leads a lot to be desired....poorly molded in my view. I didn't glue it in any way....the interior will trap it in place. I added the license plates and made up a couple of Arizona tags.........they started to curl soon after, so I took them off. I'll make some at a later date. I also started to play with the decals at this point. the interior was cemented in place...... areas on the underside of the interior was painted flat black.....touch ups made along these lines. I had to let it set at this time.
- 67 replies
-
- 10
-
-
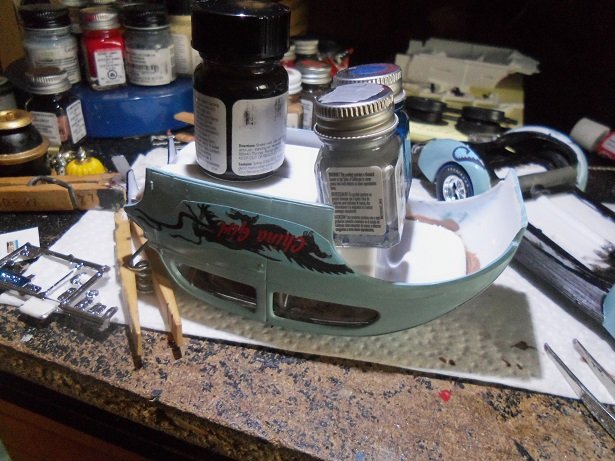
OK........update time I was a bit impatient. I knew that I was off the mark, in getting an exact paint color match. I will have to live with it I guess. I wish I could have matched it.......would have been even cooler, if these were full color decals. But, as mentioned, I would have needed to have the original image, so I could differentiate the layers. imported images will only be a single layer.......altering them in any way will affect the entire image. I could have tried them on clear paper, but I sorta spent my budget, and the budget director would have killed me {that's how she cuts the budget I sprayed the decals with bonder. and tried one........I should have made the name overlay larger the body still isn't cemented in place {obvious due to lack of interior}, so I had to cut the tail and lay it on the rear fender.
-
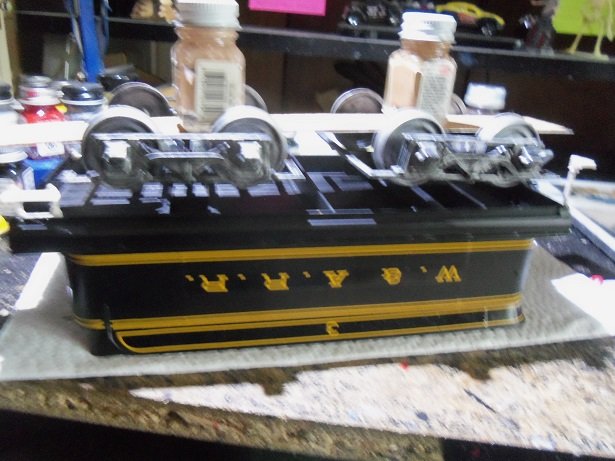
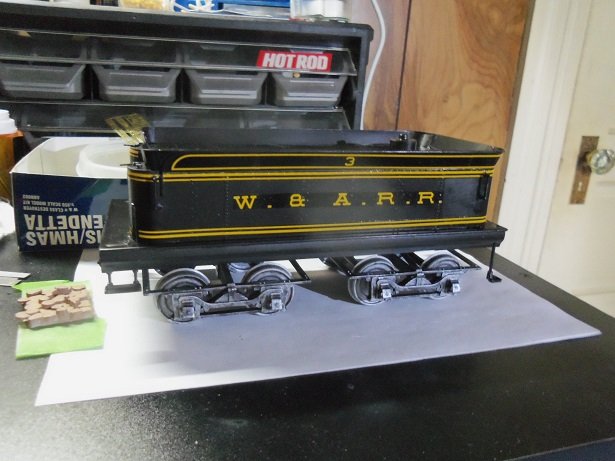
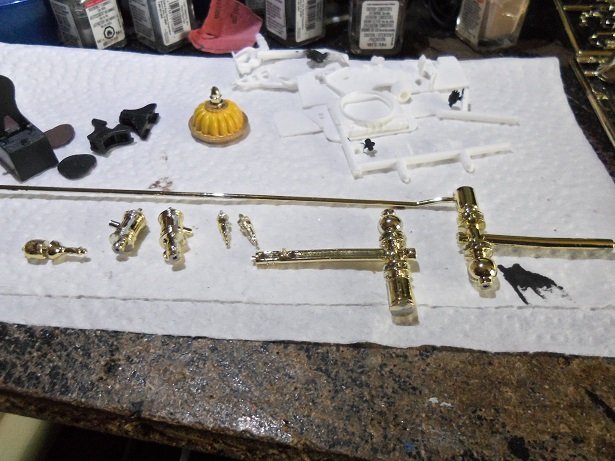
the update is small, but it is significant.......the tender is pretty much done. I do have a little more paint to do on it, the wood load, and the front coupler. the trucks are in place now.......I tried to figure out a way to make them movable, but I couldn't. the display is a straight section of track, so it's really not a big deal. as I mentioned....I almost caused a lot of problems. while the cement was setting {and it had been done quite a while in advance} on the trucks, I dozed off and my head hit the tender, breaking the bond on both trucks. there's been a few times that I've scraped the bridge of my nose, as a result of dozing off. I guess you could say that I'm not a fan of sleep.......been like this most of my life. no medical problem, I just don't sleep a lot <shrug>. back in the day, it was not uncommon for me to pull all nighters on a model build......I had many when I built the United States {Revell}........even some home improvements {painting}. it's just me.......probably explains a lot when it comes to my model building . so........I managed to get the trucks back on, as well as the handles and foot steps. not the best picture.........the rest of them were worse. I dumped them and took this one of the tender, as it sits now. the foot steps are painted, but I still need to do the touch ups and suggestions from Ken. I was thinking of doing it Ken, but I wasn't sure of how they should look.......glad that you cleared it up for me I have also finished the painting on the sand and steam domes......just need to add the other parts to them. I also have a picture of some of the plumbing that needed to be assembled...... time to touch up the loco and get working on it I have the flat red!
-
Phosphate railroad car by Canute
popeye the sailor replied to Canute's topic in Non-ship/categorised builds
they're missing out on the satisfaction of assembling a layout from the ground up -
really nice bit of rigging there what did you use to seize it? looks very life like............model's look'in really sweet!
-
yep.........Rt 114 takes you through town. I almost took a side trip out to Clough State Park..........back in the day we used to go there and give pony rides to the visitors. that is.......until the park folks would {politely} ask us to leave got to the point, they got to know us quite well......if it wasn't for safety reasons, they wouldn't care. I used to climb the cliff face near the Army Corp of Engineer's building {the dam}, and look over the lake....you could see everything from up there
-
Phosphate railroad car by Canute
popeye the sailor replied to Canute's topic in Non-ship/categorised builds
probably why it's so secular from the other modeling mediums....even with scratch builders. it takes a direction all it's own -
it was good to see my younger brother David.......I hardly ever get to travel out there, in and around the home town of Weare. he has a shop in Henniker. a small college town. darn place is growing at a fairly fast rate I sometimes wish we could move out there..........back out in the country. it's funny.........the pace is faster in the city.........but go out there, and everything slows down.........even the speed limits
-
Phosphate railroad car by Canute
popeye the sailor replied to Canute's topic in Non-ship/categorised builds
child labor was the thing back then it seems........I used to work with my father too. he was a truck driver, delivering institutional foods. I used to ride with him, or work in the warehouse. if I wasn't doing that, I used to work with my Uncle, delivering the Union Leader newspaper.........used to go all the way to the tip of New Hampshire.......Gorham, Intervale up past Conway and Wolfboro. the workload varied, but it was fun.....bank rolled my modeling. -
Phosphate railroad car by Canute
popeye the sailor replied to Canute's topic in Non-ship/categorised builds
when I was a lad, I used to have a Lionel set.......it had a plastic form layout and tunnel , on a 48 X 48 square of plywood. it was set up in the living room.....a small room off of the kitchen, with access to the bedrooms {walk through}. it should have been in the den, thinking back on it.......that was a long room, where the TV was........it was a much larger room too. it went well though, the way it was set up.......that is, until my older brother got cute with it and turned up the speed, sending it into the mouth of the tunnel, breaking part of it away. Dad got mad and banished it to the depths of the cellar......a small room where the water pump was located. determined, I decided to set it up down there........but in doing that, I must have damaged something on the pump, so it stopped working. not a good day in the Wenzel house hold........I can tell ya that! I can't recall whatever happened to it from there. when I started to work on the snow plow, I had to find trucks and couplers. HobbyTown was where I found them.......pretty knowledgeable people. I think I still have some of the parts in the kit / diorama, I have in the works for it. I was going to scratch build some buildings for it, but I've been getting catalogs from Micro Mark, and I sometimes browse Walther's and Model train stuff websites........I have others book marked. -
brief report........there is some progress.........last night I tried to derail it though. I had the tender on my desk........I was play'in a computer game, and in the boredom of chaotic mayhem, I dozed off ........I'll leave the rest to the imagination then add the goings on that I outlined in the China Girl build, and life has been a bit disrupted....to say the least. rain keeps me from doing things outside, so I'm quite sure that there will be an update.....perhaps later. as always........thanks for look'in in and follow'in along
-
just a brief update........pretty much the same between getting the car inspected.........which that pesky check engine light came on at the last possible moment and spoiled it.........that is on going. I just need to change the OX sensor in bank 2. I have 60 days to do it.......I have a garage that I can't really work in comfortably......so I need to do this outside, since I need to jack the car up. rain at the moment.......but I heard that nicer weather is on the way. then we have the landlord, who decided that this would be a good time to rip out our bathroom I can sit down today, so I should have something to report later on. thanks for look'in in and following along
-
Phosphate railroad car by Canute
popeye the sailor replied to Canute's topic in Non-ship/categorised builds
one of these days........... I've been wanting to start a small layout with the grand kids........the two oldest are almost there {age wise}. I see I'll have my work cut out for me., learning all the ins and outs -
chiming in a bit late.......but you answered some of the questions I had. it's such an interesting model....the architecture and construction is really stunning. I'm amazed that this isn't a kit.......the workmanship you two did on this model is really precise. surly there are other landmarks that could be done.......bridges come to mind, if you enjoy this type of construction. very nice model.......the display is really ingenious
-
the one thing I see is that the dead eye attached to the top, isn't captured on both sides. when the shroud line is rigged, it may pull to one side and might offset the looks of the assembly. running the fotock line though the hole, capturing the dead eye, and running it back though the same hole, would do the job better I think.