
HOLIDAY DONATION DRIVE - SUPPORT MSW - DO YOUR PART TO KEEP THIS GREAT FORUM GOING! (Only 13 donations so far - C'mon guys!)
×


popeye the sailor
-
Posts
16,007 -
Joined
-
Last visited
Content Type
Profiles
Forums
Gallery
Events
Everything posted by popeye the sailor
-
 ...and the instructions started......"and now we come to the step that your not going to like!" it would be interesting if they also came with a boring meter symbol beside each step. you'd see it often with ship kits........especially when it comes to the ratlines and rope coils I've never had a kit that had it's own disclaimer in it. you know you have to add that bit of detail........why they'd strip you down to novice, and you'll end up building snap tites can't let that get by you! still look'in good J........cleaned up and final paint, the landing gear will look great! oh and while your modding the trapeze, what is that thing that's sticking through the canopy....a sight glass? if it's not in your kit, you may as well add that too. very cool!
 -
thanks Ron for reiterating what Ken said....I must have missed it. brass knobs...........well that's bland thanks good sirs.....brass they shall be
-
that's the problem CDW.........I don't have much in the way of spare parts. there may be a couple of things I'll have to back away from. didn't take into consideration how compact this little critter would become. there's an update coming painted up, the rear end looks more the part Mark. that tiny bit of detail won't get by me thanks J.......coming out better than I thought it would. who would have thought that the admiral would have agreed with me on this?!?! wonders never cease!
-
....so much that set this clipper apart from all the others every time I look in, I'm amazed by the wonderful work you've done........so neat and clean. that wouldn't be me.......that's for sure sure I'd miss something!
- 1,208 replies
-
- 1
-

-
- great republic
- clipper
- (and 1 more)
-
your making progress Mark....that's what counts the parts look good!
-
she's look'in great Sam.......as everyone has said......I wouldn't change a thing! while it may seem an eternity work'in on the model, you can be certain, that when you are finally finished, your gonna have one superb look'in model to display nicely done!
-
thanks for look'in Ken yes, there are several knobs {valve shut offs} that are on the face of the boiler. wondering if there is any sort of color designation as to what function they serve. I think it would be a neat bit of detail if they did. I was look'in for a word for the cab....helm and pilot house are already taken booth seemed like just as good a term as any there is a tarp that when unrolled, covers the doorway. it's plastic........I was going to roll up some cloth and replace it....might make it look better perhaps {my luck...maybe not}. thanks also for the bits of information.......I don't know much about trains, and any info on them is good....big help! thanks OC........there's a museum quality train in this box somewhere....still look'in for it I'll settle for a half decent one! thanks for the good word!
-
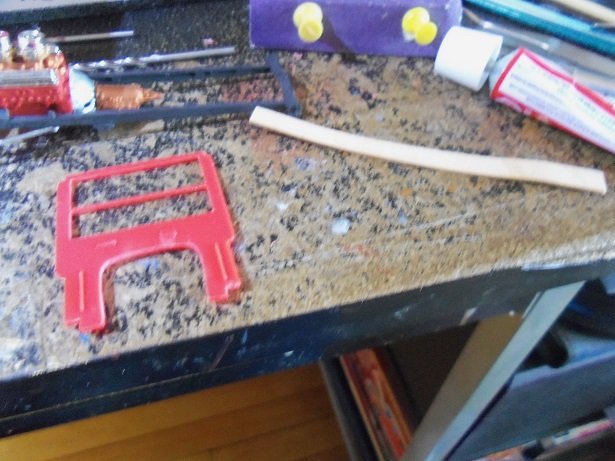
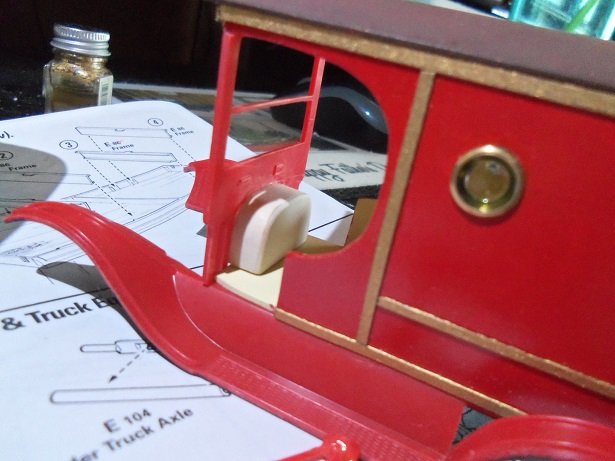
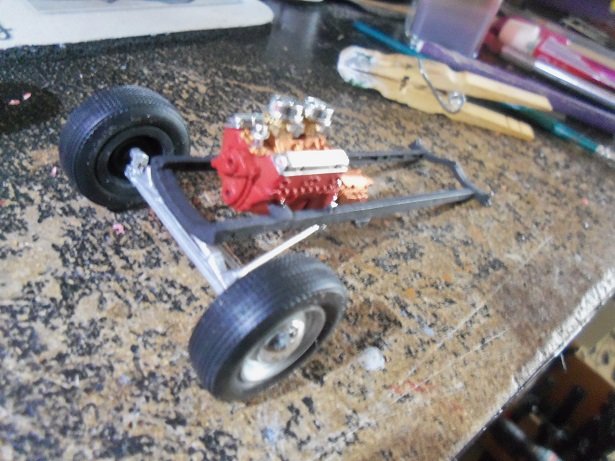
drat!..........I was hoping to have an interesting picture at the end of this update! oh...well.......next time this after noon, since I did practically nothing yesterday, I started to chip away at some of the modifications that need to get done. I still am surprised at how much I got done. for starters.....I needed to do something about the rear differential. it would be unthinkable, to have a rip roaring V8, to be turning the gears in a rear end, that was cutting edge before I was a gleam in me mother's eye not having a up to date rear end to shove under this soda popper, I guess I'll have to modify the one I have still a bit shy in the spare parts dept., I have these diamond looking parts from something or another, that might do the trick in extending the housing.. I've already shortened the drive shaft and bars, and reoriented the spring. all around the edges of this add on, I've filled it in....so painted, it will look better. I also cut out more material from the engine well. this will also make it a bit easier to install the fire wall. I can fill the open area back in if I need to, once the engine and exhaust is in place. the steering is another issue........it won't work the way it was intended. I will have to change it. first, the extra part of the steering linkage was removed from the tie rod part. then, it was cleaned up and painted aluminum. in fitting the engine, I also noted that the way I left the mounts jutting out on both sides of the frame, might be in the way of the exhaust. these two areas were trimmed flush with the frame and touched up. the fan and drive belt is added to the engine to get an idea how close to the radiator the fan would be. using the front suspension as a guide, I can now get an idea of how far back the assembly will need to sit. I'm judging...about 1/4 of an inch....to be safe, mind you...... taking some 1/32 basswood, I cut a strip in the way I can make use of the wood grain flexibility....and I wet it down. once set long enough..........not long.........it was dried off till it was just damp. then it was super glued around the opening, starting from the height of the tabs that can be seen........on both sides. a face was added to the addition, after it was sanded and trimmed to fit the body. it then went through another round of sanding, finishing off with fine paper to smooth it out. the preliminary fit looks.......not too bad. perhaps a bit more touching up. now I can cut that extra wood out of there, finishing the tunnel. that I did soon after. a dry fit revealed that I will need to sand in an indention into the underside of the floor. the transmission rises above the frame, so I will need to remove material to clear it. I can't show you a picture of the dry fit for this reason...bummer. one thing I can do, is add 1/16 to the frame.......I may have to anyway.........but try not to jack 'er up too much though, it will spoil the looks. knowing where the engine will sit.......it was cemented in place, waiting on the newly painted rear end {still in the process at the moment} to lift the rear up, so I can fit the body. now to find the right sprue to make the exhaust.........this rig is scream'in for side pipes! too bad I don't have 'em


-
keen to note that the camo on all of them is the same....very interesting. quite a project you have there.....it will be a pleasure to watch
-
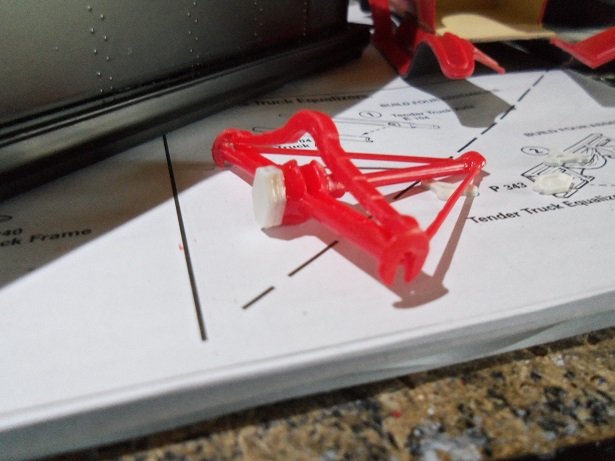
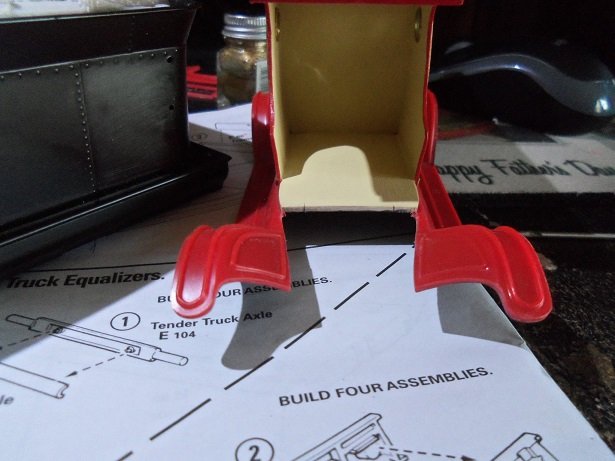
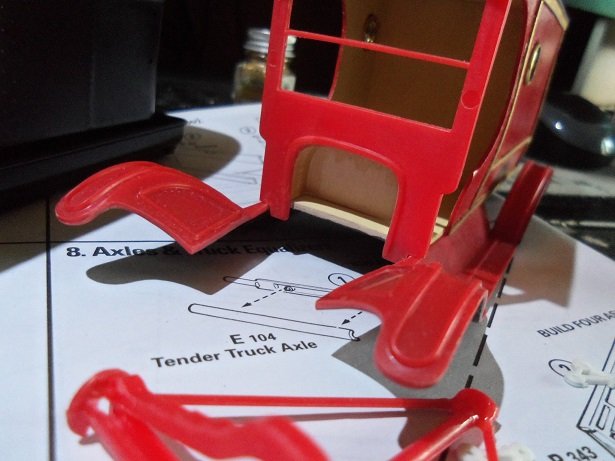
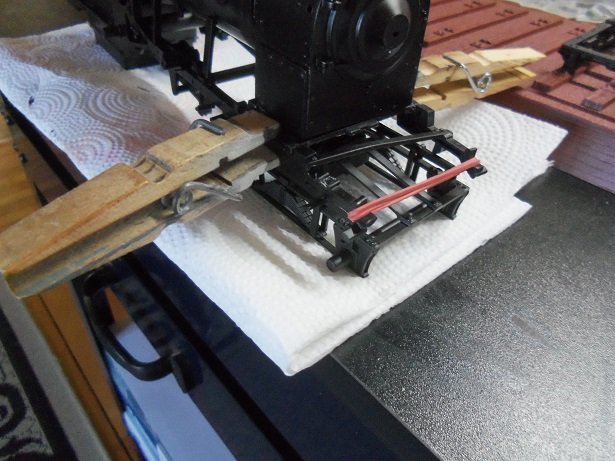
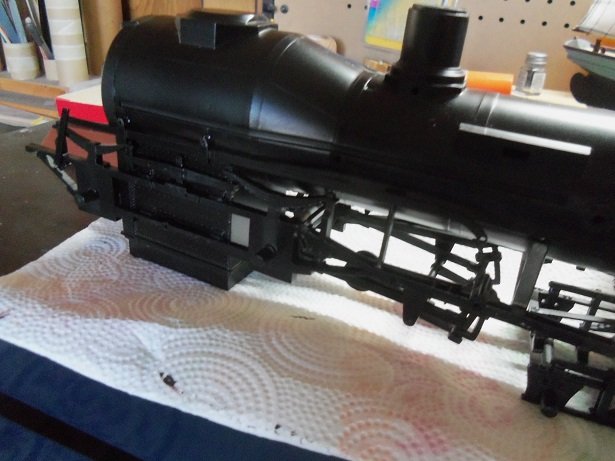
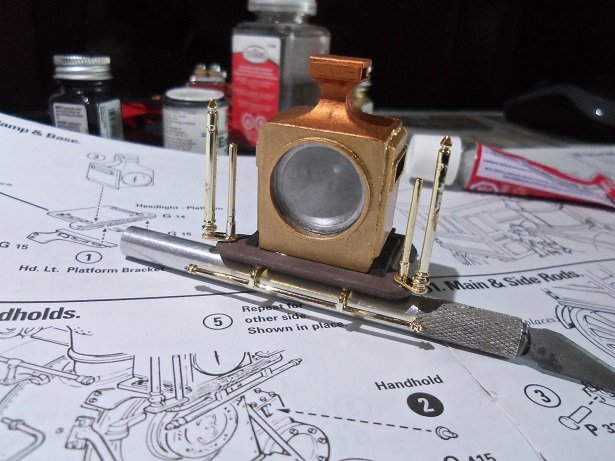
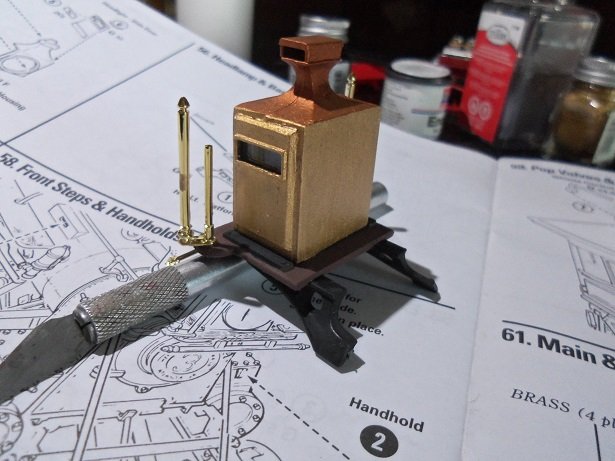
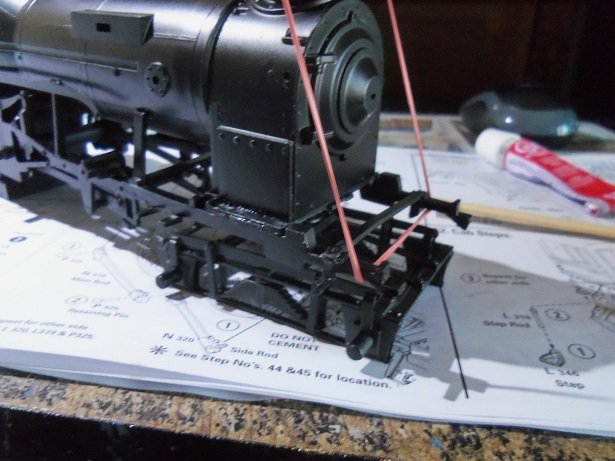
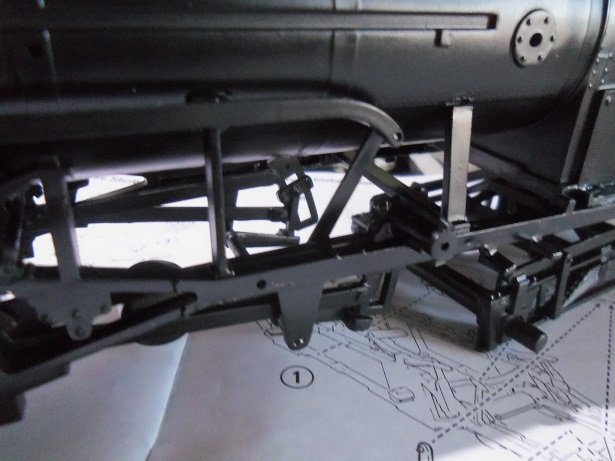
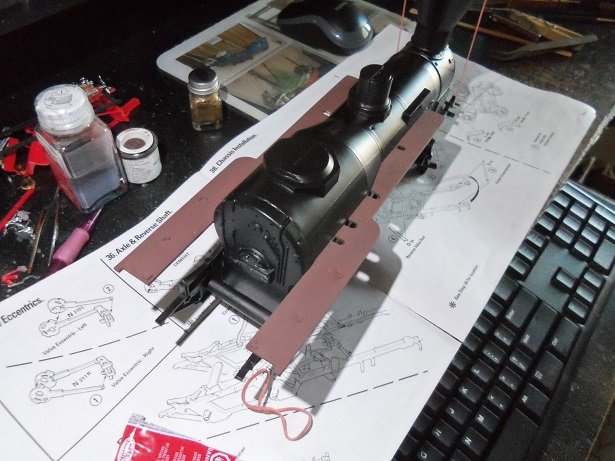
not having done any more to her, I guess this would be a good time to post an update. the pony truck is in place, after a serious game of tug 'o war, as I tried to spread the frame away from the boiler to fit the bottom smoke box floor. I ultimately had to break free the front cross member, so I could get it on top of the frame rails. the plate was cemented in place in two sessions.......first to the frame, and then to the smoke box. her it is being cemented to the frame rails. you can see the front cross member broken free on the right side. the reverse gear actuator rod was next to add......it was painted and set aside until now. I wanted to wait till I could do a good amount of assembly. the walkways that run along both sides of the boiler as painted and ready as well. ...hard to see, I know......it runs along the boiler, back to the engineer's booth. the head light is finished, waiting to be added. by this time, I could cement the smoke box floor to the box, and finish the assembly there. after it was done, the cross member was cemented back in place. once cleaned up, the cylinder / valve chests can be installed. they are in the paint booth at the moment. the wheels for the pony truck and the tender trucks have also been given the first step of their paint job. the reverse actuator lever was added to the rod, and connected to the gear assembly. it was hard to see where exactly it went, but once I saw how it fit, it was added fairly easily. the iron work on the walkways need to be done still........they are on the underside of each side. once done and dry, they were added as well. I wanted to add the engineer's booth floor, but I still need to paint the floor part. seeing that it had wood grain, it was a safe bet to paint it a wood color. the boiler door was also added to the boiler face. here is a good question..........on the shut offs and valve knobs.........do they have any specific color denotation? red for emergency.........green or blue for other purposes? if not...should they be silver or brass.......or just plain black? I started to paint the sand dome and stream dome too........more on her soon
-
the long black train..........used in old songs of the south and some country songs, as a mode of travel when they die. there are also songs about ghost trains, as well as one truck driver hit 'Phantom 309'.. wrong?!?!?! no........noth'in wrong......the log's not dead. in fact, I've done a few things to her....I'll have an update by this eve'nin....hopefully, I'll have a bit more progress to report as well.
-
well.....it looks good, no matter how you slice it
-
as I've said.......when it comes to the model medium as a whole......train modeling has always stood alone. it's kinda funny too......planes boats and cars have seemed to jumble together......techniques and styles....and even the materials used. train modeling uses pretty much the same in materials and paint, and most if not all of the techniques are transferable and applicable to all mediums as well. articles I've read haven't really put a finger as to why this is so. the only reason that I can think of, is history and the roll that trains played in the modernization process. I'm a nostalgia nut.......the older the kit, the more it peaks my interest. Ambroid has been around for some time, and when I came in possession of the snow plow, I did some digging to find out when it was produced. around 1955 is my best conclusion. I've seen some of the more modern kits, the metal construction does make them look so much better. time has past since I started to write this.......the admiral finally goaded me into pulling the lights down from the garage. that led me to starting to rearrange the garage, since I had to bring my tool box home from the shop....they supply all our tools now. I got some of it done....it became daunting when I opened the drawers for the first time, since it made the trailer ride back home............all the tools are mixed up and shuffled to the back of the drawers! just as well, I guess........I need to rearrange them anyway, now that I have the extra room {tool space}. I hope you post some of the processes in creating your train pieces....I think it would be interesting
-
very nice progress J........I've found silver to be a bear...well, any metallic really.......in regards to finger prints. best thing I've found is to give them a light coat of clear lacquer or enamel. look'in really good!
-
you'll have to pardon me Ken...I'm not in the know about tapping metal parts....I'm not a big fan of metal parts either. but the reason for tapping the holes would be to fasten another part via a screw....how would the hole be seen? it's something I thought might be a good idea........not that I've done it as a practice this also goes for the scuttle butt information I've gathered about resin....I've heard that it's a bear to work with, unless one is experienced with it. since I'm a confirmed enamel user, I have little experience with acrylics or other brands of paint. this is good new to me though, because I have a resin Batman and Robin to paint I'll draw a bath for them right away! I've never owned an expensive airbrush outfit.......using the outfits sold by Testor's mainly. I feel that it's mostly the experience of the modeler that will dictate how the airbrush will perform. true, there are some that don't have the ability to paint fine lines and various functions, but as creative folks have reported, there are work arounds. here is a link to a friend on mine, who has tried many different types of airbrushes. perhaps there is something here that might interest you: Don's Airbrush Tips
-
hello Michael.......finally caught up to your log good to hear that your wrist is better.........shows with the mileage you've put on your log you've added some really great detail and looks even better when lit! glad to see your back at the table
-
whoa! ........you've made some progress! so good to see you've been able to get to the table congratz on you marriage! look'in forward in see the sails in place.
-
thanks J.....Alan has quite a few interesting blogs and articles on his site. odd that I didn't see this one these kits are quite versatile really....even the wood kits can be modified to create other known ships, as long as their construction and type are similar. the article is very true.......there are a number of minor problems with it........mainly due to the age of the molds. I forgot to mention that the part numbers are hard to read.......I kinda laughed when I read that I haven't been sloughing off on the General though........between cleaning the flared and flashy mating surfaces, I have been able to assemble some of the parts I have done and painted. I should have more on him soon thanks for waking me up
-
they do carry graffiti decals for HO scale trains....I got a few train sites bookmarked that have them
-
she's done! in spite of all the problems you had, she looks great! the reddish headlights.........you can call her The Werewolf these bodies were perfect to base a gasser on........the pug rear quarters is the defining touch. really nice looking car 👀 🏁 I've gotten two kits that sported the reddish tinted glass.......still got 'em in the spare parts box I started
-
the seams are my biggest peeve.........the older the molds, the worse they are. I'm going through a nasty bout with the train good to see the start of this fine model J.........I love the biplanes! the truss wires can be tricky, but when all is done, they are worth the effort. looks really good!
-
perhaps the reason for metal castings, is that one could tap drilled holes and use screws to assemble it. Micro Mark sells an assortment of tiny screws. resin is aimed at the more experienced modeler......it can be unforgiving if the correct cement isn't used. paint is another issue
-
hello Ken.........so glad you decided to show some of your work very nice! I've always wanted to start a layout, but time has been an issue. I see the older Ambroid kits out there and am tempted to pick up a few more........but then I think of the snow plow and stop short. I really don't need any more skeletons in the closet who knows......maybe once I can retire {major pipe dream}. do you have any that your currently working on? perhaps a log might be in the future?