


popeye the sailor
-
Posts
16,007 -
Joined
-
Last visited
Content Type
Profiles
Forums
Gallery
Events
Everything posted by popeye the sailor
-
 small problem.........just pop the lights and switch 'em, since the boxes are on the correct side to be honest, I didn't notice it.......just goes to prove how beauty can hide a minor whoopsie. so nice to see your work again Julian........she's finishing out to be quite a superb looking model. very well done!
 -
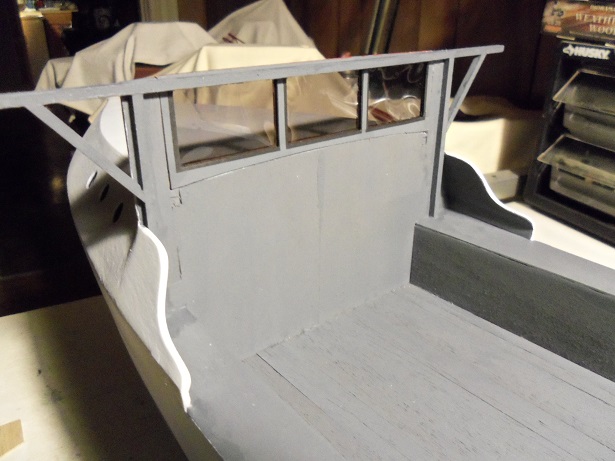
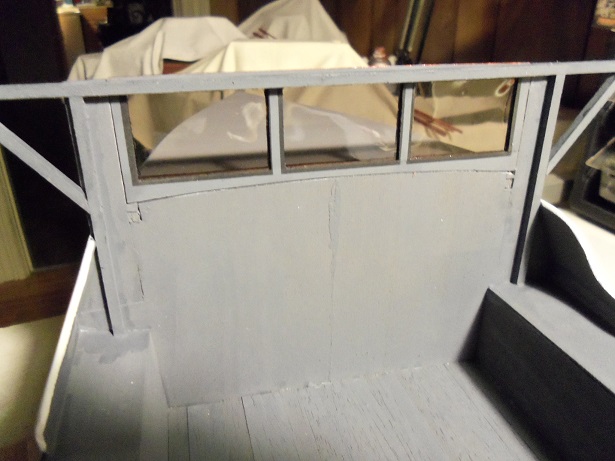
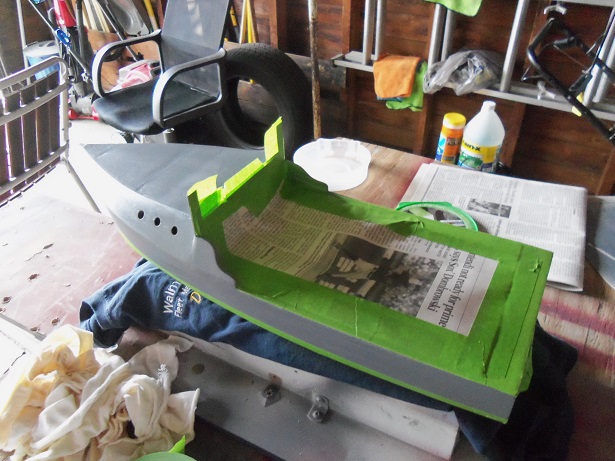
after I was done posting the update, I went back to the table. I made a boo boo in putting the outer part of the windshield together....I got a smear. this stuff dries clear, so it's not noticeable, until your right up close. I had to paint the gallows before I could fit it anyway.......took a q-tip with water and tried to clean it off. once this stuff is dry, it's hard to remove. I got most of it though I'm gonna hang some blocks off of them...that should dress them up pretty good. the windshield was fitted in place. now that it's all together.....the gasket 'round the windows looks neat
-
awesome progress Nils.......really super job!
- 2,625 replies
-
- 5
-

-
- kaiser wilhelm der grosse
- passenger steamer
- (and 1 more)
-
I'm imagining that your going to have back stays......are there any shrouds as well? well done on the boom and fore deck...masting and lights are neat too
- 348 replies
-
- 5
-
-
- pequot
- cable ship
- (and 1 more)
-
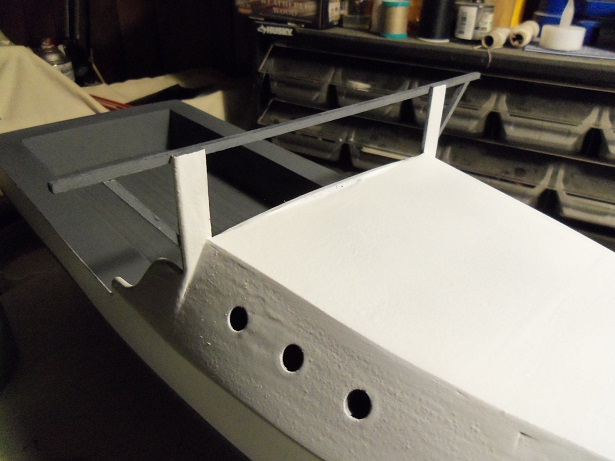
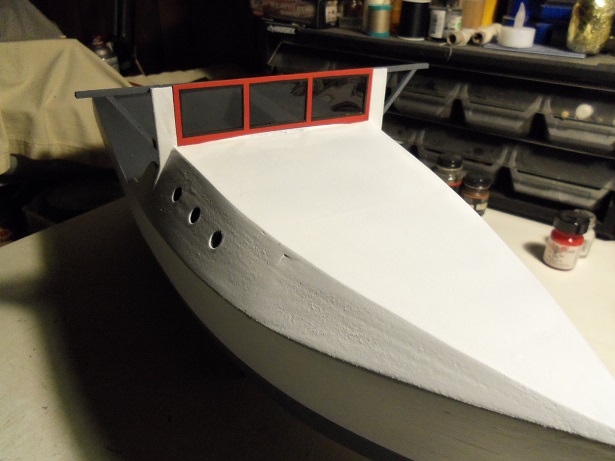
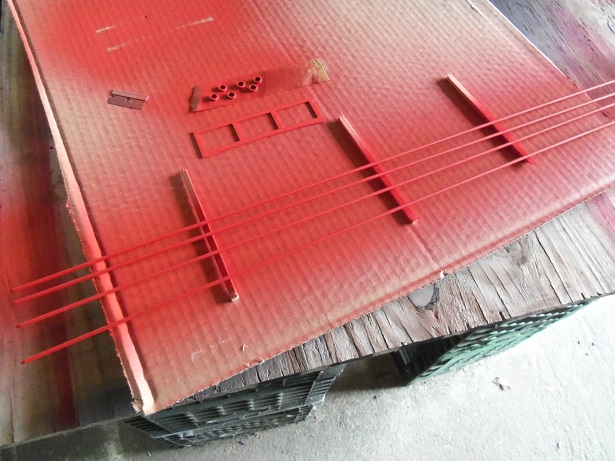
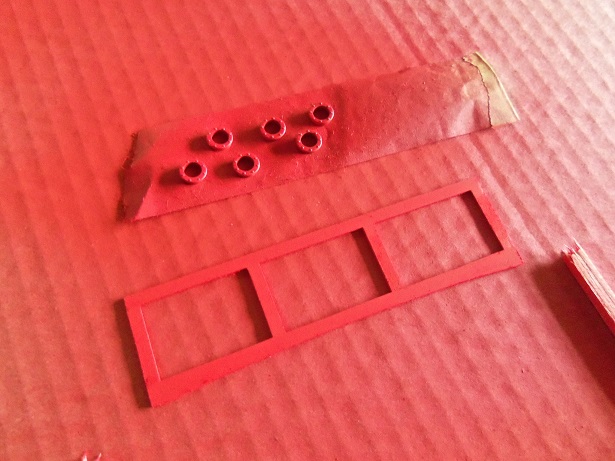
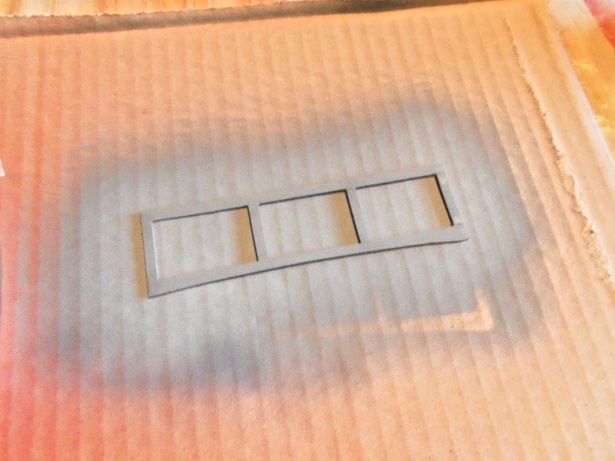
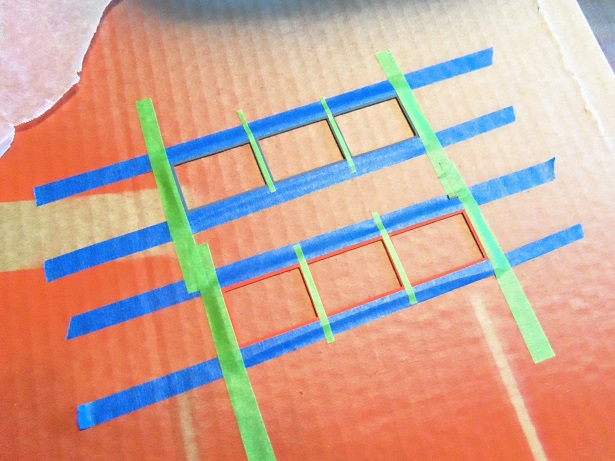
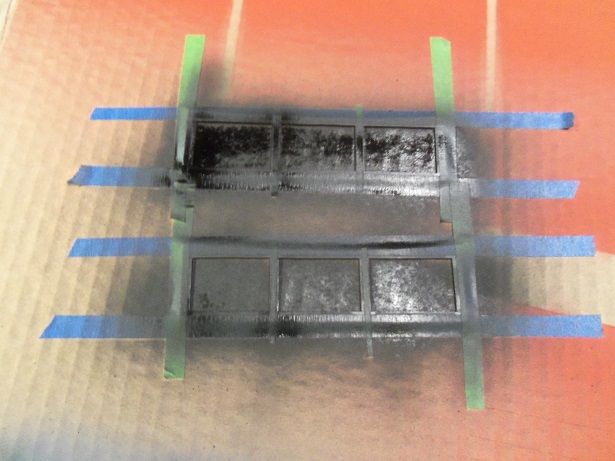
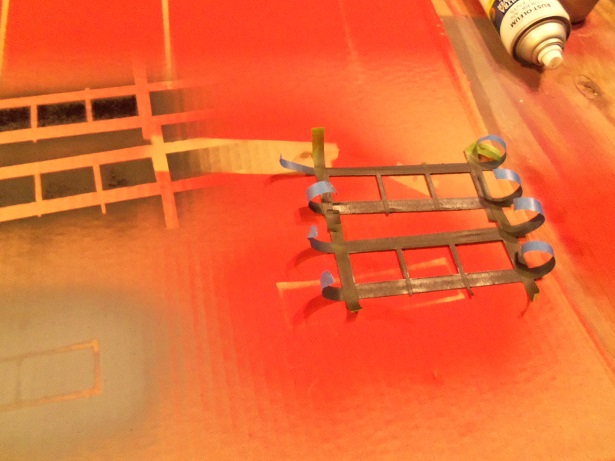
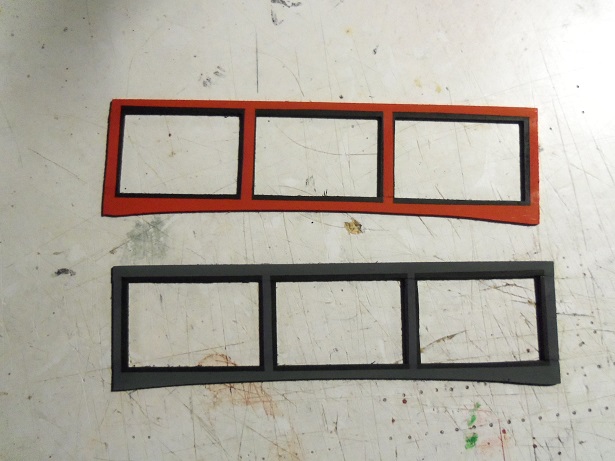
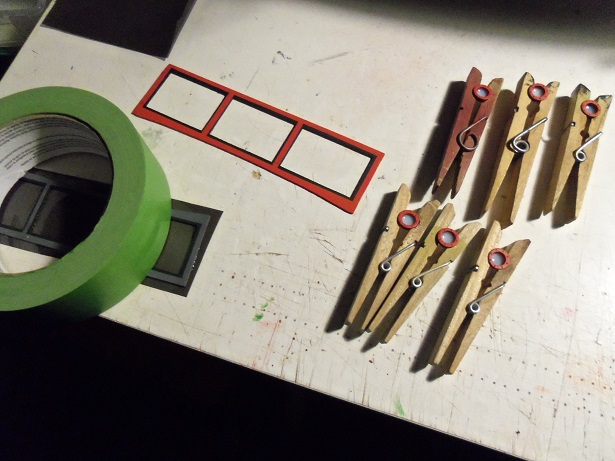
hello all...........thanks for all the likes! life got the better of me yesterday.......my son's car was a pain.......there is an issue with it that I haven't been able to nail down. >long story< I did get to do a little bit of toying around though....but not enough time to post it. I picked it back up today......later in the day {yea...I was being lazy}. I was going to show you these before I painted them.....this is some half round wood dowel, that I got a while ago {back when Billing USA closed down. Tom had sent me a bunch of odds and ends.......been trying to fine a good place to use them. the portholes were painted red too........anything that is trim. I also thought I'd get a bit creative with the windshield. one side will be painted red and the other side will be gray. I waited for these to dry. I had put strips of tape on some wax paper and cut them into small strips with a razor. I under estimated the length of the windshield........had to cut some more tape when I got out in the garage. both sides are masked up. I grabbed the flat black off the table.........found out that it wasn't any good. scrambled into the house to get a fresh bottle. there was some residual problems........but I got the job done. I thought there would be some problems with removing it from the card board.........but it came off alright once on the table, the masking was removed. give a decent simulation of the gaskets around the windows. a suitable piece of the tinted cello was cut and glued to one of the windshield halves with the window maker. there was also enough to do the portholes. I swear........I'm never going to run out of that stuff! once the windshield is dry enough, the other half will be cemented on, sandwiching the cello in between. it will take some time for the portholes to totally dry. I still have to finish the gallows, which also serves as the top frame for the windshield. I have a bit more to do there.

-
copper plates look good.......but if your going to paint over them...then you can use just about anything great food for thought. deck is looking great!
- 1,208 replies
-
- 1
-
-
- great republic
- clipper
- (and 1 more)
-
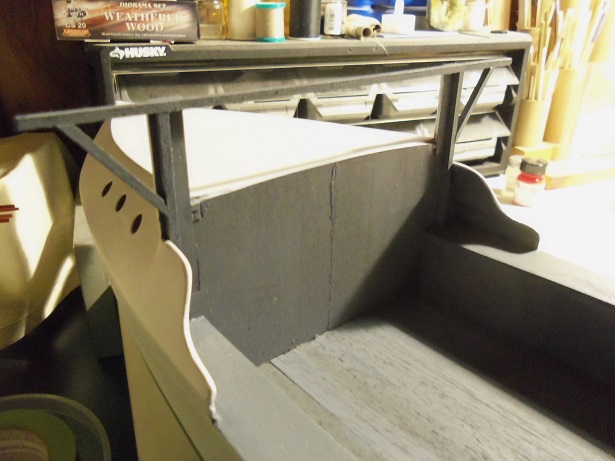
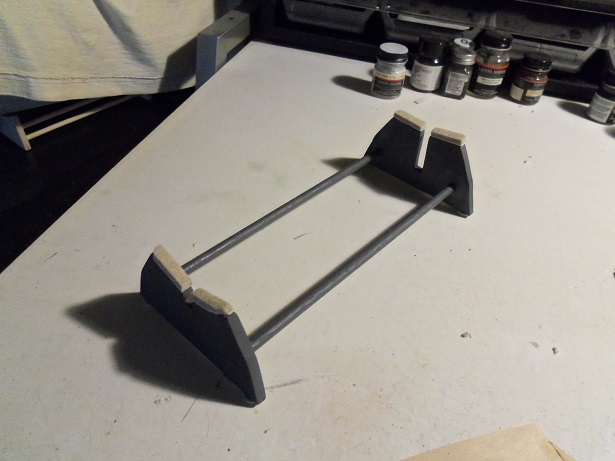
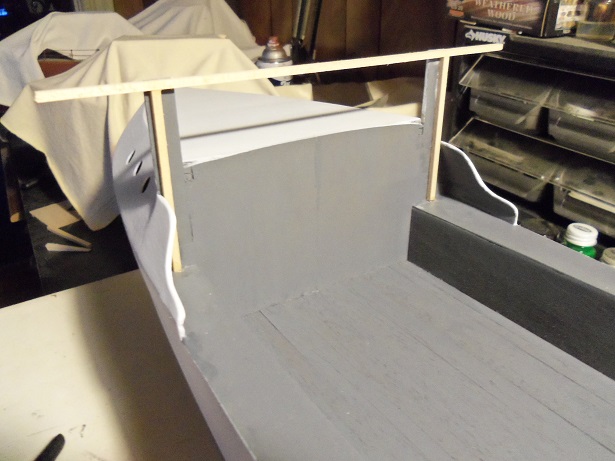
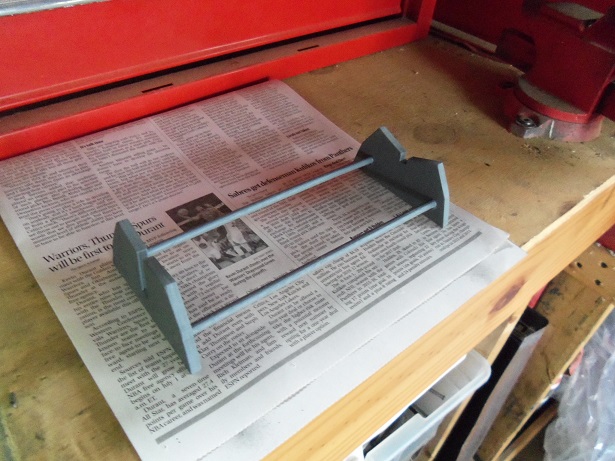
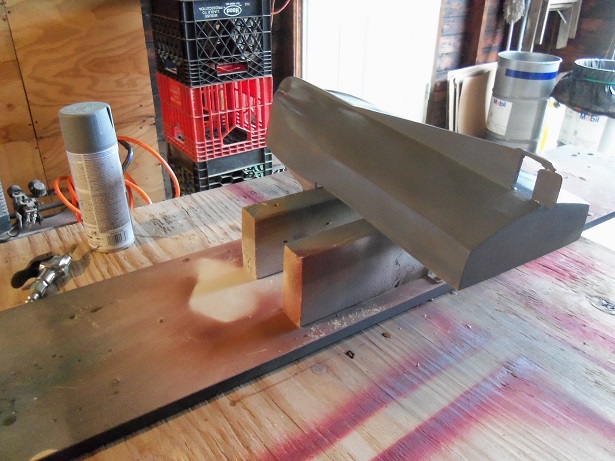
hello Ed........hope thing are well with you and the misses. yes, the basic paint is down.......the trim work will take over the scheme now. I still haven't gotten 'round to painting it yet. planned to get up this morn and start right in, but my son Kevin came home this morning, carrying on about his car. I found out that it's his car that is making oil spots in the driveway {he had an oil change recently}. I see that the filter is leaking........don't know how they could have messed it up.......but I guess it's dad to the rescue. so a small diversion is in order here. thanks for the good word and give Urmilla a hug for me. I do have a couple of pictures that I'll post for now. there is the stand.......I have the felt tabs on it. I should have taken a picture of the boat on it...... Friday, I was toying around with the "work boat" thoughts........I took a piece of 1/8 square stock and spanned it across the windshield opening, with a couple of clamps. I wanted to give it a pair of gallows.......I figured about a 1 1/2 inch overhang, but clamping the wood in place was as far as I got. Saturday night.......I measured it out and cemented the wood in place. a pair of support posts were added here.........there is still a few more parts to add. I did find out that the model master Battleship gray, is pretty much the same color as the primer....so I'm in good shape there. I should go and get some flat white.....perhaps. maybe I'll go while I'm out getting the stuff for Kevin's car.

-
where are the curtains? LOL! I envy you.........your own little niche. I can keep wishing.............. good to see the ECB again......I see you've made some progress on her. super nice work I'd disconnect that bell in a heartbeat though
-
sweet look'in ship's wheel Bug...........Chuck has a sweet little kit there
- 2,191 replies
-
- 5
-
-
- confederacy
- Model Shipways
- (and 1 more)
-
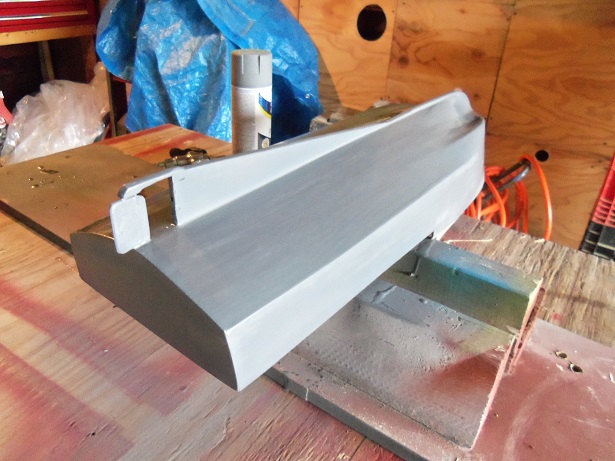
thank you all for the kind comments and also to all who hit the like button. ...and also another suggestion for the name! you in the running good sir! I'll add it to the list! now that she's back on the table, I decided to try out the idea of giving her a little work boat appeal. putting the windshield in place, I saw promise, as well as a thought about how the windshield will be painted. I did a little bit last night.......strange, because it's a work night and I don't even go near the table. just too darn tired............but I did. what I had assembled with clamps is now cemented in place and I have more to add. I,m taking the day off tomorrow...........an extra day to get a bit further with what I have in mind. for sure, there will be an update tomorrow welcome bdgiantman2.........it won't look so ghostly once I get the trim on. hopefully I can snap a picture of the two together. should be interesting
-
looking very nice Rob....deck planking looks to scale. no bulwarks........that's interesting
- 1,208 replies
-
- 1
-
-
- great republic
- clipper
- (and 1 more)
-
here is the link I was referring to: http://modelshipworld.com/index.php/topic/13831-my-airbrushes/ getting back to airbrushing has made painting easier for me.......a lot more control than the rattle can. I hope you find something useful
-
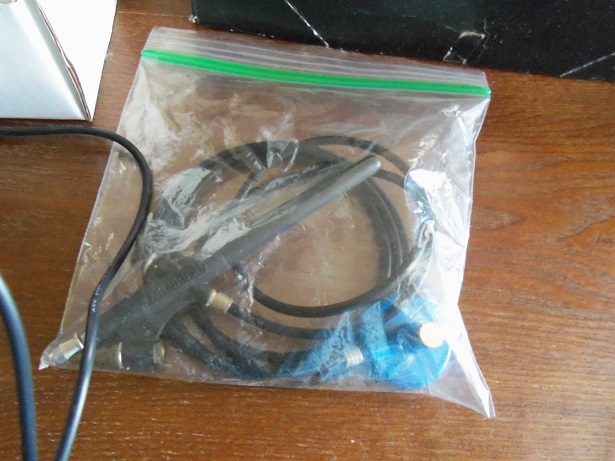
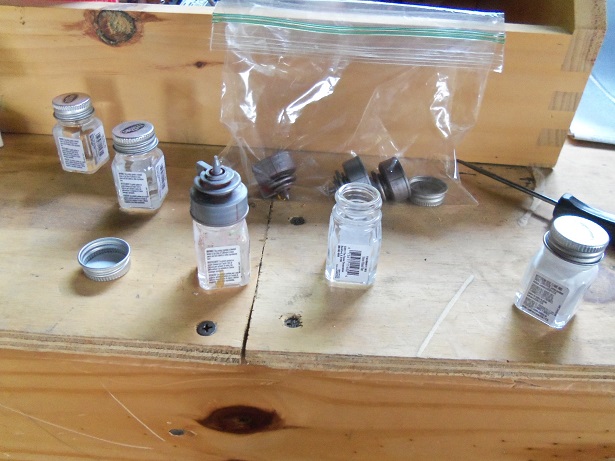
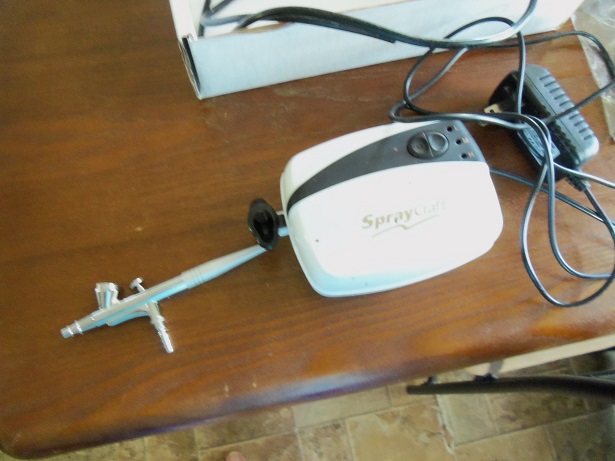
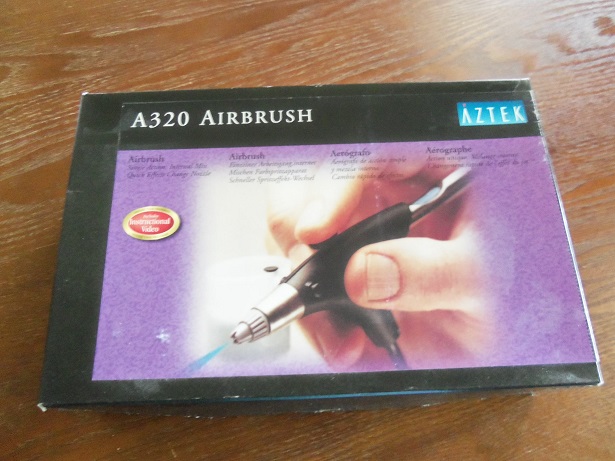
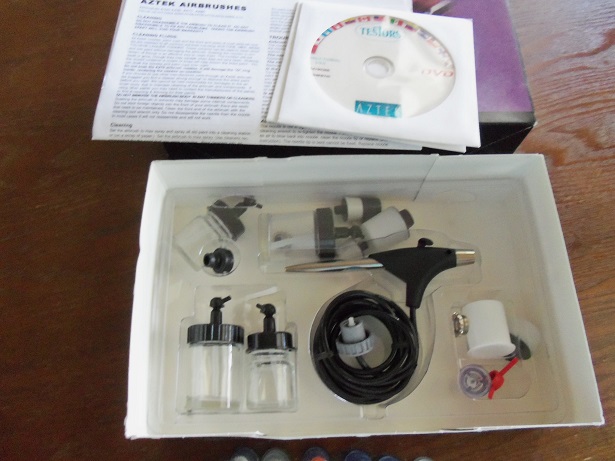
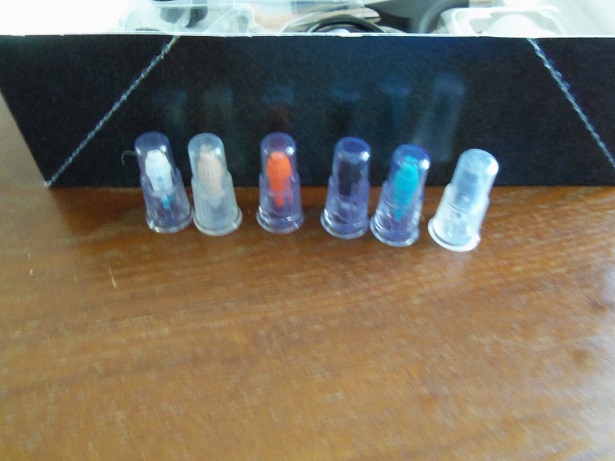
I am a born again user of the airbrush. I tried one in my younger days, but hung it up because of it needing so much attention......cleaning and such. not to mention......I was building plastic kits......mostly small tasks to do.....it just didn't seem worth it. getting back into modeling..........and finding a new love, building wooden ships. I found a huge need to get back into it....those huge hulls were a pain to paint with a brush. a friend of mine sent me one of his old ones..... this is a siphon feed......it has a port for an external paint cup. the paint is brought into the chamber, aerated, and sprayed internally through the nozzle. there is a cap connector for a compressed air can. I never got a chance to try it out though. I was in the local Hobby Lobby and I saw a kit, put out by testor's....the "Amazing Air" airbrush kit. http://www.testors.com/product-catalog/testors-brands/testors/airbrush/external-mix this is a different type of siphon feed......it is external. the science behind it is simple........it duplicates the act of blowing across the top of a bottle. air enters the ported top, pushes the paint up via a feed tube, aerates with the air stream that emits from the nozzle. Testor's also carries the EZ airbrush......which is nothing more than the airbrush itself, without the kit. the kit comes in many forms: auto paint enamels, acrylic paints, and camo paints........all boxed in the same size packaging format. it comes with a can of compressed air, but I adapted mine to run of of my Craftsman 25 gal compressor. it uses the 1/4 oz bottles......Testor's, Humbrol, and Pactra all have pretty much the same bottles.......any one of them can be used. http://www.testors.com/category/136949/Airbrushes I'm not trying to promote Testor's products or the company. these are just pages that I have bookmarked. I gather many sites that I find useful..... sites like this one: https://sites.google.com/site/donsairbrushtips/home I've known Don for quite some time, and he put together this review of god knows how many types of airbrushes. if you have a problem.....or a question...you may find an answer here. I do have two more outfits......to be honest, I haven't tried or used them yet. I did use the compressor from this one for a short time....has some tell tale paint spatters on it, to prove it. this is a Spraycraft outfit..........this particular one is a gravity feed. paint is put in the cup on the top, aerated in the chamber, and out through the nozzle. I have never tried a gravity feed before.......should be very interesting when I do get 'round to use it. ....and I also have this little gem......an Aztek A320.... if I told you how I came by it.....you wouldn't believe it. it is a kit........complete, with many added and extra parts. I am not sure how many nozzles come with it.......but I have several I found another nozzle in the box..........color coded as for what they do. it is a siphon feed, but this one is an internal mix........paint is introduced into the chamber, and sprayed out the nozzle. there are complete instructions and DVD's to accompany it. I have been using the EZ airbrushes since 2010.........quite an accomplishment for a $35.00 airbrush. one of these days, they will wear out {what they call a handle has already broken off one of them}, and when they do, it's nice to know that I'll have a back up. what worries me, is will I need to alter my style of painting, to use them?!?! these are what I have for airbrushes....I hope that anyone reading this found some useful info. know that you don't need the most up to date airbrush outfit.......you only need one that works. thanks for looking in
-
- 6
-
-
thanks Tom and Nenad for the kind comments........and to all the likes. it's working out well.....the build is almost caught up to the Jingle Belle. a group shot of these boats is going to look strange now........I saw the thread about builds in progress. I should snap a picture and post it there. even crazier, what if I took a picture of them all? sick! thanks Tom....yesterday was a nail biter that went down the tubes once the rain drops started to fall. good thing I wasn't using lacquer. I wouldn't have painted anything that week either........too cool..........slow drying. thanks Nenad.......I remember my younger days, first try with the airbrush. I hated brushes because of the streaks it left behind......so I bought one. it wasn't long before I hung it up.......too much of a pain to clean it. I went many years after that working on brush techniques.....some good.....some bad. I was going to post it here........but I think I'd get in trouble for it......but I have a few different airbrushes. I believe there is a thread about airbrushes here somewhere....I'll find it and post it there. for folks looking to get into an airbrush of their own, I think they will find it interesting. I'll post a link when I post it.
-
thanks for the good comments Rob and Mark....also, thanks for all the likes I know what your say'in Rob.......I can be at times, but not so much with this one. it's a work boat.......can't have it look'in pristine now, can we? some of the minor stuff, I'm not going to sweat....in fact, I'm rather glad that all I have is matte paint........it will add to the detail when I get around to doing the trim. "who does camo with gloss paint?" I appreciate your kind words............thank you:) thanks Mark..........didn't get much further than this........the sky opened up then the air was like soup! I gathered some material together for the next steps.......hopefully another update will come of it. thanks for the good word.
-
that's what happens to projects like this.......they have a habit to snowball well.......I guess.......there's your 'snow' Piet! are you going to add a building or two?
-
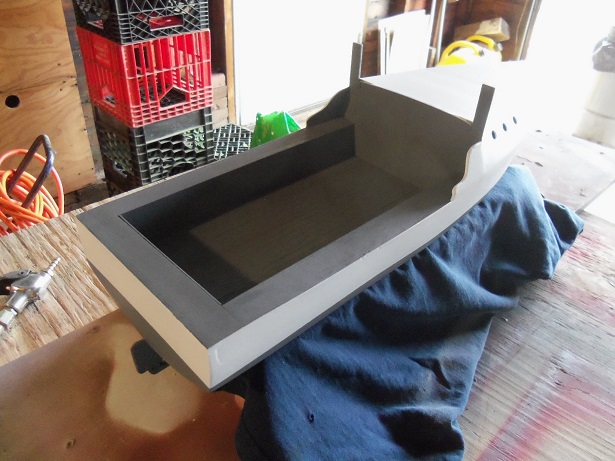
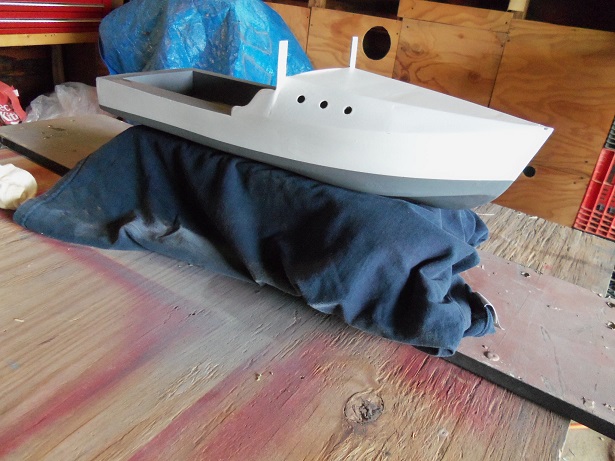
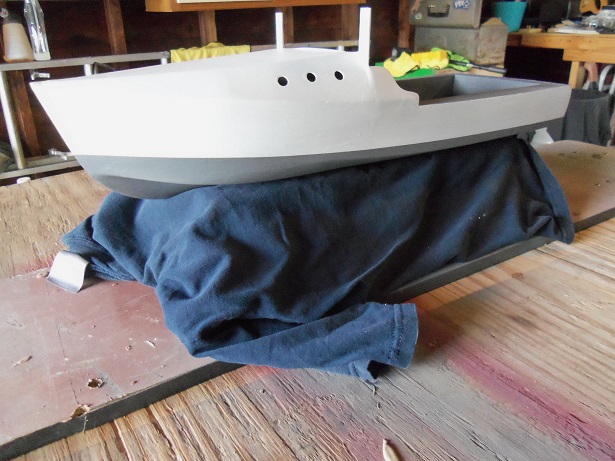
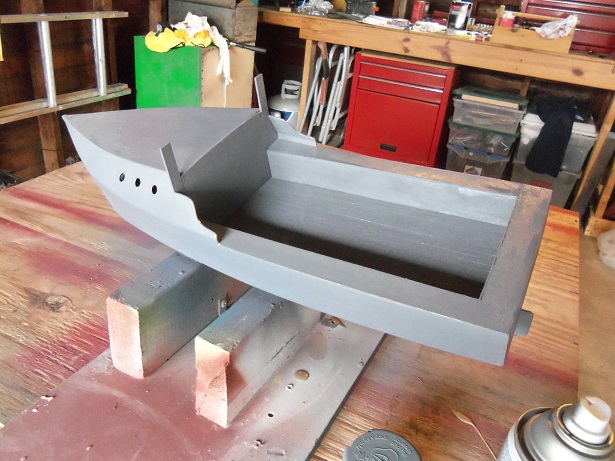
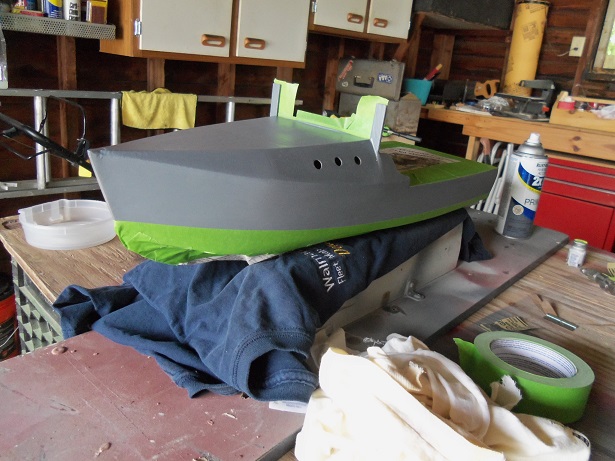
\/\/\/\/\/\/\/\/\/\/\/\/\/\/\/\/\/\/\/\/ ON WITH THE PAINT /\/\/\/\/\/\/\/\/\/\/\/\/\/\/\/\/\/\/\/\/\/\/\/\/ mixing up half of the bottle, the first light coat was laid down. mixing up the rest of the paint, I put two caps of thinner in the mixing bottle and poured it into the original paint bottle. the mixing bottle was cleaned out to use again, and clean thinner was run through the siphon cap to clean it out. never let it set for too long. the second spray was the final coat.....I have just enough to do touch ups. it's a common color....I'll get some more later. as mentioned, there are a few minor imperfections, but I can live with them the stand was brought out too........and given a coat of gray primer. so far, the rain has held off.......we are now well in the after noon. I let the paint set for a short time, and then removed the masking. the darn thing was almost dry to the touch. time is shortened due to the temps....I think we are in the low 90's. the masking is now removed.......... I brought the stand in and put felt buttons on the bottom corners........I will line the boat contacts with felt strips that I have cut already, but haven't put on. once they are on to protect the paint, I can bring the boat back in the house......she's still out in the garage. the bottom paint I will leave the gray. trim and the windshield will be the next things I tackle
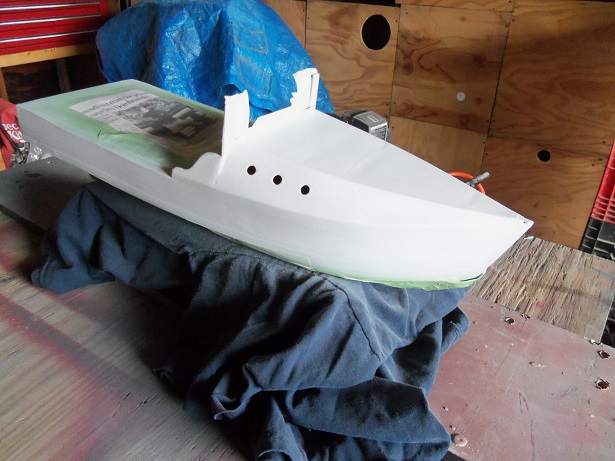
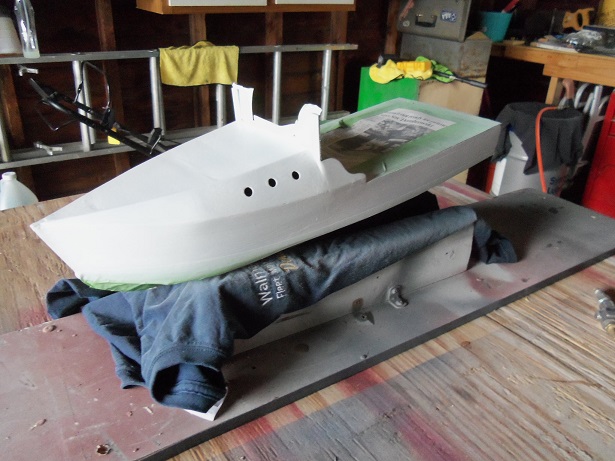
-
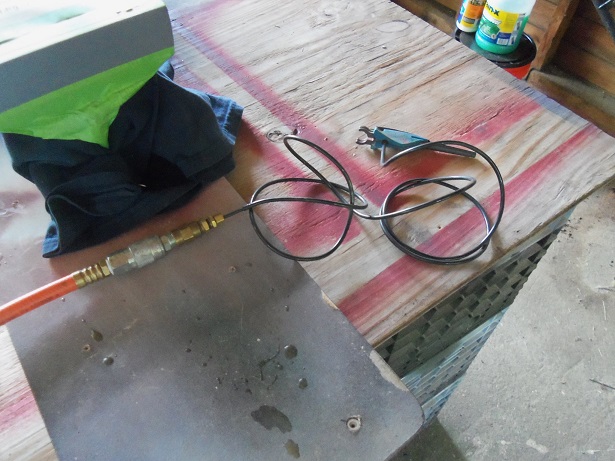
back out in the garage...........changes were happening. the hull got some sanding to clean up the imperfections.....later I found, that I didn't get them all. I'll see how the process goes.......perhaps I can clean a few of the more obvious ones later or cover them with trim work. it's a work boat........ bringing all my stuff up from the cellar, I even brought up the two cans of white primer. they were empty......go figure! I wasn't going to use the red primer........looking around, I noticed that my son had a can of gray primer in his basket. so I grabbed it and shot the hull....completely. OK.........that it for the spray can....... the second phase and everything else, will be done with airbrush. first order of business was to get the hull masked up. after waiting a while for the primer to dry, the task was done. being in the garage again, I can use the Craftsman 25 gal compressor........I had to set up the airbrush, since I had removed the nipple hook up. I've shown what I use in a few of my logs.......for anyone who hasn't viewed one of my builds, this is a Testor's EZ airbrush. there are kits sold in most hobby and craft shops, under the name "Amazing Air" airbrush kit. they come with a compressed air can, but I've adapted mine to work with my compressor. I bought another one {clearance, cuz someone returned it....mucked up} and I use it with a Starcraft mini compressor. darn thing is about the size of a fish tank aerator. it is a siphon feed........comes also with the caps and feed tubes. Testor, Humbrol, and Pactra 1/4 oz bottles will work with this outfit. sometimes clean bottles can be found.......but if none can be found, I buy the 1/4 oz bottles of thinner and I dump the contents in the larger can that I also purchase. I used one bottle of paint for this {1/4 oz}. one bottle is the mixing bottle....another bottle has clean thinner to clean the cap, or if it happens to get plugged. the larger can has a small cap plug, which works well as a measuring cup for the thinner. I had tossed around to the admiral a bunch of color combos. she chose the colors as shown in the pictures. since all I have on hand is matte white.........a matte scheme it is!


-
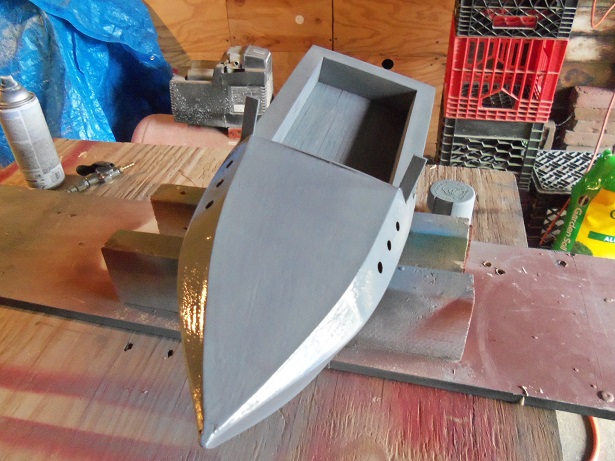
oh......nutz!!!!! I had a picture of the bow.....I took it this morning while it was sitting on the table. better late than never!

-
thanks Patrick and Bob,,,,,,and those who hit the like button. changes are happening......I'm also keeping an eye to the sky. s'pose to be storms today. haven't seen but a few very short sprinkles so far. at the moment......it's a drying process.........next, well.........you'll see very soon I wasn't taken any chances Bob.........didn't like what happened to me the last time
-
you should have had a taste of that weather in your neck 'o the wood...........terrible........very un-summer like very nice job on the dead eyes! nice detail for the hull too
-
say it isn't so..........I do agree though, you've made some really nice progress. the carvings look fantastic.........and I guess I'll have to wait to see what you do with the bow. I'll hope that there's more, but if not......then I will wait Sam. you have a great imagination. .........but what of the other hull frame ?