popeye the sailor
-
Posts
16,007 -
Joined
-
Last visited
Content Type
Profiles
Forums
Gallery
Events
Everything posted by popeye the sailor
-
 oh yea John..........cook'in! the guys won't let me on board with the blow torch though..........I dunno......some crap about no pipes and start'in a fire, or something. thanks for looking in.........good ya do, so I don't hurt myself Mark.....really?!?! >look........I'm smil'in< shoe......that appendage that holds the rudder in place.......that's supposed to be UNDER the boat, rather than trail behind it like a tail I saw that, and I almost busted out laughing......... I will fix it later, if I don't break it off first. funny thing about that too....is all the weird positions I've had this hull in, and it hasn't broken yet. now that I've mentioned it....it will break >like I'm gonna cry< thank to all for the likes.......I should have another update by this evening.
 -
sounds like a great guy already looking good on the planking!
-
she looking sweet Bob......the mortar pits are very well done. nice attention to detail
-
I've built five vessels from this series so far.........the decks were the worst part. I made the wood decks for the second build of the United States....that problem is done and over with. another thing I tried, was to do a dry fit of the sections to see how they fit. along the bottom of the offending section, I cemented a narrow strip of 1/32 styrene along the mating joint. it also gave me a better glue point, so it wasn't oozing out form the joint as much. ......so much better........but not a fool proof method. you'll figure it out, I'm sure.........but don't take too much off. those decks fit in there loose as it is
- 601 replies
-
- 3
-

-
- constitution
- revell
- (and 1 more)
-
super progress since I last looked in your cannons came out great! yea, it's taken a bit of time, but look what you've done. well done!
- 1,306 replies
-
- 7
-
-
- syren
- model shipways
- (and 1 more)
-
hull looks great OC..........bow deck does too are the anchor chains supposed to be white?
-
nice to see an update..........how are you my friend? yea......it's a tough thought. we all know what Augie was planning.....but you have the seat now......it's your call. you could add the breech ropes somewhat coiled up in back of the cannons, since there are folks mentioning that they weren't used when the cannons were inactive. you've had a few ups and downs in getting to know her........you expect that it's nice to see her again.
- 2,191 replies
-
- 6
-
-
- confederacy
- Model Shipways
- (and 1 more)
-
really great progress Pat........I'm just catching up. great fix on the stunsail booms........that would have bugged you to no end the rigging looks very good......nicely done! happy belated birthday...BTW I miss so much when I have to catch up
- 517 replies
-
- 3
-
-
- Endeavour
- Artesania Latina
- (and 1 more)
-
neat looking little boat Jack.........it has a "New England" look depending on the application, I will sometimes use different size wood. especially when the instructions call for wood that seems too bulky for the task. hearing your dilemma concerning wood availability, I feel lucky......but then again, I like to keep an inventory of wood. I still get my wood from Billing USA, even though Ages of Sail had taken the business over......they kept the Billing's site open. you should give them a try: http://www.billingboatsusa.com/ http://www.agesofsail.com/ecommerce/ I've never gotten a late delivery from them and they are pretty quick.
- 250 replies
-
- 3
-
-
- willie l bennett
- model shipways
- (and 1 more)
-
hello Jerry! I'm so glad you decided to post a log for this beauty bad bit of luck at the beginning.......if that was regular plywood, that might not have happened. I'd really like to get my hands on a few sheets of the kit plywood though.....it's much easier to sand. I'm kinda surprised that the manufacturer didn't get feedback that the stern was a critical area, and supplied a couple of balsa blocks to remedy the potential problem. no matter.......your planking it now, that will solve the problem I noticed that you didn't fare the frame {bulkheads}......are the planks laying on the bulkheads OK? your not getting that chunky look, so they must be to some degree. I've never done a bearding line either......guess I can join your club I have though, made rabbits for some of my builds....I'm used to them. you can bet your boots I'm gonna be following your build..thanks for allowing me {us} to follow along I see that the La Nina is in the house........is Charlene planning on posting a log too? tell her "PLEASEEEEEEEEE" for me
-
Cutty Sark by NenadM
popeye the sailor replied to NenadM's topic in - Build logs for subjects built 1851 - 1900
looking good Nenad..........I'm play'in catch up nice video.......I didn't know you directed too;) happy to see you overcame the dead eye issue.- 4,152 replies
-
- 6
-
-
- cutty sark
- tehnodidakta
- (and 1 more)
-
Hey there Patrick.........did you manage to get majellan back on course? I hope you did!
-
most definitely awesome..........even better than the store bought brands! {models, that is }
- 434 replies
-
- 4
-
-
- pelikaan
- beamtrawler
- (and 2 more)
-
glad your back my friend!
-
not to poke fun at my own shortcomings..........but did you get a load of that shoe? looks like I need to do some necro with it as well the night is dark and full of terror..........
-
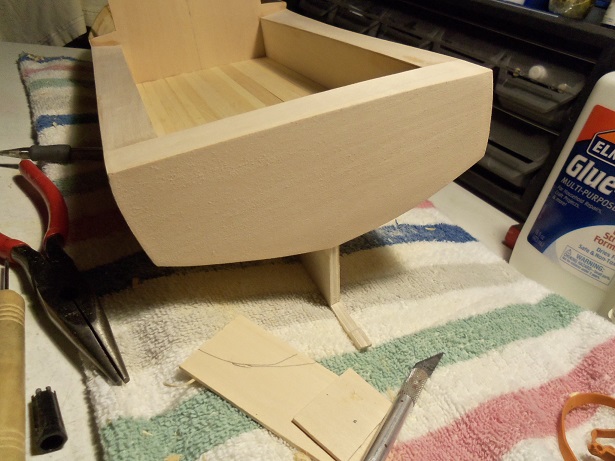
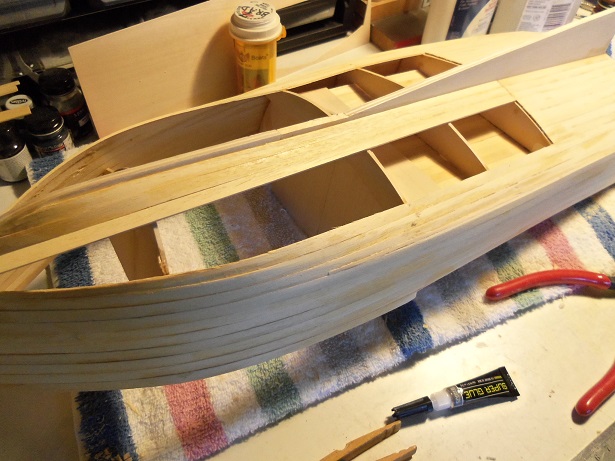
that might be the way to go Greg {and Patrick}. I thought of making a couple of ribs to stick in there. one consideration you forgot the dynamite John........perhaps even a blowtorch. although an alteration like that might be fun two considerations I thought of that as well Mobbsie........now that would be a cool design. .........less dynamite too thanks John.......very kind to say, but I goofed. gonna take more than a can 'o spinach ta get me outa this one. the chine parts were key..........and I omitted them. well......I'll just have to make the best of it. I haven't scrubbed a hull yet. it's been a couple of weeks {I think} since I last posted......these late answers are proof of that. I really haven't had much to report.....been a little busy on other matters. I am on vacation this week end. I have a couple other chores to do, but I should see some table time. in fact, I saw a little yesterday. looking at my mess {thank the model god the admiral doesn't seem to mind}, I tried to make some sense of the hull. I figured that I might as well start working from the stern to the bow.........and so I did. I filled in the last two segments of the aft. then, after sanding the transom smooth, along with the planking surrounding it, I took a piece of 1/32 flat stock and traced out the transom. this was cemented over the transom to hide all that Frankenism. when it was dry, it was sanded to shape.......I only saw one tiny gap that need to be fixed. it looks much better now. I need to do this now to the inside cockpit bulwark and the cabin bulkhead. first.......I'll fix the hull problem....then I can work on the cabin. if you saw my initial idea......you'da thought I got a bad can 'o spinach........or it was definitely laced with something. but I came to my senses and ripped it out. I began to plank the bow starting at the keel........seems like a better approach. I may make up a couple pairs of bulkheads and close the hull inward. I have gone further with it........more progress soon

-
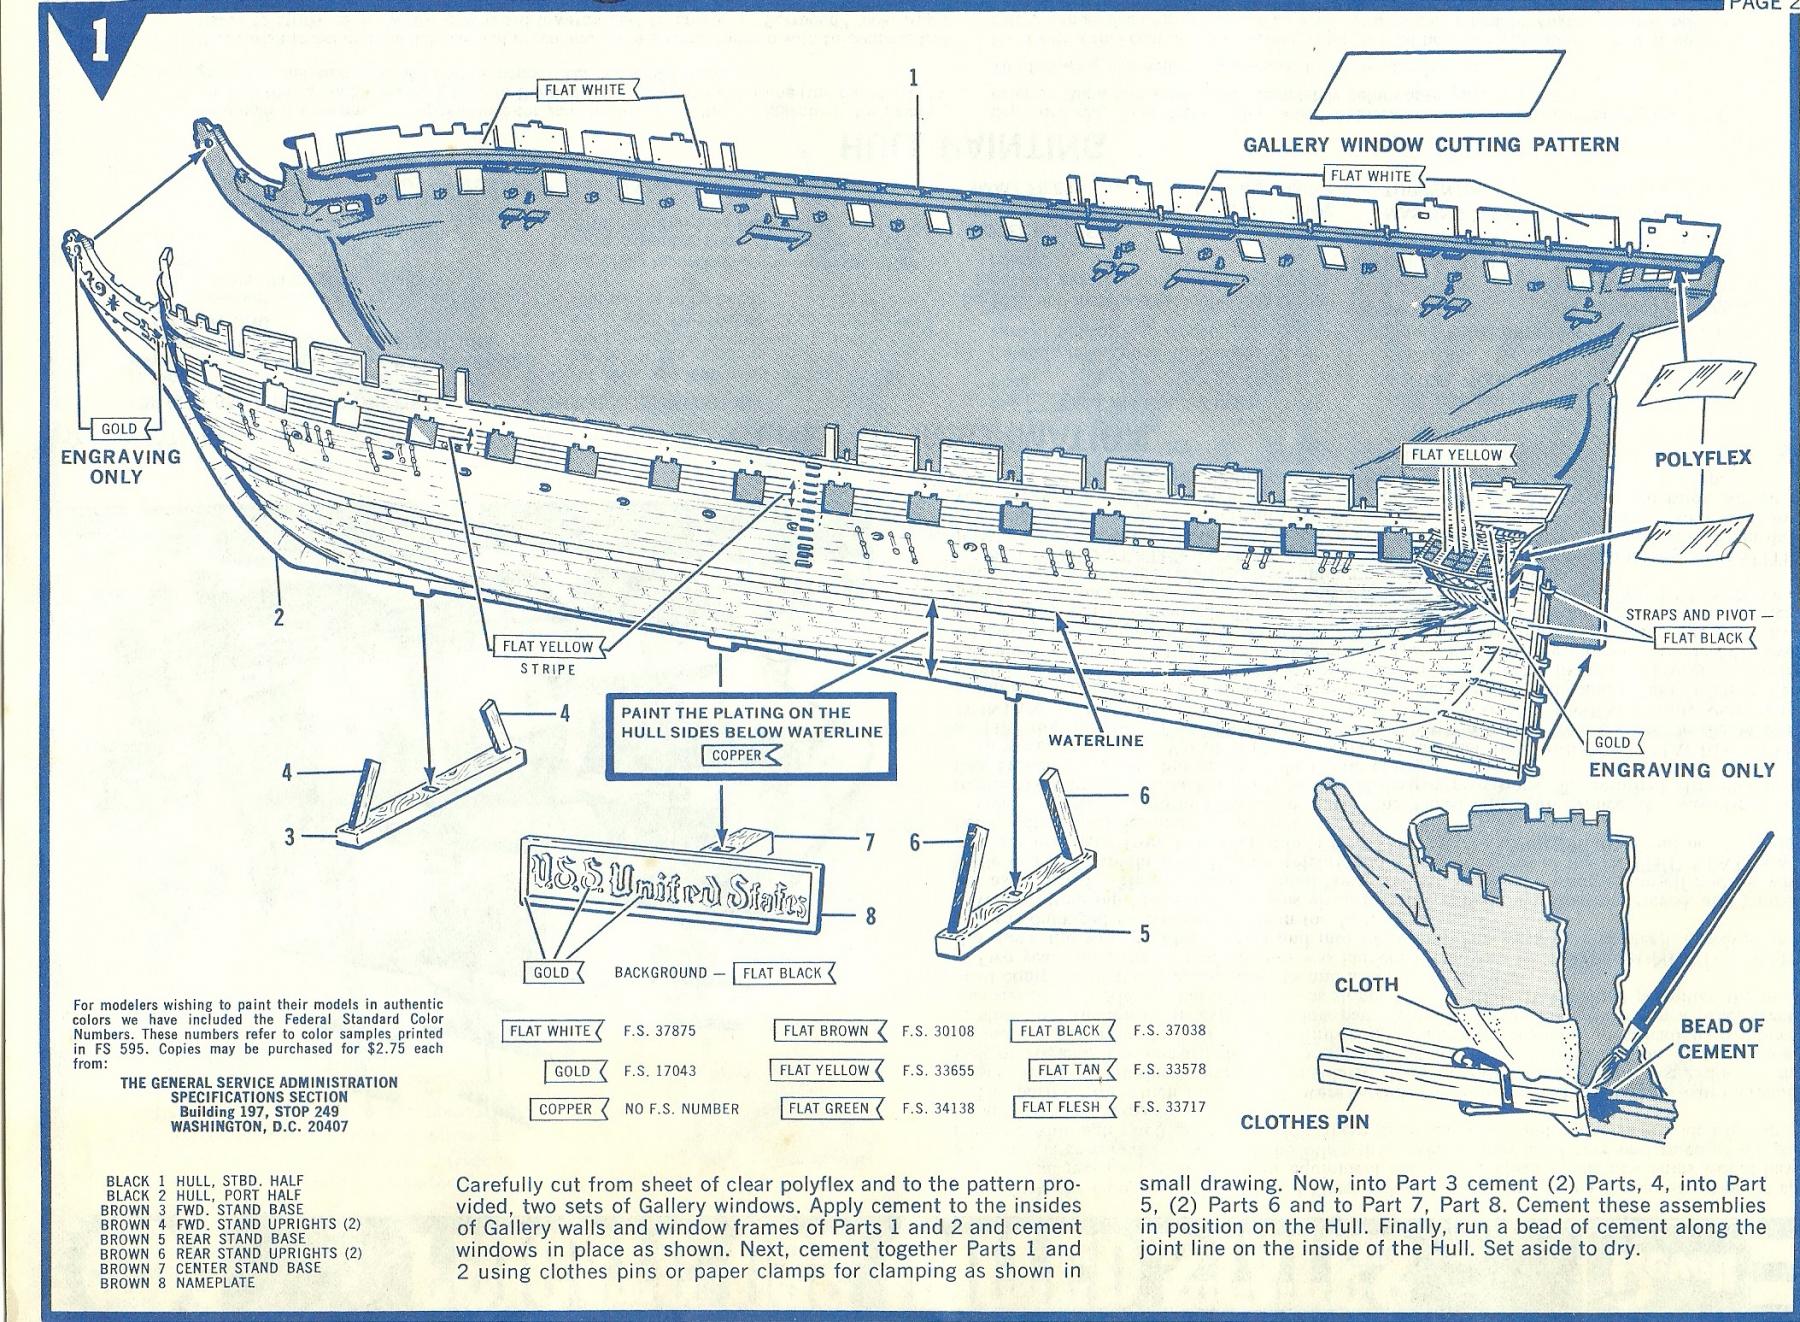
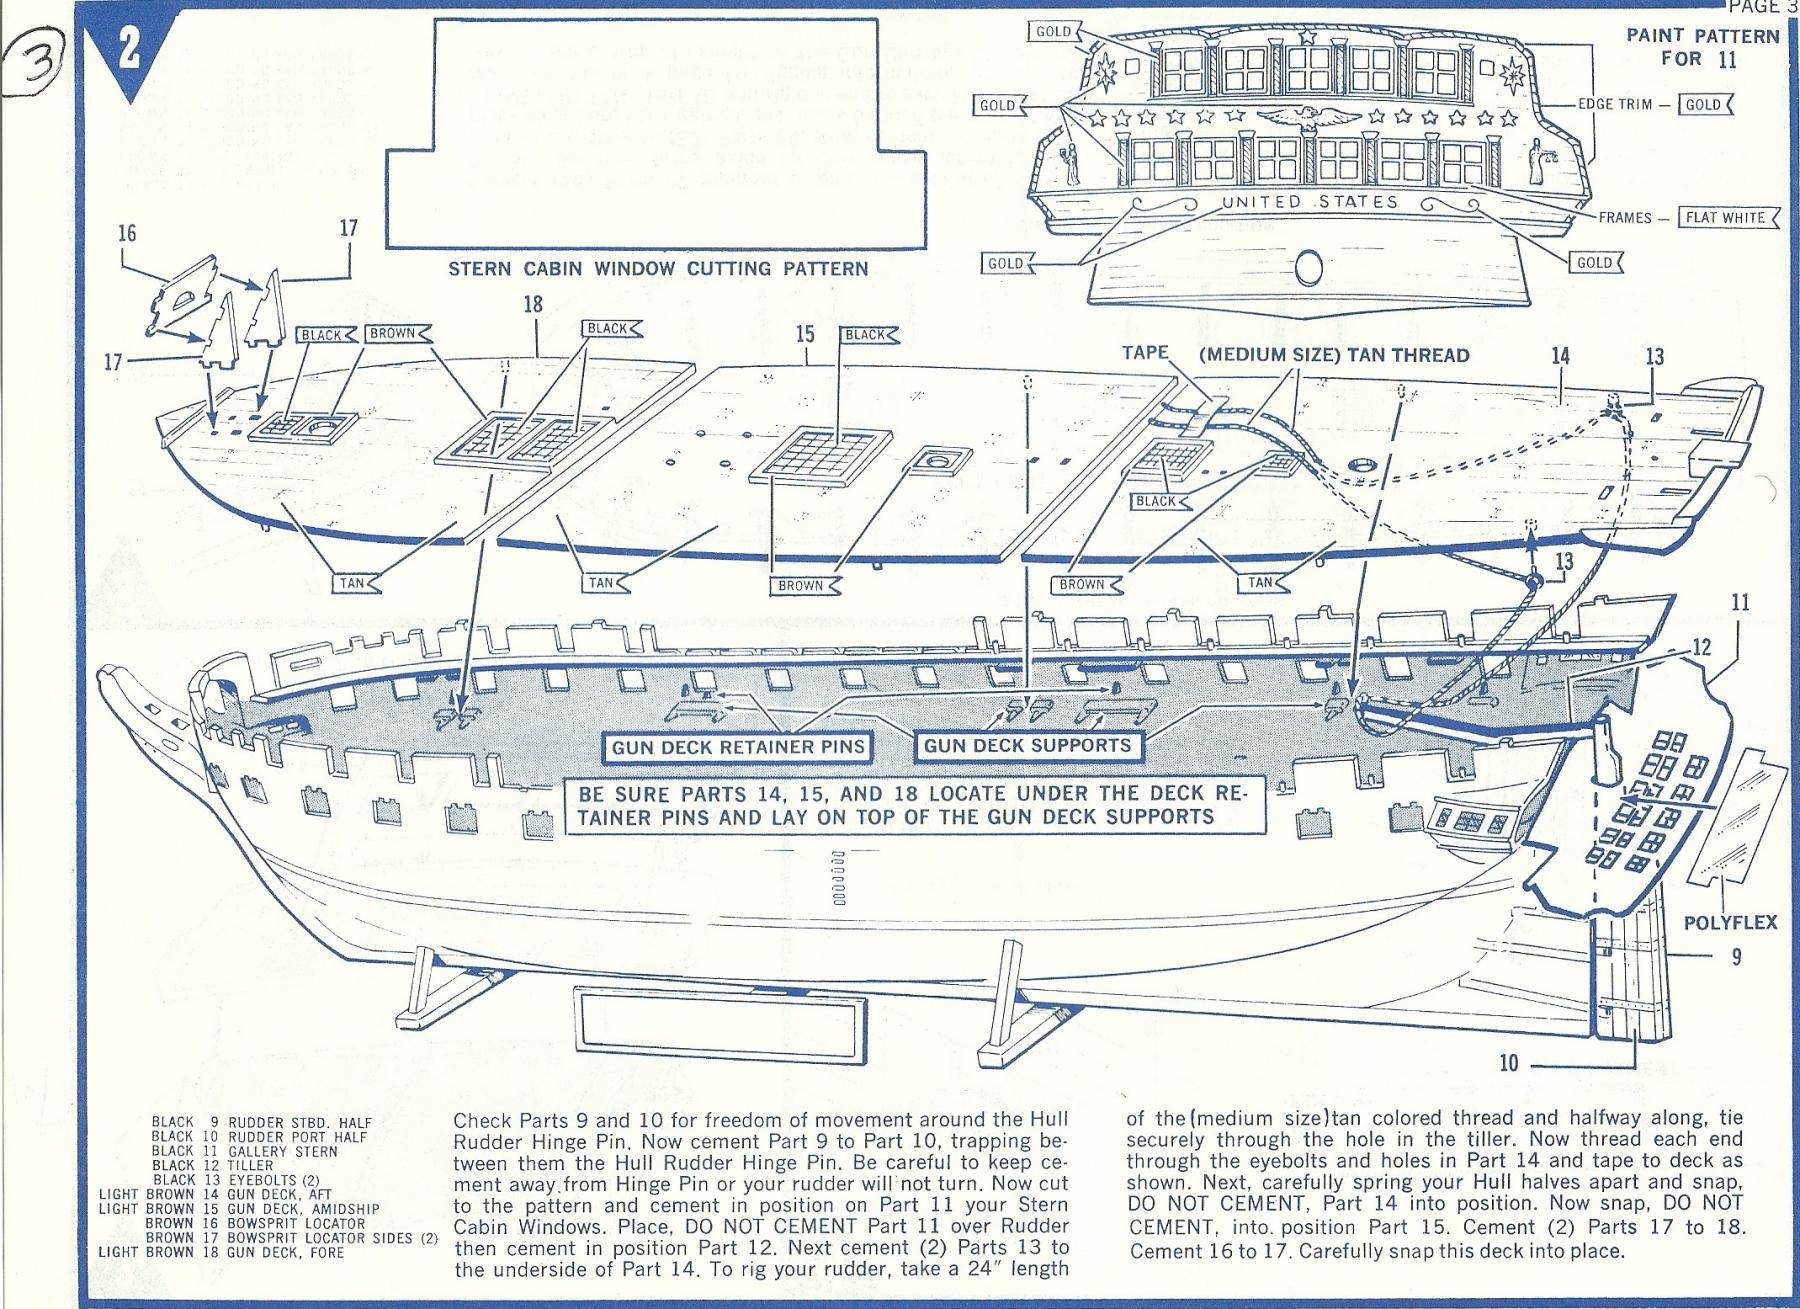
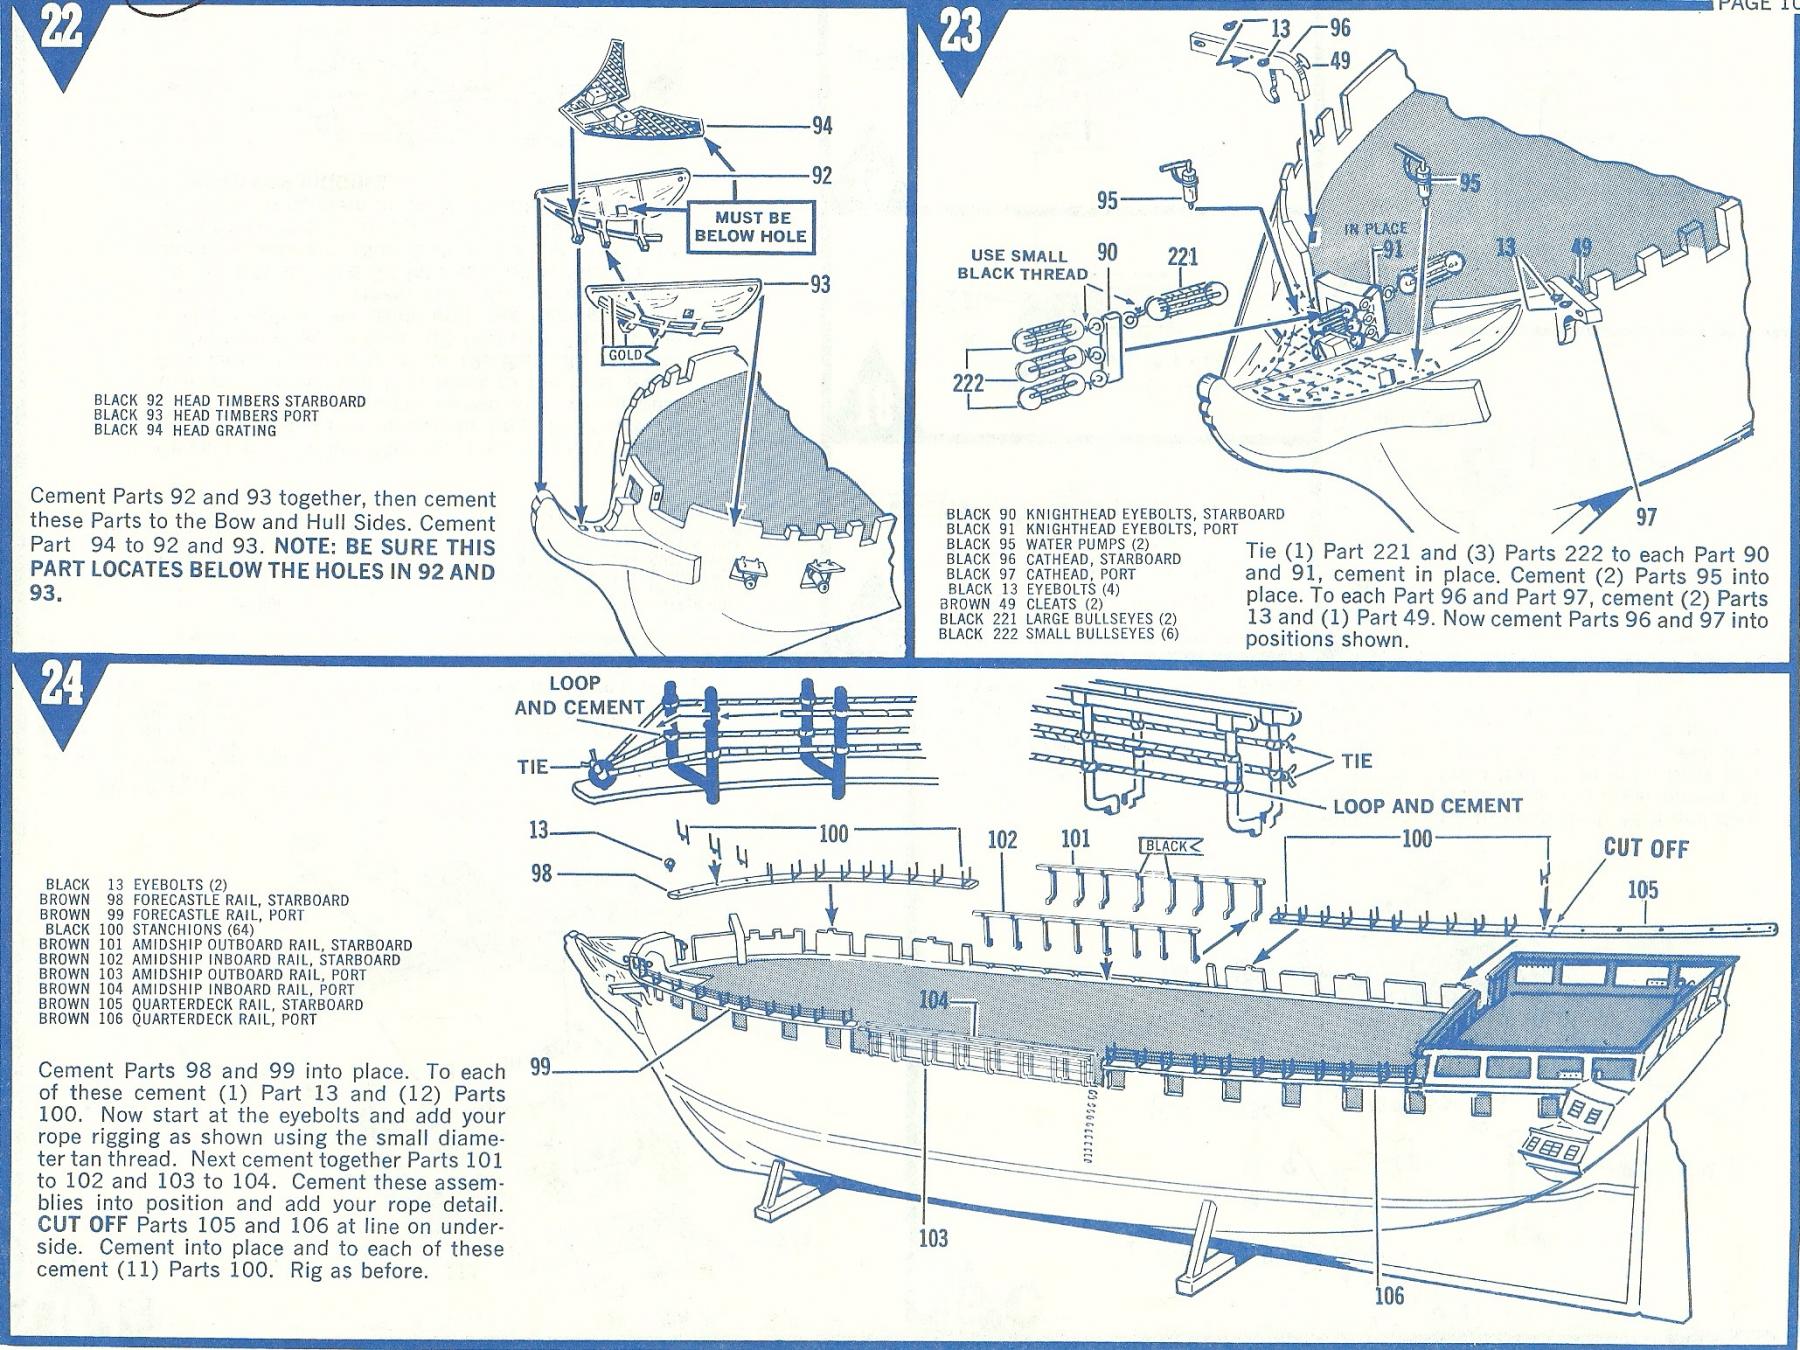
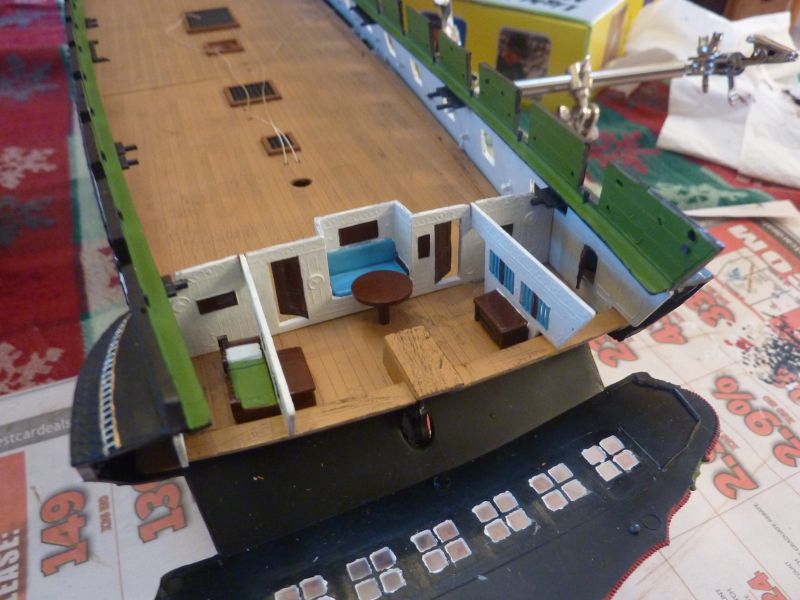
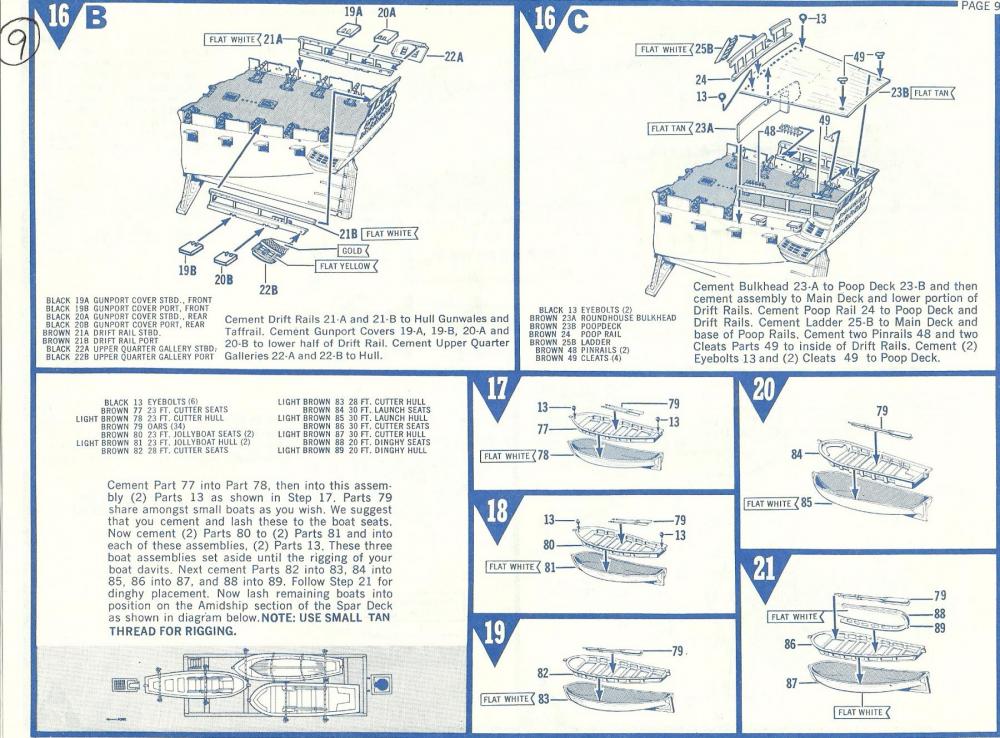
hello Marcus, believe it or not, I have this book marked.....found it a while ago. personally, I'm not much for hand drawn or painted pictures. something about 'artistic licencing' makes me a skeptic. I know.....it's all we have to remember her by.........best we can do is use them as a rough draft. try and read all we can about her and imagine what the change may look like per the drawing. here are a few articles that I have http://militaryhistory.about.com/od/shipprofiles/p/ussus.htm http://www.modelshipmaster.com/products/tall_ships/uss_united_states.htm there are a few links at the bottom of one of these articles.........I have them book marked as well. in my mind, since there was to be six vessels built {I think that is how many that were planned}, all of them would have some basic similarities. of course, the commanding officer would have a say as to how they were fitted out. there are features that I want to change and add, besides not adding the cannons at the very bow of the ship..........I am going to leave the port lids. they look so good when they are all installed. I wonder if this address is still good.......it's at the lower left of page 2. I'm sure they would cost more than $2.75 today when was the last time you saw a reference to the F.S. numbers? of course, it's still a mystery why Revell printed the instructions in blue, rather than black and white. I wouldn't go with a flat yellow stripe though..........a sandy sort of yellow maybe {ocher}. I still wonder why Revell left the galley quarter parts out of this kit.......after all, it is a spin off of the Constitution kit. where these parts would be located, the holes still remain. the gun deck never changed >shrug< I've forgotten where I got that picture of the galley quarters.......but in comparison to these two images, it is the same stern gun deck section. it all boils down to what is really different about the Constitution and the United States......to me, it's the addition of the poop deck. I never realized it when I built her the first time, but the pumps probably should be in a more logical place, than at the bow. at least they didn't forget to add the heads. AWWWWWWW! I'm just rambl'in..........sorry to say, I haven't done much with the build. it's safely tucked away in the closet.........I have the wood decks clothes pinned to the plastic ones, so they don't lose their shape. looking back, I started monkeying around with it in 2012.....the allure of making the wooden decks was just too much to pass up. in 2014, I made the horrifying discovery that the decks had warped.......so badly, that others had to be made. I forget where the mold date is on the kit..........I just looked at them, and they are still good. I guess it does make a difference which way the wood grain runs my plan for this build, is to continue it when I get at least a couple of the other projects finished. for you folks who are following this log....I do apologize. at this time, all I can say is that it has not been scrubbed.......I have no intention of missing out on another opportunity to build this fine vessel {model}. you know, it took me less than a year to build the first, but I didn't concentrate on paint, and had no clue about the inconsistencies with the kit. even I.......am hoping it's not too much longer thanks Marcus for looking in


- 165 replies
-
- 7
-
-
- united states
- revell
- (and 1 more)
-
very nice work Hank.......the superstructure looks sweet! looks like your gaining on the hull......very nice!
- 187 replies
-
- 3
-
-
- new jersey
- trumpeter
- (and 2 more)
-
looking very good if the hull is large enough........I'd copper {even though I've never done it before}.
-
she's looking great Grant.......I tried hull sheeting on a Midwest kit for the first time....and failed miserably, I might add ya did a super job!
- 339 replies
-
- 6
-
-
- dumas
- Chris-Craft
- (and 3 more)
-
great update Sjors..........very well done !
-
very nice progress Stwart.....looking sweet!
-
very nice.........I also like the different woods.......really enhances the hull wonderfully. the gratings look fine to me. reminds me of that method I tried making them for one of my builds....without the tools that some folks have here......they can be very labor intensive. always good to see an update mobbsie......whatever the frequency {I'm late myself........again I'm catching up on all these wonderful builds!}
- 129 replies
-
- 6
-
-
- armed launch
- panart
- (and 1 more)
-
very nice progress........love the idea with the prop!