HOLIDAY DONATION DRIVE - SUPPORT MSW - DO YOUR PART TO KEEP THIS GREAT FORUM GOING! (Only 13 donations so far - C'mon guys!)
×


popeye the sailor
-
Posts
16,007 -
Joined
-
Last visited
Content Type
Profiles
Forums
Gallery
Events
Everything posted by popeye the sailor
-

Cutty Sark by NenadM
popeye the sailor replied to NenadM's topic in - Build logs for subjects built 1851 - 1900
war of the roses? so nice you and your son can do that.......I couldn't even get mine to do a 50 piece puzzle!- 4,152 replies
-
- 5
-

-
- cutty sark
- tehnodidakta
- (and 1 more)
-
the bow came out great Patrick..........glad to see that the rest of the fix went as well! glad to see her back in shape!
-
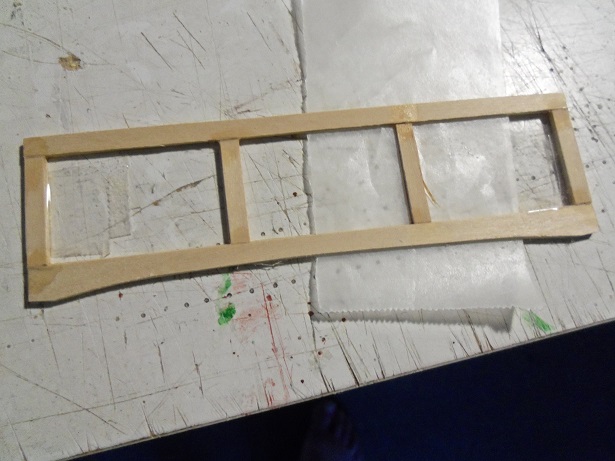
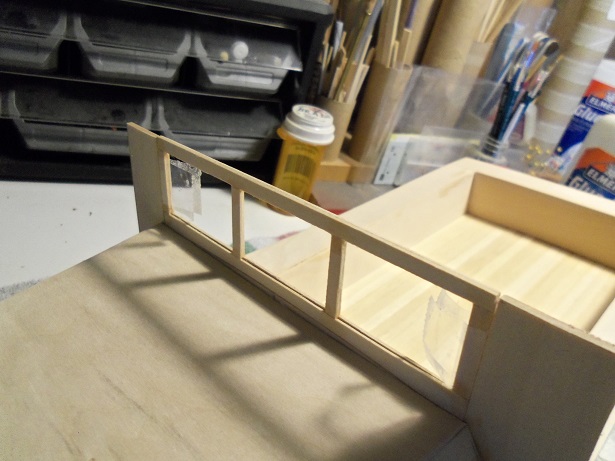
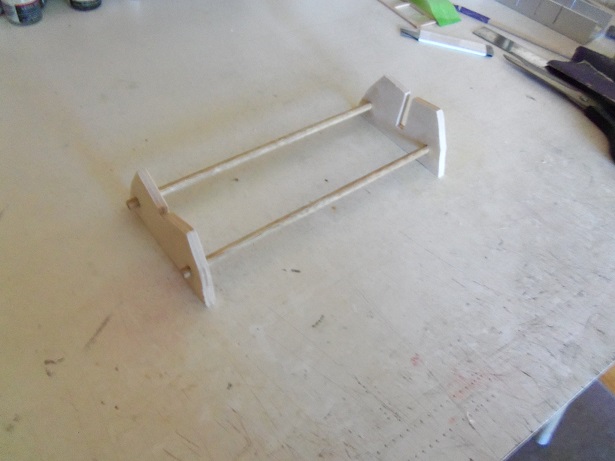
started right off early today........figured out what to do about the shoe. odd that I didn't do it before it went out to the garage.........darn thing STILL hasn't broken off! hmmmmmm, what to do this morn.....I know! I'll play with a bunch of scrap wood! "......that should be good 'n hostile!", he said with a devilish grin. I had cut out the bottom part of the windshield using 1/8 scrap stock {used to be a big piece}. but.......something else could be done.......I was sure of it. sure.......I'll make a sandwich here's the formula.......1/32 + 1/32 + the thickness of clear cello.......should add up to the thickness of the windshield "box". I'm not pleased with that either.......I think that when I do what I'm gonna do regarding the sides of the helm {there's gonna be something there}, I'm gonna trim'em. so, now to make identical plates I had to keep track of how the pieces were cut and glued.......later I'll need to tape them together for sanding. then I though how cool it would be if it had tinted windows.....so I went and got that roll I had found >hoarded< I'll be able to do many builds with this.........it's a huge piece. by this time, the two windshield plates were taped together, and the process of fitting them was taking place. this took a while.......I had cut it a bit wider.....larger.....so that it could be shaped without ruining the part..........especially now, that it has been assembled. I expected some breakage during the process.........with some wax paper in between, I could re-cement the broken part without having to take it apart. every once in a while, I would dry fit it in place......it was sticking out above the side pieces. it was getting closer towards being level...as I went along........the air gap between the windshield and the bulkhead was my guide. when I do inside the helm bulkhead........this will be hard to see. with more sanding and trimming, it looked even better, as far as the air gap went what is left now, I can probably skim off the top, without notice. the portholes were trimmed of any flash and stuck to the sticky side of some painter's tape, waiting for paint. the hull went to the garage.........the only thing I can do now, since the hull is drying, is make the stand for it. I did clear the table....it looks much better. first the stand parts were traced out. ...and that was the last picture that my camera let me take. it needed to be charged. I was able to assemble the stand in the time it took to charge the camera........this is how it came out. hopefully, I can post some after shots of the hull
-
should be a fun build Rob.........as with all your other builds I've looked in on. pleased to take a seat on this one, if you don't mind
- 1,208 replies
-
- 1
-
-
- great republic
- clipper
- (and 1 more)
-
looking great Jerry
-
looking very nice Nils.........the figures fit well. as we say over here.........'nailed it!'
- 2,625 replies
-
- 5
-
-
- kaiser wilhelm der grosse
- passenger steamer
- (and 1 more)
-
thanks for looking in and the kind comments. reality can be a hard thing, especially when one gets as far on a design, and finds out that it's really not a good fit. I'm lucky that there is another direction I can take. thinking of how futuristic it looks...........I thought of something a bit more involved.......and quickly blotted it out! ........a river boat?!?!?!? "Welcome to my Nightmare" good thing this isn't plywood Carl..........it would have been a tougher repair. I work a lot with flat stock.......1/32 x 4 x 24......1/16 x 4 x 24....etc. I have found it wider........I get it when I can. I will most likely have to give it a seal coat, unless the resin will lay down the tiny hairs that basswood produces after sanding. I try to use a real fine paper for the finish work, but they do have a tendency to rise anyway. I still have some ground to make up......I'm not at the point yet, where I was with the other boat. I was hesitant Patrick....I really didn't want to confuse anyone. this needed to happen though........I was thinking too much 'fishing boat' and not enough 'tree boat'. the perception and sad reality caught up with me....especially when in my travels, I would run across those pictures. the thoughts that would go through my head after were getting pretty loud. time to answer them.......and shut'em down.....once and for all I combined those two tubes of wood filler last night.........while I was play'in on the computer, I was shaking it. kneading the tube from time to time.....I think it got a good mixing. I'm still doing it this morning I'm messing with another aspect at the moment........I really should be thinking about the hull and what I'm going to do with it. the admiral is eyeballing my table..........the shavings and such are beginning to hit the floor. time to clean, one thinks
-
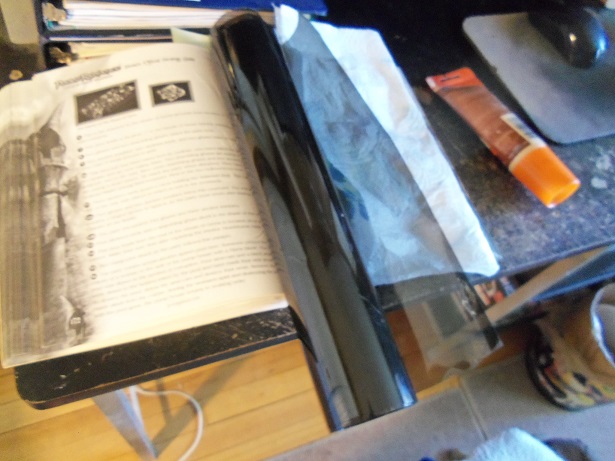
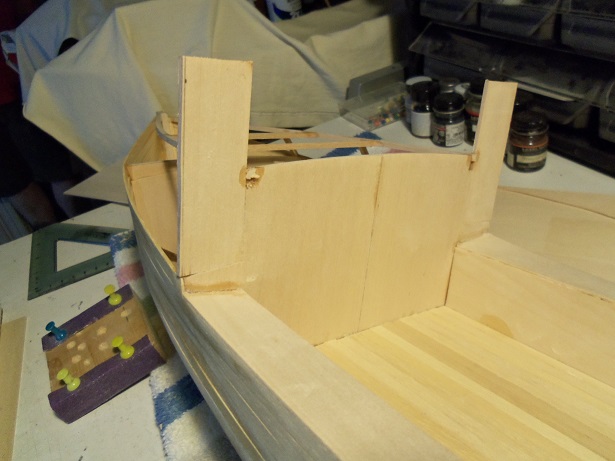
fear not Mark............{famous last words} .......remember, I said the words 'icky may' {or is it spelt icky mae} I'd put the clip I have in my you tube vids about Beetlejeuce tell off the deet's, after they declined his offer. ahhhhhhhh, but the F-bomb would kill the mood it's wasn't that serious {did you hear the ominous organ playing?} it went like this.........I use a couple size drills to reach the size hole, where I can use a sandpaper dowel. I tried to rush it.......but since it's basswood, and only 1/32 thick to boot. it didn't like what I was doing. it ripped out a chunk of wood. what I ended up doing, instead of tearing out the whole piece, was to trim it out as square as I could and glue in a piece.......sanded later. it will be filled with putty later and sanded. you'll see in a moment. wood can be fickle.......the harder the wood, the cleaner hole you can make. I was going to do a piece on wood-ology on another site, but they drew the wrong folks.......the folks that frequented there didn't care. all they wanted was to get their answers, answered, and off they'd go....most likely, never to be heard from again. look at wood down to it's fiber......softer wood has stringy, loose fiber, while harder wood is more compact, bonded together in it's own pulp. it also affects it's bend ablilty. I like to use the softer woods like basswood and obechi........but they do have their drawbacks. basswood is smoother that obechi, which is usually rough cut, like someone used a dull blade. it bends better than basswood though and it's a lot cheaper. basswood does not drill well either......it tends to want to tear at the most inopportune time, and that's what it did here. sadly, the only picture I took was the repair.....but believe me, it's bad enough.once I could work with it again, I used my sanding dowels........I'm sure some of you use these too. different size dowels with sandpaper glued around them. I took a different approach this time.....I left the paper loose on the dowel. once it was in the hole, it was twisted backwards so that the paper would fan outwards in the hole, enlarging it as it was moved in and out. the one on the bottom is the loose fitted one. here it the starboard side after I had enlarged the holes. I still have some portholes from the Nordkap boon, that I'm going to fit in them. I also have some of the Testor's window maker left over, and I'll be using it to make the 'glass'. the boat only has one porthole on each side, but I decided to add a couple more for copyright reasons. ............not that I'm at all worried about the small stuff.......folks should be happy that someone think their boat is model-worthy. here's what it looks like......... .........a little bit of putty. this stuff was kinda dry......didn't want to stick too good. I usually add a little water to it, to make it more like a thick paste. I have two tubes and I added too much water to the other one........I need to combine these two together and cure the problem. I'm going to need it for the hull soon. giver some sanding after it was dry made it look better.......the inconsistency you see might be the CA that showed though after sanding. now........the other side came out much better. the wood did tear a little, making a rough hole, but I passed a dowel through them a few times to clean them up some. sized large enough for the portholes, this side is almost finished. even with sanding, care needs to be taken with basswood.......the front hole is slightly oblong. I need to fix it. I like this picture........the shape of the bow allows both sides to be seen. the idea of the three portholes is pretty good too........kinda gives it a bit of a 'capt. Nemo' look I only have two more portholes left now, and one more square window frame, from the Nordkap boon. the rest of the parts......the winch and the anchor winch....{I think that's all that's left}........will be used on the trawler Syborn. I've had such an urge to flesh out the mast on that one........undecided if I want to add a mast top on it {I would then have to make a ladder for it.....ugh! another ladder!!!} my god.......I'm babbling tonight!.......it's almost like I don't get out much cripes.....I'm all over the map, aren't I?!?!?! here is the picture.........enjoy


-
thanks Gerhard..........and all who hit the like button been doing more on her this morning...............and then diss-asta struck! WHAAAAAAAAT! NOOOOOOOOOOOO! uh-ohhhh surely it's a small set back.........show ya what happened a bit later.
-
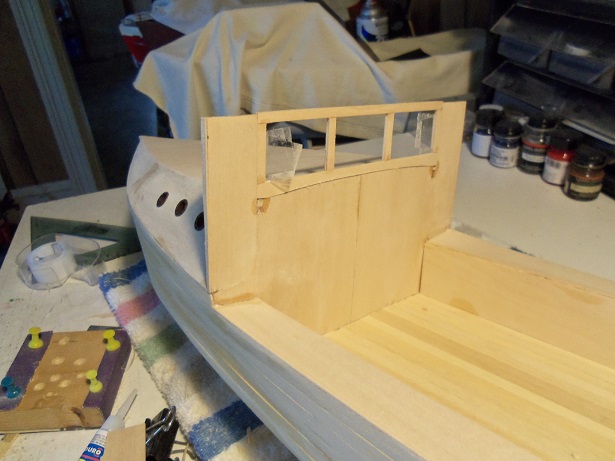
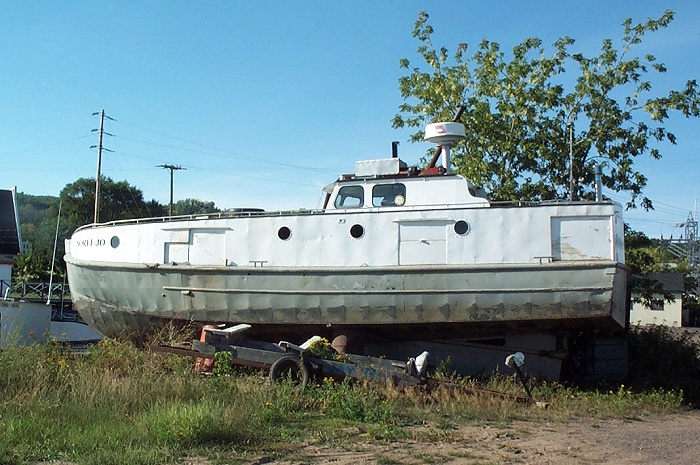
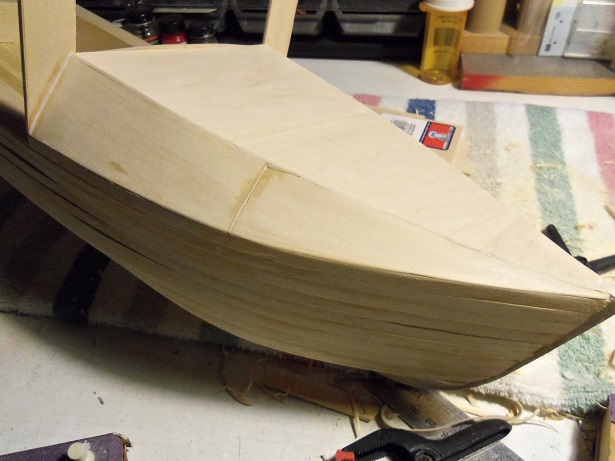
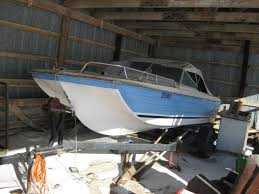
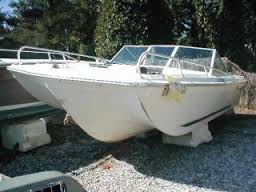
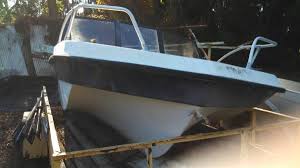
thanks Piet for the good word........I could be guessing here........but this boat kinda reminds me of the boat Tom sent me a while ago. when I was working with him {when he owned Billing USA}, I had an idea to try and build a boat from all around the country {US}. the Maine Lobster boat was a good representative for the New England states....that particular hull design could very well mimic many other boats.....fitting them out differently. he in turn sent me a picture of a boat that is fairly common to the great lakes. I mentioned this picture earlier...the Noree Jo.........I love the design. if I ever do it, I wonder how much of the interior I could flesh out..... the large bow cabin of this boat that I'm making here would give the crew enough room to warm up during those cold nights fishing. seems like a common fitting for great lakes boats. I think it would tickle Tom's fancy, if I ever did it {he was planning to do it.....but he has since gone back to working, and it quickly has taken up most of his time}. I might have been happier doing a schooner..........but this little ditty, for it's purpose, will do just fine thank you.....and thanks for all the likes I do have a small update........I finished roughing out the bow cabin. in fitting the side cover for the starboard side, it was a bit wider.......I was off with my cut. I filled it in with a sliver of wood.......I have plenty to choose from by this time I also began to cover the top.........I failed to mention that I'm using 1/32 flat stock to do this. it doesn't take much to cut it and shaving the edges {trimming it}, is very easy. it took three sections to cover the top..........I used rubber bands to hold them in place as they were installed. I was sitting at my desk, playing a game {waiting for the cement to set}.......when I heard a snapping noise. all I thought of was stressed wood giving way......wrong.........just a rubber band at the end of it's usefulness. even the admiral heard it......whenever she hears something that I might have broken,,,,she goes....uh-oh....... I put her mind at ease soon, the top was covered. later it was trimmed and sanded........I had to add a bit more glue to the bow tip, to fill in gaps and secure it down. more sanding was done.........I used a finer sandpaper to eliminate the fine hairs that basswood produces when sanded with rougher grit paper. sealed and resanded with fine paper will smooth it out....but I can wait till later to do that. more to come


-
very nice progress Nils...........and a very ambitious plan for the railings. no doubt in my mind that you'll figure them out
- 2,625 replies
-
- 6
-
-
- kaiser wilhelm der grosse
- passenger steamer
- (and 1 more)
-
they turned out great Sam........a very nice job indeed!
-
that right.........I have others Andy I thank you for allowing me to post it.......I want to put this into the United States....why it was omitted, I have no idea. I was a teenager when I built the Constitution. when I moved away, my mother kept it. when I came back to N.H. she still had it........I had to do a couple repairs, but it was still intact. when they moved to the lake house, I was put in charge of making sure nothing happened to it........made it there without a scratch {a little dust maybe...she would never clean it....too afraid} it went down hill from there.........they had it by a wood stove. how sparks were getting onto it, I haven't a clue, but there were holes in the sails by this time. add in the soot tinge, and she looked right proper for battle. can't remember when it's final day was........I heard about it though........it got knocked over. I didn't say anything. I would love to get another one.........but after seeing what I do with wood, the admiral doesn't want me doing plastic any more. it's not set in stone, since I have the Lindberg Jolly Rogers and an old kit of the Revell Santa Maria. as I recall, you finished your Connie.......the kit makes such a stunning model.........I love the size your work is also commendable......I will be following some of the ideas you had building her. thanks for looking in daddyrabbit. I've not done this type of mod, to this degree....it will be interesting once I can get back to her. the hull needs a bit more paint before I can get into outfitting the gun deck.......I sure there are some sub assemblies I can get into as well. I will be putting some movement to this log soon.........trying my darn-dest to find an opening for it don't give up hope.
- 165 replies
-
- 3
-
-
- united states
- revell
- (and 1 more)
-
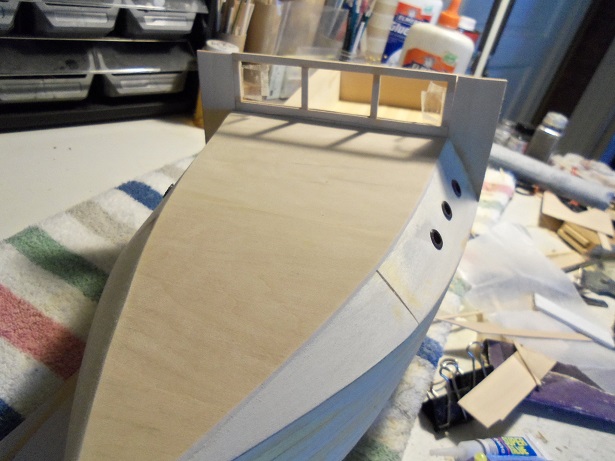
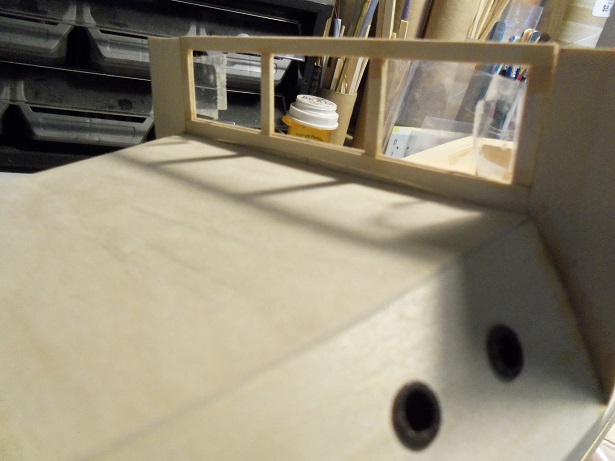
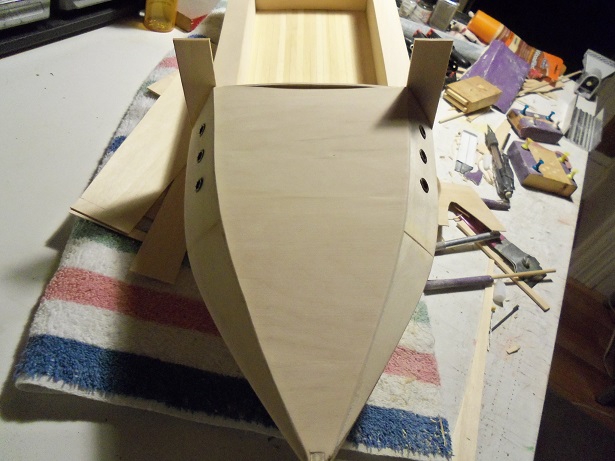
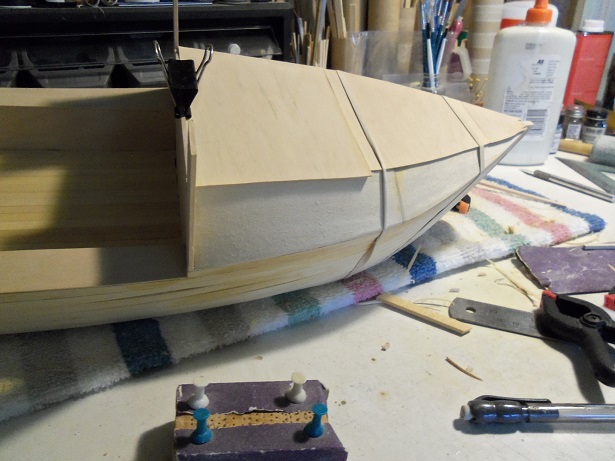
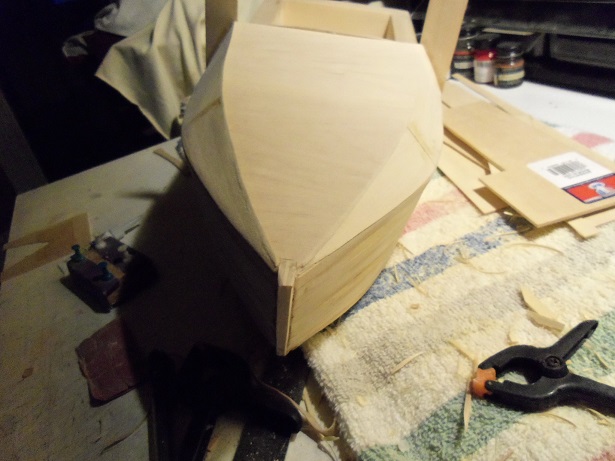
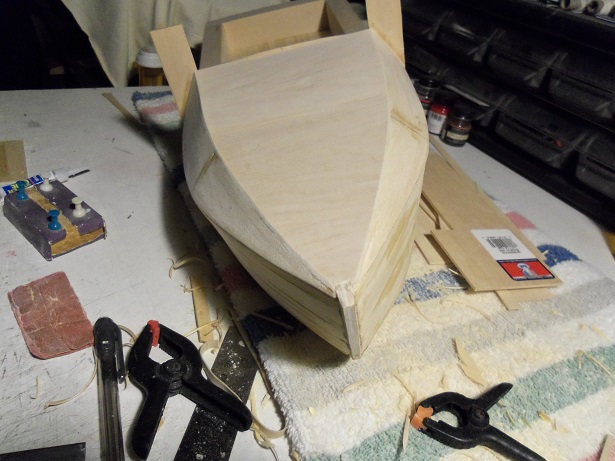
now........I can get to the update. I probably should have taken care of the shoe malfunction........but I got carried away with the cabin fabrication. one of the pictures looked like the boat had a end board on each side of the windshield........I put a pair on. then I got this last picture of it, and it looks like it doesn't. no matter.......I'm leaving it.........it will serve well in casing in the windshield and aide me in forming the cabin. there is no real fore deck to this boat......the bow section is encased as one large cabin. framing the cabin, I utilized the two slots that were left over after I had cemented on the side boards. I'm going to add another pair of scrolled side boards, boxing in the helm. a plate will also be made to cover the bulkhead, getting rid of that ugly center line and for what I have in mind for it >icky may< after finishing the frame work for the cabin.......using 1/8 square stock to do it......I got the side cabin panels for the Lobster boat. the curved line that would run along the hull was traced out.......this should give me a good lip for along the bow. the bottom and top frame parts for the windshield is also on that template....I will get those as well. they will be done in the 1/8 thick flat stock.........the actual windshield part will be done in something a little thinner. I was out with Gibbs the other day...........while I was out there, I found a large piece of the stuff that is used for tinted windows. how it got there, I don't know.........it looked really clean, so I rolled it up and brought it home. {if that don't show you how bad of a pack rat I am.......nothing will}. unfortunately for me....this is a scratch build.........if I had followed the kit procedures, it might have worked better. the part did not fit too good.........so I split it into two pieces and fitted it together. the split was knitted together with a small piece across the inside........then filled in with CA and sawdust. I applied the CA and then sanded over it, forcing it into the gap that is there. it filled in pretty good......but I will do it a couple more times to be sure and to insure that it will be invisible. I saw this shot earlier........thought it was kind cool to have so now it off to do the other side....of course the same thing happened. thinking it would be odd for both sides not to look the same, I follow the same process to cover it. if it's any consolation, looking at the pictures, I see some dents and lines that I can't explain.....the boat has been up and down the river a few times. the transom is covered over........now it was time for the inner stern bulwark to get it's covering. I can do a little molding, or run some white glue along the corners.......but it covers over the "Frankenstein stern" once and for all. I bought the resin for the hull.........I was hoping that I could buy a small can.......not {the way I'm interpreting it} 9/10ths of a Quart. I bought some extra hardener too........just in case. once this hull is totally fleshed out, I can start that process. more on this soon.........


-
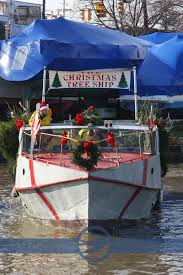
hello all.........thank you for the Anniversary wishes! it was a fun day for us both......even if it was a simple quiet day. I will divulge a bit of fact surrounding our big day. in spite of my reputation for getting crushed at holidays and gatherings........it was the admiral who was the culprit this time around {they must have held her under the spigot}. we drove the hour or so it took to get to Hampton beach.......me sober as a judge.......and her talking incoherently, giggling, babbling............it was a good thing though. I would have had to carry her over the threshold at the hotel 28 years and still very happy Anyway...........on with yet another bazaar update.........but first a little more history. I did some more digging to see if there were any more pictures of this boat........I found one more....... I was also curious where these pictures were taken.......they were taken on the Vermillion River.......McGarvey's Landing, and the article I got this info from, is a place in Ohio {USA}. Jeeze..........I was thinking Amsterdam, or someplace a bit more rustic, but coming from the late 1800's to the early 1900's.......I guess the Great lakes states, was a really swing'in place at the time for over 100 years, this was the preferred mode to get Christmas trees to water front markets. I read that the Schooner was the common ship for the task.......they would break from their businesses of transporting supplies and cargo, and undertake this task in the tradition of the Christmas spirit. The Rouse Simmons was the most famous ship, but the Schooner George L. Wrenn had been doing it a lot longer. smaller vessels would participate in this endeavor as well.....an opportunity to supplement their incomes. the practice has gone by the wayside to some degree, trees being trucked in by land......but the Coast guard took over that tradition....probably in an effort to preserve it, and serve the people they protect. there are quite a few images of the Rouse Simmons............17 men were lost that day. while looking at them, I spied this one photo........total disbelief! I later saw how this optical illusion was done.........reminds me of Christmas Vacation I never did find out the name of this boat I'm building from.....perhaps one day I will dig deeper


-
thank you Jack
-
holy smokes! what have i done!?! I caused all of you who looked in to get 'tone blindness'! I didn't mean it ...I tell ya!............we'll get medical help for you folks right away! no.......actually I'm kinda glad to see so many who like it......it's not exactly what I wanted, but I'll take it. the existing bulkhead at the bow should have been shaved down a bit.......it appears to be a little bulgy in the keel area, but it's too late for that now. I'll just make the best of it. thanks to all your kind comments and to all who hit the like button hello Keith! glad to see your still look'in in I know it didn't come out perfect Gerhard....a more perfect curvature would have been better. what I was going for was more of a tri hull design, as seen below. I thought it might be cool to try........later on, I did find some plans that would have life easier......too late to put them to theory. I've done some more sanding......and then with a little filler and resin.....should smooth her out. this will be the first time I use resin on my hulls.......might be a trend setter for future models. Hello Wayne.....you really need to get back on the radar my friend! that is, unless it's MY radar that's broken, and you've been posting updates right along without my knowledge. I miss your talent I also want to thank you for posting on the admiral's facebook page........I forgot to tell everyone here that it was our 28th wedding anniversary yesterday {don't look on mine.....the only thing I use mine for is to post my boats and models VWV boring! VWV! we had a quite day........she read, and I messed around on my computer and sanded.........a couple of real live wires, we are!! then it was off to eat at a fancy restaurant.....got fat and happy, and went home. well......thanks for the good word......glad to see your still following along
-
awwww c'mon! I've crammed more photos into my updates.......... not enough Mobbsie........just beautiful! what a boatload of progress you've made! really sweet job.......big difference now that you've totally done her in the poly,,,really tones her up nice. you really have a gem there my friend
- 129 replies
-
- 7
-
-
- armed launch
- panart
- (and 1 more)
-
thanks Patrick...... I have a round piece of stair railing that I wrap sandpaper around. sculpt out the curvature a little more and up sweep the bow angle. now I gotta go get some resin. I don't think I'm going to use the cloth on it though........really don't want to get the cloth pattern showing through. I hope to show more soon. thanks also for all the likes....at least I'll know that it wasn't any of you guys........if the 'white coats come knock'in
-
"emityna dneirflrig ym ward nac uoy" {use a mirror}
-
..........yea Sam.......I remember now I'm usually not that forgetful. it will be super to see more of your work. the cat kinda reminds me of Disney.......really good artistry. I'll look forward in seeing them in wood.
-
awesome looking hull Hans....the internal shots are really nice
-
the carving looks great farbror! the transom does too I think it's a great name for her.......reminds me of that early Monty Python Sketch with Lupins as a running gag so cool. I did see that frame {card?} in the background. I'll look forward in seeing what it's going to be welcome back!
-
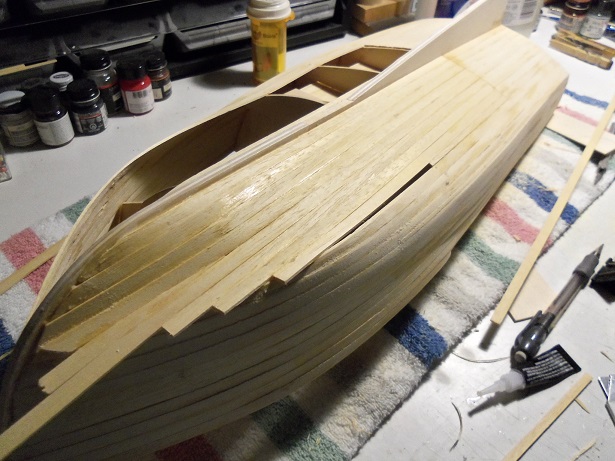
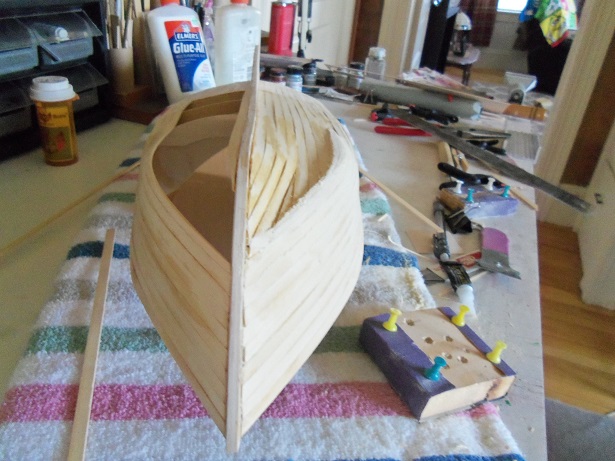
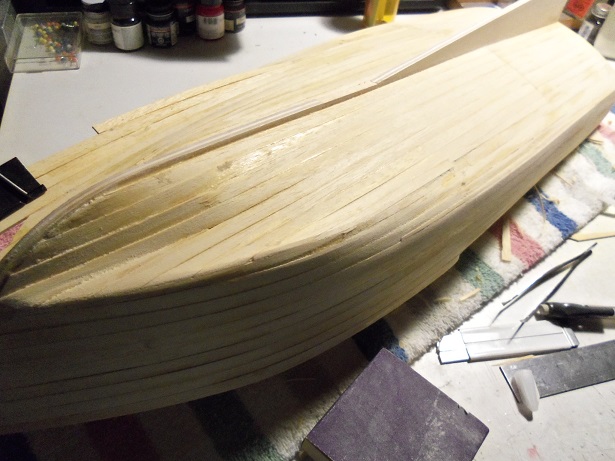
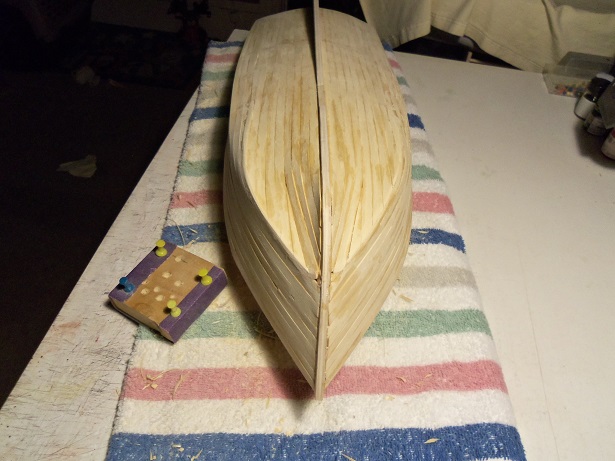
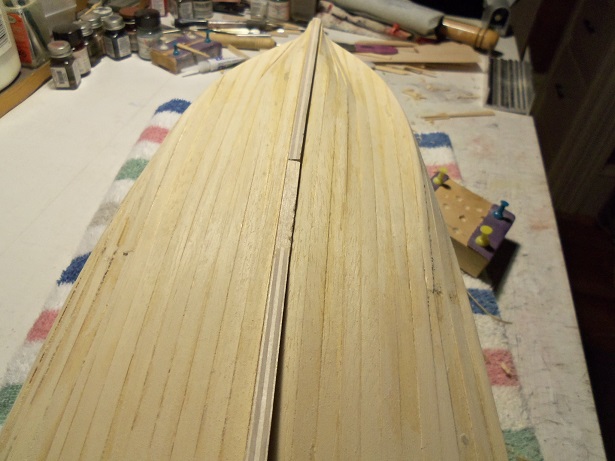
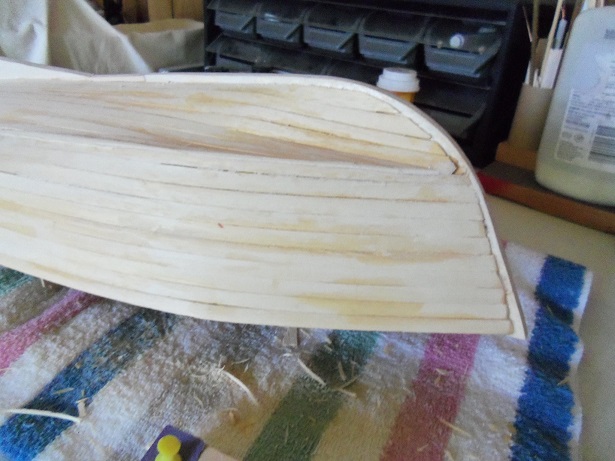
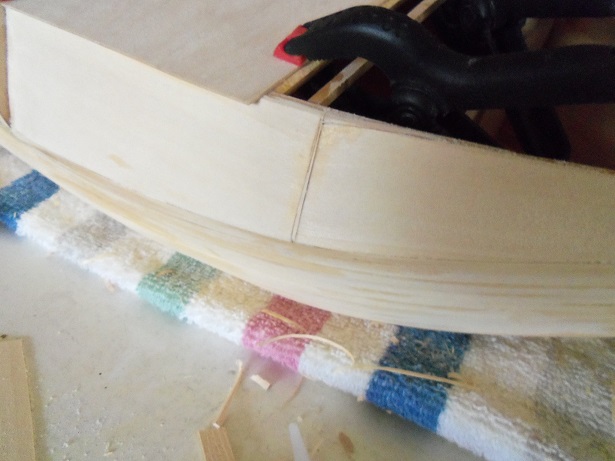
sorry I'm late..........it's hard to type with CA on my finger tips. I had inverted "sticky Keys". I've had to stop many times during the entire process to clean off my fingers........immersing them in water helped somewhat.....brake parts cleaner works well too. I began by doing both sides at the same time......but I ended up concentrating on one side, once I gained momentum. starting at the keel, I worked my way down from there......trying to let it 'fan out' as much as it wanted. the trouble here, is it didn't.....it wanted to run close to the bulkhead. when I got to the point where I was going to close the gap at the bow stem....I lapped it onto the hull side. the gap here was filled in with material, making sure that it was installed at an angle. the hull side was prepped to receive the planking, by shaving it down just a little, giving it a curved 'dip'. as more planks were run, it was the same.......making sure that they followed the plank next to them. for the last plank, you see that it will be rather narrow. no matter.......extra wood will be left there, since quite a bit of sanding is going to happen along this line. I know it looks rather scary........I didn't quite get what I wanted, but I got most of it. just as you described Mobbsie, I wanted to give the bow sort of an inverted flare "V" ...along the lines of what would be seen on power boats.......including PT boats. I have model magazines that contain quite a few articles about PT boats...... ....one day perhaps {I do have that Marine Model kit still in the closet}. for the final section of planking....here I shaved down this small area and sanded it flat. this is to be the apex of the curvature. along this hull line, it will need a lot of sanding and shaping...I'll do some of it as I go along. then I can do the other side and match what I've done here. for almost the entire assembly......I've used CA.......I can't even guess how many of those small tubes I went through. as I was doing the other side, the excess wood was cut off and some sanding was done. here is what it looks like at this point. it kinda hard to see the contour with the plank lines and brabble running interference. once I can get a picture of it with resin and primer.........then it can be seen more easily. so now it on with the other side. I get this one brand of CA at Wal-Greens......been using it for quite some time. I was running out, so while we were in the local Wal-Mart, I picked up their brand. soooooooooo not the same! GRRRRRRRR! that stuff wouldn't stick to save my life!.........meant for longer holding time. I have few clamps that can do some of the tasks I require....you see, I've been reading that book......."Karma Sutra"........Hmmmmmmmmm.......don't know if I can get my hull to do THAT!!!! so anyways.....when it was dry enough, the excess was cut off and some sanding was done. again, it is a little hard to see, with everything going on on the surface. I took a couple of pictures this morning without the light........you may see it a little better. now it will get more sanding {story of my life}