HOLIDAY DONATION DRIVE - SUPPORT MSW - DO YOUR PART TO KEEP THIS GREAT FORUM GOING! (Only 24 donations so far out of 49,000 members - C'mon guys!)
×


DelF
-
Posts
1,409 -
Joined
-
Last visited
Content Type
Profiles
Forums
Gallery
Events
Everything posted by DelF
-
 Glad to see you gave into temptation Tim! You won't regret your choice. I second Glenn's comments about jigs. Half the art of milling is about finding the best ways to hold work down securely and in the best position to work on it. If you enjoy problem solving that's half the battle, but you'll also find lots of examples of jigs on the forum. As a starter, have a look at Marsalv's Royal Caroline build. In his current model he uses CNC machinery, but on Caroline you'll see what he was able to achieve with the standard MF70. I also agree with Glenn on the Proxxon vice (PM40) and dividing head (#24 264). Enjoy! Derek
 -
Kind of you to say so Glenn. You set the standard on paintwork and photography that I aspire to.
- 345 replies
-
- 1
-

-
- Duchess Of Kingston
- Vanguard Models
- (and 1 more)
-
Looks fine to me Steve, although I hope those reddish patches aren't blood! Derek
-
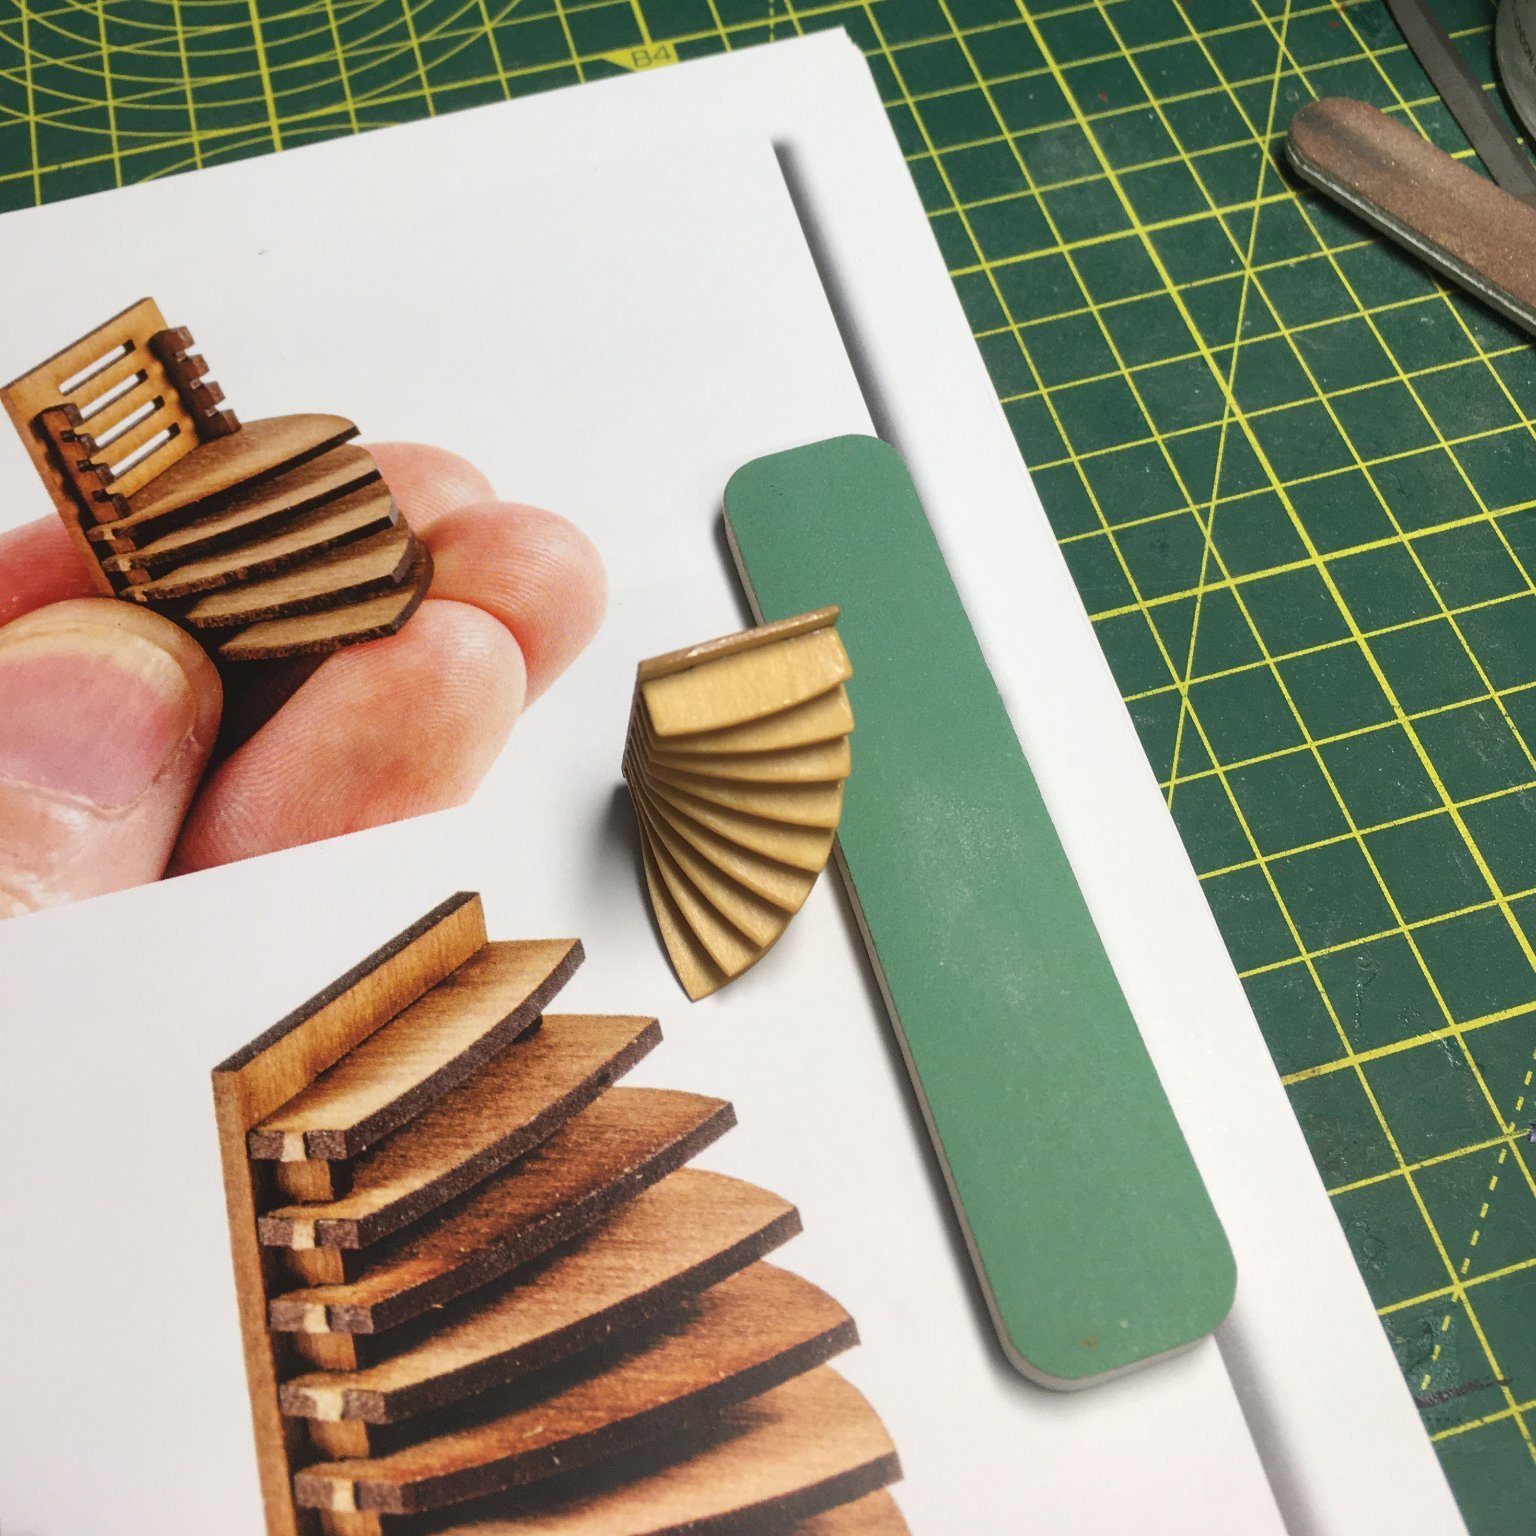
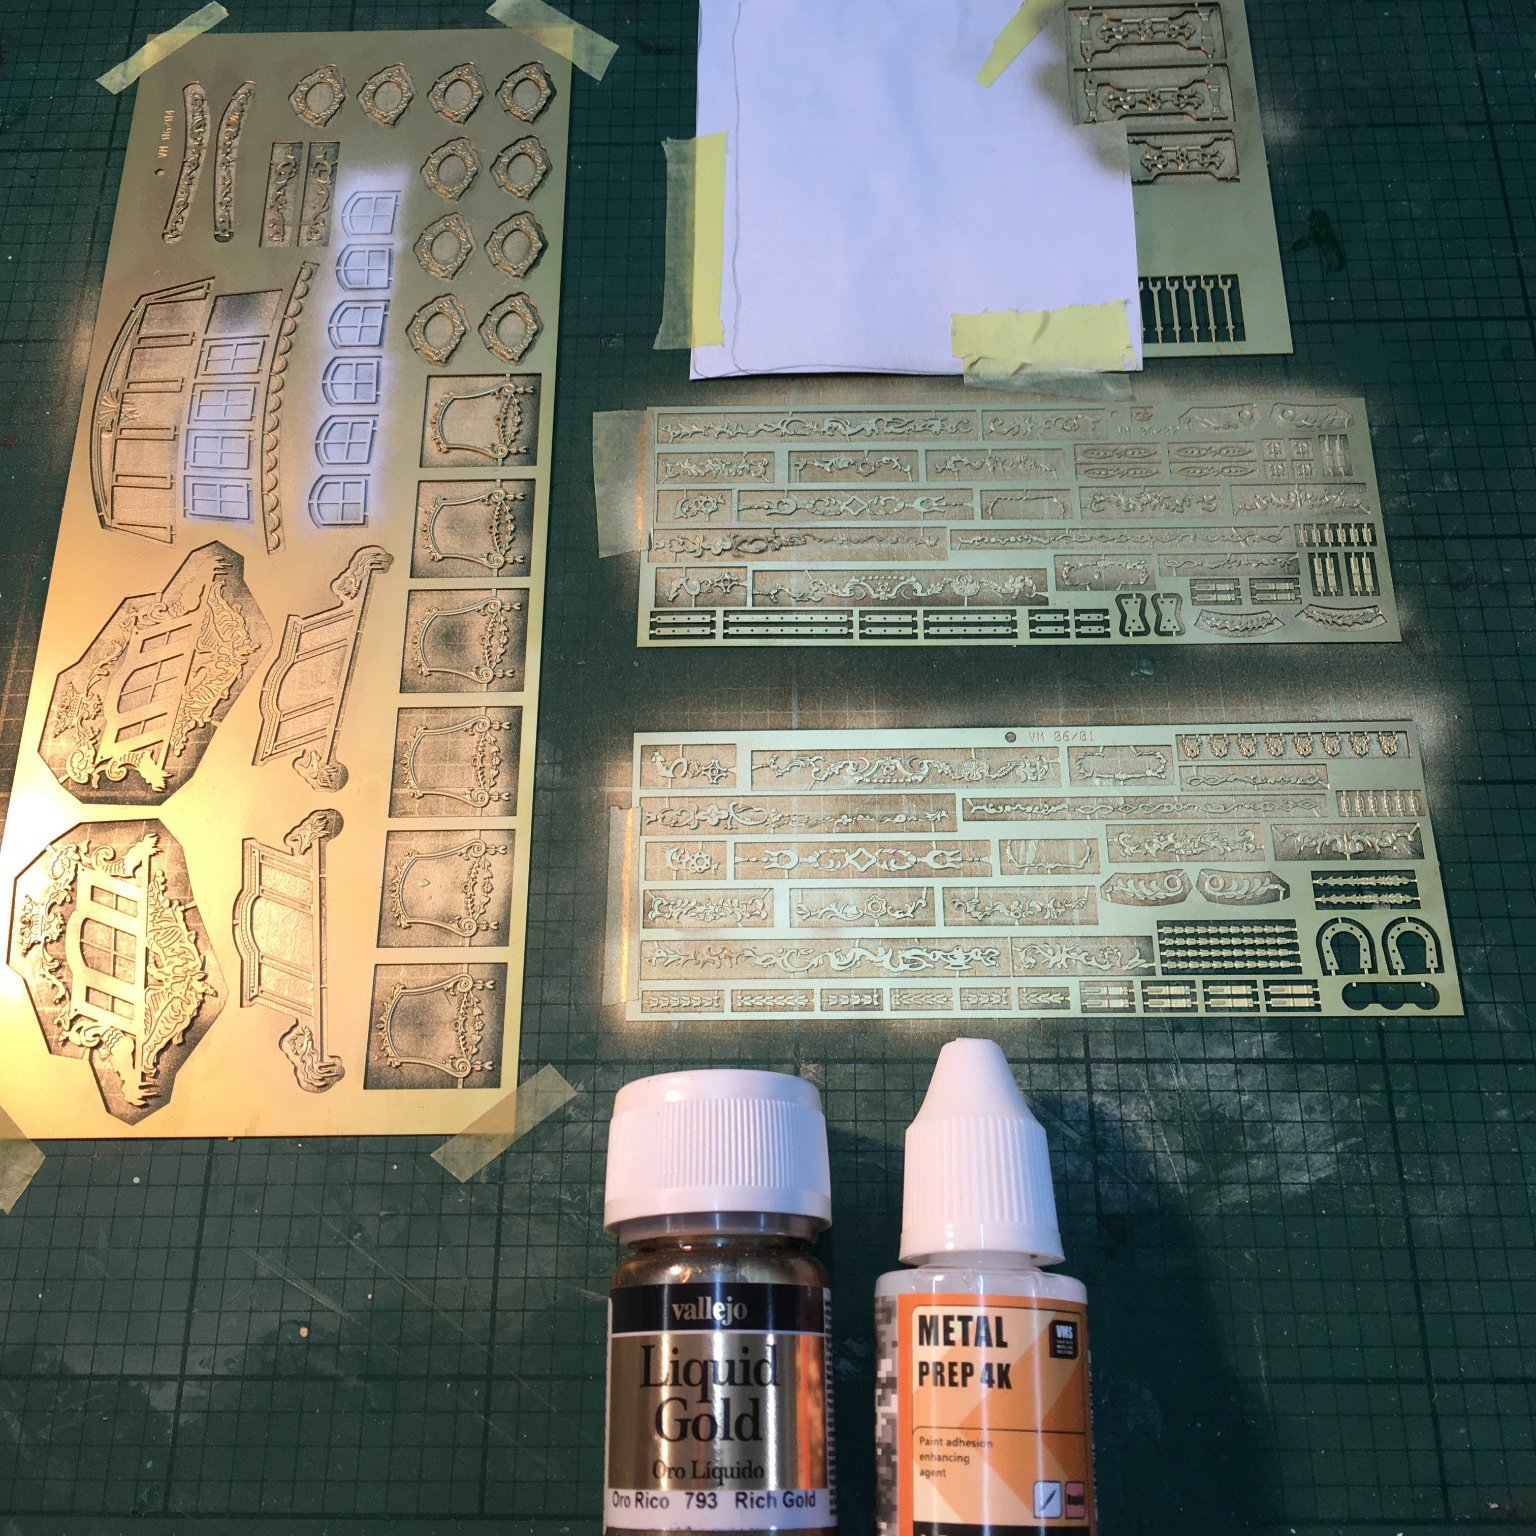
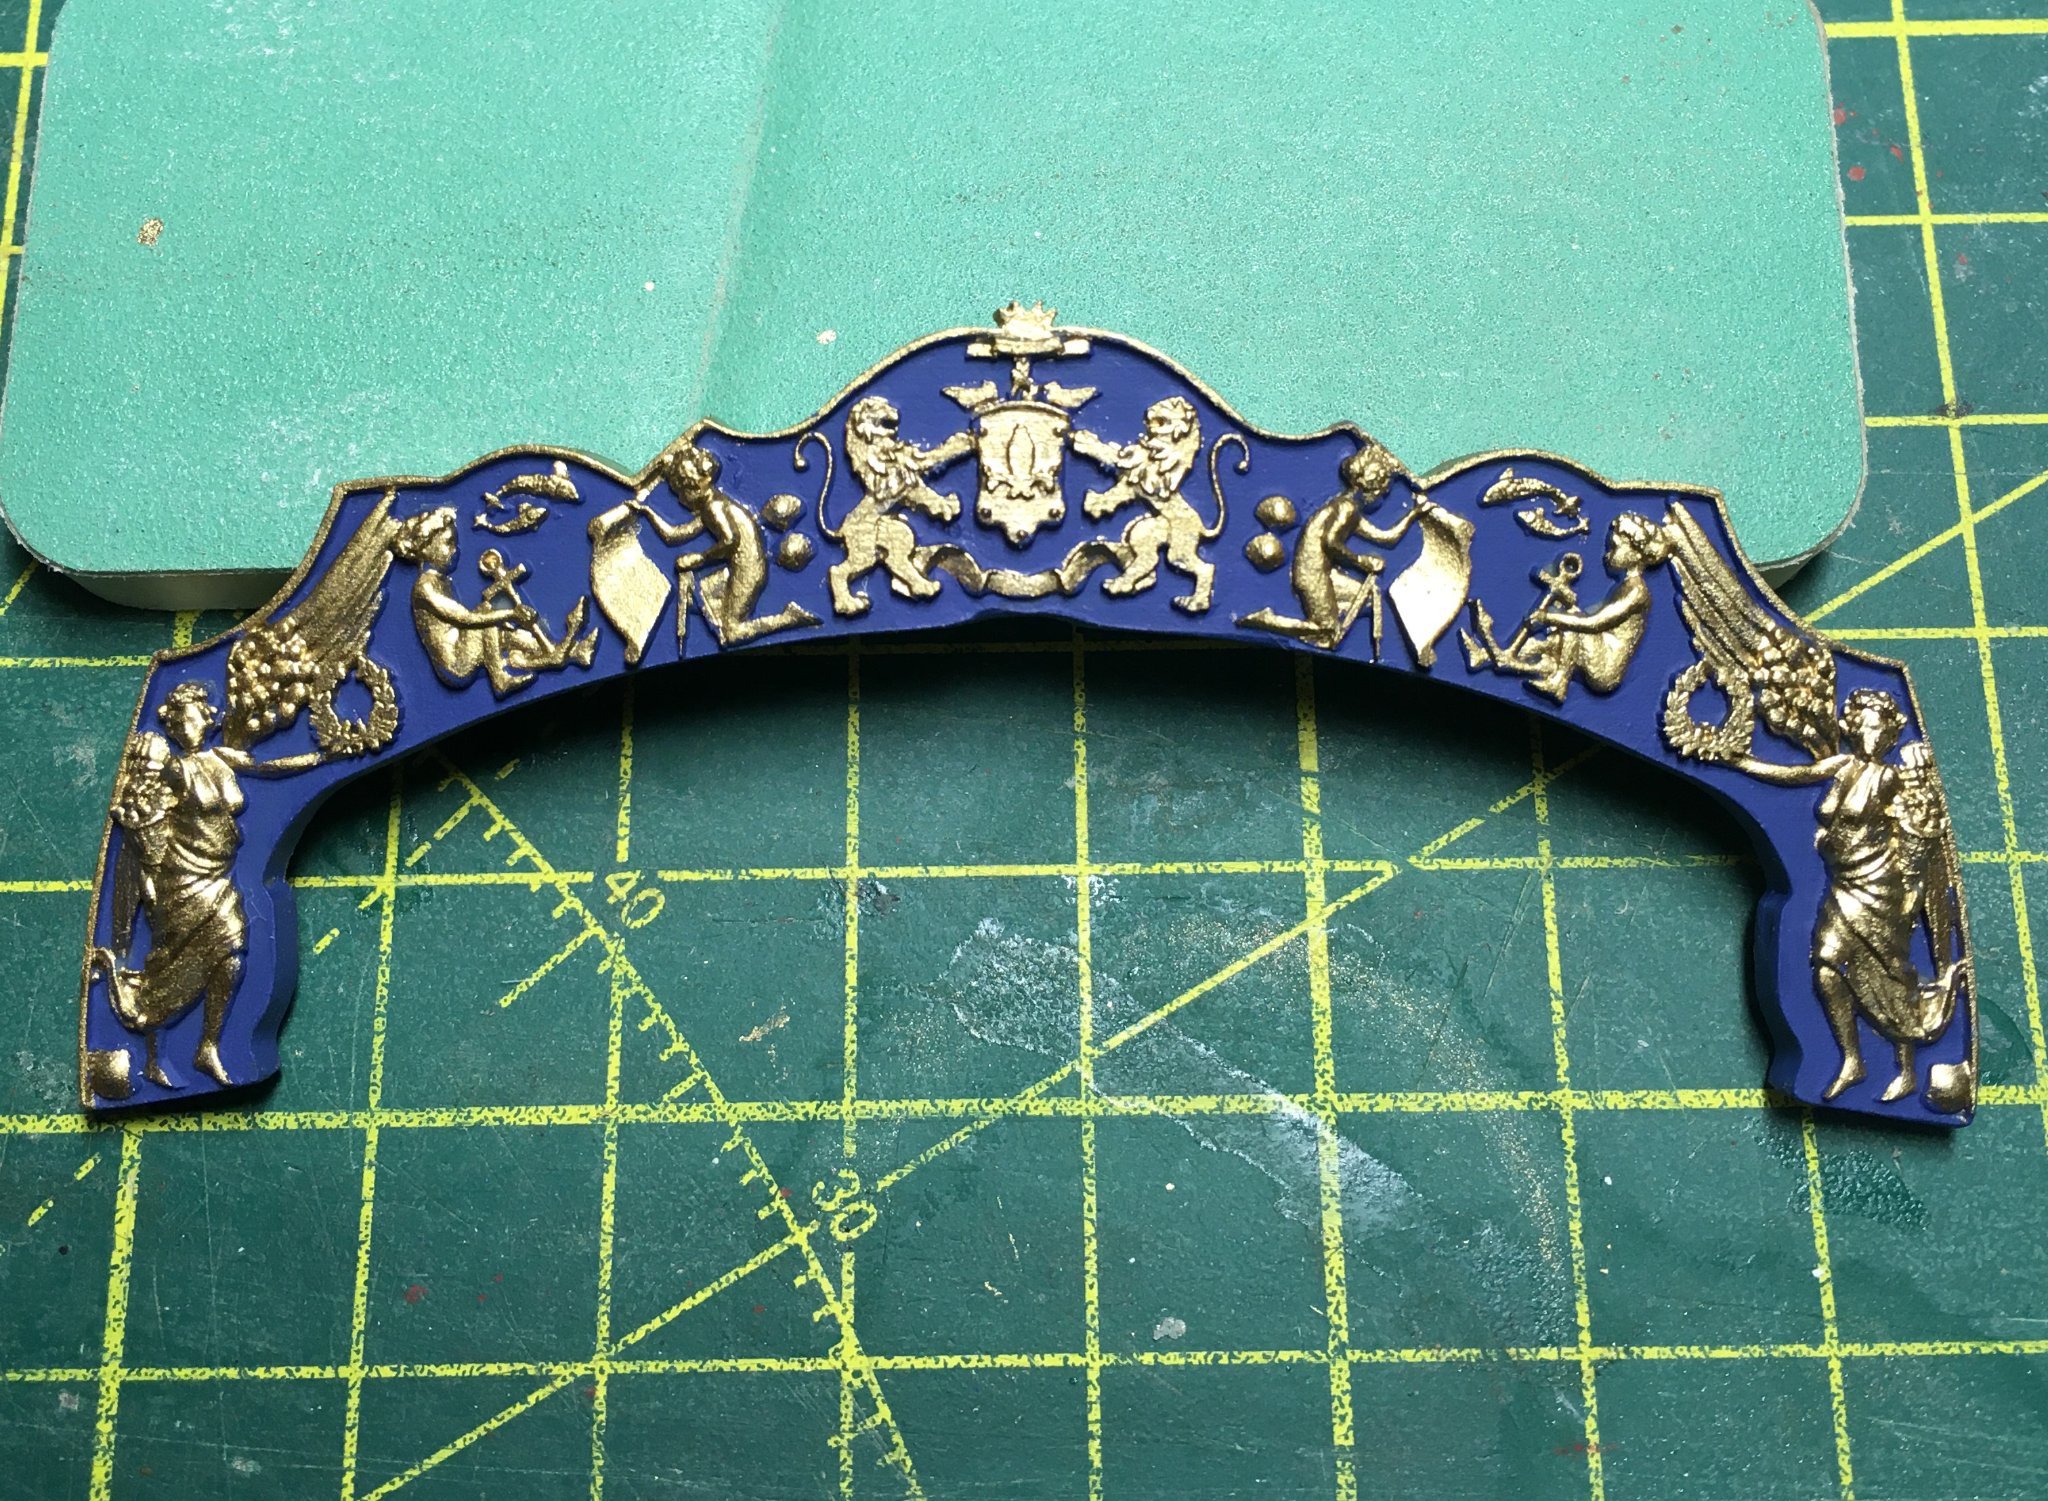
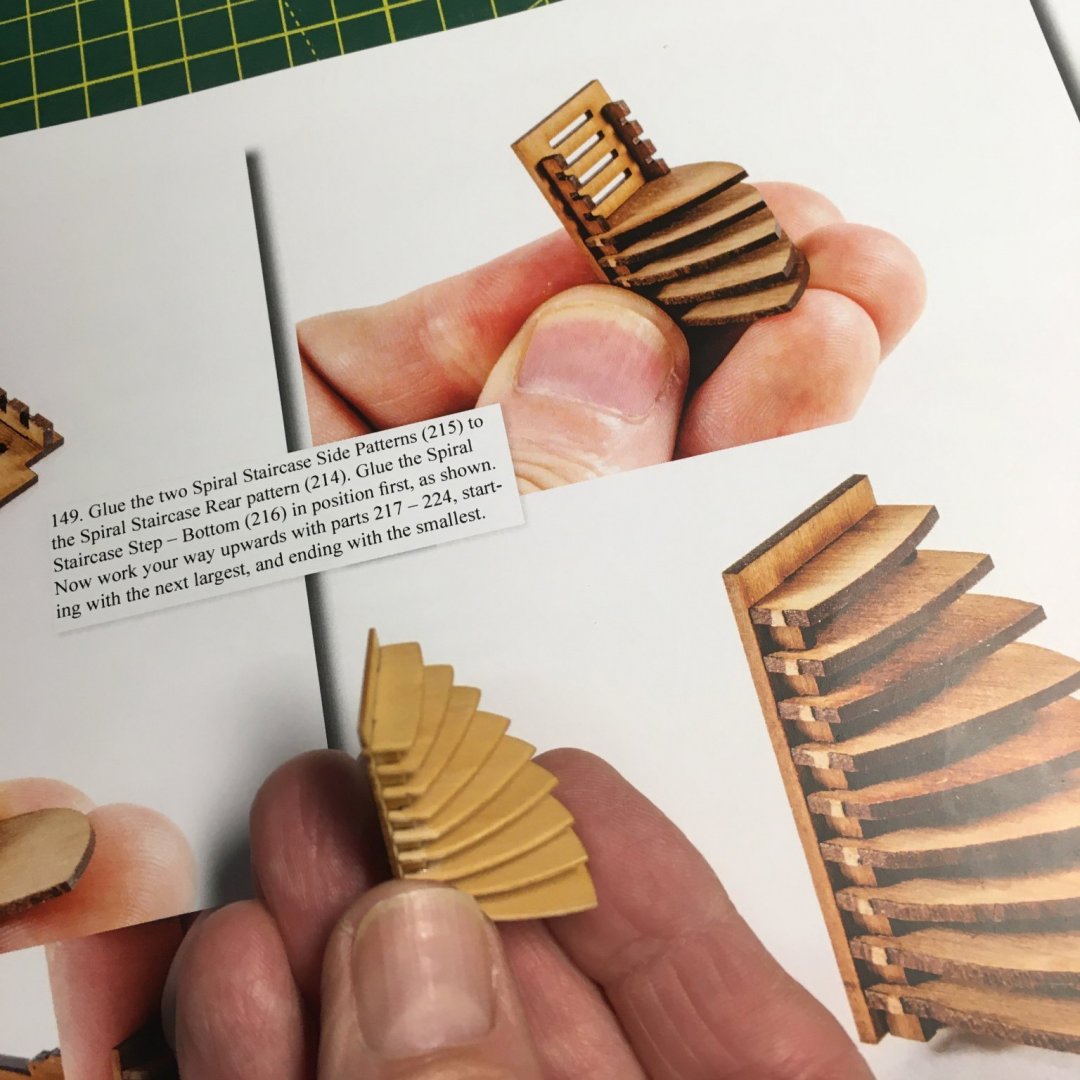
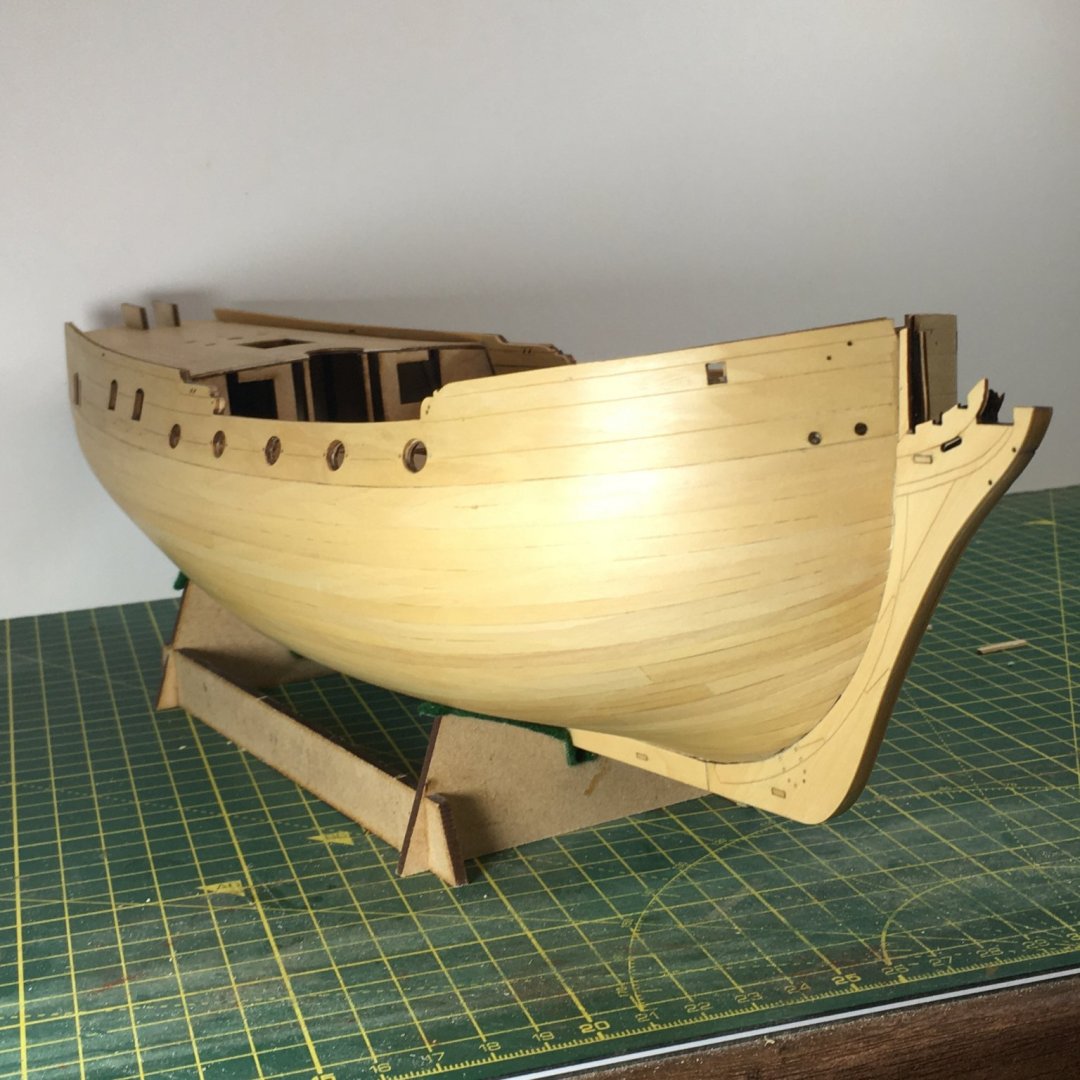
Bits & pieces Thanks for the likes and supportive comments. I've finally made my mind up not to paint the hull white, so instead of struggling to get the waterline right I decided to amuse myself with a couple of odd jobs. First, I had a go at the stern decoration. I'd seen and admired this in other people's logs and the prototype, and when I came to examine the resin casting closely I was struck again by how finely detailed and well produced it is. I dug out my smallest brush and held my breath for about two hours whilst I produced the following: I followed the kit instructions on dipping the casting in hot water to soften it before moulding it to the curve of the stern, and on the painting technique. Humbrol #25 acrylic blue went on first, followed by Vallejo #793 Rich Gold thinned with a drop of isopropyl alcohol then sealed with Vallejo matt acrylic varnish. Then it was on to the photo-etch decorations. The instructions suggest priming these in white then applying gold where appropriate. However I'd found a product called Metal Prep 4k by Vantage Modelling Solutions (VMS) that claims to prepare PE for painting more effectively than traditional primers and etchers, and to be more resistant to damage after painting. I gave it a go on four sheets of photoetch (degreasing first with acetone) and it seemed to provide a good base for the white and gold top coats. After applying the latter I was fed up with cleaning my airbrush so I painted on the matt varnish sealing coat with a brush. It remains to be seen how well this finish stands up to handling and fitting to the hull. Again, I was struck by the incredible quality and detail in the photo-etch. Finally I had an enjoyable 30 minutes assembling the curved staircase. In previous models I've made my own stairs and ladders as kit offerings were invariably the wrong scale and too chunky. However with Speedy and now with Duchess Chris Watton has ensured that all the fittings are to scale. Although the staircase will be largely hidden in the final model, I wanted to clean it up properly for my own satisfaction, sanding off the char, smoothing the upper surfaces and gently rounding the noses of the treads. Obviously James didn't need to go to these lengths for the prototype, but it's worth showing the difference this preparation makes: Next I'm planning to experiment with different glazing options before I fit the window frames and continue with the decoration. Derek


- 345 replies
-
- 17
-
-
- Duchess Of Kingston
- Vanguard Models
- (and 1 more)
-
I agree - she's looking great. I'm glad to see someone else using shellac - one of my favourite finishes. One thing I'm sure you're aware of though - rubbing down with steel wool can cause problems unless you manage to get rid of every last tiny piece, otherwise they'll rust and spoil the finish later on. In future you might be safer just buffing - I use a piece of soft, lint-free cloth once the shellac has dried. Derek
- 91 replies
-
- 1
-
-
- Speedy
- Vanguard Models
- (and 1 more)
-
Beautiful planking work Maurice, really showing off the fine lines of this ship. I particularly like the round tuck in the 5th shot down. Derek
- 857 replies
-
- 2
-
-
- Sphinx
- Vanguard Models
- (and 1 more)
-
Go on, give in to temptation - you know you want to!
-
I would also suggest barrette files, such as those from Vallorbe, one of the top makers. See here for a series of posts discussing these and other files in my Speedy log. The discussion starts off on filing out gunports, but these files are very useful for any jobs where you need to file just one face whilst protecting others. Derek
-
Neat work David - you're making good progress. Have you treated the deck? Sorry if I've missed the explanation, but it looks different in the last few pics.
-
Hi Tim I don't know how I missed your log before now, but I'll follow with interest from now on. It's great to see you back in your workshop, and with what looks like a fun project. I love cross-sections, they're full of interesting detail and take up a lot less space than conventional models - I have one framed as a picture on the wall. Derek
-
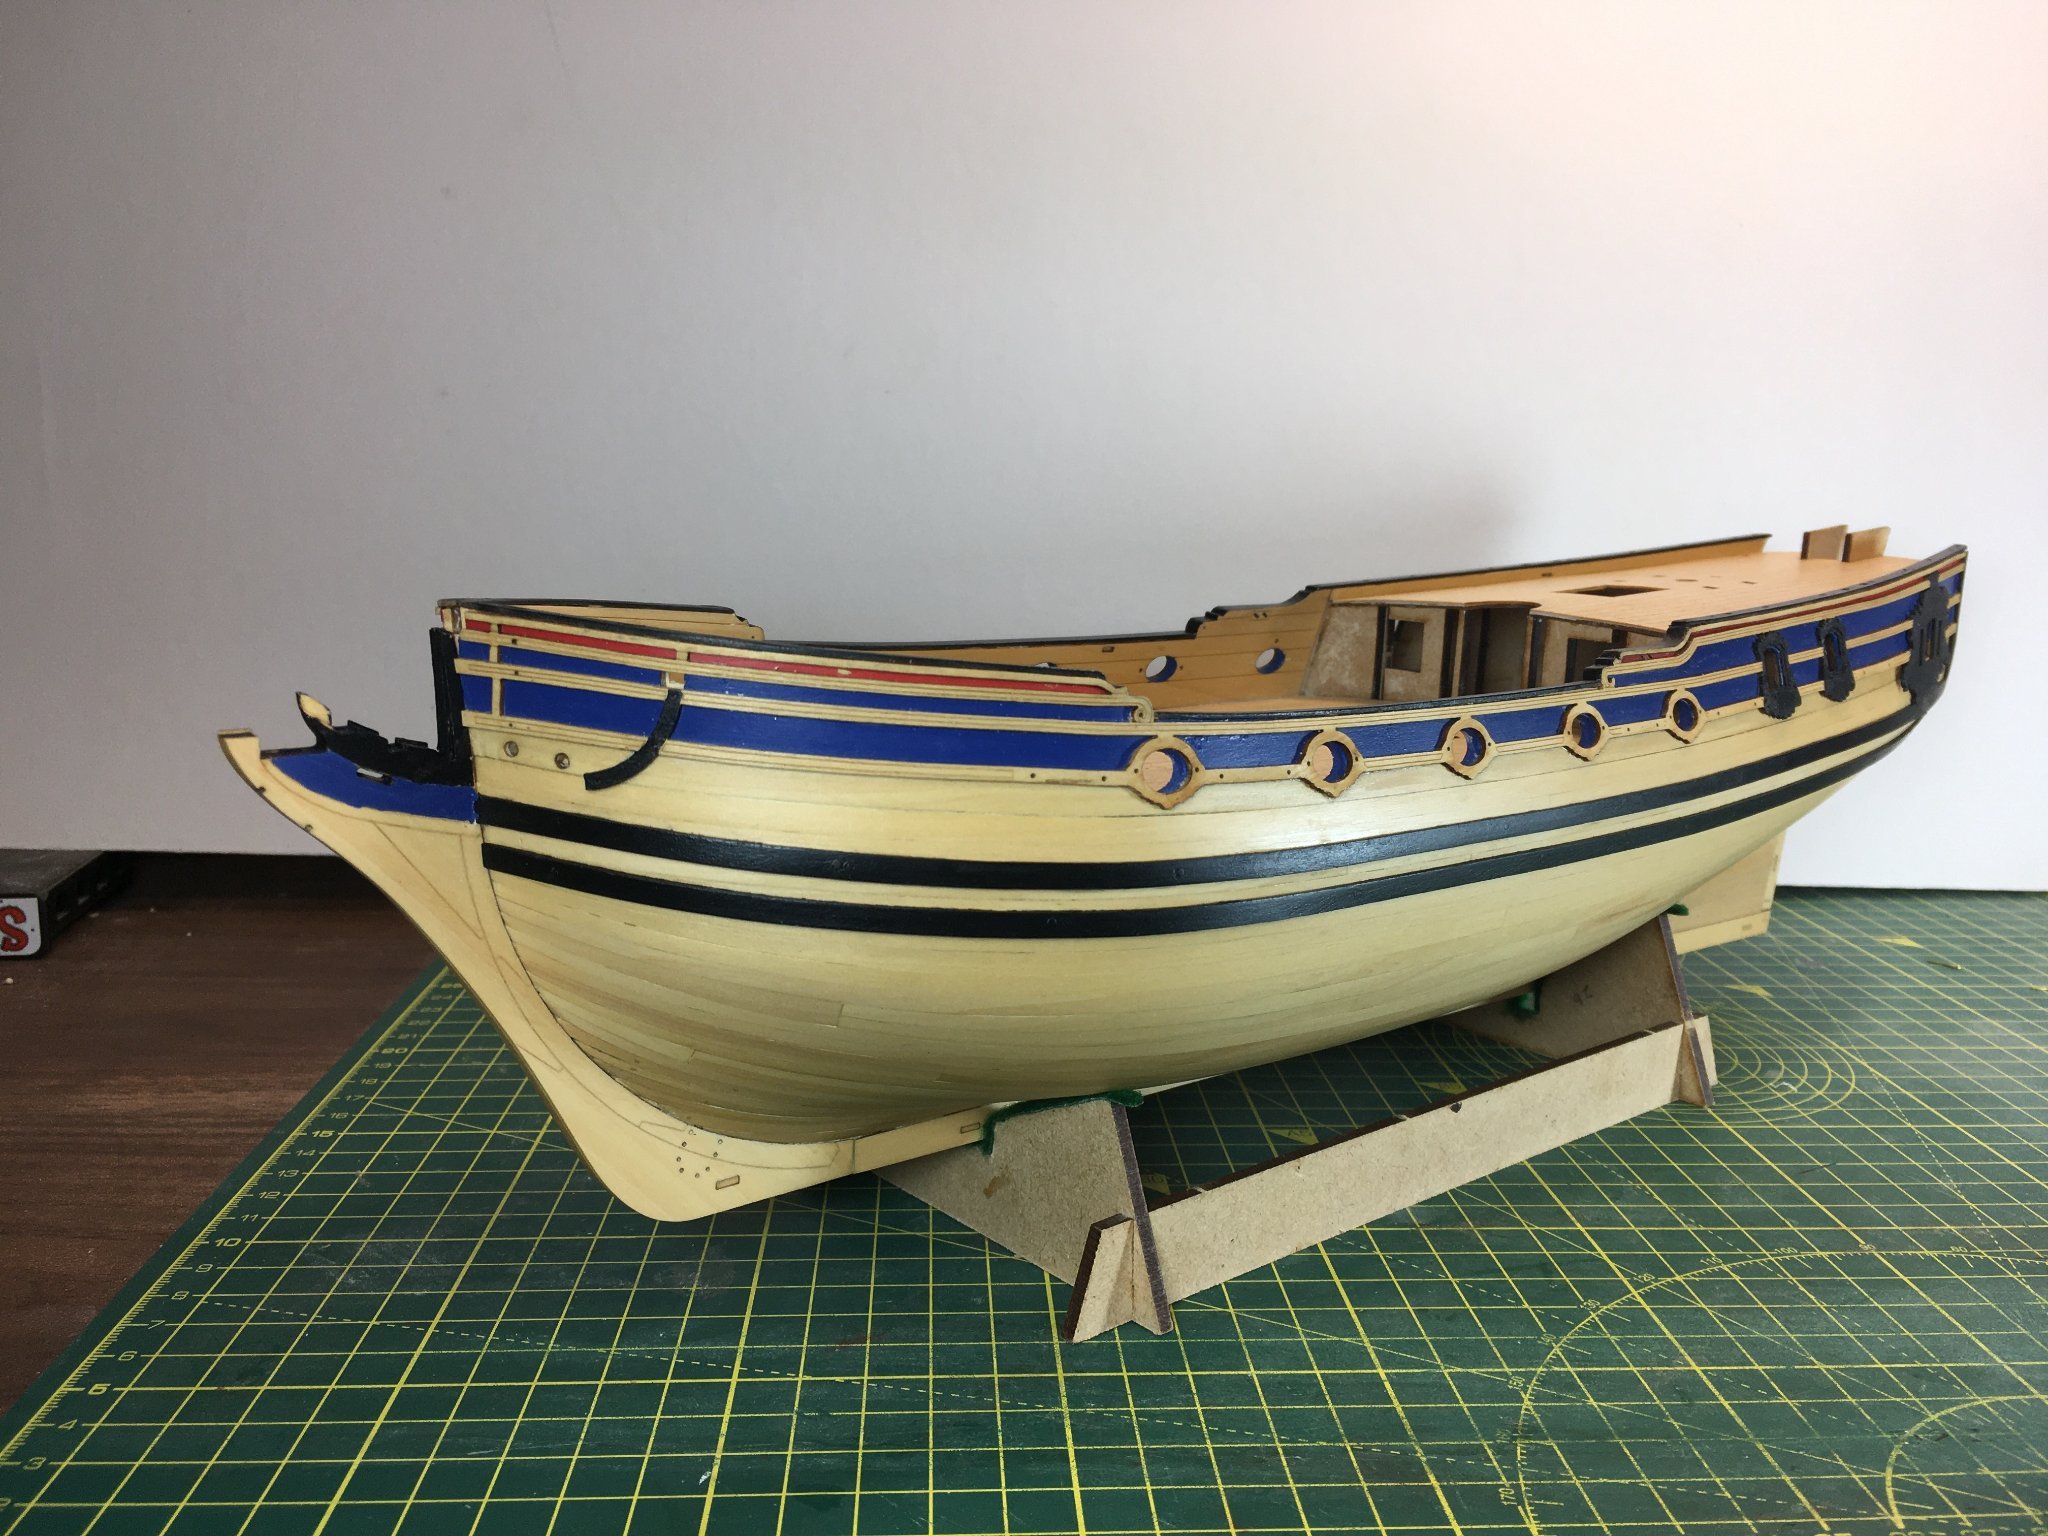
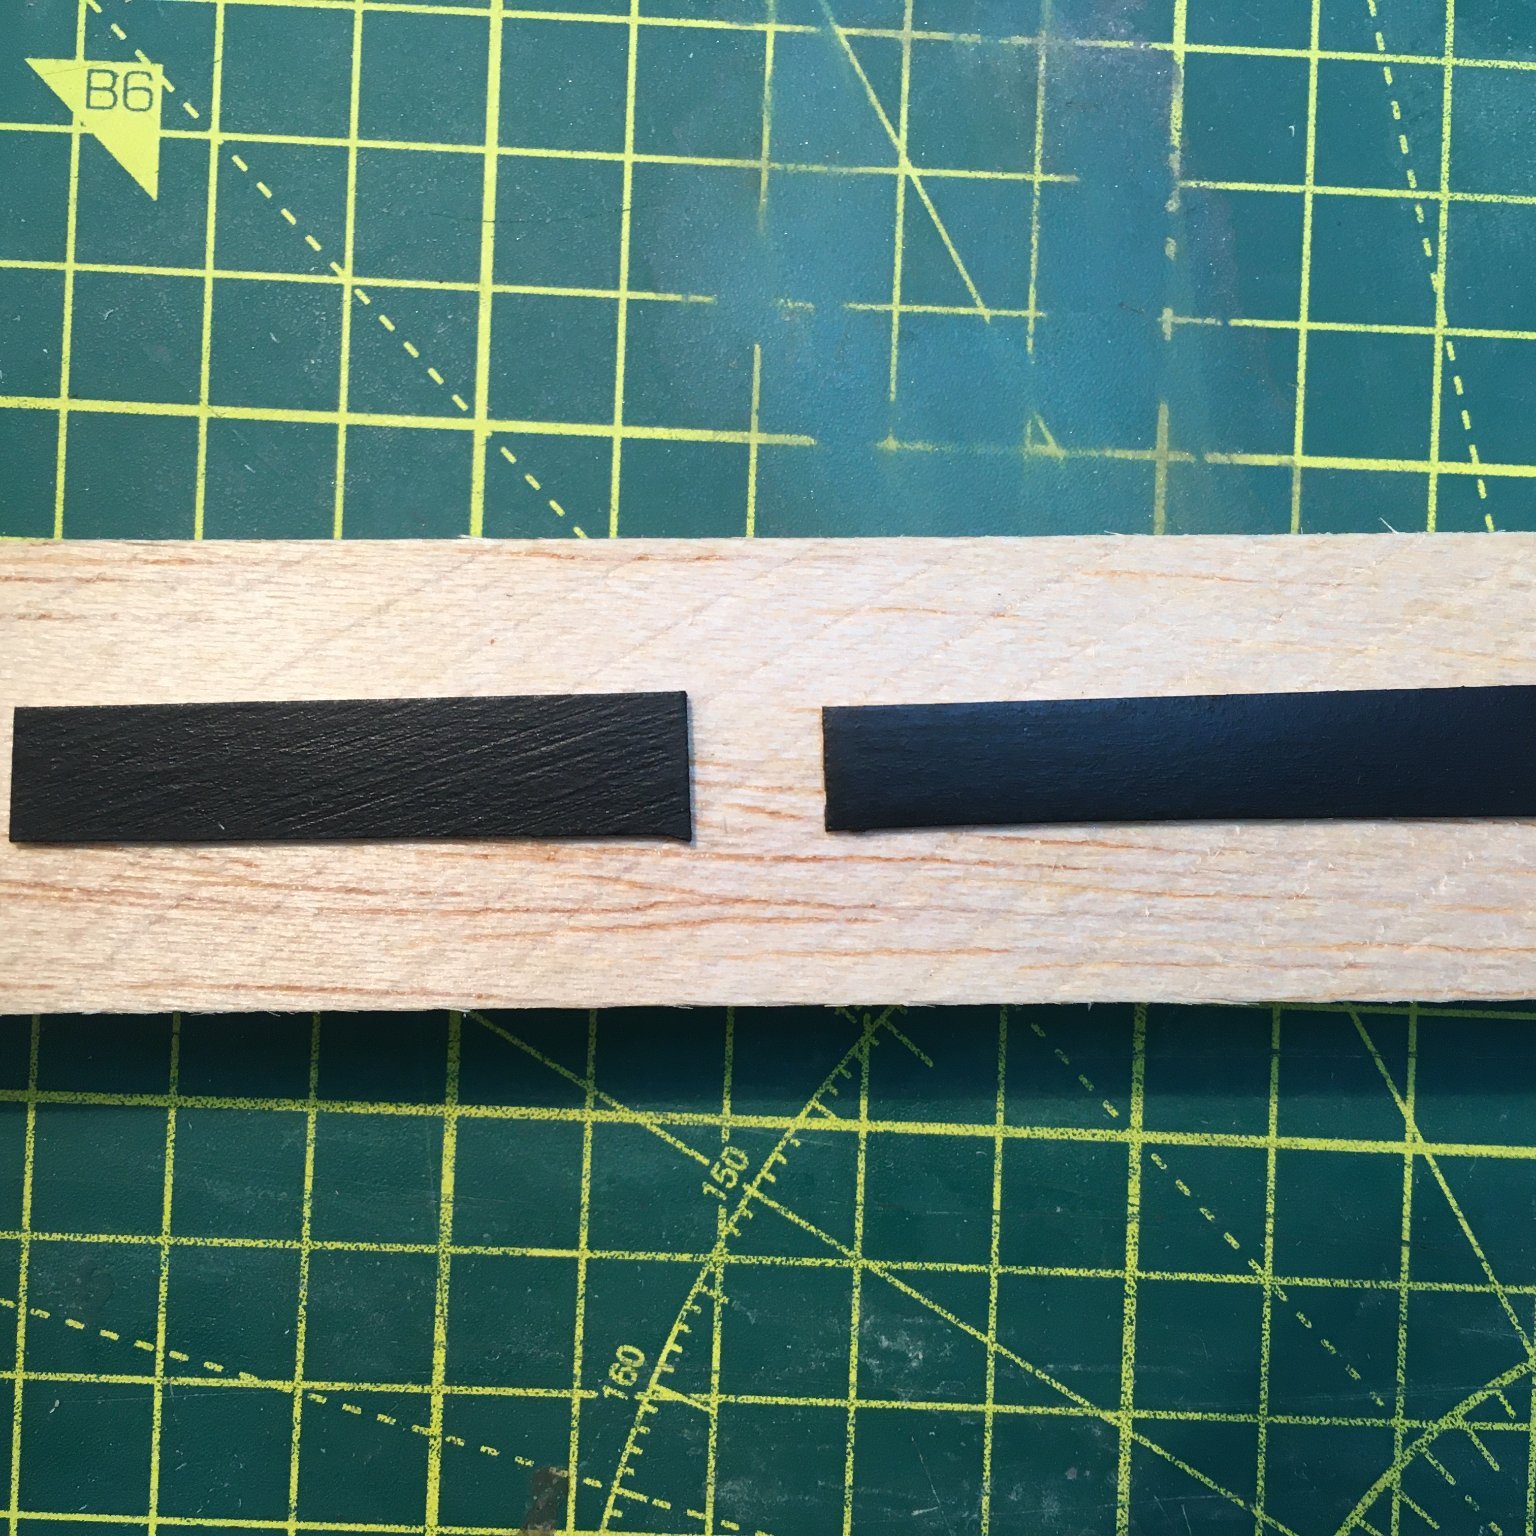
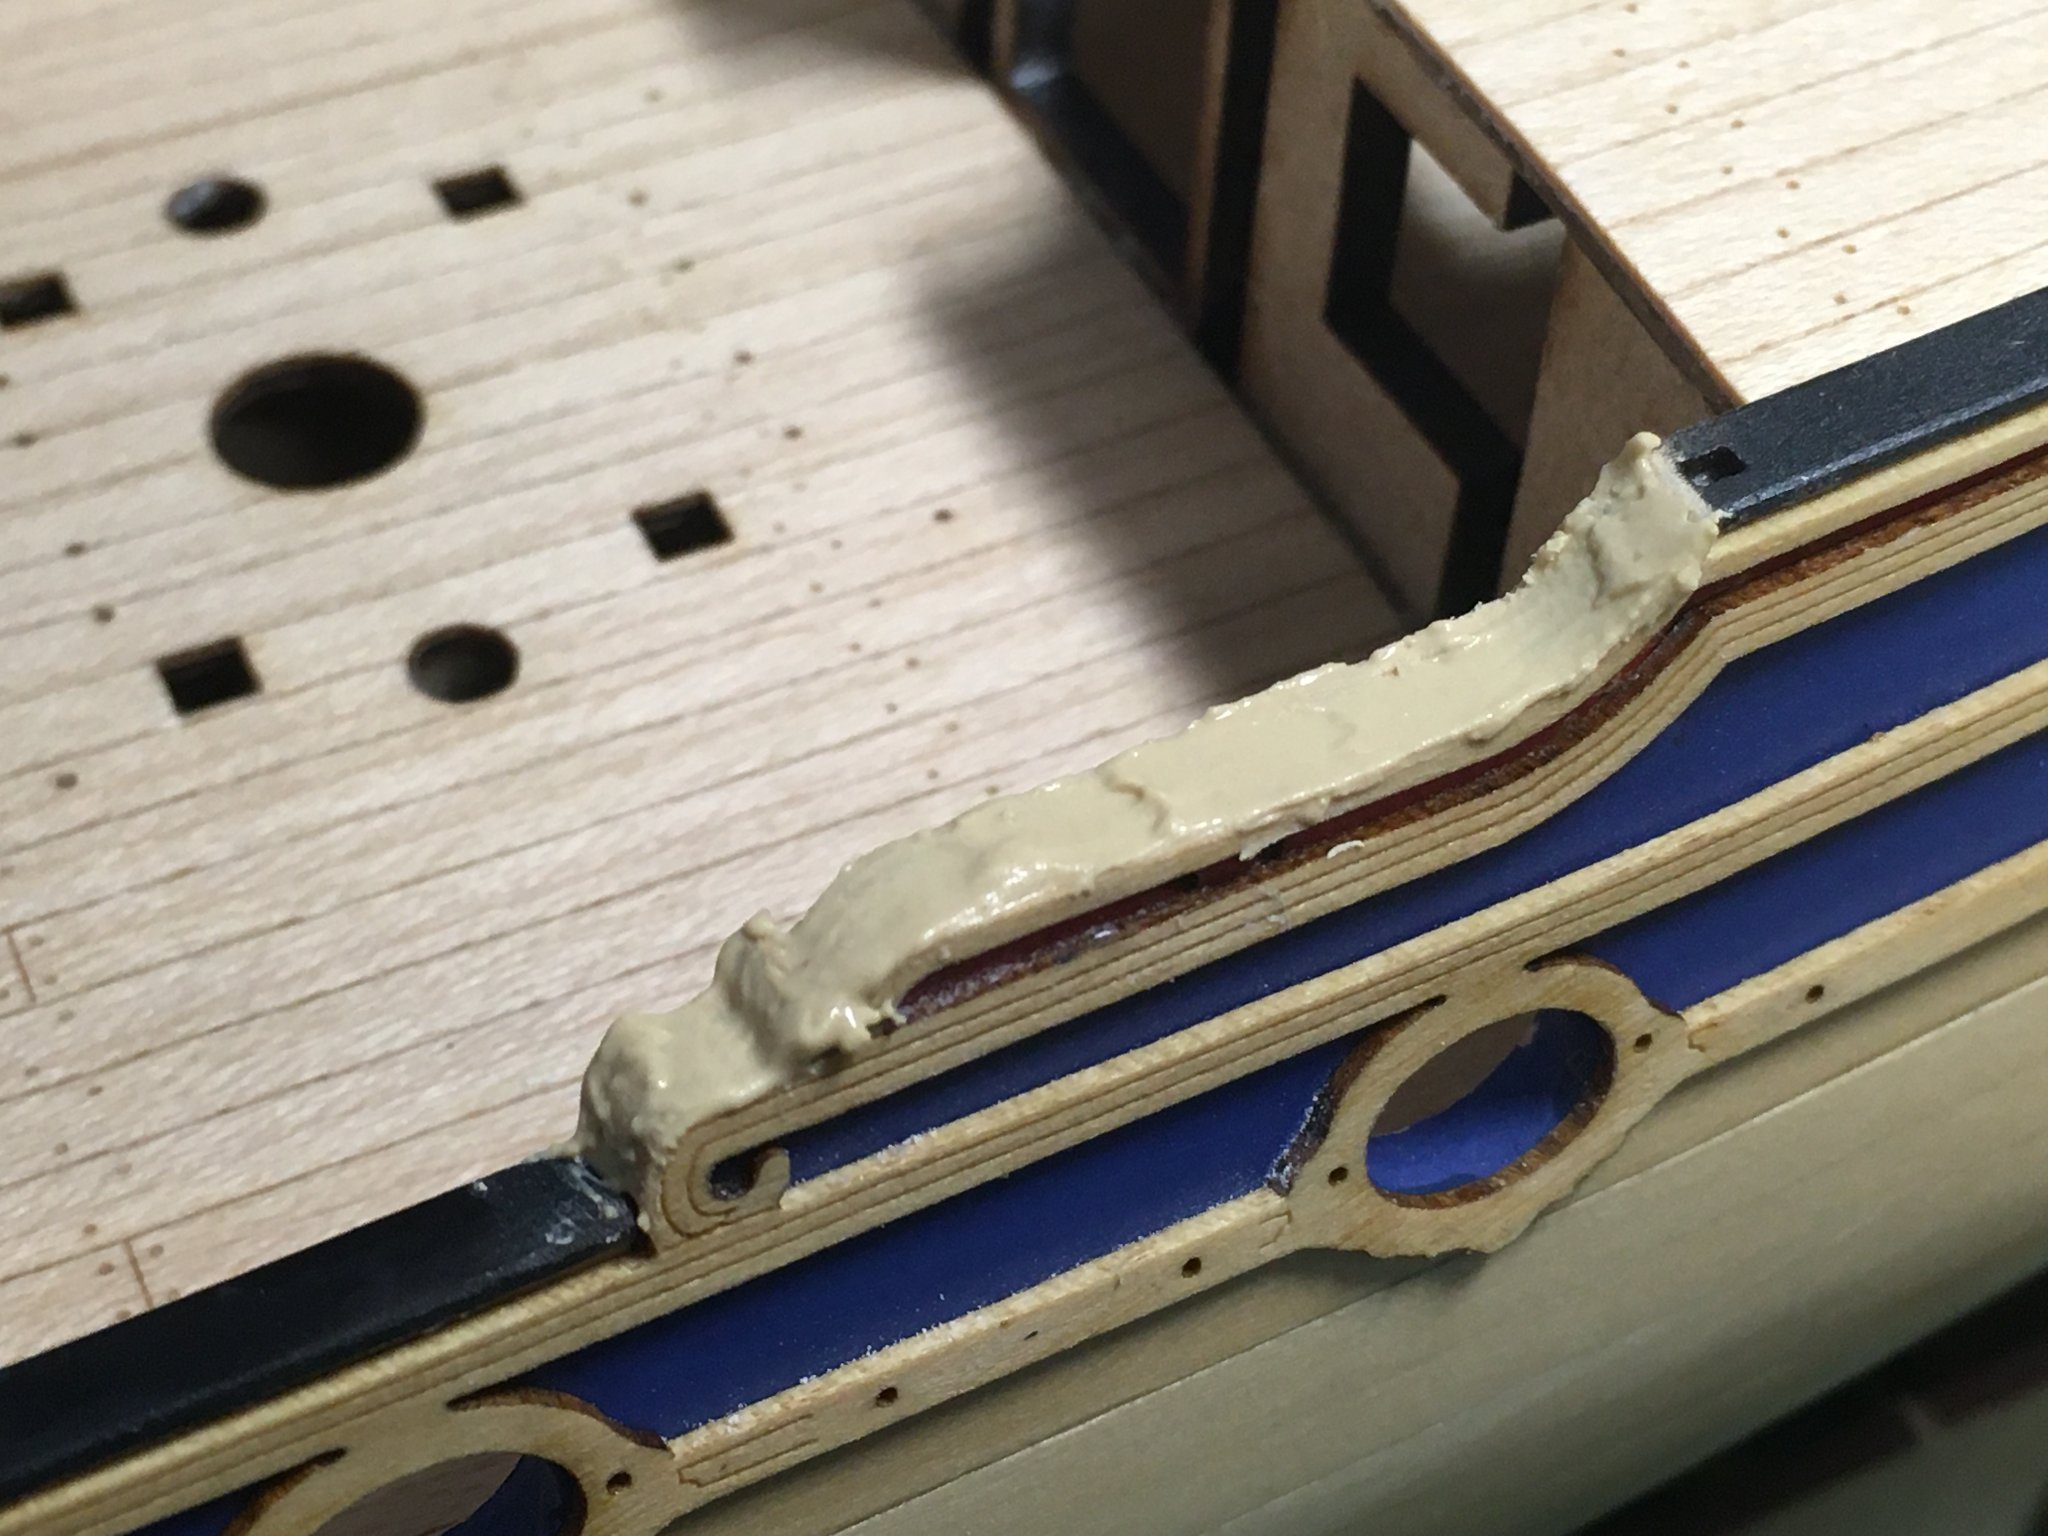
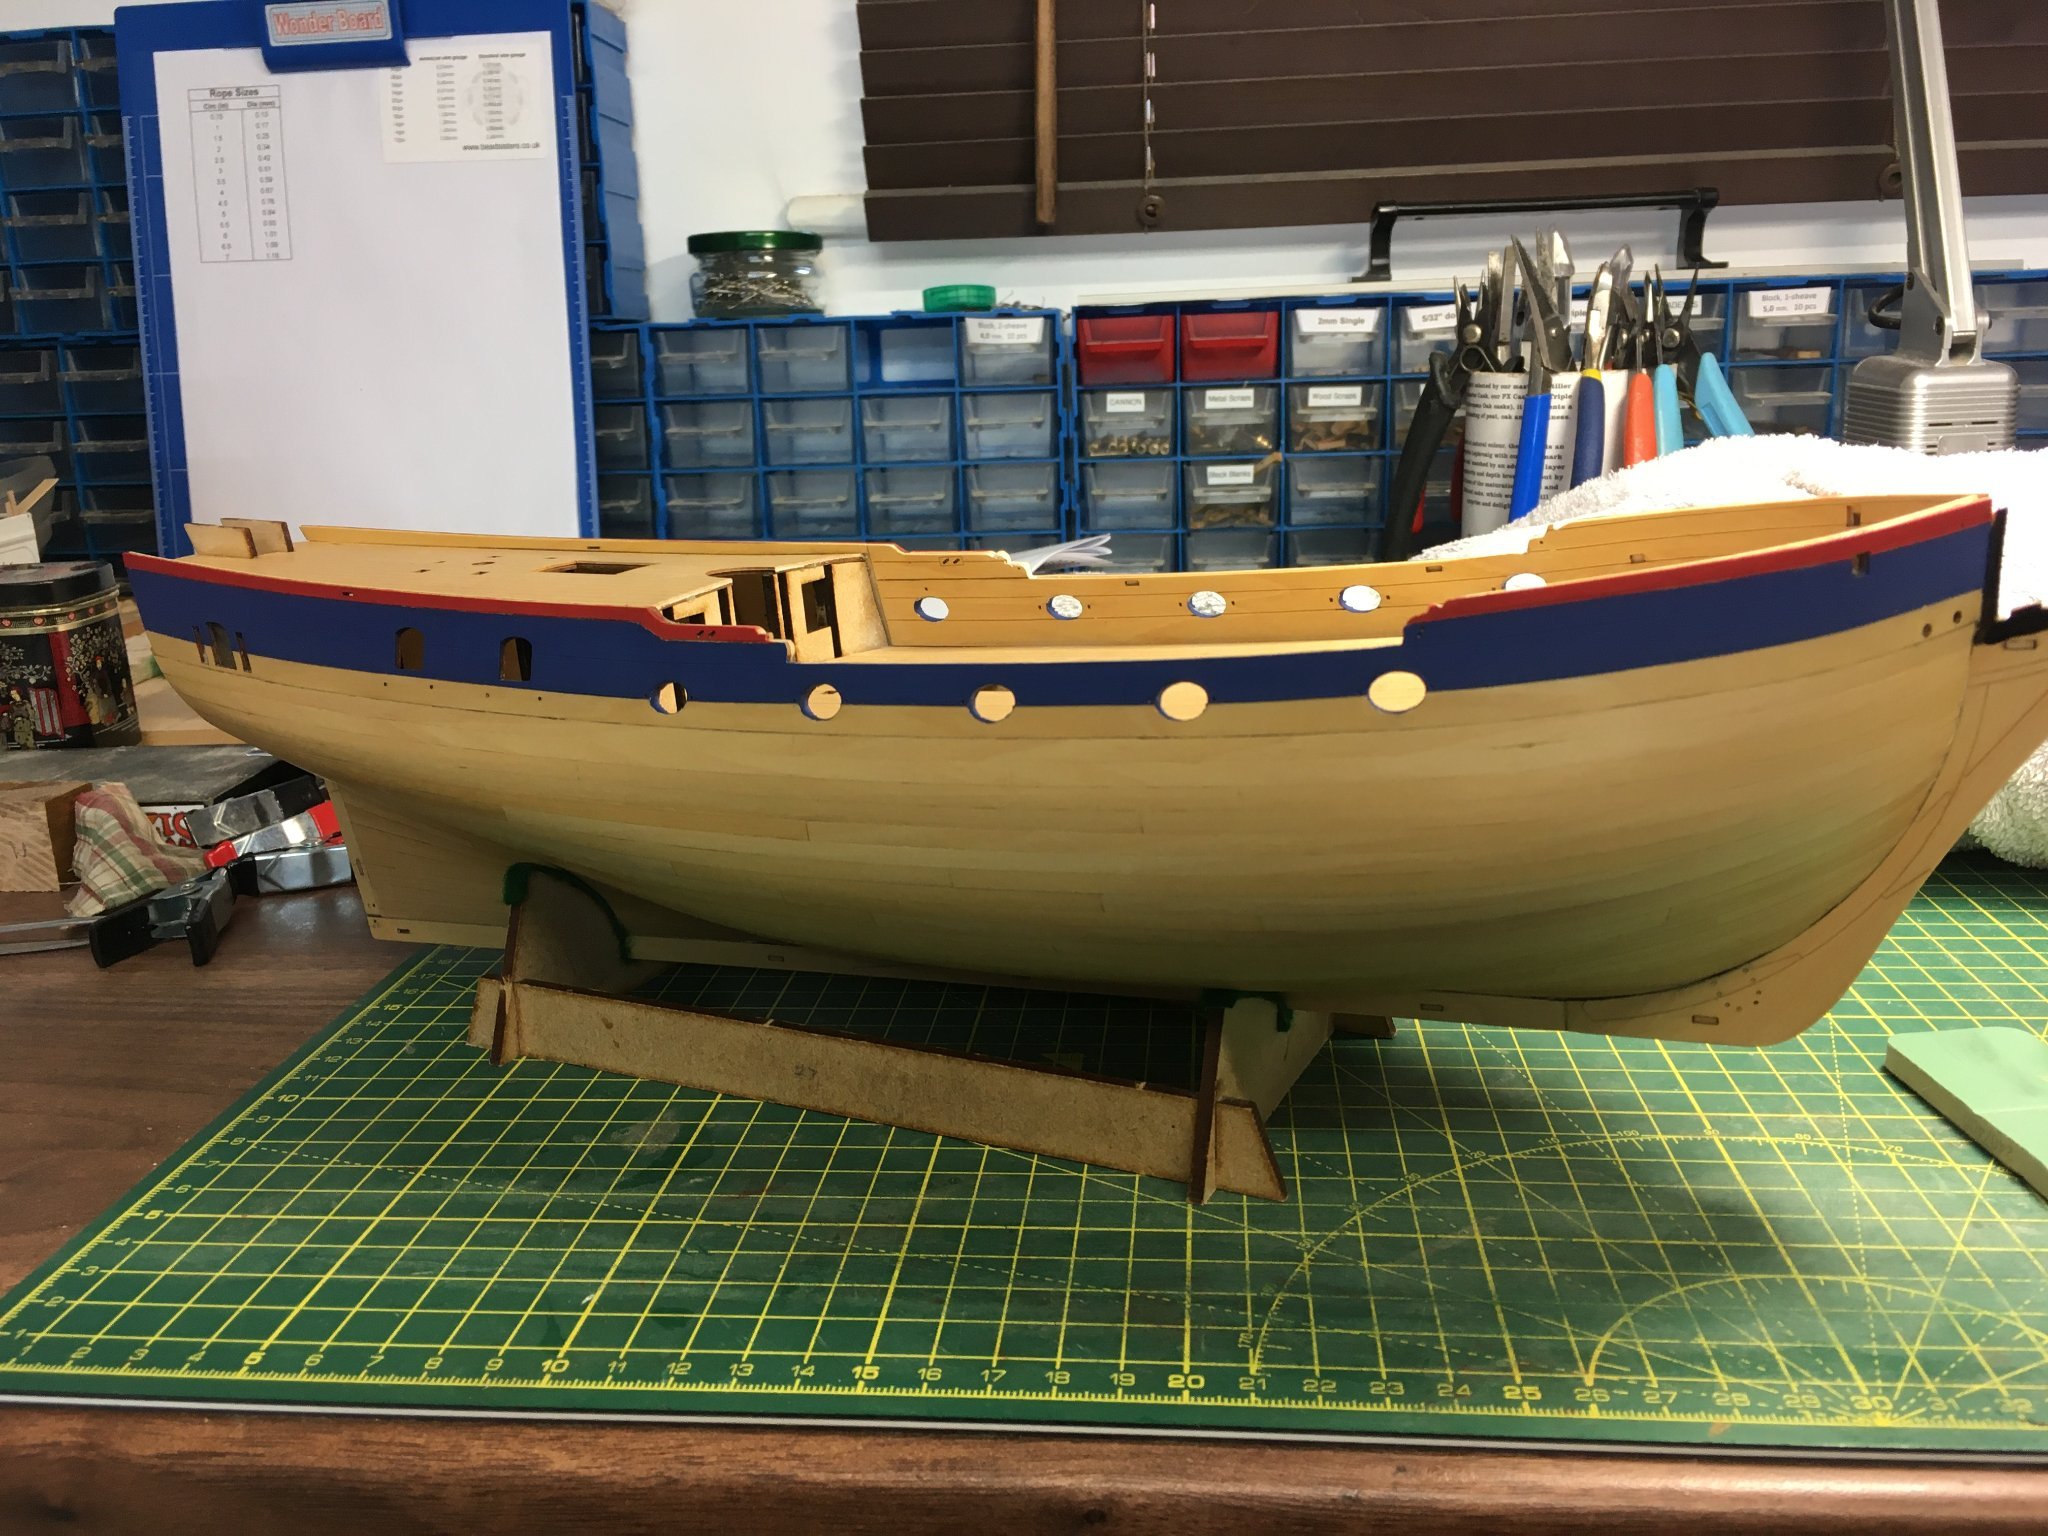
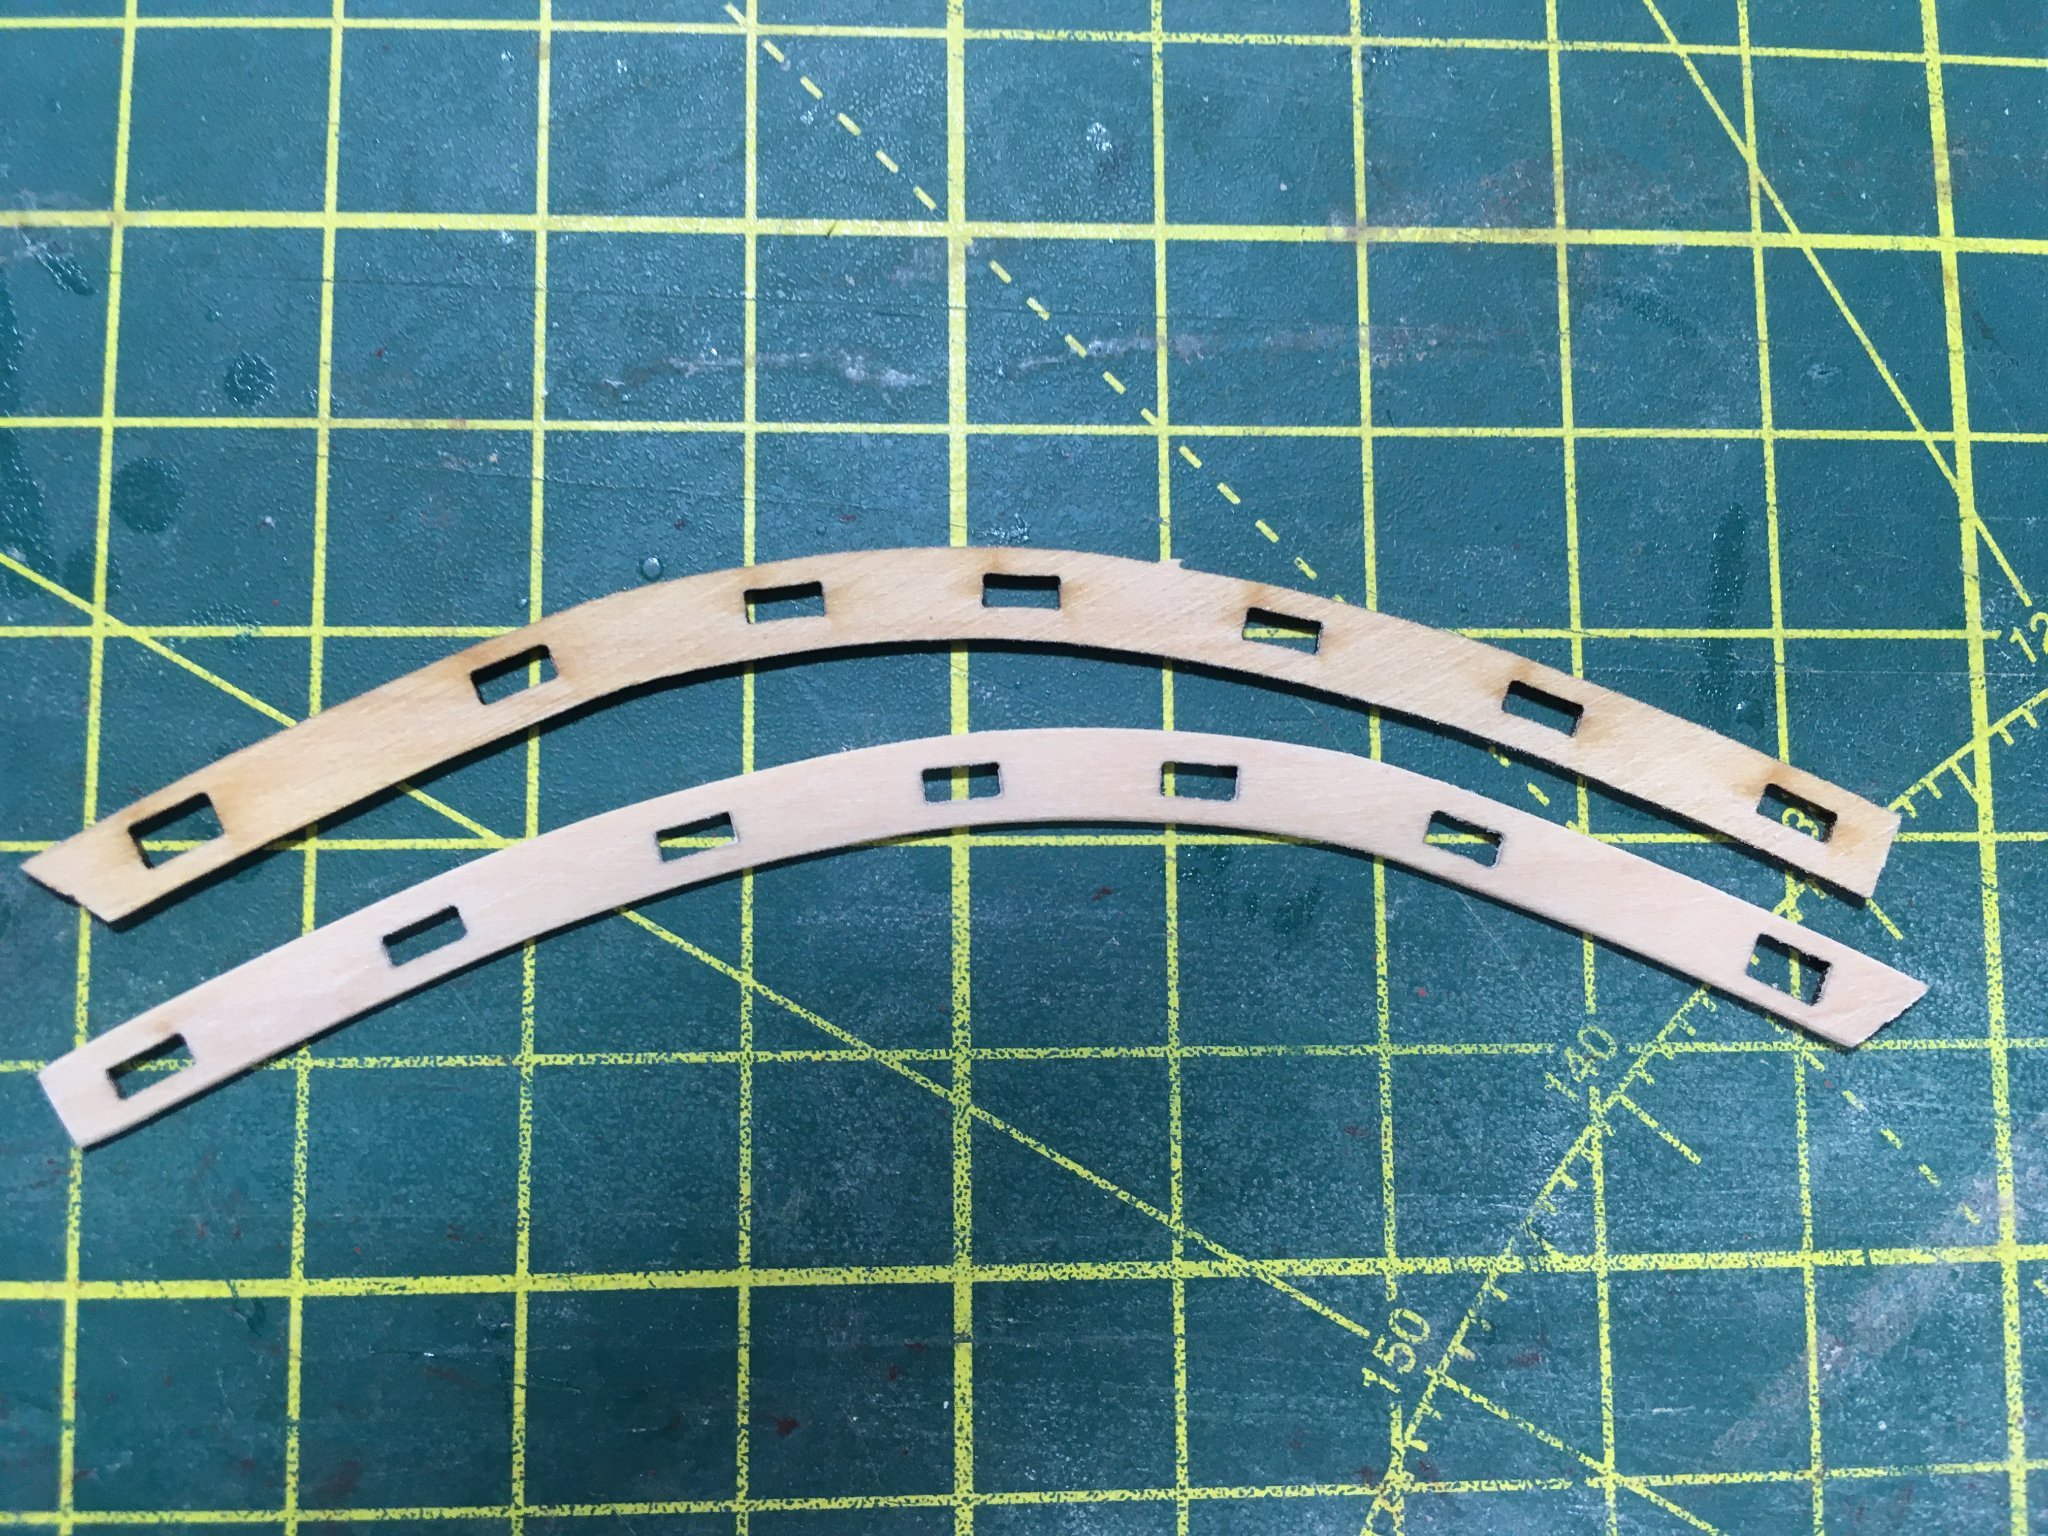
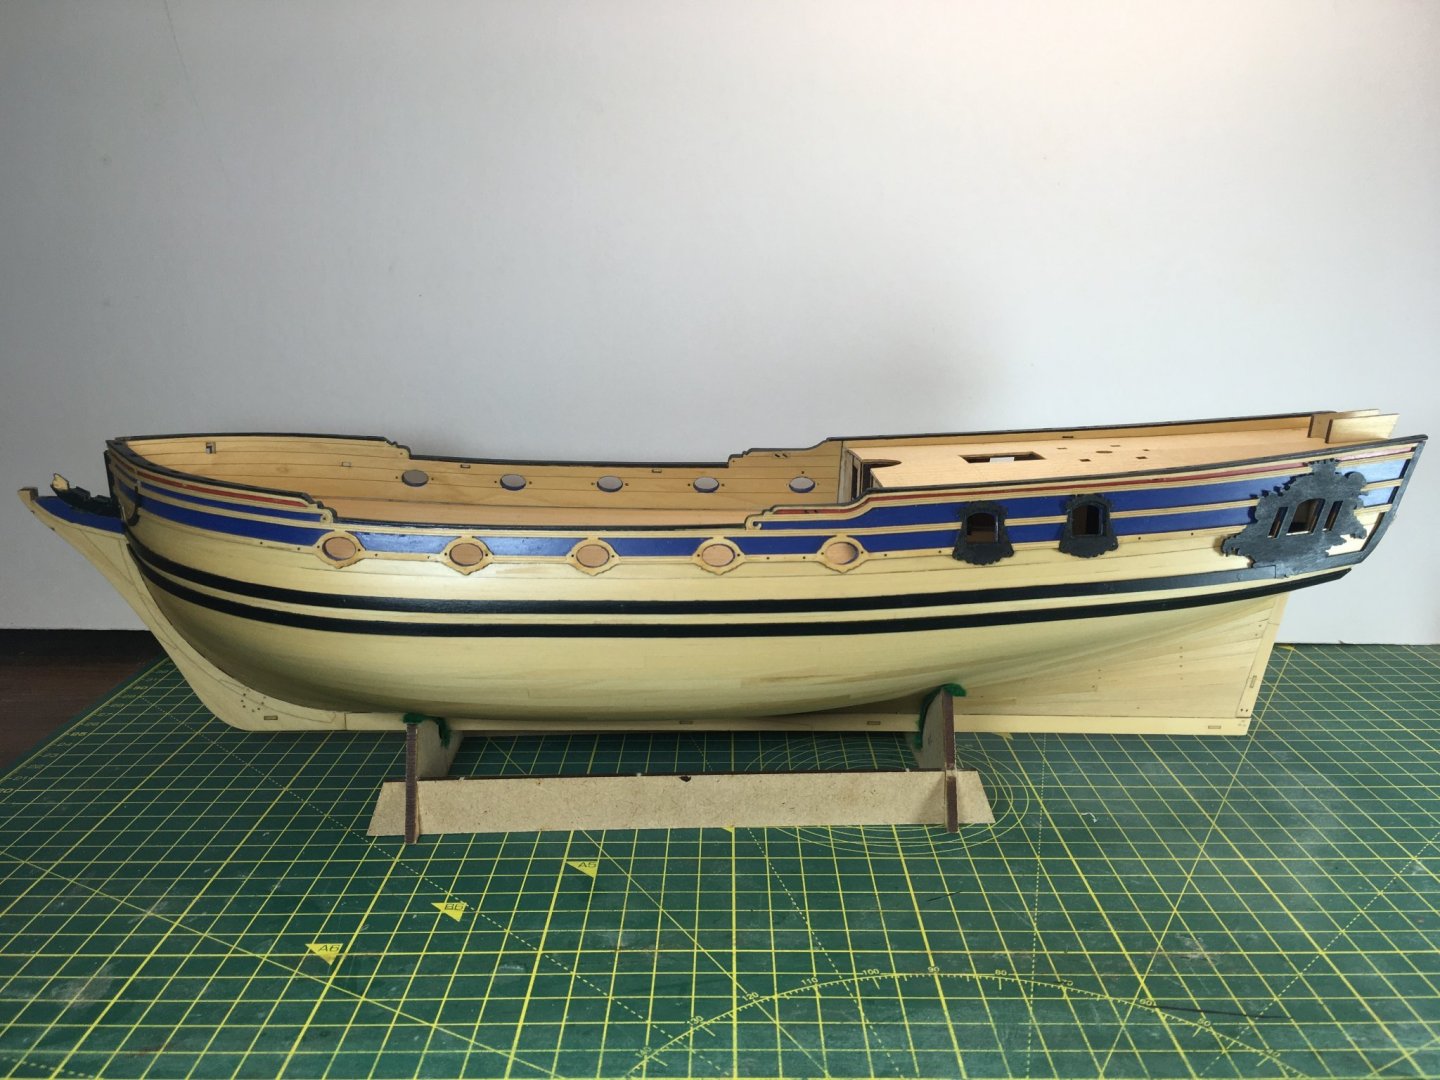
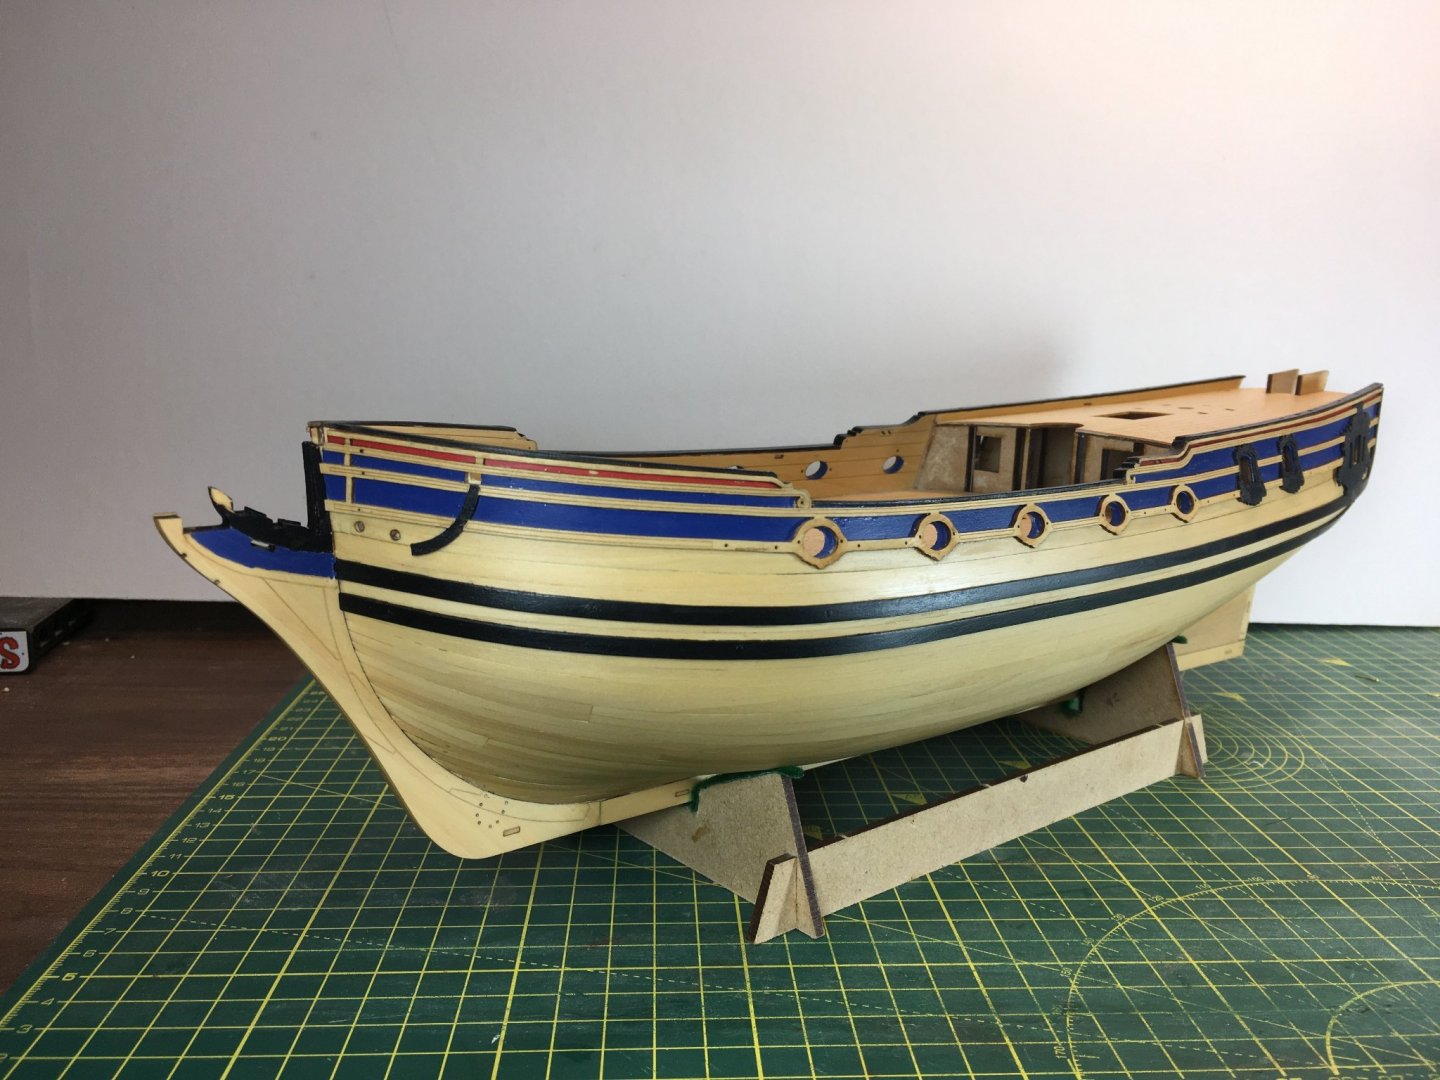
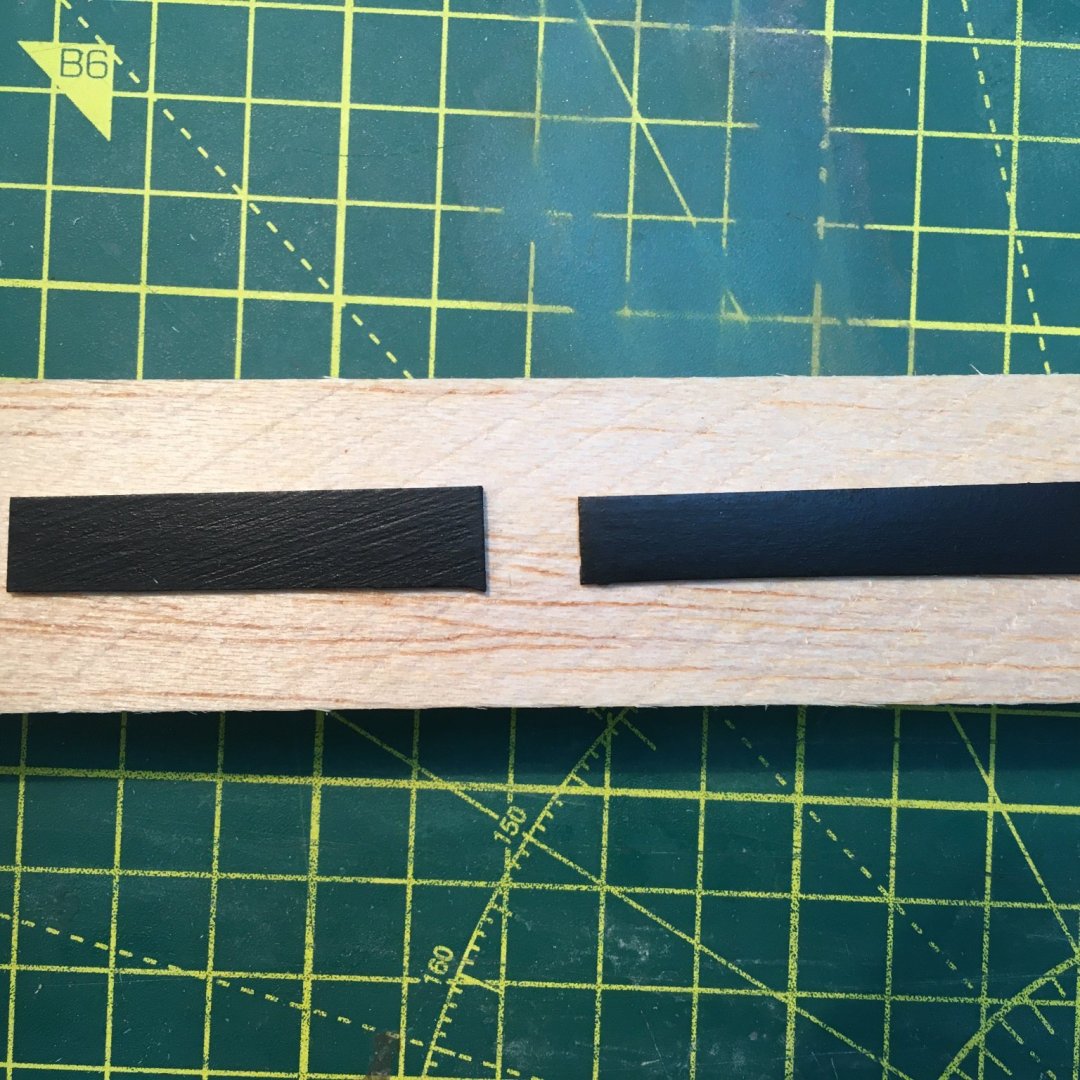
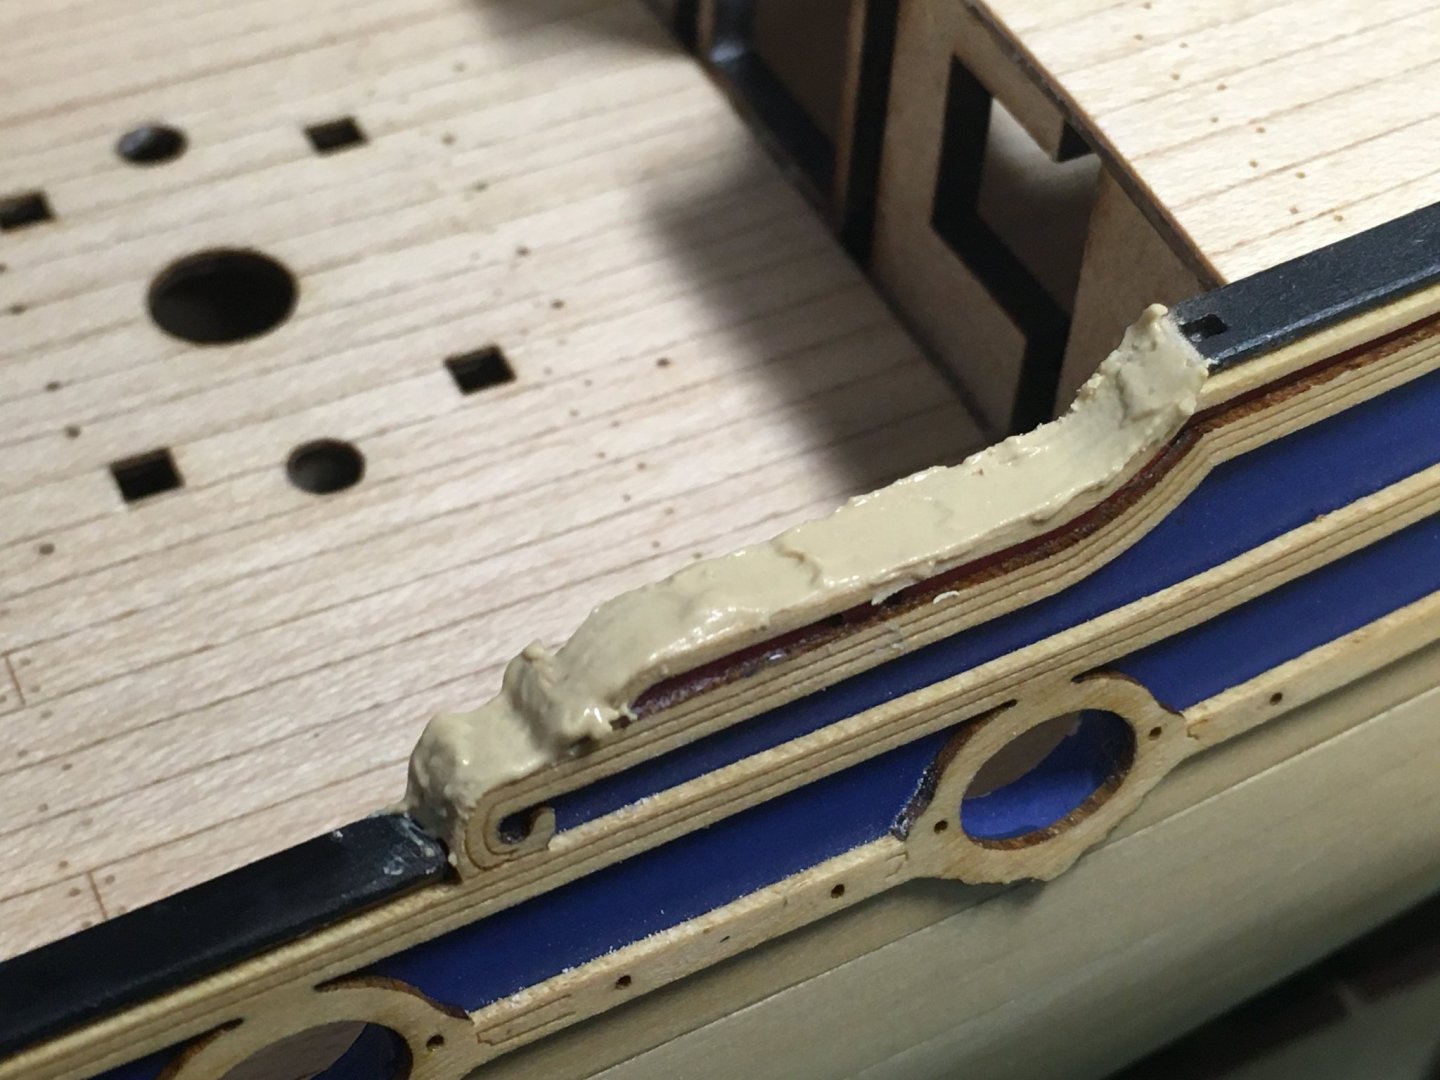
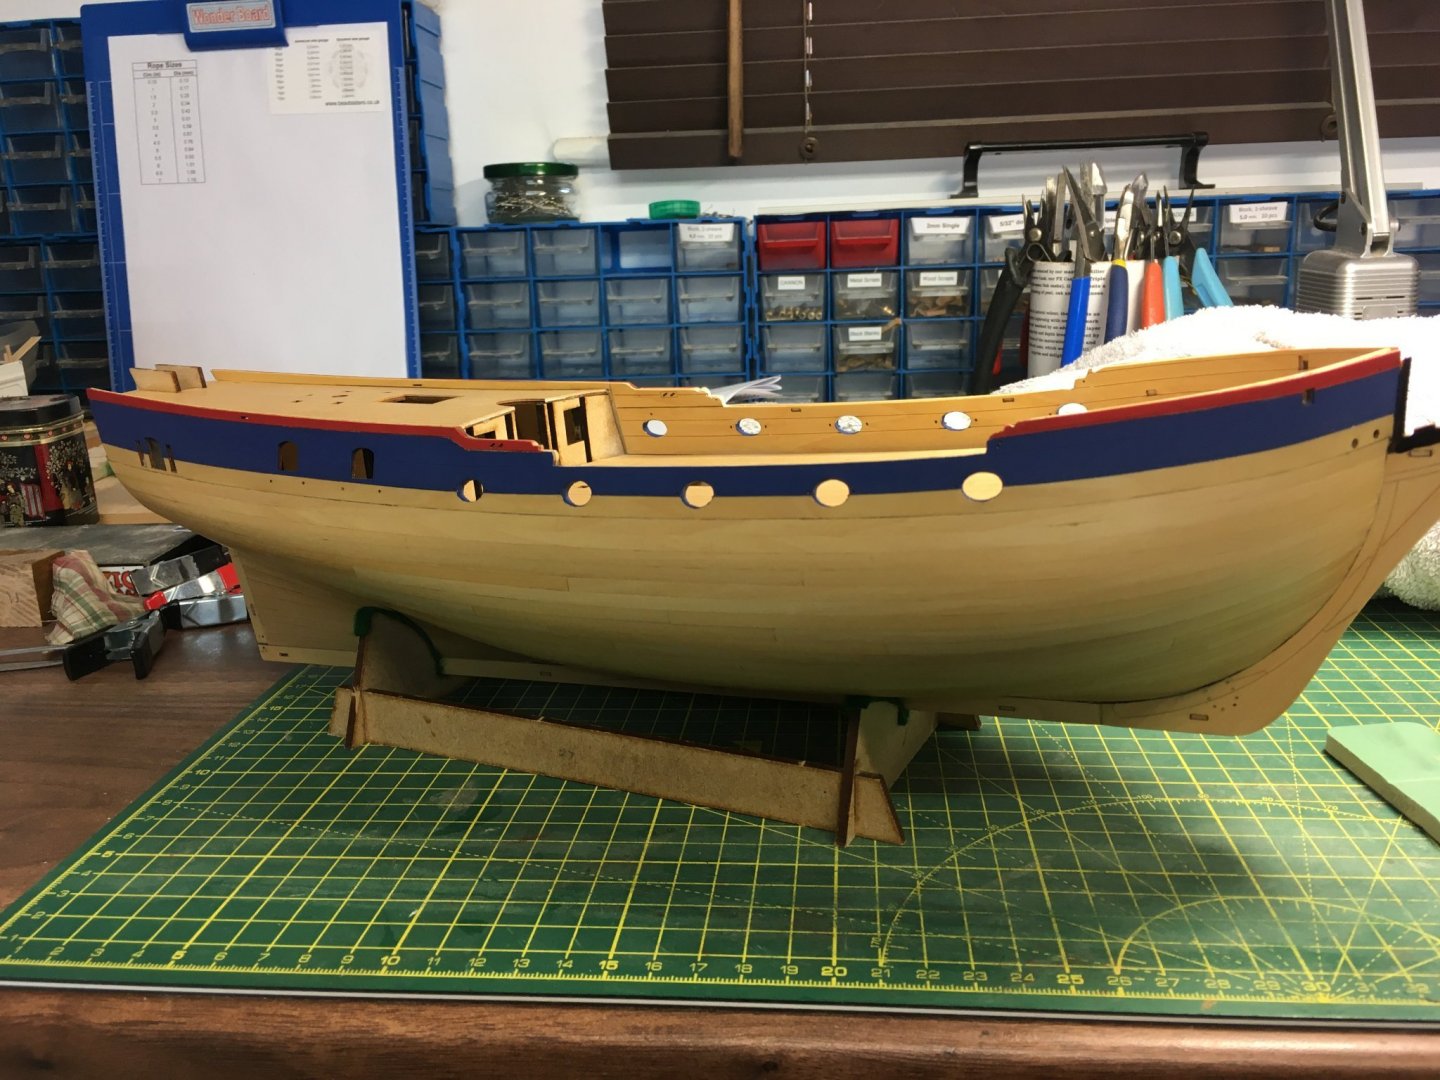
Gunwales, Rail Patterns & Wales Thanks as always for the likes and kind comments. Before starting on painting the upper works, I wanted to do something about the laminations visible in the gunports. Their oval shape made lining them in the normal way with thin strips of timber a challenge, so I decided to disguise them with woodfiller. I used masking tape on the inner bulwarks to prevent filler and paint getting on to them, as unlike warships they will not be painted. Here's the filler I used, and the result: For paint I used Humbrol Blue #25 and Vallejo Red 70.957. In the manual James used Humbrol enamel but I prefer acrylic for wood. I wanted to try to up my game on this job, using multiple coats of thinned paints rather than slapping on a couple of thicker coats and hoping for the best. Not easy to tell in the first picture, but hopefully the close-up of the starboard bow shows the result was smooth with no visible brushmarks: I used Tesa tape for the straight and gently curved bits, and this Modelcraft flexible tape from Vanguard Models elsewhere. @James H recommends Tesa tape and after trying it so do I - a fraction of the price of other brands and it works just as well. The next job was fixing the gunwales to the hull, three lengths each side. Although each piece is precut to shape, they take a bit of preparation before they can be fitted. There has been some discussion on other logs about the importance of removing laser char, even on parts that will be painted. However I've found that it is equally important to sand laser cut parts everywhere that will show because, although the wood is good quality, the finish isn't smooth enough for painting. Here's two gunwales to illustrate the point, one sanded with 240 grit, the other not. I also like to lightly sand edges and corners to make them less sharp: As a further test, I cut two pieces from the sheet the gunwales came from, sanded one and painted both: Hopefully the difference is obvious. The next job was applying the rail patterns, two each side. The technique as set out in the manual was fairly straightforward - soak the bow ends in hot water, clamp to the hull and leave to dry (I did this part before painting the hull) then paint and glue in place. The manual recommends allowing the patterns to dry overnight, but I got impatient and used a hot air gun to speed the process. Seemed to work OK. Here's the port patterns clamped up: The sharp eyed among you will have noticed that I'd already managed to break off all but one of the little dangly bits (nautical term 😁) under the windows. These patterns are incredibly well cut and detailed, but also incredibly fragile. Fortunately I was able to find all the missing parts, but I won't re-attach them until I come to fit the PE over them otherwise I'd be sure to snap them off again. Before fitting the wales I wanted to finish sorting the gunwales. There are two places on each side where the for and aft gunwales dip down to the midships area, and in these places the laminations are exposed. Although I'd got them sanded fairly smooth I was still concerned that they would show through the paint, so I applied applied woodfiller, sanded it and painted to match the rest of the gunwales: Lastly, it was onto the wales. These come precut to the shape of the hull, so after sanding, soaking in hot water, shaping on the hull and painting, I was left pondering how best to fit them. I knew from the plans and manual where the upper wales needed to go, but I was worried about getting glue on my nice WOP-ed hull. In the end I decided to use pins to fix the wale in position initially, tweaking the pin positions as necessary before committing to PVA. I used the 0.5mm pins supplied in the kit, and drilled 0.45mm holes. I drilled a series of holes in each wale first and inserted pins so they just poked through, then held one end in position against the stem. When it looked right I pressed on the first pin with a spare finger to mark the hull for drilling. With the first pin in position, but not driven fully in, it became easier to repeat the process along the length of the wale. If necessary I took pins out, re-drilled their holes and repositioned them. Once happy with the upper wales I took them off the hull and applied PVA before pinning them back in place, this time driving the pins fully in. Next, I followed the manual's suggestion and cut a 3mm wide piece of spare limewood from the kit to act as a spacer for lower wales. This made positioning the latter easy. Once all four wales were in place I filed the pin heads flush and painted them. Here's the current state of play: I'm enjoying this part of the build, and looking forward to all the fancy decoration. Derek PS I'm increasingly tempted not to paint the hull below the waterline. Anyone disagree?


- 345 replies
-
- 22
-
-

-
- Duchess Of Kingston
- Vanguard Models
- (and 1 more)
-
I understand she was built and launched as a two-decker but razeed almost as soon as she hit the water, and just before she was commissioned. Fashions and military requirements change. In any event, she will make a fine model.
-
Proxxon compound table KT 70
DelF replied to Dziadeczek's topic in Modeling tools and Workshop Equipment
Agreed, for the reasons you and Tony @tkay11 mention. Derek -
You should be OK using PVA on the first layer of planks if you are also pinning them (I'm assuming Lady E is double-planked?). I normally only use CA for the second layer. Planking can be challenging, especially when you first start ship modelling, but there is plenty of information, tips and techniques on the forum, both in individual logs and under Modelling Techniques (<More> on the menu bar). I wouldn't worry too much about the first layer - you can use plenty of sanding and filler. The key is to provide a sound, smooth surface for the second layer. Having said that, the first layer is also a safe place to practice techniques so it's worth making an effort, but without fretting about it too much. Btw, if you can make musical instruments you will have more than enough skill for a miniature shipwright! Derek
-
I'm sorry to hear that Paul from Just Bases is no longer in business. On your recommendation I ordered a case from him for Royal Caroline and I was very pleased with it. I found him a pleasure to do business with and would certainly have ordered more from him. Well done on getting a case for Spinx before he retired. I guess we'll have to make our own in future
- 857 replies
-
- 3
-
-
- Sphinx
- Vanguard Models
- (and 1 more)
-
Stunning Glenn. Your trademark immaculate finish, captured with expert photography. I hope you won't let her gather dust too long - she may be a little Flirt, but she deserves to be treated right!
-
Black scroll bars
DelF replied to Dr PR's topic in Using the MSW forum - **NO MODELING CONTENT IN THIS SUB-FORUM**
Nor here - Windows 10 & Chrome. -
I would do the WOP first. That way, if any white paint seeps through the masking tape it won't soak into the wood and it'll be easier to clean off. I might then apply WOP over the whole hull to protect the paint, but I'd experiment on a piece of scrap wood first to make sure the WOP would look good on the paint.
- 345 replies
-
- 4
-
-
- Duchess Of Kingston
- Vanguard Models
- (and 1 more)
-
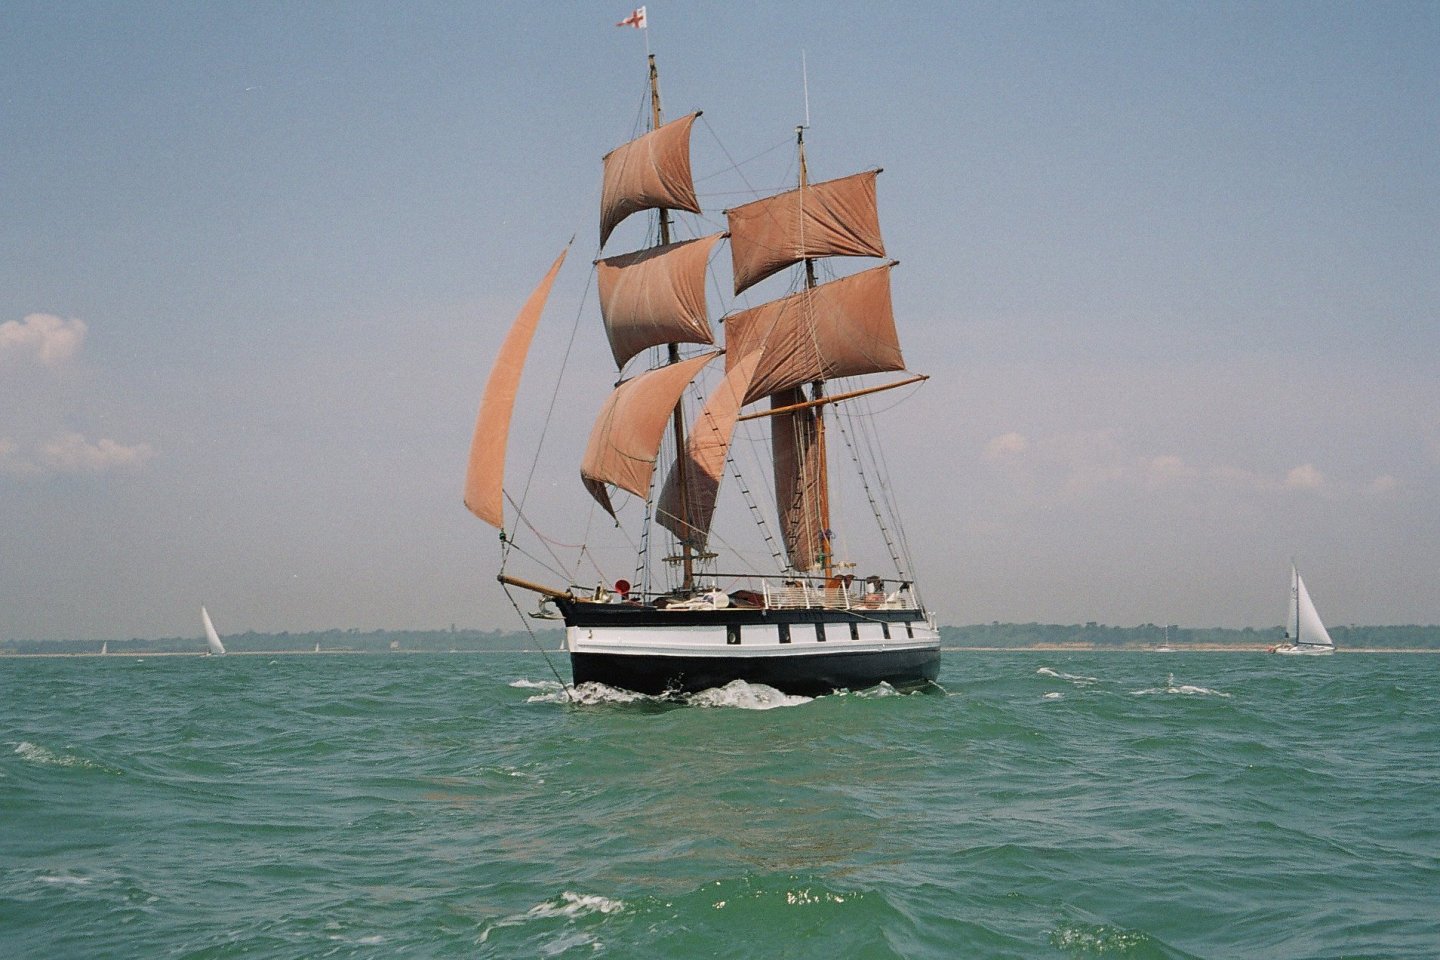
I agree John. She was under motor power when I saw her in Falmouth, and I expect the engine gets a lot of use inshore.
-
I agree with Tim. Personally, I take it as a compliment if someone uses one of my ideas. As they say, imitation is the sincerest form of flattery.
-
Well that's great! We're in Alaska for two weeks so if the distances involved aren't too great we'll take a day off the trip to pop over and see you In Alberta and Yves in North Carolina (did I mention geography's not my strong point?). Good luck with your own planking. You won't regret using WOP.
- 345 replies
-
- 3
-

-
-
- Duchess Of Kingston
- Vanguard Models
- (and 1 more)
-
Steve Good to see another Vanguard Model on the stocks. You can't go wrong with Chris's designs and instructions - I'm on my second with a third waiting on the shelf. Despite already achieving very high standards he is always seeking improvements and innovations. I think you've made a wise choice going for a comparatively straightforward but still very attractive kit for your first model. Joining this forum was another good choice - I've learned more since joining than I'd every learned about ships and modelling, especially since I stopped 'lurking' and started actively participating. Well done for starting a log, and enjoy your build. Derek
-
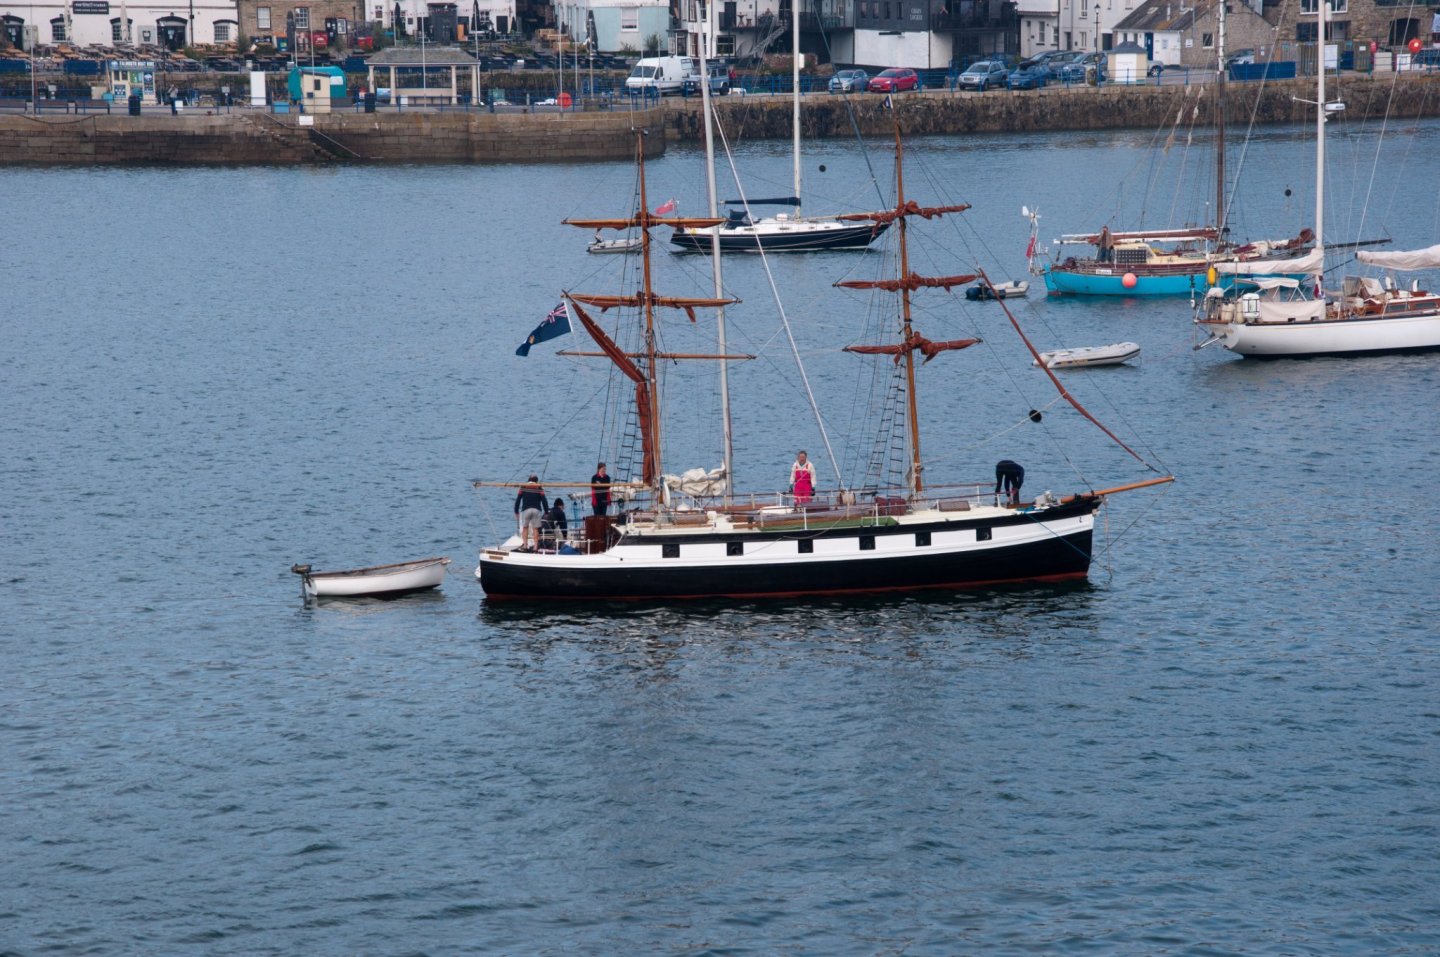
I spotted this strange little vessel in Falmouth harbour earlier this year: With her square rig and a line of portholes painted in a checkerboard pattern mimicking the gunports on a man of war, I thought she must either be a rich person's modern toy or perhaps a film prop. However I found she was called the Marjorie and she's well over 100 years old. According to the National Historic Ships UK website she was built in 1913 as a motor-powered ketch by David Munroe and Sons of Blairmore on the River Clyde, possibly for an Air Commodore Upfill-Brown. After being requisitioned for service as a Thames River patrol boat during the First World War she was eventually bought in 1938 by Vice Admiral Richard Bell Davies who had her converted to a brig with two new masts in 1939. His motives for the conversion aren't known, but Bell Davies is a notable figure for several reasons - he was among the last cadets to be trained under sail, one of the first naval pilots (he joined the Royal Naval Air Service the year Marjorie was built) and one of only four to be awarded the Victoria Cross. He was awarded the latter for what has been described as the first known instance of the rescue of a downed pilot behind enemy lines. He picked up a fellow pilot under heavy fire and got them both safely back to base. His single-seater cockpit was such a tight squeeze he had to push his comrade into a tiny space beyond his foot controls - it took two hours to extract him! From 1917 he was heavily involved in aircraft carrier development and was the first man to land on a carrier-proper (as opposed to a converted warship). I expect this might spark some debate, but I checked the claim in several sources. He was actually sailing Marjorie in summer 1939 when he received his joining instructions from the Admiralty and he did not see her again until 1945. She has remained in the Bell Davies family ever since. Here's a picture of this fine little brig under sail: Derek
-
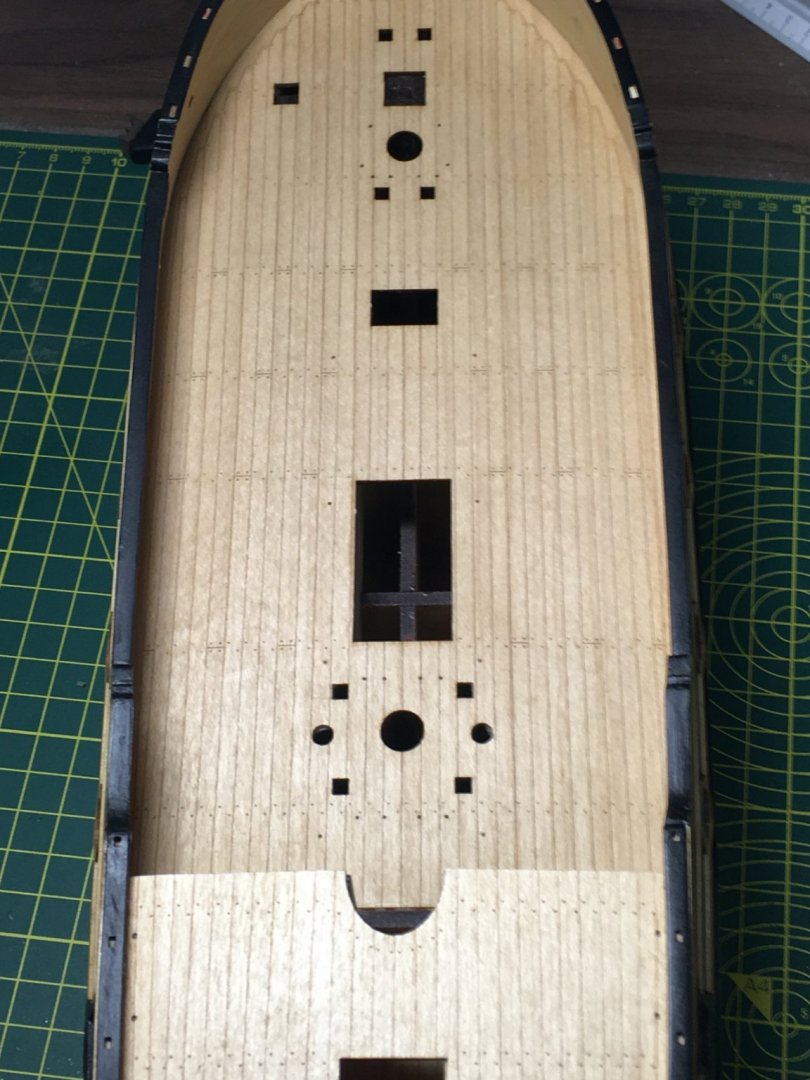
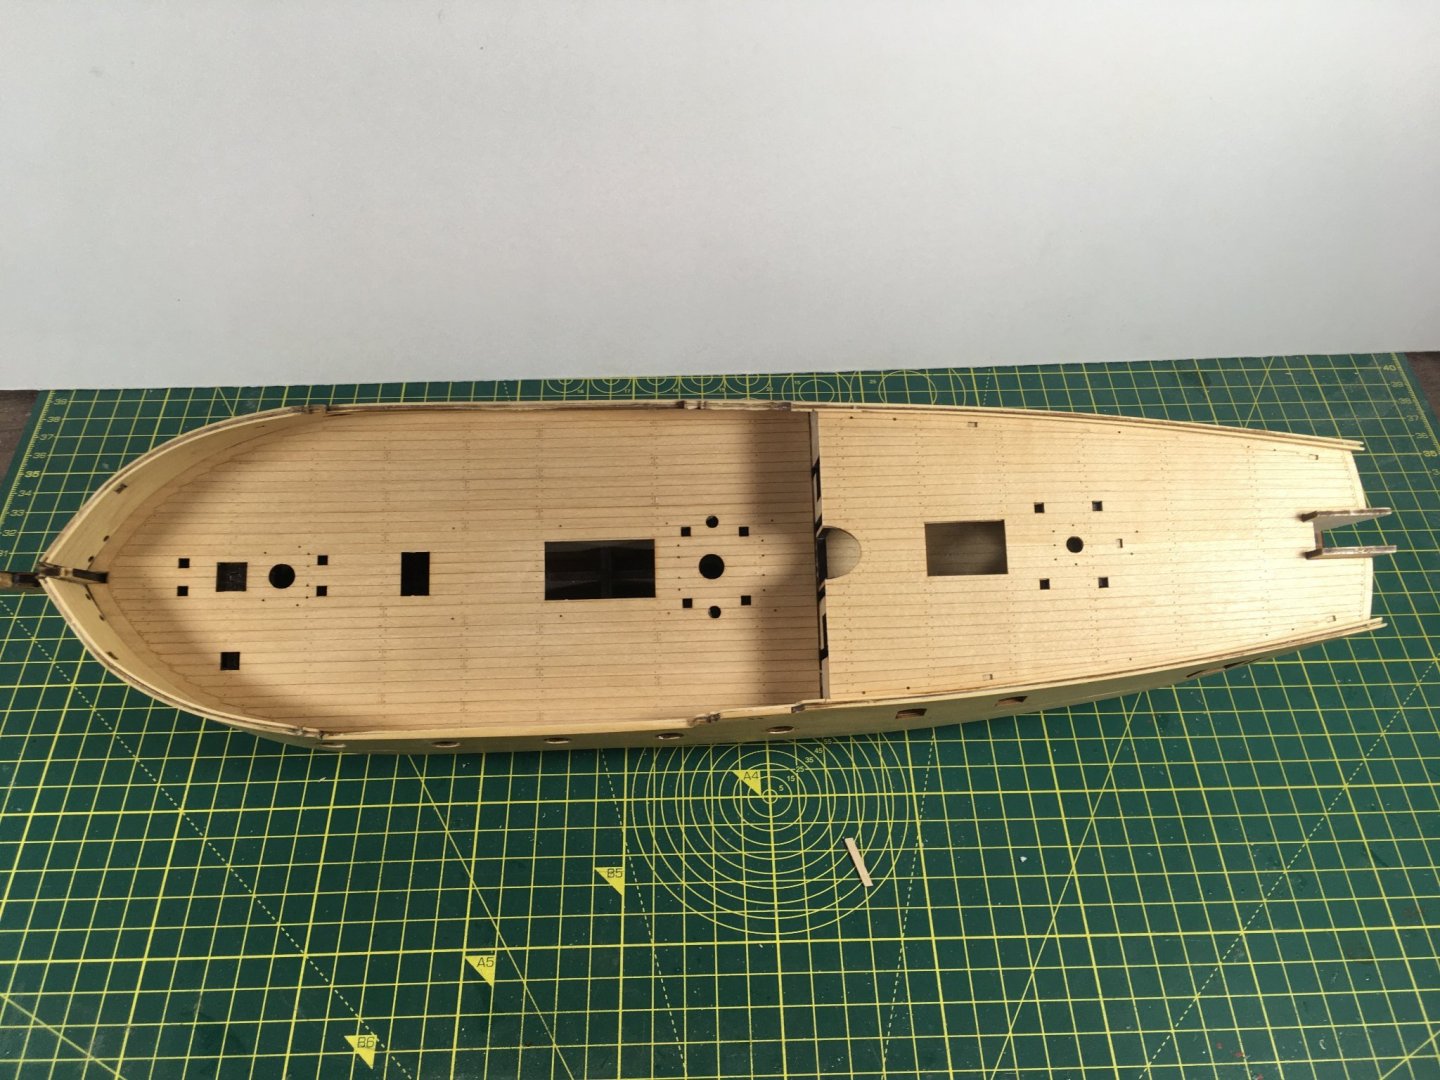
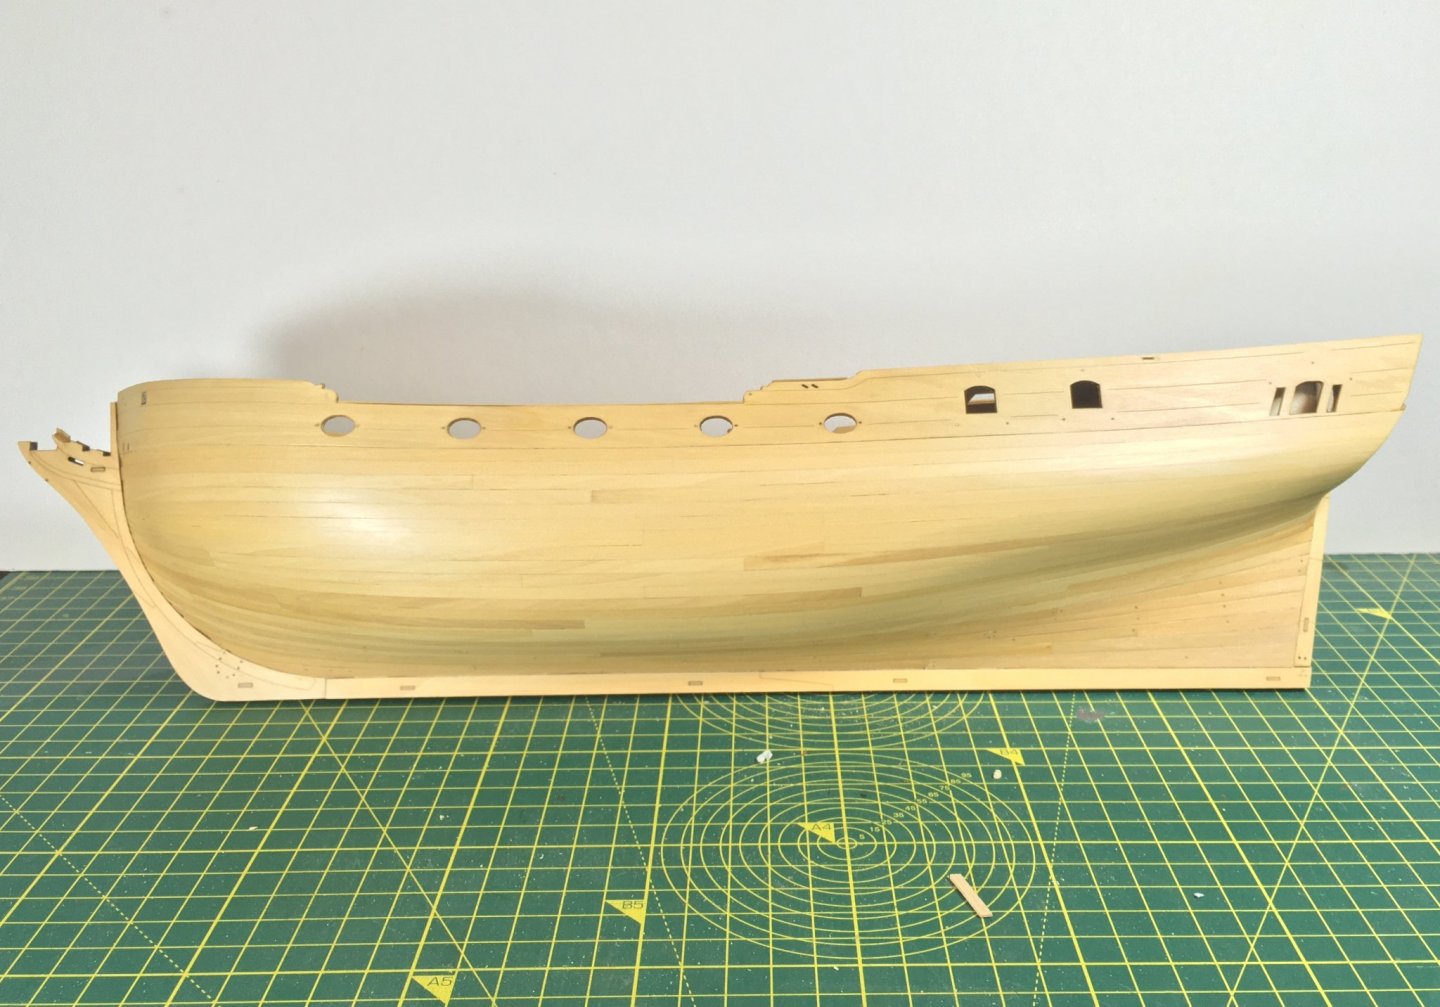
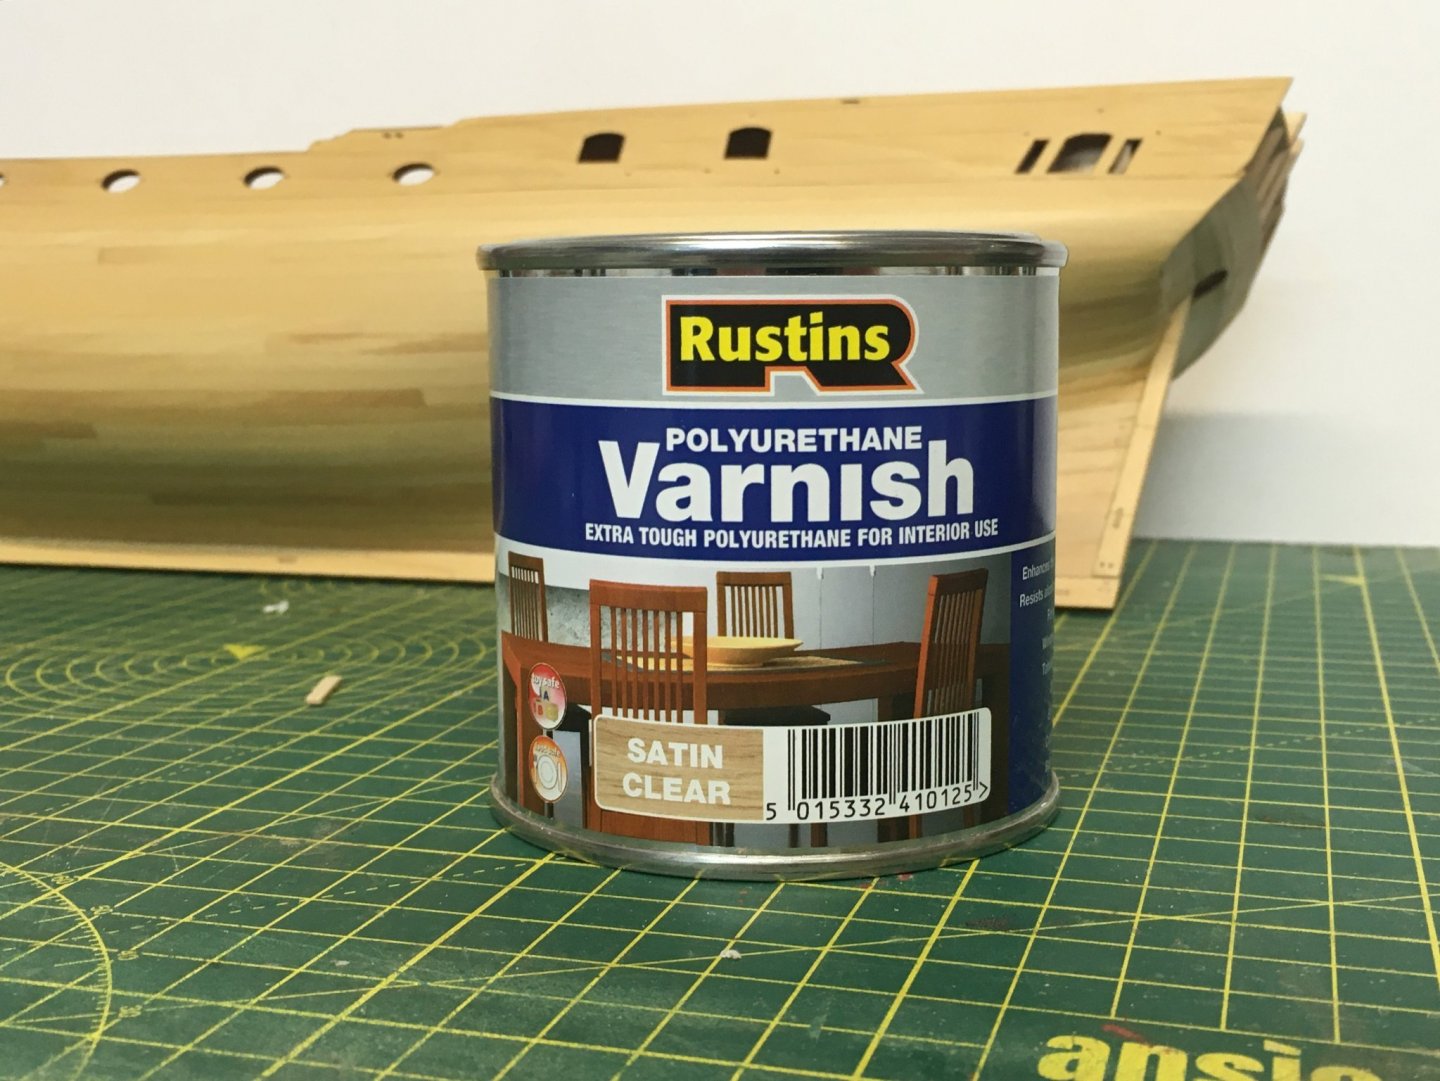
Decks, bulwarks and an experiment with wipe on poly Not much time in the dockyard lately but I've made some progress. I decided in the end to use the etched decks supplied in the kit. Although I enjoy planking my own decks and did so on Speedy, the ones supplied with this kit seem such good quality I thought I'd give them a go. They fitted without issue along with the interior bulwark patterns, following the steps clearly set out in the manual: Whilst continuing to dither over whether or not to paint the hull below the waterline, I decided I ought to at least apply a finish to protect the wood before I got on with other tasks such as painting the blue and red areas along the upper part of the hull. I have used shellac for a long time and love the finish I get with the pale version. However I've seen the results other people achieve with wipe on poly and thought I'd give it a go. The ready mixed products aren't commonly available in the UK so after some research on the web and the forum I made up my own from a 50:50 mix of matt polyurethane varnish and white spirit (aka mineral spirits on the other side of the pond). Early results were not promising, taking ages to dry and leaving a less-than-impressive finish. I knew I must be doing something wrong, but rather than starting a load of hit and miss experimentation I asked @glbarlow, someone who clearly knows what he's doing as evidenced by his current (Flirt) and previous builds. Glenn kindly sent me two detailed messages setting out his methods and advice. Straightaway I saw what I was doing wrong - I was wiping on but I wasn't wiping off! I tried again and soon, as they say in these parts, I was cooking on gas. I'm sure Glenn won't mind if I paraphrase his method: Apply generously with a soft cloth (eg old cotton t-shirts cut up) AND (the real key to a nice finish) wipe it off before it dries, leaving only what’s absorbed into the wood. If you let it dry on thick the finish will look too artificial. Leave to dry thoroughly before buffing with a clean soft cloth. It can take 12-24 hours to dry depending on conditions. You know it’s dry if you can buff it without it seeming gummy. If it is stop and wait longer. For a deeper finish like on a hull, lightly sand with 400 grit making sure to wipe with a cloth to remove dust and then repeat the wipe on/wipe off process Use a brush on small nooks and crannies, but only if you can get in immediately with a cloth to wipe it off. Two coats are better than one, with at least three on the hull. Different woods will vary in absorbing the wop so the key is simply to repeat the process until it looks right. I experimented with matt and satin polyurethane. I found the matt a little too dull whereas the satin gave a beautiful silky finish. In both cases the varnish tins had been unused for a while and needed a lot of stirring to thoroughly mix the particles that give the matt/satin finish to what would otherwise be gloss. As I was just experimenting I used tiny amounts - I found 6ml of poly mixed with 6ml white spirit was more than enough for three coats on the Duchess. For measuring I used one of those plastic pipettes sold for model paints eg these at £2.99 for 50 from Amazon. Here's some pictures: It's difficult to convey just how silky smooth the result is, both to the eye and the finger. Glenn told me I'd know I'd done enough when after buffing I looked at it and smiled. I'm smiling now 😁 Derek
- 345 replies
-
- 25
-
-
-
- Duchess Of Kingston
- Vanguard Models
- (and 1 more)
-
You've bought a recognised classic Dave. I've got it, and can reassure you that you've not wasted your money. To quote one top modeller "Everything you wanted to (and should) know about sailing period ships". Derek