HOLIDAY DONATION DRIVE - SUPPORT MSW - DO YOUR PART TO KEEP THIS GREAT FORUM GOING! (Only 20 donations so far - C'mon guys!)
×


DelF
-
Posts
1,409 -
Joined
-
Last visited
Content Type
Profiles
Forums
Gallery
Events
Everything posted by DelF
-
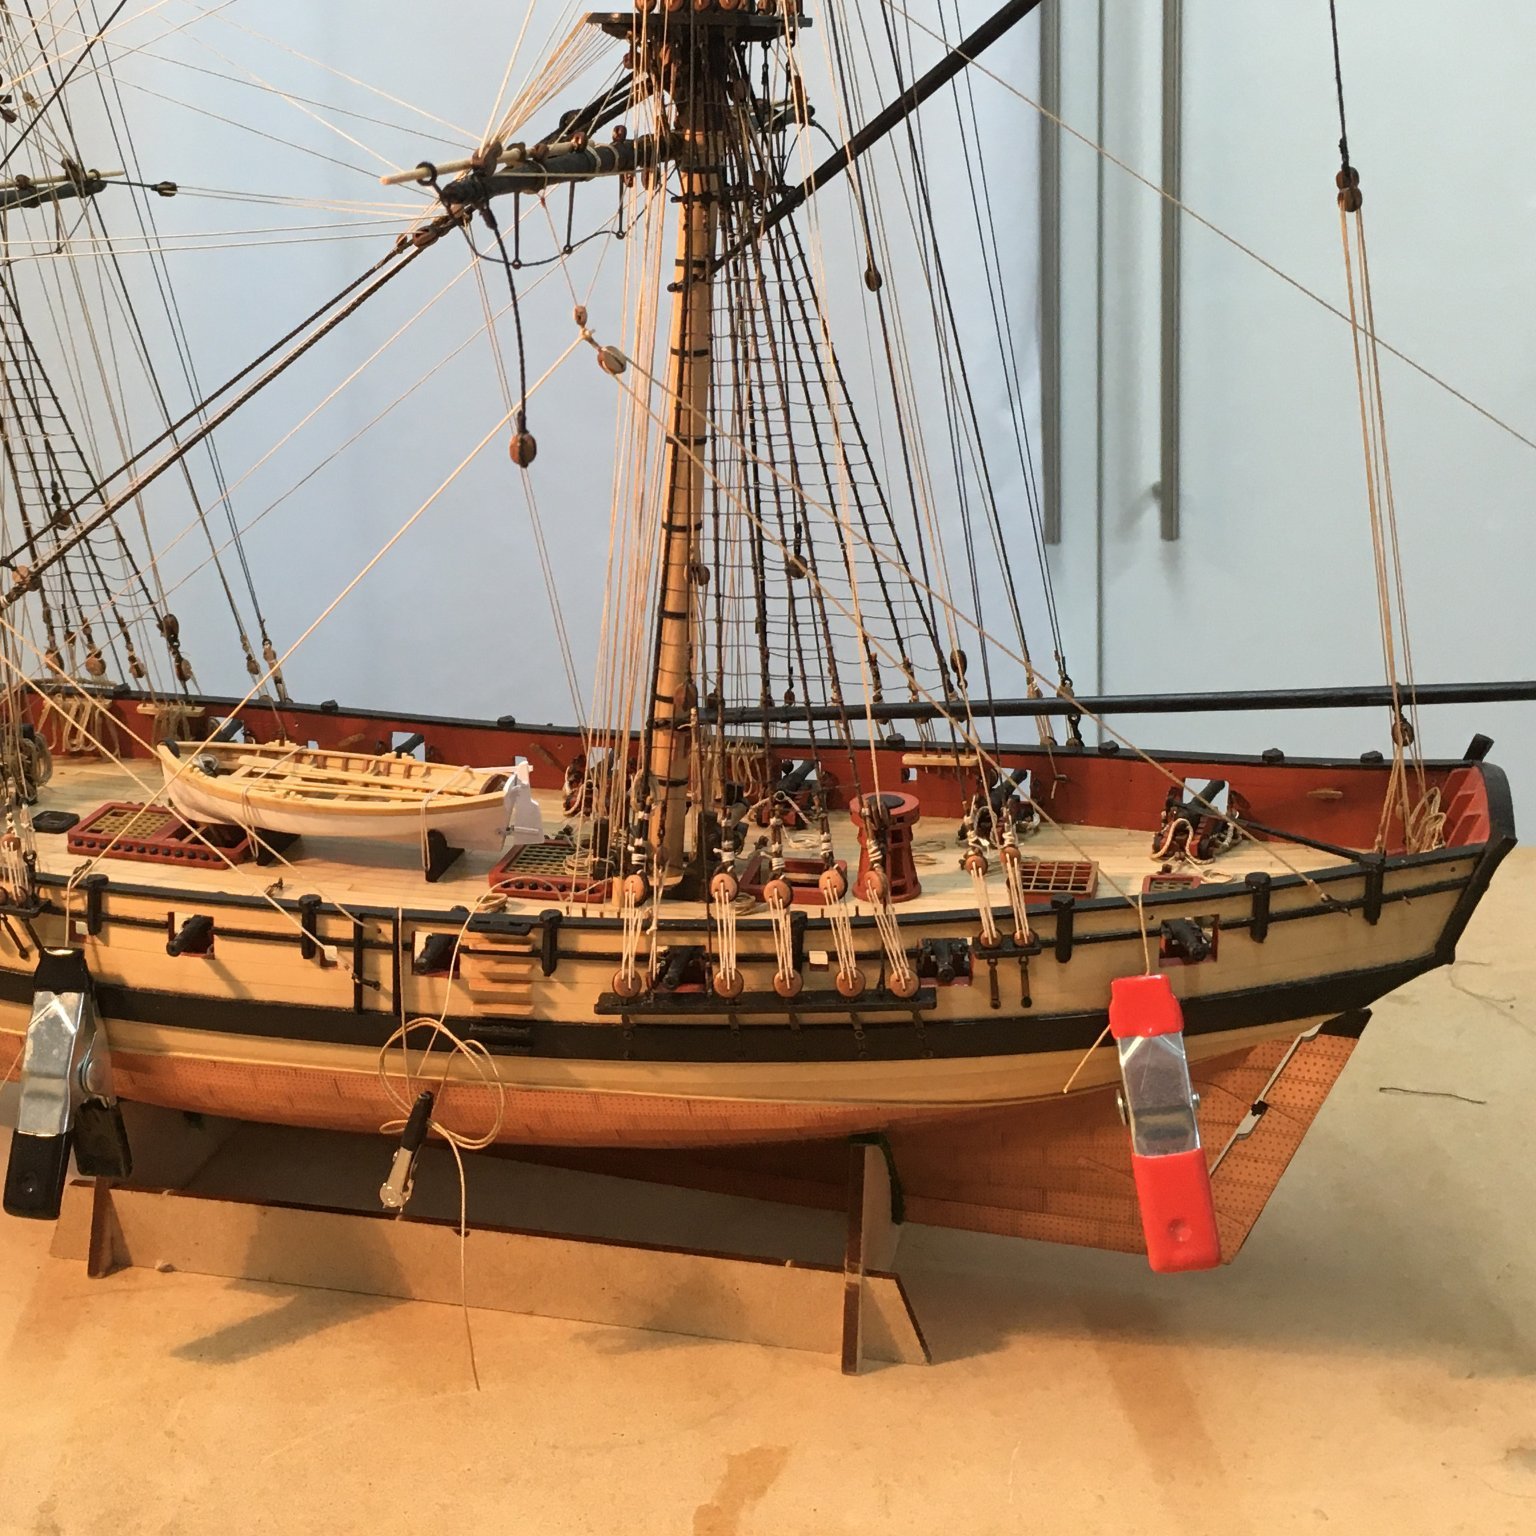
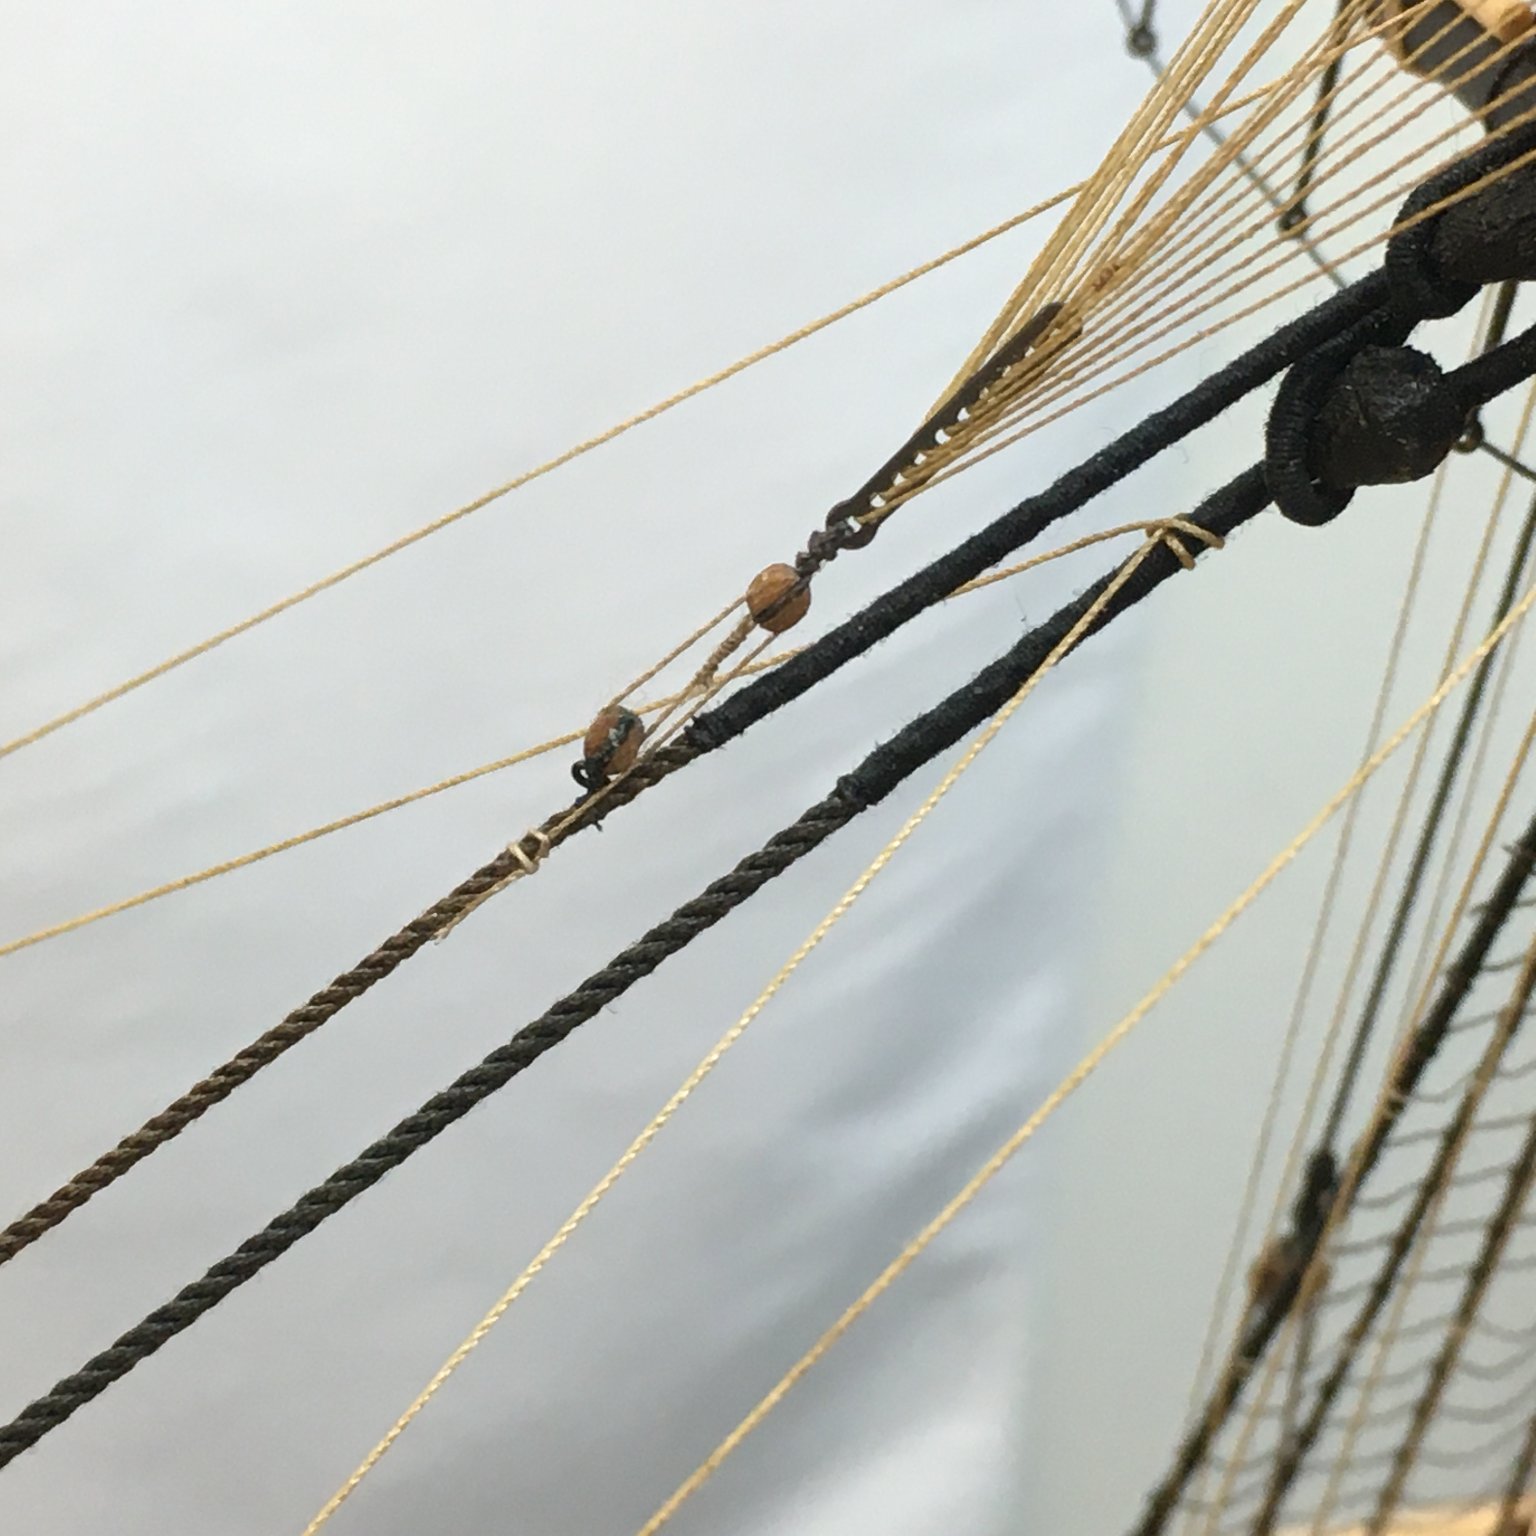
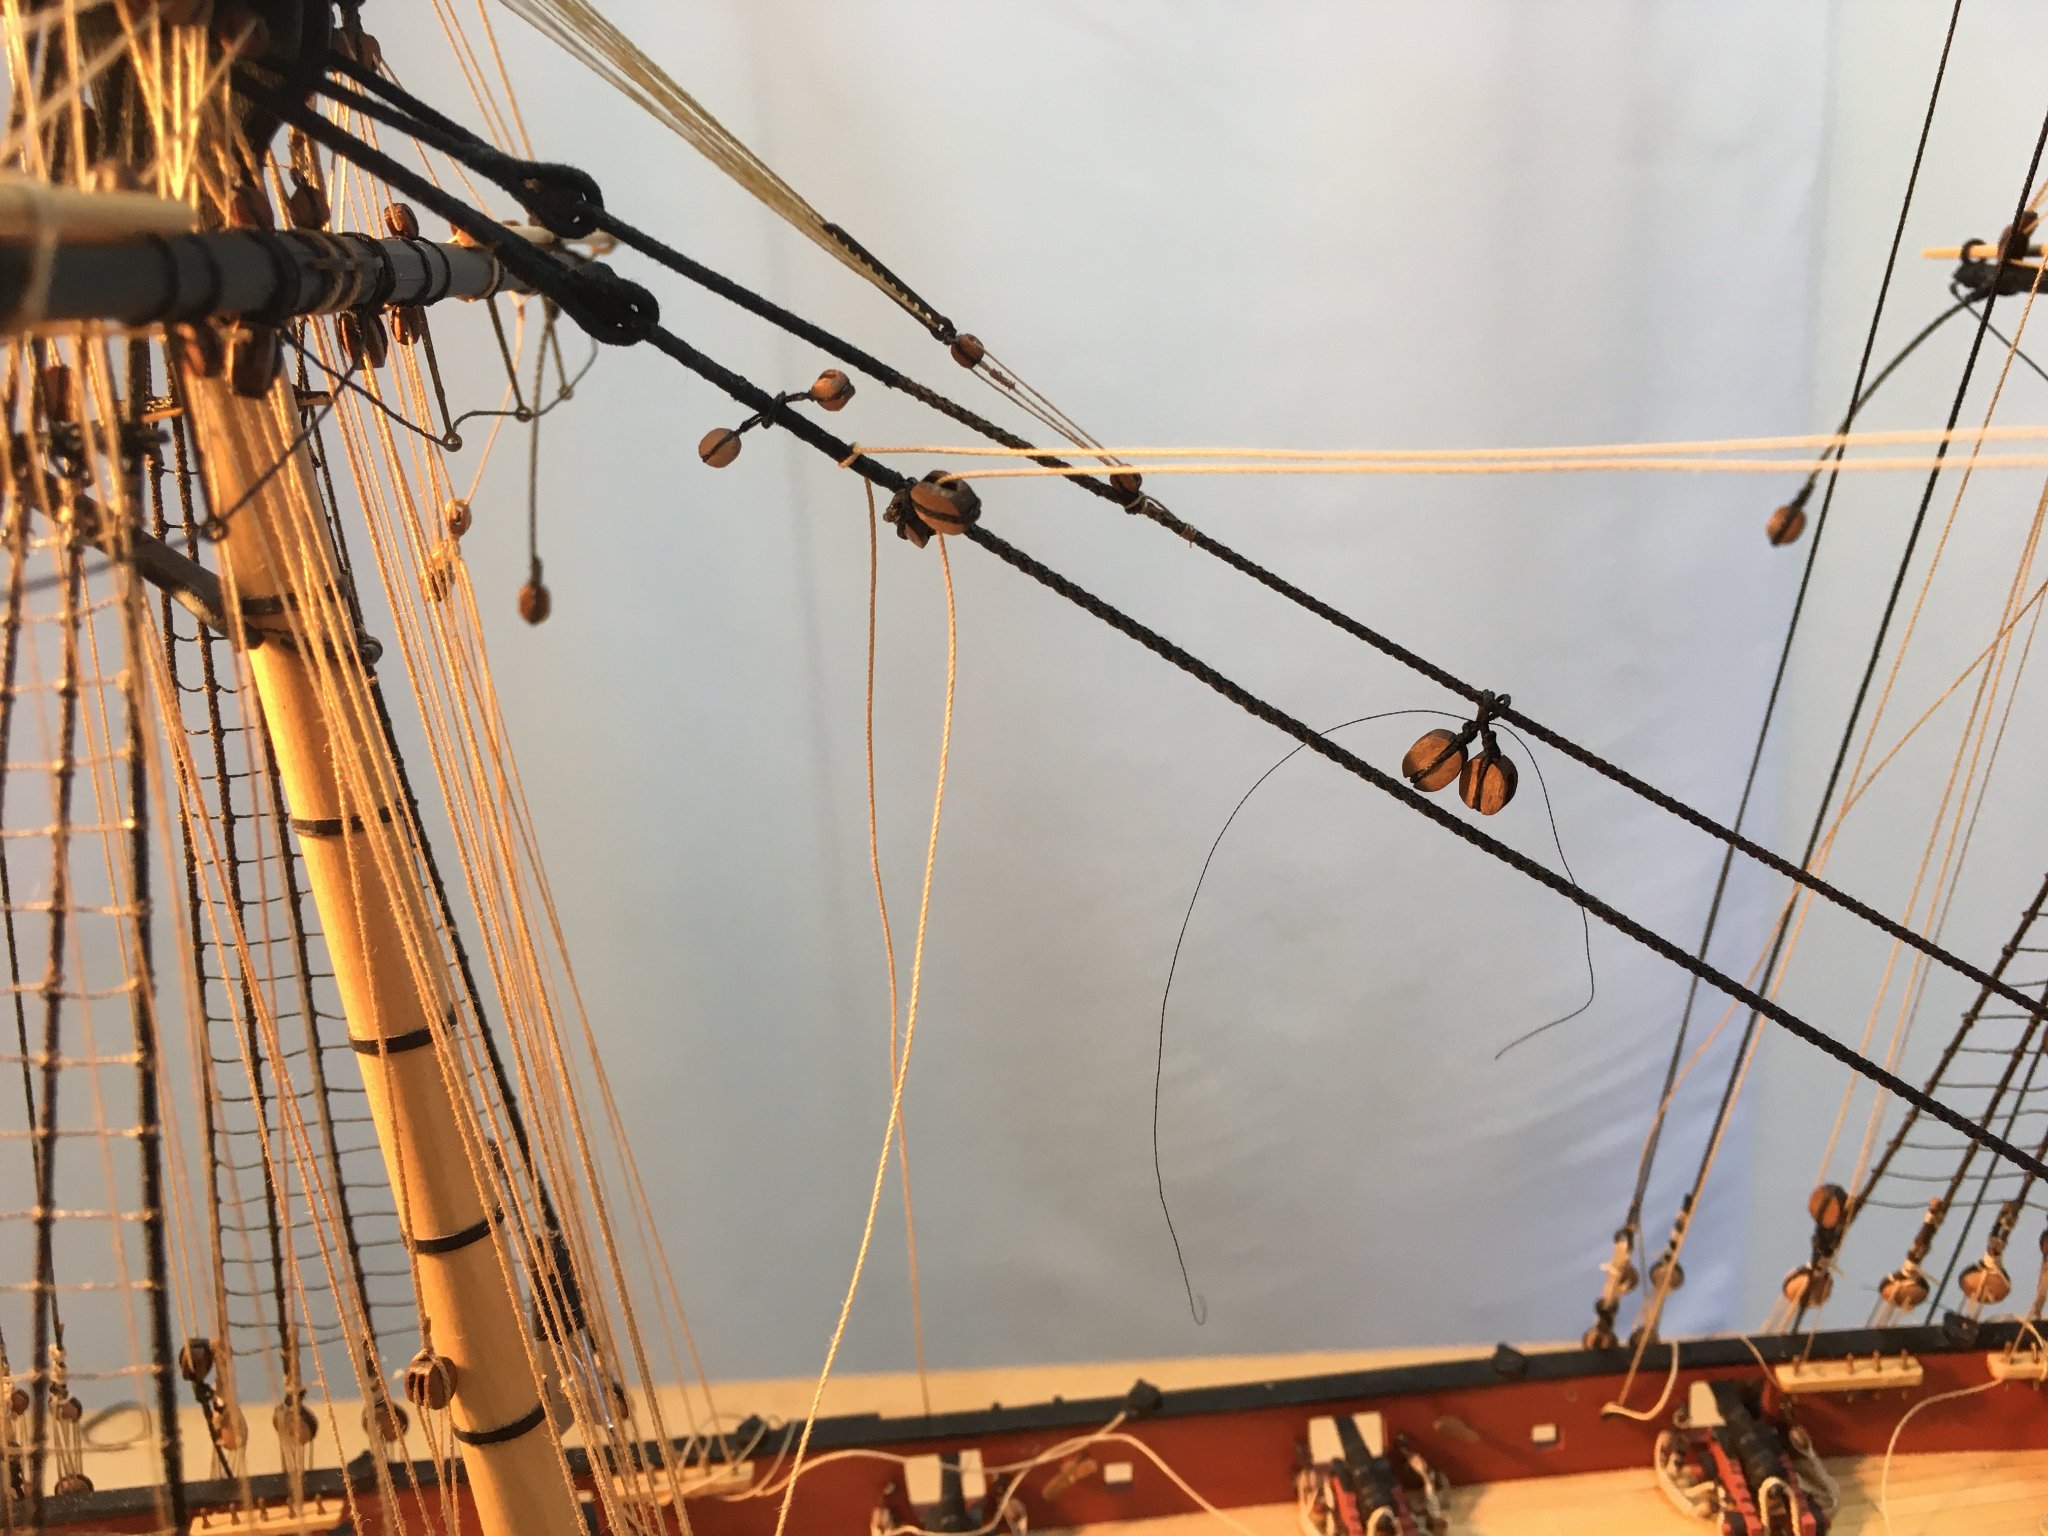
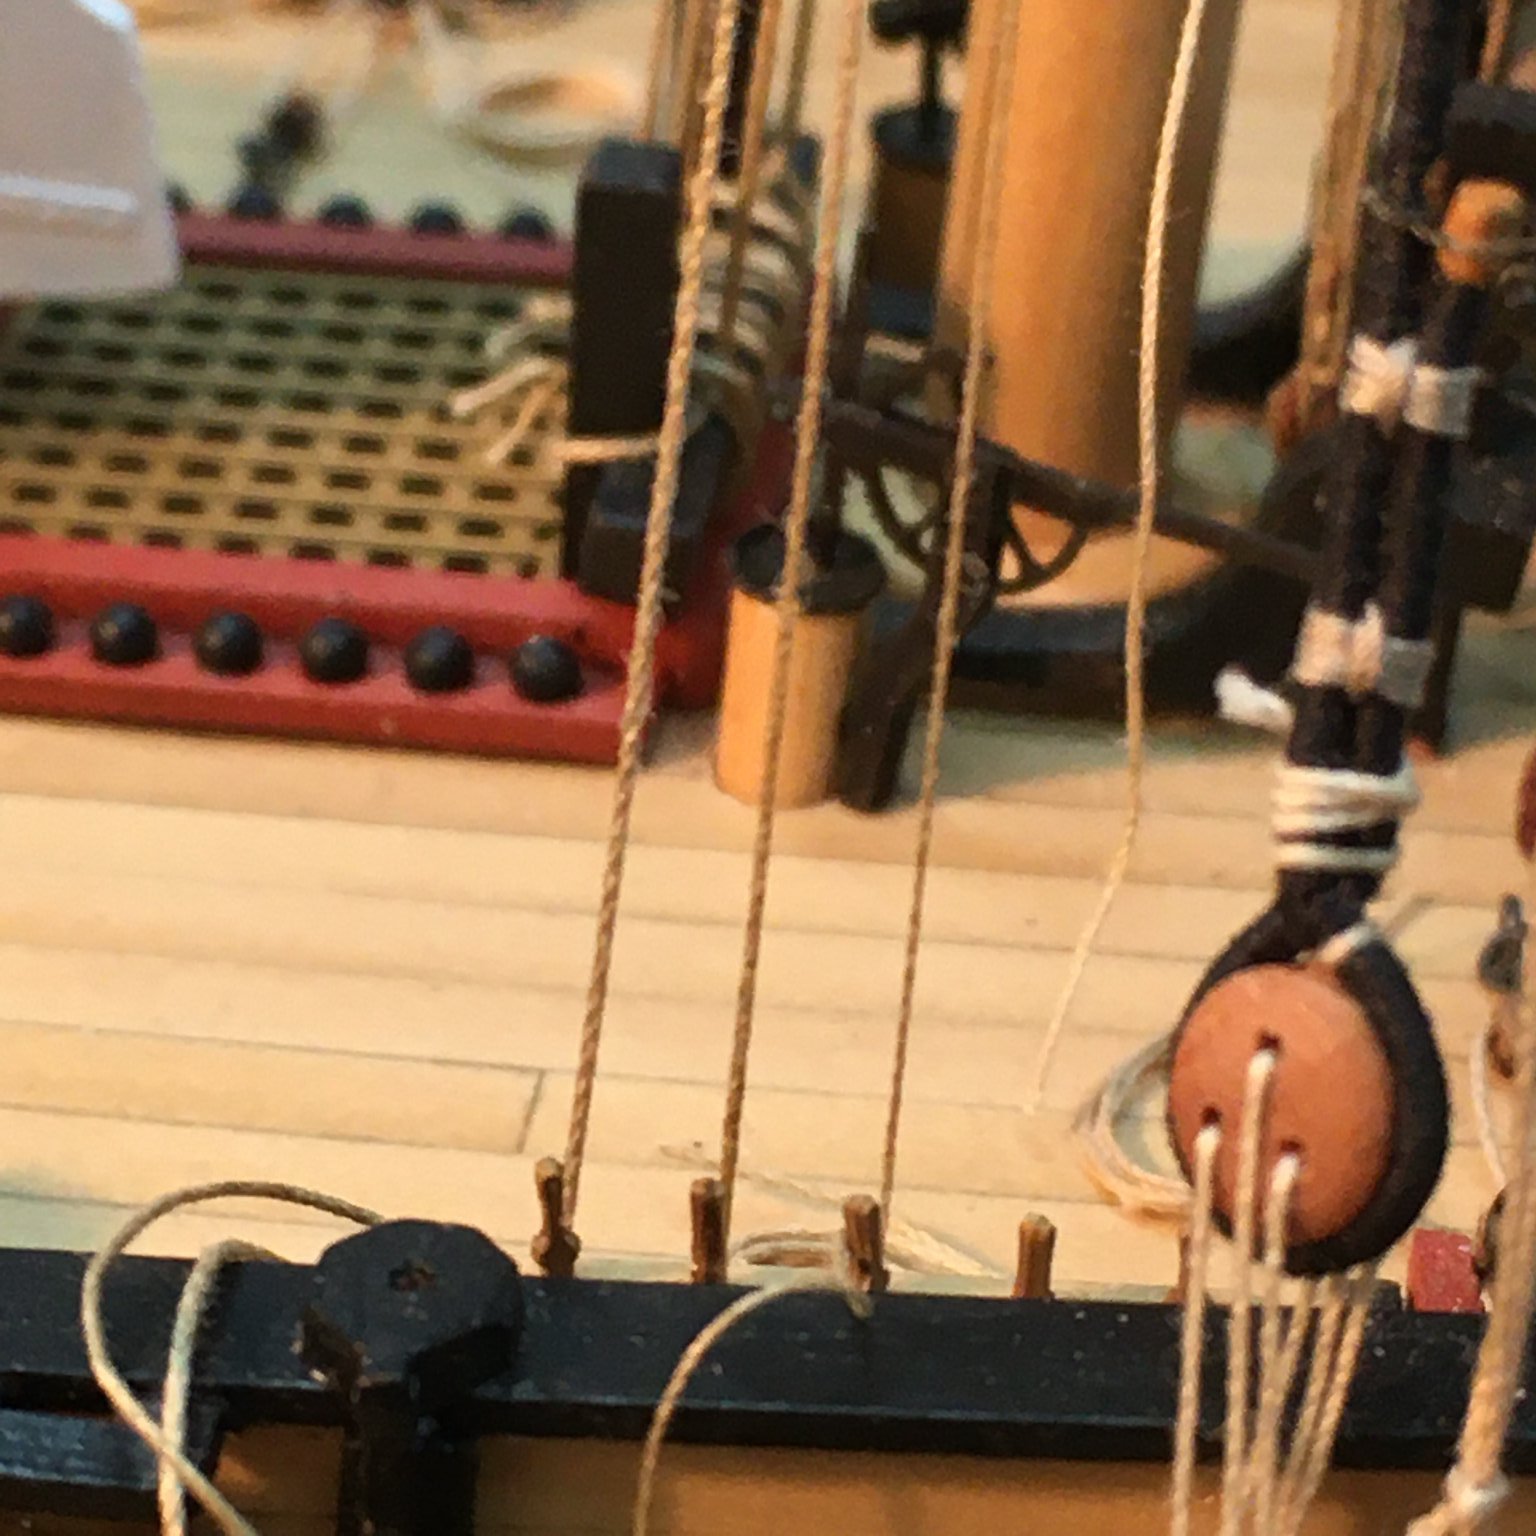
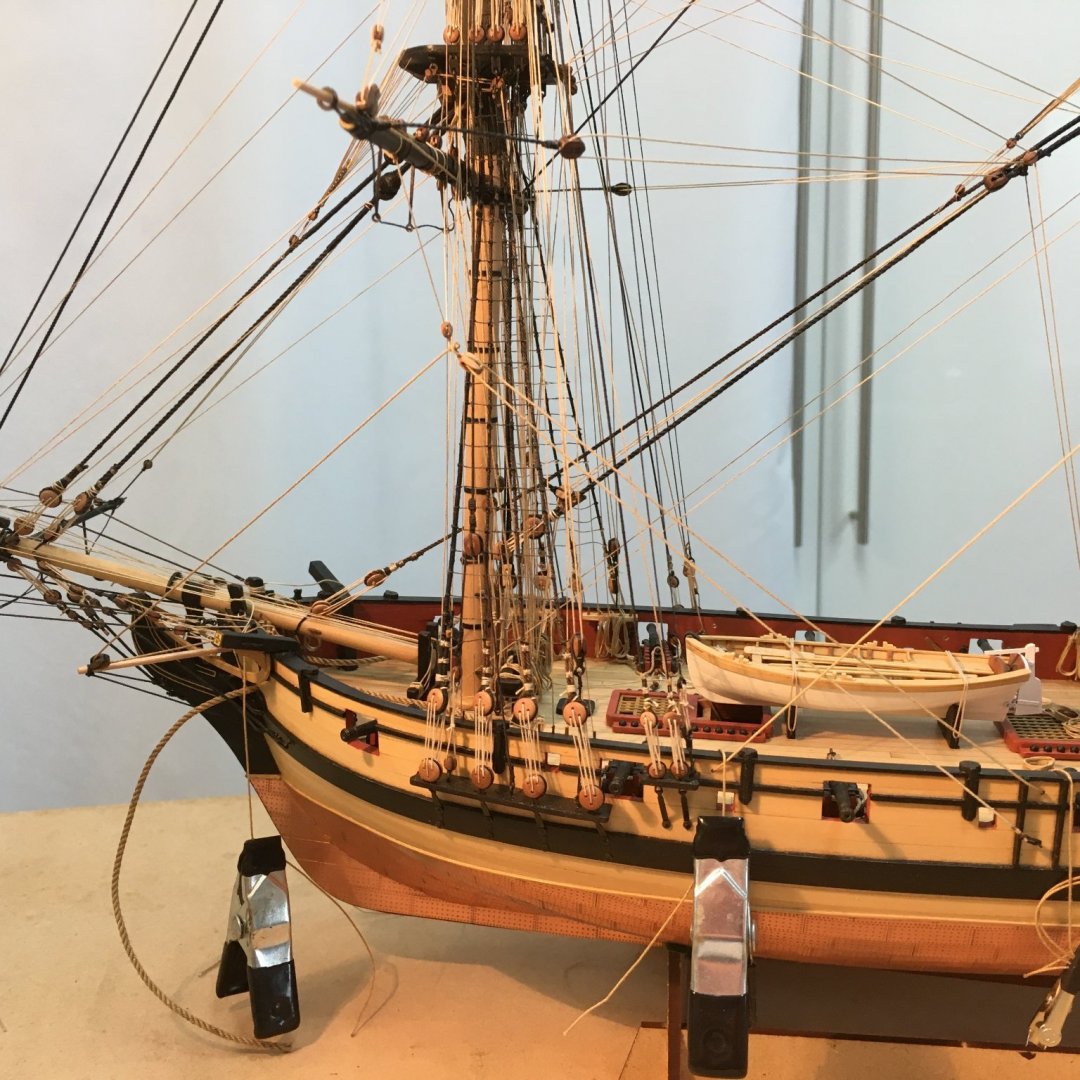
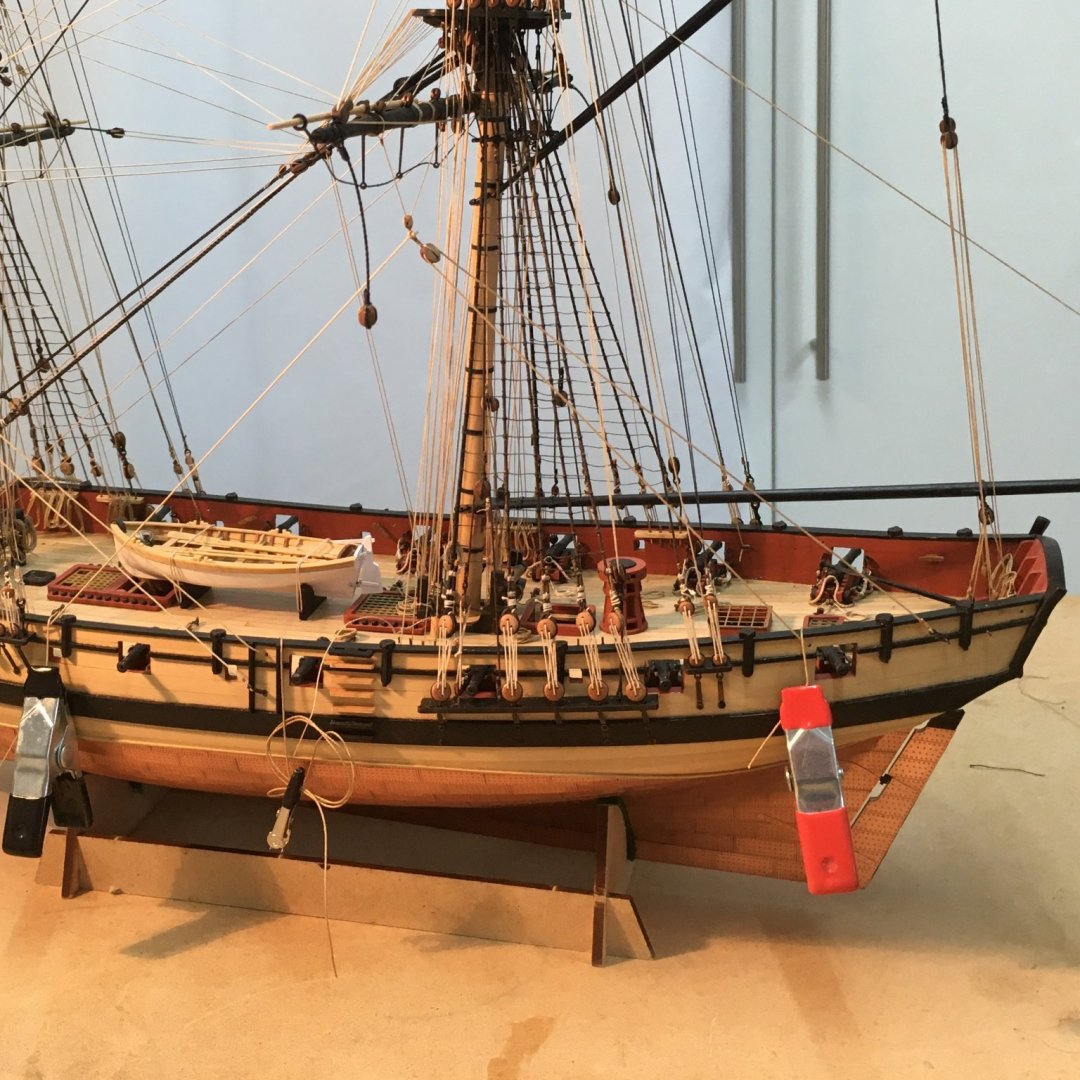
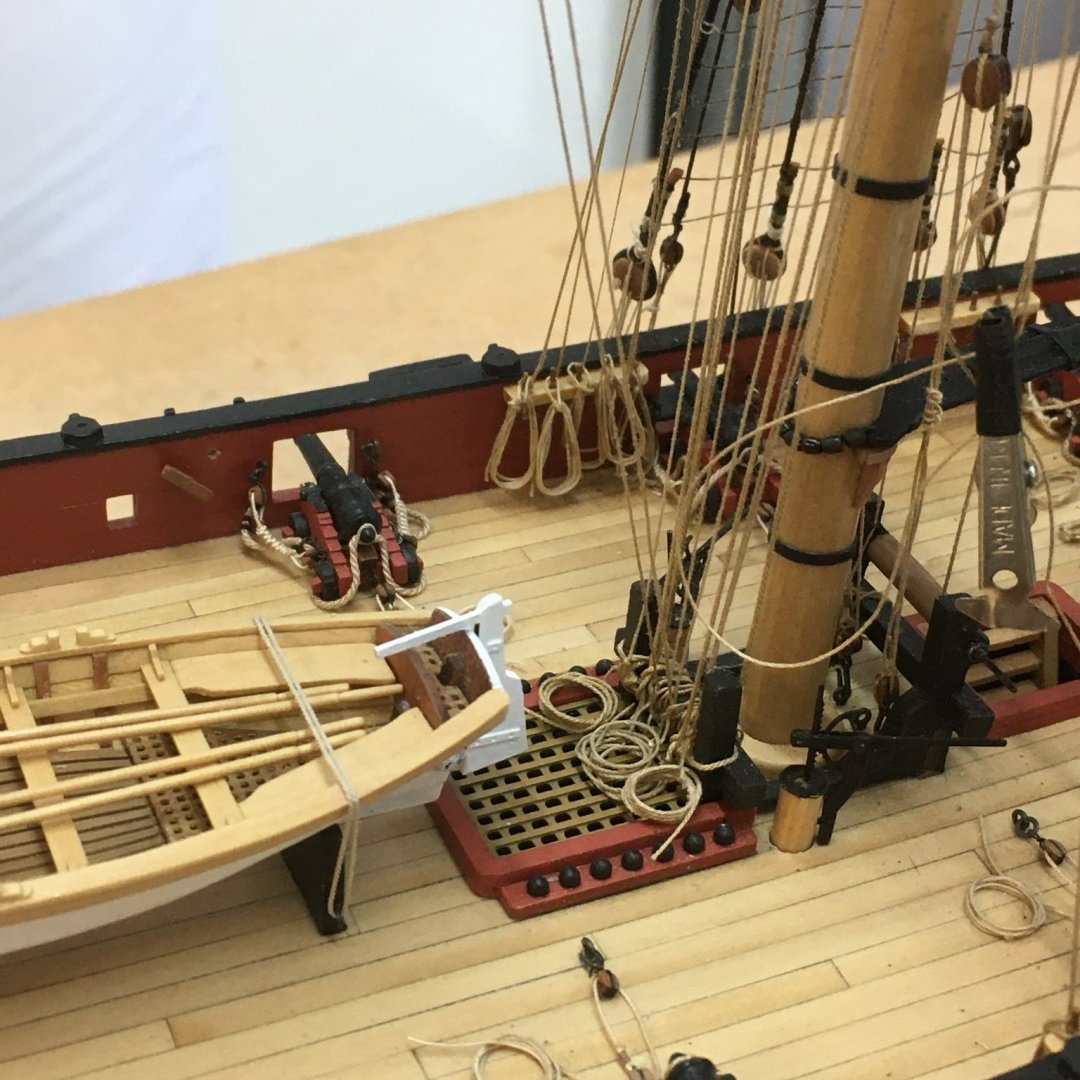
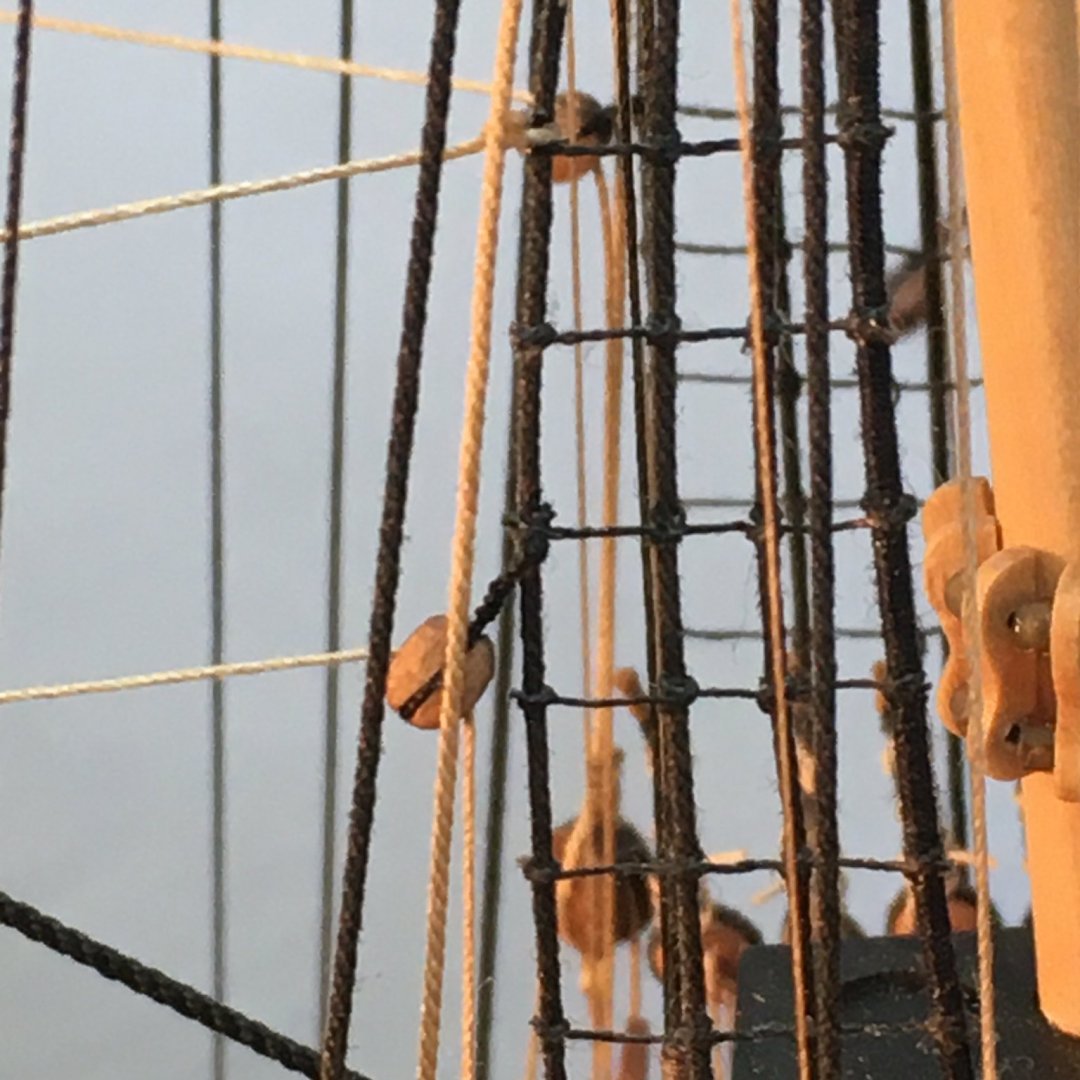
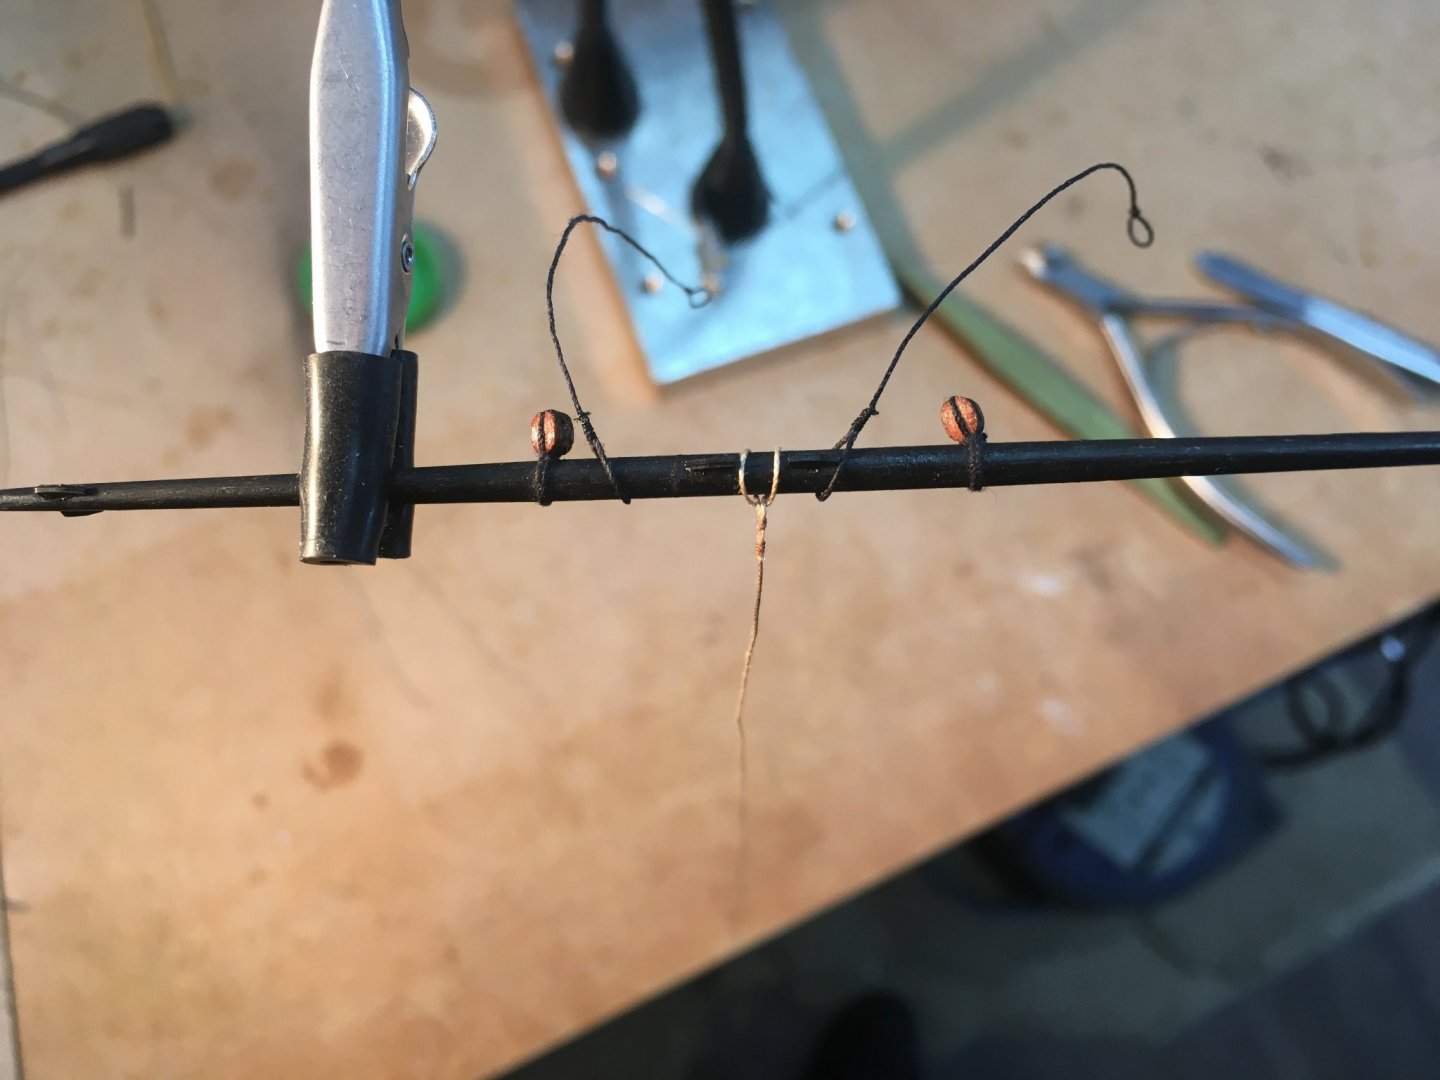
 Lower yard cluelines, sheets and tacks The cluelines are set up in a similar fashion to those on the topsail yards (Post #664). This time however there is a three-way junction with the sheets and tacks, with a toggle on the tack holding the other two together. Easier to show with a picture, this of the set up on the foreyard: The clueline reeves through a block under the yard and down to belay on the bitts. The tack runs down to a block on the end of the boomkin then up to belay in the bows. The standing end of the sheet hooks to an eyebolt near the steps amidships and the running end passes through a hole nearby, simulating a sheave, belaying on a cleat on the inner bulwarks. Again, a picture hopefully makes this clearer: The next shot shows a comparable setup for the main yard: For both yards, I found I needed to 'persuade' the junctions of the three lines to sit as far outboard as I could, by moving the 3mm block along the clueline, in order to avoid the tacks and sheets fouling shrouds and stays. I haven't permanently rigged these lines yet - hence the clips - as I'm still messing about with coils. I copied a method Glenn Barlow (@glbarlow) developed and described in his Cheerful log (here). I thought I was doing OK until I saw Glenn's final results (here) and decided I needed to do better! I'm reasonably happy with the coils that sit on the deck; it's the ones on the belaying pins I need to work on: Back to the drawing board 😬 Derek
- 725 replies
-
- 9
-

-

-
- vanguard models
- speedy
- (and 1 more)
-
More superb work. I'm particularly impressed by your coils. I've been trying the method you described and thought I was doing OK, until I saw how good yours are. I'll try your suggestion of matt acrylic as an alternative to PVA. Thanks again for the method. ...and I thought I was strange 🤪 🤣 Derek
- 778 replies
-
- 1
-
-
- cheerful
- Syren Ship Model Company
- (and 1 more)
-
Looking very smart Glenn.
-
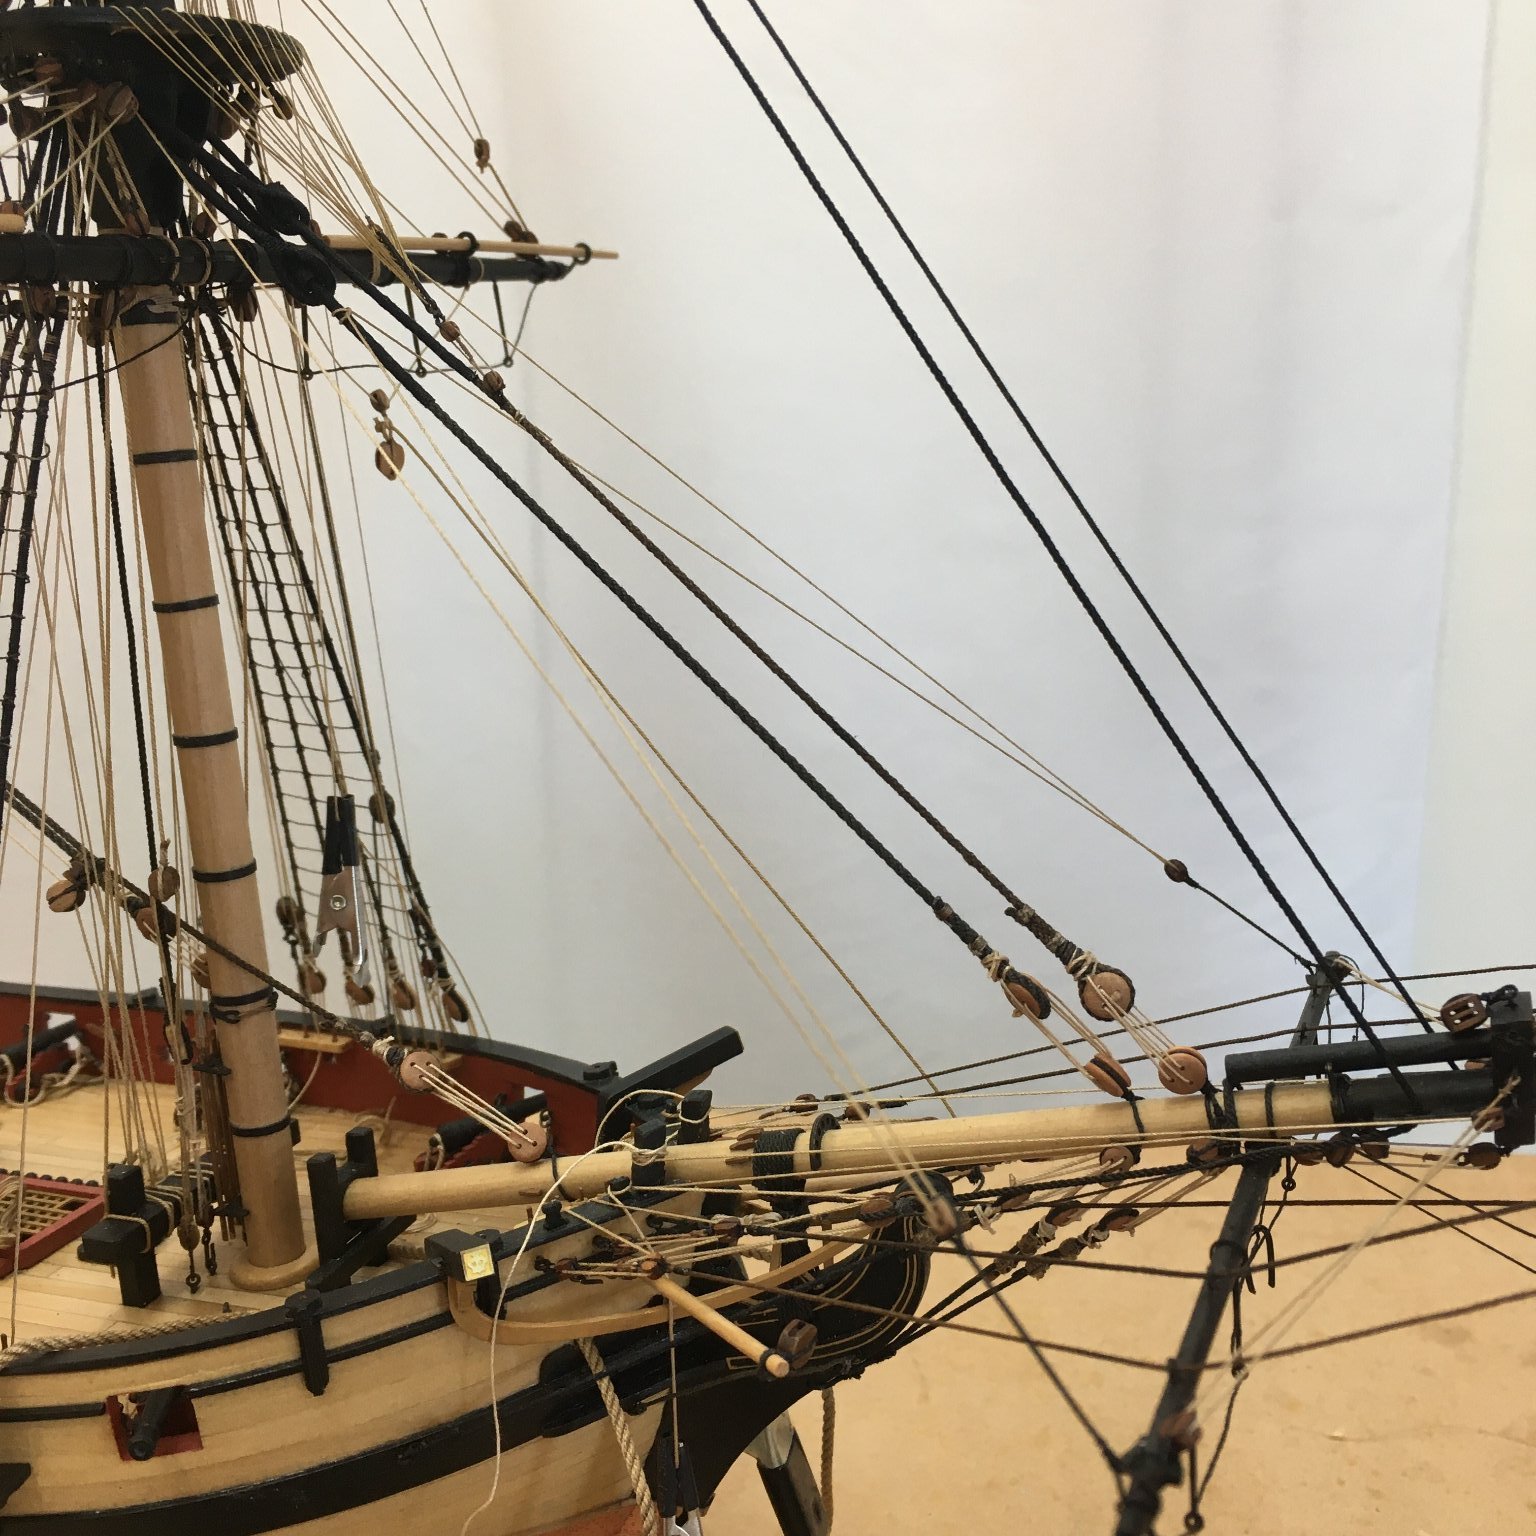
Bowlines Back to the running rigging! Having debated whether or not to rig these lines they actually turned out to be relatively straightforward, the main difficulty being weaving them through all the existing rigging and finding space for them on the already crowded bitts. I eventually counted some 19 lines on the bitts abaft the foremast alone. As usual, I started with the lower yards and worked up. However in describing the setup I'll cover all the bowlines on the main mast then all those on the fore. The kit suggests 0.1mm line for all bowlines, but I chose to use 0.25mm for the lower and topsail yards as that seemed closer to the rope sizes given in Lees' Masting & Rigging. Main yard - I tied the standing end just outside the first quarter, using a couple of half hitches and taking care to keep the knots under the yard and out of sight where I could dab them with CA and trim them neatly. I also had to be careful to avoid pinching other lines running along the yard. I used the same approach for the standing ends of all the bowlines: From the yard the line runs down to a 3mm single block near the foremast then up to belay on the bitts: For once I'd thought ahead, and hadn't fitted these blocks in advance. I prepared them off the model, complete with eyebolts, which meant I could thread a block on the bowline then glue the bolt into a pre-drilled hole in the deck. Main topsail yard - the bowlines reeve through the outermost of the blocks rigged to eyebolts in the rear edge of the fore top, then down to belay on the fore bitts: Main topgallant yard - these 0.1mm lines run through holes pre-drilled in the rear of the fore trestletrees, then down to belay on the fore bitts: Foremast yards - I'm not sure an exhaustive account will be of much value here as it's all in the rigging plans. Suffice to say, all bowlines run to blocks attached to the bowsprit and jibboom, back through holes in the saddle and then on to belay on bitts at the foot of the bowsprit. Seeing these extra lines running through the saddle made me glad I'd decided to rig them: Next, it's on to the lower yard tacks and sheets (and tidying up all the crowded bitts!). Derek


- 725 replies
-
- 7
-
-
- vanguard models
- speedy
- (and 1 more)
-
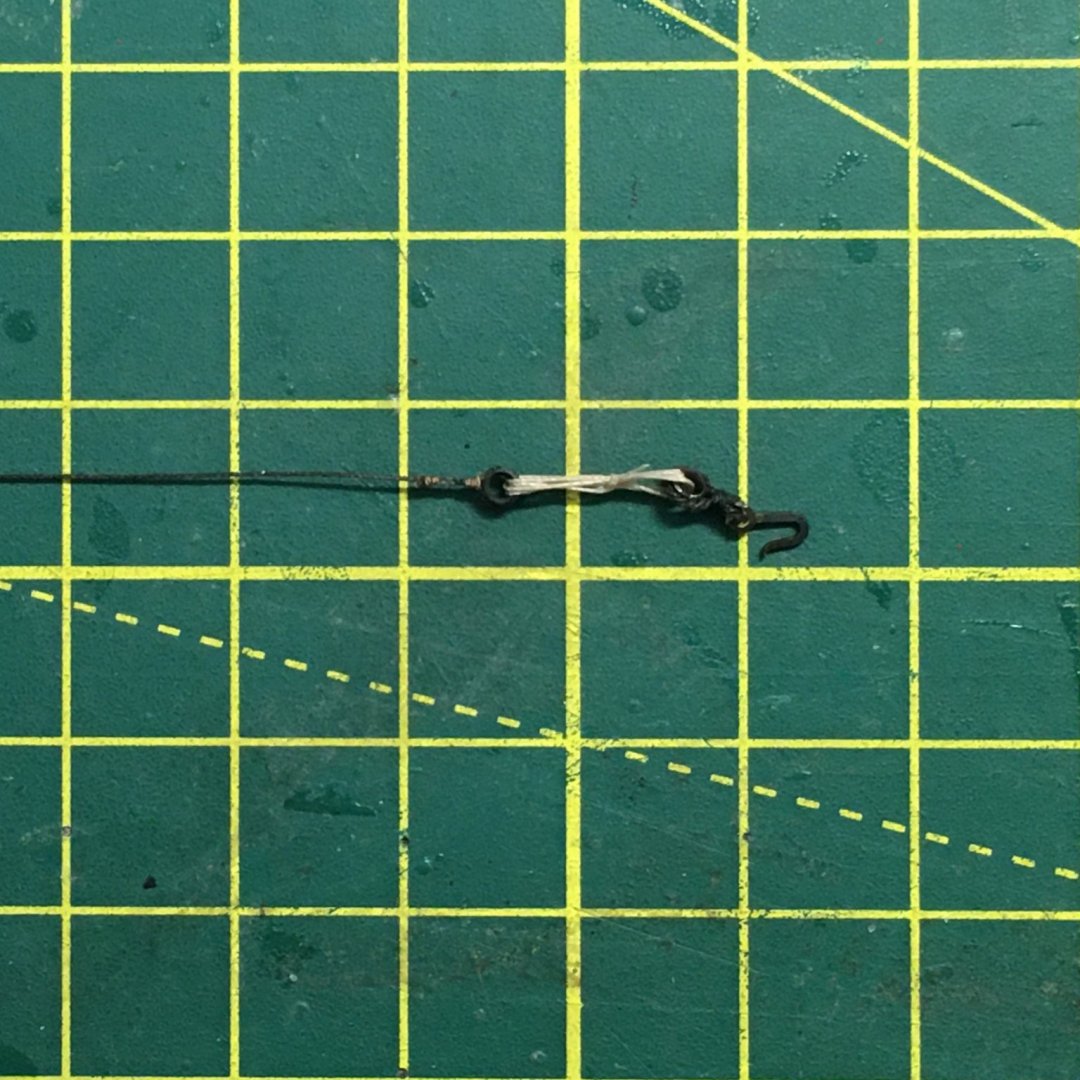
Standing rigging revisited (unintentionally!) While preparing to rig the bowlines I somehow managed to snap the fore topgallant stay. It broke near the dolphin striker and I suspect it had partially frayed when I first threaded it and didn't need much force to finish the job: There was no way I could replace the stay as originally rigged - starting at the top of the fore topgallant and ending in a pair of thimbles in the bows, with a lashing added last to tension the stay. The bows are simply too crowded now. Instead, I aimed to repeat the process in reverse, starting at the bows. Fortunately the thimbles were attached by a hook to an eyebolt which made them easy to retrieve, complete with their lashing: It was then a case of removing the stub of the old stay seizing a new length of 0.25mm dark line to the first thimble. I was then able to hook the assembly back to the eyebolt. It's the lower of the two sets of thimbles in the picture: Some of the bowlines can also be seen in this shot running through the saddle on the bowsprit, and loosely rigged at this stage. I'll cover these in the next log entry. I took the free end of the stay back through the dolphin striker, through the sheave in the end of the flying jibboom and up to the fore topgallant mast. There it was simply a case of seizing it carefully so as to get the right tension in the stay: I was so relieved to get over this wobble that I forgot to take a photo of the finished job. Anyway, it's just like it was in the last photo of the whole ship 😬. Derek

- 725 replies
-
- 8
-
-
- vanguard models
- speedy
- (and 1 more)
-
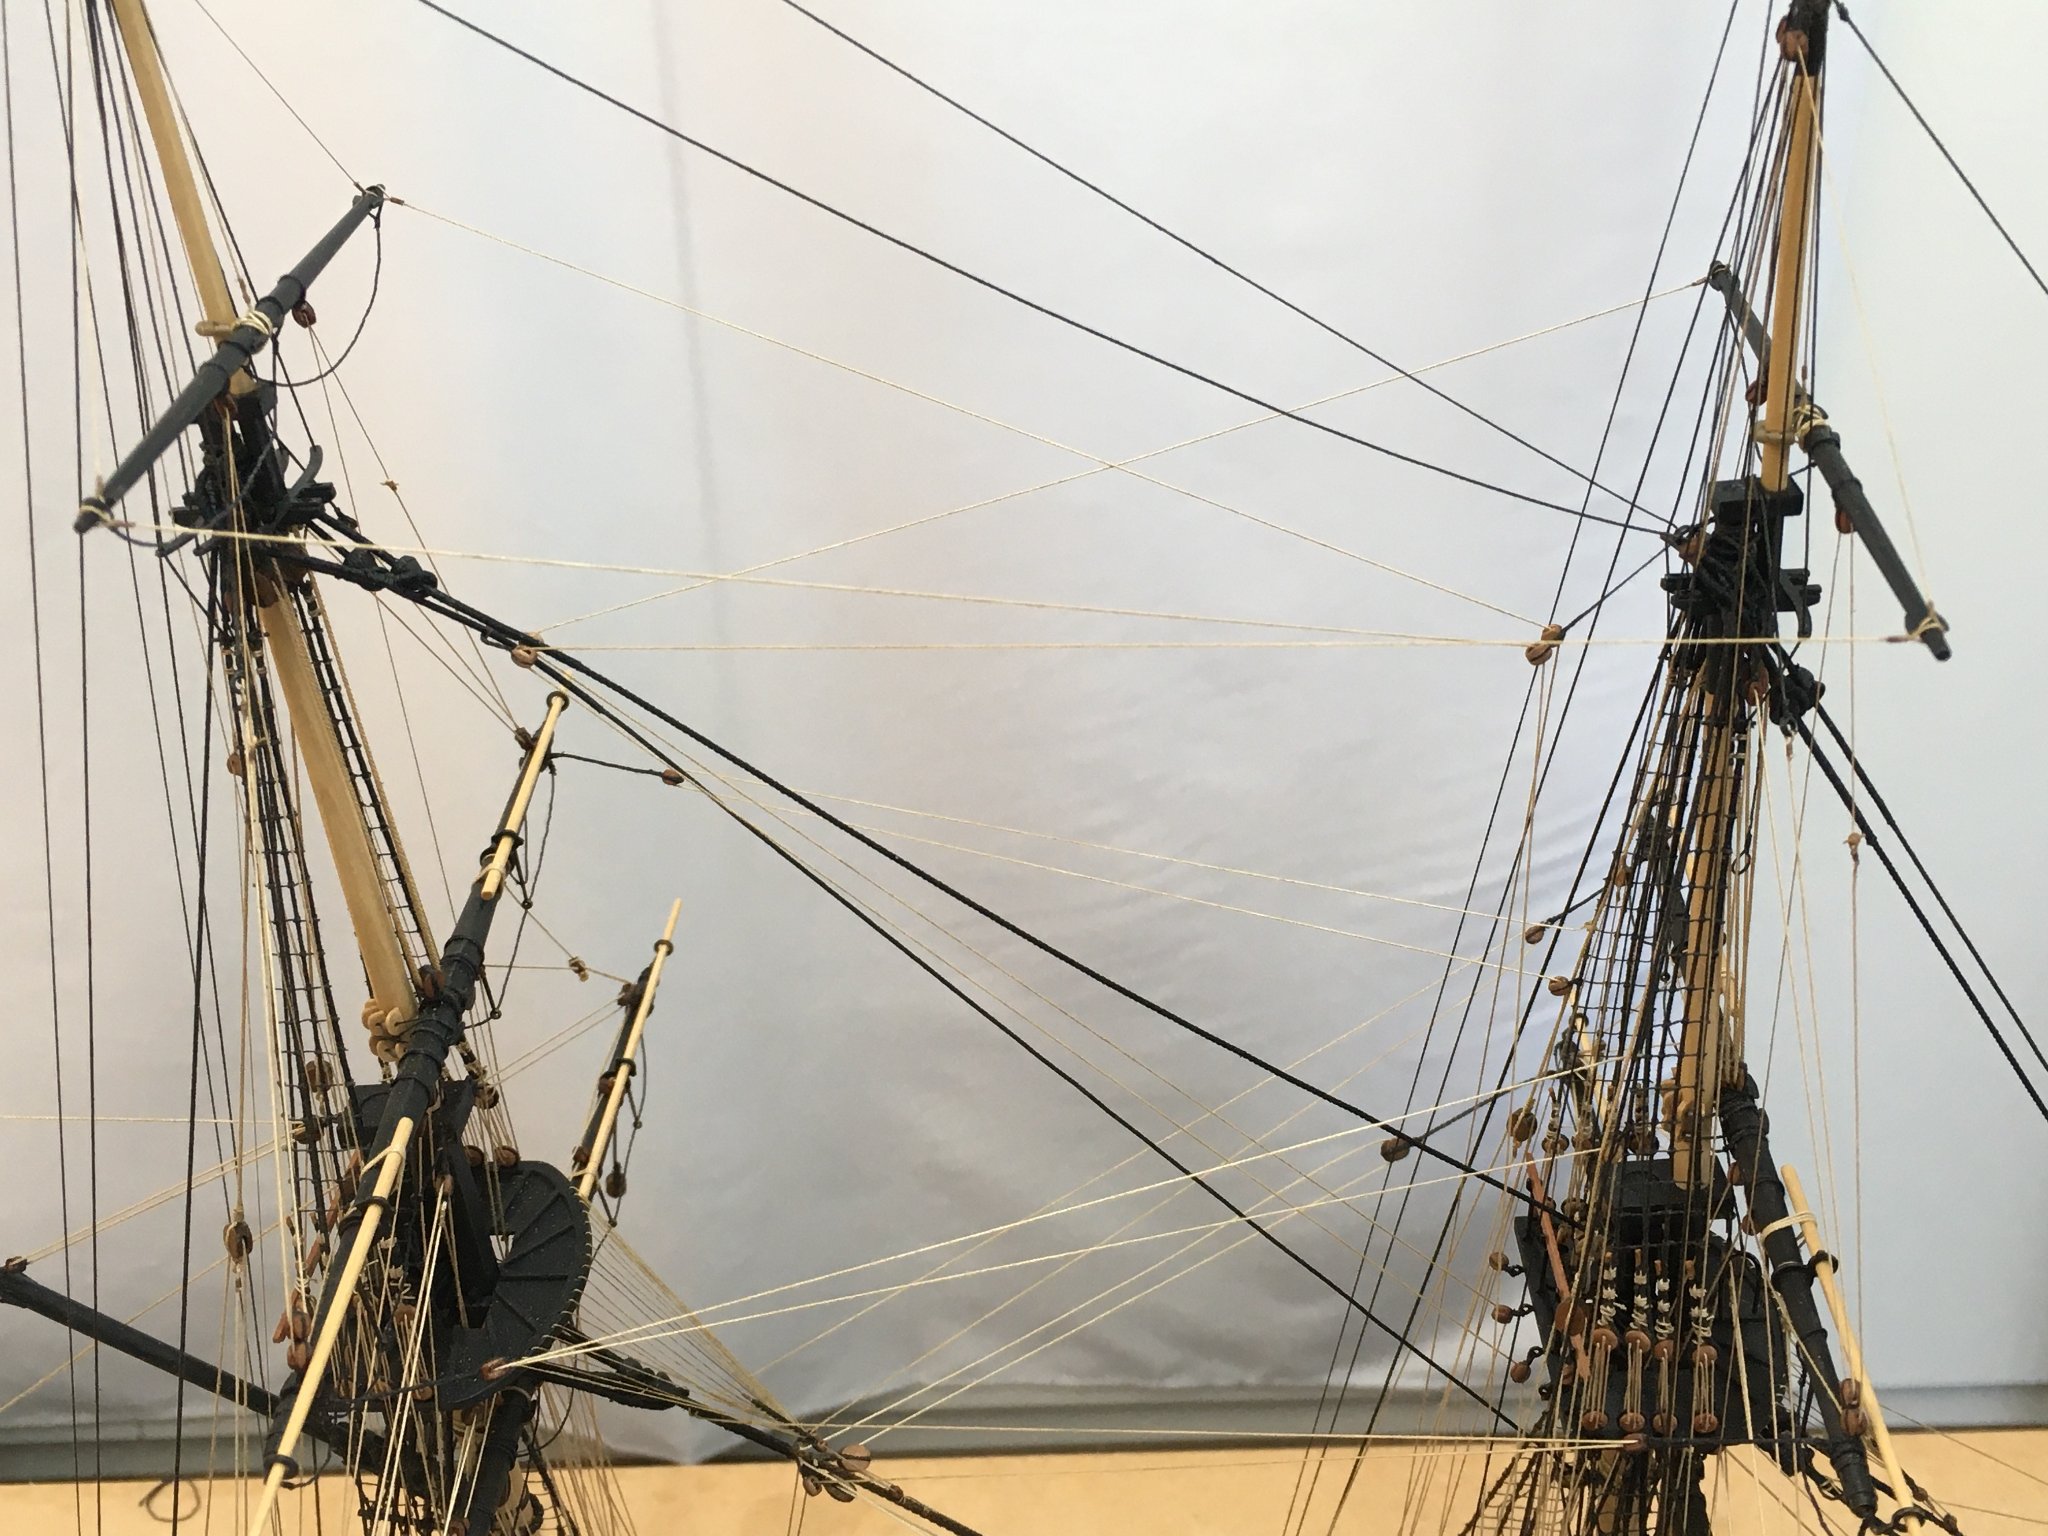
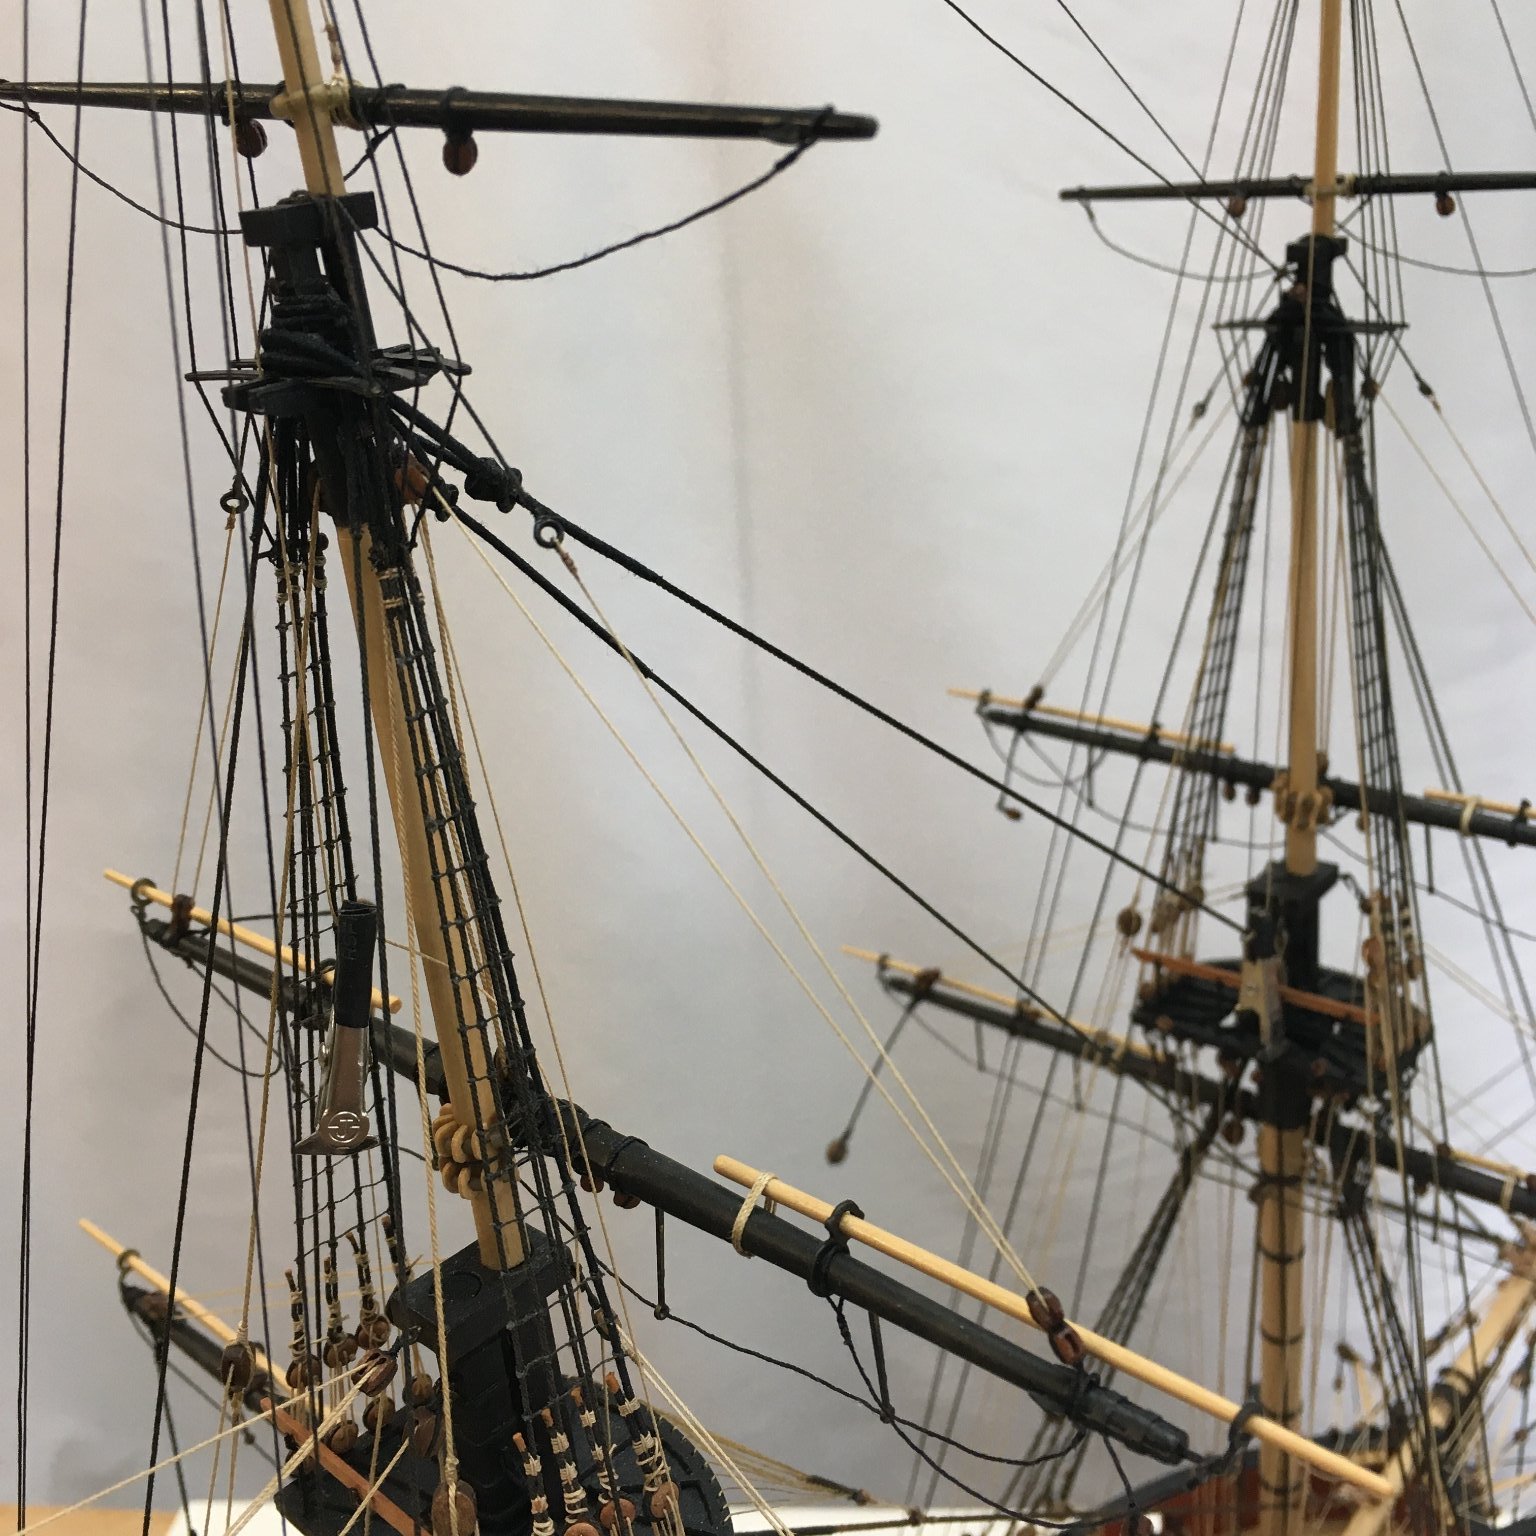
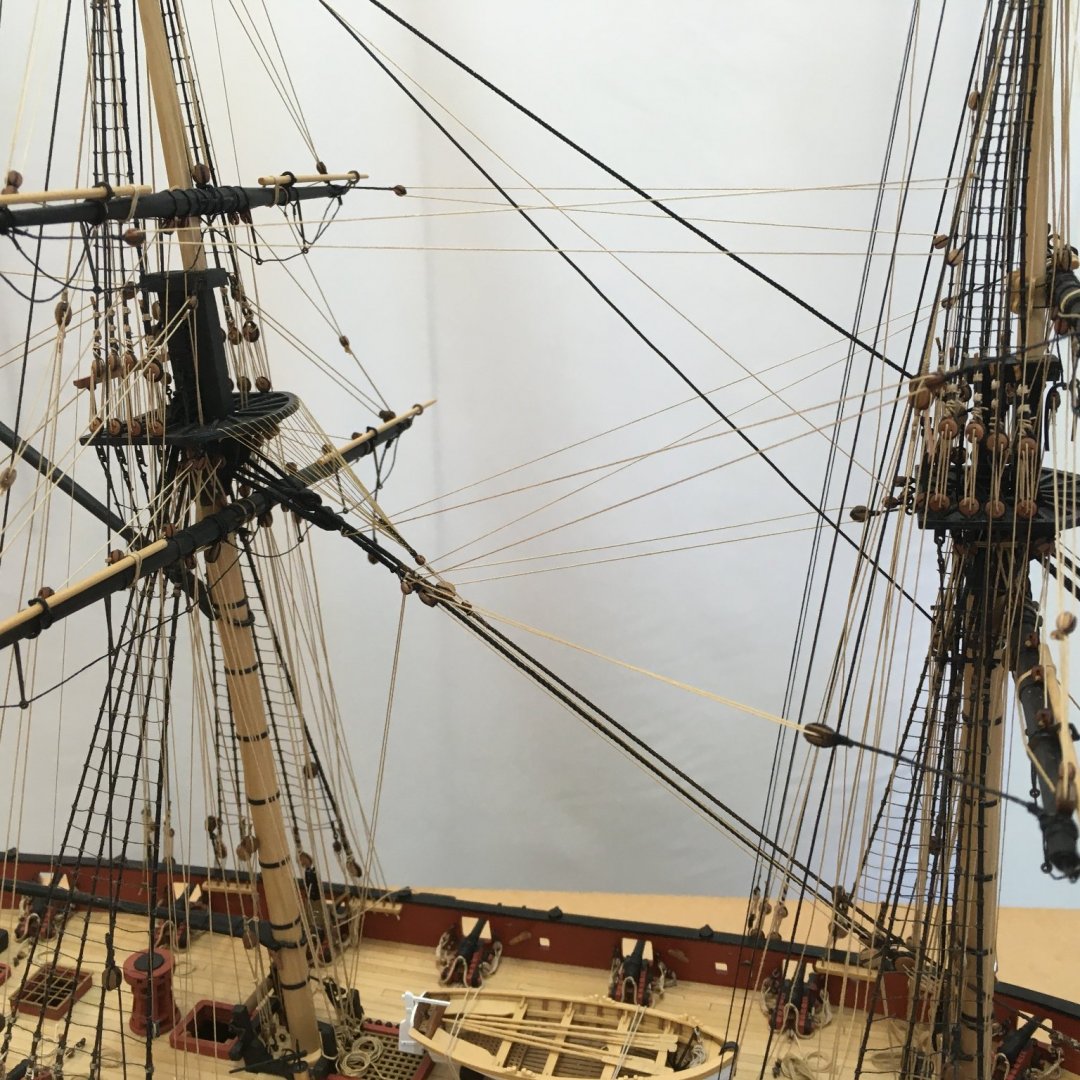
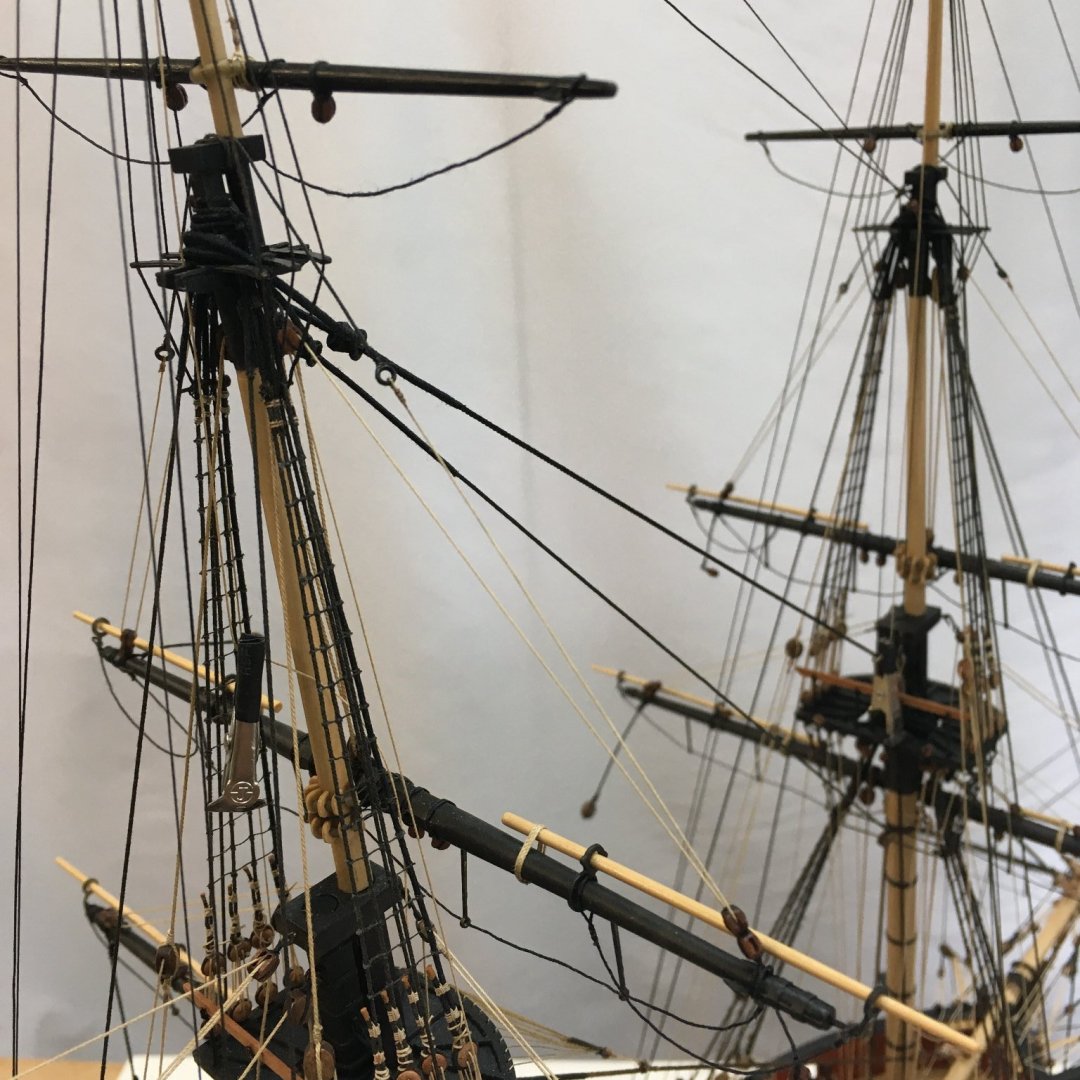
Topgallant yard braces Thanks as always for all the likes and kind comments. These final braces brought their own little challenges, again because I'd not studied the rigging plans carefully enough at an earlier stage. The fore topgallant braces run to a pair of 3mm blocks lashed round the main topmast preventer stay. These were fairly straightforward to rig, using the indispensable quadhands as with the lower yard braces. The main topgallant pair run to a pair of blocks lashed round the fore topmast head. These also had to be added late in the day, and I found I had to seize them in a fairly long strop in order to weave through the numerous lines already in place. Hopefully this shot shows the run of these lines and the position of their blocks: After a deal of head scratching I've decided to rig the bowlines. In the end I was swayed by Glenn's comment: Like coppering, I'm not sure I'd want to rig all this sail handling tackle again! It's further testament to the quality of Chris's kit that all these lines are shown on the plans. Derek

- 725 replies
-
- 8
-
-
- vanguard models
- speedy
- (and 1 more)
-
Thanks Bob & Glenn, much appreciated. Glenn, did you rig all the bowlines on Pegasus? Chris shows them on Speedy's rigging plan but I'm not sure I want to go that far. Although I like to be reasonably accurate I'm not totally wedded to modelling every last detail - otherwise I'd be rigging sails. What do you think?
-
That’s great news Chris, and I join everyone in wishing you every success. My only concern is that you’re already developing models faster than I can build them. With you going full time I’ll never catch up! Derek
-
Simply stunning! I quite like the fact that there's going to be lots of 'secret' detail only the builder will know about. Does that make me strange 🤪?
- 355 replies
-
- 4
-
-
- vanguard models
- Sphinx
- (and 1 more)
-
Braces I've made a bit of progress in between jobs around the property, starting with the spritsail braces. These required a single long length of 0.25mm line which I clove-hitched round the fore stay, leaving an equal length each side: Each end then reeves through the pendant blocks previously rigged to the ends of the spritsail yard, then back up towards the foretop: Difficult to see in the photo, but the braces reeve through the inner sheaves in the double blocks under the front edge of the foretop. The next part was one of the trickiest in the whole rigging process, as the lines then have to reeve through the double blocks under the rear edge of the top. This was hard enough with the buntlines and leechlines on the foreyard, but the space under the top was more crowded and tighter now, and I couldn't thread the line through from the front and hope to get it through the rear block in one go. In the end I had to push the line as far as I could from the front then fish around with tweezers until I could pull it through from the rear. I then had to grip the rear double block with needle nose pliers and gently twist it round so I could thread the line through in the right direction. I was relieved that I hadn't rigged the blocks too tight under the top, meaning I was able to twist them round far enough. It was then an easy job to take the braces to their belaying points. Fore yard braces Following advice in the kit instructions I'm leaving the main brace until last, otherwise it will get in the way of other rigging. The fore yard braces don't present that problem, but I soon realised I should have studied the rigging plans more thoroughly before I got to this stage, as I found myself having to rig pairs of blocks to the main stay in order to rig these lines. It wasn't too big a deal, especially with the quadhands. I found the best technique was to rig the blocks in the middle of the stay where they were more accessible, then slip them to their final position before final tightening: I actually 'cheated' here slightly. I should have rigged all the blocks on the main stay, but I couldn’t get the lower pair as close to the foremast as I wanted (deadeyes in the way) so I moved them to the preventer. As with the spritsail, I made the fore yard braces from a single length of 0.3mm line, clove hitched round the stay as shown above. Form the stay the braces reeve through the pendant blocks at the ends of the yard, back to the upper pair of 5mm blocks on the stay, down to the 5mm pair on the stay near the foremast, then down to belay on the bitts. Photos later will show this more clearly. Topsail yard braces The fore topsail yard was straightforward - a single 0.25mm line clove hitched around the main stay, running up to the pendant blocks on the topsail yard, back to the pair of 3mm blocks on the stay then down to belay on the main bitts. The main topsail yard was trickier. Again, I'd failed to look at the plans far enough in advance, and found I now had to seize blocks and lines to the fore topmast shrouds. Not easy with several lines in the way. I started by seizing a 3mm block in the centre of a 6" length of line (deliberately long so I had plenty to work with in the tight confines of the shrouds): I made two of these, fastening one to each of the rearmost topsail shrouds. I had to use a pair of tweezers in each hand to pass the strop lines round the shroud then tie them with a reef knot. I did the same with one end of each brace ( I used two separate lines for the braces this time), tying it to the same shroud as the block, a couple of ratlines higher. A dab of CA and a trim later and this was the result: The brace runs from the shroud to the pendant block on the main topsail yard, back to the 3mm block on the same shroud and down to belay on a pinrack. Here's a shot with these various lines finished: Starting to feel like the home straight now! Derek


- 725 replies
-
- 18
-
-
- vanguard models
- speedy
- (and 1 more)
-
Good start. I shall also follow your build with interest. I'm itching to get started on my own Duchess kit now that it feels like I'm on the home straight with Speedy. Derek
-
Thanks Chris, that makes sense. I hadn't thought to run the lines via the futtock staves, and would have done that rather than go for shroud cleats if I had known. Whilst I stand by my earlier comment about not expecting you to cover every conceivable aspect of rigging in the plans, this is one area (the futtock staves in particular and avoiding fouling in general) where you might want to consider giving builders a few more pointers. Btw, I noticed that you replied well after midnight. You're clearly still burning the candle at both ends so I appreciate you taking the time to respond so quickly. Derek
- 725 replies
-
- 1
-
-
- vanguard models
- speedy
- (and 1 more)
-
Thanks John. You've raised an interesting point here about the accuracy and/or completeness of rigging plans in kits. In my experience (admittedly not as extensive as some) you always have to be prepared for a degree of problem solving when it comes to rigging model ships. The original ships' rigging was so complex it was a daunting task to get every line to its belaying point without fouling on some other line or part of the ship. For a kit designer to describe that complexity by way of plans and instructions must be at least as difficult and I think it inevitable that some practical details will have to be left to the builder. Otherwise the manual would rival War & Peace. I don't mind that as I actually enjoy the problem solving part of the hobby, especially researching different ways in which real ships were rigged in order to look for alternatives that might work better in particular circumstances. For example, in the case I mentioned in my last post I could have got the line to the belaying pin specified on the plan, perhaps by routing the line through a block or thimble seized to a shroud - perfectly acceptable full-size practice - but I decided that I preferred moving the belaying point as I described. What I'm taking a long time to say is that the rigging plan is not 'wrong'. It is as complete as it reasonably can be (and far better than others I've seen) but there are inevitably instances where the builder needs to think through the run of lines and if necessary introduce minor adjustments to avoid fouling. I mentioned one earlier in the log, where I used an extra ringbolt in the main top to avoid a line rubbing against the gaff. Some people might regard that as an unnecessary step, but to me the line bending round the gaff just didn't look right. Of course there's another possibility in these cases - I might have got it wrong! Perhaps I've misread the plan or got an earlier part of the rigging wrong thereby throwing the next part off. I hope not but it's not impossible. I'd also be interested in Chris's (@chris watton) take on these points, so I've tagged this post for his attention. Derek
- 725 replies
-
- 2
-
-
- vanguard models
- speedy
- (and 1 more)
-
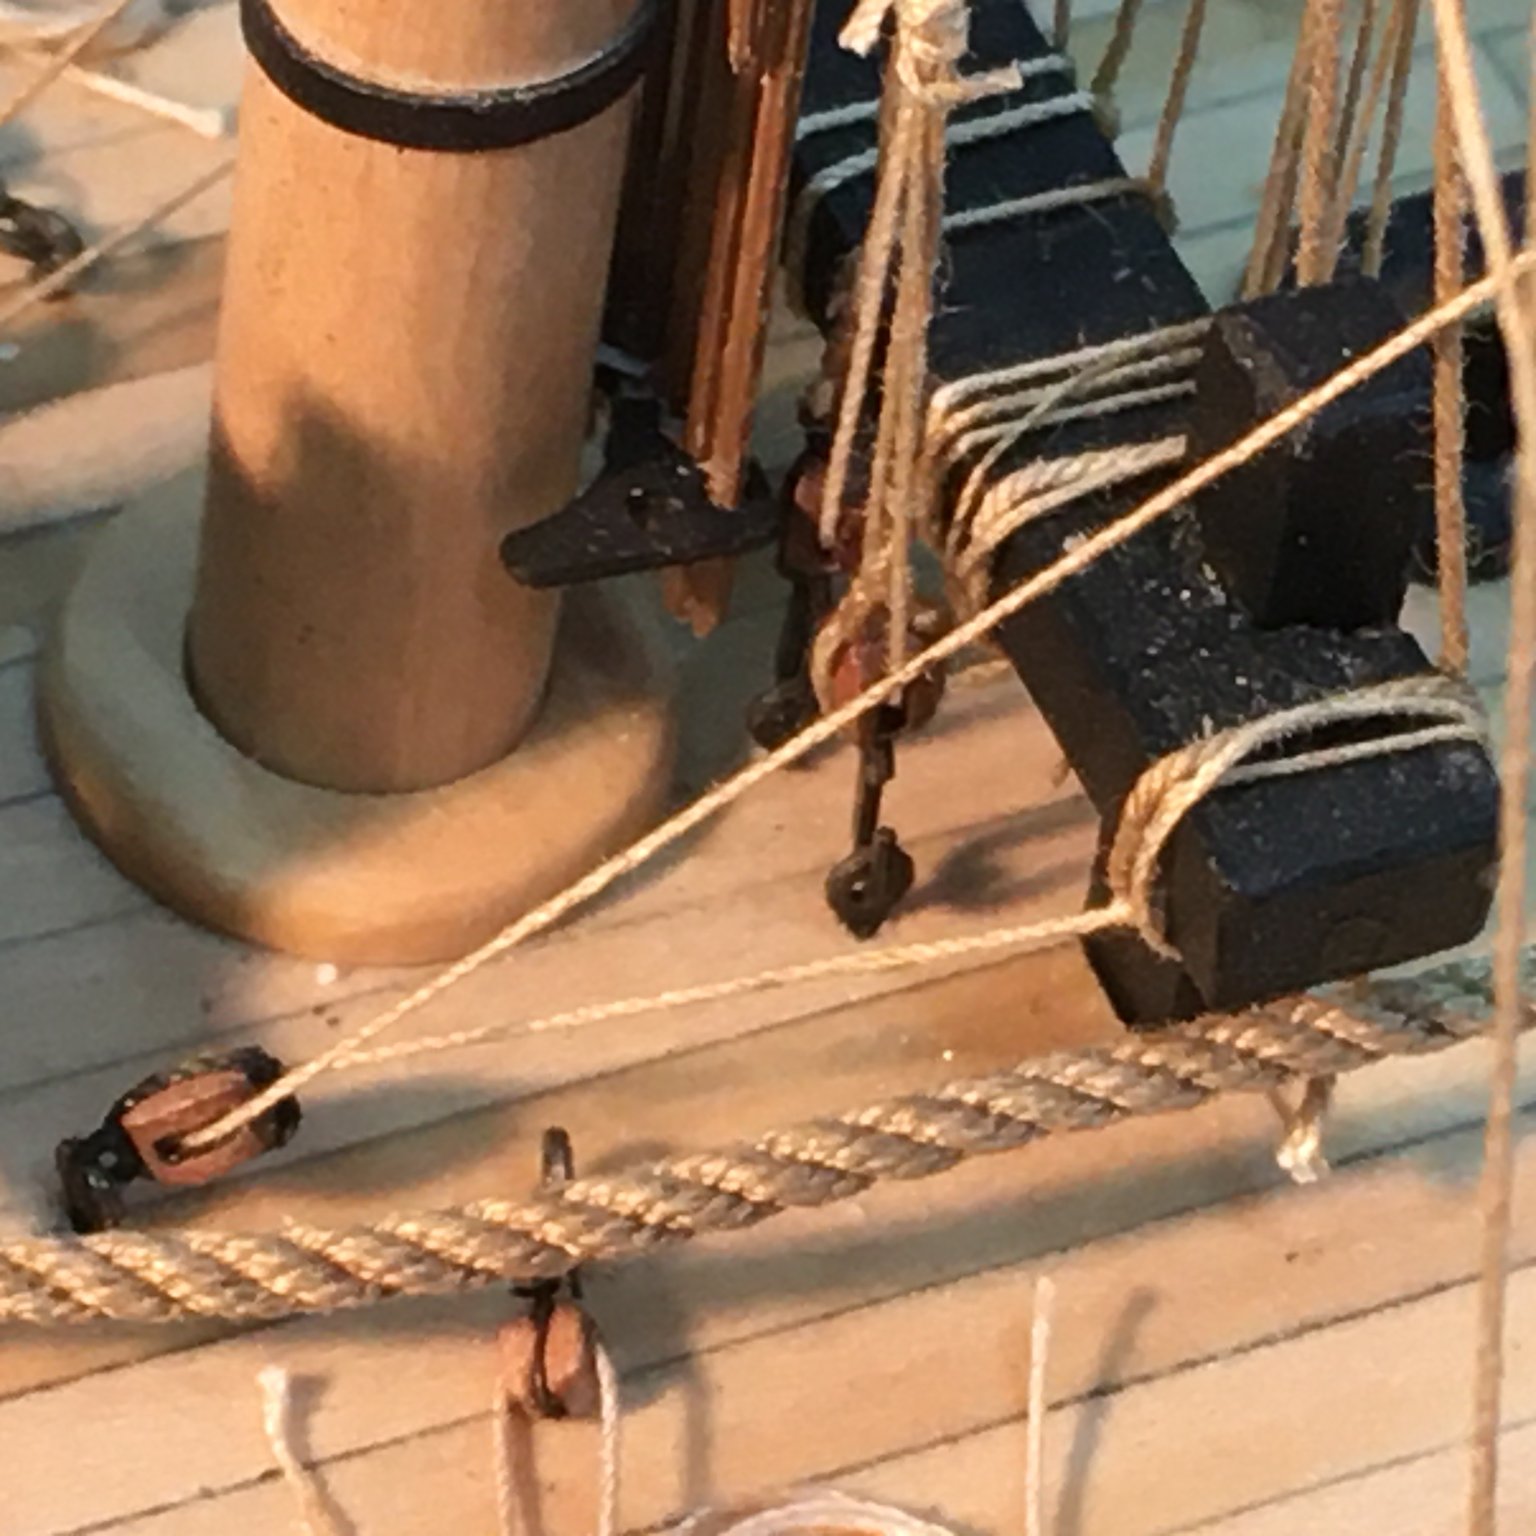
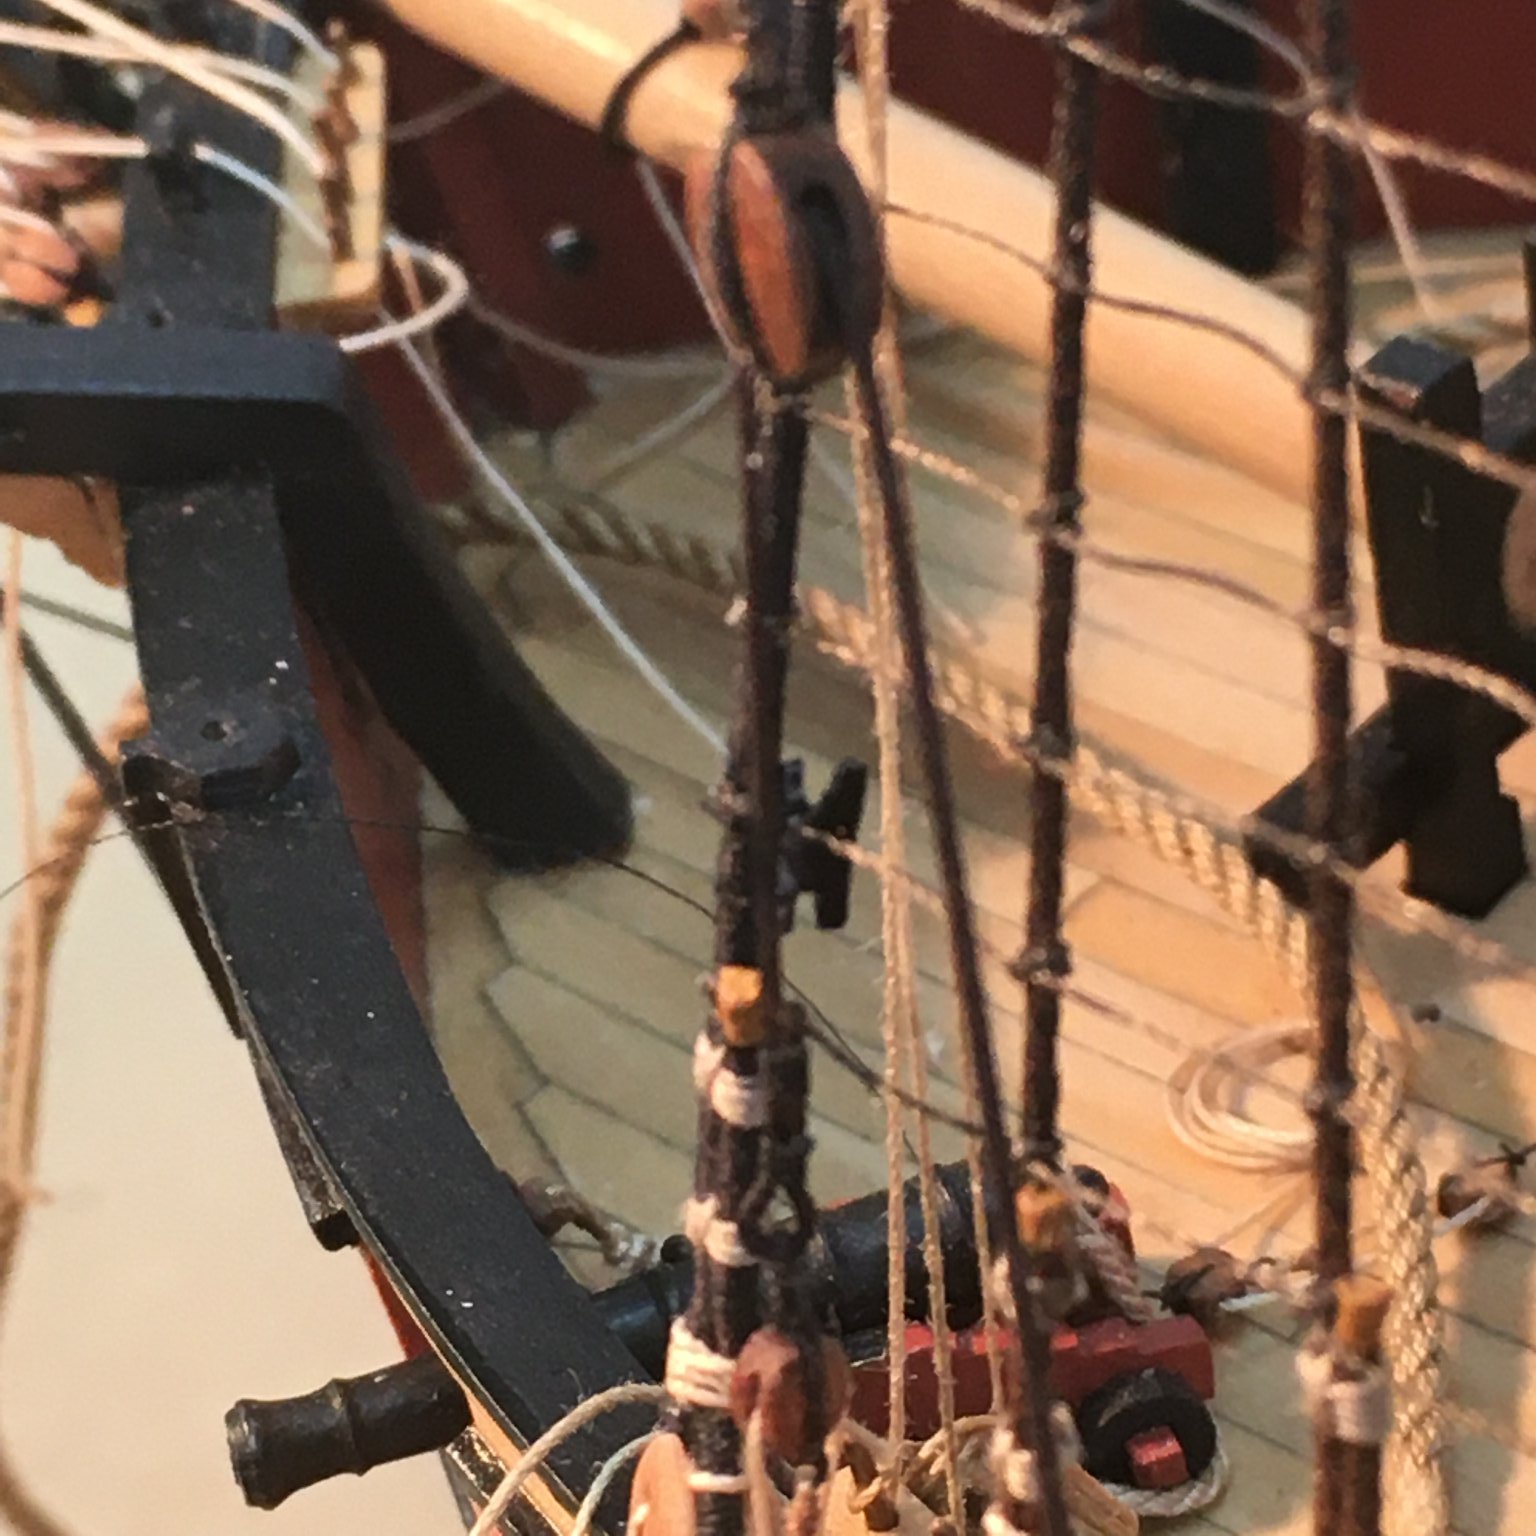
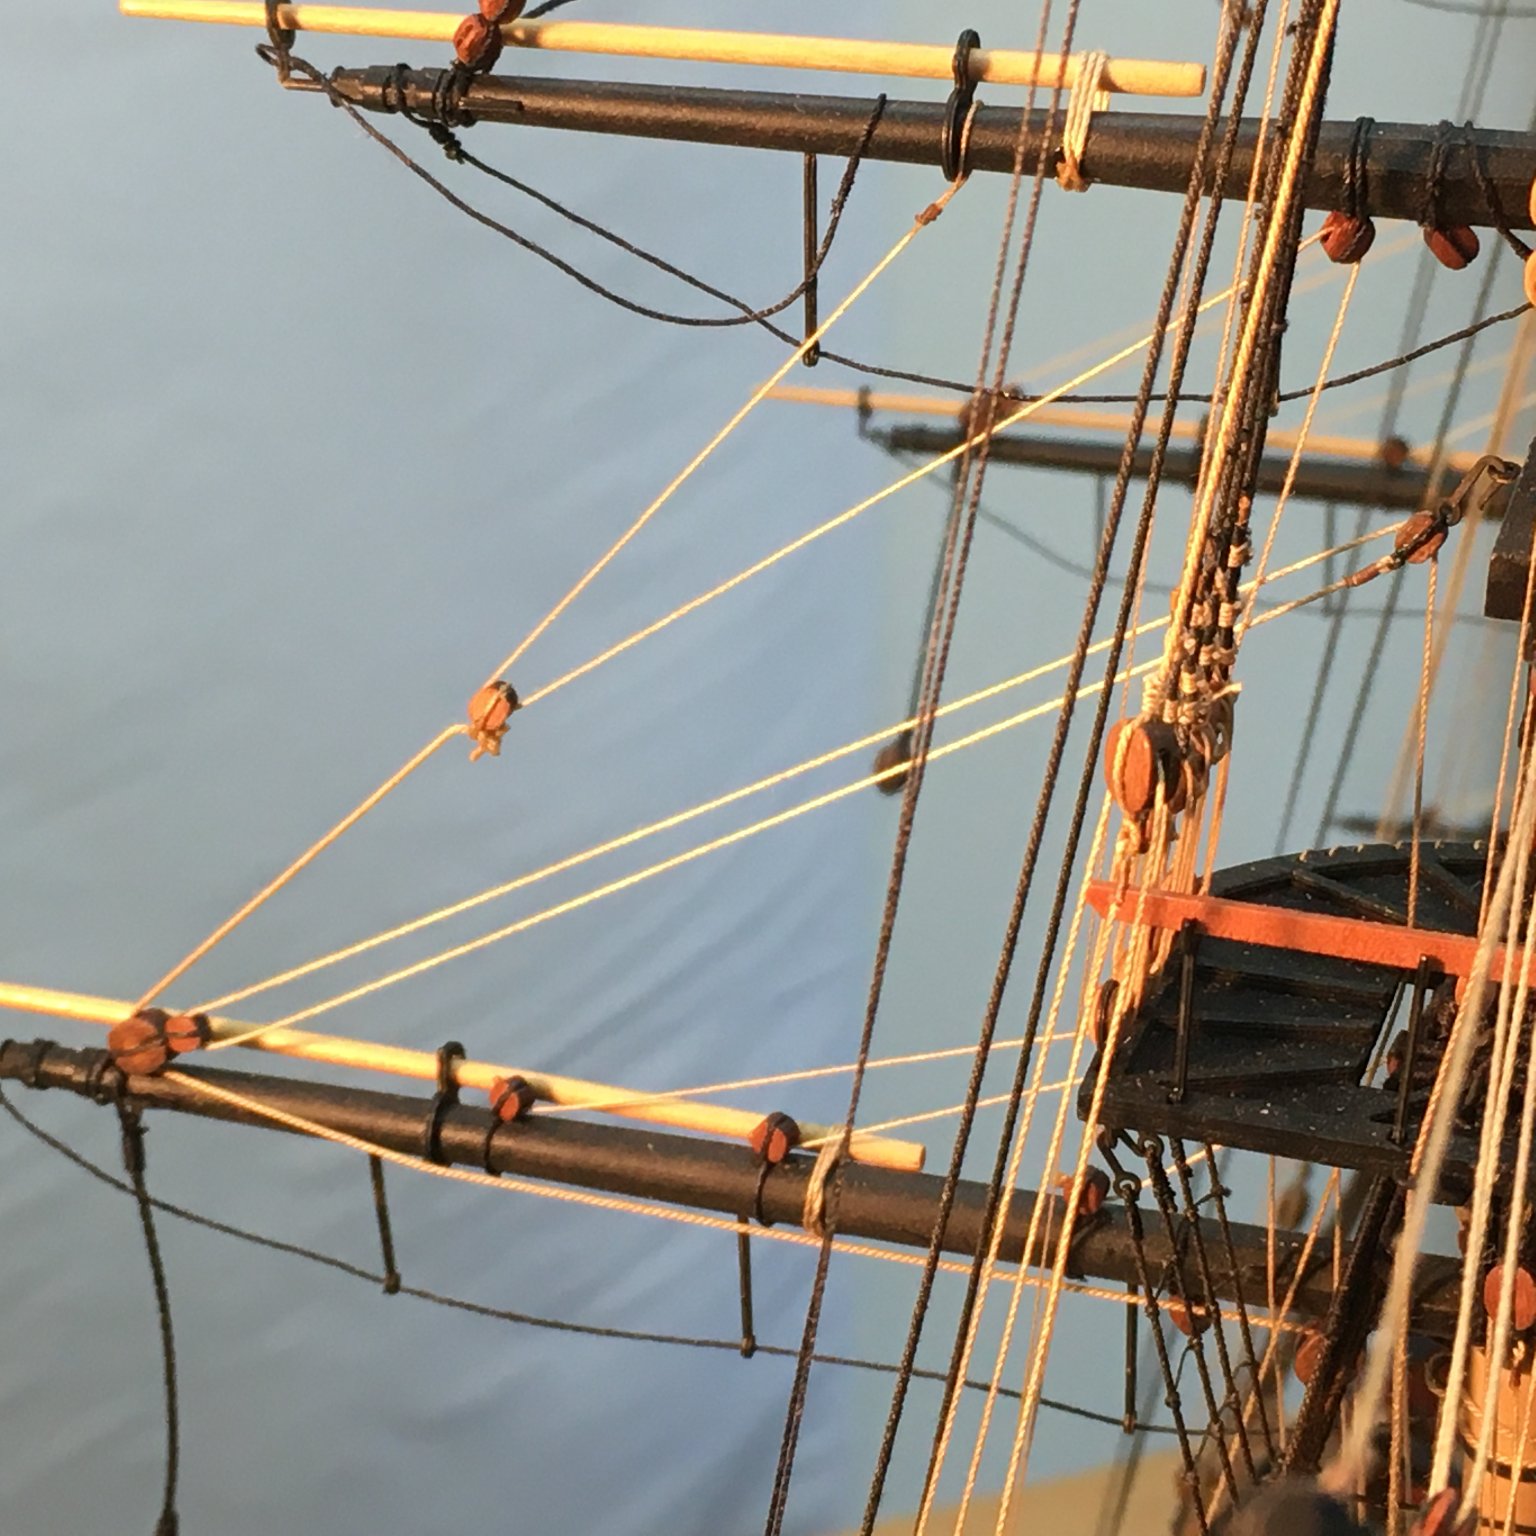
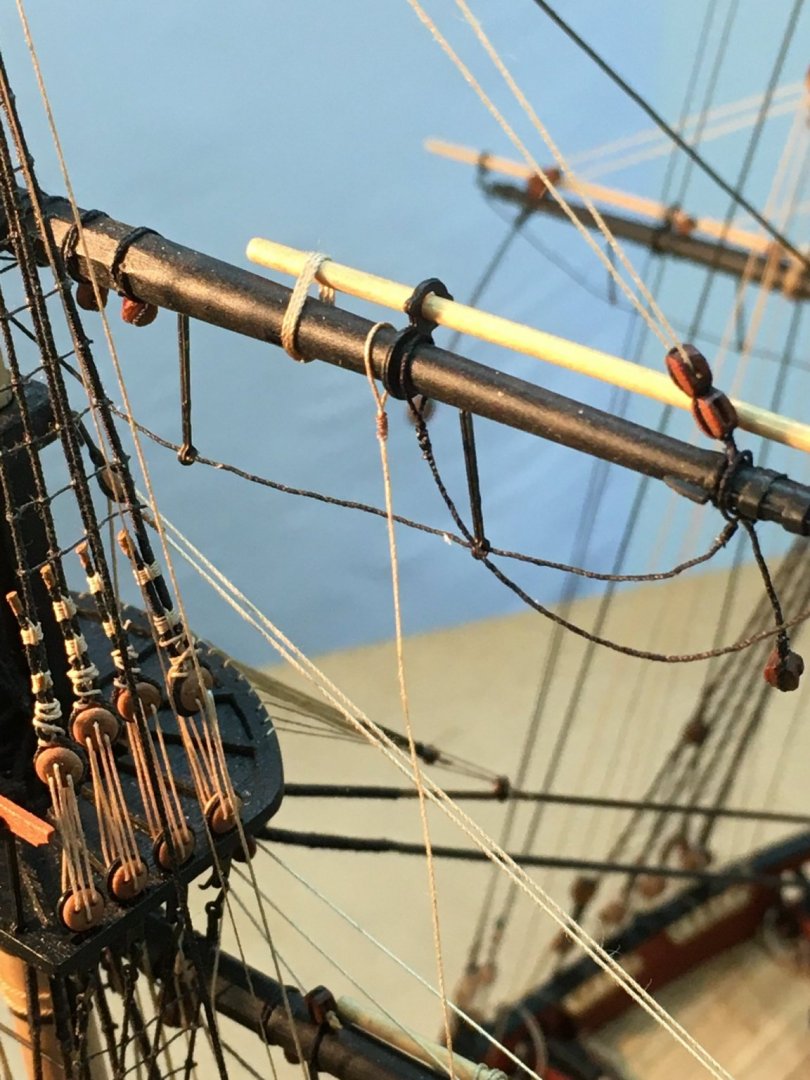
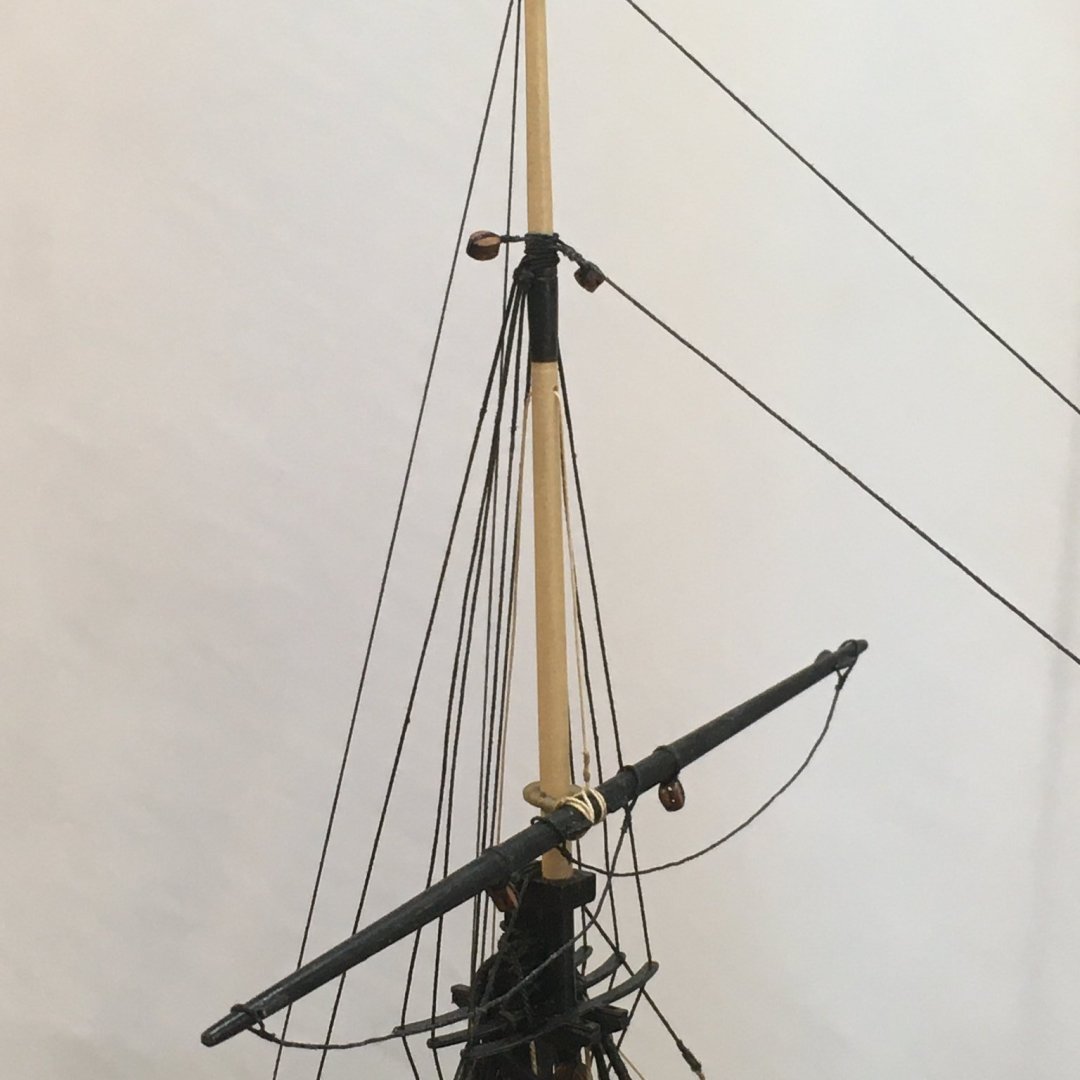
Topgallant cluelines and sheets Not much time for modelling over the last few days. In between DIY and gardening chores I managed to rig these lines, which presented an interesting belaying problem, which I'll describe below. The first part of the job was similar to the topsail equivalents, linking the two lines with a toggle made as described in the earlier post. Here's the 0.25mm sheet and 0.1mm clueline and waiting to be rigged: The photo is deceptive as it makes the two lines look identical. I checked and they're not. Here they are rigged to the yards on the foremast: It was when I tried to belay them to the pin rack that I ran into problems - there was simply no way on either mast that I could get the lines to reach the designated pin without fouling on shrouds and other obstacles. I considered several options, including belaying in the tops (which seems to have been done historically, at least in some ships) or leading the lines through thimbles seized to the shrouds. Belaying in the tops wasn't a practical option this late in the build, and in the end the simplest solution I found was to belay to a cleat seized to the foremost shroud on each mast. Given their small size (4 X 1.6 X 0.5mm) I decided to make the shroud cleats from styrene strip rather than wood, using the sandwich method I described earlier for parrel ribs. Starting with a 2 X 0.5mm strip I cut 4 lengths, each 4mm, and glued them with PVA. The PVA didn't stick them very well which didn't really matter as I held the block in a vice as I shaped it with a 0.5mm bit in the Proxxon mill. A bit of gentle filing gave me the required shape: Once separated from the block I used fly tying thread to seize the cleats to the four forward shrouds and painted them black (difficult to photograph!): Once dry it was easy to belay the lines and hang on a coil to complete the job: Derek

- 725 replies
-
- 5
-
-
- vanguard models
- speedy
- (and 1 more)
-
That's useful to know Glenn. I also use Admiralty paints, but hadn't thought of using the ironwork black on anything other than metal. Must learn to think outside the box!
- 778 replies
-
- 1
-
-
- cheerful
- Syren Ship Model Company
- (and 1 more)
-
Beautiful yards, and as always your paint work excels. Pity in a way to cover the box, but with your paintwork it's worth it.
- 778 replies
-
- 1
-
-
- cheerful
- Syren Ship Model Company
- (and 1 more)
-
More superb rigging Glenn. Your ratlines look great, and your description of rope coil making is very timely as I'm going through similar experimentation on Speedy. I've not had too many problems at 1:48 scale but I've been struggling at 1:64, especially with Chris's properly in-scale belaying pins which virtually force you towards something resembling full-size practice. There isn't enough space to hang an entire coil over the pin, so your method with the single loop over the pin is what I'm aiming for. I'd seen Tom Laura's video but discounted it at this scale, so your approach looks much closer to what I need - the coils on your Cheerful look very realistic. Thanks for posting! Derek
- 778 replies
-
- 2
-
-
- cheerful
- Syren Ship Model Company
- (and 1 more)
-
Thanks Don, I really appreciate your feedback. Thanks Glenn. You're starting to make me suspect that you know a lot more about this rigging lark than you sometimes pretend. String, indeed
- 725 replies
-
- 2
-
-

-
- vanguard models
- speedy
- (and 1 more)
-
Wow. Just catching up - that paint line is really neat. Great job!
- 160 replies
-
- 1
-

-
- Alert
- vanguard models
- (and 1 more)
-
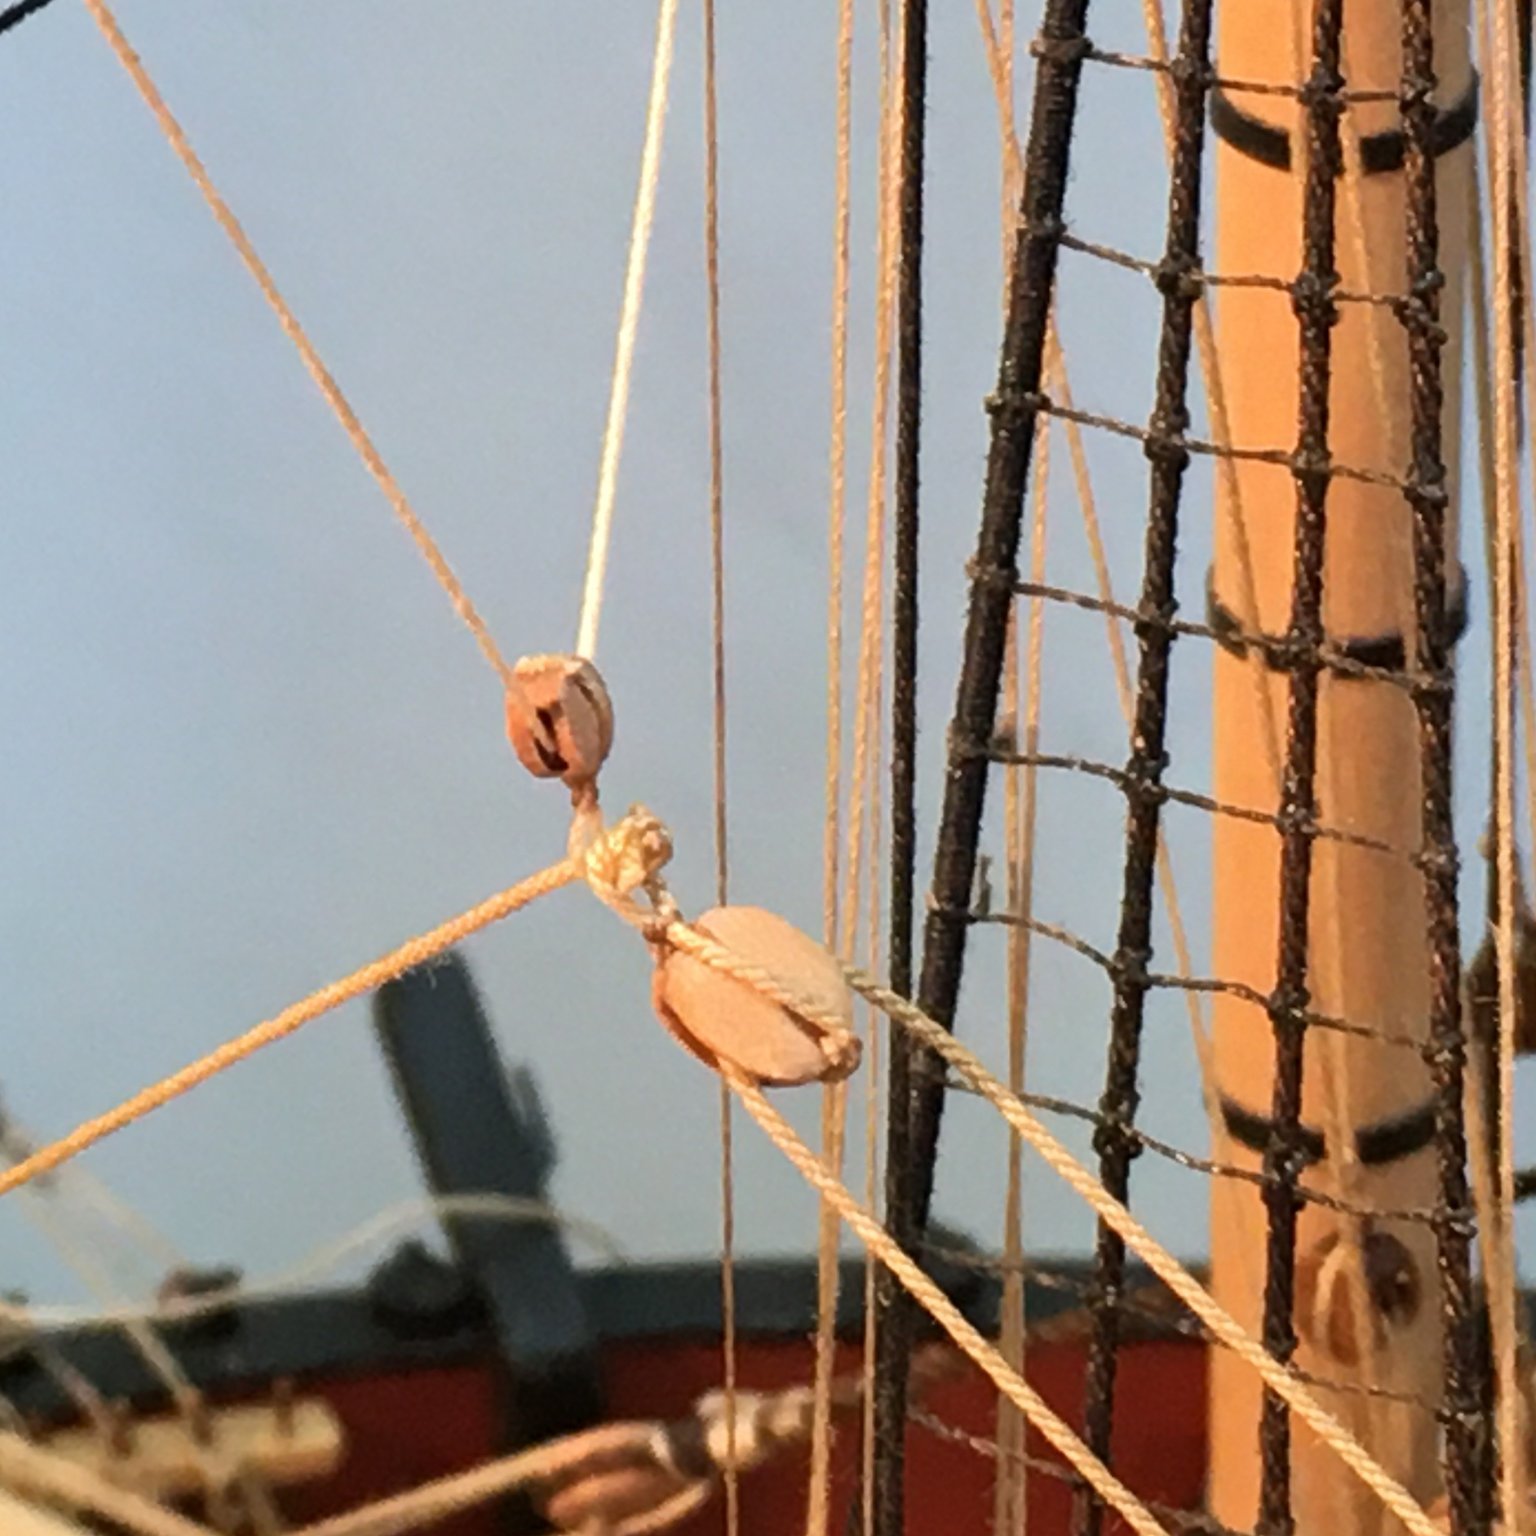
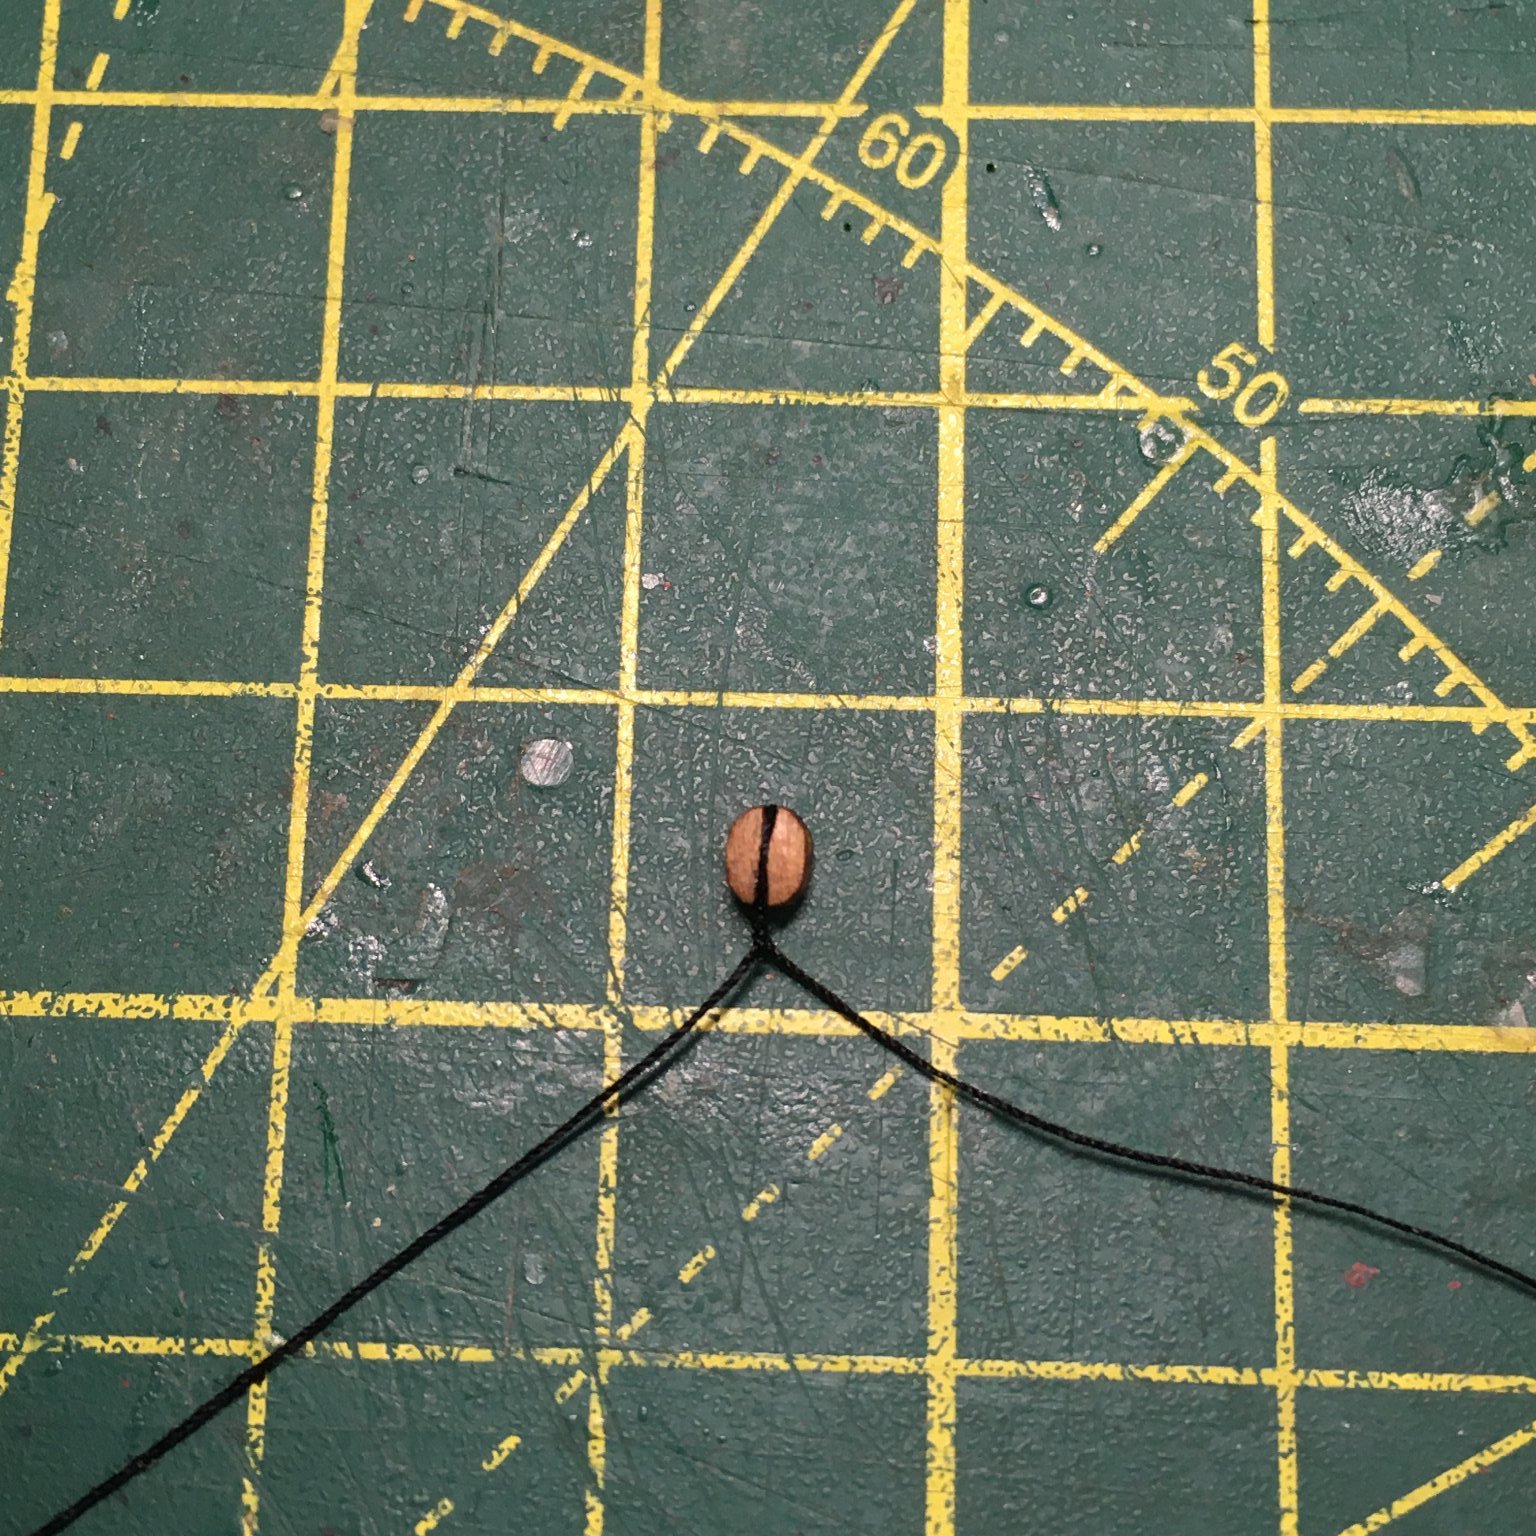
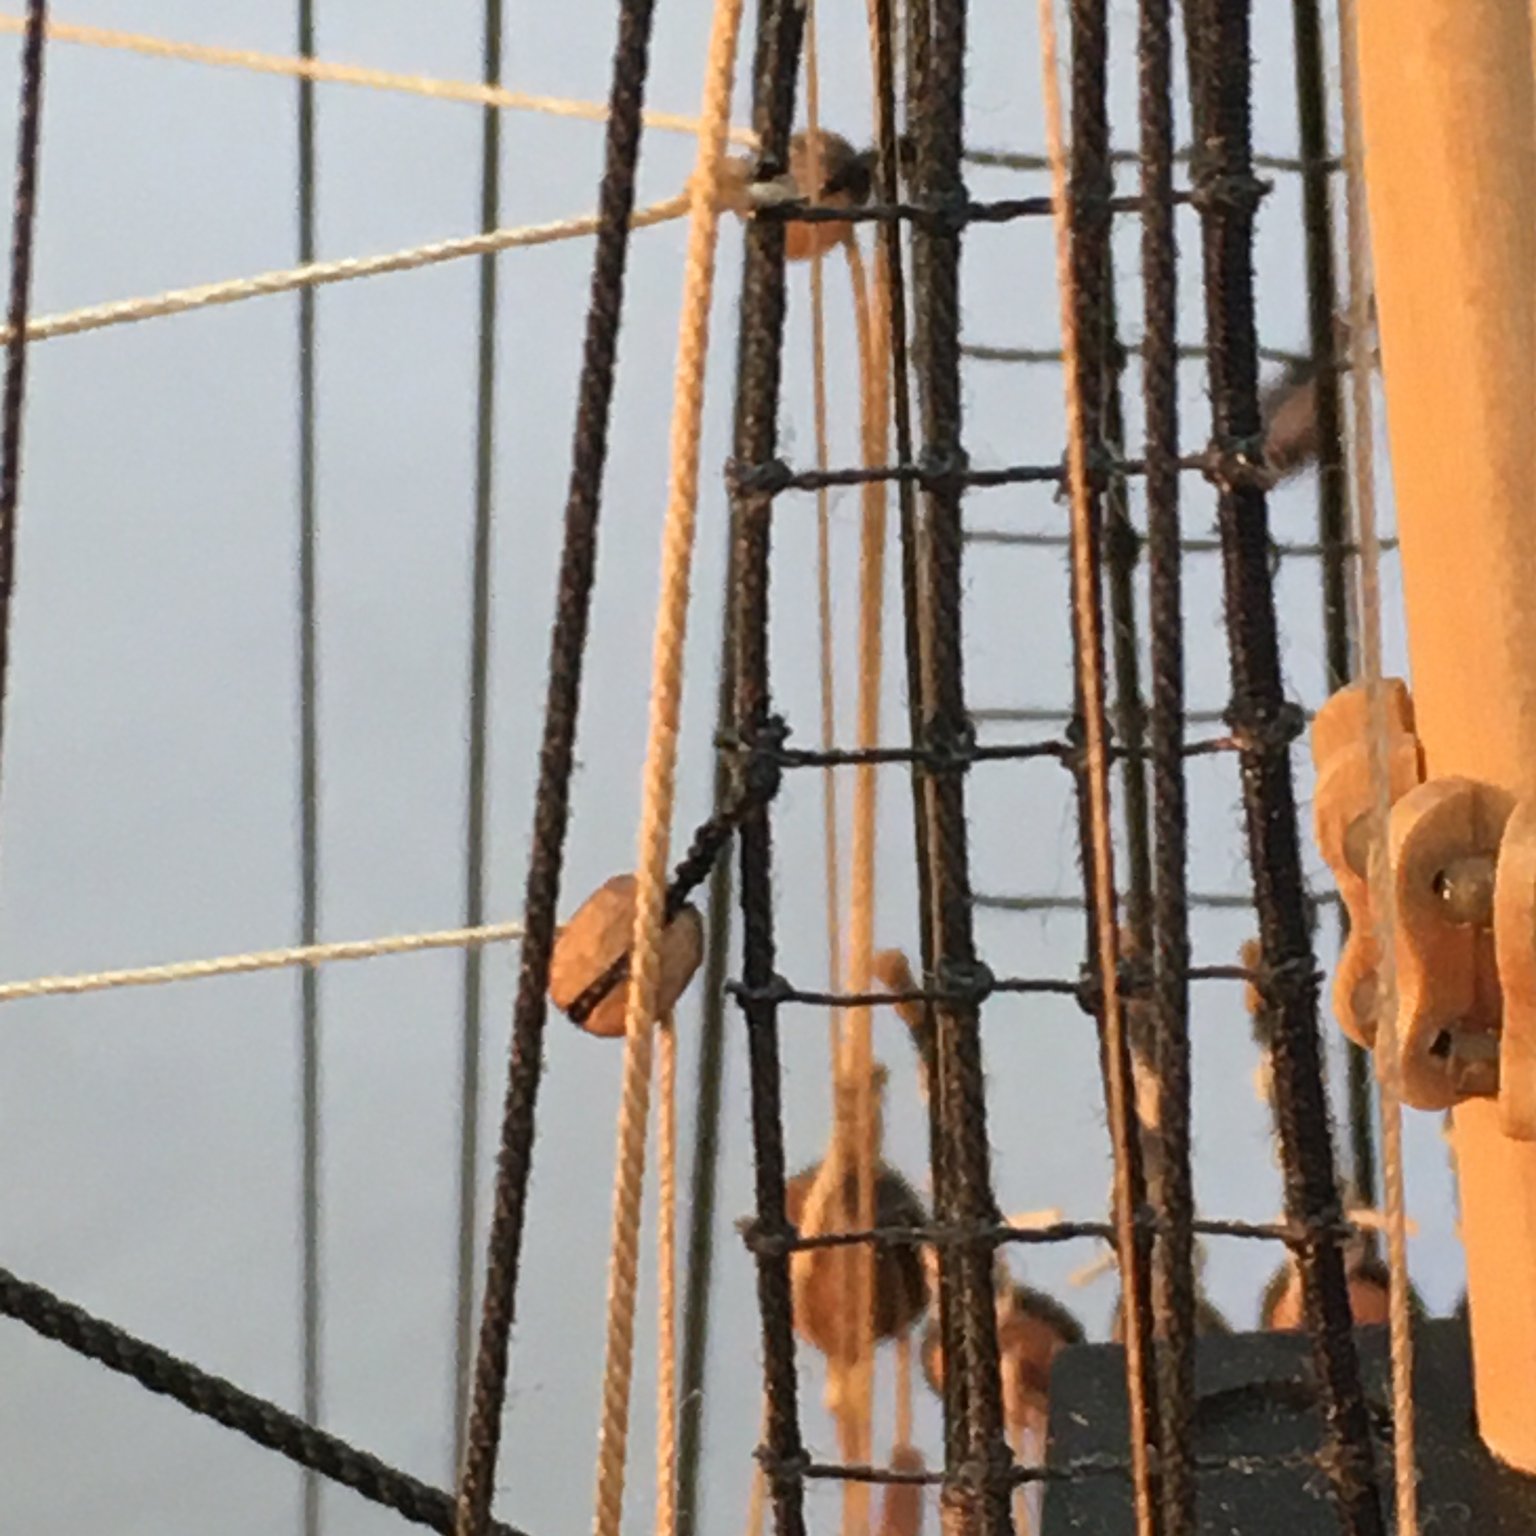
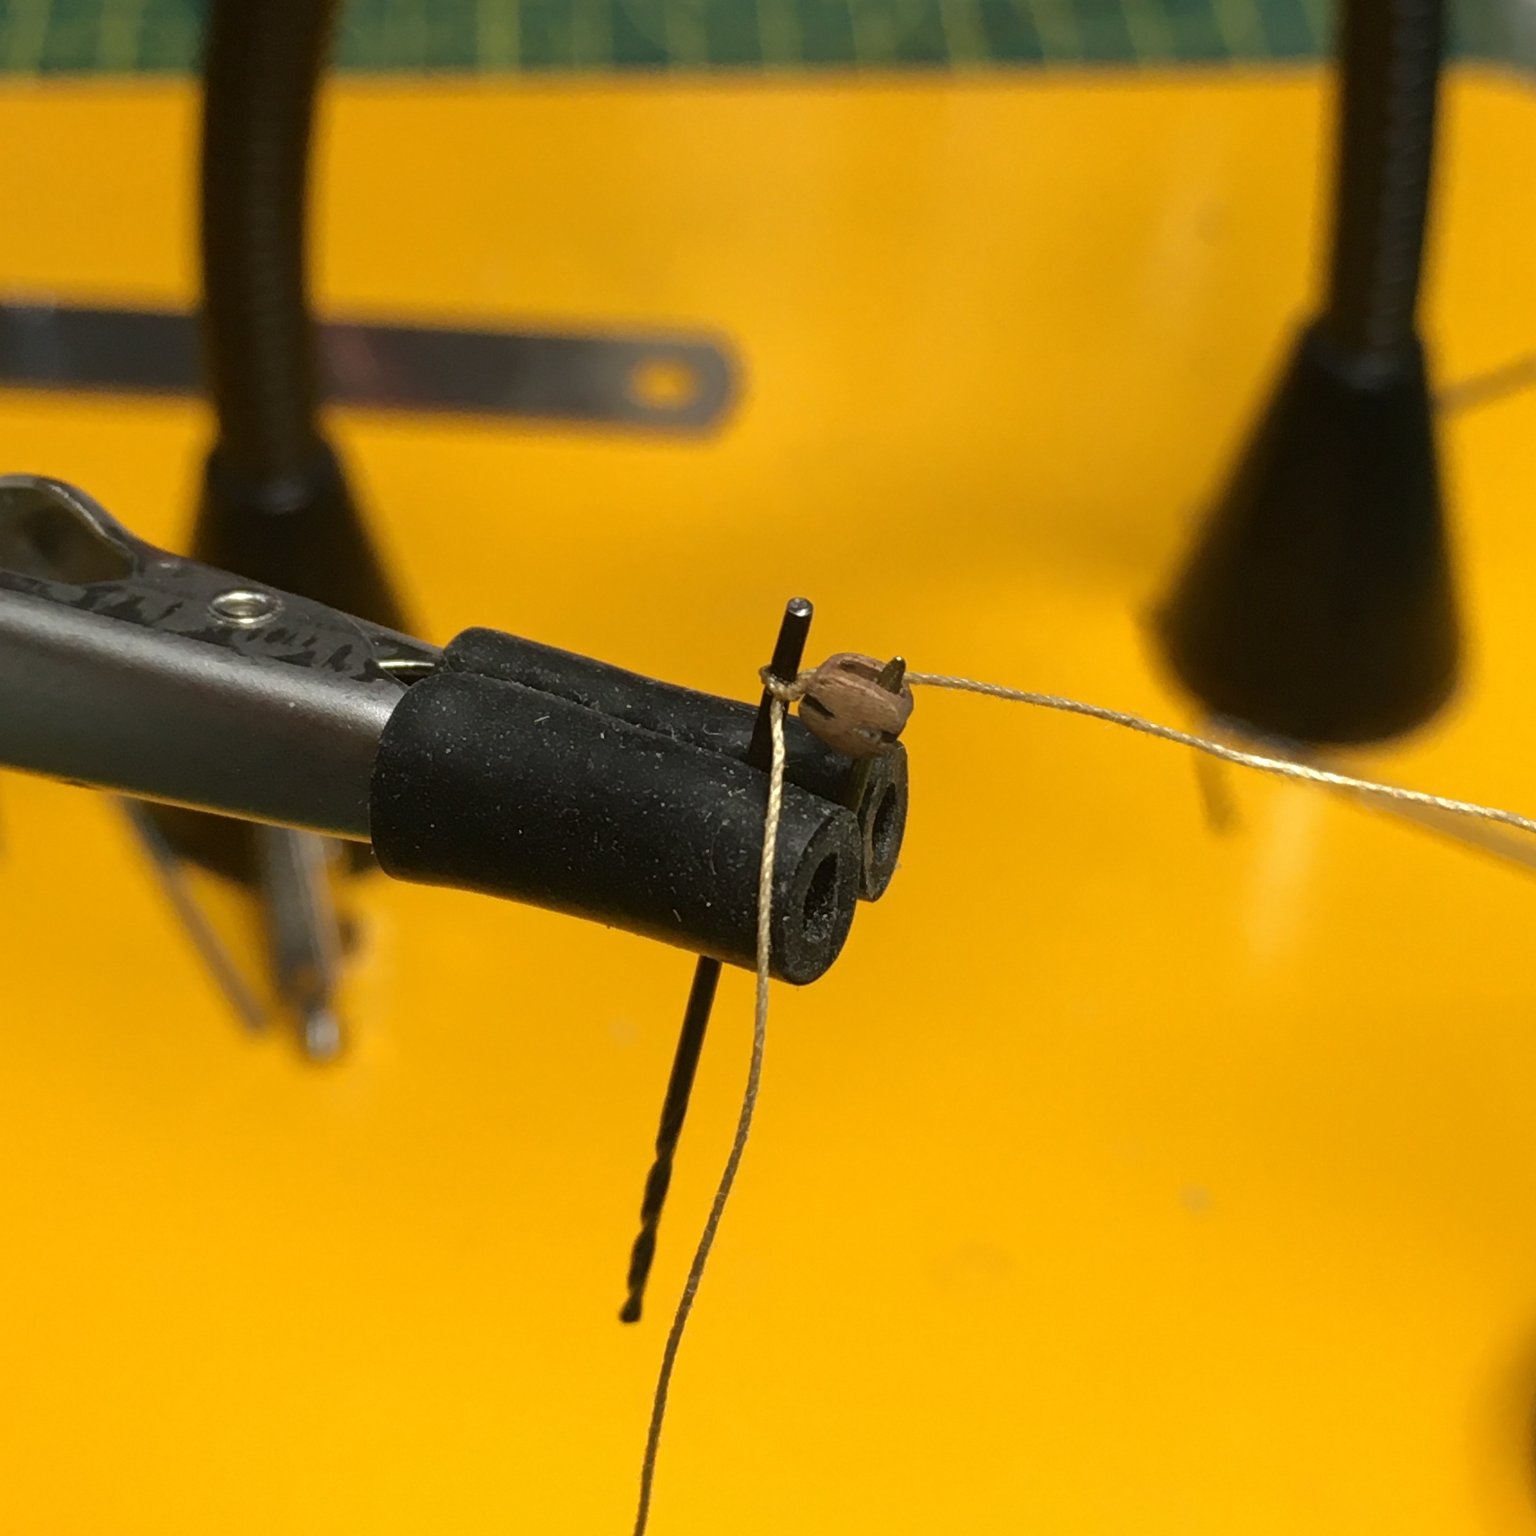
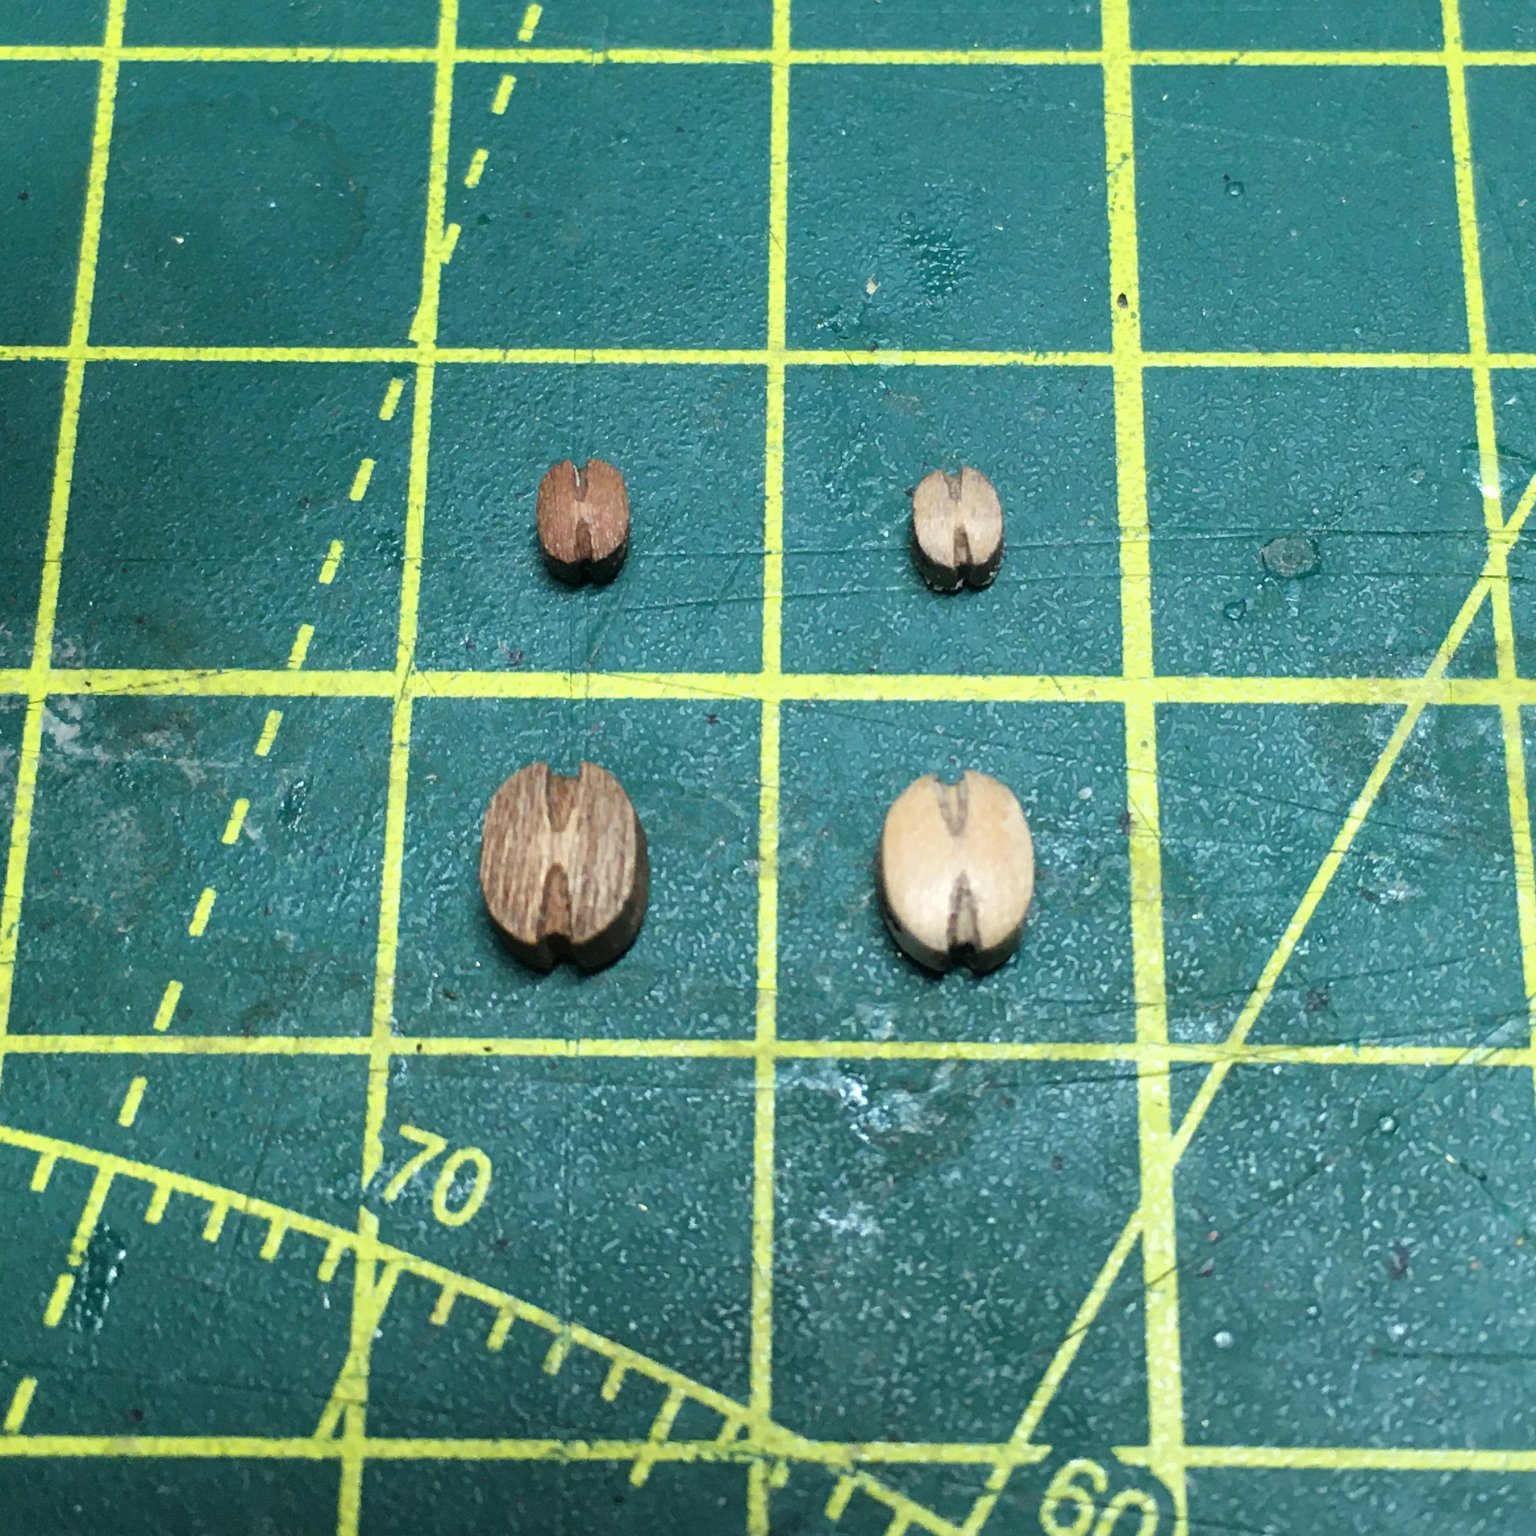
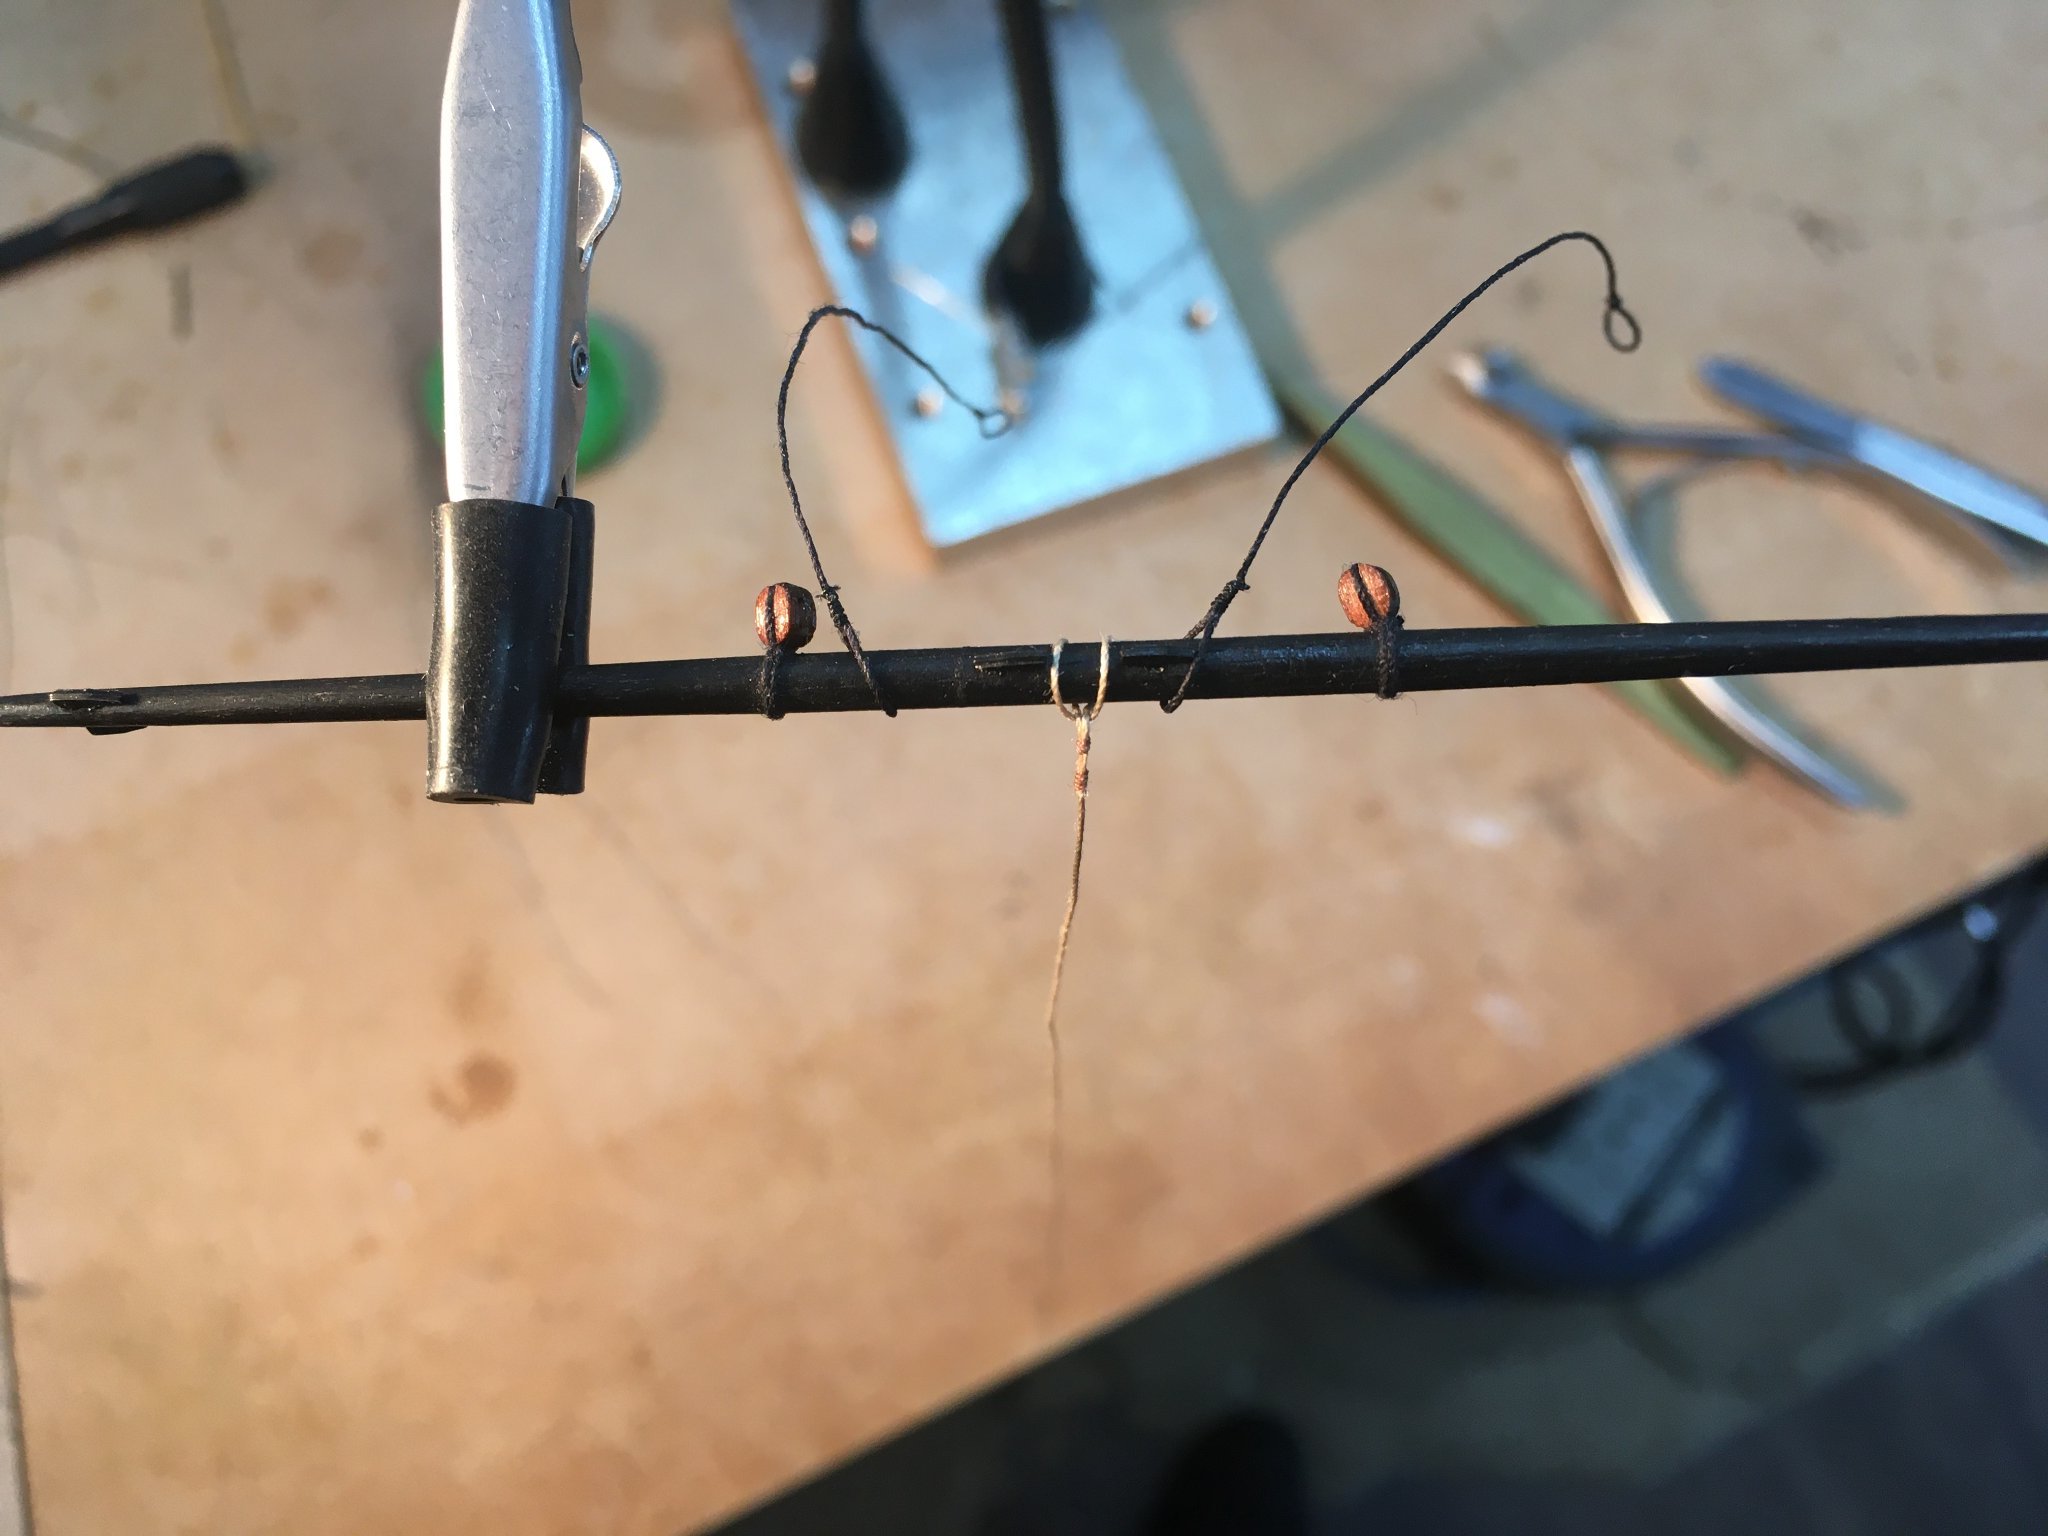
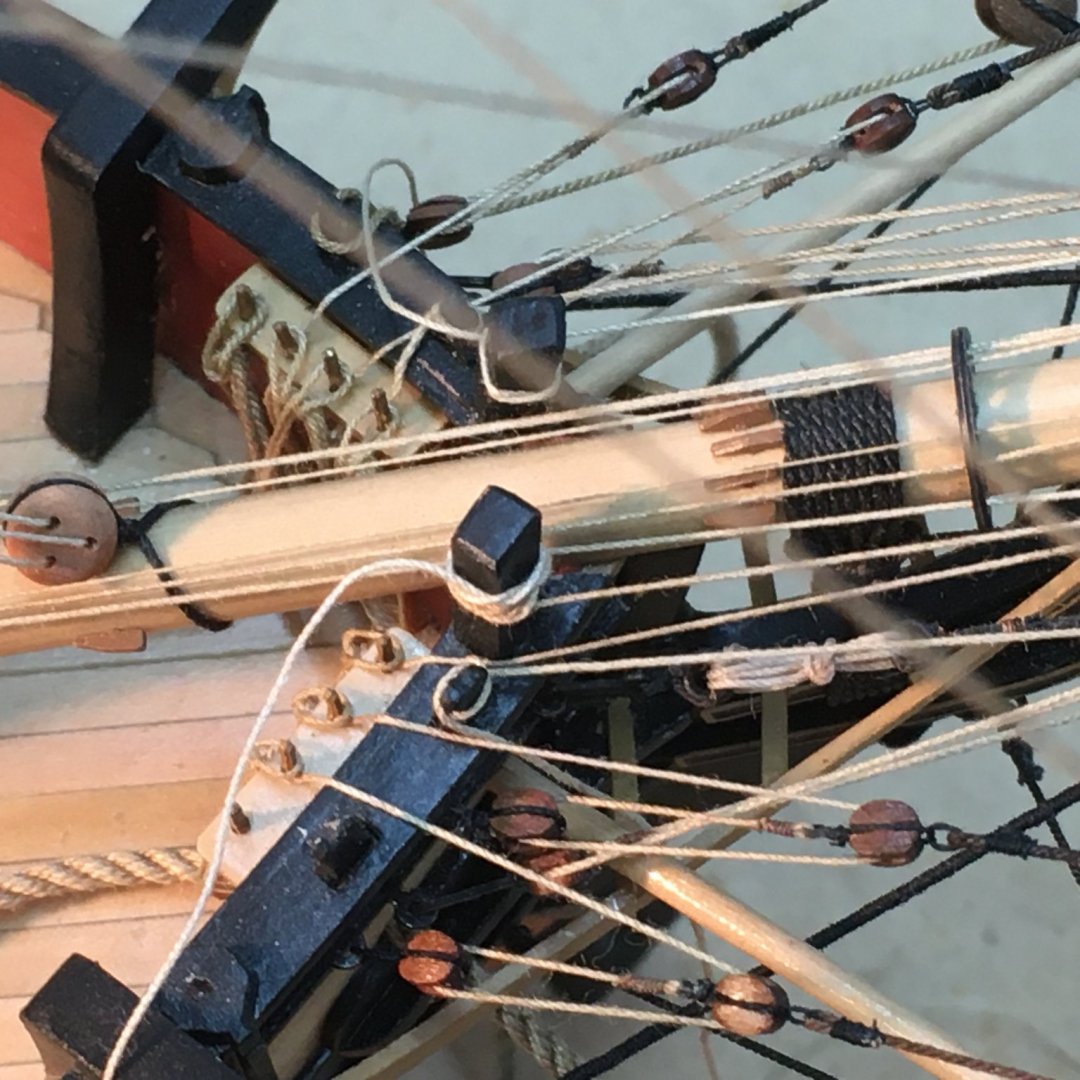
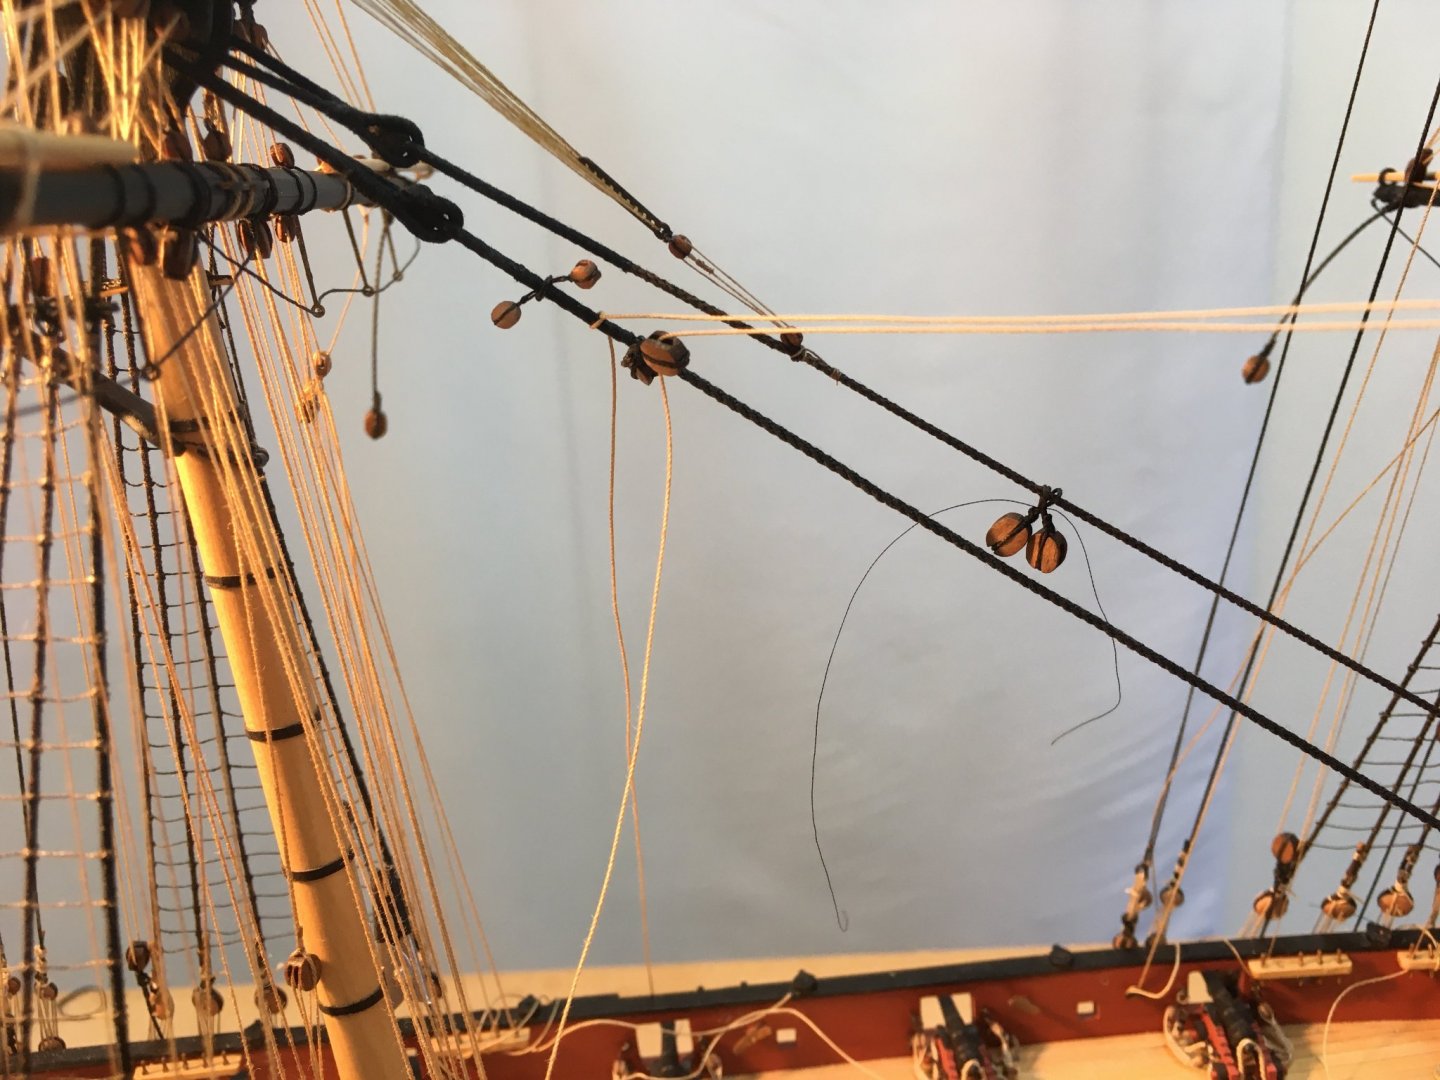
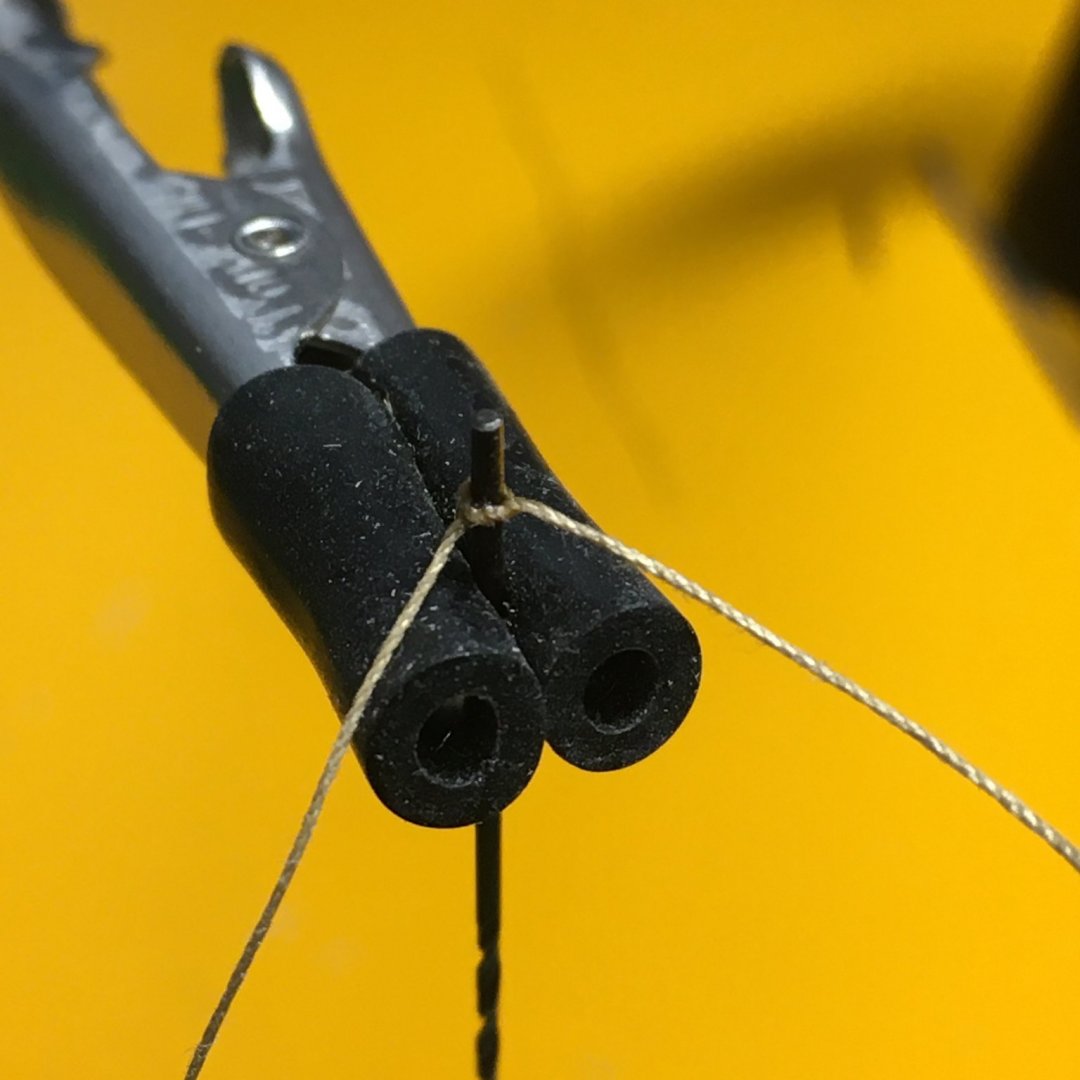
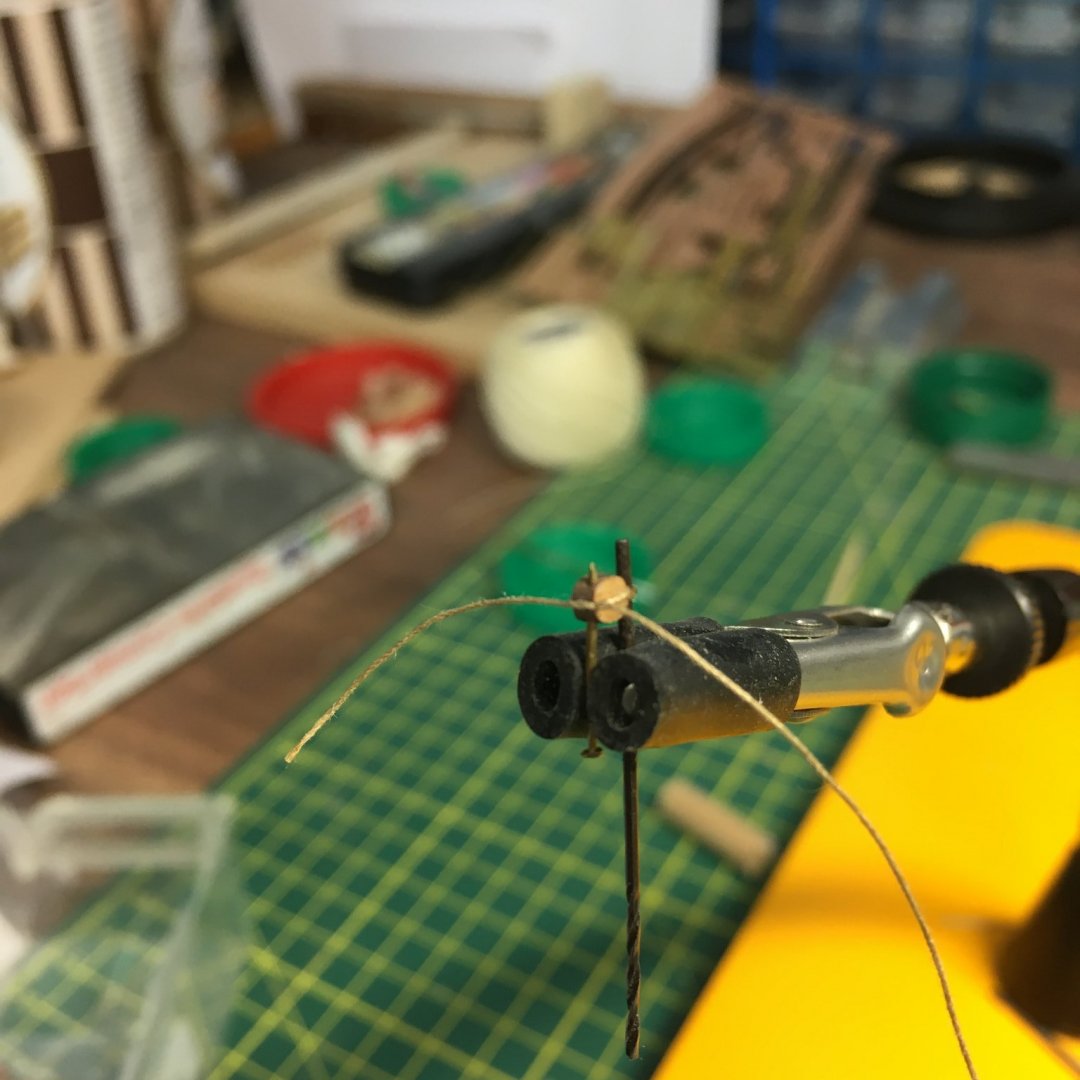
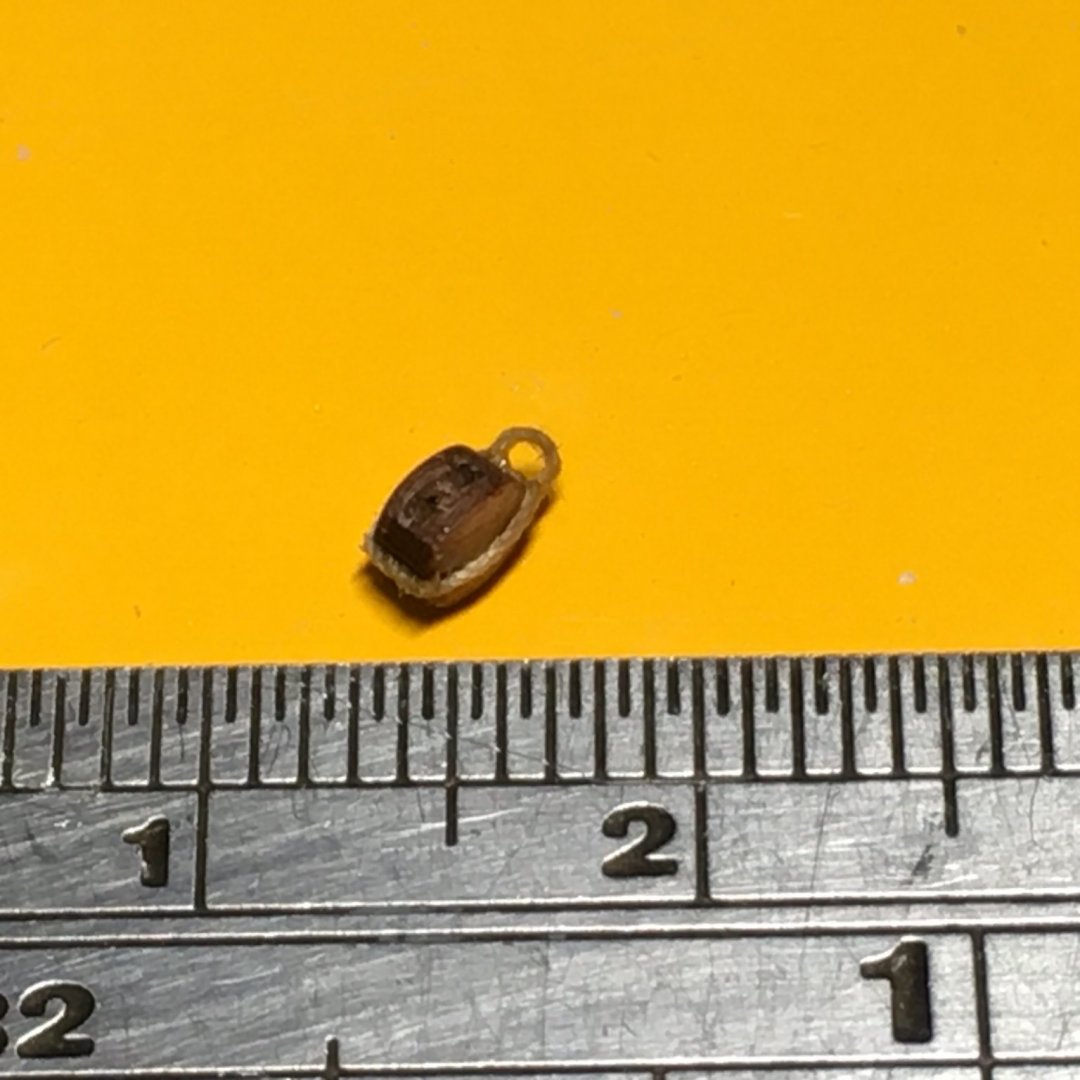
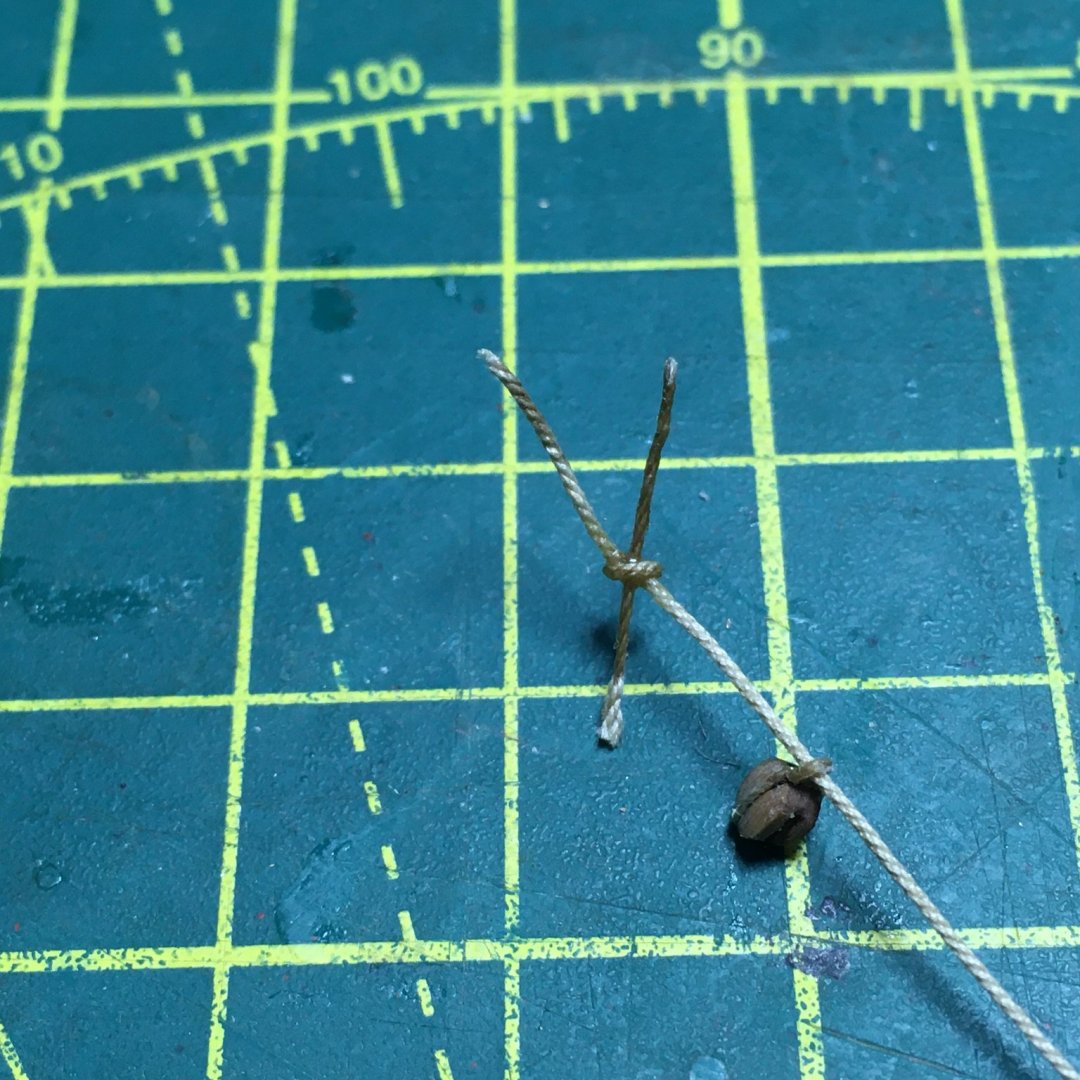
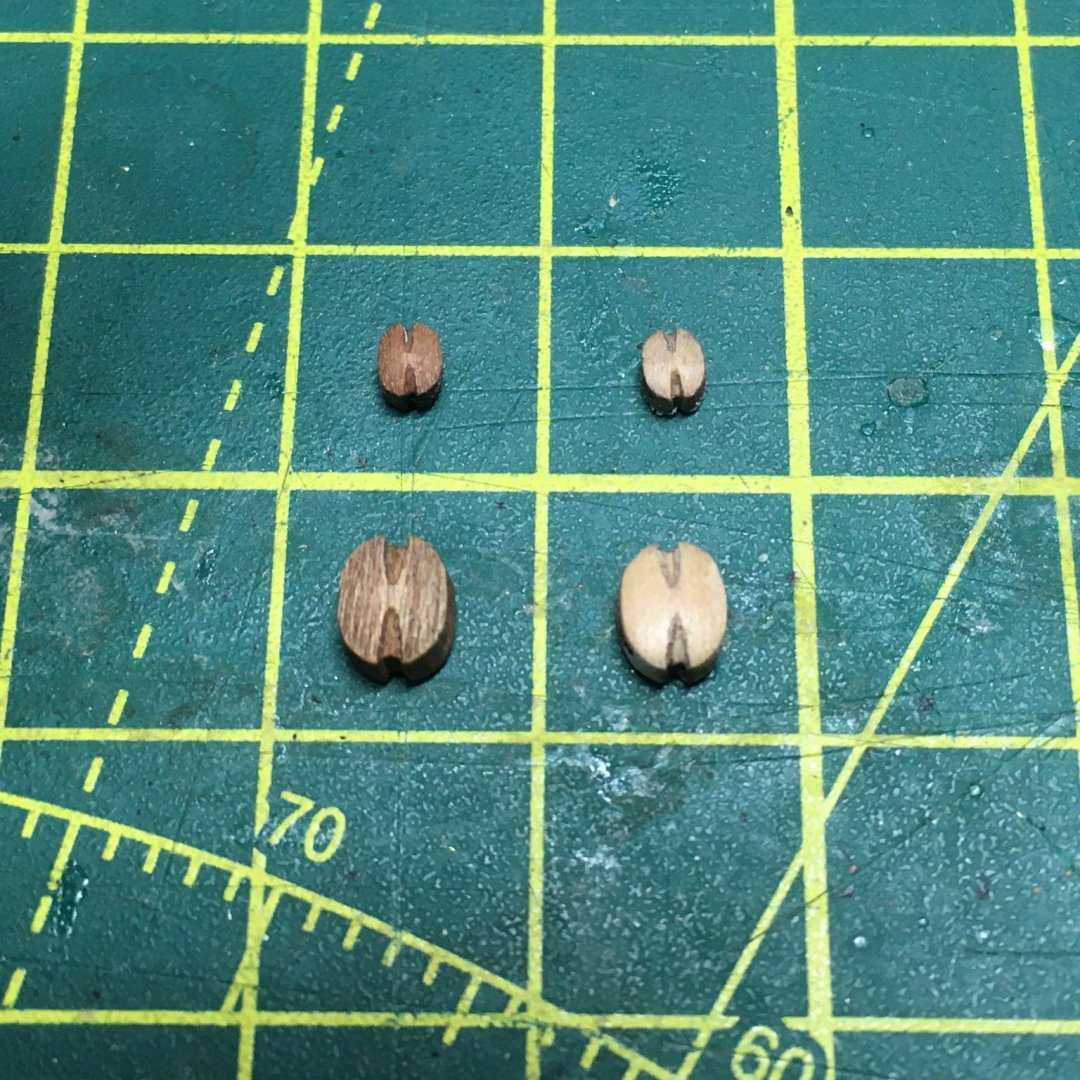
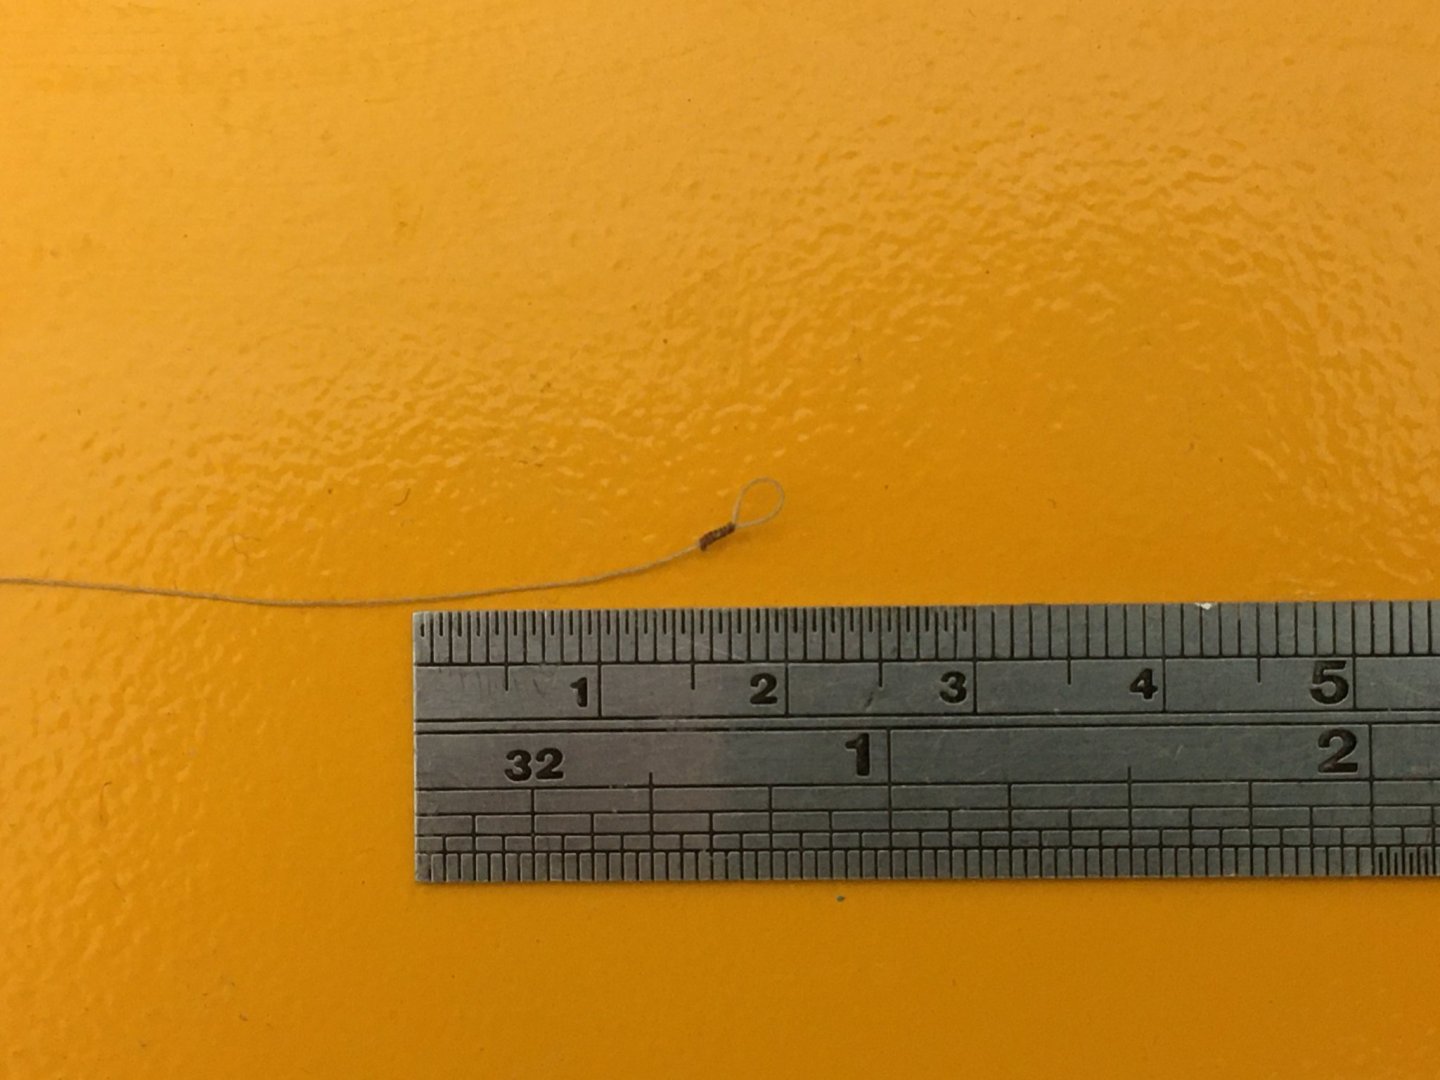
Topsail cluelines and sheets More sail handling lines that I haven't rigged before. I couldn't find a great deal of information about rigging these lines on a bare sticks model either in the forum or more generally, and what I did find agreed with the kit plans so that made life simpler. On each topsail yard the cluelines and sheets were linked with an interesting toggle arrangement which is easier to illustrate than to describe. The first job was to strop a 3mm block with a becket at one end. As I used fine 0.25mm line for the strop I felt I could get away with a slight cheat, as follows. I started by tying the line round a 0.7mm drill bit: I put a dab of CA on the loop to form the becket, having previously rubbed the drill bit against a beeswax block to prevent the line sticking. I should probably have made a little jig for the next part but I was too impatient, resorting instead to jamming a pin in the block to hold it against the drill bit whilst I completed the strop: With a simple overhand knot in at the end of the block it was a quick dab of CA followed by a trim and the stropped block was ready: A job made much easier and neater thanks to my new cuticle cutters. The idea now is that the 0.5mm sheet reeves through the becket and is prevented from pulling all the way out through a clever little toggle arrangement. I followed the kit instructions to make the toggle - basically tying the sheet round a small straight length of 0.5mm line, soaking in CA and trimming: Toggle done it was on to the clueline. I had to fasten this 0.25mm line round the topsail yard, just inboard of the first stuns'l boom support: This proved to be very awkward, being close to the mast and with masses of rigging in the way. I managed it with the help of one of the longer quadhands but, not for the first time I wished I'd attached some of these lines before I crossed the yards: Next, the clueline reeves through the 3mm block with the sheet pulled against the becket. Then each line goes it's separate way, the clueline back up to reeve through the clueline block under the topsail yard then down to belay on it's designated pin; the sheet to reeve through the sheet block at the lower yard yardarm, then back along the yard to reeve through a 5mm block under the yard then down to belay on main or foremast bitts. All as per plan: Needless to say, in bringing the cluelines and sheets down to their belaying points you are weaving through a forest of existing lines, stays and shrouds which requires some care to make sure you're not fouling something on the way. It took me several goes, especially with the cluelines, before I found a clear run to the belaying points. I'm going to finish this entry with a slight digression. I've mentioned before how pleased I was with the quality of the pearwood blocks in the kit. The other day I looked more closely at one and realised the grain was slightly raised. Just out of interest I gave it a quick wipe with a 400 grit sanding stick and I was amazed at the difference. Here's a before and after set of 3mm and 5mm blocks: I still like the unsanded blocks - they look fine on the model - but I also like the colour and sheen of the sanded ones (they almost look like boxwood) and when I start on Duchess of Kingston I may be tempted to go down that route. Thanks as always for the likes and kind comments. Derek


- 725 replies
-
- 10
-
-
- vanguard models
- speedy
- (and 1 more)
-
Thanks Allan, I appreciate your kind comments although I can't take credit for the belaying pins. They are down to Chris Watton who supplies photoetch pins in the kit. Contrary to expectations these do not look flat, especially when painted and positioned in their racks. I've tried making my own wooden belaying pins and managed reasonably well down to 1:48 scale, but any smaller and even boxwood pins are too fragile to use. Brass definitely seems the way to go. Derek
-
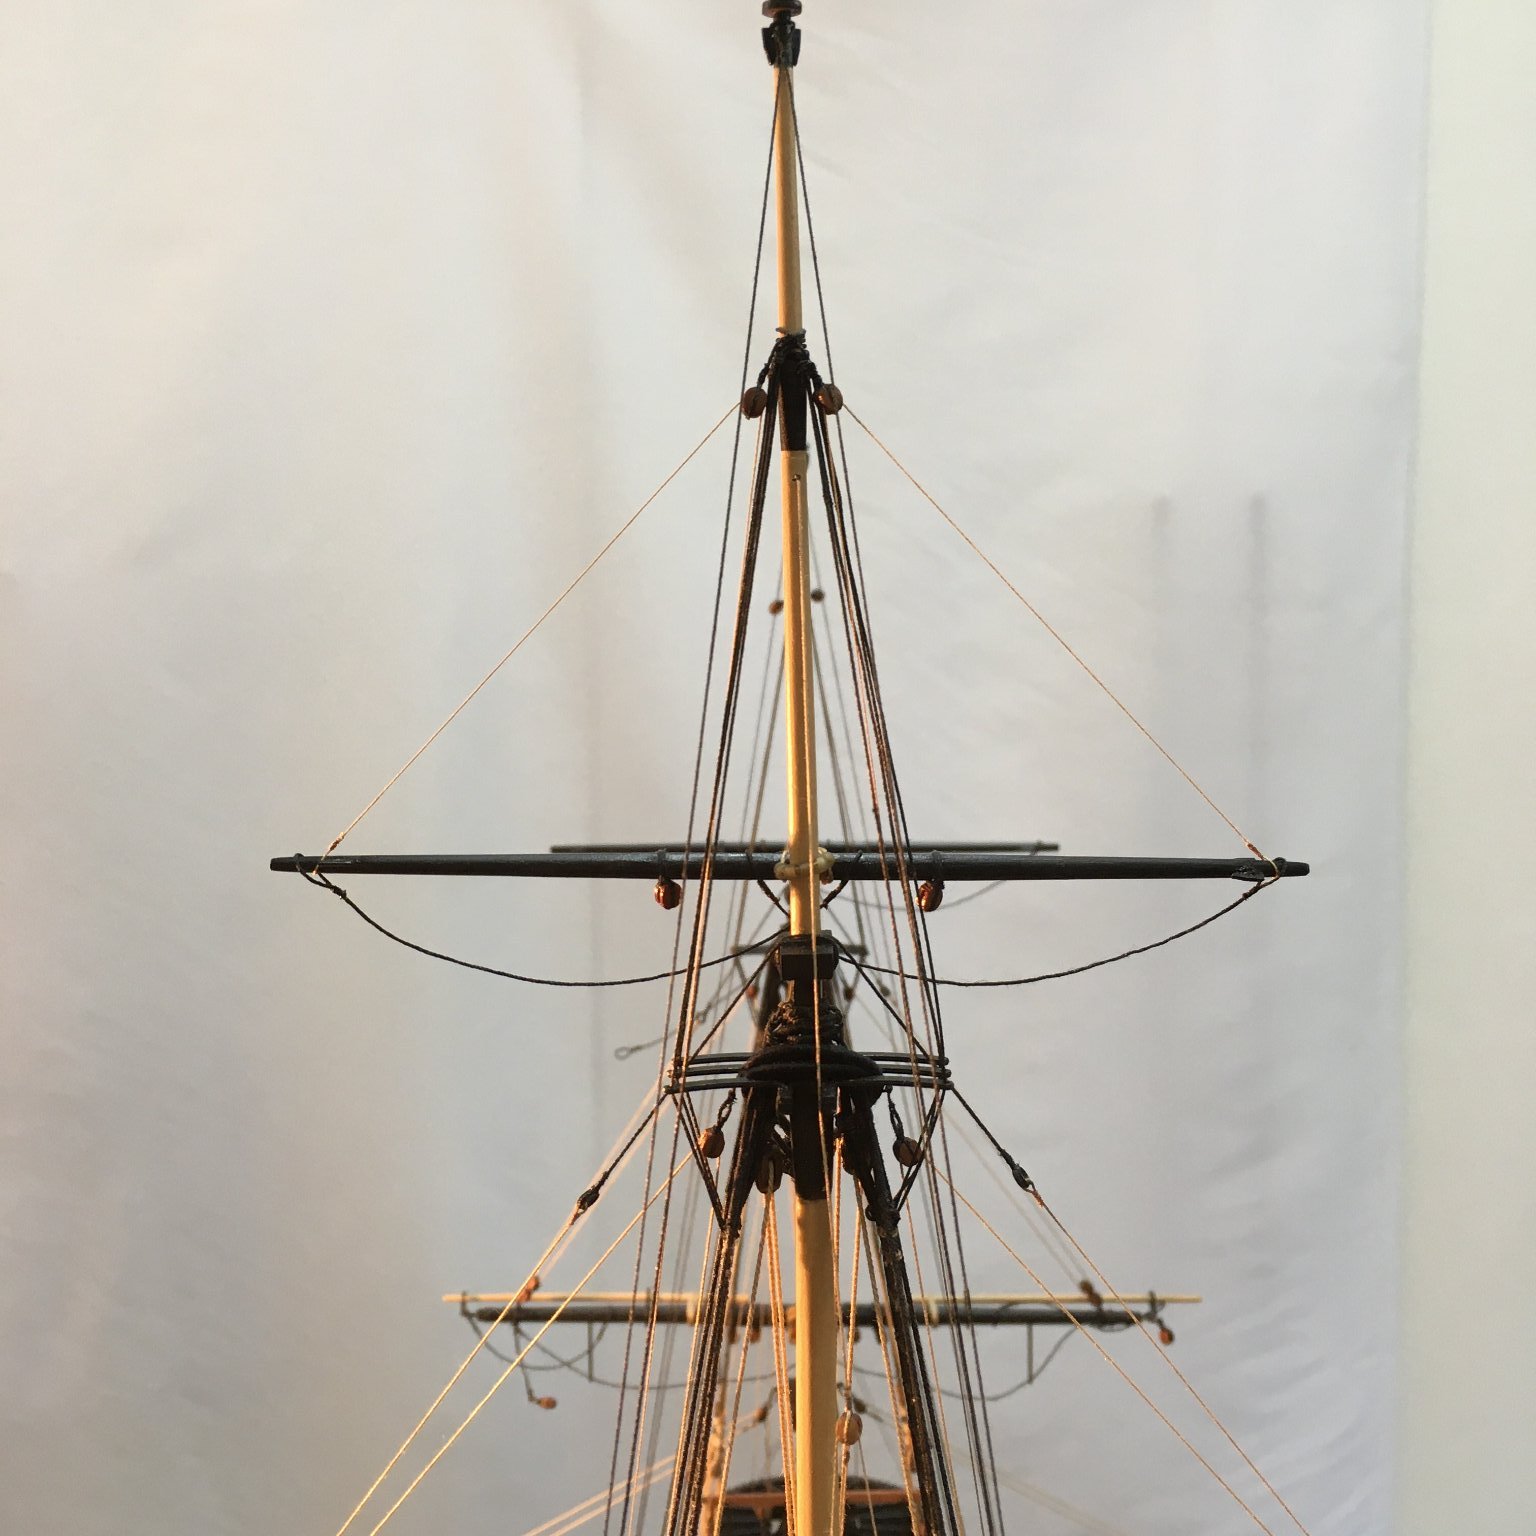
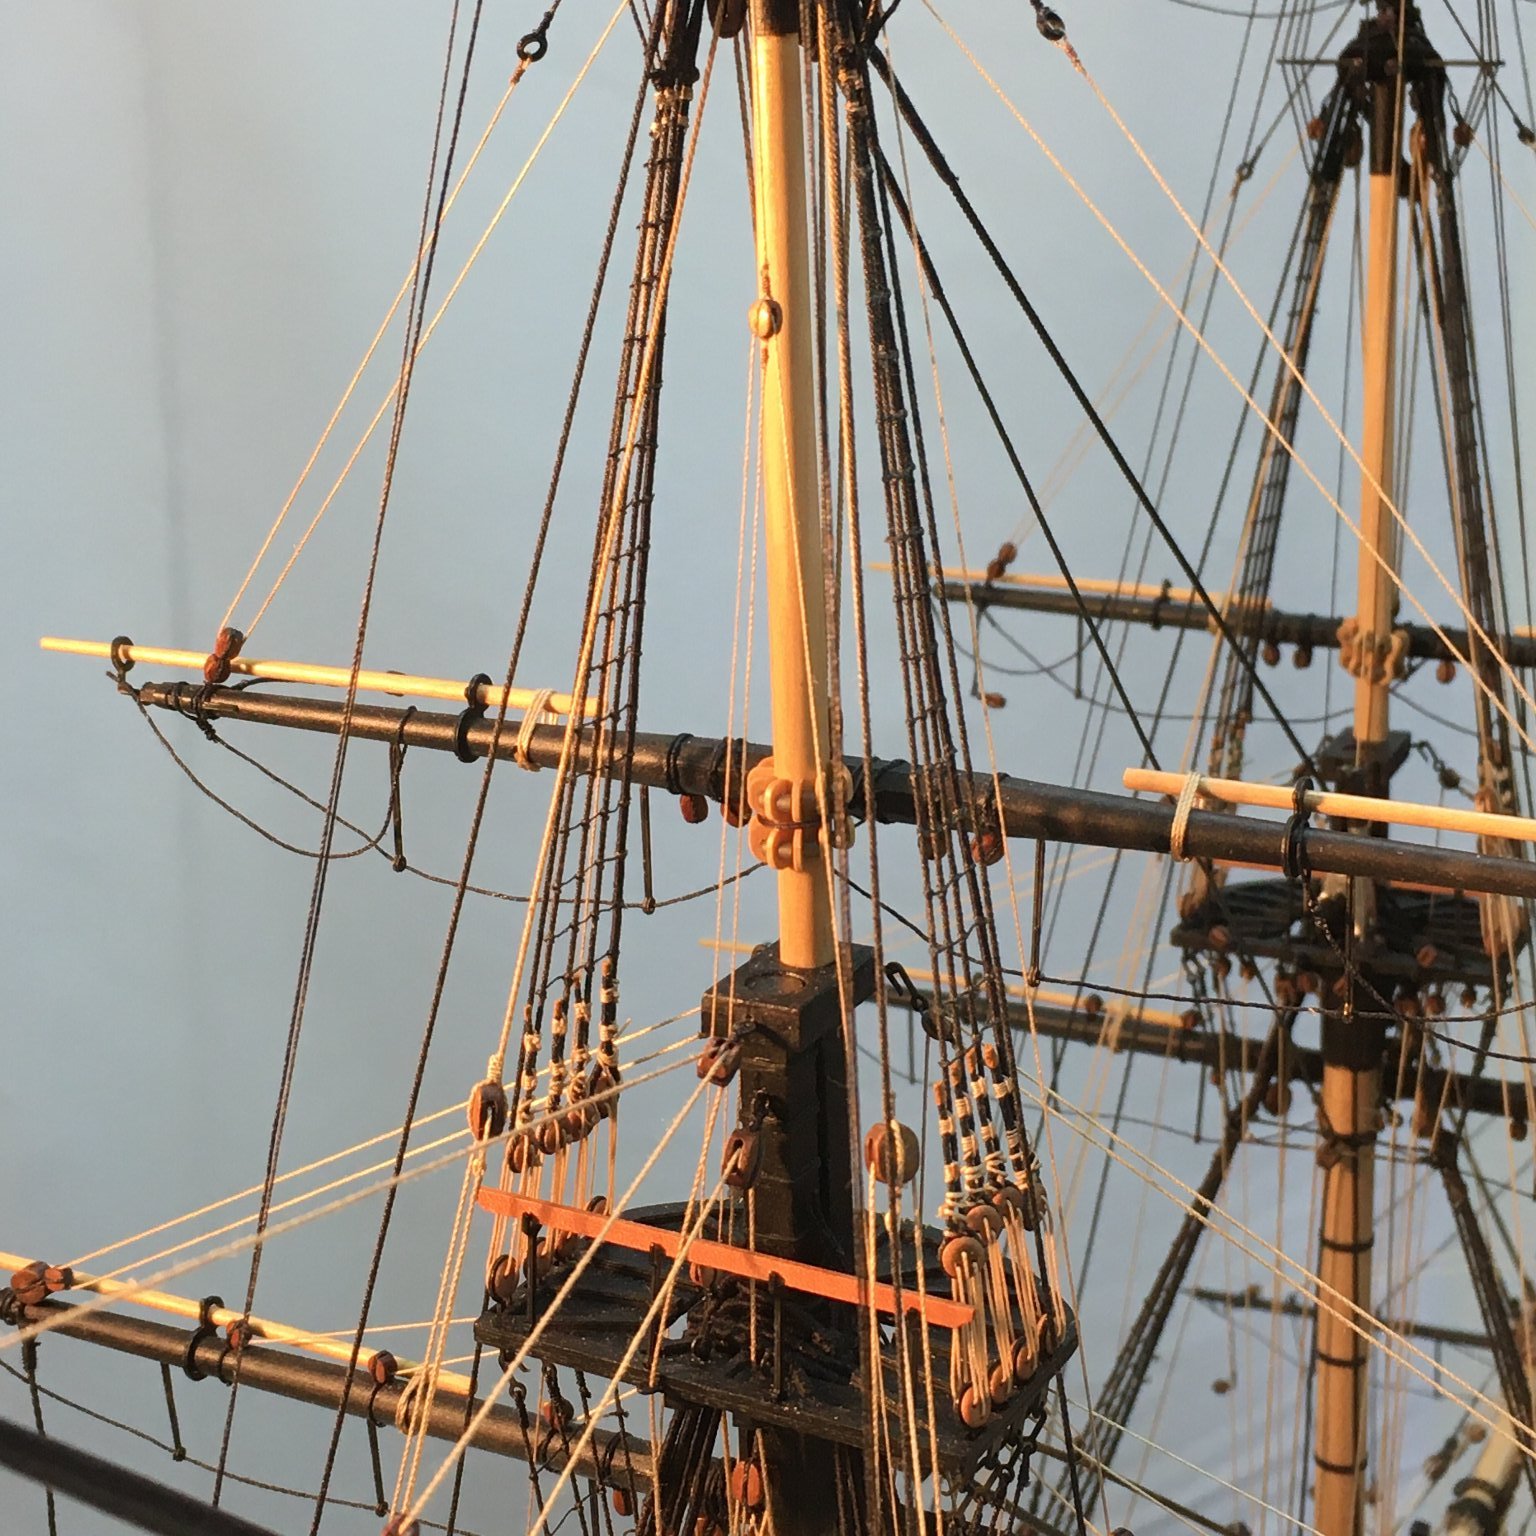
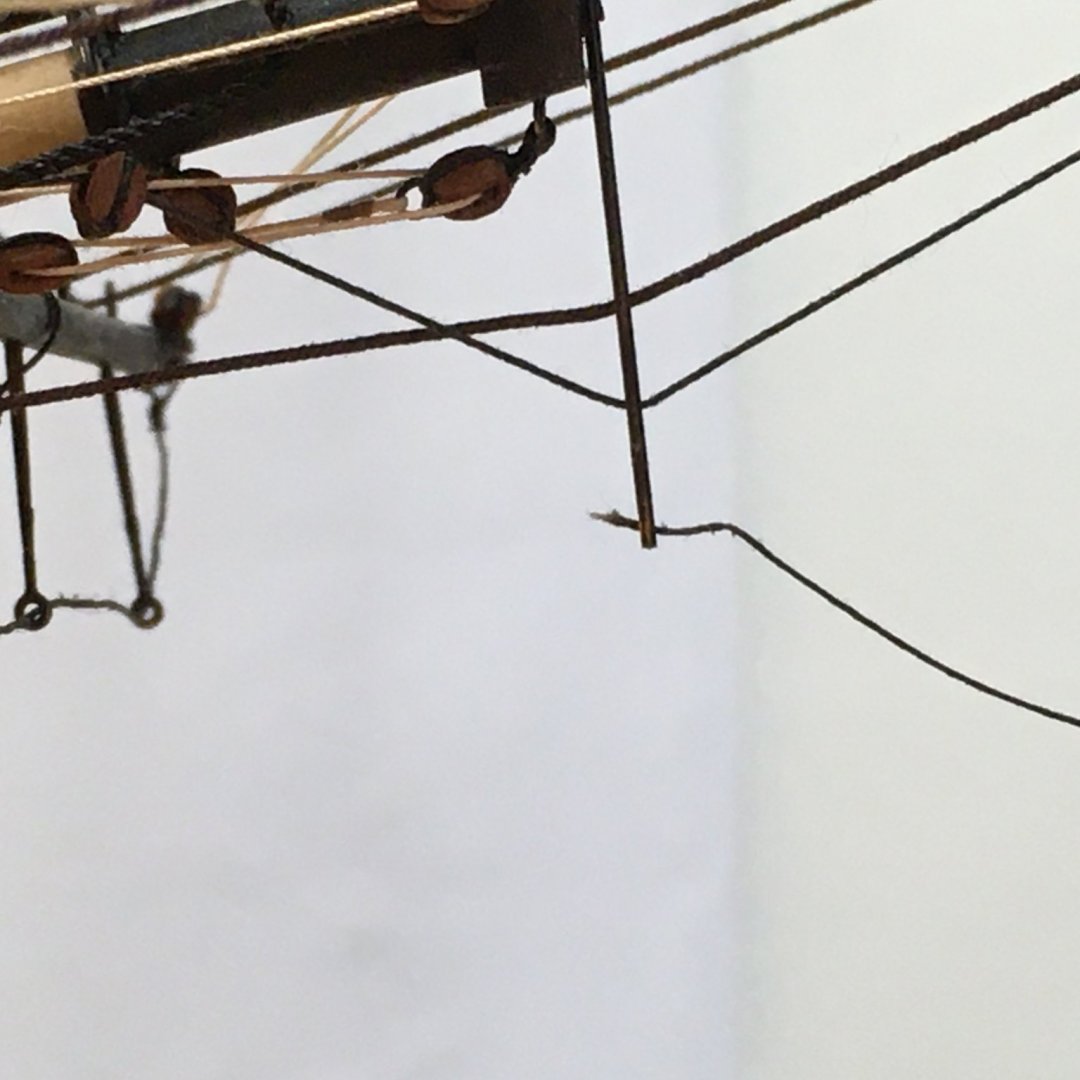
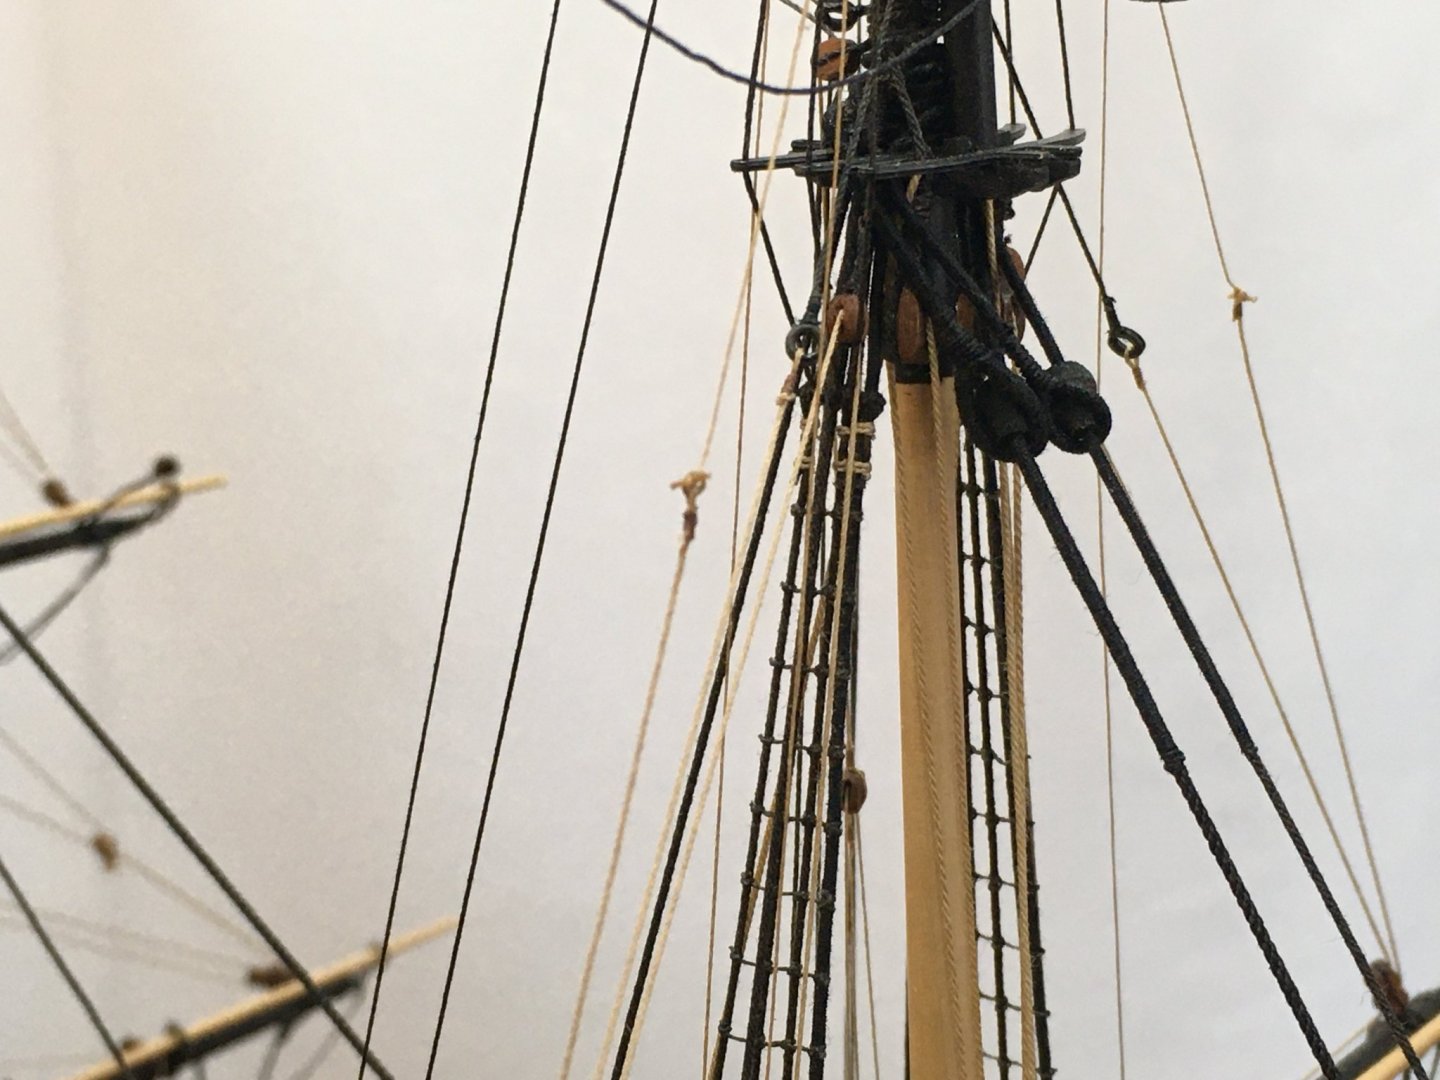
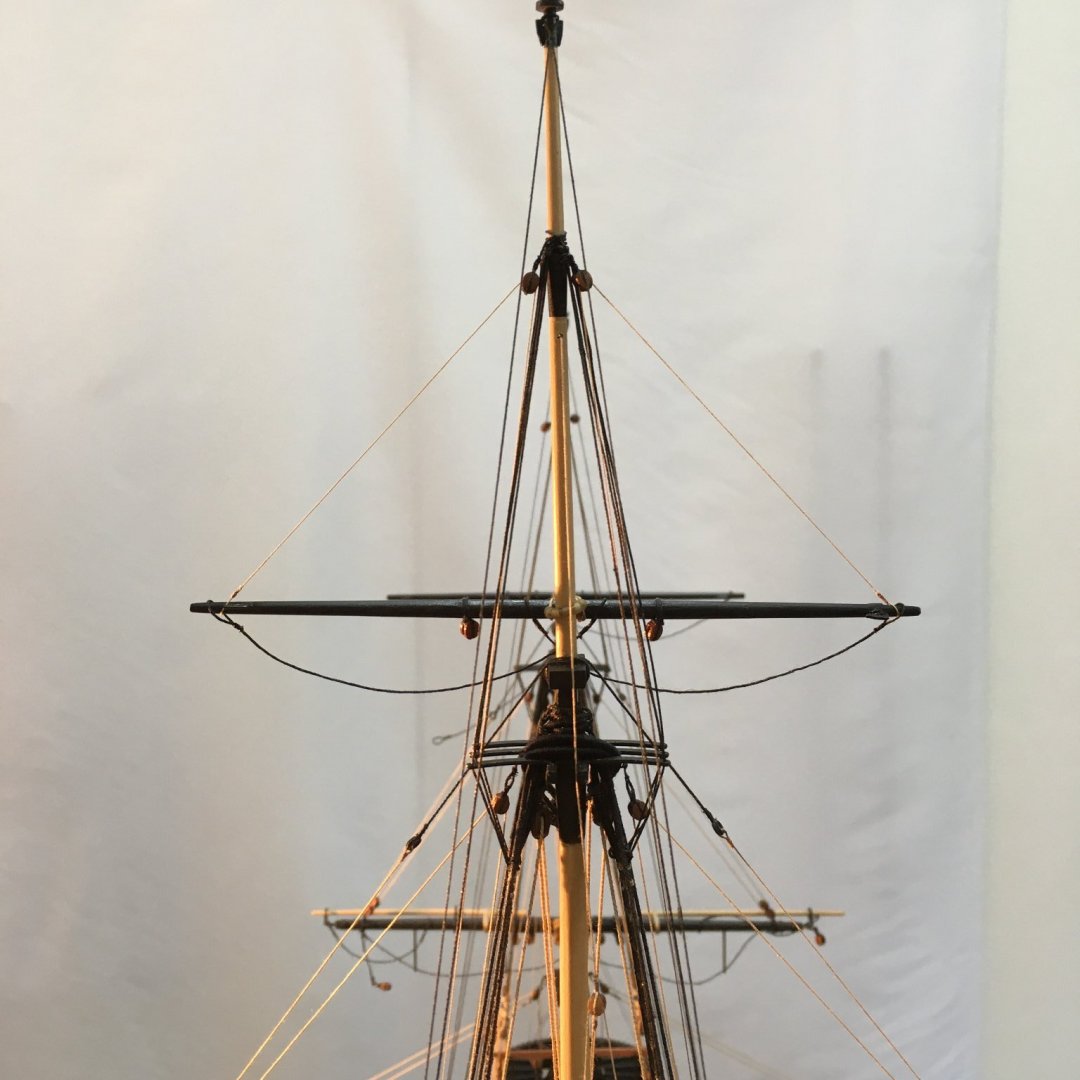
Topgallant lifts I meant to cover these earlier but got shouted for dinner! The kit instructions call for the finest rope for these lines - 0.1mm - and I feel that is exactly right. To my eye a model looks top heavy and out of proportion if the highest lines are too heavy. Equally, it means you have to use the finest thread to seize these lines - in my case my favourite 18/0 fly tying thread: The lifts themselves are quite straightforward. The loop in the previous photo slips over the topgallant yardarm, inboard of the footrope, then goes up and reeves through one of the pair of 3mm blocks clove hitched round the topgallant masthead, then down to belay next to the lower yard lifts. The next shot shows the main topgallant lifts in place: The final shot shows the three main mast lifts belayed on the starboard side. From the left they are the main, topsail and t'gallant yard lifts. Hopefully this illustrates the way the rigging gets progressively lighter as it gets higher up the masts, with 0.5mm, 0.25mm and 0.1mm lines. Next, it should be on to the various tacks, sheets and braces, but I think I should start making and fitting lots of rope coils whilst I've still got room to fit them! Derek

- 725 replies
-
- 7
-
-
- vanguard models
- speedy
- (and 1 more)
-
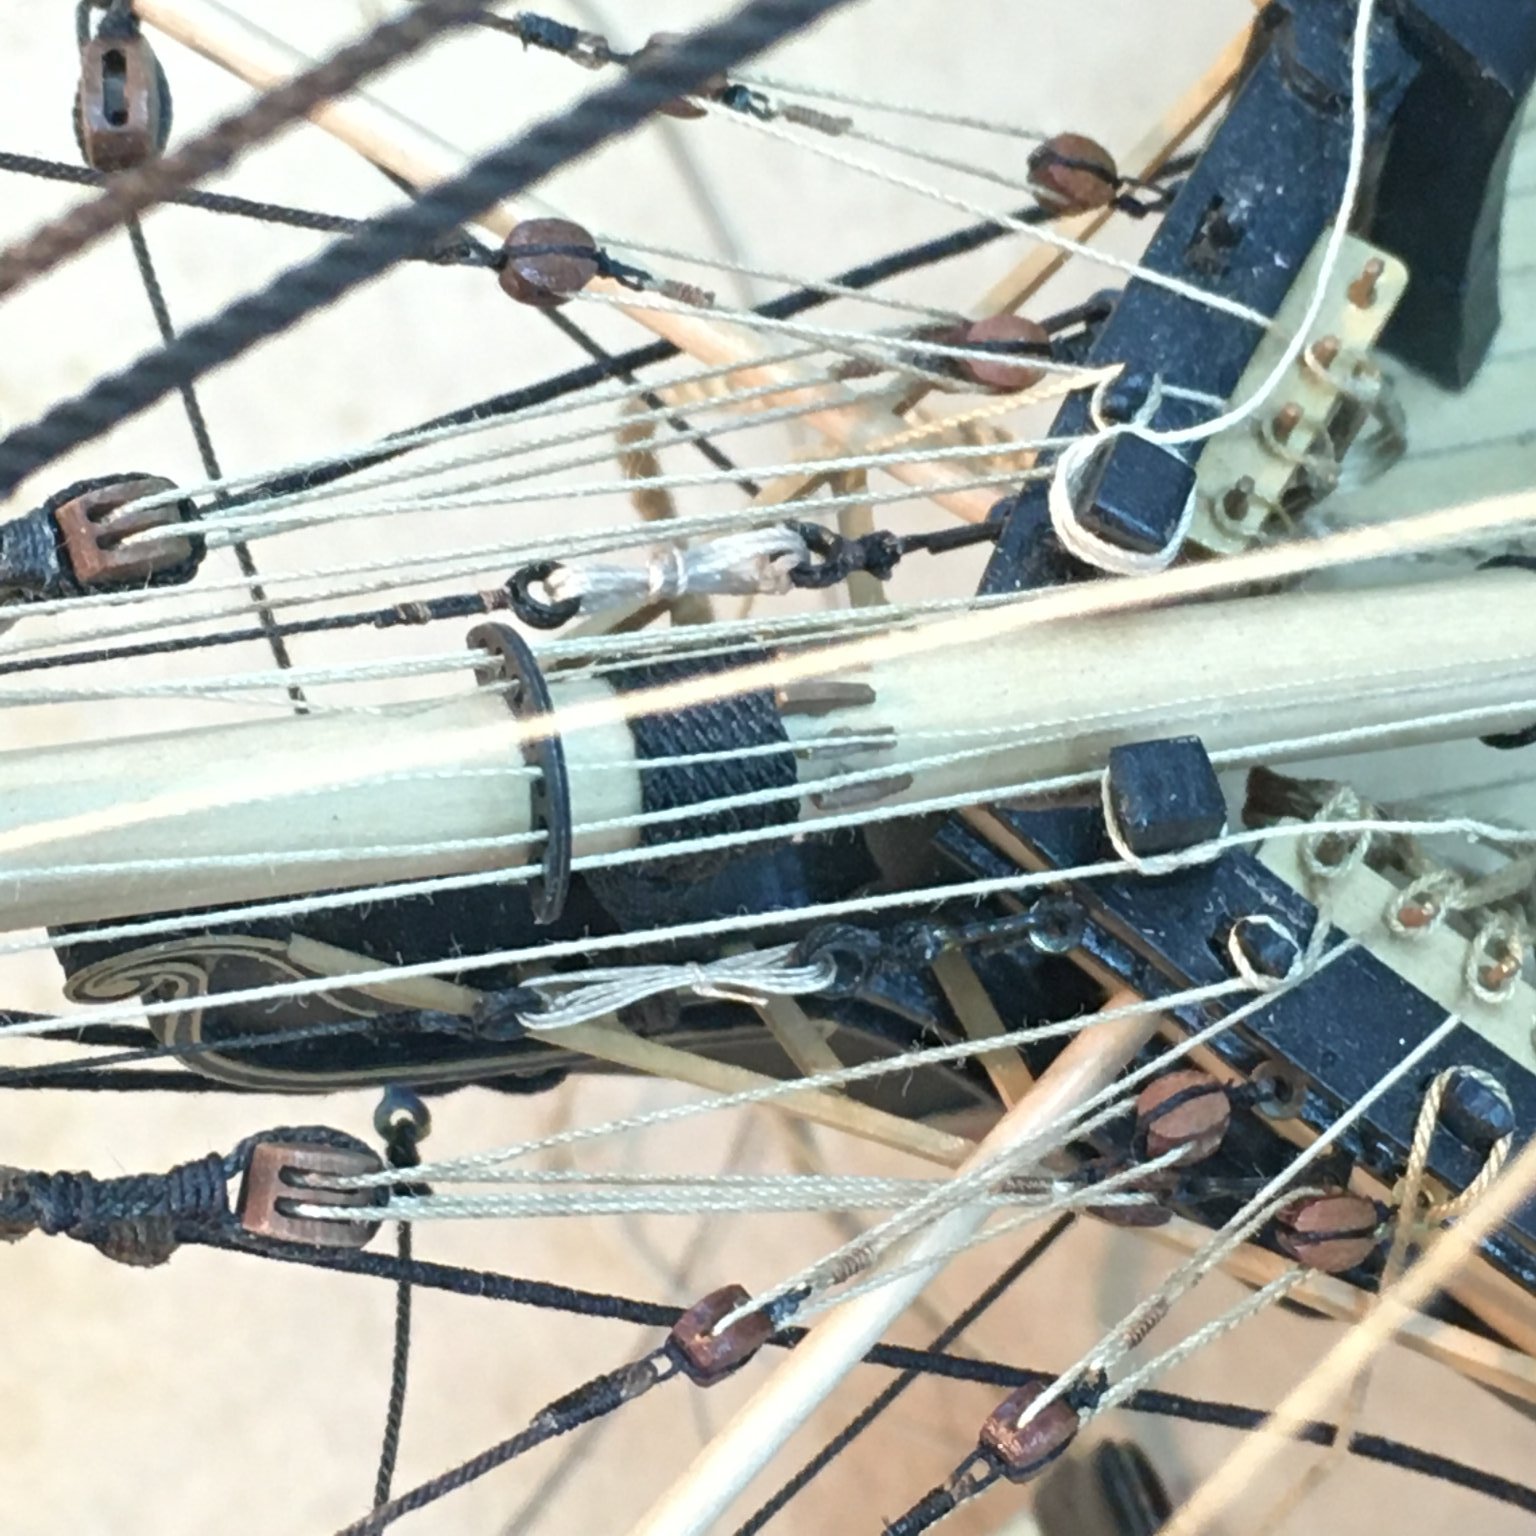
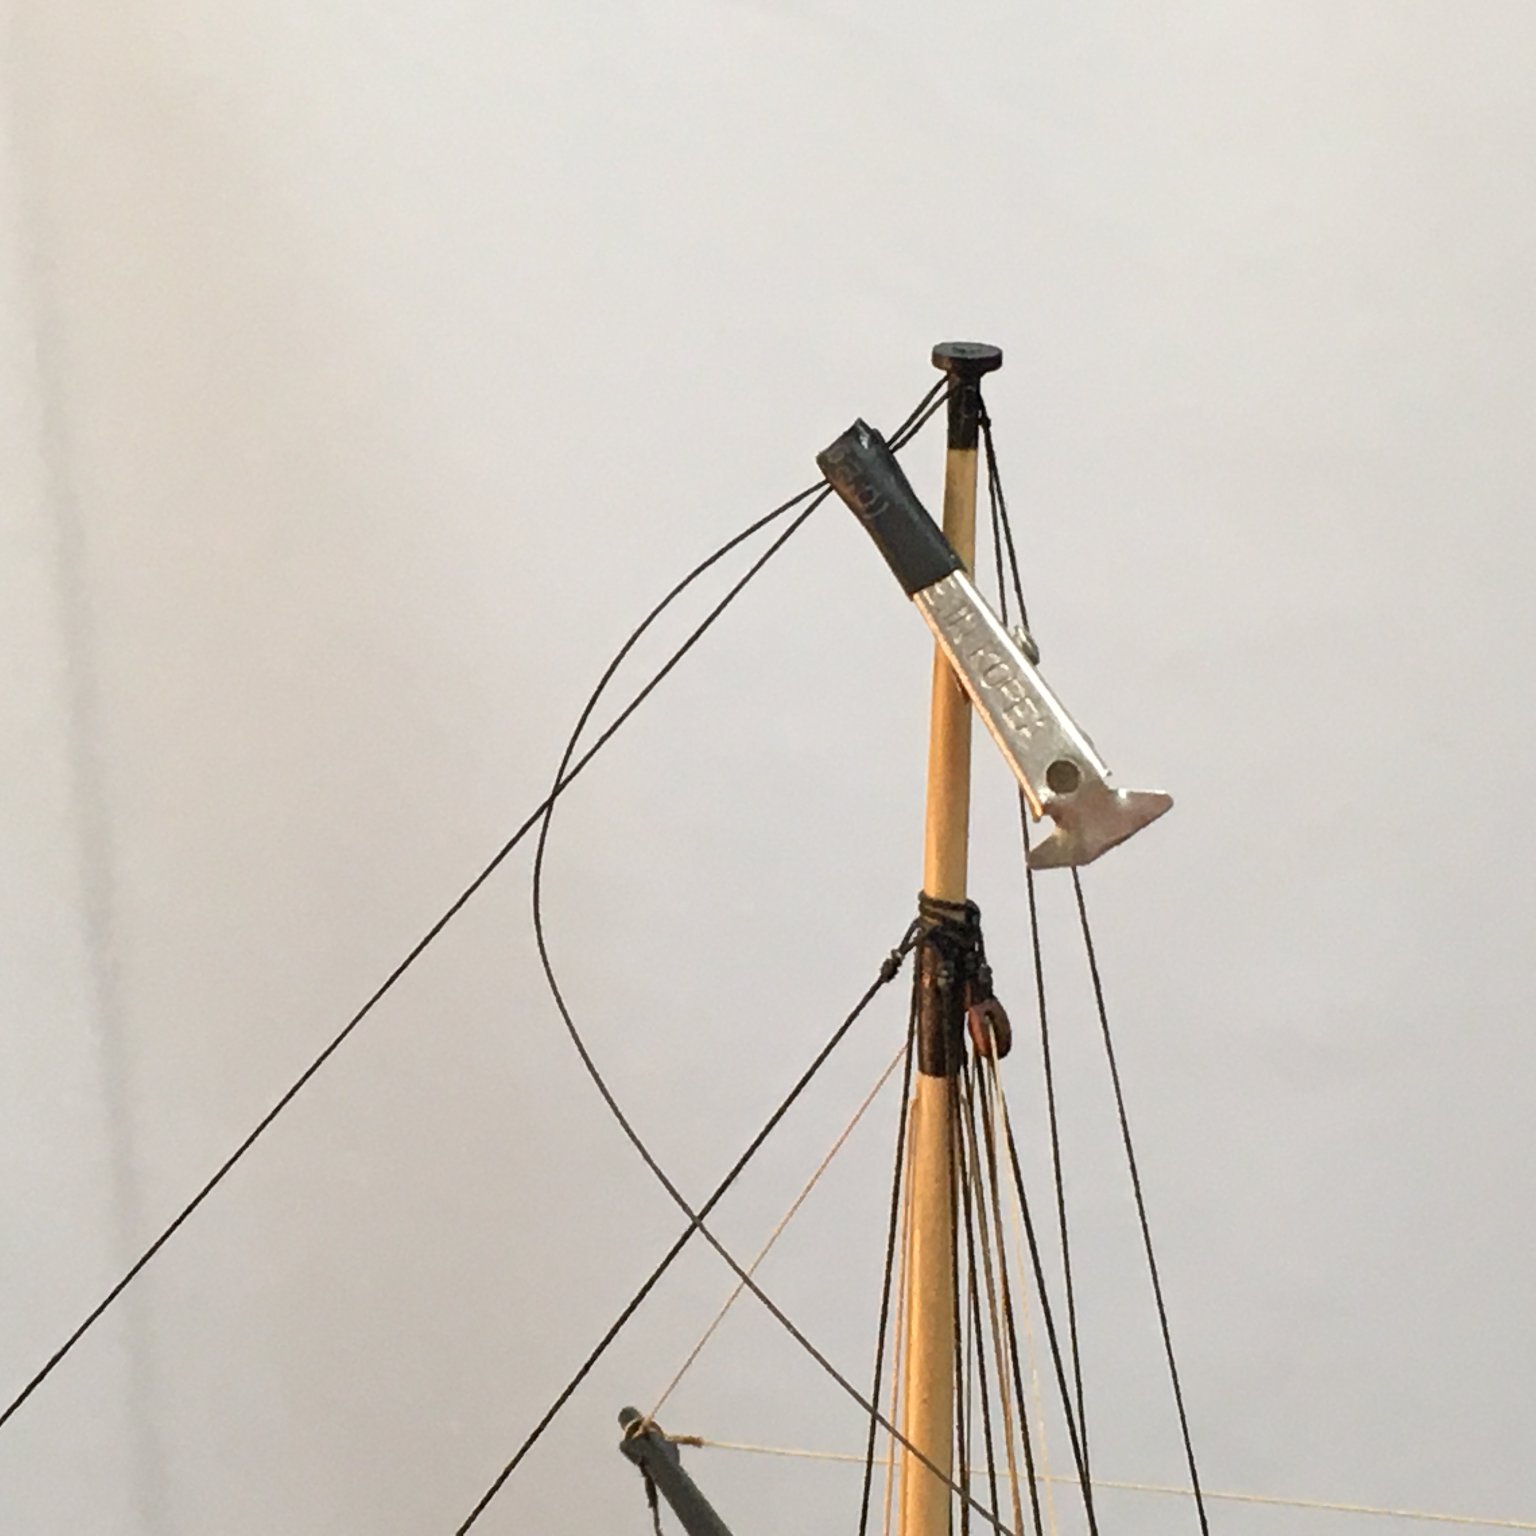
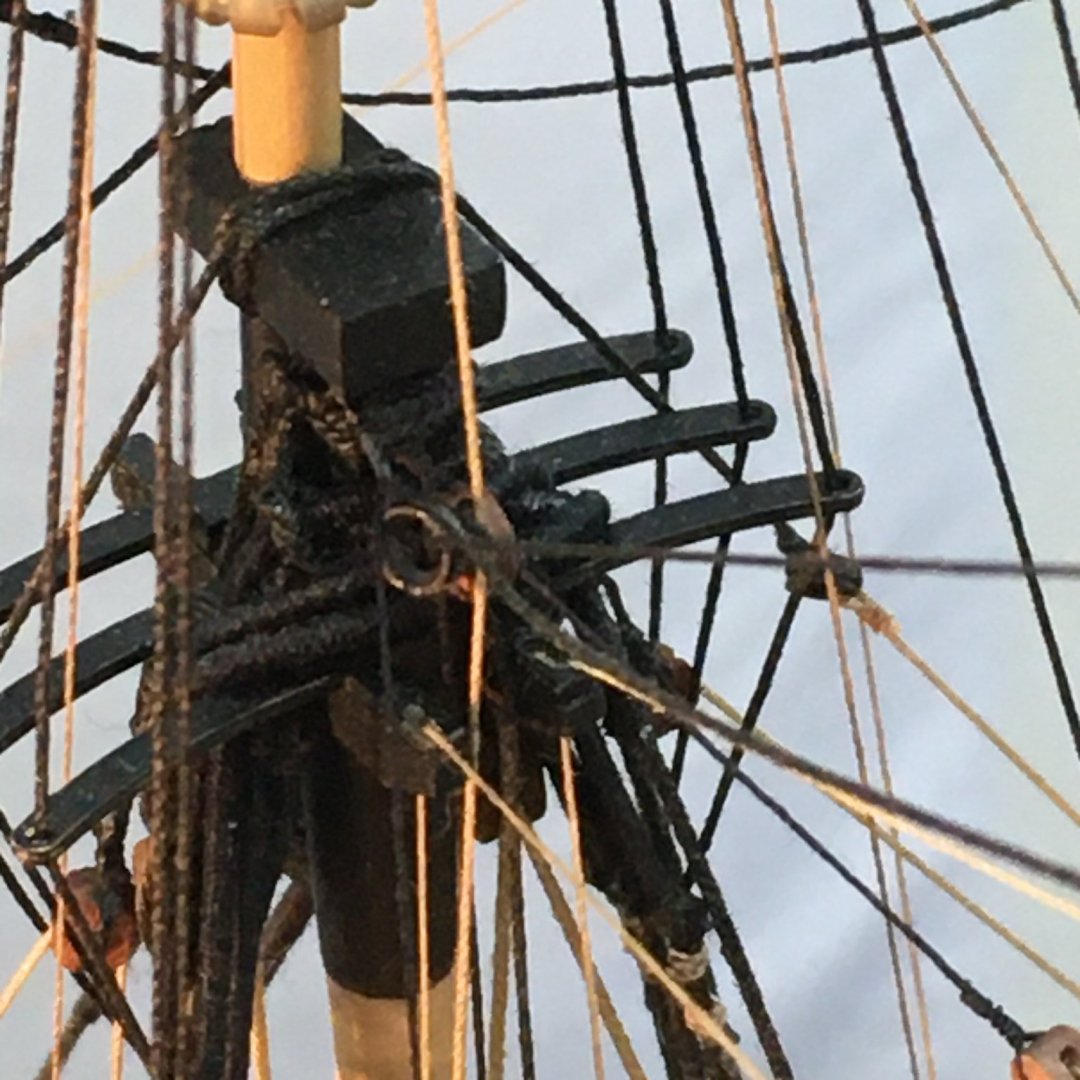
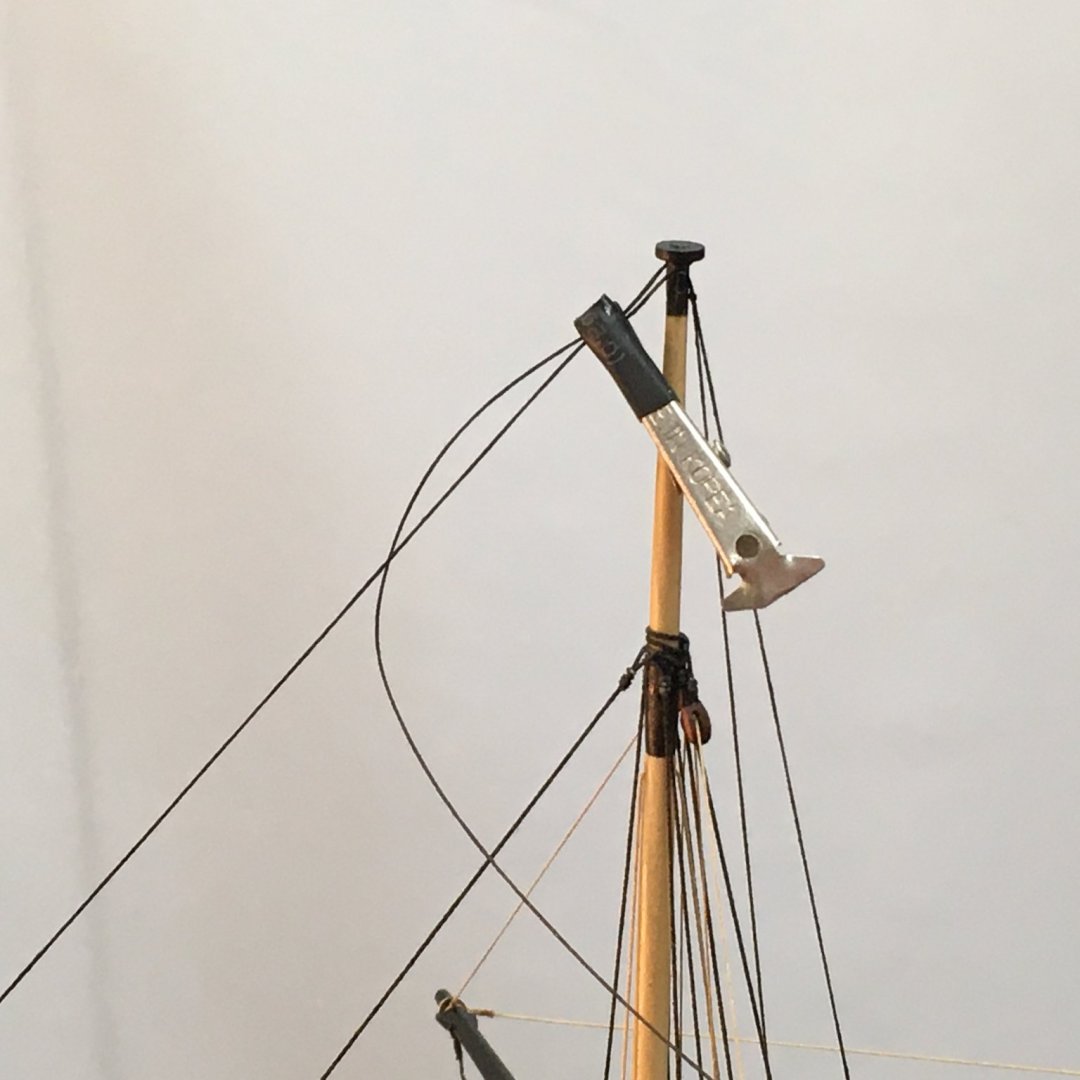
Topsail yard lifts Topgallant yard ties The topsail yard lifts were relatively straightforward, with the major elements shown in the next photo. As with the lower yards, I lashed the stuns'l booms to the yards before too much rigging got in the way. The lifts start by being seized to thimbles I'd previously set up round the topmast caps, then reeving through the uppermost of the pairs of 3mm blocks at the yard arms, then up to the blocks suspended under the tops (as described earlier in the log these are the ones I set up when I couldn't fit sister blocks between the shrouds to my satisfaction), then down to belay next to the lower yard lifts. Incidentally, the little clips in the picture are temporarily holding the topgallant yard ties which I'll cover next. Topgallant yards These yards are suspended from their ties and held against the topgallant masts by parrels. The ties are lashed round the centre of the yard, between the slings: The tie then passes through the sheave hole previously drilled near the top of the topgallant mast Also in this shot is the parrel, consisting of a single row of trucks. I used a single parrel rope, starting by tying it round the port side of the yard within the slings then threading the trucks on to both ends of the rope together, then tying the two ends round the starboard side of the yard. The tie ends in a 3mm block about 1/3 the way down the aft side of the topgallant mast. The plans suggest a 4mm double block, but I felt this was too large for these fine (0.25mm) ropes. So, to avoid having to use a double block I seized the halyard (0.1mm line) to the 3mm block and set it up with a 3mm block hooked to an eyebolt in the top below: The running ends of the halyards belayed on pinrails as shown in the plans. Have to rush off for dinner now... Derek

- 725 replies
-
- 7
-
-
- vanguard models
- speedy
- (and 1 more)
-
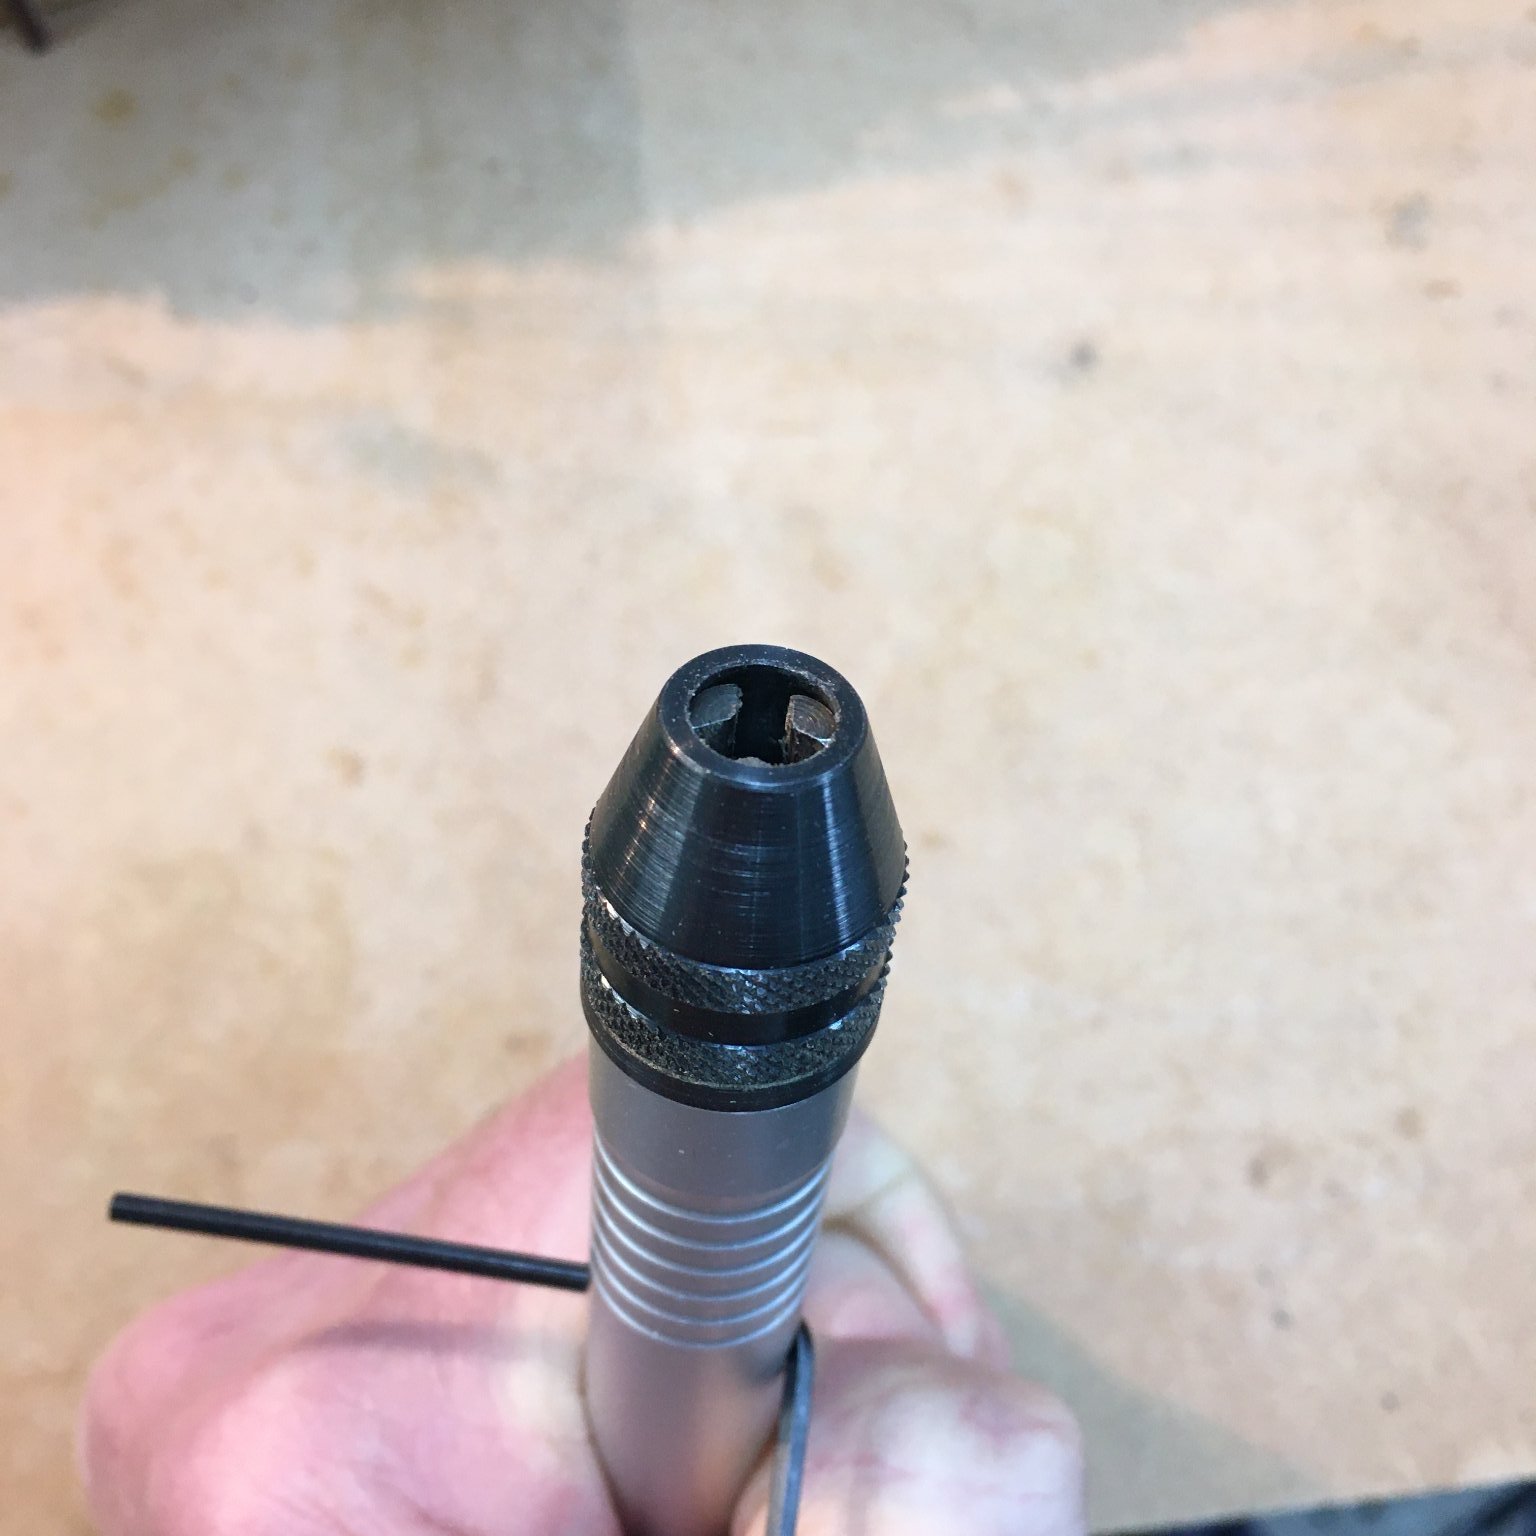
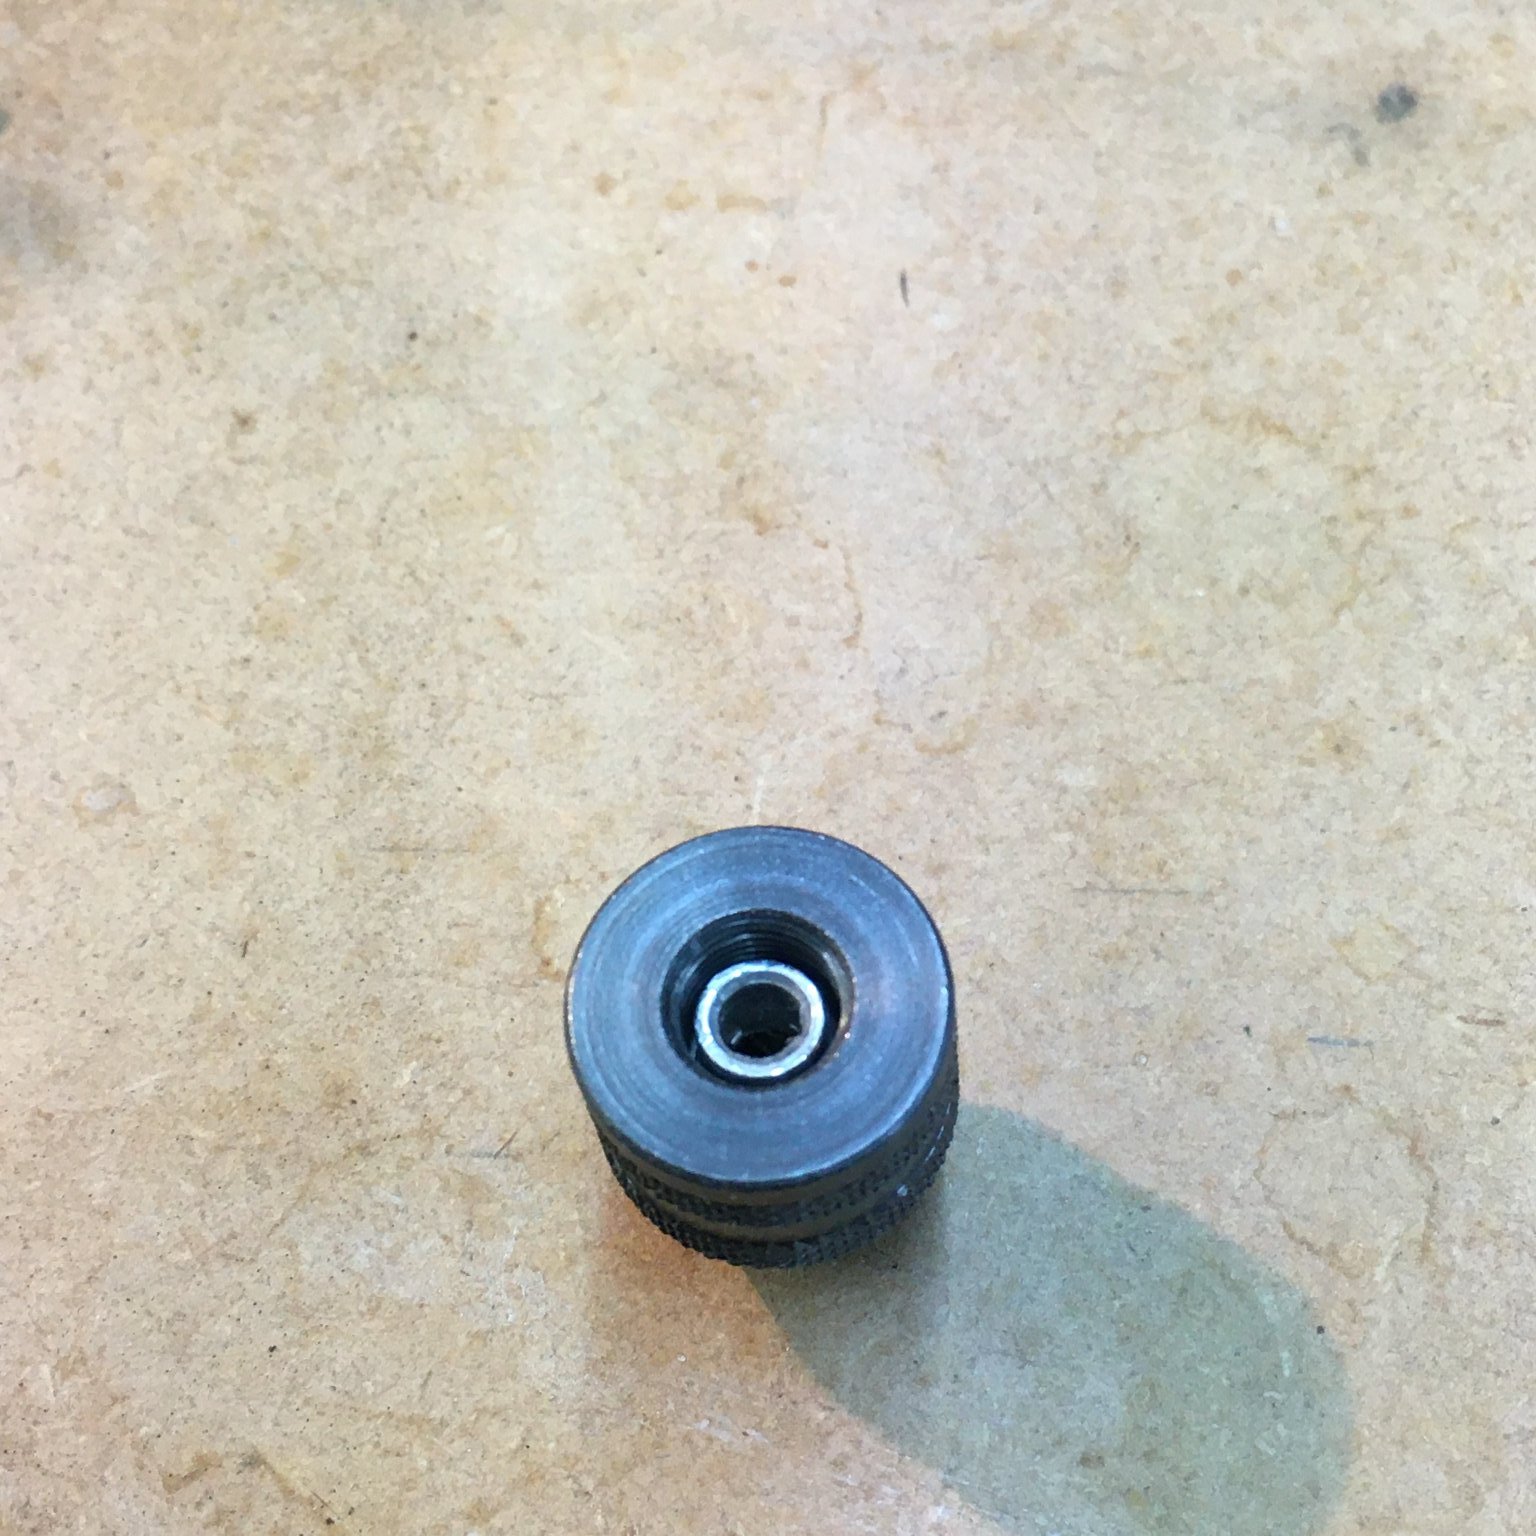
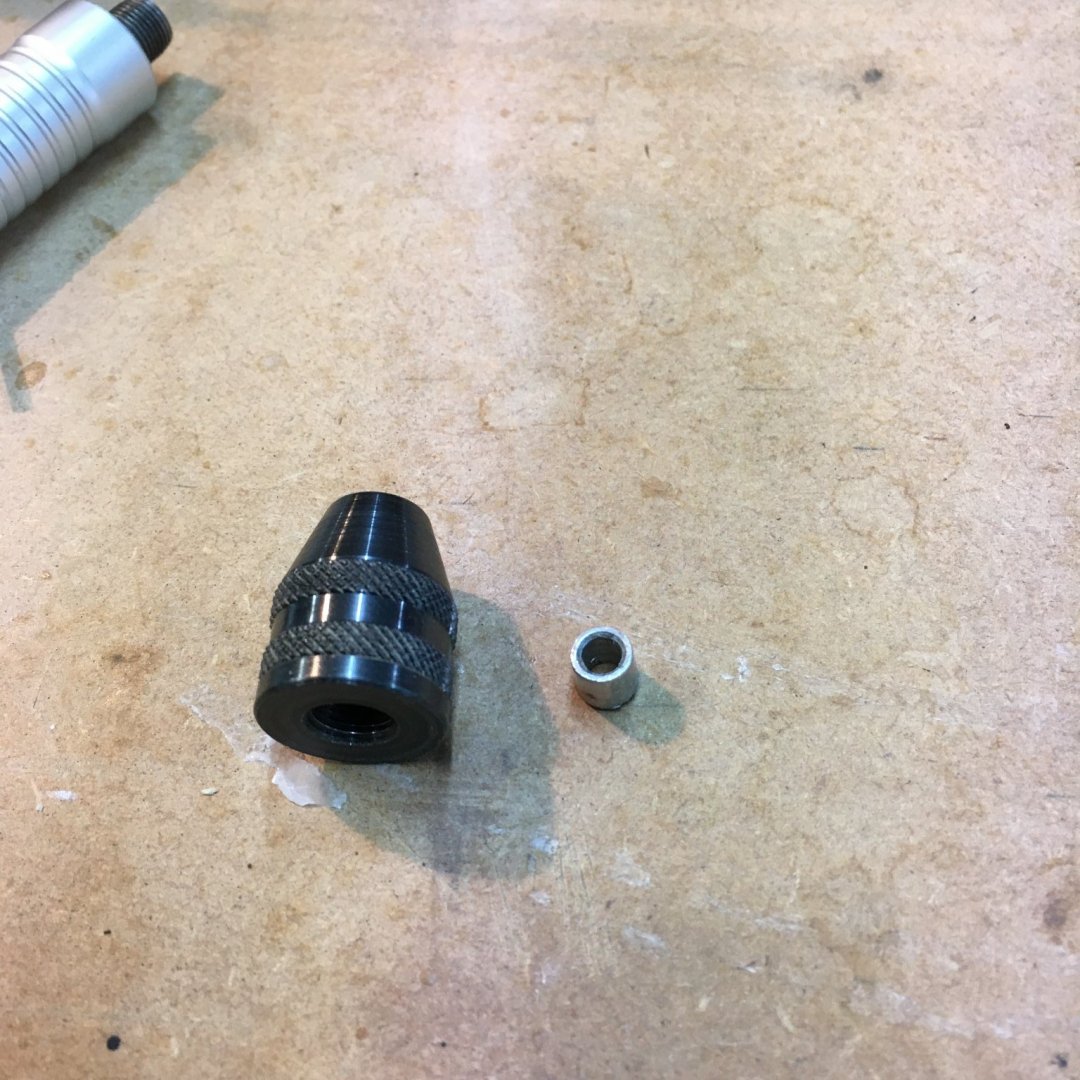
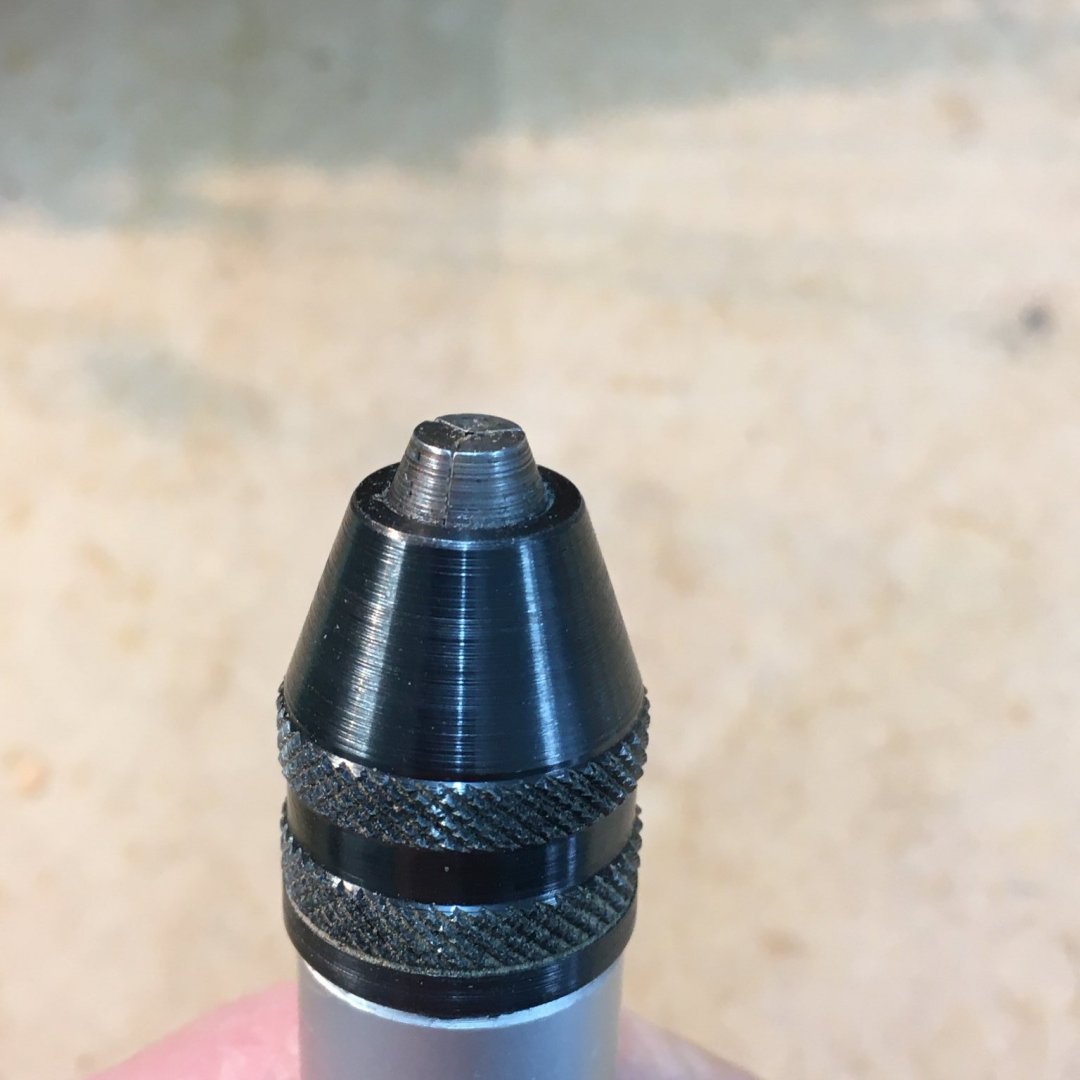
Hi. I scratched my head a bit when I read this until I found the thread where you'd raised your problem with the collet nut and realised we were probably talking about different things. From your photo in that thread it looks like your problem was where the flexible shaft connects to the Proxxon tool, whereas the chuck I referred to is at the business end. When I realised that, I had another look at my Proxxon, but the only way I could see that the collet could get stuck in the way you described would be if you tried to jam the spindle into a too-small collet. You need one that is a slide on fit - neither loose nor too tight. If you've not got one, it's worth getting a 3-jaw chuck for the other end. The problem I referred too is that when you screw the chuck onto the threaded end of the flexible shaft the jaws don't fully close. Here it is fully screwed in: Useless. The solution I found was to effectively lengthen the shaft by inserting a small length of metal tube roughly the same diameter as the shaft, and with an internal diameter wide enough to accommodate your drill bits. I was lucky to have a scrap piece of 6mm aluminium tubing that was just right. A 6mm length fitted in the chuck was sufficient to enable the jaws to close fully: Hope that helps. Derek


- 725 replies
-
- 2
-
-
- vanguard models
- speedy
- (and 1 more)
-
Thanks Glenn. Coming from someone with your photographic skills that means a lot, although I'd be the first to admit I've still got a long way to go.
- 725 replies
-
- 2
-
-
- vanguard models
- speedy
- (and 1 more)