


druxey
-
Posts
13,368 -
Joined
-
Last visited
Content Type
Profiles
Forums
Gallery
Events
Everything posted by druxey
-
 Don't post your e-address publicly - it's asking for spam! Send it by PM and delete it from this public forum.
 -
Nicely done roband there. For small scales, the simpler version is fine, but you'll impress folk by doing it correctly as you've shown.
-
It's more than likely that the beam layout varied between ships. The plan was specific to Pegasus rather than Atalanta. You've done the tight thing to be your own master shipwright. As for cumulative error, when the Admiralty inspectors come to see the work, the additional length means a larger tonnage. The contract says you are to be paid by tonnage, so you'll profit from this 'mistake'!
-
Mid 18th Century glass
druxey replied to Mark P's topic in Building, Framing, Planking and plating a ships hull and deck
Yes, that's my understanding, Welfalk. 'Blown plate' is another name for 'cylinder glass'. There was also spun glass, which was disc-like, the pontil mark piece of the disc becoming the cheapest 'bulls-eye' seen in old panes. -
Mid 18th Century glass
druxey replied to Mark P's topic in Building, Framing, Planking and plating a ships hull and deck
This is in accord with what I've read elsewhere. Large 'blown plate' aka 'ground glass' was made by grinding and polishing 'broadsheet glass'. This accounts for its expense. Large pieces were principally used in coaches and for mirrors. Nice find, Mark! -
Looks promising!. And you are right: it takes the to work out the details properly, but it is time well spent.
-
Frégate d'18 par Sané , la Cornélie
druxey replied to JohnE's topic in CAD and 3D Modelling/Drafting Plans with Software
Ca, c'est bon! Felicitations, John! -
They don't represent real dolphins, Siggi, but mythical ones. So - in a way - they are fantastical or imaginary.
- 58 replies
-
- 3
-

-
- barge
- ships boat
- (and 1 more)
-
Torsion would only occur if there are unequal forces acting on both sides of the shell. I've not had any issues of this nature by spiling the planking properly and pre-bending them, so that the shell is stress-free.
-
Yes, Pollex, that's the volume I was thinking of! Thanks for providing the information. hopefully, David, you can locate a copy. Try abebooks.com or Amazon. Oh, and the author is Jenson with an 'o'.
- 24 replies
-
- 1
-
-
- three sisters
- schooner
- (and 1 more)
-
I sit corrected, then! Replacing a knee of that type would involve removing decking to get at the bolts.... Thanks for an interesting exchange, everyone.
- 649 replies
-
- 5
-
-
- dunbrody
- famine ship
- (and 2 more)
-
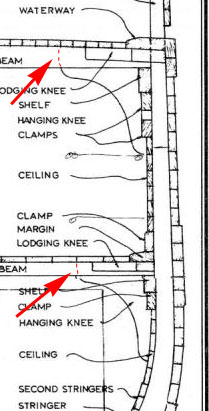
I've no wish to quibble, but the knees, fitted as shown, would be weak. My interpretation is that we are looking at the beam closer to the viewer and the athwartships arms of the knees are hidden. As modified, the illustration shows what was standard wooden ship practice. The bolts would run horizontally through the beam and the lodging knees would interlock with the hanging knees.
- 649 replies
-
- 4
-
-
- dunbrody
- famine ship
- (and 2 more)
-
Lovely work, but usually hanging knees attach to the sides of beams, not under them. Are you sure that this was not the case here?
- 649 replies
-
- 5
-
-
- dunbrody
- famine ship
- (and 2 more)
-
"Ve haf vays of keeping you vertical..." Those supports look like instruments of persuasion! However, they obviously do the job well. Good stuff!
- 525 replies
-
- 3
-
-
- anchor hoy
- hoy
- (and 1 more)
-
I guess I missed all your updates since April until now, Clare.How did you manage to fly under the radar? Anyway, catching up, your model looks terrific. Coming late to the table, I agree that, while Morope looks great, it has those major drawbacks discussed. Syren line behaves in a much more civilized way.
-
Pandora by marsalv - FINISHED - 1:52
druxey replied to marsalv's topic in - Build logs for subjects built 1751 - 1800
Nice smithy work! I like the bolt heads and roves flanking the ports. -
Good lighting is both a blessing and a curse. Shows up every little flaw! However, I can't see them in your work so far. That is a very nice stand you are building there, GDM67.
-
Try starting with a small block, carved to shape and fitted to the model. You can then wrap paper around it to get the expanded view of the railing.