catopower
-
Posts
1,912 -
Joined
-
Last visited
Content Type
Profiles
Forums
Gallery
Events
Everything posted by catopower
-

Something is wrong with these measurements (SOTS kits)
catopower replied to Ulises Victoria's topic in Wood ship model kits
Add to that fact, even Amati's plans for the Sovereign of the Seas builds to a model that's 1100mm long. What's with this magical number? http://www.amatimodel.com/en/models/naval/construction-plans/sovereign-of-the-seas I don't know what scale those plans are though. Clare -
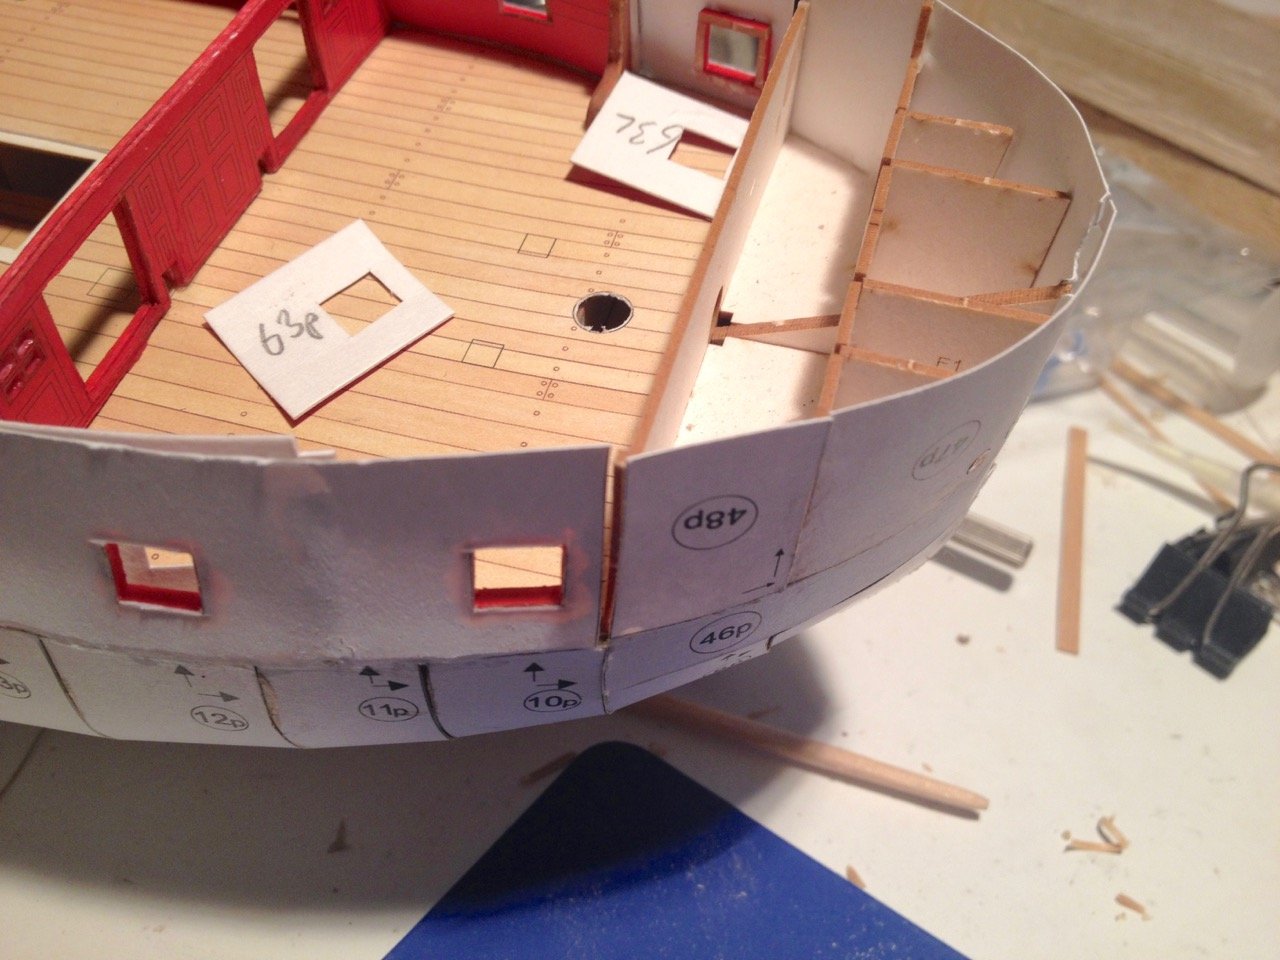
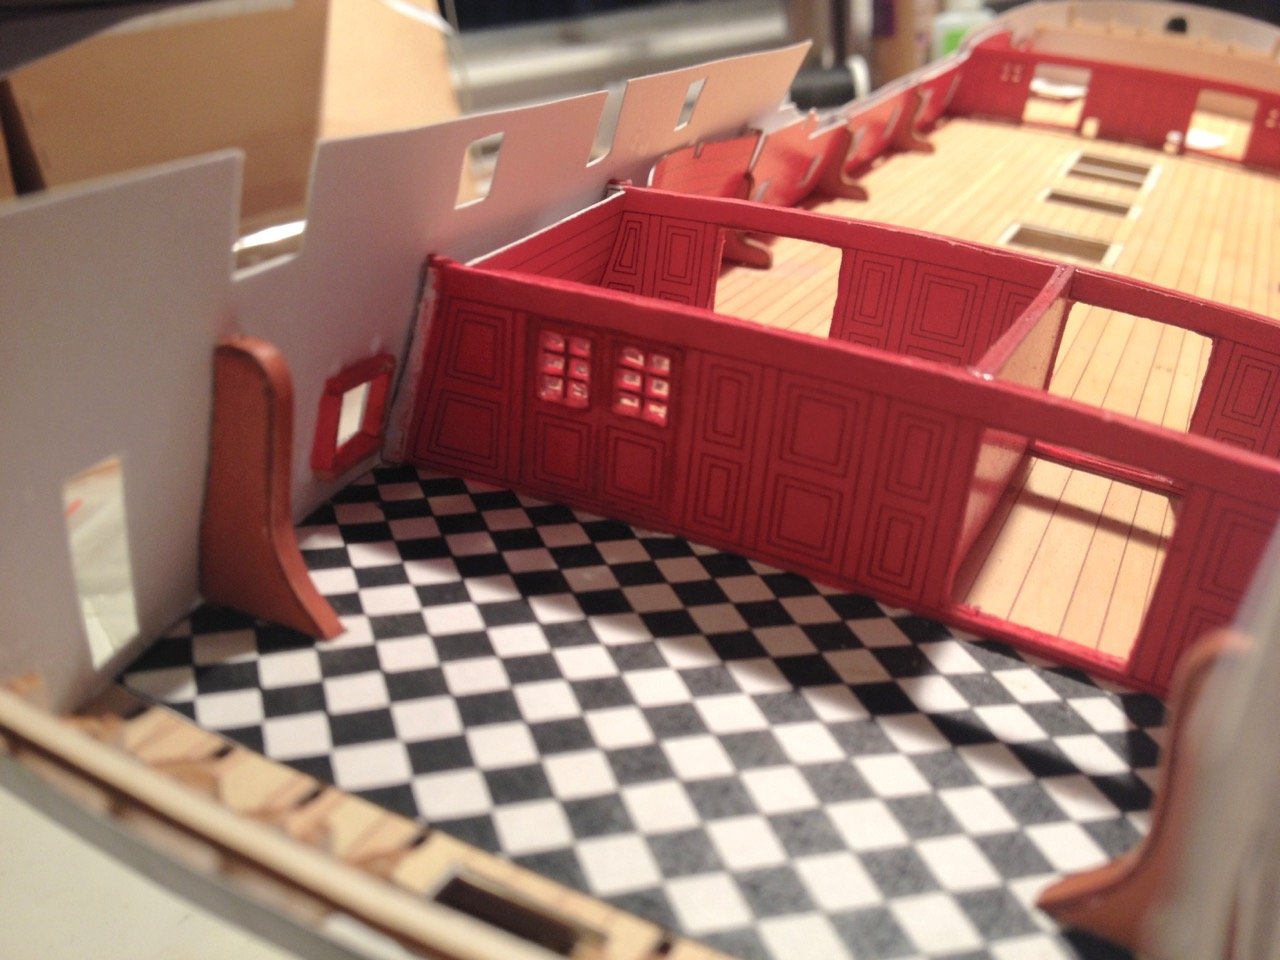
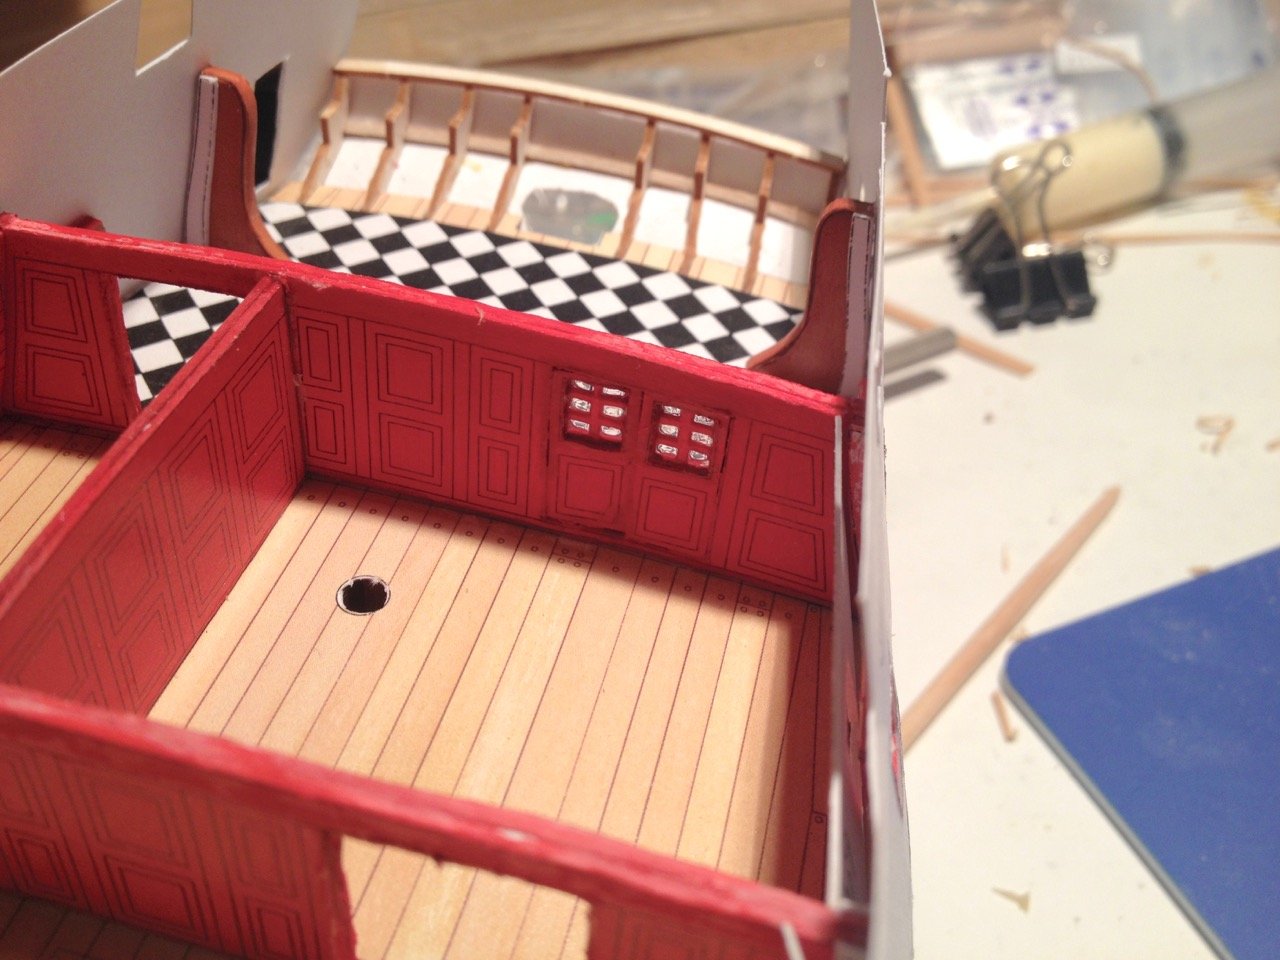
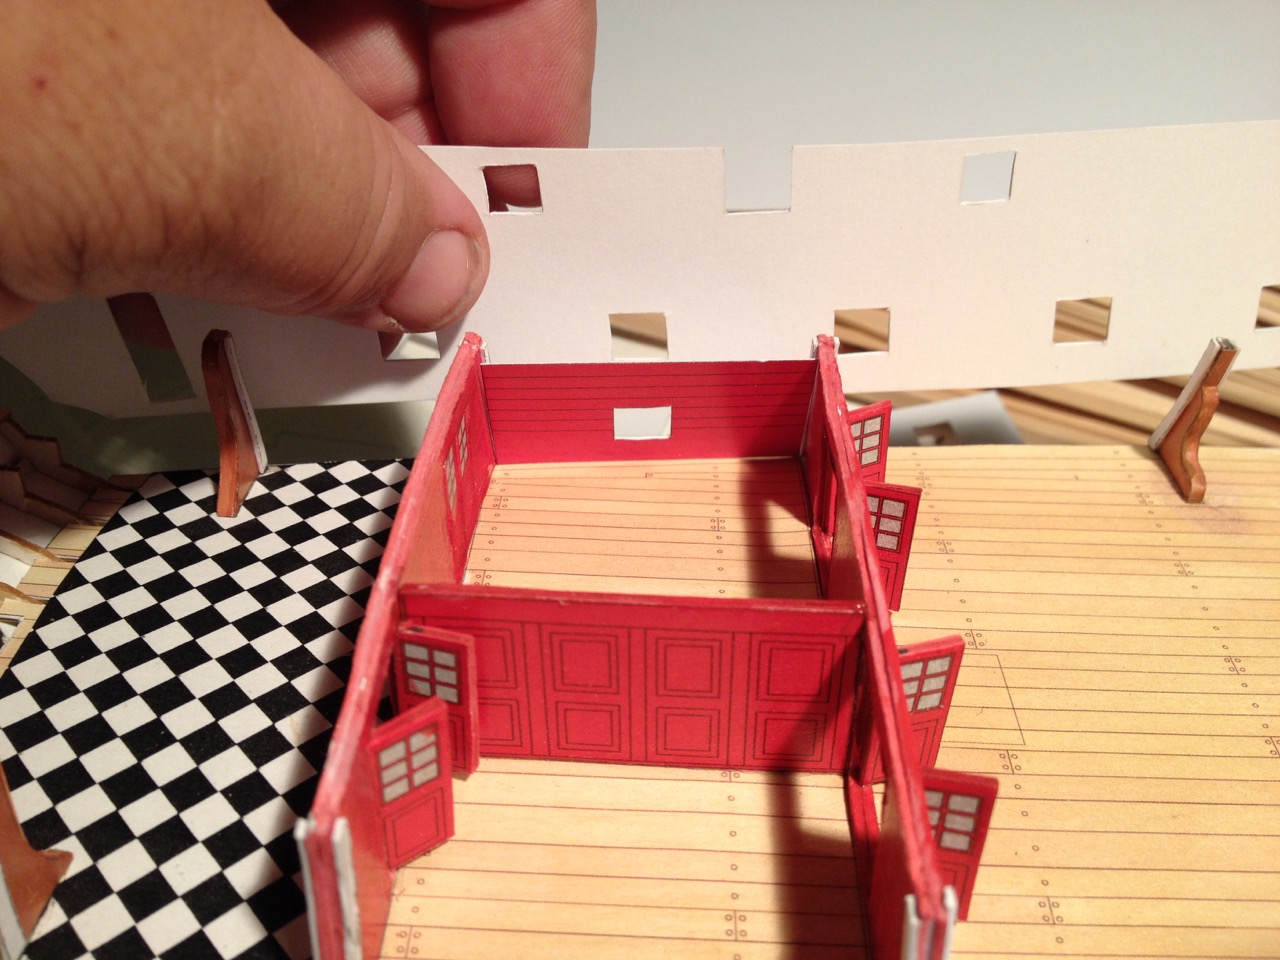
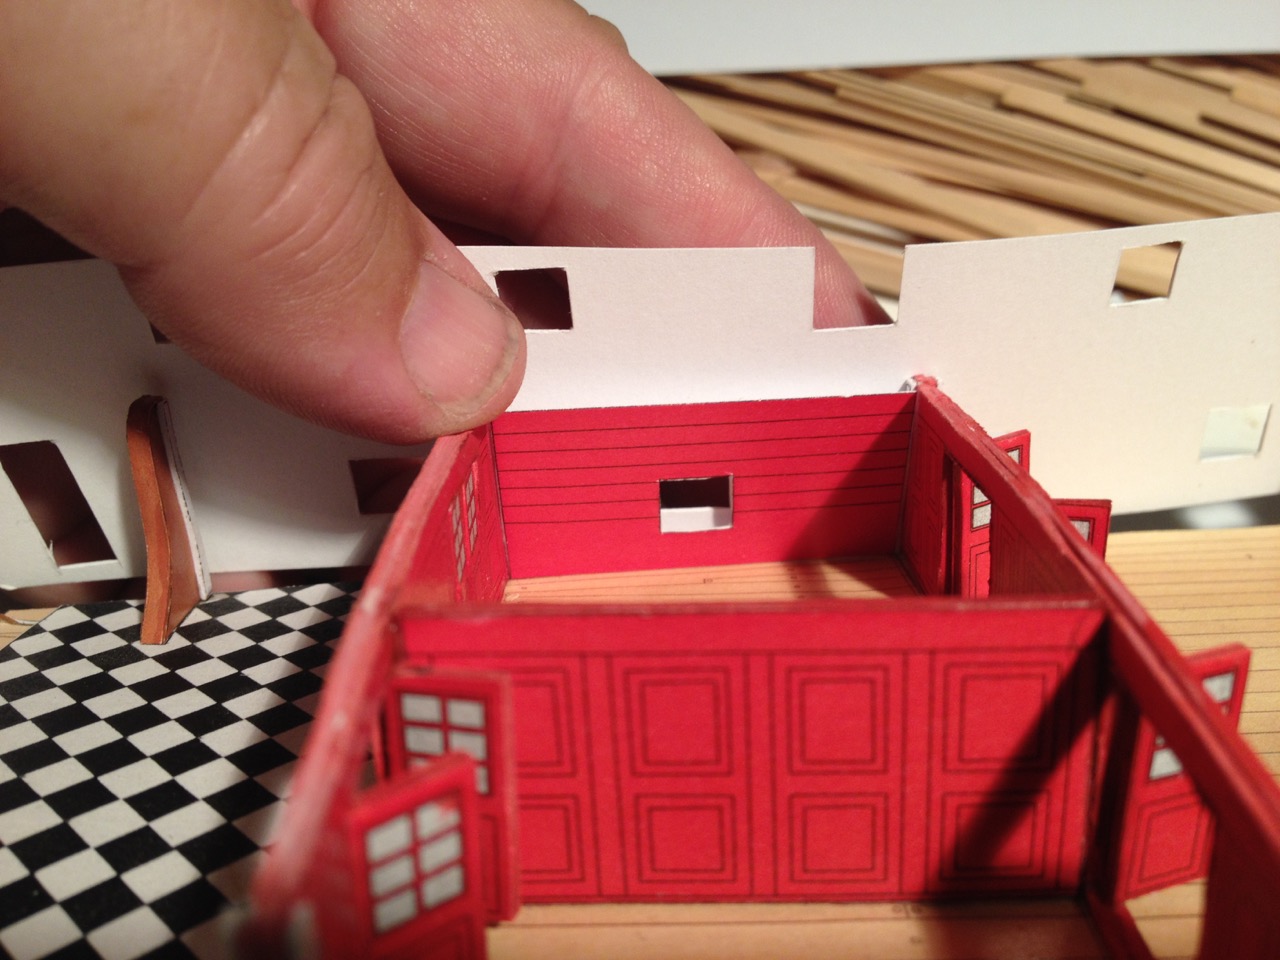
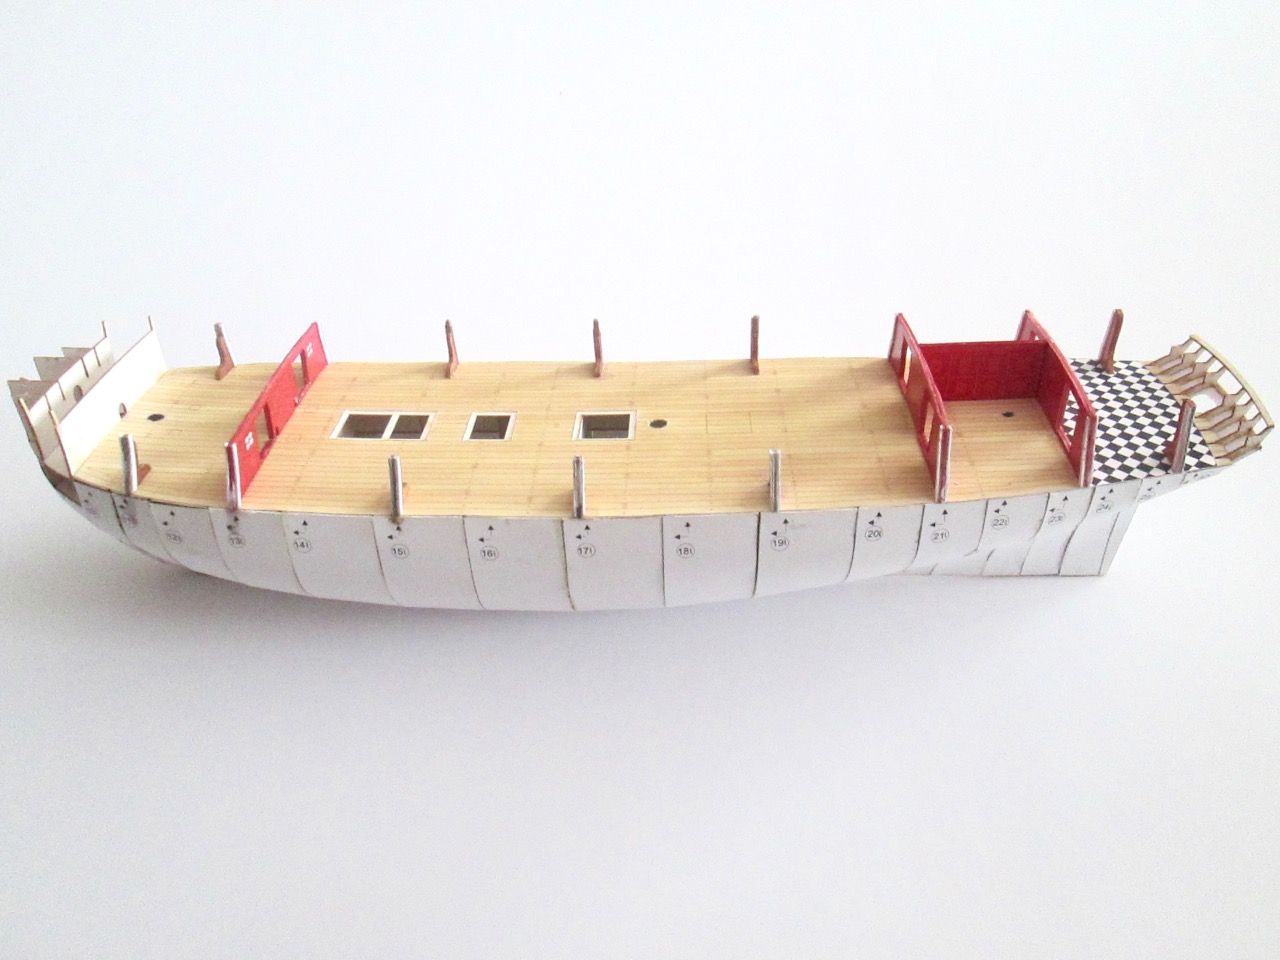
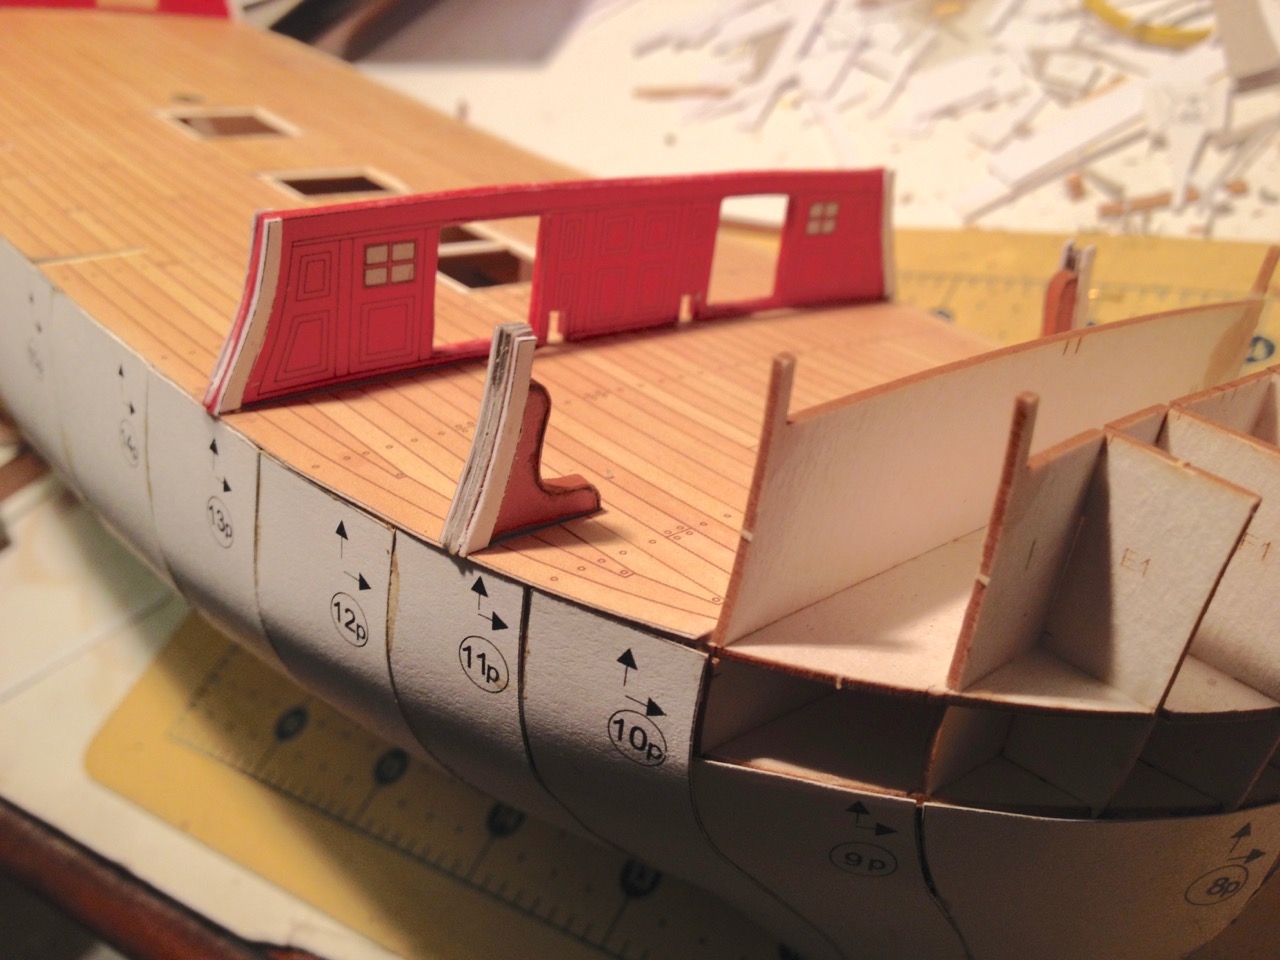
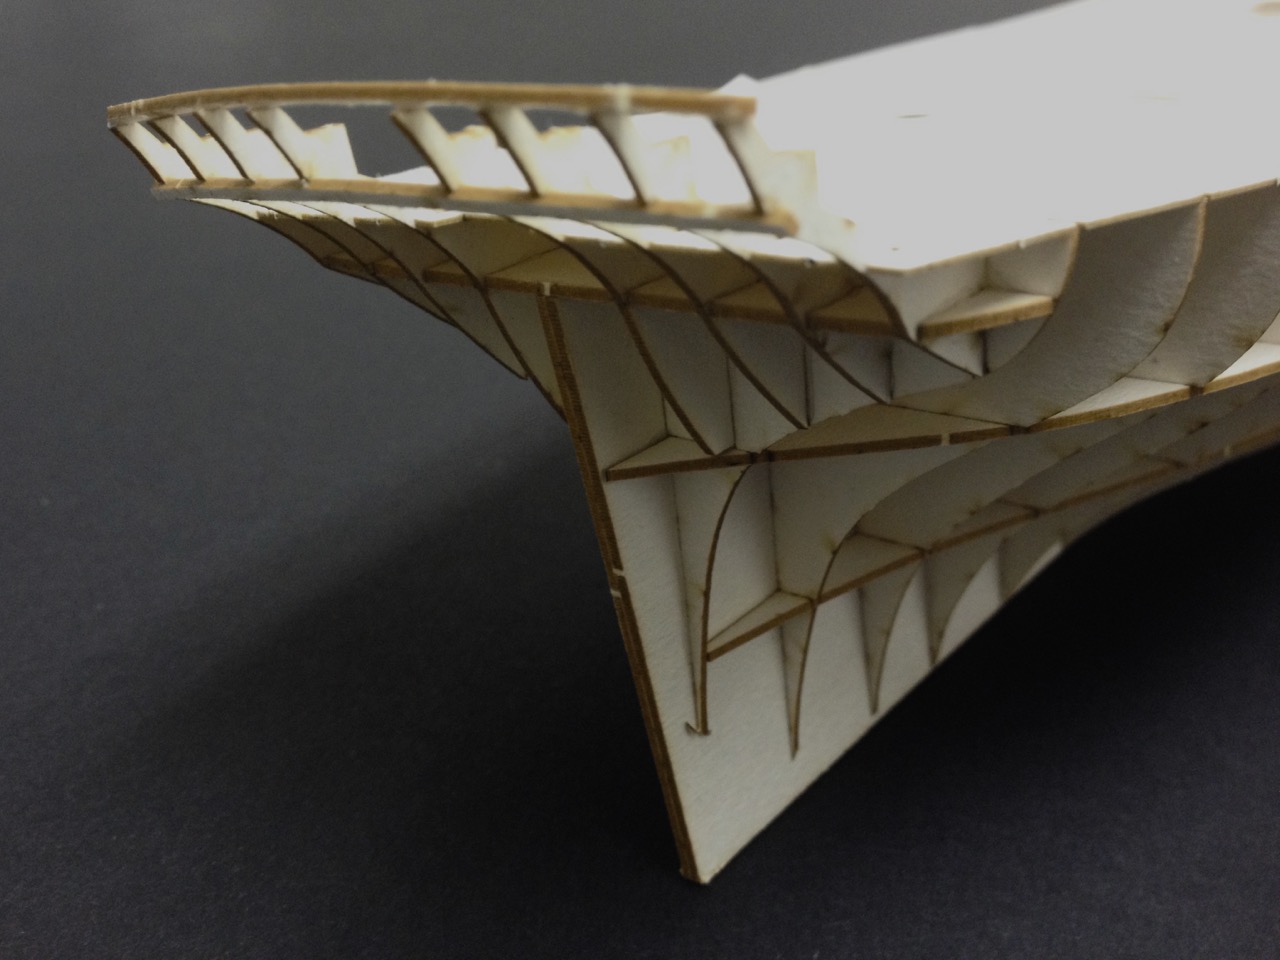
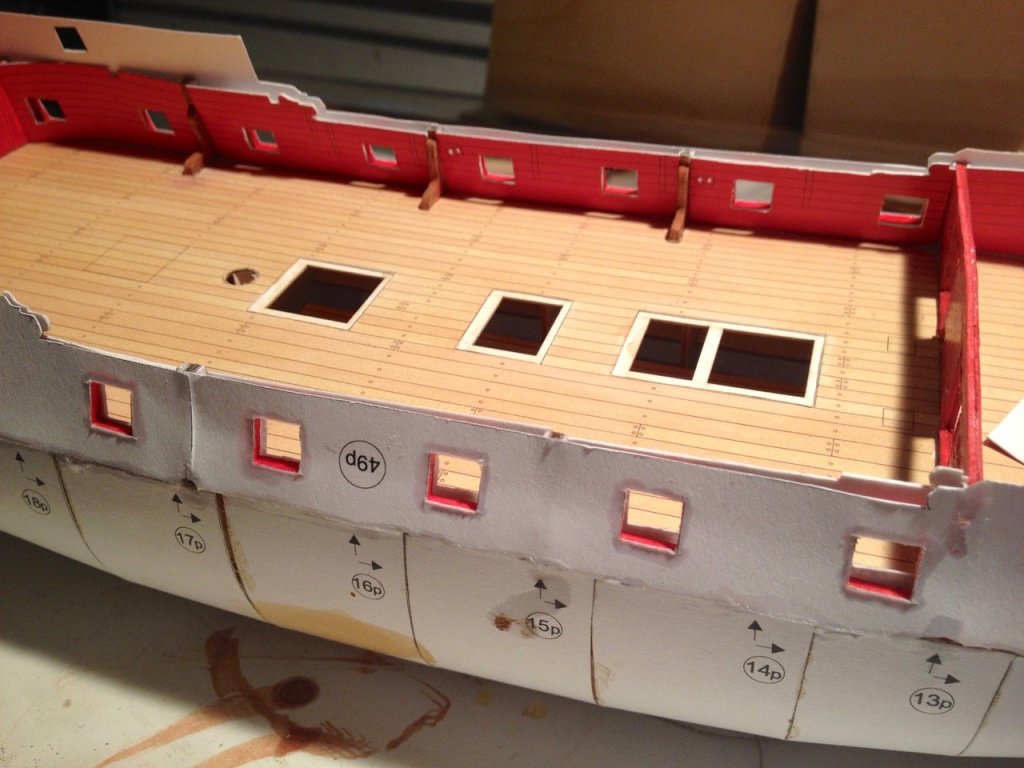
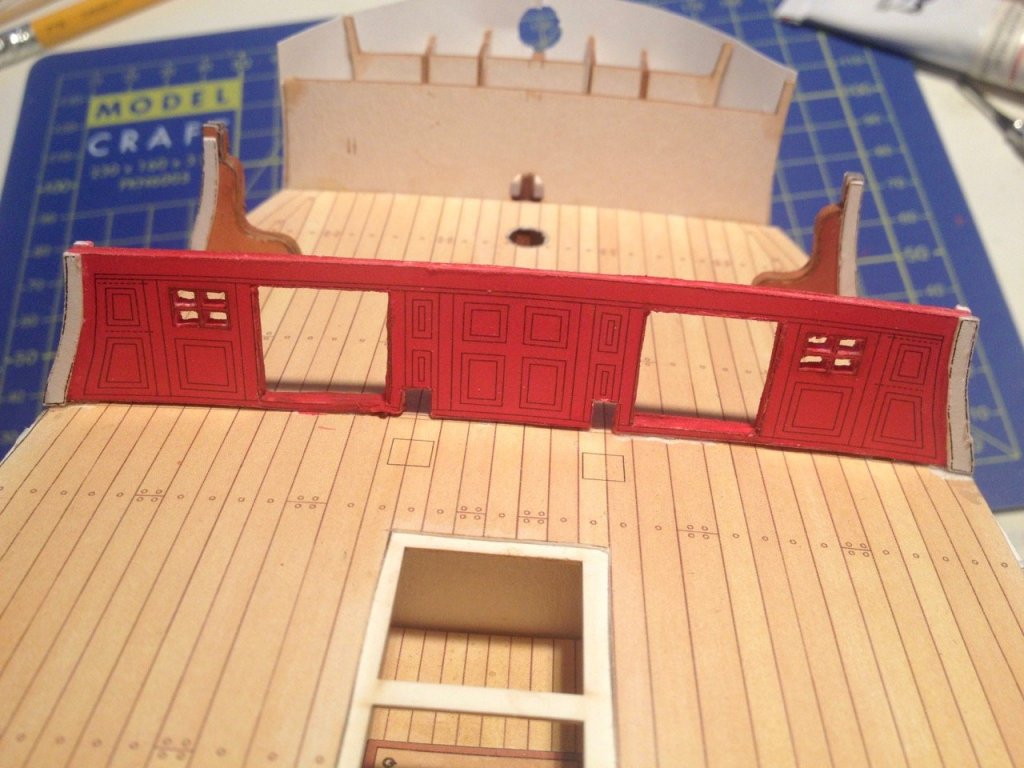
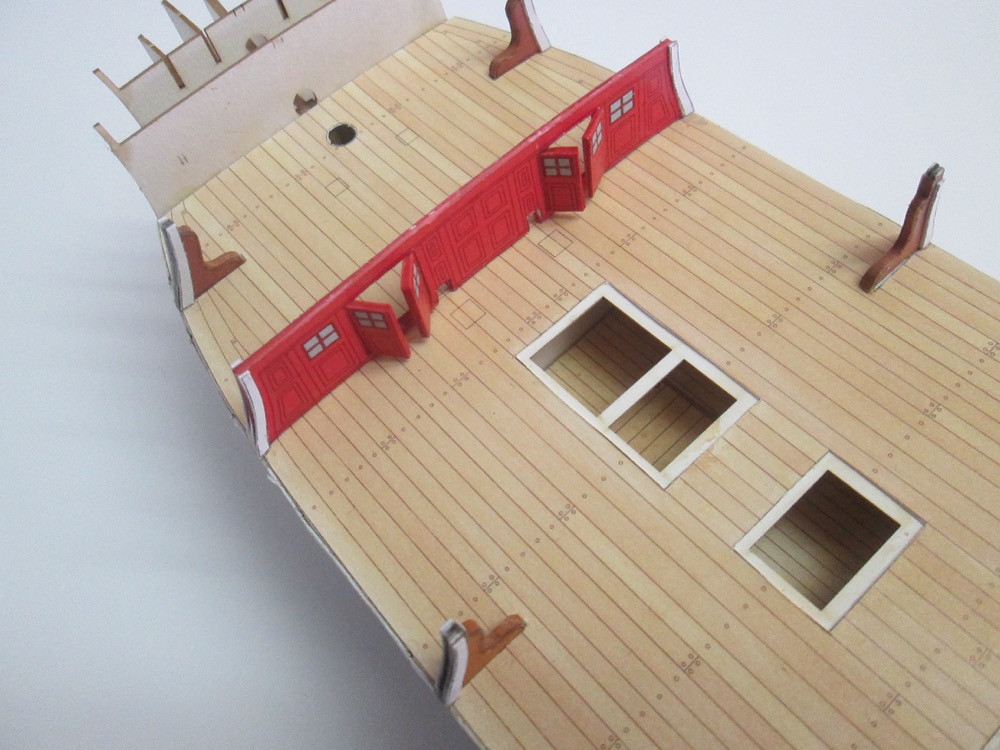
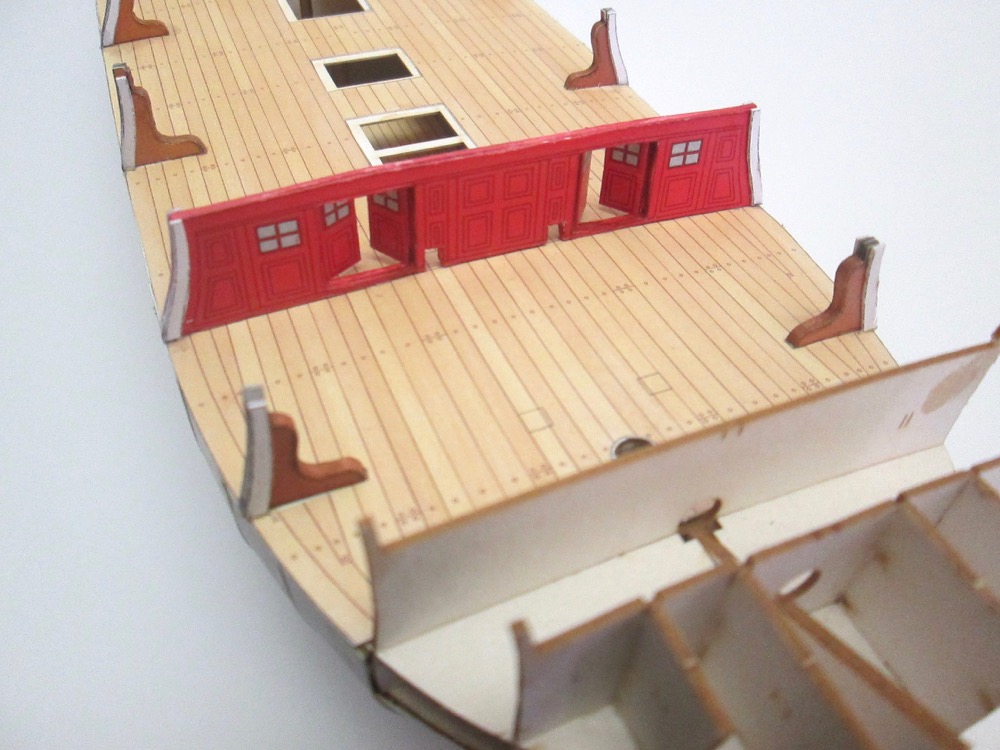
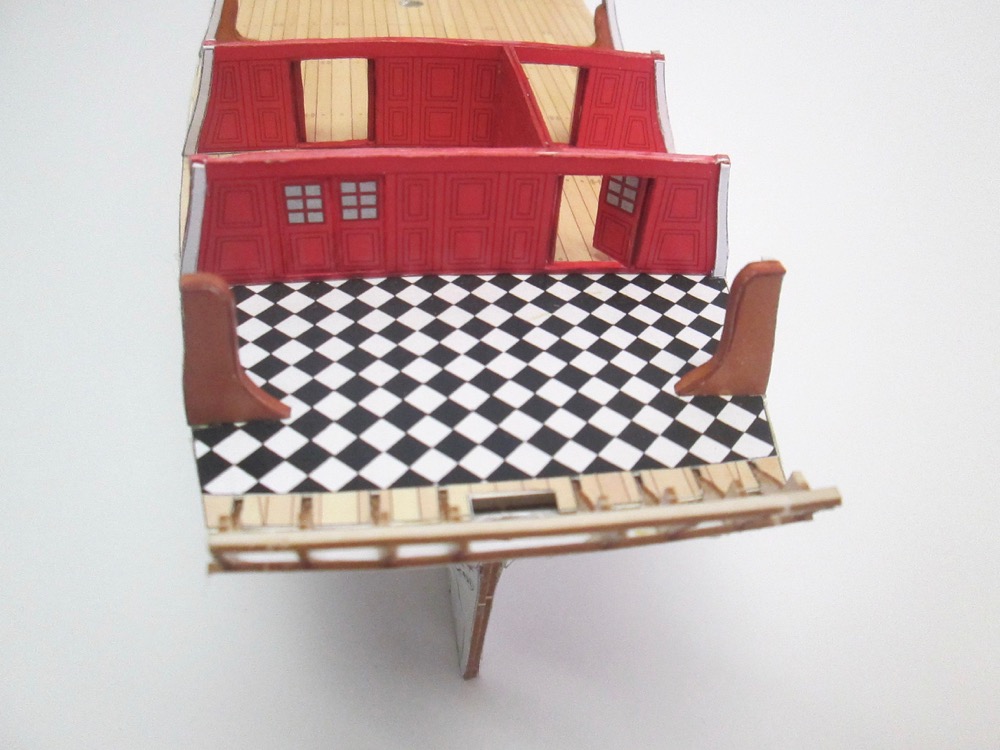
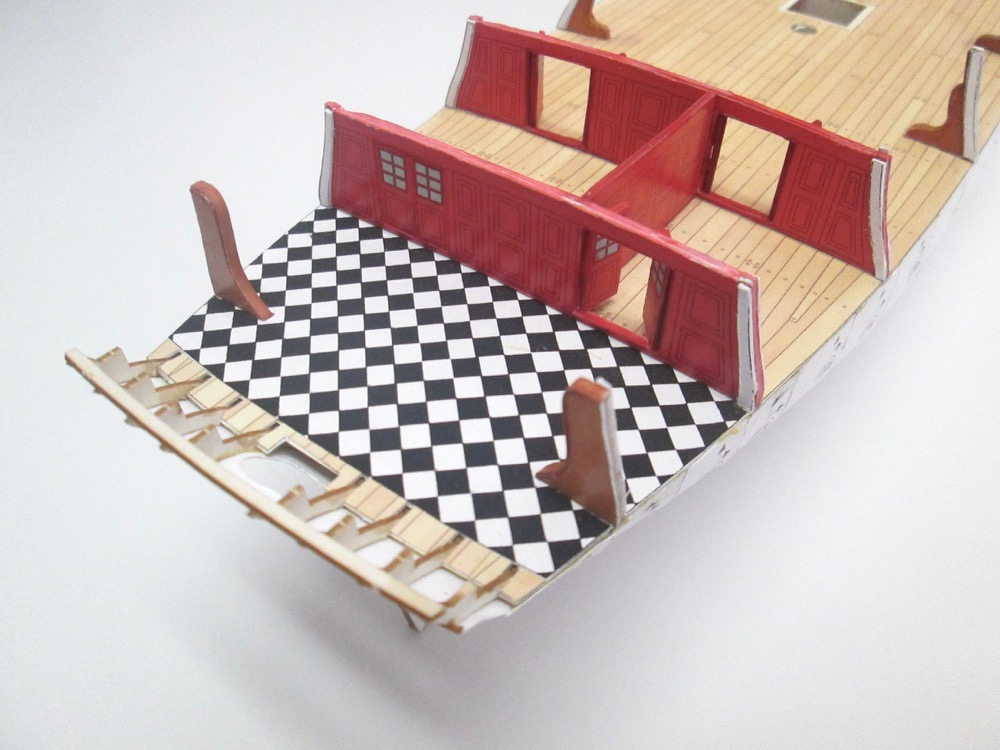
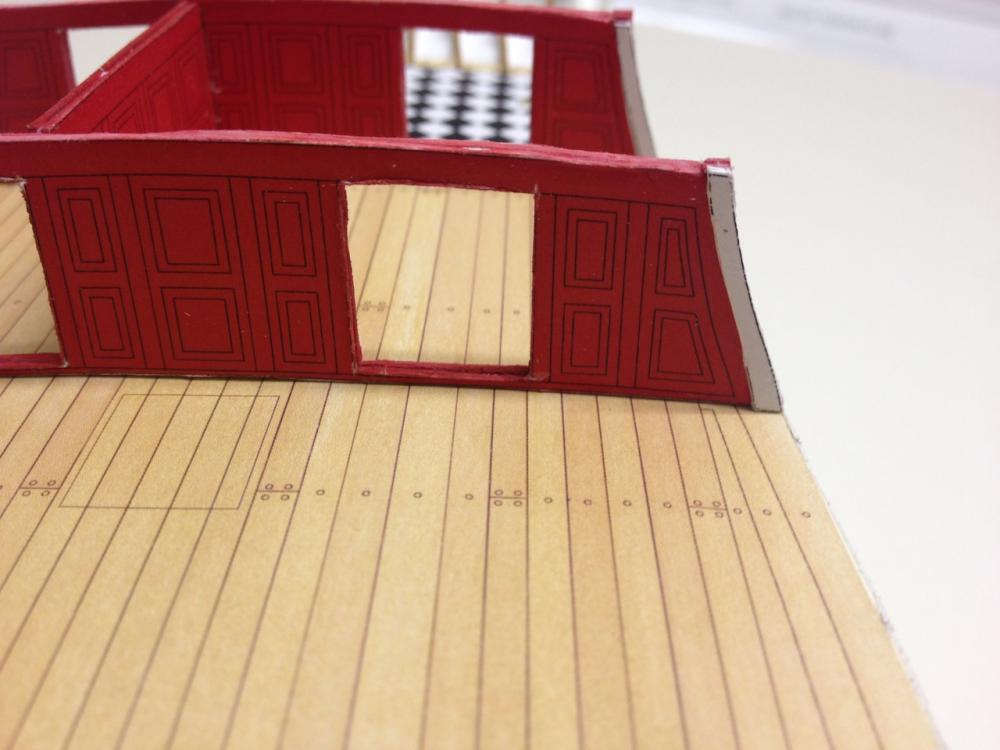
Okay, before getting back to my other projects, I thought I'd wrap up this issue about getting the bulwarks into position so that the gunports line up with the inside pieces. First, I had to finish up the windows, which worked out fine, using a film of canopy glue for the glass. They're not perfect, but they're mostly down inside the ship and not very visible. As I worked to get the bulwarks pieces in position, the addition of the newly windowed doors could wait. I cut and temporarily positioned the internal bulwarks pieces to help me with the alignment of the large outer bulwarks pieces. Without doing this, I don't know how one would know where the big pieces would fit. As you can see, some of the inner pieces have to be trimmed to fit. None are glued in at this point. You can see the seam where the large pieces meet between the first and second gun ports in the foreground on the left. At the bow, I ended up with a small gap for some reason. I will probably glue a support piece on the inside corners, which will be covered by the inside bulwarks pieces. I know the outer layer looks pretty gluey, but it's all going to get covered up anyway. Inside the great cabin, I didn't worry about the alignment except at the very stern. If everything else lines up, this area should be fine. I did discover than I needed to bend the stern transom framing back a little, so that things lined up better. Here's the same bulkhead viewed from the cabin forward of the great cabin... And another view of the great cabin from a higher angle... It's pretty cool to be working with this kind of interior, as you never get this kind of detail in a wooden kit. That's all for now. I may tinker with installing the doors and adding the inner bulwarks pieces over time. But, this was a nice break, and I'm ready to make some progress on elsewhere. Until my next break! Clare


- 82 replies
-
- 10
-

-
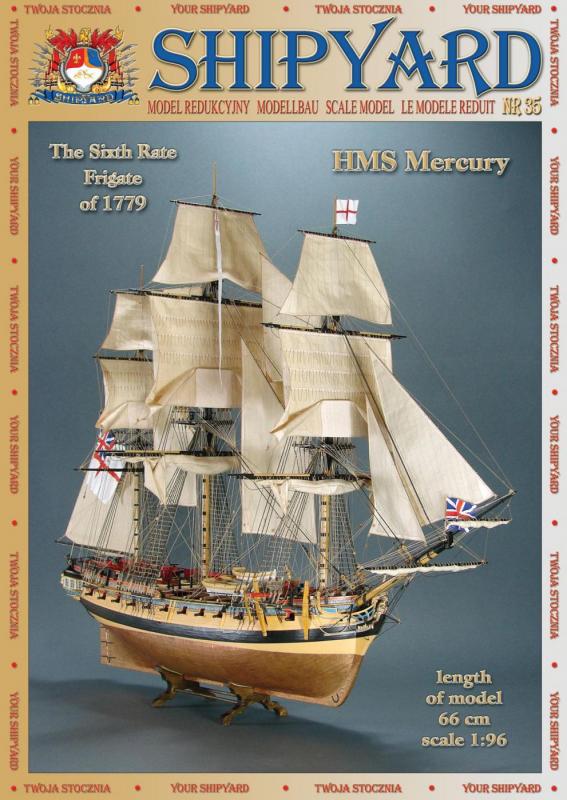
Hi Shiphile, Those are some really great looking kits. I'd like to try one of the boxed kits sometime. I'm in the same fix regarding the HMS Mercury kit. It's a nice kit, but it's more money than I should really be spending. Anyway, I've started to take a shine to the smaller paper model kits in 1/96-scale. My first shipmodel was the Model Shipways Phantom, oh so long ago, and after that, I swore I'd only build in larger scales. But, I really enjoyed working in 1/96-scale with the HMS Alert kit. The smaller size makes for a neat model, plus it takes up far less room on the shelf. The low cost of these paper model kits makes it difficult not to go out and buy ones that I might be interested in building. Then, I thought it might be interesting to buy one and try enlarging it to another scale. I had to catch myself from going out and buying yet another kit – they're just so darned cool! Clare
-
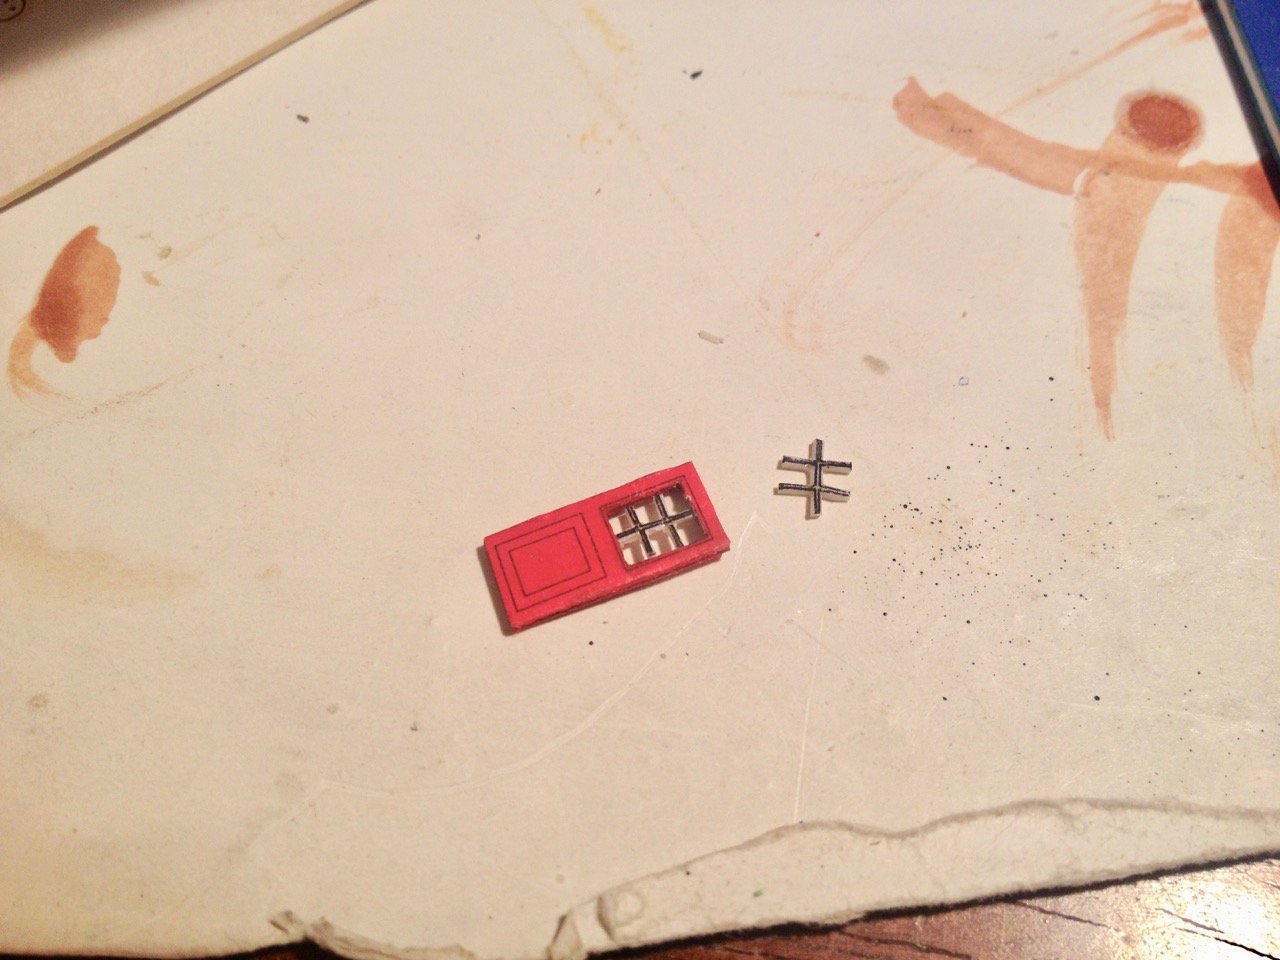
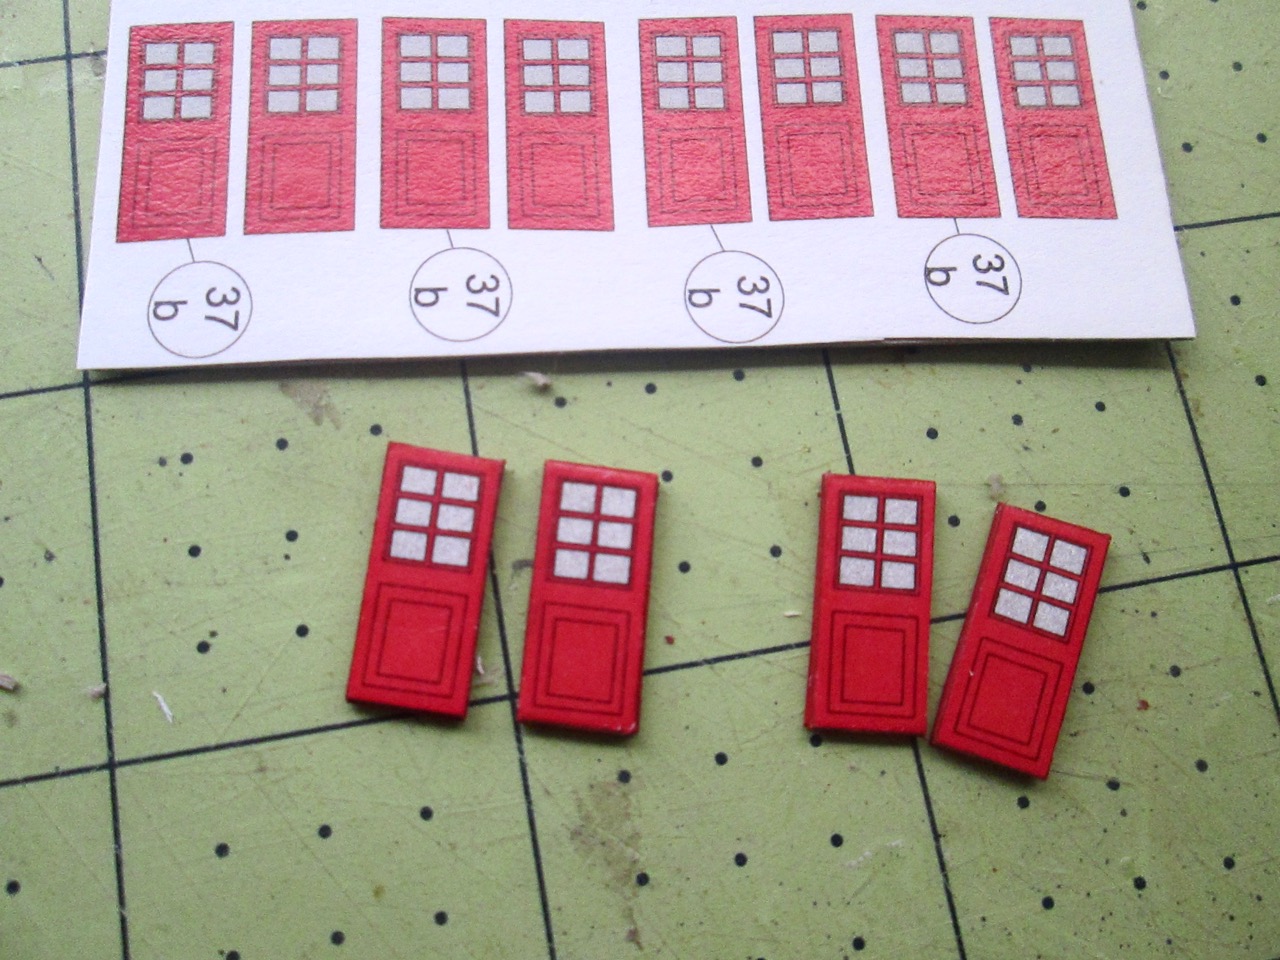
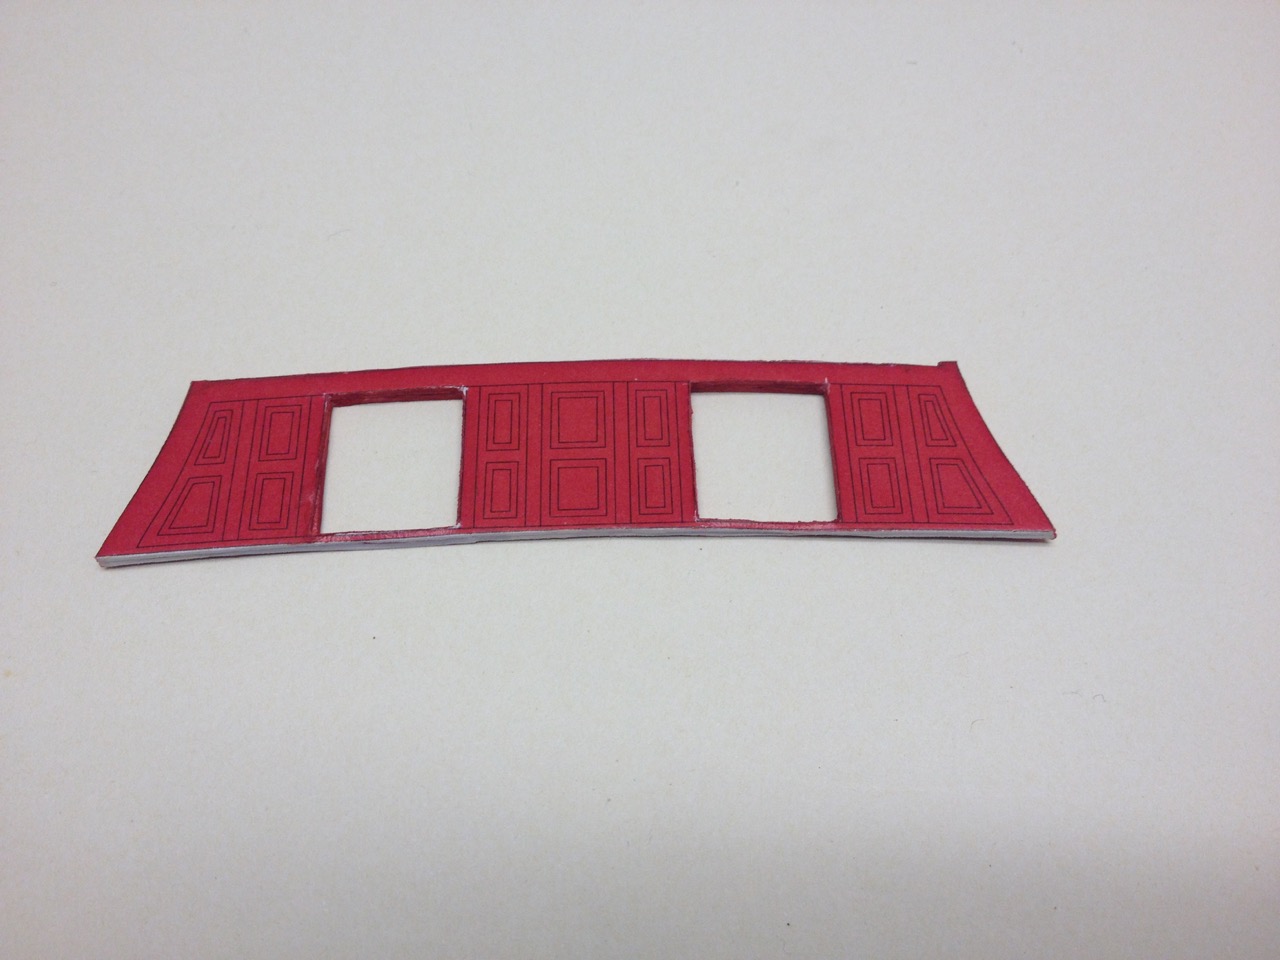
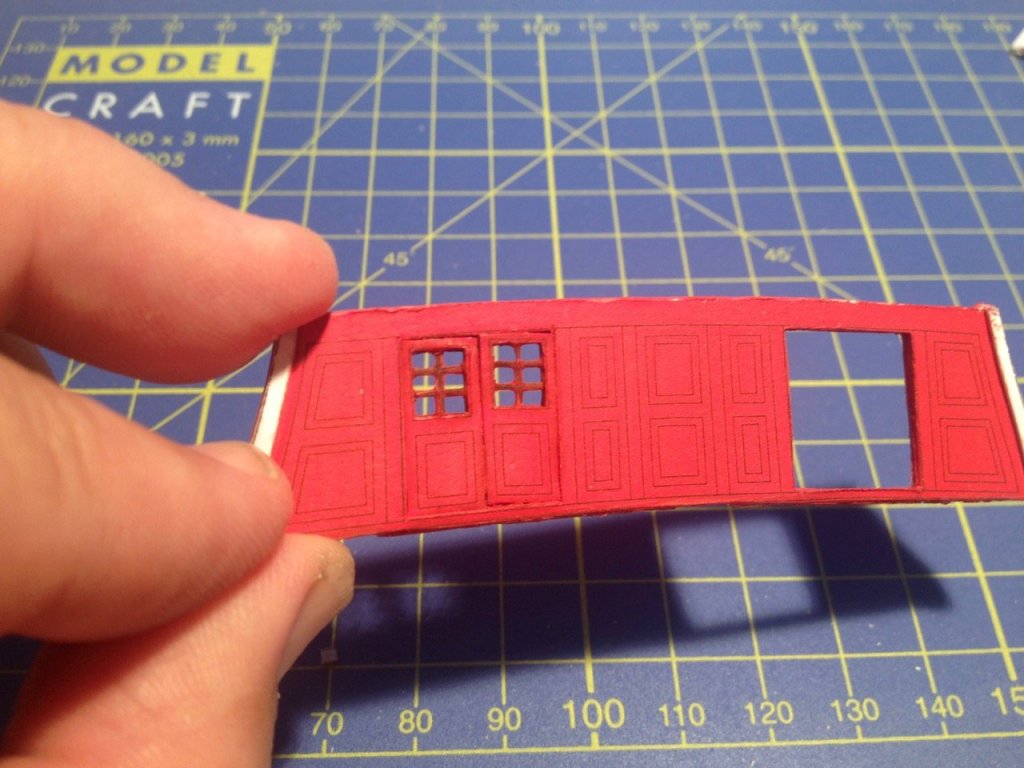
A long belated thanks, Zoltan! It's been, what, six months since I last posted? I just finished writing up an article for SIS on buiding the HMS Alert paper model, so that's been occupying most of my paper modeling time for the past few months. With that done, and having spending a pretty significant amount of time working on my main wooden ship modeling projects, I thought I'd put a little time into HMS Mercury again. I've been contemplating those fake window panes and recently realized that forward partition is pretty much right under the edge of the forecastle deck, so those windows are pretty visible. Also, since I'm building this model so that the stern gallery windows are clear, you'll be able to look inside and see the windows in the aft partition as well. So, I broke down and cut out those fake windows. I had to remove the partitions in order to do it, but that wasn't too bad. I actually managed to cut out just the fake glass panes of those 4-pane windows in the forward partition and its doors. However, the after partitions and doors all have 6-pane windows, so I had to cut out the whole window section in one piece and then rebuild them. As you can see, the results aren't perfect, but I'm reasonably satisfied, because I'm pretty sure I can't do better than this. I'll try using some canopy glue to create the window pane glass. So far, I have all but 4 doors left to do. Once that's done, I'll move on to the next thing. Before I started getting obsessed with getting rid of the fake windows, I went on to the next step, which was to add the gunport frames to the bulwarks core pieces. The frames came from the laser-cut super detail set I purchased from GPM. It was a little confusing figuring out which piece was which, because many of the pieces vary in shape and have unique part numbers. I should point out here that one of the reasons I got inspired to do some work on the model again, is because I was at a local IPMS conference and spoke with someone who was building his first paper model, and I think it was also his first ship model, the larger 1/72-scale boxed kit of the same ship, HMS Mercury. He's doing a great job and some photos of his progress were posted on Ages of Sail's blog here: https://blog.agesofsail.com/2017/03/08/a-172-scale-hms-mercury-card-model/ Clare


- 82 replies
-
- 13
-
-
Hi Druxey – It would be harder to part with them if I didn't have so darned many of them! I actually have another Kanrin Maru kit that I've been working on (was working on when I had more time), and I plan to eventually build the Nippon Maru, just not right now. While Woody Joe seems to limit production and sell a kit until they run out, I think these should be available for a while yet. Also, I still have a Charles Yacht, another Hacchoro, another Higaki Kaisen, the Kanrin Maru kit I mentioned, a Sir Winston Churchill, an old line (before laser-cut production) Sengokubune and an out of production Kitamaesen to build. I've been thinking I really should add a couple of these to the sales list too. But, in fact, if nobody wants to buy any of these kits, I won't exactly be heartbroken! Clare
-
Let me add that with the Kanrin Maru kit, I'll add a copy of the kit review I wrote in Ships in Scale a couple years ago. Also, since I'm already building another identical kit, I can share my research on the subject and some construction photos. Also, with the Nippon Maru, I'll include a CD with the photos (over 200 I think) I took aboard her sister ship, Kaiwo Maru. There are some various small differences between the two, but the photos should provide some useful details. You can always access my Wood Joe Kit Builder's Guide on my shipmodeler blog. Just hover over the Resources menu, scroll down to Shop Notes and choose Woody Joe Kit Builder's Guide. I just looked at it again and realized there's something I should add about identifying parts. So, I'll probably be updating it in the next month or so. Clare
-
Hi Don, In fact, I just jumped back in on the Independence and going full tilt to get her done. I think I'll have the rigging finished this weekend, and then I have to work on finishing and mounting the swivels. Also, I lost the compass I made, so I'll be remaking that as well. That should be it. Unfortunately, I haven't had time to blog about it. Too much to do! Clare
-
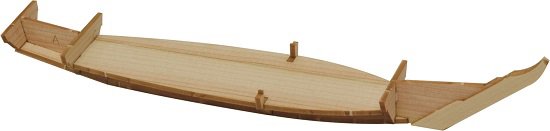
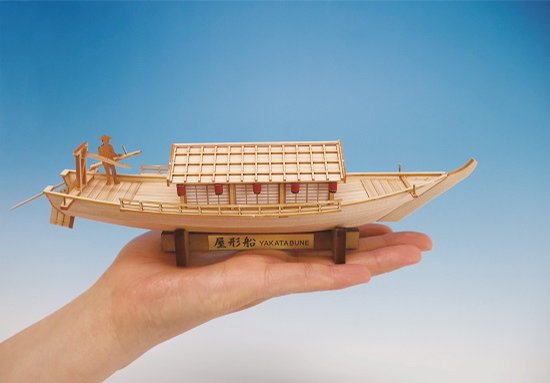
Well, as long as I'm posting today about needing some Syren 5/52" Swiss pear single blocks, I thought I'd also take the time to offer some kits that I have on hand. I've been realizing that I just have way too big a stack of Woody Joe ship model kits, all brand new in the boxes. I'm cutting down the stack, though I will still have something like a half dozen to build! Two kits are still available: Yakatabune mini-kits, 1/75-scale Kanrin Maru w/sails. While they all have well illustrated instructions, please keep in mind that what text there is it's in Japanese. I don't really NEED to sell these, but I'm not getting to them any time soon. I've listed some of them on Amazon.com, but I'm offering them here for a bit less. Please contact me for more information, photos, options. Yakatabune mini-kits (1 sold, 1 still available) Length 210mm Width 49mm Height 57mm $45 + shipping Kanrin Maru w/sails, 1/75 scale The Kanrin Maru was built by the Dutch at the request of the Japanese Shogun, becoming her first screw steamer and her second steam warship, the first being the paddlewheel corvette Kanko Maru (ex-Soembing). Kanrin Maru became the first Japanese navy ship to visit the United States as an escort for the Japanese embassy, arriving in San Francisco on March 17, 1860. Aboard the ship was then Lieutenant John M. Brooke, who with a handful of American sailors, was instrumental in the ship's successful navigation across the Pacific. The details of the journey are chronicled in the book John M. Brooke's Pacific Cruise and Japanese Adventure, 1858-1860. With the model kit, I'll add a copy of the kit review I wrote in Ships in Scale a couple years ago. Also, since I'm already building another identical kit, I can share my research on the subject and some construction photos. Length 820mm Width 203mm Height 487mm $320 + shipping


-
Hi All, I'm putting out a general call out to anyone who may have some extra 5/32" single Swiss pear blocks from Syren Ship Model Company. I'm running very short. As you may know, these are out of production and only boxwood blocks are now available and I don't need those. I've checked with Chuck Passaro just in case, but no luck. I have a small supply of other sizes of Swiss pear blocks. I'm hoping someone out there has an extra pack or two of the 5/32" singles they might be willing to sell or to trade for another size they might need. Thanks in advance for your responses, Clare
-
Hello navymast, I recommend going through Seawatch Books. I'm sure they can forward your letter or email to one of them. Here's a link to the page with their email, phone and postal address: SeaWatch Books | Contact Us Clare
-
Hello All, I just wrote up an out-of-the-box review of the Sir Winston Churchill kit that Woody Joe revised and re-released last year. I posted the review on my blog, but though I'd go ahead and put it here too. I was originally going to write this for Seaways' Ships in Scale magazine, but I've already written three Woody Joe kit reviews for them, and I figured people might get tired of reading them in the magazine. So, I put it here. Of course, I don't get any money when I post articles online (and I could really use the extra income), but I was going to write it regardless. Hope you find it useful! The sail training schooner Sir Winston Churchill is a beautiful looking 3-masted, steel-hulled schooner that was originally launched in 1996 to compete in the Tall Ships Race. Woody Joe's revisted kit was released in 2015. The model is 1/75-scale and measures 24" long and just over 20-1/2" tall. Like other Woody Joe kits, the model features plank-on-bulkhead construction, using Woody Joe's box-frame structure, which is designed to help the modeler more easily achieve good alignment of the parts. The kit features lots of laser-cut wood parts, with a healthy supply of both cast metal and photo-etched brass parts. The only plastic parts in this kit are the lifeboats and rigging blocks. It no longer surprises me to look inside the box of the Woody Joe kits. Their ship model kits fit well in the box, and everything is plastic bags, so that the box is full, and the bags are so numerous that they provide a certain cushion, keeping items from getting knocked about and damaged in shipping. One sheet of styrofoam fills the remaining space underneath, keeping things from bouncing around in the box. Small parts are organized into separate bags, with each bag carded and labeled with the part numbers, descriptions (though in Japanese) and quantities in the bag. Small bags are stapled to a cardboard insert that keeps the box nice and neat. A small coardboard tray at one end seems to be a standard packing feature of Woody Joe kits, and contains any loose packages of parts as well as the spools of rigging line. The plans consist of 7 sheets of A3 sized paper, 13" x 19" each. Six of these sheets are pairs, so that they make up 3 larger drawings. Registration marks are provided, allowing you to align the sheets properly. Some of the older Woody Joe kits have larger sheets, but I expect that there is a cost-cutting move to these smaller sheets as they can be printed on a large office laser-printer instead of a dedicated plotter. Given the alignment guides, this shouldn't be a problem for the builder. There is one oddity, however, in that the models is about 1/4" too long for the plans. The result is that the top of the jackstaff at the stern is cut off. This is a minor issue, but it's a little odd to look at. I don't it will create a hardship for any builders. Instructions The instruction book is extremely well illustrated with steps clearly identified, and lots of color drawings and photos. Being that this is a Japanese kit made for the Japanese market, all the text is in Japanese. This may put off many potential builders outside of Japan. However, if you are an experienced ship modelers, you shouldn't have any trouble with the instructions. That may not be true of complicated kits of non western-style ships like Woody Joe's Higaki Kaisen kit. But, for the schooners, galleons, clipper ships, yachts, and sailing ships and barks that Woody Joe makes, there's probably nothing out of the average ship modeler's experience. Most of the text in the instructions and plans are labels. There are some instructions, but most are pretty simple in nature. If you look at the example below, Step 8 tells you to use a strip of wood to help you determine the correct bevel of the bulkheads. A close-up of a frame edge highlights the beveled edge. In another example, Step 11 shows you to use alignment marks laser-etched onto the bulwarks piece to get the position correct. Woody Joe does a good job at "dummy-proofing" the process by putting two alignment marks, one for each edge of the bulkhead, so you would have to go to extreme measures to mess up the step. The same step also shows you to pre-bend the bulwarks piece with a photo illustrating how you can bend it over a curved surface, like a large bottle, to apply the curve. One suggestion though, make sure you dampen the wood before you try to bend it. Another piece of advice. Look ahead a step or two, particularly when you see red text in the step your on, to make sure it's telling you not to glue something in place yet. Sometimes, a part, like the deck in this case, is just used temporarily to aid in alignment. If you look at the next step or two, you'll notice that the part is no longer in place. That's a good clue that you're not supposed to glue that part. Also, in any red text, look for a step number. If you jump to that step, you may see where the part does get glued into place, helping you get a better handle on the big picture. Being that this is a model of a steel hulled vessel, Woody Joe's method of hull construction is particularly well suited. The stern, in particular, requires a stack of laser-cut blocks that you must file to shape. This works just like bread-and-butter style hull construction, with the blocks pre-defining your contours for you, making it very easy to get exactly the right shape. My steel-hull comment above refers to the fact that with some models, you want the lines of planking to show. But, this method used the stern block un-planked and flush with the hull planking. On a model of a steel-hulled ship, this is a non-issue, as you want a good smooth surface anyway. And the method results in an accurate hull shape. On this model, the deck is not planked. Instead, you are provided with a single laser-scribed sheet, with all the deck planking and waterways already marked for you. Wood The wood in the kit is made up of at least three types. The frames are made of some type of plywood that resembles birch; the remaining laser-cut parts and most of the strip woods are Hinoki, or Japanese cypress, a very pleasantly aromatic wood that is stiff and slightly brittle when dry, but bends easily when wet; and some structural parts, such as the stern blocks, are a fine-grained, grayish wood called Ho (I don't know the western equivalent name). The laser-cut parts are interesting in that there is almost no char. Either a lot of care has gone into the manufacturing of the kits, or the woods used are thin enough or possess some other quality that makes the laser cutting process easier. Probably, it's a combination of both, as Woody Joe tends to use parts that are a bit thinner than other manufacturers All laser-cut sheets are also laser-scribed so that part numbers are clearly identified on the part or next to it. Woody Joe also makes good use of scribed lines to create alignment guides and beveling guides or, in the case of the deck sheet, the outlines of the planking. Fittings As I mentioned before, fittings are well packaged and identified. Each pack is carded, includes the part number and quantity. Note that Woody Joe's quality control is very good, and I've yet to hear of missing pieces. But, if the model calls for 20 turnbuckles, as shown below, that's exactly what you'll get. There's no extras thrown in, so make sure not to lose anything, as it's not going to be very easy to claim that the kit was just missing a piece. Those who don't like plastic, can easily upgrade these few parts using commercially available fittings. My preference for wooden blocks would be for those made by Syren Ship Model Company. Being that this is a 1960's steel-hulled schooner, perhaps metal blocks such as those sold by BlueJacket Shipcrafters might be more appropriate. Cast metal parts are plentiful and the castings are of excellent quality. I've had someone ask me about them before and I'd send them photos, and after getting the kit, they told me the photos didn't do justice to the high quality of the castings. They're very good. There's also a nice sheet of photo-etched brass parts, some turned brass parts, etc. Rigging and Sails The kit includes three sizes of black line for the standing rigging, and one size of tan line for the running rigging. These are provided on plastic spools, so there's no worry about your line getting tangled and knotted. The sails are a stiff cloth, possibly, this is pre-stiffened in some way, as the cloth comes rolled, not folded. The material is printed on one side, and the ink used is a beige color, so the lines of the sail are subtle, as they should be. Weaknesses in the Kit Really, this is an excellent looking kit. I think the detail is better than the Kanrin Maru kit that was the first Woody Joe kit I'd ever reviewed. I was actually pretty excited by what I could see of this revised kit when it was released, and I haven't lost any of my enthusiasm for it when I looked it over in detail. Wood Joe kits are, however, designed to be relatively easy to build, and there are sometimes simplifications that experience ship modelers might not like. But, these seem to be pretty minor in this kit. In fact, some things that I might consider a weakness, are just a matter of personal taste, like the use of a plastic for the blocks and dinghies. There is really just one weaknesses that I can see in the Woody Joe kit, and that is that the laser-scribed deck sheet is thin and a little delicate, and will require some care to work with, as I've discovered in working with the kit. In particular, the deck is weak along the laser scribed planks. If you run into any issues, I recommend reinforcing the deck by gluing some short wood pieces underneath. Just make sure that they don't interfere with where the deck rests on the framing. You might even want to do this before you run into any issues. Less of a weakness, and more just a simplification, is that the way the mizzen sail attaches to its mast. The use of mast hoops are shown, but I believe the real ship doesn't use mast hoops there, because the spreaders on the mast would interfere with the raising and lowering of the sail. Instead, I believe there is some internal track inside the mast to which the sail attaches. I don't know how a kit manufacturer would design this in a kit thats supposed to be a fairly easy build. Certainly, just using mast hoops is simple. Another simplification are the yokes on the ship's squaresail yards. These are simply made from stamped brass in the Woody Joe kit. This is the same thing they do in their other kits as well. I've tried to catch a glimpse in photos on the Internet of what these look like on the real schooner, but I've had no luck. I'd probably replace this with something that looks a little more realistic, even if it's not accurate. Woody Joe versus Billing Boats The Woody Joe kit's of scale of 1:75 is the same as the Billing Boats kit of the same ship. I had hoped to find the Billing Boats kit to do a comparison, but it's been hard to come by. However, I'm pretty familiar with the Billing Boats offerings and their instructions and plans. Pricewise, the Woody Joe kit lists for ¥30,000. At this time, that's about $300. The Billing Boats kit, by contrast, lists for $280 at Ages of Sail, which is the U.S. distributor for Billing Boats. Having seen other Billing Boats kits, the main comment I can make here is that the packaging of the Billing Boats kits doesn't even come close to the care taken with the Woody Joe kit. Most Billing Boats kits are put in oversized boxes that are sturdy, but leave the parts to slide around inside, often allowing the heavier wooden parts sheets to potentially damage the bags of fittings. I've seen this in many cases, where the parts bags get torn in shipping and small parts fall loose in the box and either slip out of the box or end up damaged. Also, the parts in a Billing Boats kit are usually just all piled into one bag, requiring you to sift through them to find out what's what, and to make sure you received everything you're supposed to. Both the Woody Joe and the Billing Boats kits offer laser-cut wooden parts, stripwoods for planking, dowels for the masts and spars, rigging line, etc. Both offer turned brass fittings, photo etched brass, as well as some plastic parts. But, one difference is that the only plastic parts in the Woody Joe kit are only the blocks and the two dinghies. The Billings Boats kit provides quite a few detail parts in plastic, including the props, cabin doors, fife rails, binnacles, ladders, boat chocks, anchors, etc. Most of these are either cast metal or laser-cut wood in the Woody Joe kit, which certainly adds to the cost. However, the Billing Boats kit does have the advantage of including one page of instruction in English. You can check the Billing Boats instructions out for yourself, as they have the instructions on their website and you can download them here. As for the Woody Joe instructions, simply from the images I posted above, you can see that with any experience, you should be able to build this model just from the numerous color photos and illustrations. And comparing the two brands, Billing Boats gives you 9 pages that have a large black and white, labeled instructional photo or diagrams, many of which simply show you where things go, plus 3 pages of illustrations of the included parts. Woody Joe provides 33 pages that are packed with color photos and illustrations. That said, I actually do like Billing Boats kits. They seem to do a nice job on overall accuracy of the basic structure of the subject. Where they may be a little lacking in detail, they can be enhanced by a good modeler. And, I for one, am the kind of person that will buy a kit and replace the fittings with ones I like better. So, a cheaper, but accurate kit isn't necessarily a bad thing. But, if your expectations are high for a kit, and you appreciate quality and want something that will build into a beautiful model with a minimum of fuss, the Woody Joe kit is hard to beat. To purchase the kit, you might be able to find it on Ebay or Amazon, but I recommend the Japanese online seller Zootoyz. I've worked with the owner, Mr. Kazunori Morikawa, for the past couple years and his service is very good. He stopped selling Woody Joe products for a while, but resumed a couple months ago. Ω
-
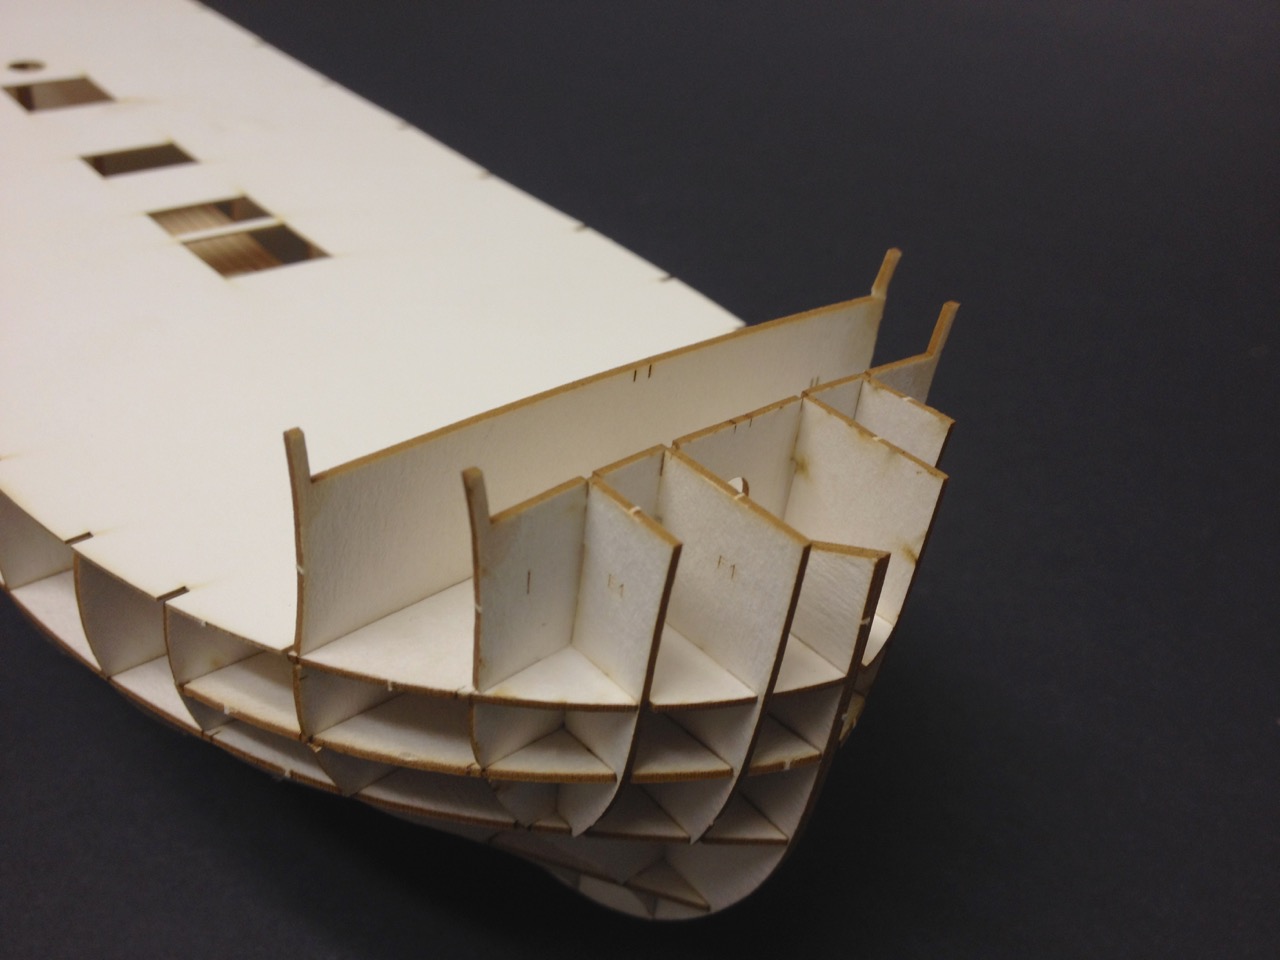
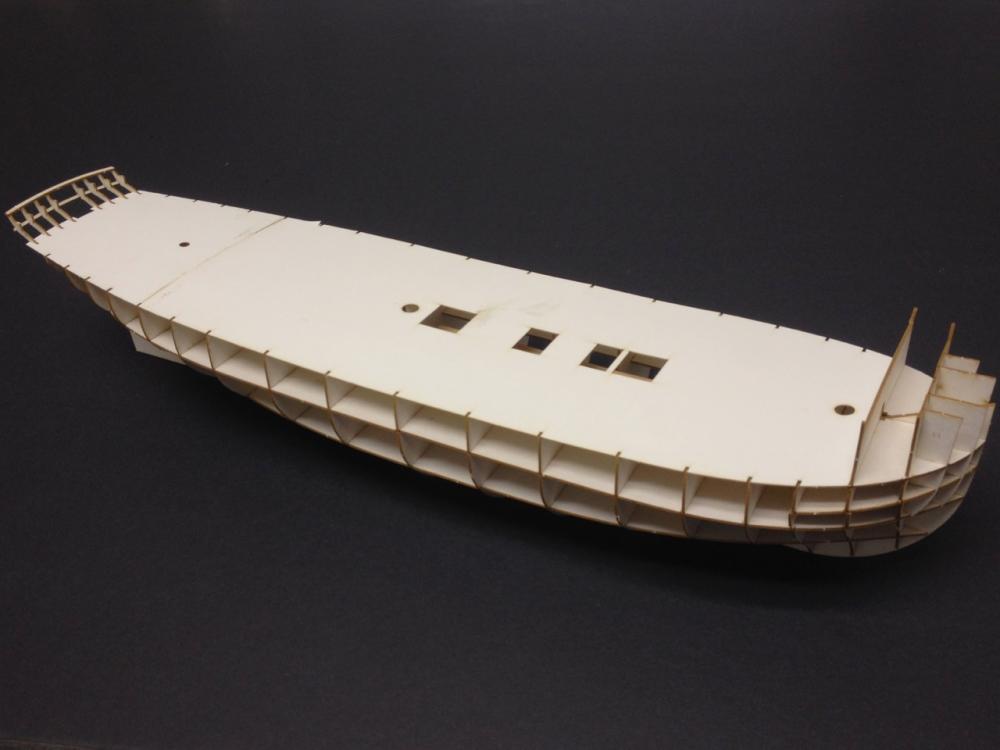
I'll have to admit that my recent post wasn't much of an update and doesn't really say much of anything. So, I'm continuing on here. I have been trying to figure out how to make sure that my bulwarks core pieces will be lined up properly on the hull. The reason I thought it was important is that the gunports are pre-printed on these pieces and have to be cut out. Those have to line up with the gun ports cut out of the inner bulwarks pieces as well as those of the outer hull pieces. So, if something is off somewhere some parts aren't going to line up correctly, and that's gotta show up somewhere. Realizing that the inner bulwarks pieces can only fit between those inverted knees and bulkheads that are already glued in place, it seems that the position of these pieces, and their gunports, is pretty well determined. But, even with so, there is a little wiggle room as I discovered some of the inner bulwarks pieces will need to be trimmed a little in order to fit. It would seem a lot of test fitting is in order at this stage. So, I decided it was time to go ahead and laminate (to a thickness of 0.5mm) and cut out all those inner bulwarks pieces. You'll notice in that last photo, I finally got smart and wrote the part number on the back of the part. So, I did a little dry fitting, but it is clear I'm going to have to get a little more elaborate and start taping or temporarily tacking lots of pieces into place to work out the alignment issues. Still, I think this is going to go a long ways toward getting this hull together right. Clare


- 82 replies
-
- 16
-
-
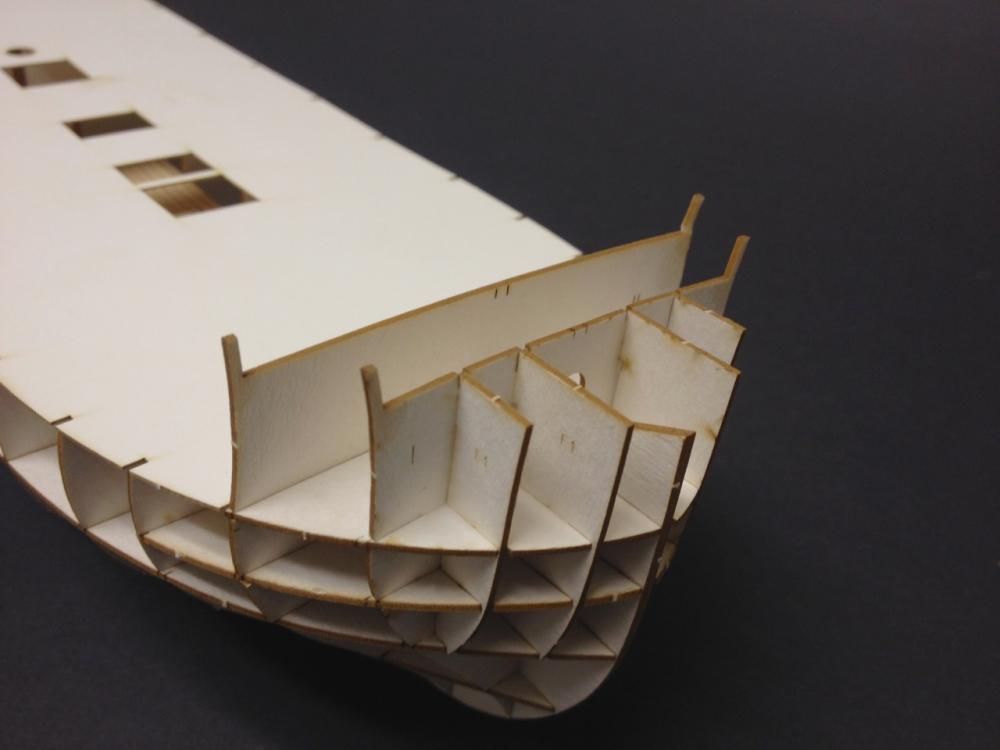
At the NRG Conference, I took my HMS Alert model and it was nice to see some of the attention it got as a paper model. I had brought my HMS Mercury project, but I didn't work the Ages of Sail table like I did at past conferences, so I didn't really trust that it wouldn't get squished and didn't bring it out. But, yesterday, I finally did a little bit more work on it. I cut the core pieces for the bulwarks, which the gunport linings will be glued to. I attached the bow pieces, which have no gunports, and test fit the other pieces. In doing so, I realized that I screwed up on the placement of those inverted knees. I have no idea how it happened. I must have mixed up some of the part numbers, but I can't tell because the part numbers were on the parts sheet area that got cut away when I cut out the pieces for the knees. Another good reason for photocopying all the parts sheets, which I didn't bother to do in this case. I managed to make the repairs last night, removing the knees that were in the wrong place and relocating them and fixing the bulwarks spacer on one of them. All appears well, and I'll be adding the gunport linings next. I think I'll attempt to do this with the bulwarks sheets off the model, as the sheets are not very sturdy and I think they'll be easy to mess up once glued in place. One oddity is that you may notice that the inboard hawse pipe has a frame partially blocking it. I don't see how I could have messed this up. There simply aren't any options when cutting and applying the conflicting pieces. So, I have to assume this is a kit fault. Later, I'll either have to black out that frame and not use the inboard hawse pipes, or I'll have to drill it out. That shouldn't be too much of an issue for the structure once the hull planking and forecastle deck is in place. Clare

- 82 replies
-
- 10
-
-
In addition to asking Chuck to do a one-off laser cutting job, I understand Bluejacket also provides the service. I've used Pololu, one of the companies that Chuck mentions. You can use the material they supply, or you can send them the material you want to use. Not sure which services will do the necessary CAD work for you, but Pololu accepted an Adobe Illustrator file to do my laser cutting work.
-
Thanks Druxey, Carl. Bill, working from copies is smart. I have done that at times, but I get lazy with it and end up using copies as my backup. The color on the printed parts is so good that I don't even bother copying those. If I screw up, I'd probably just pick up another kit. Coming from the wooden ship modeling background, and knowing the amount of time spent on model making, the cost for the kit is pretty insignificant. As for the Cleopatra kit, I'm inclined to agree with Chris, and would avoid buying from Chinese sources right now. As far as I know, all the Shipyard kits are of the same A3 format, so 8" x 11" doesn't sound right. You can always email Shipyard and see if they can tell you. But, none of the Shipyard kits I have are bound into a book. All the sheets, including the cover and back cover are separate. HMS Victory is the only Shipyard kit that I've personally seen that is in a staple-bound book format. Also, GPM has the Shipyard HMS Cleopatra kit and a laser-cut detail set for it (gpm.pl). If you ordered the laser-cut detail set, you'd be able to tell right away if your kit is the right scale or not. Also, the kit itself is less than $25. Clare ***Follow-up*** I just looked at one of the Shipyard lighthouse kits, and it measures 8-1/4" x 11-5/8". If that's what your kit measures, then maybe it's okay.
-
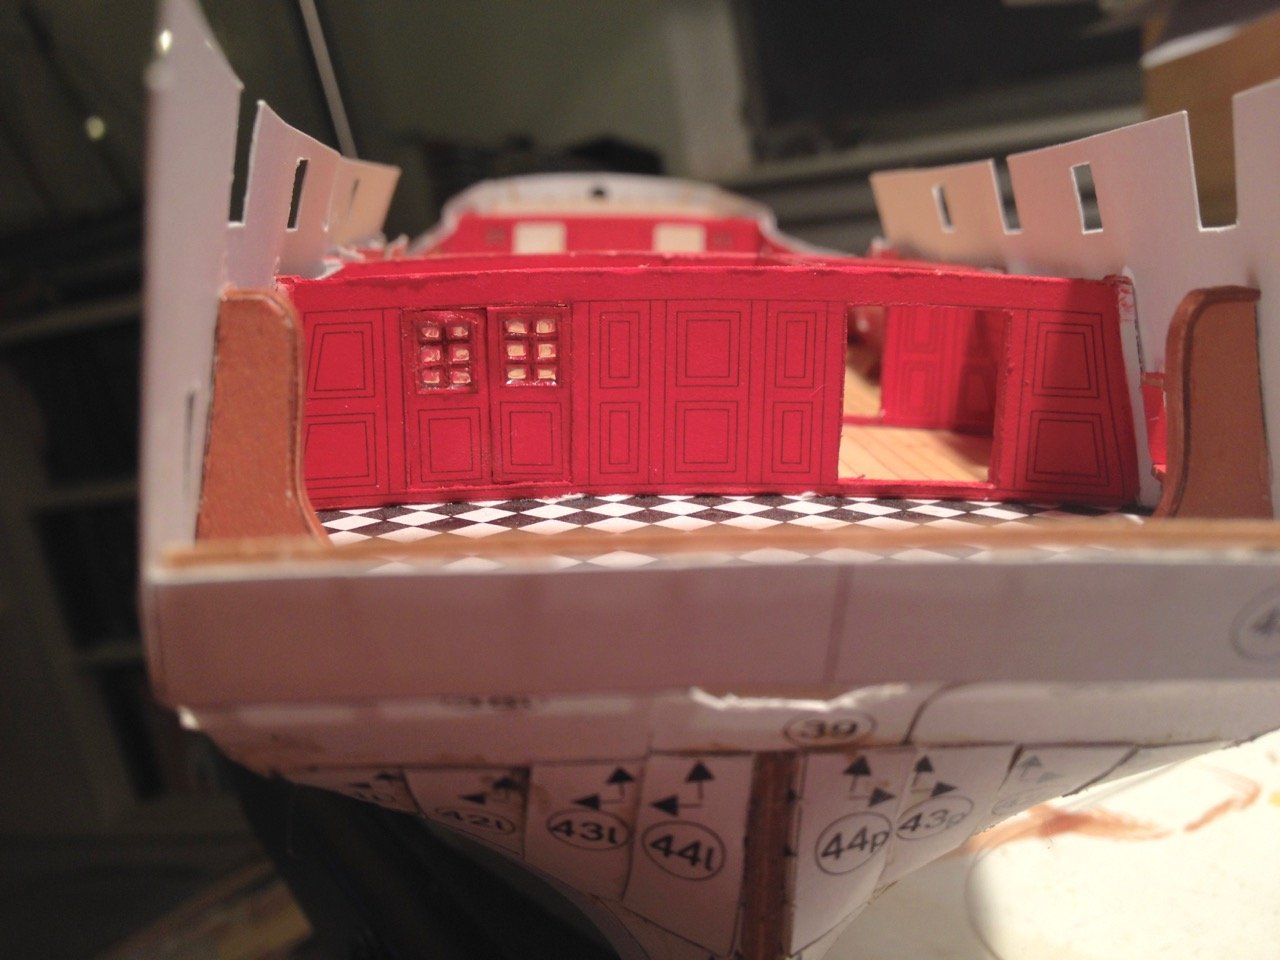
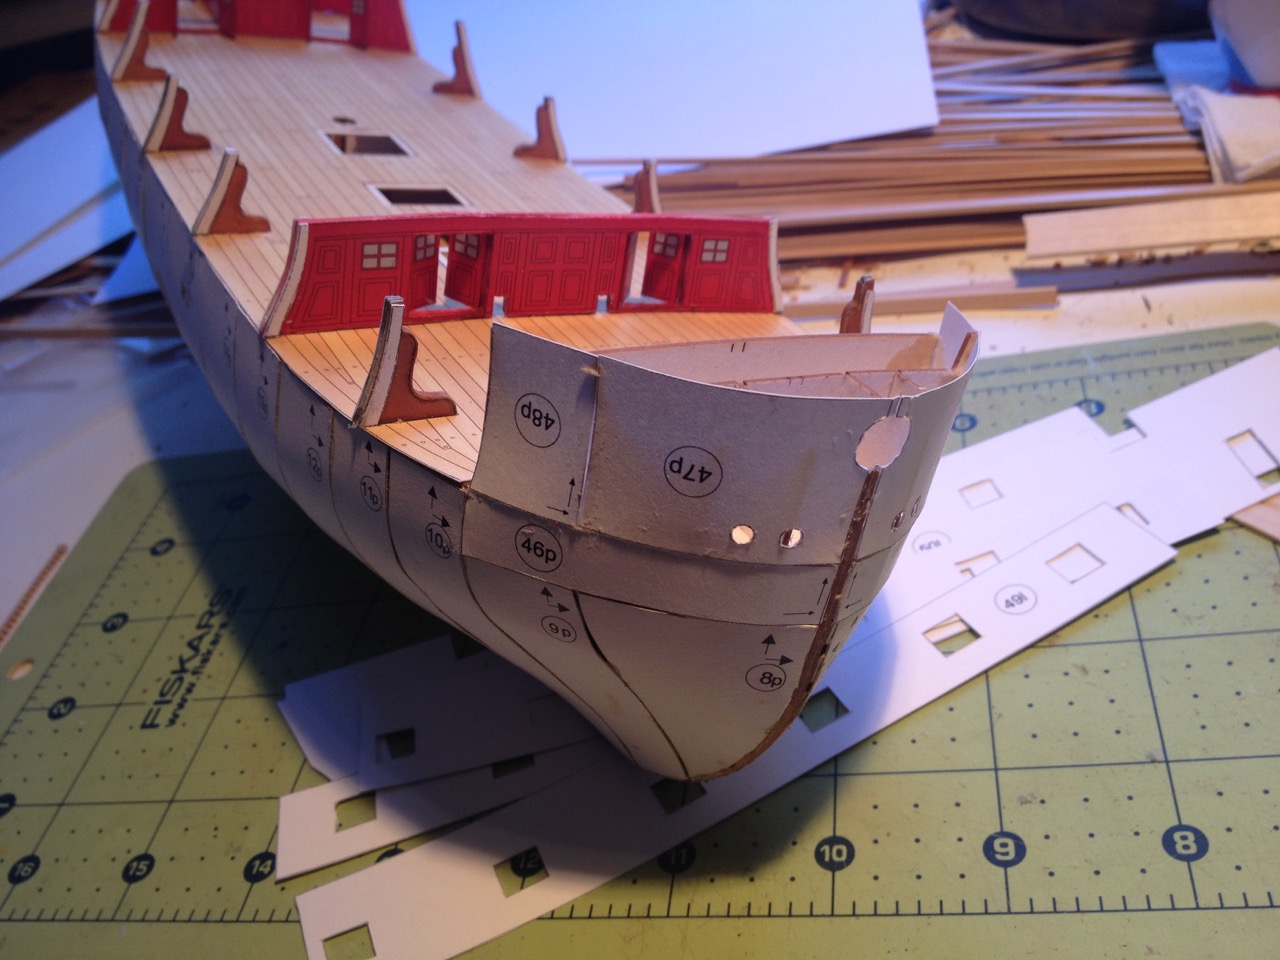
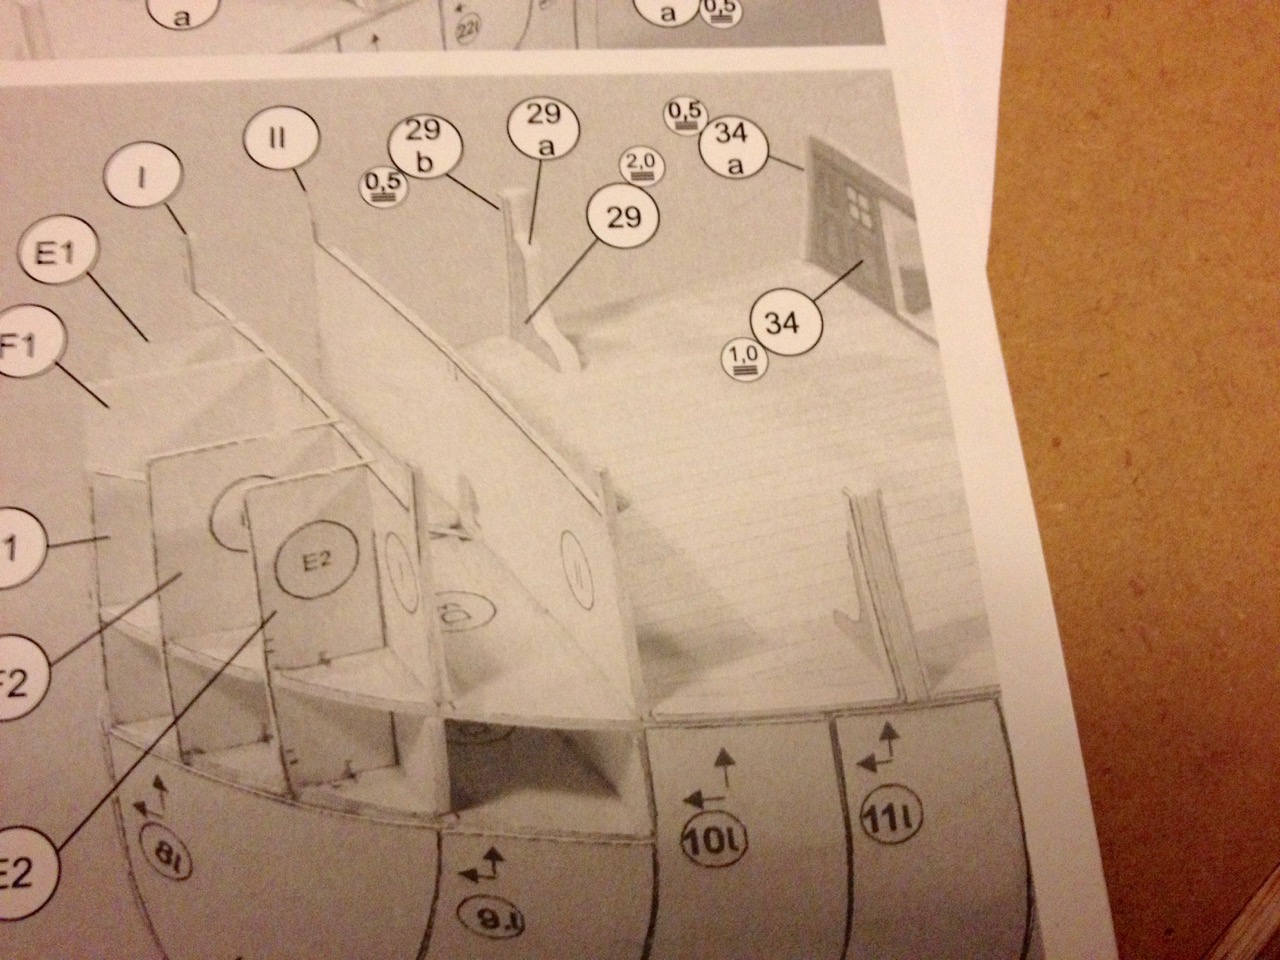
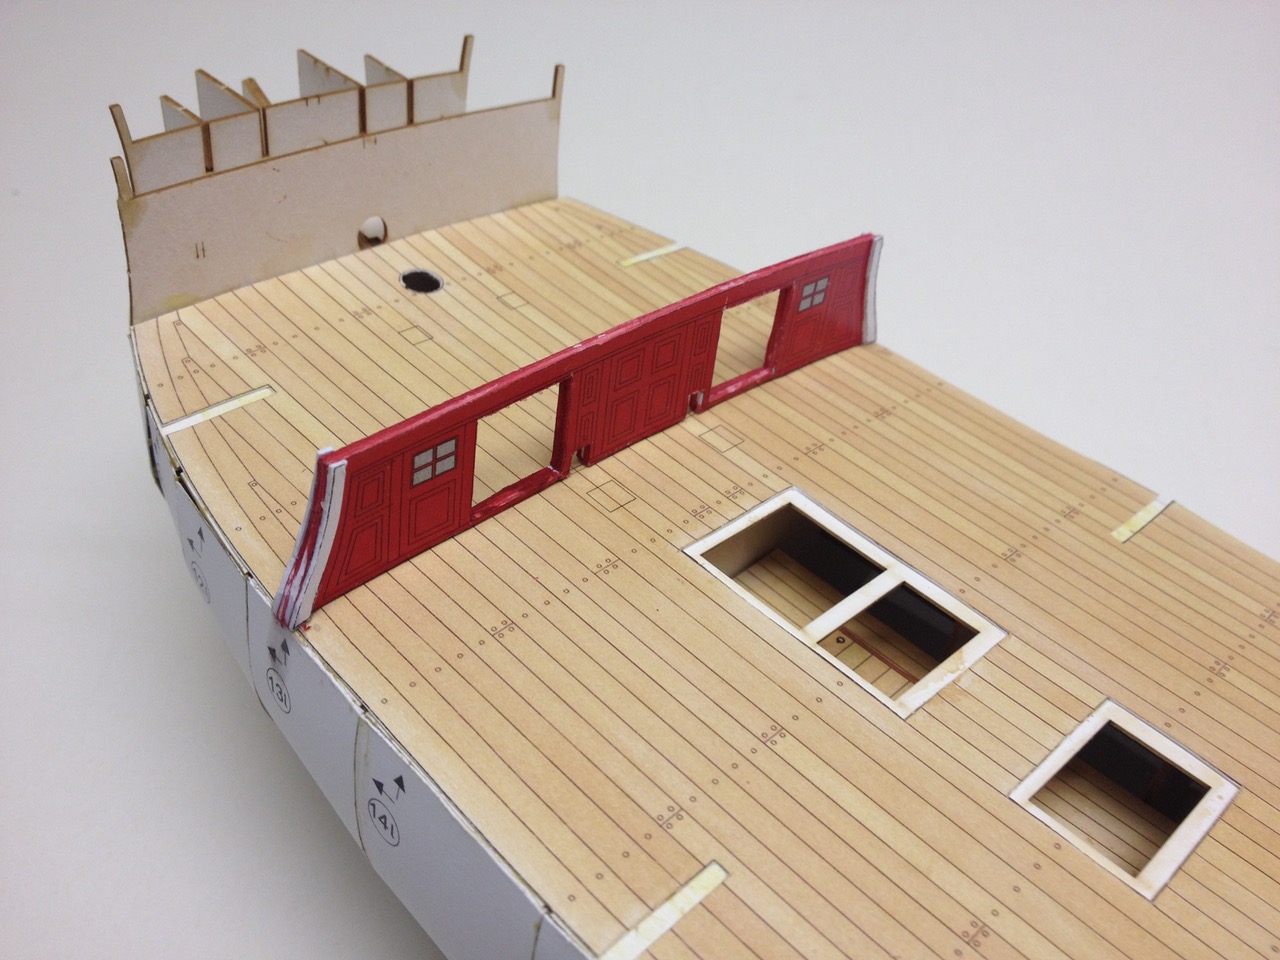
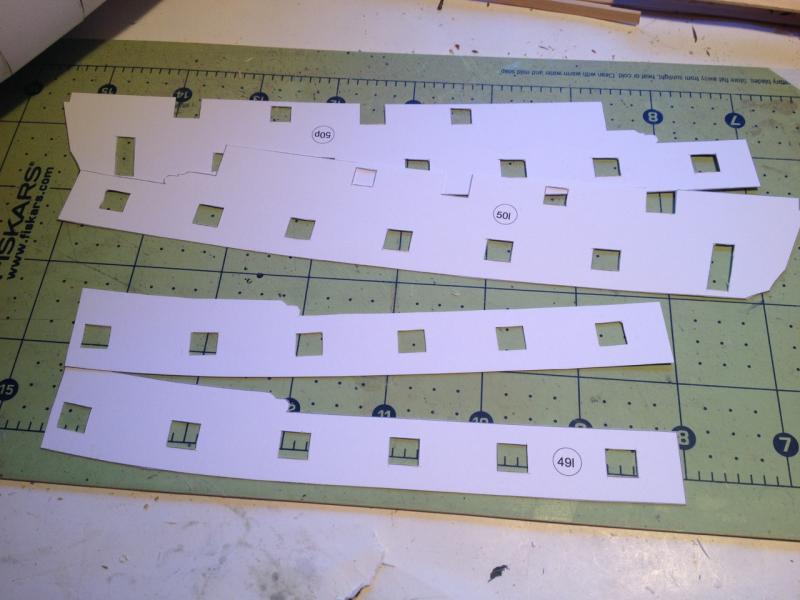
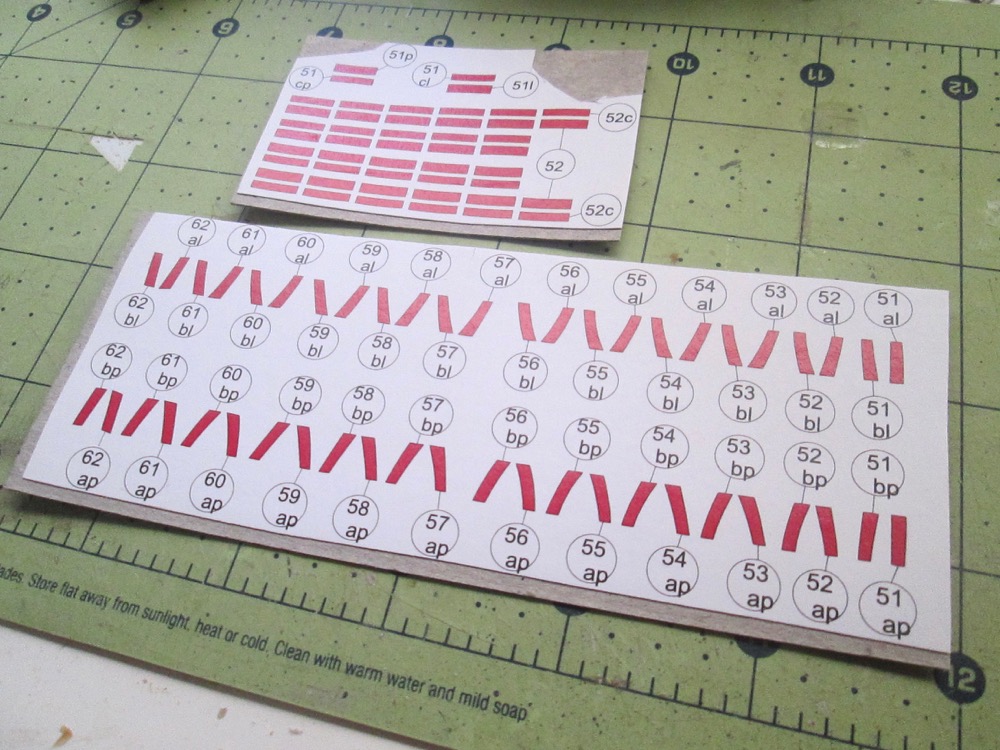
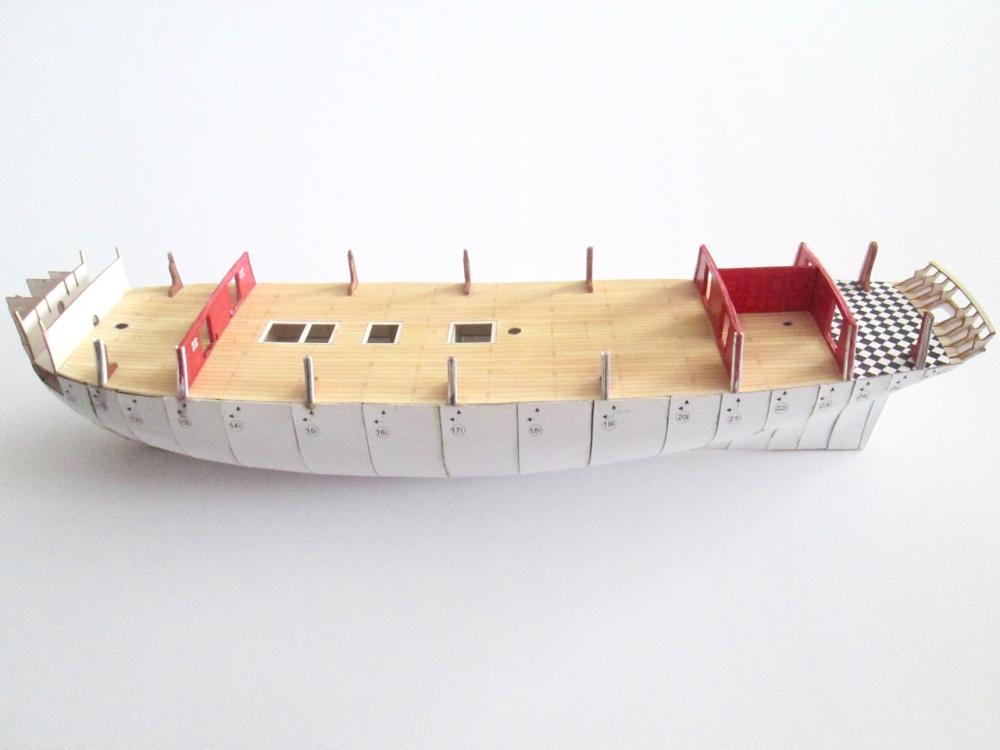
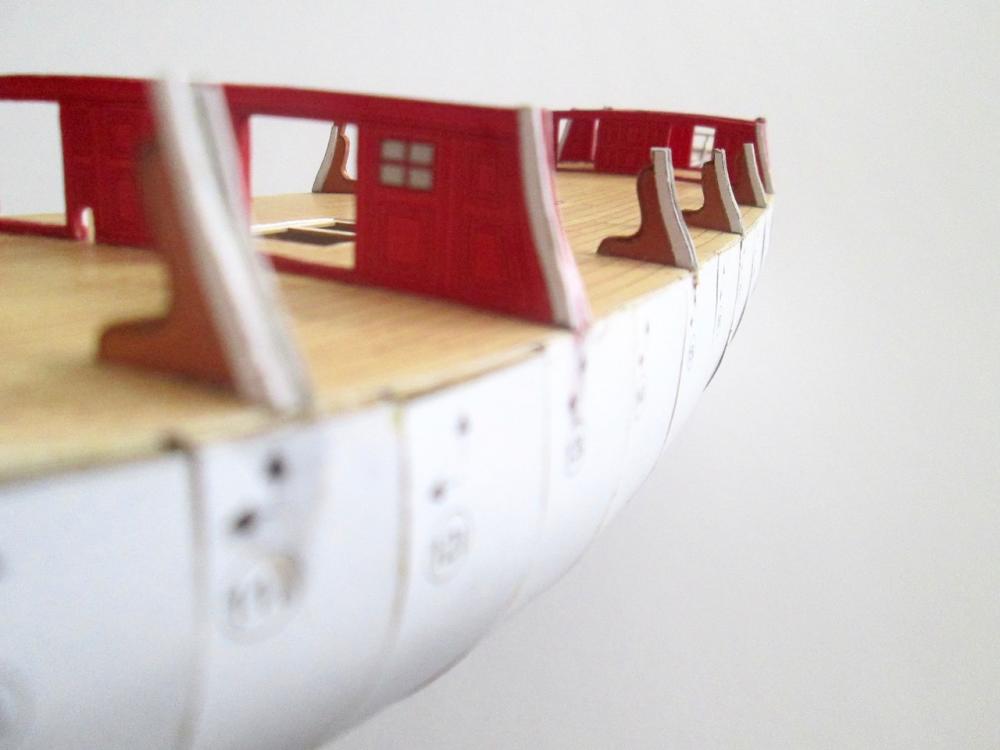
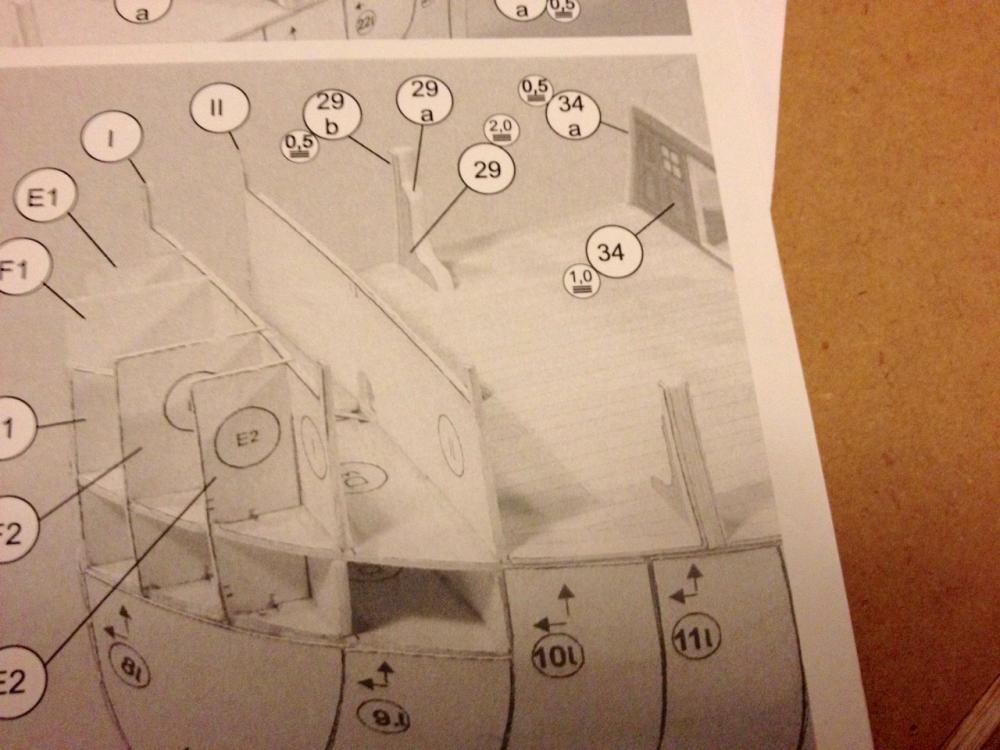
This SHOULD be my last update for a little while as I've got some other things I need to get back to. HMS Mercury has been a great part-time distraction and it's terribly addicting to work on. I'll TRY to set it aside for the next couple weeks as I get some other project work done and prepare for a trip to Japan I'm making at the beginning of next month. More on that later/elsewhere. Well, I managed to put all the interior partition doors in place. For the most part, since these are separate parts, I left them in some degree of openness. This lets light shine through, which is useful, since the internal windows are just printed. As I mentioned before, the gallery lights are also just printed, but the separate "detail set" from GPM has laser cut window frames, so the gallery lights should look a lot more natural. I was all set to start making the gun port frames, which are constructed from 4 pieces each. Then, I discovered that I'd lucked out and don't have to cut out all those parts because the detail set has them already cut. There'll be plenty of tiny parts to cut later. For now, it's nice to avoid that step. Here are the kit's printed parts, ready to cut... Here are the detail set parts, already laser-cut, shown here painted, ready to remove from the sheet and glue up... What you may note here though, is that the gun port frame pieces are individually numbered, because there is a slight difference between them. The detail set isn't number like this, but the parts still differ. Fortunately, the parts are laid out on the sheet in the same order. But, you definitely have to keep the printed sheet intact to serve as a reference. Also, this makes it difficult to make all the gun port frames all at once. Best to make them one at a time and then attach them to the hull before losing track of which one is which. Clare

- 82 replies
-
- 15
-
-
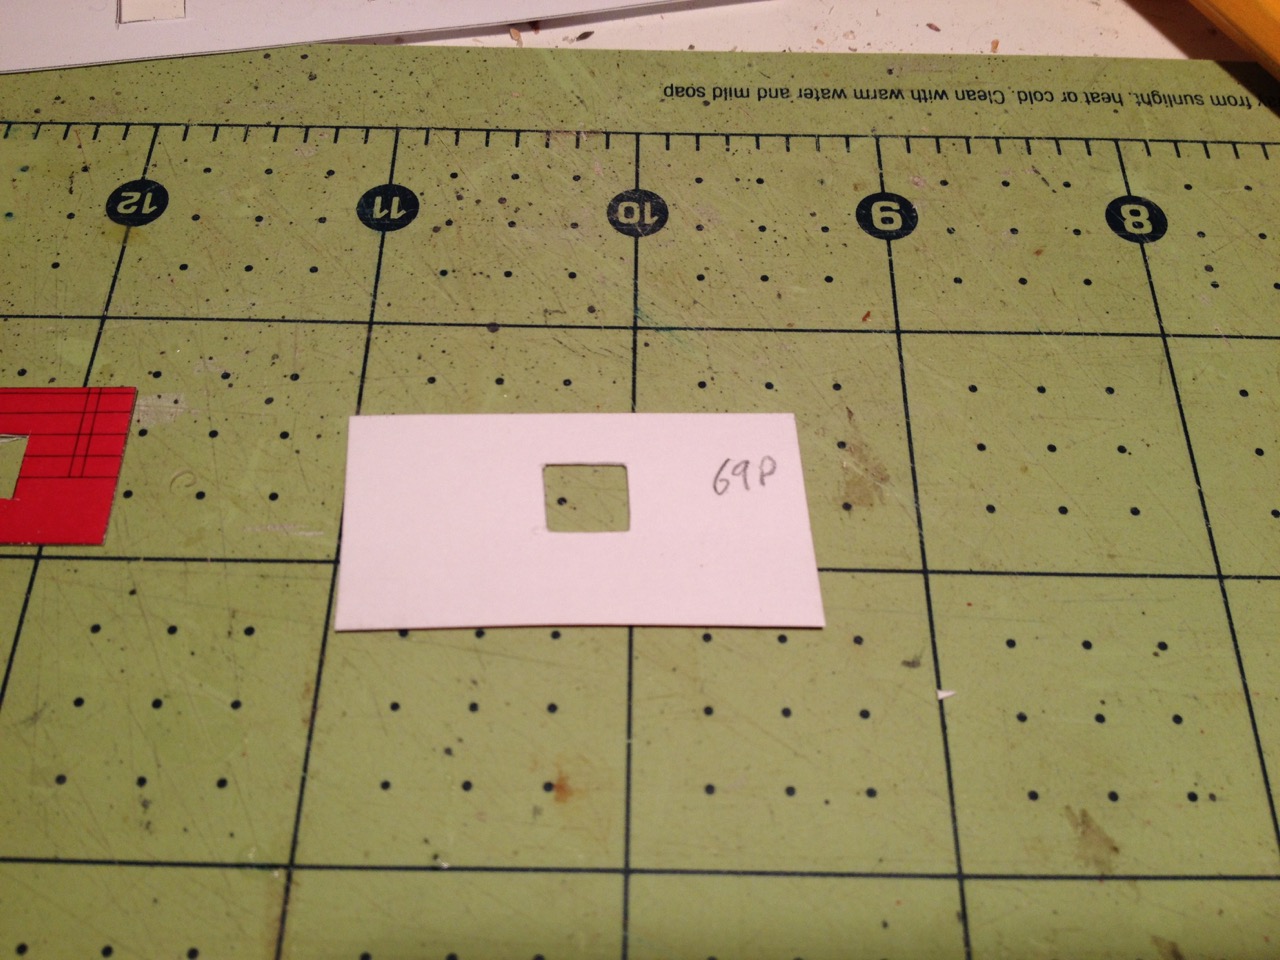
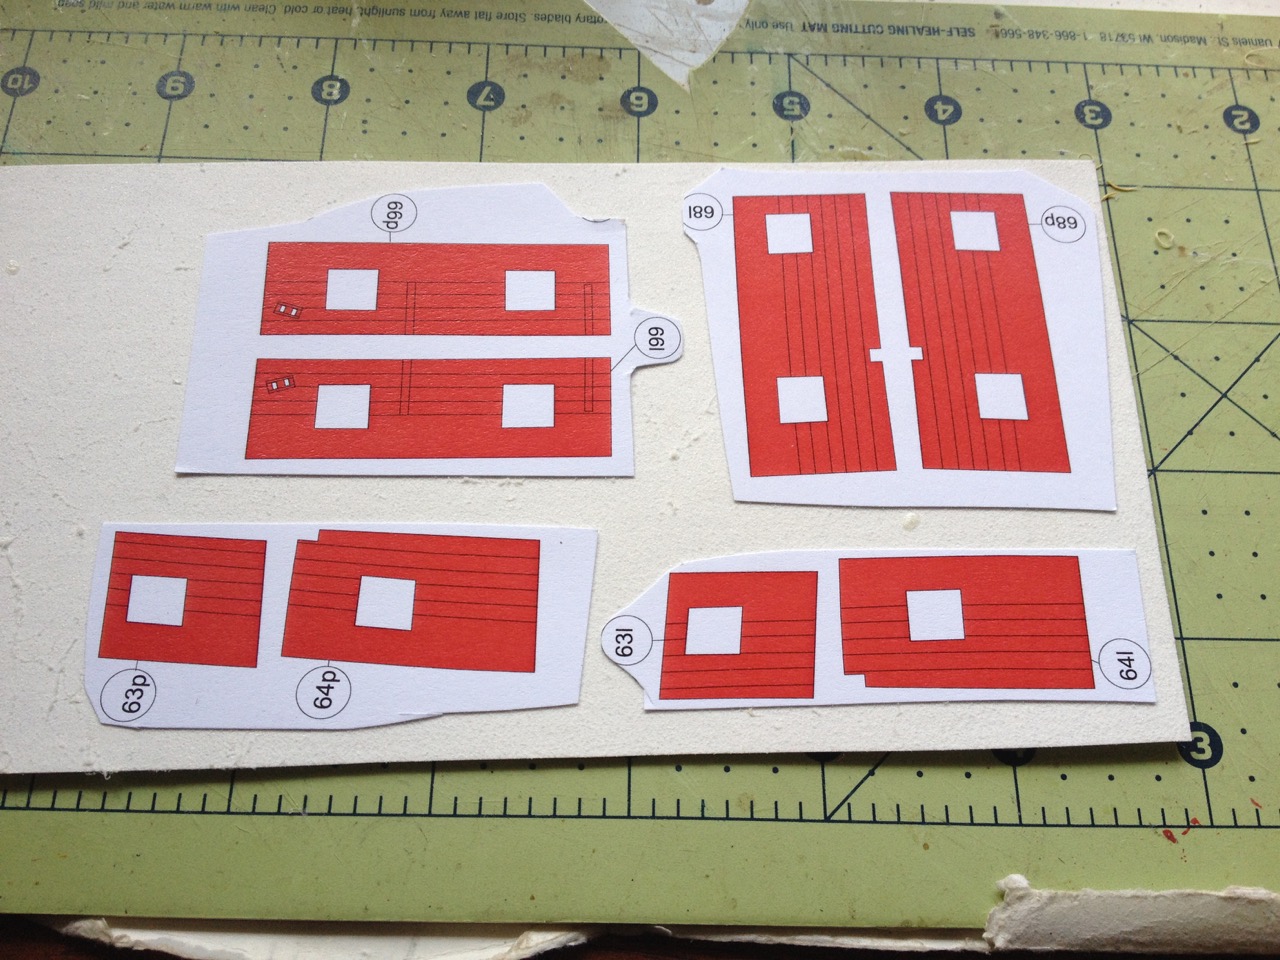
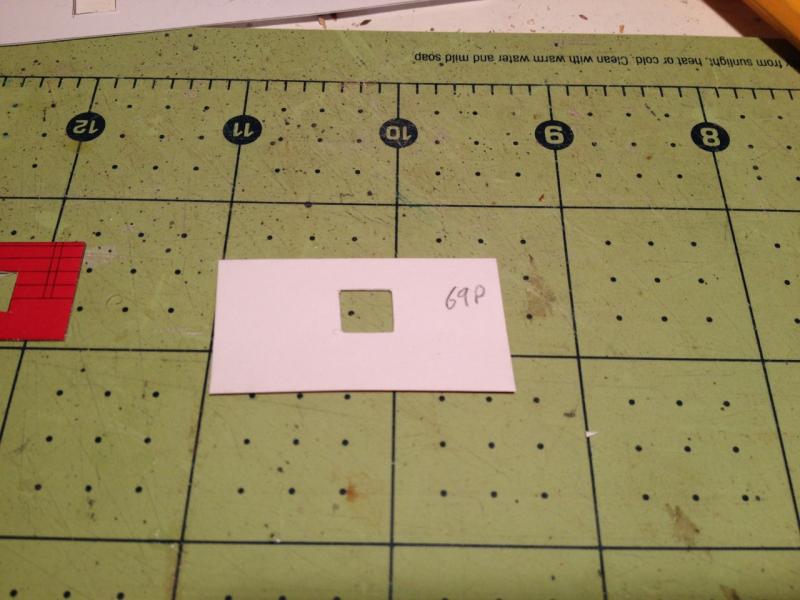
Druxey, Thanks for the explanation! I don't have Shipyard's HMS Enterprize plans, which is the same class as HMS Mercury. I'd be curious to see if they included standards in those plans. They don't show up in their plans of HMS Success. Carl, You're right about those being faster to construct from wood. Once I get past the "paper" model project, it would be interesting to build multi-media style. Using materials that work or are easier to fashion, rather than trying to stick to a class of model. Still, I love wooden ship modeling, but working with another medium is quite liberating. I have Shipyard's Santa Leocadia "Super Modellar Plans", which includes the basic hull parts and some detail parts in paper. I pieced the laser-cut hull framing together as a demo display. Might be interesting to build that as such a model. We'll see. Long ways to go here. Back to my model... If someone out there works on one of these kits, and were I to do this again, I would consider taking and cutting a razor blade so that is very narrow and has a cutting edge maybe only 1/8" long or so. It might be possible then to chop out the printed window panes. Then, sandwich a piece of clear acrylic between the paper sheets for the windows. I'm beyond that stage now for these interior partitions and doors. For the gallery and quarter galleries, I have the Super Detail parts set from GPM. One of the nice things about the set is that it includes laser-cut gallery lights. So, I won't have to worry about those windows looking like silver colored paper. The set is about $24 at gpm.pl (Polish site) plus $12 shipping. It takes only a couple weeks to get, but you just have to put up with the fact that their address form isn't formatted quite right for US addresses. I kind of rearranged my address so it appears correctly. But, USPS seems to get it figured out okay regardless. The set also include laser-cut parts for the capstan, gun carriages, blocks and deadeyes, mast tops (I think), gratings (!), and figurehead. I don't remember what else. It's definitely worth the cost. I much prefer having these gratings on my model than the 2D printed paper. Clare
-
Gunther, I have a lot of kits in my closet too. But, I work on what intrigues me the most regardless of what's in storage. After all, I'll probably never get to all of those kits, and there's no rule that says I ever have to. I usually go through and cull them periodically, deciding which ones I don't really need after all. There's too much cool stuff out there. On scale, I know what you mean. I'd sworn off 1/8" scale at one time. But, I've come to accept smaller scales because of the sheer size of some models. I have a Victory in 1/78-scale in the works and it's big now, but when that bowsprit goes on, it's going to get crazy here. So, I've just put up with the small scale. Anyway, you can get away with faking more at smaller scales! Johnny, I'm looking forward to seeing those build logs. I need to see how this is done! Hey Chris, That's the beauty of paper models. How room do you really need to cut and glue paper? My wooden ship modeling work is all over the place. But, all the paper model work I can do in one small place. And, there's no "stuff" needed except glue, cutting mat and a few small hand tools. Well, of course, I understand your situation, so I don't slight you for not working on any paper models... much Bill, Do you have a build log for your Goeben? I'd love to see how the kit goes together. I bought the GPM kit of the Japanese pre-dreadnought battleship Shikishima. It's pretty interesting, but a very different kind of construction than these Shipyard sailing ship kits. Mike, These kits are amazing well engineered. It makes me wonder why these paper kits can have so many interior details, when a wooden kit has to be heavily modified just to be able to look through the gallery lights to see the inside of the great cabin. It does make me think that one of these days, some company is going to make a larger scale wooden ship model kit with lots of laser-cut parts in the fashion of these paper kits. Timmo, The Enterprize class is the one set of plans I don't have from Shipyard. I figured this HMS Mercury, being an Enterprize-class frigate would do. But, it would be interesting to try this in a larger scale. Don't get me started! Carl, You know, that remark about wood being considerably faster... If I didn't have so many other projects to finish, I might take that as a challenge. I'm beginning to think this model could go together very quickly. Clare
-
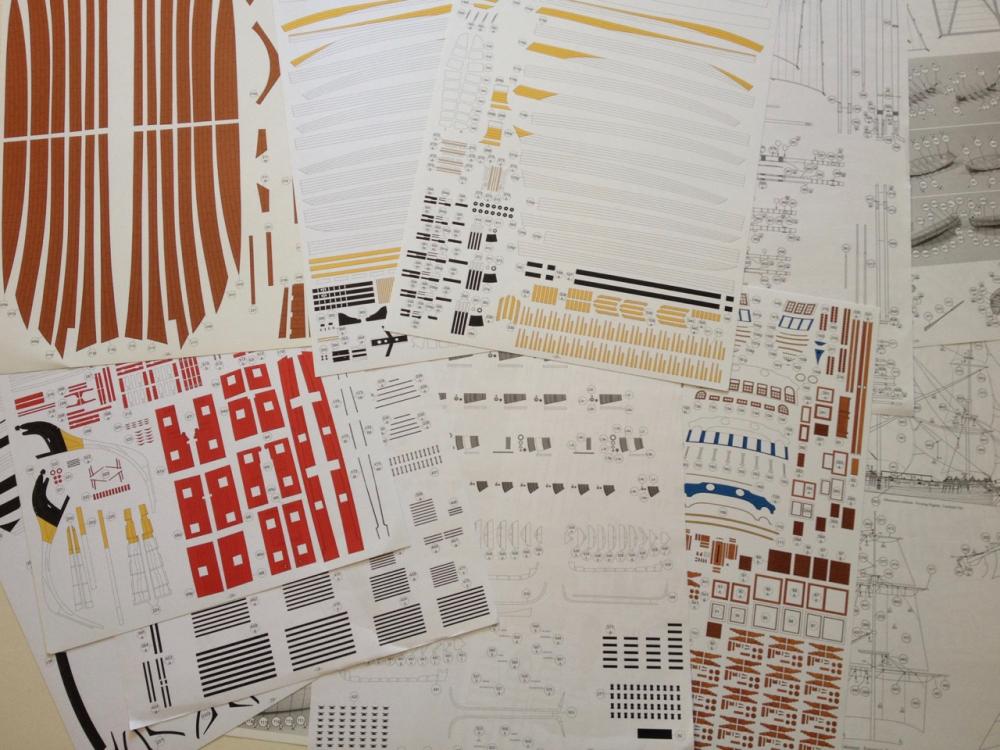
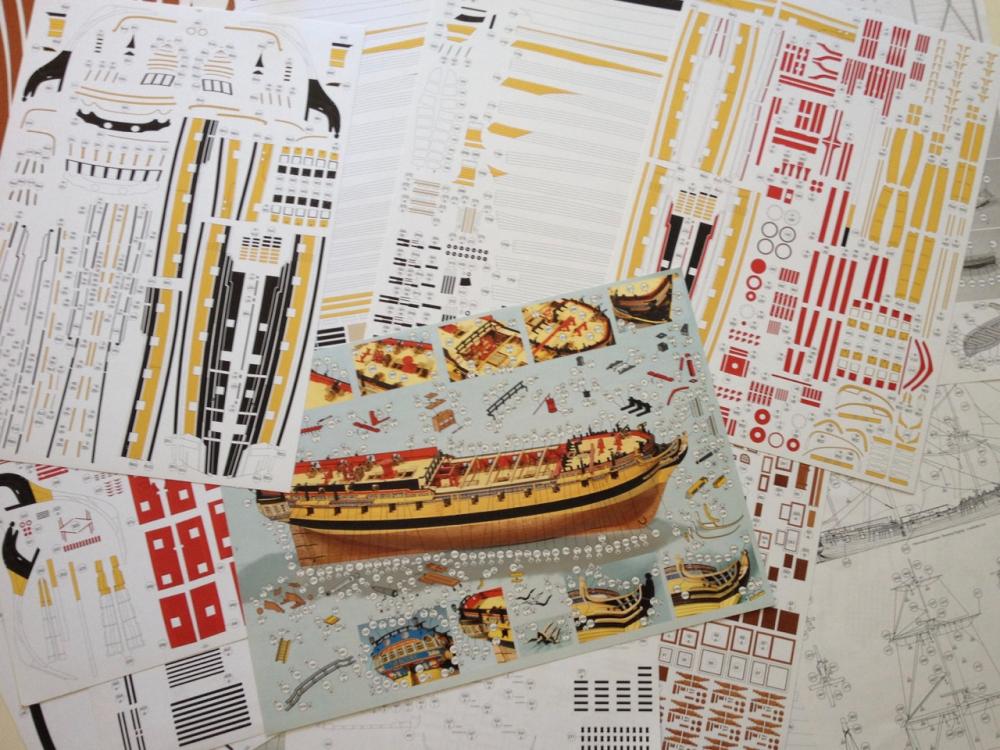
Thanks for all the replies! I really hope to see some more card model blogs soon. Makes for much better discussion when others are going through similar steps and card modeling issues. First off, for those who haven't seen the contents of a Shipyard paper model kit, here's a peek as what you get... Now, for a progress update. I've been putting in a lot of ship modeling hours, getting myself better organized and more productive – at least for now. HMS Mercury has benefitted quite a bit. For this most recent step, I've been constructing these inverted deck clamps. Strange addition, but most people won't know, and it's clear that they will support the bulwarks. Next up, I'm piecing together the interior doors and the gun port linings. I'll also cut out the bulwarks panels and figure out if I should glue the gunport linings to them before or after I put them on the model. I'm thinking, before. I haven't decided if I'll have all the doors in the open position or not. This is only my second paper model, so I'm still learning quite a bit. I think I'm wising up in my cutting and pasting techniques. Mostly, it's about the kinds of glue to use, the kinds of cardboard, whether to glue the printed pieces to the cardboard, then cut the whole thing out, or to cut parts while they're thinner and easier to manage, etc. One thing I've found was that while CA glue can really solidify a piece, the thinner stuff has a tendency to wick in the printed paper and cause discoloration. It's mostly noticeable on the printed deck. I'm going to have to do like I did with HMS Alert and give the deck another couple thin washes of slightly darker wood tone. That not only hides discoloration, but it takes the shine off of the printed paper parts and makes them look a bit more like wood. Clare

- 82 replies
-
- 17
-
-
Jonny, sorry I missed your post earlier about you building HMS Victory and HMS Wolf from card. Do you have a build log somewhere? If not, I hope you'll start one here on MSW. For one thing, I'd really like people to see that there are those of us who really are building models from paper (card), and they really are cool. Clare
-
Hi Chris, I just wish there was another card model build or two going on here. I'd love to see someone building one of the boxed laser cut kits. Ages of Sail has several. The 1/72 scale HMS Mercury kit is a bit too much money for me right now, but I would have considered starting the HMS Wolf kit if I didn't already have the 1/96 scale HMS Mercury paper model kit. Anybody out there thinking of starting one? Clare
-
Hi Carl, Yes, wood is definitely faster for some things. Then again, it's taken an incredibly short amount of time taken to get the hull to this point. But, cutting paper is a slow process when you have these inside curves to cut. For straight sided pieces or gentle curves, a pair of scissors is very quick! Clare
-
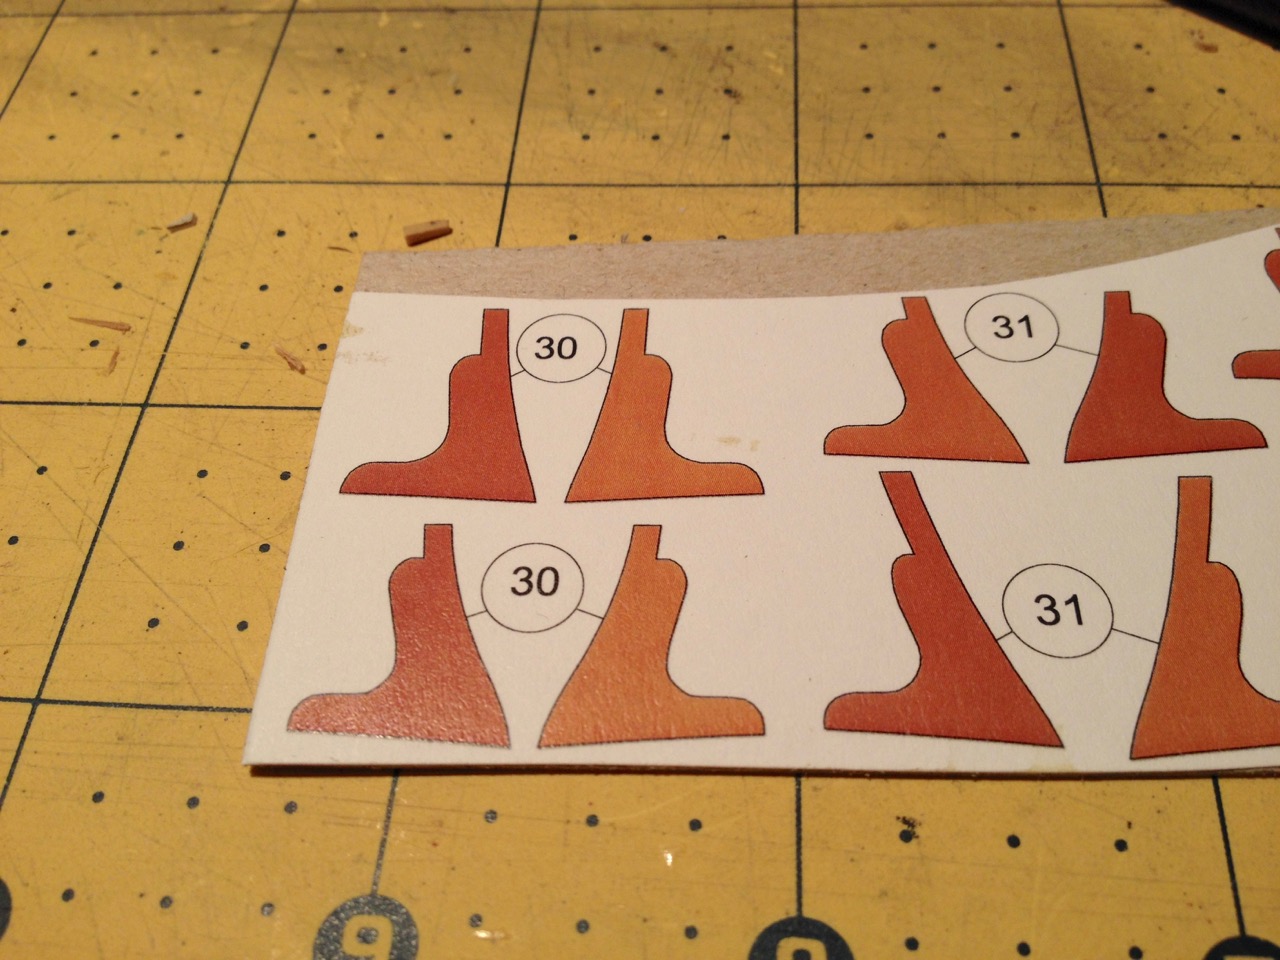
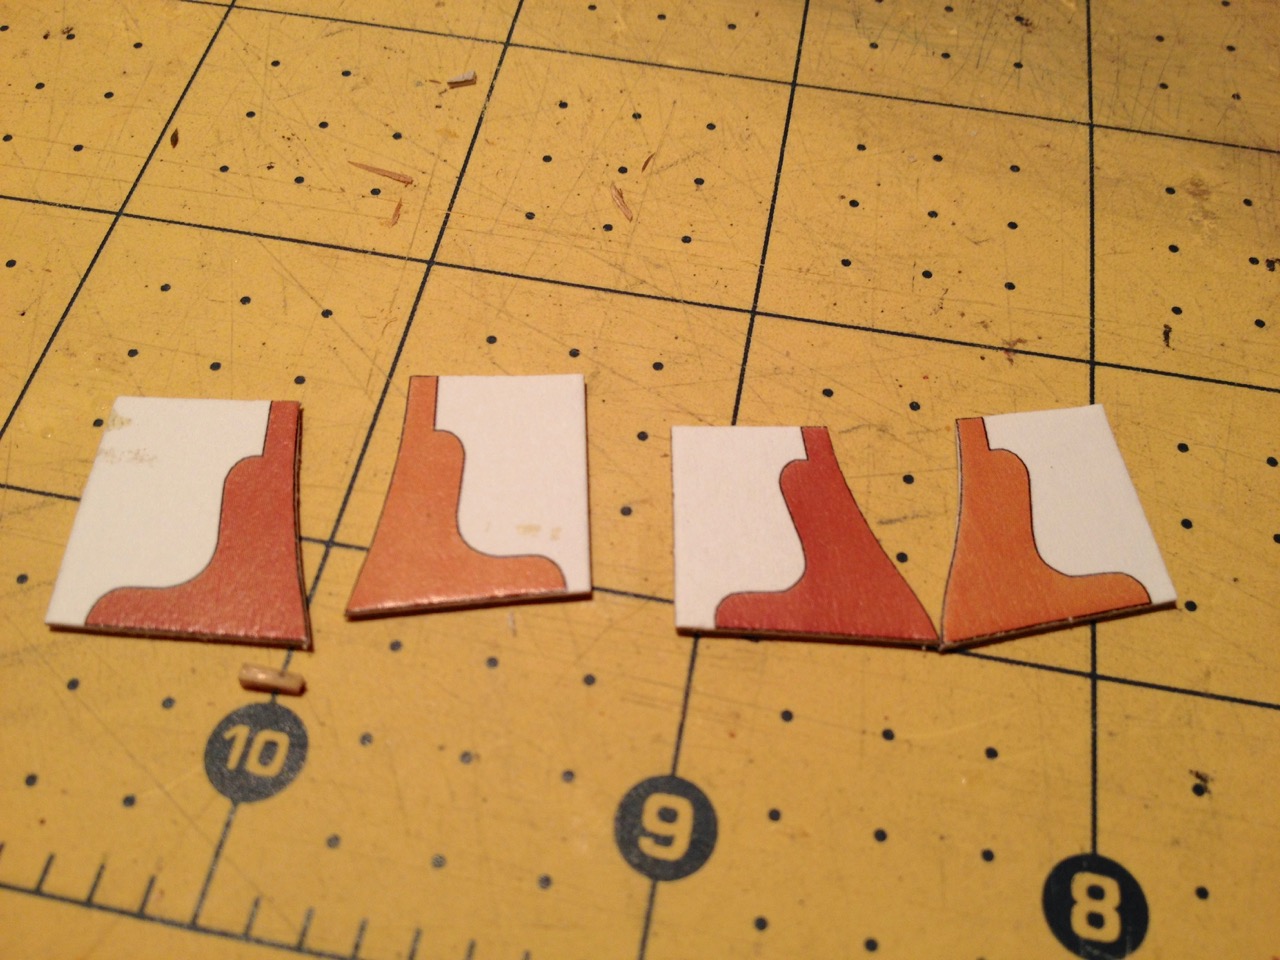
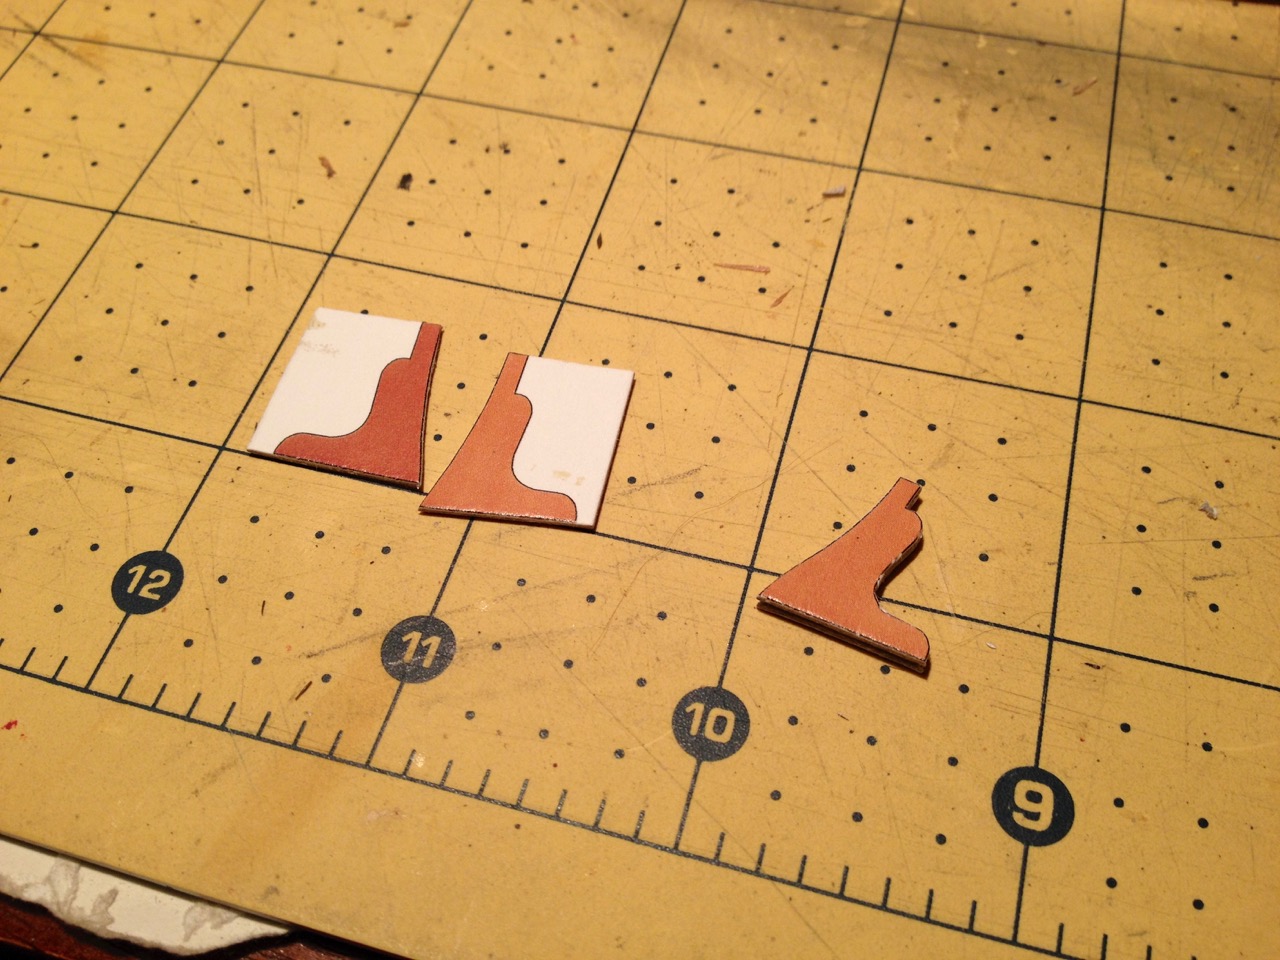
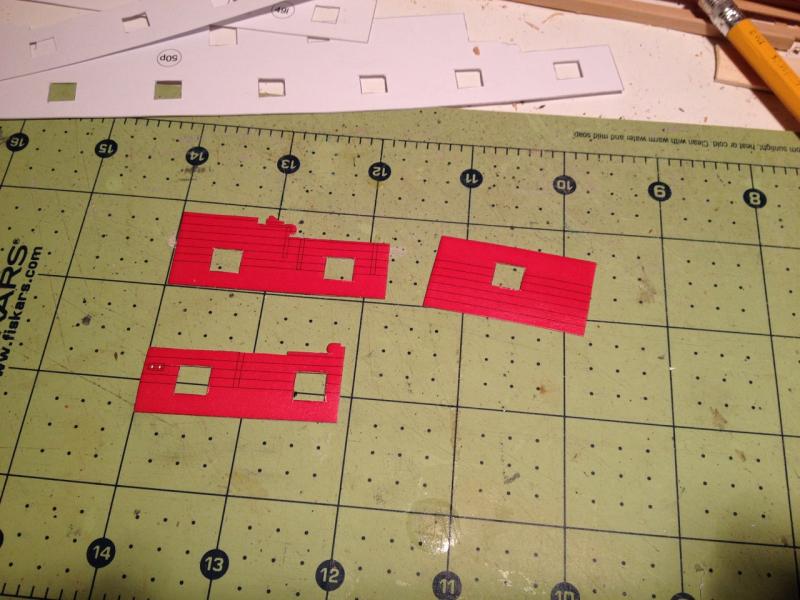
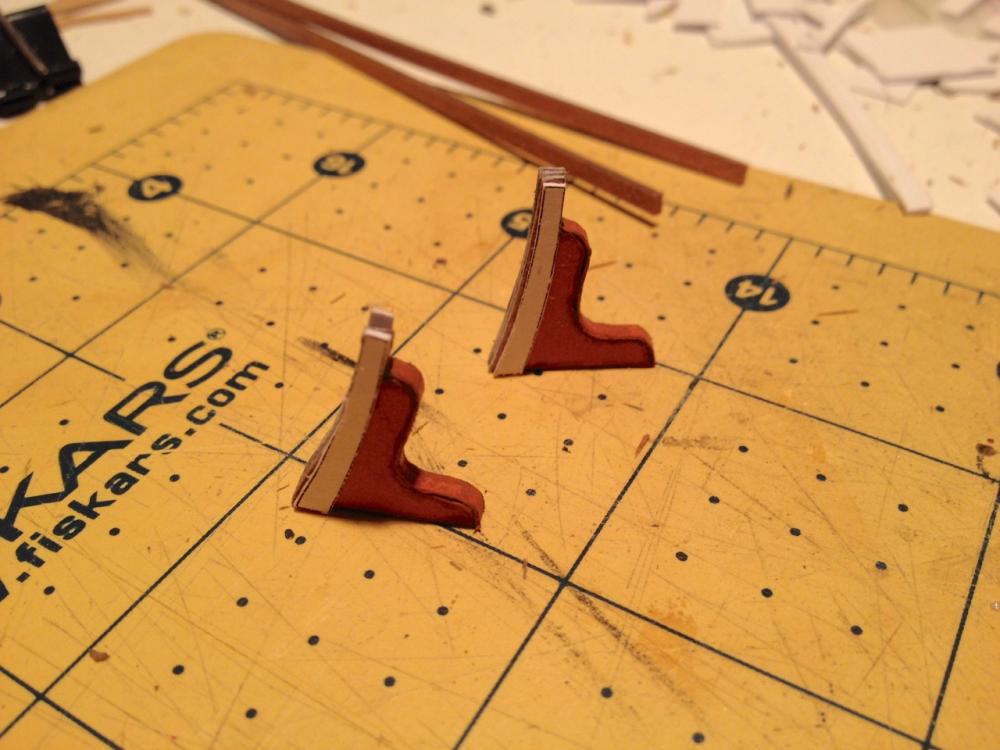
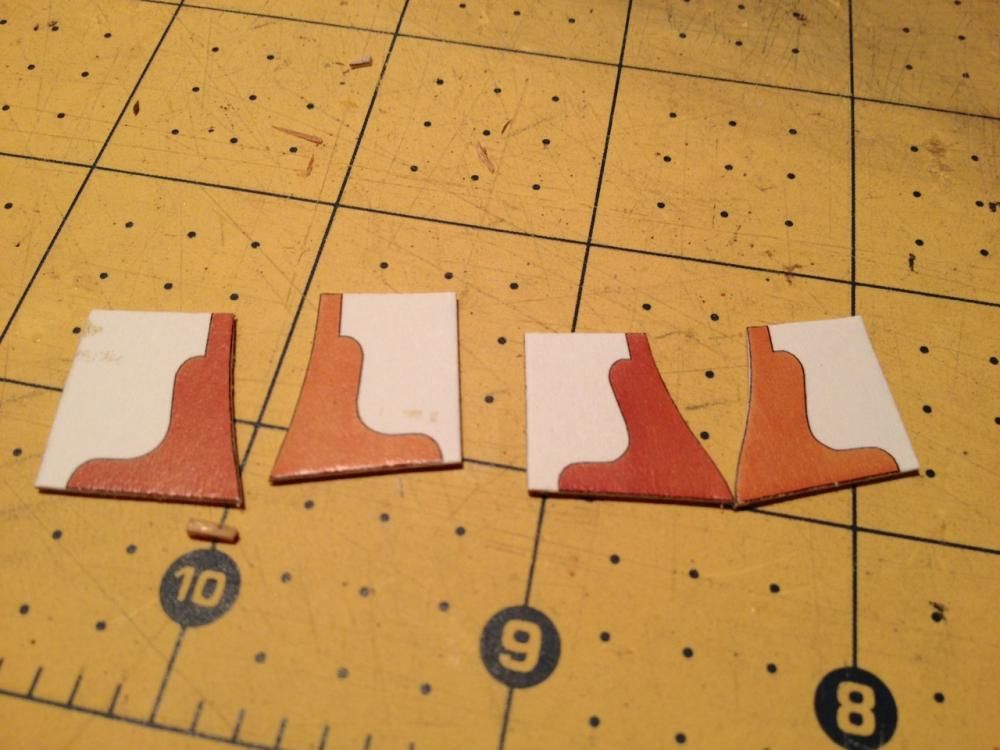
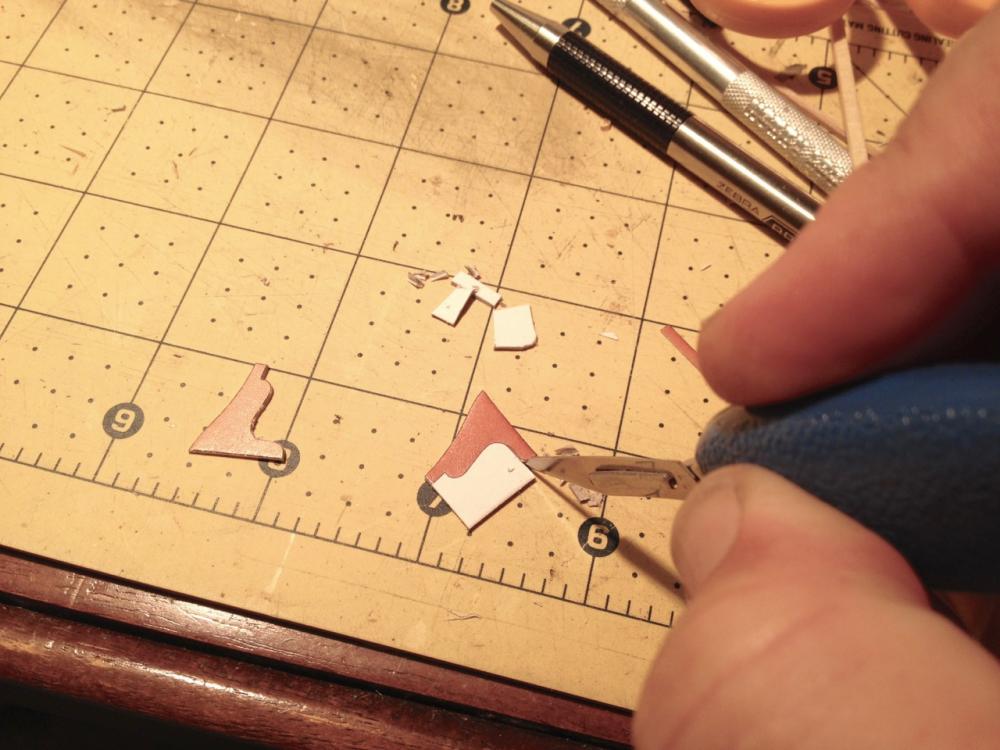
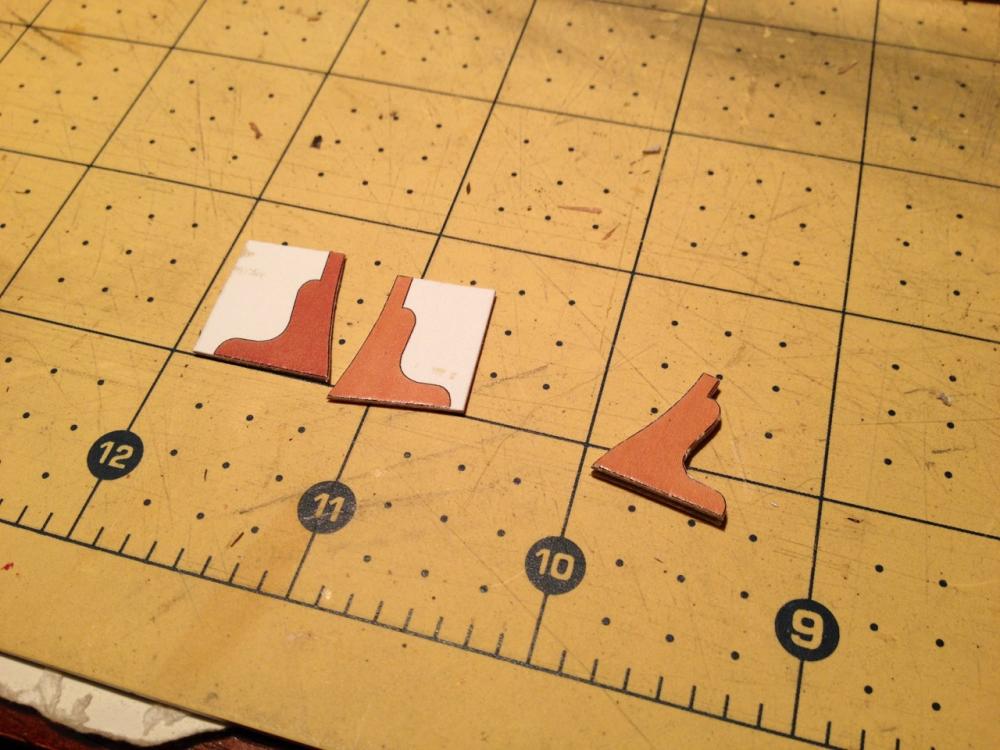
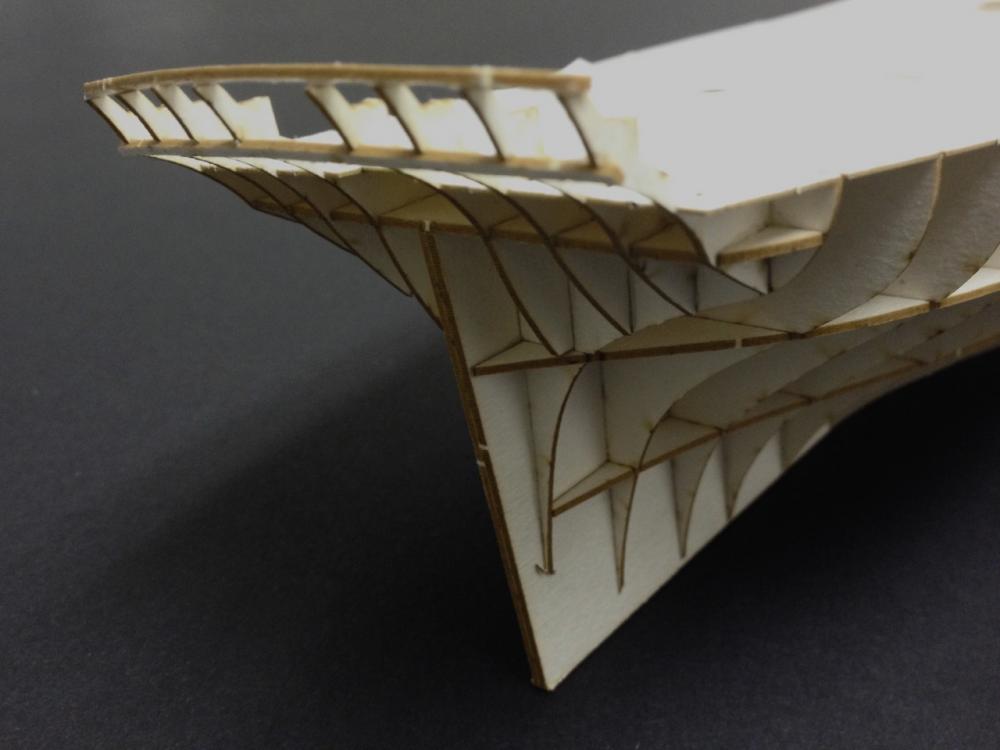
Welcome everyone! You'll have to be patient with this one in particular since it's very much a secondary project. But, I'll try to make periodic progress on it to keep it moving forward so you won't forget about it. Tonight, I sat down and worked on the bulkhead supports. These particular pieces look like inverted deck clamps and seem to be something of a model kit anomaly. The only references I could find that showed these a set of plans by the same company. Those plans are for the Spanish warship Santa Leocadia. Interestingly enough, I have another set of plans from the same company, but of another English frigate, and the plans show no such part. I am surmising that the part is the equivalent of bulkhead extensions in a wooden kit. They're needed to help shape the hull and to support the bulwarks planking, but they don't necessarily exist in real life. No matter. These are mostly hidden below the spar deck. I have to make several of these and it does take a bit of time. These are a little trickier than many other parts because of the inside curve that has to be carefully cut. Here's the process for building the part (similar process for all parts). The entire piece has to be about 2 mm thick. What I do is to then glue the main pieces onto card stock to make each half 1 mm thick. I use digital calipers regularly with paper model work. The first cuts I make using a scalpel or scissors. Note that an Xacto blade is really too thick for this work. A razor blade may be the best for cutting paper, but not entirely convenient. A scalpel is somewhere in between. Nice this is that you can buy a box of 100 blades, with blades coming individually packaged, for $5 with a basic handle. I bought a handle with a molded plastic grip on Amazon where I also bought the blades. Important thing with cutting paper with a knife, you need a cutting mat to work on, and you want to make multiple passes without trying to cut through in one pass. below, I made the initial cuts with a pair of sharp scissors along the easy, relatively straight lines. The inner curves require more careful work. Tight turns require multiple short cuts. One thing that is useful is, after glueing the two pieces together, wick some thin CA into the cardboard. That will make it work like plastic and you can sand that inside curve smooth with a piece of rolled sandpaper. Finally, some spacer pieces are built-up, cut and added. The completed pieces glued into place on the deck. One thing that is very confusing is that there is a difference between the port and starboard side pieces, yet the parts all have the same part number, and there is no indication that I can find to explain which side the longer piece goes on. In fact, all of these bulkhead supports are the same way. You can see what I'm talking about in the second photo above. Finally, I thought I'd include a couple photos to show what the instructions look like. One pair down, another 4 pairs to go... Clare


- 82 replies
-
- 19
-
-
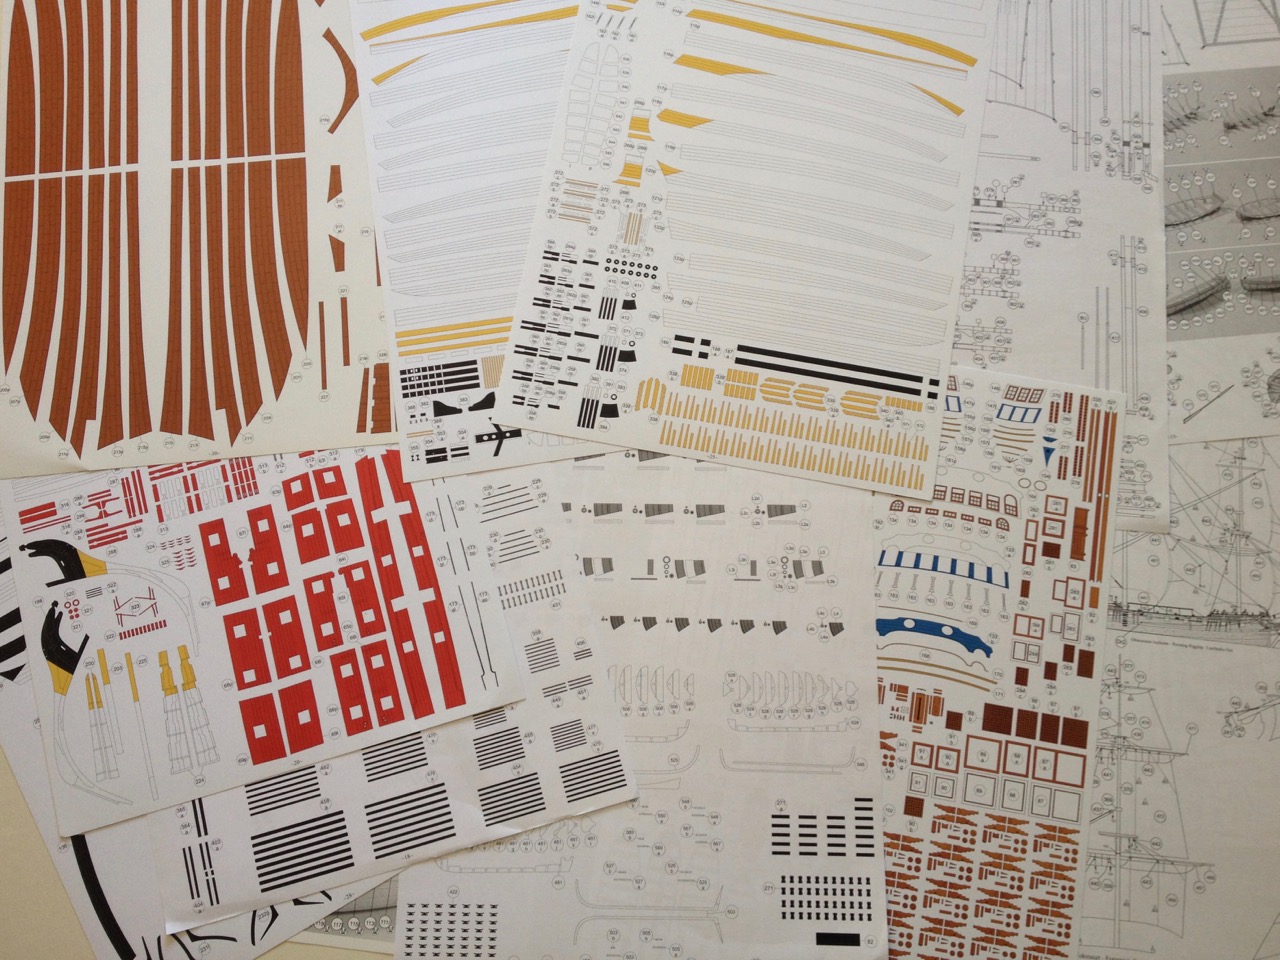
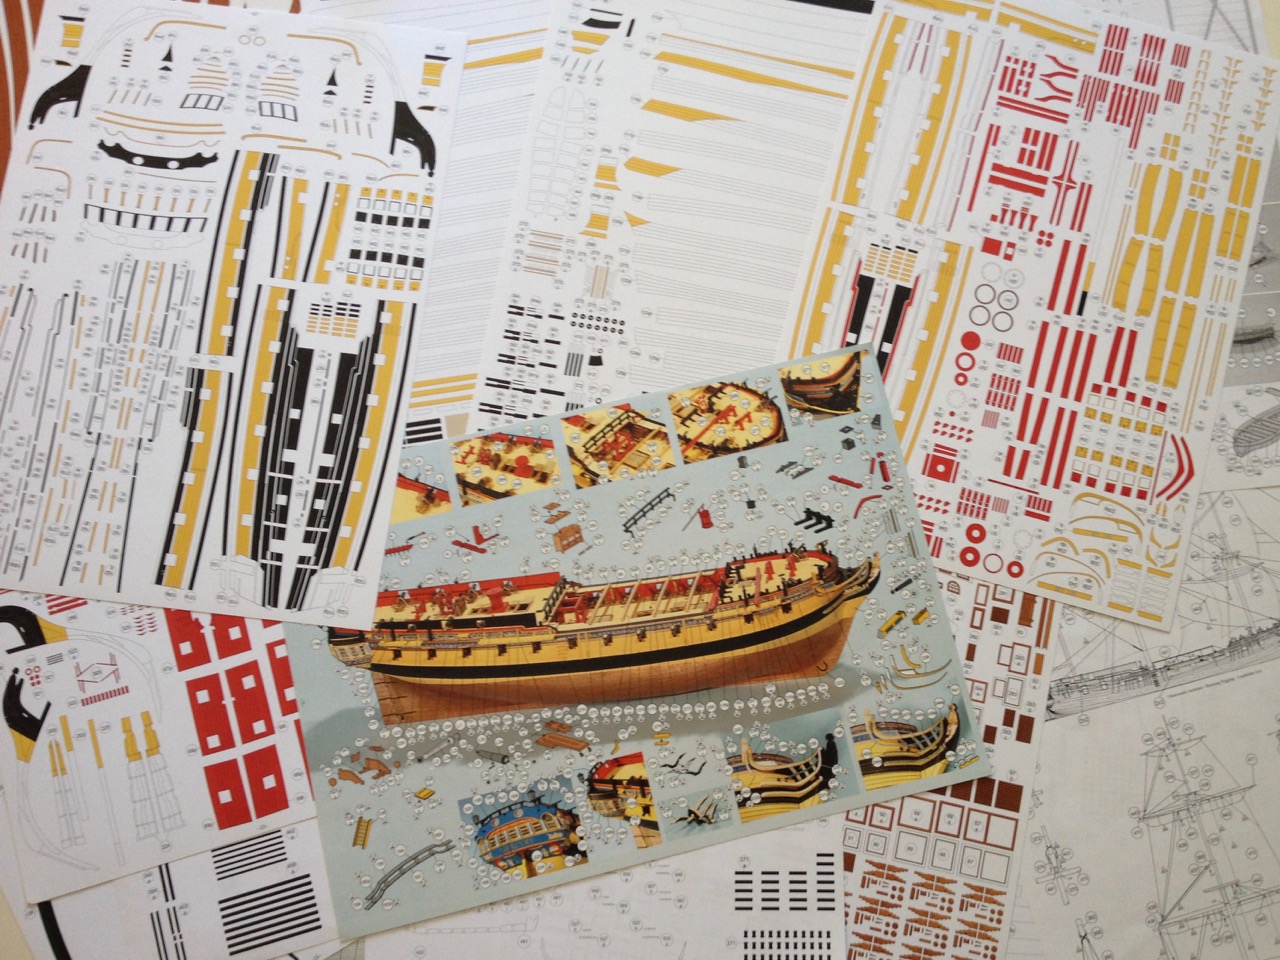
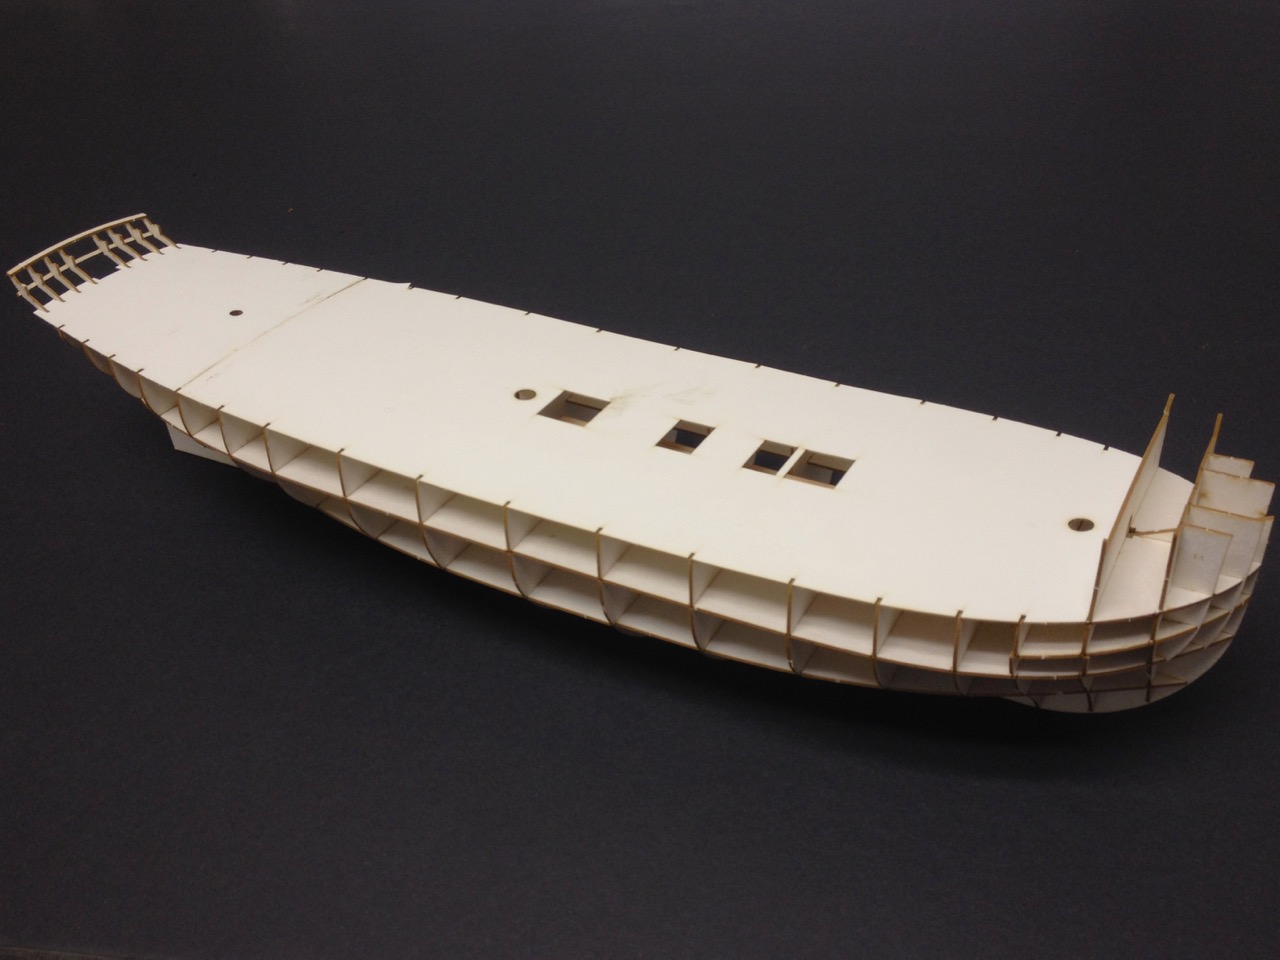
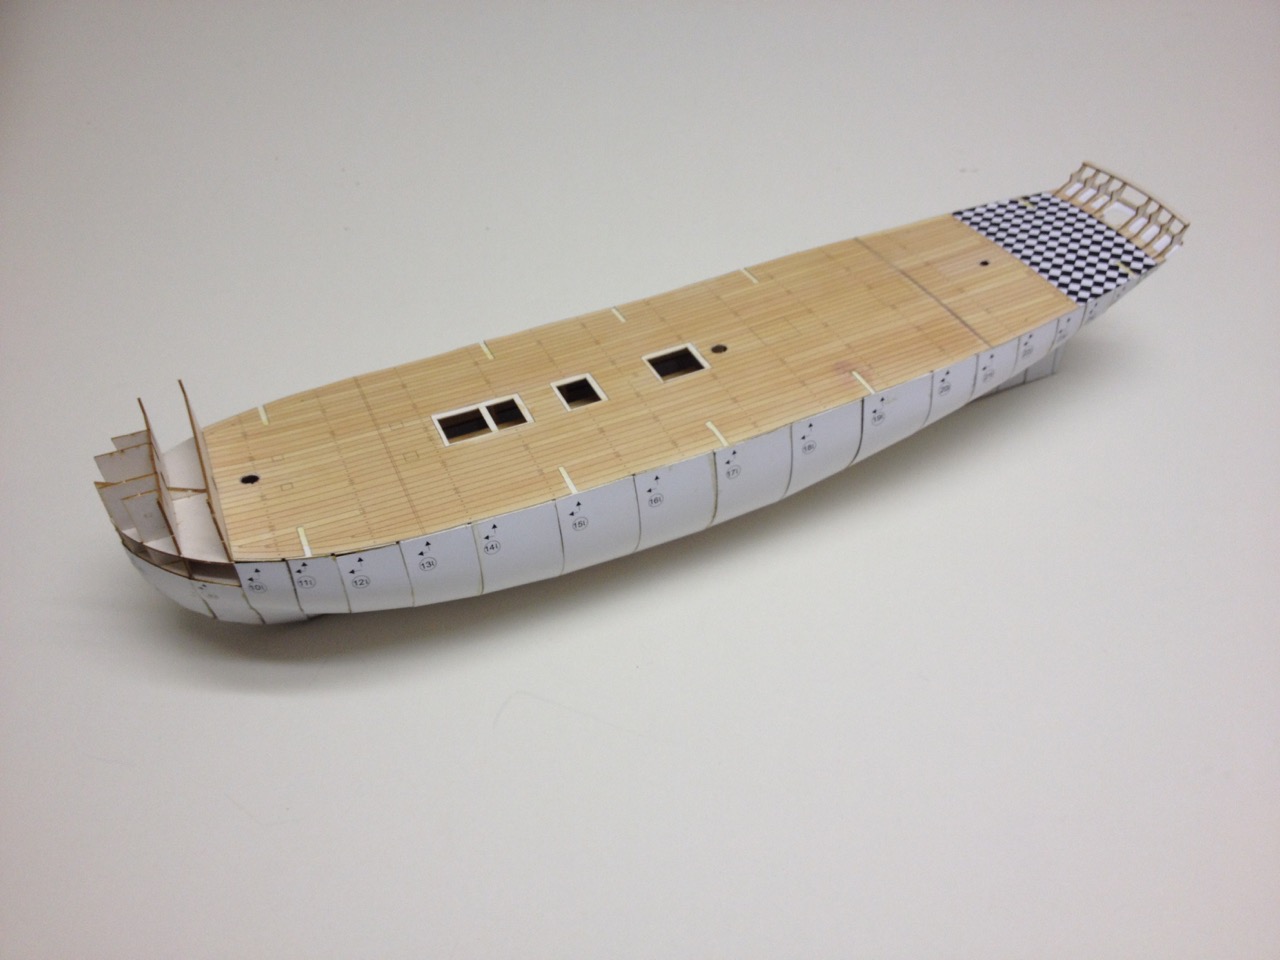
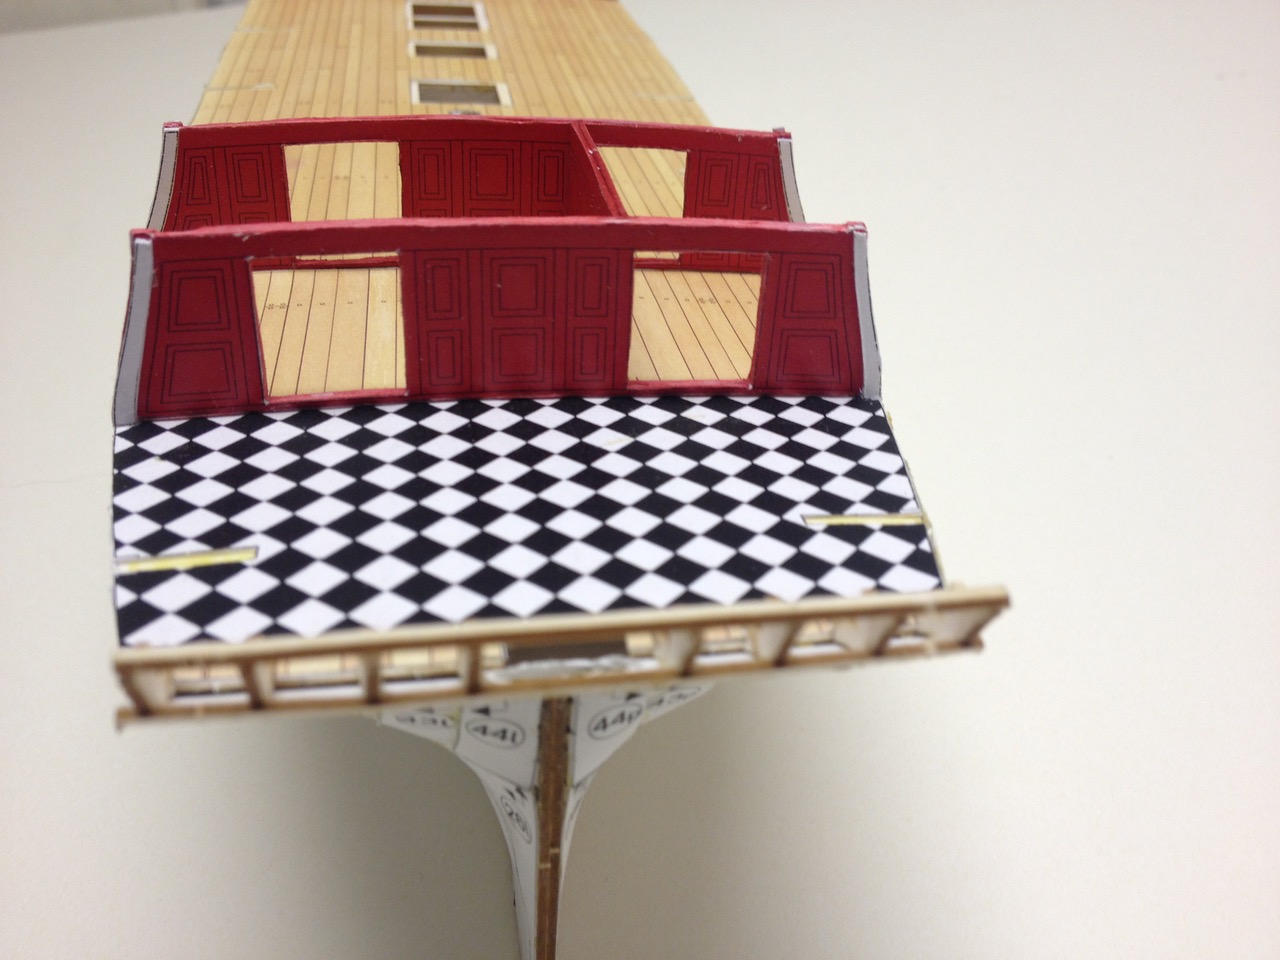
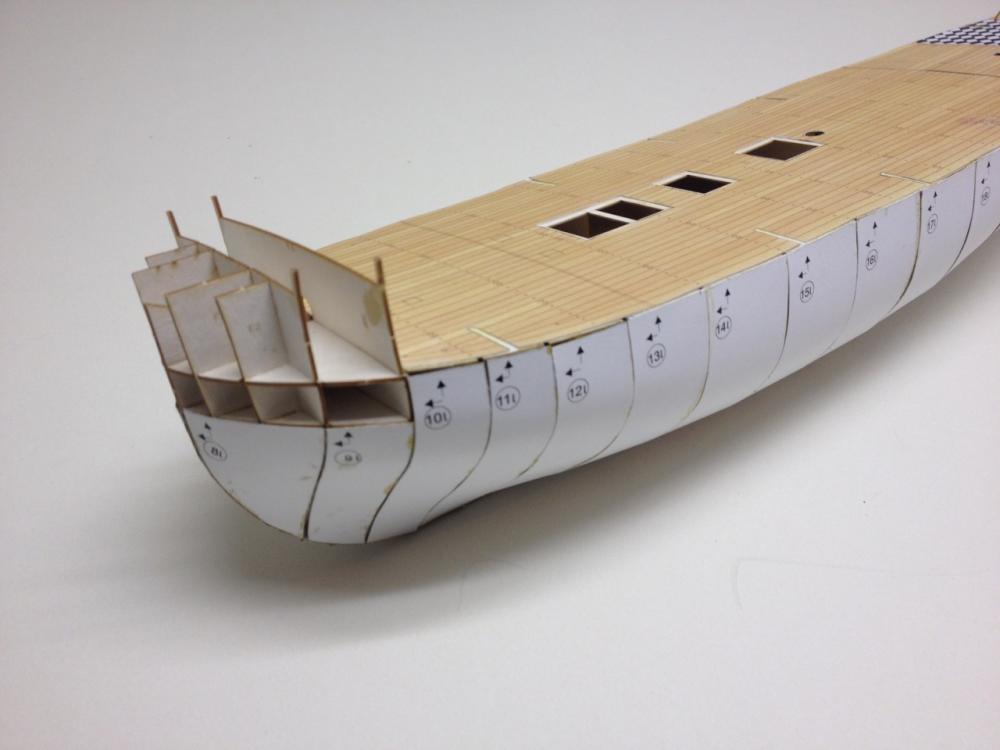
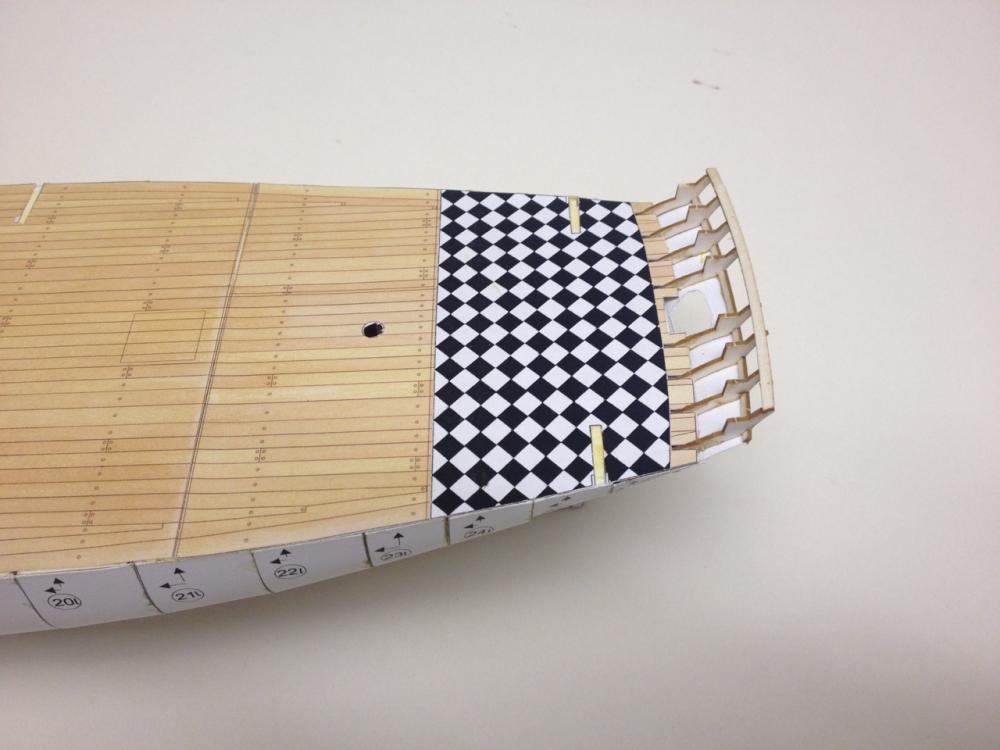
Having completed HMS Alert, which is now safely in a case, I'm left with a kind of paper emptiness... I have plenty of projects, but I'm so accustomed to having a paper model project in the works that it just didn't seem right to not have one now. So, I've taken on the 28-gun Enterprize-class 6th rate frigate HMS Mercury. Shipyard (Vessel) makes 2 versions of HMS Mercury. One is a 1/72-scale boxed kit with laser-cut parts and all the fittings, brass cannons, resin figurehead, wooden spars, cloth sails, plus paints, brush and rigging line, etc. However, that version is a lot pricier than the simple 1/96-scale paper model where you have to cut everything out yourself. I got the latter from Ages of Sail for around $40. The kit includes pre-printed parts that you have to cut out, plus laser-cut framework that makes hull-construction very quick and accurate. I've actually had this kit for quite a while, probably at least a year or more. I also started it some time ago so I would have a hull that illustrates how these kits go together. I was going to just do a partial start and give it to Ages of Sail as a demo model. But, that never happened. As I got further along on the Alert, I thought about how interesting a larger ship might be. Also, knowing the complexities of a 3-masted square rigger, I thought I might just build this as a kind of admiralty style model. Possibly building a launch ways and adding pole masts for the launching flags. In fact, right now, that's my plan unless I eventually change my mind and decide to rig this model. The kit includes some 15 pages of printed parts, the laser cut framework, several sheets of drawings and templates, including patterns for making sails. Printed parts are included for two different color schemes. The completed, fully rigged model, measures about 26" long. The hull itself is just about 16" long. I put the hull framework together many months ago. It goes together very easily and takes very little time. More recently, I started putting on the first layer, which basically turns the model into a hollow solid hull model. As you can see, I also added the deck. The parquet floor is a separate piece which sits on top of the wood-pattern floor. Lastly, over this past weekend, I wanted a distraction, so I started working on the cabin partitions. I have to say that this is one advantage that these paper models have over their wood counterparts – there is much more internal arrangement provided in these kits. It even includes furniture for the great cabin. So, there you have it. Another paper model begun. As I said earlier, this isn't a priority project, just something I'll tinker with over time. But, like HMS Alert, it may very well get to the point where it takes on a life of its own and demands more of my time to take her to completion. Clare


- 82 replies
-
- 29
-
-
ratlines-At what scale do you just use an overhand knot?
catopower replied to bear's topic in Masting, rigging and sails
Like John, I clove hitch down to 1/96 scale. I prefer the way the ratlines hang when tied with a clove hitch. If you use an overhand knot, the line on one side of the knot hangs nicely, but on the other side, it starts with an upward wave. Below 1/96, I would probably just consider gluing. But then, I've never built anything with ratlines smaller than 1/96. Clare