
HOLIDAY DONATION DRIVE - SUPPORT MSW - DO YOUR PART TO KEEP THIS GREAT FORUM GOING! (Only 20 donations so far - C'mon guys!)
×


Old Collingwood
-
Posts
12,098 -
Joined
-
Last visited
Content Type
Profiles
Forums
Gallery
Events
Everything posted by Old Collingwood
-
 Now that is looking Smart nice and sharp very very nice OC.
- 151 replies
-
- 10
-

-
- duke of york
- tamiya
- (and 2 more)
-
Hola onas deas bueno mucho bueno - magnifico, thats about all I can say in spanish. OC.
-
SUPERB Work, I have to be honest, I cheeted with my Orks - I used the main plastic barrel arrangements and used the PE shields with them, then fitted them inside the tubs but with the PE Amo baskets - doors etc. OC.
- 151 replies
-
- 12
-
-
- duke of york
- tamiya
- (and 2 more)
-
Loving the detail with the PE, I often wish some PE would come pre assembled like the Pom Poms or other complicated assemblies, surely companies like Pontas with all thier experience could do that - IM sure it would help a few of us with less tahn stella eyesight or dextrus fingers. OC.
- 151 replies
-
- 4
-
-
- duke of york
- tamiya
- (and 2 more)
-
Craig I appologise if I came across like I was critisizing the lovely work you have done - I wasn't as she is looking superb an a credit to you and your craftmanship, I just thought I would offer what I had read when studying British RN Battleships of the period when building my Warspite. OC.
- 151 replies
-
- 7
-
-
- duke of york
- tamiya
- (and 2 more)
-
Now that is looking impressive. OC.
-
Looking really smart. Craig I was a bit confused with the color question at first as I had seen pictures of here in that mixed camo scheme, however what I will say is - almost all RN battleships used three main colours AP507A(RN Dark Grey) AP507B(RN Medium Grey) AP507C(RN Light GRey) I would have heonestly thought that she would have looked similar to Hood at the time with AP507B hull sides and sides of superstructure, and with AP507A on all tops and steal decks. Just my understanding of RN ships of the time. OC.
- 151 replies
-
- 4
-
-
- duke of york
- tamiya
- (and 2 more)
-
Fantastic work craig those pom poms just look so fine and perfect, I have the same with my pontos bits and the Master barrels I brought when I brought the warspite. Keep up the great work you are doing OC.
- 151 replies
-
- 7
-
-
- duke of york
- tamiya
- (and 2 more)
-
Hi folks thought I better say something on my build - well, I am still having quite bad hand problems from my condition that tbh seems to be not getting any better, even using my laptop is painful as resting my left hand and using the left key is pressing on the painful areas, flipping cant win, there isnt mutch I can do for it as its a guide and tendon problem and short of having major hand surgery, there is no way to treat it. Anyway enough of my moaning and to say that I will try to do some more to my build, even in little steps (Im feeling left out folks and miss the chat) Reagards as always OC.
-
Can I also take a chair and follow with underwater goggles. OC.
- 83 replies
-
- 8
-
-
- o16
- pacific crossroads
- (and 2 more)
-
Do the whole wood deck in one strip before cutting in sections, thats what I would do, also try applying with a cloth so you control more evenly. OC.
- 151 replies
-
- 6
-
-
- duke of york
- tamiya
- (and 2 more)
-
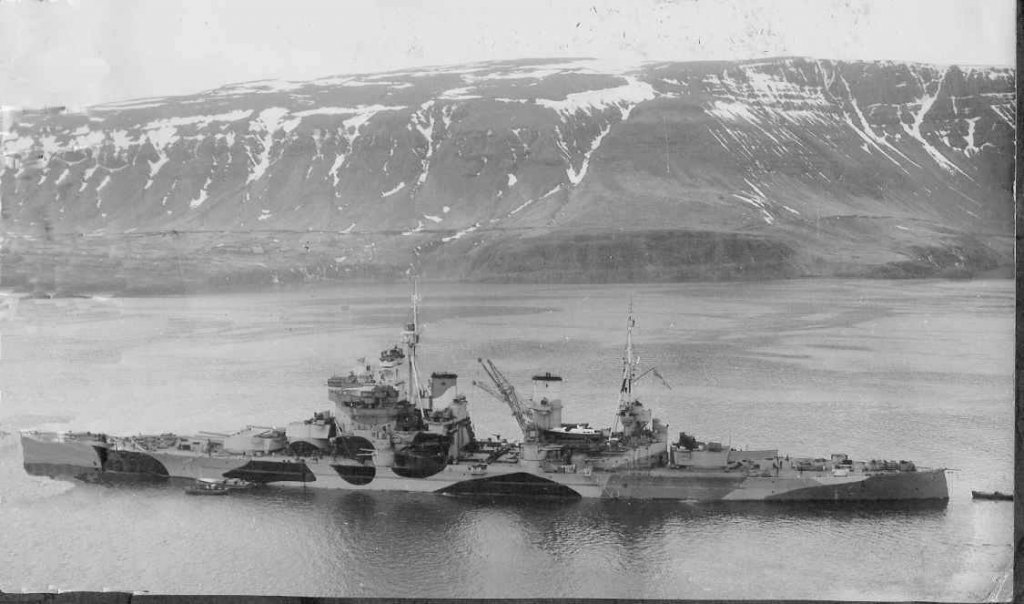
I fould this on the net supposed to be from Dec 1943. OC.
- 151 replies
-
- 11
-
-
- duke of york
- tamiya
- (and 2 more)
-
Great to see another plastic build on here and a mighty british one at that, I will be following with great interest OC.
- 151 replies
-
- 5
-
-
- duke of york
- tamiya
- (and 2 more)
-
Loveley work reminds me of my old build, can I ask if you dont mind - whats the connection with your avatar name and picture - just curious. OC.
-
She is coming along nice and tidy with lots of interest. OC.
- 44 replies
-
- 4
-
-
- schnellboot s-100
- revell
- (and 2 more)
-
Nice work greg - looking well and truly battered like she has been sat in a ships graveyard for years. OC.
- 743 replies
-
- 11
-
-
Looking good denis very very nice building work going on here. OC.
- 453 replies
-
- 10
-
-
- thermopylae
- sergal
- (and 1 more)
-
Hi there can I take a seat - this looks interesting as I did a few 1/72 scale kits years and years ago including the Vosper Motor boat and a German Torpedo boat similar to this but both Airfix. OC.
- 44 replies
-
- 4
-
-
- schnellboot s-100
- revell
- (and 2 more)
