
HOLIDAY DONATION DRIVE - SUPPORT MSW - DO YOUR PART TO KEEP THIS GREAT FORUM GOING! (Only 20 donations so far - C'mon guys!)
×


Old Collingwood
-
Posts
12,098 -
Joined
-
Last visited
Content Type
Profiles
Forums
Gallery
Events
Everything posted by Old Collingwood
-
 Thank You for all the very nice comments its a condition that alas will only get worse as its a family ill past down from my late mother's side, just gets in the way and causes at best a constant ache in both hands and at worse pain and stiffness. As I use my hands for all my hobbies - model making, photography and recording keyboard music, its very frustrating. OC.
 -
Folks I just wanted applogize for the lack of work on my build, to be honest I am battling painful hands at the moment as I suffer from an Arthritic condition causing painfull fingers and hands and also a condition called Dupuytrens Disease casusing swelling to the finger joints. When I have some better days I will try to get back on the build, for now holding small implements and model parts is too painful. OC.
-
This is Seriously good work - when its finished you have it displayed in the window of Harrods with all that Gold. :) OC.
-
Just wondered if you might have found it easyer to have done a dark wash in the scribed panel areas after spraying the hull, you could have done this with a cloth and thin paint - just a thought. OC.
-
I am probably missing something here - but is the models hull physical raised or sunken panel lines, where you have had to airbrush all those black shading? OC.
-
Oh also at the side of Cutty Sark was the small yaht Gypsy Moth - so tiny compaired to the Sark. OC.
- 453 replies
-
- 6
-

-
- thermopylae
- sergal
- (and 1 more)
-
Looking Great - she so reminds me of the Cutty Sark when I visited her as a young child, they where so graceful yet poweful OC.
- 453 replies
-
- 5
-
-
- thermopylae
- sergal
- (and 1 more)
-
Just poking my nose in to say - Same here with photography but - it arrived at the same time as my first plastic kit which was a Airfix Red Arrow Gnat aircraft, and a Polaroid Instamatic camera, the rest is history Anyway sorry for railroding your thred Brian Sam (unusual name that) Looking great by the way. OC.
-
Super fine work going on here could do with a new smiley saying "super fine detail going on here" :) OC.
-
Greg im loving the detail of the plates along the hull bottom, they are consistant with what I would have thought would have been on her, from battleship plans I have seen most have this routine patern of interlocking plates - similar to what I did on my Warspite lower hull. OC.
-
I have been following some build tips for this section - some suggest attaching the frame to the roof first followed by the floor, and others its the reverse, will have to see what works best - need to buy somemore ca glue first though before I do anything. OC/
-
Nimble fingers I dont think I have - gone from one extreme to the other - working with parts so tiny many would fit on one finger, to doing finger streaching exercises for my keyboard work (music type not laptop). OC.
-
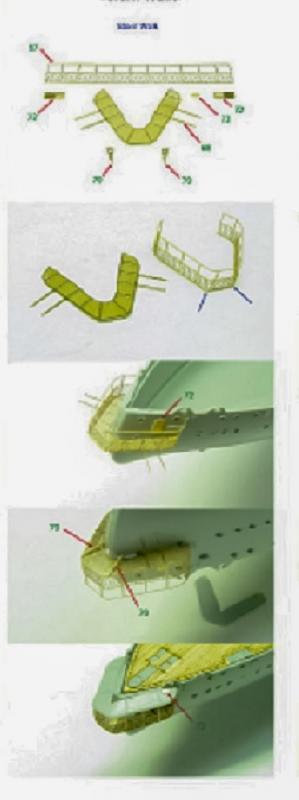
Right folks - I thought I would show the project and area I will be working on next with my build, the picture shows the Pontos parts for the rear gallery(walk way) that was fitted at the back of Warspite and her sisters. Its 75% pontos brass bits but with the kit platic roof and will be a nice little project in its own right. OC.
-
Loving the detail on that hull so mutch scribed armour plate detail, wish my Warspite was as accurate and detailed. OC.
-
Hi folks - remember me? I just want to squash any rumours that I have been eaten alive by my keyboard or become too famous from producing music, to carry on building my Warspite, nope Im still about just waiting for my mojo to come back from its holiday and inspire me to carry on with the ole lady. OC.
-
Sounds like a plan greg - one day I mite get an airbrush type thingy, till then I am resigned to using a hairy stick with a bit of watered down paint and blowing on it, guess that is my airbrush OC.
-
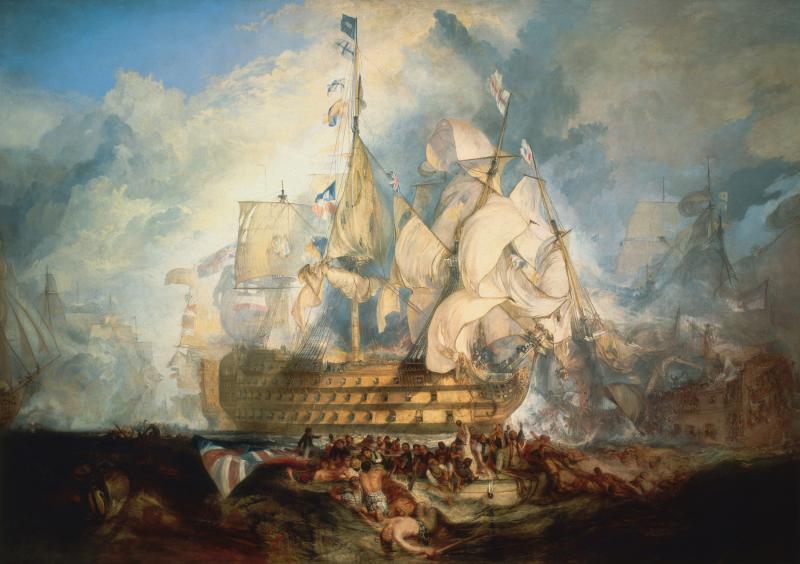
Wonder if this painting by turner might help in relation to her Trafalger condition. OC.
-
I will be doing more work soon folks (promis) its just that I have had a few distractions from my joke and gag writting, getting a new camera set up and needing to test it out, then later getting an asignment to do some keyboard recording for a record to be produced later this year. Its like having so many irons in one fire - enjoyable but busy. OC.
-
So much detail at 200 scale I was so thinking of getting Hood in that scale for my 100th - when I finish my ole lady :D OC.

