


Beef Wellington
-
Posts
2,245 -
Joined
-
Last visited
Reputation Activity
-

 Beef Wellington got a reaction from chris watton in HMS Snake by Beef Wellington - FINISHED - Caldercraft - Scale 1: 64 - First wooden ship build
About time I caught up with myself...
@Ben - I'm going to have to stand guilty as charged! Appreciate your post, this was something that I have been wrestling with for some time and fully recognize that the approach taken is a compromise. My thinking has been as follows, and I suspect that every model builder will arrive at a different place. Your coils are certainly excellently executed!
Quality of rope used: Having used the Syren line on 'Jason', there is just no comparison between good quality custom rope and the 'stuff' supplied in kits. My skill levels are just not up to achieving consistent coils following a seamanlike practice (that look anywhere near acceptable). Scale: This seems to be a variable from modeler to modeler, but to my eye many of the coils using this technique just do not look right at scale, especially when many pins are used on a rail adjacent to each other. Much of the rope used per kit instructions are much thinner than your prototype - mostly kit supplied 0.25mm line which is not very substantial and subject to gravity making floating 'ovals' distracting Quantity of rope (on the actual ships): Looking at many older photographs of ships, the one thing that stands out to me is that the quantity of belayed rope used on contemporary working vessels just looks far more voluminous for whatever reason than that seen on modern 'museum' ships, maybe because of longer working lengths, necessity to be worked by many hands etc etc. The bottom line though is that there is enough on this build that continues to bother me (both mistakes and things that I have since learned) to push me to continue with an eye to completion. I'll apply for parole at the duly appointed time...
Rigging (almost) complete:
After nearly 7 years, with all the main rigging elements in place, I can start to smell the scent of completion. The only outstanding rigging feature (in addition to some remaining decorative coils) are the spritsail sail sheets which will be added when I'm confident that the anchor placement won't cause problems.
Braces:
One of the bigger challenges were the braces, mainly because many of these are bent onto various stays. At this scale the rope doesn't behave well, and preventing the stays being pulled into all sorts of unnatural alignments by the much thinner braces, and keeping the braces taught, meant taking this very slowly, ensuring line had time settle into place and in many cases using dilute PVA while attempting to keep the stays in position. This proved to be especially challenging for the fore and fore topsail braces which bend to the main stay in one rather tight spot.
Sheets, tacks and cluelines:
Petersson was a big help here to illustrate how these worked in practice as the instructions are simplified. Given that both the main and fore require these, with 3 belaying points for each, some planning is needed to ensure sufficient working room as once in position access is even more severely limited. The tack is the most substantial of the running rigging used and 0.75mm rope was used as per instructions. At this thickness, it proved necessary to coil rope on the deck after belaying to pinrails.
I took the same approach to BE on his Pegasus build in having the sheets and tacks go outboard of any standing rigging, although the sheets are yet to be finally secured.
And finally, some overall shots..
-

 Beef Wellington got a reaction from ERS Rich in HMS Snake by Beef Wellington - FINISHED - Caldercraft - Scale 1: 64 - First wooden ship build
Ensign...conclusion:
A tiny bit of steam was used to soften the ensign while various "rounded implements" with different radii (dowel, metal file shafts etc.) were used to try and introduce various folds. I'd love to be able to describe a reproduceable scientific process, but thats not what happened. It was really just a continual serious of tweaks, leaving to dry and most importantly trying not to introduce creases. Steam worked fine to initially soften and allow the structural folds to be introduced, but isn't really a good ongoing solution as it tends to undo any previous work. Real care is also needed to not 'over wet' the painted flag, not sure I was completely successful here. Final tweaking was done by wetting very gently any tools used and trying to hold in position while it dried and the fold takes.
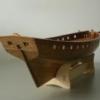
...and with that milestone, I'm declaring this build FINISHED!
This was my first wooden ship build, and first model I've built for over 30 years. Its taken probably 8 years to get this far off an on (probably 7 years more than it should), but I have to say I'm glad I was able to finish her. I've come to realize that I enjoy the journey more than the destination, and I certainly experienced moments when I could easily have put her aside permanently, mainly due to me recognizing unfixable mistakes or compromises that that could so easily been enhanced had I known more at the time. Given the length of time taken to complete, this progression in knowledge and execution is very apparent to me, but I hope is less apparent to others. All in all, this was a most enjoyable project that exposed me to the necessary knowledge and techniques that I hope build on and leverage in the future. I still need to make up a protective case, and will probably continue to see needed fixes and touchups before she (hopefully) is put in a place of rest. I would like to thank this entire community for the ongoing help, support and encouragement - without which I would not have reached this point.
Few pictures to celebrate, apologies that these aren't exactly studio quality.
-
 Beef Wellington got a reaction from Blue Ensign in HMS Snake by Beef Wellington - FINISHED - Caldercraft - Scale 1: 64 - First wooden ship build
Thanks whitejames, Eamonn, Joe, Martin, Stergios, mugje, Mike and all the 'likes' for the continued interest and encouragement. Happy New year to everyone!
Anchors:
Adding some appropriate features here at the bow will do much to enhance the overall look of the model, the kit itself leaves the bow area a little sparse, especially the rigging which has already been commented on. The kit provides 4 full sized 'bower' anchors. However, Steele indicates that a ship of Snakes size and class would only carry 3, in addition to a smaller kedge and stream anchor : “Ships of 110 to, 100, 98, and 90 guns, have seven anchors; from 80 to 20 guns inclusive, 6 anchors; ships of 300 tons, and sloops, have 5; and brigs and cutters 3 anchors.” - This would include the large (best, small, and spare) bower anchors, stream and kedge anchors.
As for positioning, per Steele: "The spare anchor is stowed on the starboard side, and is seldom used, but when one of the others is lost......The stream anchor is stowed on the spare anchor; and, when used, it is sent in the long-boat or launch, with its cable bent, and let go at any particular spot, either for steadying the ship, when riding by only one bower, or to assist a ship when in shore, or to warp her, &c. ......the kedge is stowed on the stream and spare anchors, and is frequently used to stop a ship for a tide in little winds…”
A number of years ago (!) I had purchased a smaller Caldercraft anchor for the kedge anchor, and luckily was able to find it. Not much to cover in the making up of these anchors, which had previously started some time ago. The ends of the stocks were rounded of and tapered. One mistake I did make that I am now aware of is that there should be gap between the two halves, speculating to retard rot. I found the 'puddening' particular challenging to complete as the pieces are hard to hold securely but finally got there - once again the 'springiness' of the kit supplied rope seems very capable of undoing work at the most inconvenient moment.
The next question was how to install on the model. Info on anchor handling practices seems to be a little sparse, with diagrams and descriptions appearing in 'Lever' being replicated in other reference books. Other logs, especially BE's fantastic Pegasus build, helped fill in areas of confusion. Again Steele sheds a bit more light: “The best bower is then placed forward near the bows on the starboard side; the small bower near the bows on the larboard side, a little abaft their respective catheads; and are secured by their stoppers, from the catheads and shank-painters. The stopper has one end clinched round the cathead; the other end passes through the ring of the anchor, returns upwards, and leads over a large thumb cleat bolted to the cathead, and is made fast with several turns, and the end hitched round the head-rail and timber-head, on the fore side of the cathead.”
Anchor hawse clinch:
The approach to attaching the hawse to the anchors using a clinch is shown pretty clearly in 'Lever'. A bight is made by lashings ("no larger than the anchor ring") and the hawse fed through the anchor ring and the bight. Nothing too complicated, but this was rather tricky to execute because it needed to be done in situ, a tin was used to rest the anchor while this was performed. Before the last bight lashings were put on, the intended end of the hawse was seized to prevent it unravelling once cut. This approach seemed to work well, and the extra untrimmed length of the hawse was helpful in keeping things positioned to allow the last lashing to be put in place.
Anchor stopper:
Per Steele: "The stopper has one end clinched round the cathead; the other end passes through the ring of the anchor, returns upwards, and leads over a large thumb cleat bolted to the cathead, and is made fast with several turns, and the end hitched round the head-rail and timber-head, on the fore side of the cathead."
The rope would likely need to be reasonably substantial, and given a diagram in Lever which corroborated, 0.75mm rope was used. Although the size looked appropriate, the poor quality of the kit rope led me to look for options, and a solution became clear after looking at some photo's of Victory. It seems the stopper was served (presumably for protection), so this was replicated and it went a long way to improving the visual appeal.
Cat block:
The cat blocks seem to be a nice feature to add for visual interest. The blocks were made up from a couple of kit 7mm double blocks and shaped. Card was used for the iron band and brass ringbolts used for the hook and the simulated axle. A small PE eye bolt was installed on the rear of the cathead and 0.5mm line attached and fed through the block before securing to a cleat at the base.
Shank painter:
Per Steele: "The shank-painter hangs the shank and fluke of the anchor to the ship's side outboard; and when stowed, the shank-painter is passed under the inner fluke round the shank of the anchor, and made fast with two or three turns, and the end stopt round timber-heads on the forecastle." Lever also has a well replicated diagram showing how this would be used.
Luckily I had some spare chain left over from the rudder, and this was used for the shank painter together with some 0.5mm line. At first, I felt this was a little oversized, but looking at photos again of Victory it doesn't seem too out of line. Against the black background of the hull it sits OK with my eye. I suspect that the end of the chain ended in a hook, but this detail was omitted for convenience, as it would not be very visible.
Undecided as of now whether to leave the port anchor suspended from the catblock or replicate that used on the starboard side.
-
 Beef Wellington got a reaction from Jörgen in HMS Snake by Beef Wellington - FINISHED - Caldercraft - Scale 1: 64 - First wooden ship build
Ensign...conclusion:
A tiny bit of steam was used to soften the ensign while various "rounded implements" with different radii (dowel, metal file shafts etc.) were used to try and introduce various folds. I'd love to be able to describe a reproduceable scientific process, but thats not what happened. It was really just a continual serious of tweaks, leaving to dry and most importantly trying not to introduce creases. Steam worked fine to initially soften and allow the structural folds to be introduced, but isn't really a good ongoing solution as it tends to undo any previous work. Real care is also needed to not 'over wet' the painted flag, not sure I was completely successful here. Final tweaking was done by wetting very gently any tools used and trying to hold in position while it dried and the fold takes.
...and with that milestone, I'm declaring this build FINISHED!
This was my first wooden ship build, and first model I've built for over 30 years. Its taken probably 8 years to get this far off an on (probably 7 years more than it should), but I have to say I'm glad I was able to finish her. I've come to realize that I enjoy the journey more than the destination, and I certainly experienced moments when I could easily have put her aside permanently, mainly due to me recognizing unfixable mistakes or compromises that that could so easily been enhanced had I known more at the time. Given the length of time taken to complete, this progression in knowledge and execution is very apparent to me, but I hope is less apparent to others. All in all, this was a most enjoyable project that exposed me to the necessary knowledge and techniques that I hope build on and leverage in the future. I still need to make up a protective case, and will probably continue to see needed fixes and touchups before she (hopefully) is put in a place of rest. I would like to thank this entire community for the ongoing help, support and encouragement - without which I would not have reached this point.
Few pictures to celebrate, apologies that these aren't exactly studio quality.
-
 Beef Wellington got a reaction from HardeeHarHar in HMS Snake by Beef Wellington - FINISHED - Caldercraft - Scale 1: 64 - First wooden ship build
Ensign...conclusion:
A tiny bit of steam was used to soften the ensign while various "rounded implements" with different radii (dowel, metal file shafts etc.) were used to try and introduce various folds. I'd love to be able to describe a reproduceable scientific process, but thats not what happened. It was really just a continual serious of tweaks, leaving to dry and most importantly trying not to introduce creases. Steam worked fine to initially soften and allow the structural folds to be introduced, but isn't really a good ongoing solution as it tends to undo any previous work. Real care is also needed to not 'over wet' the painted flag, not sure I was completely successful here. Final tweaking was done by wetting very gently any tools used and trying to hold in position while it dried and the fold takes.
...and with that milestone, I'm declaring this build FINISHED!
This was my first wooden ship build, and first model I've built for over 30 years. Its taken probably 8 years to get this far off an on (probably 7 years more than it should), but I have to say I'm glad I was able to finish her. I've come to realize that I enjoy the journey more than the destination, and I certainly experienced moments when I could easily have put her aside permanently, mainly due to me recognizing unfixable mistakes or compromises that that could so easily been enhanced had I known more at the time. Given the length of time taken to complete, this progression in knowledge and execution is very apparent to me, but I hope is less apparent to others. All in all, this was a most enjoyable project that exposed me to the necessary knowledge and techniques that I hope build on and leverage in the future. I still need to make up a protective case, and will probably continue to see needed fixes and touchups before she (hopefully) is put in a place of rest. I would like to thank this entire community for the ongoing help, support and encouragement - without which I would not have reached this point.
Few pictures to celebrate, apologies that these aren't exactly studio quality.
-
 Beef Wellington got a reaction from Snug Harbor Johnny in HMS Snake by Beef Wellington - FINISHED - Caldercraft - Scale 1: 64 - First wooden ship build
Ensign...conclusion:
A tiny bit of steam was used to soften the ensign while various "rounded implements" with different radii (dowel, metal file shafts etc.) were used to try and introduce various folds. I'd love to be able to describe a reproduceable scientific process, but thats not what happened. It was really just a continual serious of tweaks, leaving to dry and most importantly trying not to introduce creases. Steam worked fine to initially soften and allow the structural folds to be introduced, but isn't really a good ongoing solution as it tends to undo any previous work. Real care is also needed to not 'over wet' the painted flag, not sure I was completely successful here. Final tweaking was done by wetting very gently any tools used and trying to hold in position while it dried and the fold takes.
...and with that milestone, I'm declaring this build FINISHED!
This was my first wooden ship build, and first model I've built for over 30 years. Its taken probably 8 years to get this far off an on (probably 7 years more than it should), but I have to say I'm glad I was able to finish her. I've come to realize that I enjoy the journey more than the destination, and I certainly experienced moments when I could easily have put her aside permanently, mainly due to me recognizing unfixable mistakes or compromises that that could so easily been enhanced had I known more at the time. Given the length of time taken to complete, this progression in knowledge and execution is very apparent to me, but I hope is less apparent to others. All in all, this was a most enjoyable project that exposed me to the necessary knowledge and techniques that I hope build on and leverage in the future. I still need to make up a protective case, and will probably continue to see needed fixes and touchups before she (hopefully) is put in a place of rest. I would like to thank this entire community for the ongoing help, support and encouragement - without which I would not have reached this point.
Few pictures to celebrate, apologies that these aren't exactly studio quality.
-
 Beef Wellington got a reaction from GrandpaPhil in HMS Snake by Beef Wellington - FINISHED - Caldercraft - Scale 1: 64 - First wooden ship build
Ensign...conclusion:
A tiny bit of steam was used to soften the ensign while various "rounded implements" with different radii (dowel, metal file shafts etc.) were used to try and introduce various folds. I'd love to be able to describe a reproduceable scientific process, but thats not what happened. It was really just a continual serious of tweaks, leaving to dry and most importantly trying not to introduce creases. Steam worked fine to initially soften and allow the structural folds to be introduced, but isn't really a good ongoing solution as it tends to undo any previous work. Real care is also needed to not 'over wet' the painted flag, not sure I was completely successful here. Final tweaking was done by wetting very gently any tools used and trying to hold in position while it dried and the fold takes.
...and with that milestone, I'm declaring this build FINISHED!
This was my first wooden ship build, and first model I've built for over 30 years. Its taken probably 8 years to get this far off an on (probably 7 years more than it should), but I have to say I'm glad I was able to finish her. I've come to realize that I enjoy the journey more than the destination, and I certainly experienced moments when I could easily have put her aside permanently, mainly due to me recognizing unfixable mistakes or compromises that that could so easily been enhanced had I known more at the time. Given the length of time taken to complete, this progression in knowledge and execution is very apparent to me, but I hope is less apparent to others. All in all, this was a most enjoyable project that exposed me to the necessary knowledge and techniques that I hope build on and leverage in the future. I still need to make up a protective case, and will probably continue to see needed fixes and touchups before she (hopefully) is put in a place of rest. I would like to thank this entire community for the ongoing help, support and encouragement - without which I would not have reached this point.
Few pictures to celebrate, apologies that these aren't exactly studio quality.
-
 Beef Wellington got a reaction from j21896 in HMS Snake by Beef Wellington - FINISHED - Caldercraft - Scale 1: 64 - First wooden ship build
Ensign...conclusion:
A tiny bit of steam was used to soften the ensign while various "rounded implements" with different radii (dowel, metal file shafts etc.) were used to try and introduce various folds. I'd love to be able to describe a reproduceable scientific process, but thats not what happened. It was really just a continual serious of tweaks, leaving to dry and most importantly trying not to introduce creases. Steam worked fine to initially soften and allow the structural folds to be introduced, but isn't really a good ongoing solution as it tends to undo any previous work. Real care is also needed to not 'over wet' the painted flag, not sure I was completely successful here. Final tweaking was done by wetting very gently any tools used and trying to hold in position while it dried and the fold takes.
...and with that milestone, I'm declaring this build FINISHED!
This was my first wooden ship build, and first model I've built for over 30 years. Its taken probably 8 years to get this far off an on (probably 7 years more than it should), but I have to say I'm glad I was able to finish her. I've come to realize that I enjoy the journey more than the destination, and I certainly experienced moments when I could easily have put her aside permanently, mainly due to me recognizing unfixable mistakes or compromises that that could so easily been enhanced had I known more at the time. Given the length of time taken to complete, this progression in knowledge and execution is very apparent to me, but I hope is less apparent to others. All in all, this was a most enjoyable project that exposed me to the necessary knowledge and techniques that I hope build on and leverage in the future. I still need to make up a protective case, and will probably continue to see needed fixes and touchups before she (hopefully) is put in a place of rest. I would like to thank this entire community for the ongoing help, support and encouragement - without which I would not have reached this point.
Few pictures to celebrate, apologies that these aren't exactly studio quality.
-
Beef Wellington got a reaction from Blue Ensign in HMS Snake by Beef Wellington - FINISHED - Caldercraft - Scale 1: 64 - First wooden ship build
@ Eammon - I think you and many others deserve a perseverance award for sticking around
@ Sjors - Its great that you'll be starting a Snake build as well, there are a number now in progress, and there is still a chance you will finish yours before me 🙂
@ Mike - Thanks for reminding me that you put these on your badger, she really is a nice looking model
@ Martin - Hope it helps, like always, we stand on the shoulders of those who go before
The Ensign:
Really the only missing item at this point is an ensign. Making one's own is really the only option as aftermarket items are the wrong time period (the cross of St Patrick in the Union Jack was only introduced after the Act of Union in 1801), only white ensigns are available and they seem somehow a little too perfect, and the material they are made from seems overly heavy. There seem to be a couple of very similar approaches to making these, and here is how I approached it. This was my first effort, and although results are not the height of perfection, I'd say this is something that any modeler should feel comfortable taking on. I am not quite finished in that the final article needs to be 'folded' to sit more realistically, but I'm stepping back for a moment to think through options as I'll probably need to use some steam to help make permanent - and this seems like it could be a little catastrophic if approached incorrectly. Open to thoughts here!
The first decision was to decide what sized ensign to create. I printed on paper various sizes to see what looked good to my eye before committing further. I'm rather taken with the majestic look of a large flag, and have erred on the side of larger size, even if it would be perhaps more appropriate to use a smaller size for a ship not under sail or in battle. If I could make one recommendation to a modern navy, it would be to use larger ensigns! The other factor that played into my decision to err on the larger side was that when tweaked to hang more realistically, it will look smaller and less obtrusive to the eye.
The first step was to soak some modelspan tissue in water and stretch over a frame to dry. I used an old cheap picture frame which worked quite handily, and the modelspan tightened quite nicely. Once dry, dilute PVA was painted on, this causes the paper to stretch and wrinkle again. Once dry, it becomes taught again and the outline of an ensign was very lightly drawn on with pencil tracing from an appropriate pattern. After that it was a simple case of slowly layering dilute acrylic paints. I was somewhat limited to what I could get my hands on, using Tamiya XF-7 Red, XF-8 Blue and Vallejo 'Off White' used on the cutter.
Some masking tape was used where the hoist will be to try and limit mistakes in that area, and while this did work, masking tape did not seem to be able to provide a clean edge for the rest of the flag so it was pretty much all painted free hand. Both sides were painted, and for the field of the flag, brush direction was alternated in horizontal and vertical directions.
I forget how many dilute coats were applied, but I stopped before the colour became too solid and while there was still some translucency when held up to light (the horizontal and vertical lines were still somewhat visible). Once removed and cut to size, the hoist was trimmed to an appropriate size so it could be doubled back on itself and hard crease introduced. This is just visible below at bottom left of the flag.
In reality, the ensign would have been attached with either toggles or loops to the halyard, I decided to avoid reproducing this exactly because it would likely look a little out of scale and introduce some unnecessary complexity. In the end, a length of rope was lightly glued into the crease of the hoist, which was then then lightly glued back into place. Two knots were then placed into the rope where this would normally attach, and a false seizing placed above (on the top) and below (on the bottom) to give the impression of a loop. The hoist was then tidied up with a little off-white paint.
The ensign could now be trial fitted by threading the halyard through the small block on the end of the gaff. An ensign staff would have been used on larger ships, and even some earlier smaller craft seem to have a temporary mount to be able to place a staff. With the platform, there is really no space for such a feature, so I'm going to proceed with the ensign flying from the gaff. Given the spartan, utilitarian approach to the rest of the ship design, it does not seam unreasonable that this was the approach taken, similar to what I understand was done for smaller cutters. I'm also proceeding on the assumption that the ensign halyard would just have been secured to a cleat on either the side of the stern. I would welcome some additional insight or correction on this point.
-
 Beef Wellington got a reaction from VTHokiEE in HMS Snake by Beef Wellington - FINISHED - Caldercraft - Scale 1: 64 - First wooden ship build
Ensign...conclusion:
A tiny bit of steam was used to soften the ensign while various "rounded implements" with different radii (dowel, metal file shafts etc.) were used to try and introduce various folds. I'd love to be able to describe a reproduceable scientific process, but thats not what happened. It was really just a continual serious of tweaks, leaving to dry and most importantly trying not to introduce creases. Steam worked fine to initially soften and allow the structural folds to be introduced, but isn't really a good ongoing solution as it tends to undo any previous work. Real care is also needed to not 'over wet' the painted flag, not sure I was completely successful here. Final tweaking was done by wetting very gently any tools used and trying to hold in position while it dried and the fold takes.
...and with that milestone, I'm declaring this build FINISHED!
This was my first wooden ship build, and first model I've built for over 30 years. Its taken probably 8 years to get this far off an on (probably 7 years more than it should), but I have to say I'm glad I was able to finish her. I've come to realize that I enjoy the journey more than the destination, and I certainly experienced moments when I could easily have put her aside permanently, mainly due to me recognizing unfixable mistakes or compromises that that could so easily been enhanced had I known more at the time. Given the length of time taken to complete, this progression in knowledge and execution is very apparent to me, but I hope is less apparent to others. All in all, this was a most enjoyable project that exposed me to the necessary knowledge and techniques that I hope build on and leverage in the future. I still need to make up a protective case, and will probably continue to see needed fixes and touchups before she (hopefully) is put in a place of rest. I would like to thank this entire community for the ongoing help, support and encouragement - without which I would not have reached this point.
Few pictures to celebrate, apologies that these aren't exactly studio quality.
-
Beef Wellington got a reaction from Blue Ensign in HMS Snake by Beef Wellington - FINISHED - Caldercraft - Scale 1: 64 - First wooden ship build
Ensign...conclusion:
A tiny bit of steam was used to soften the ensign while various "rounded implements" with different radii (dowel, metal file shafts etc.) were used to try and introduce various folds. I'd love to be able to describe a reproduceable scientific process, but thats not what happened. It was really just a continual serious of tweaks, leaving to dry and most importantly trying not to introduce creases. Steam worked fine to initially soften and allow the structural folds to be introduced, but isn't really a good ongoing solution as it tends to undo any previous work. Real care is also needed to not 'over wet' the painted flag, not sure I was completely successful here. Final tweaking was done by wetting very gently any tools used and trying to hold in position while it dried and the fold takes.
...and with that milestone, I'm declaring this build FINISHED!
This was my first wooden ship build, and first model I've built for over 30 years. Its taken probably 8 years to get this far off an on (probably 7 years more than it should), but I have to say I'm glad I was able to finish her. I've come to realize that I enjoy the journey more than the destination, and I certainly experienced moments when I could easily have put her aside permanently, mainly due to me recognizing unfixable mistakes or compromises that that could so easily been enhanced had I known more at the time. Given the length of time taken to complete, this progression in knowledge and execution is very apparent to me, but I hope is less apparent to others. All in all, this was a most enjoyable project that exposed me to the necessary knowledge and techniques that I hope build on and leverage in the future. I still need to make up a protective case, and will probably continue to see needed fixes and touchups before she (hopefully) is put in a place of rest. I would like to thank this entire community for the ongoing help, support and encouragement - without which I would not have reached this point.
Few pictures to celebrate, apologies that these aren't exactly studio quality.
-
 Beef Wellington got a reaction from md1400cs in HMS Snake by Beef Wellington - FINISHED - Caldercraft - Scale 1: 64 - First wooden ship build
Ensign...conclusion:
A tiny bit of steam was used to soften the ensign while various "rounded implements" with different radii (dowel, metal file shafts etc.) were used to try and introduce various folds. I'd love to be able to describe a reproduceable scientific process, but thats not what happened. It was really just a continual serious of tweaks, leaving to dry and most importantly trying not to introduce creases. Steam worked fine to initially soften and allow the structural folds to be introduced, but isn't really a good ongoing solution as it tends to undo any previous work. Real care is also needed to not 'over wet' the painted flag, not sure I was completely successful here. Final tweaking was done by wetting very gently any tools used and trying to hold in position while it dried and the fold takes.
...and with that milestone, I'm declaring this build FINISHED!
This was my first wooden ship build, and first model I've built for over 30 years. Its taken probably 8 years to get this far off an on (probably 7 years more than it should), but I have to say I'm glad I was able to finish her. I've come to realize that I enjoy the journey more than the destination, and I certainly experienced moments when I could easily have put her aside permanently, mainly due to me recognizing unfixable mistakes or compromises that that could so easily been enhanced had I known more at the time. Given the length of time taken to complete, this progression in knowledge and execution is very apparent to me, but I hope is less apparent to others. All in all, this was a most enjoyable project that exposed me to the necessary knowledge and techniques that I hope build on and leverage in the future. I still need to make up a protective case, and will probably continue to see needed fixes and touchups before she (hopefully) is put in a place of rest. I would like to thank this entire community for the ongoing help, support and encouragement - without which I would not have reached this point.
Few pictures to celebrate, apologies that these aren't exactly studio quality.
-
 Beef Wellington got a reaction from egkb in Queen Anne Style Royal Barge c1700 by Beef Wellington - Syren Ship Model Company - 1:24
Hi Chuck, appreciate you checking in and apologies for missing your post. Progress will hopefully start again shortly.
-
 Beef Wellington got a reaction from CaptMorgan in HMS Snake by Beef Wellington - FINISHED - Caldercraft - Scale 1: 64 - First wooden ship build
Ensign...conclusion:
A tiny bit of steam was used to soften the ensign while various "rounded implements" with different radii (dowel, metal file shafts etc.) were used to try and introduce various folds. I'd love to be able to describe a reproduceable scientific process, but thats not what happened. It was really just a continual serious of tweaks, leaving to dry and most importantly trying not to introduce creases. Steam worked fine to initially soften and allow the structural folds to be introduced, but isn't really a good ongoing solution as it tends to undo any previous work. Real care is also needed to not 'over wet' the painted flag, not sure I was completely successful here. Final tweaking was done by wetting very gently any tools used and trying to hold in position while it dried and the fold takes.
...and with that milestone, I'm declaring this build FINISHED!
This was my first wooden ship build, and first model I've built for over 30 years. Its taken probably 8 years to get this far off an on (probably 7 years more than it should), but I have to say I'm glad I was able to finish her. I've come to realize that I enjoy the journey more than the destination, and I certainly experienced moments when I could easily have put her aside permanently, mainly due to me recognizing unfixable mistakes or compromises that that could so easily been enhanced had I known more at the time. Given the length of time taken to complete, this progression in knowledge and execution is very apparent to me, but I hope is less apparent to others. All in all, this was a most enjoyable project that exposed me to the necessary knowledge and techniques that I hope build on and leverage in the future. I still need to make up a protective case, and will probably continue to see needed fixes and touchups before she (hopefully) is put in a place of rest. I would like to thank this entire community for the ongoing help, support and encouragement - without which I would not have reached this point.
Few pictures to celebrate, apologies that these aren't exactly studio quality.
-
 Beef Wellington got a reaction from Landlubber Mike in HMS Snake by Beef Wellington - FINISHED - Caldercraft - Scale 1: 64 - First wooden ship build
Ensign...conclusion:
A tiny bit of steam was used to soften the ensign while various "rounded implements" with different radii (dowel, metal file shafts etc.) were used to try and introduce various folds. I'd love to be able to describe a reproduceable scientific process, but thats not what happened. It was really just a continual serious of tweaks, leaving to dry and most importantly trying not to introduce creases. Steam worked fine to initially soften and allow the structural folds to be introduced, but isn't really a good ongoing solution as it tends to undo any previous work. Real care is also needed to not 'over wet' the painted flag, not sure I was completely successful here. Final tweaking was done by wetting very gently any tools used and trying to hold in position while it dried and the fold takes.
...and with that milestone, I'm declaring this build FINISHED!
This was my first wooden ship build, and first model I've built for over 30 years. Its taken probably 8 years to get this far off an on (probably 7 years more than it should), but I have to say I'm glad I was able to finish her. I've come to realize that I enjoy the journey more than the destination, and I certainly experienced moments when I could easily have put her aside permanently, mainly due to me recognizing unfixable mistakes or compromises that that could so easily been enhanced had I known more at the time. Given the length of time taken to complete, this progression in knowledge and execution is very apparent to me, but I hope is less apparent to others. All in all, this was a most enjoyable project that exposed me to the necessary knowledge and techniques that I hope build on and leverage in the future. I still need to make up a protective case, and will probably continue to see needed fixes and touchups before she (hopefully) is put in a place of rest. I would like to thank this entire community for the ongoing help, support and encouragement - without which I would not have reached this point.
Few pictures to celebrate, apologies that these aren't exactly studio quality.
-
Beef Wellington got a reaction from md1400cs in HMS Snake by Beef Wellington - FINISHED - Caldercraft - Scale 1: 64 - First wooden ship build
@ Eammon - I think you and many others deserve a perseverance award for sticking around
@ Sjors - Its great that you'll be starting a Snake build as well, there are a number now in progress, and there is still a chance you will finish yours before me 🙂
@ Mike - Thanks for reminding me that you put these on your badger, she really is a nice looking model
@ Martin - Hope it helps, like always, we stand on the shoulders of those who go before
The Ensign:
Really the only missing item at this point is an ensign. Making one's own is really the only option as aftermarket items are the wrong time period (the cross of St Patrick in the Union Jack was only introduced after the Act of Union in 1801), only white ensigns are available and they seem somehow a little too perfect, and the material they are made from seems overly heavy. There seem to be a couple of very similar approaches to making these, and here is how I approached it. This was my first effort, and although results are not the height of perfection, I'd say this is something that any modeler should feel comfortable taking on. I am not quite finished in that the final article needs to be 'folded' to sit more realistically, but I'm stepping back for a moment to think through options as I'll probably need to use some steam to help make permanent - and this seems like it could be a little catastrophic if approached incorrectly. Open to thoughts here!
The first decision was to decide what sized ensign to create. I printed on paper various sizes to see what looked good to my eye before committing further. I'm rather taken with the majestic look of a large flag, and have erred on the side of larger size, even if it would be perhaps more appropriate to use a smaller size for a ship not under sail or in battle. If I could make one recommendation to a modern navy, it would be to use larger ensigns! The other factor that played into my decision to err on the larger side was that when tweaked to hang more realistically, it will look smaller and less obtrusive to the eye.
The first step was to soak some modelspan tissue in water and stretch over a frame to dry. I used an old cheap picture frame which worked quite handily, and the modelspan tightened quite nicely. Once dry, dilute PVA was painted on, this causes the paper to stretch and wrinkle again. Once dry, it becomes taught again and the outline of an ensign was very lightly drawn on with pencil tracing from an appropriate pattern. After that it was a simple case of slowly layering dilute acrylic paints. I was somewhat limited to what I could get my hands on, using Tamiya XF-7 Red, XF-8 Blue and Vallejo 'Off White' used on the cutter.
Some masking tape was used where the hoist will be to try and limit mistakes in that area, and while this did work, masking tape did not seem to be able to provide a clean edge for the rest of the flag so it was pretty much all painted free hand. Both sides were painted, and for the field of the flag, brush direction was alternated in horizontal and vertical directions.
I forget how many dilute coats were applied, but I stopped before the colour became too solid and while there was still some translucency when held up to light (the horizontal and vertical lines were still somewhat visible). Once removed and cut to size, the hoist was trimmed to an appropriate size so it could be doubled back on itself and hard crease introduced. This is just visible below at bottom left of the flag.
In reality, the ensign would have been attached with either toggles or loops to the halyard, I decided to avoid reproducing this exactly because it would likely look a little out of scale and introduce some unnecessary complexity. In the end, a length of rope was lightly glued into the crease of the hoist, which was then then lightly glued back into place. Two knots were then placed into the rope where this would normally attach, and a false seizing placed above (on the top) and below (on the bottom) to give the impression of a loop. The hoist was then tidied up with a little off-white paint.
The ensign could now be trial fitted by threading the halyard through the small block on the end of the gaff. An ensign staff would have been used on larger ships, and even some earlier smaller craft seem to have a temporary mount to be able to place a staff. With the platform, there is really no space for such a feature, so I'm going to proceed with the ensign flying from the gaff. Given the spartan, utilitarian approach to the rest of the ship design, it does not seam unreasonable that this was the approach taken, similar to what I understand was done for smaller cutters. I'm also proceeding on the assumption that the ensign halyard would just have been secured to a cleat on either the side of the stern. I would welcome some additional insight or correction on this point.
-
 Beef Wellington got a reaction from Martin W in HMS Snake by Beef Wellington - FINISHED - Caldercraft - Scale 1: 64 - First wooden ship build
Ensign...conclusion:
A tiny bit of steam was used to soften the ensign while various "rounded implements" with different radii (dowel, metal file shafts etc.) were used to try and introduce various folds. I'd love to be able to describe a reproduceable scientific process, but thats not what happened. It was really just a continual serious of tweaks, leaving to dry and most importantly trying not to introduce creases. Steam worked fine to initially soften and allow the structural folds to be introduced, but isn't really a good ongoing solution as it tends to undo any previous work. Real care is also needed to not 'over wet' the painted flag, not sure I was completely successful here. Final tweaking was done by wetting very gently any tools used and trying to hold in position while it dried and the fold takes.
...and with that milestone, I'm declaring this build FINISHED!
This was my first wooden ship build, and first model I've built for over 30 years. Its taken probably 8 years to get this far off an on (probably 7 years more than it should), but I have to say I'm glad I was able to finish her. I've come to realize that I enjoy the journey more than the destination, and I certainly experienced moments when I could easily have put her aside permanently, mainly due to me recognizing unfixable mistakes or compromises that that could so easily been enhanced had I known more at the time. Given the length of time taken to complete, this progression in knowledge and execution is very apparent to me, but I hope is less apparent to others. All in all, this was a most enjoyable project that exposed me to the necessary knowledge and techniques that I hope build on and leverage in the future. I still need to make up a protective case, and will probably continue to see needed fixes and touchups before she (hopefully) is put in a place of rest. I would like to thank this entire community for the ongoing help, support and encouragement - without which I would not have reached this point.
Few pictures to celebrate, apologies that these aren't exactly studio quality.
-
 Beef Wellington got a reaction from p.hoek in HMS Snake by Beef Wellington - FINISHED - Caldercraft - Scale 1: 64 - First wooden ship build
Ensign...conclusion:
A tiny bit of steam was used to soften the ensign while various "rounded implements" with different radii (dowel, metal file shafts etc.) were used to try and introduce various folds. I'd love to be able to describe a reproduceable scientific process, but thats not what happened. It was really just a continual serious of tweaks, leaving to dry and most importantly trying not to introduce creases. Steam worked fine to initially soften and allow the structural folds to be introduced, but isn't really a good ongoing solution as it tends to undo any previous work. Real care is also needed to not 'over wet' the painted flag, not sure I was completely successful here. Final tweaking was done by wetting very gently any tools used and trying to hold in position while it dried and the fold takes.
...and with that milestone, I'm declaring this build FINISHED!
This was my first wooden ship build, and first model I've built for over 30 years. Its taken probably 8 years to get this far off an on (probably 7 years more than it should), but I have to say I'm glad I was able to finish her. I've come to realize that I enjoy the journey more than the destination, and I certainly experienced moments when I could easily have put her aside permanently, mainly due to me recognizing unfixable mistakes or compromises that that could so easily been enhanced had I known more at the time. Given the length of time taken to complete, this progression in knowledge and execution is very apparent to me, but I hope is less apparent to others. All in all, this was a most enjoyable project that exposed me to the necessary knowledge and techniques that I hope build on and leverage in the future. I still need to make up a protective case, and will probably continue to see needed fixes and touchups before she (hopefully) is put in a place of rest. I would like to thank this entire community for the ongoing help, support and encouragement - without which I would not have reached this point.
Few pictures to celebrate, apologies that these aren't exactly studio quality.
-
 Beef Wellington got a reaction from Dfell in HMS Snake by Beef Wellington - FINISHED - Caldercraft - Scale 1: 64 - First wooden ship build
Ensign...conclusion:
A tiny bit of steam was used to soften the ensign while various "rounded implements" with different radii (dowel, metal file shafts etc.) were used to try and introduce various folds. I'd love to be able to describe a reproduceable scientific process, but thats not what happened. It was really just a continual serious of tweaks, leaving to dry and most importantly trying not to introduce creases. Steam worked fine to initially soften and allow the structural folds to be introduced, but isn't really a good ongoing solution as it tends to undo any previous work. Real care is also needed to not 'over wet' the painted flag, not sure I was completely successful here. Final tweaking was done by wetting very gently any tools used and trying to hold in position while it dried and the fold takes.
...and with that milestone, I'm declaring this build FINISHED!
This was my first wooden ship build, and first model I've built for over 30 years. Its taken probably 8 years to get this far off an on (probably 7 years more than it should), but I have to say I'm glad I was able to finish her. I've come to realize that I enjoy the journey more than the destination, and I certainly experienced moments when I could easily have put her aside permanently, mainly due to me recognizing unfixable mistakes or compromises that that could so easily been enhanced had I known more at the time. Given the length of time taken to complete, this progression in knowledge and execution is very apparent to me, but I hope is less apparent to others. All in all, this was a most enjoyable project that exposed me to the necessary knowledge and techniques that I hope build on and leverage in the future. I still need to make up a protective case, and will probably continue to see needed fixes and touchups before she (hopefully) is put in a place of rest. I would like to thank this entire community for the ongoing help, support and encouragement - without which I would not have reached this point.
Few pictures to celebrate, apologies that these aren't exactly studio quality.
-
 Beef Wellington got a reaction from usedtosail in HMS Snake by Beef Wellington - FINISHED - Caldercraft - Scale 1: 64 - First wooden ship build
Ensign...conclusion:
A tiny bit of steam was used to soften the ensign while various "rounded implements" with different radii (dowel, metal file shafts etc.) were used to try and introduce various folds. I'd love to be able to describe a reproduceable scientific process, but thats not what happened. It was really just a continual serious of tweaks, leaving to dry and most importantly trying not to introduce creases. Steam worked fine to initially soften and allow the structural folds to be introduced, but isn't really a good ongoing solution as it tends to undo any previous work. Real care is also needed to not 'over wet' the painted flag, not sure I was completely successful here. Final tweaking was done by wetting very gently any tools used and trying to hold in position while it dried and the fold takes.
...and with that milestone, I'm declaring this build FINISHED!
This was my first wooden ship build, and first model I've built for over 30 years. Its taken probably 8 years to get this far off an on (probably 7 years more than it should), but I have to say I'm glad I was able to finish her. I've come to realize that I enjoy the journey more than the destination, and I certainly experienced moments when I could easily have put her aside permanently, mainly due to me recognizing unfixable mistakes or compromises that that could so easily been enhanced had I known more at the time. Given the length of time taken to complete, this progression in knowledge and execution is very apparent to me, but I hope is less apparent to others. All in all, this was a most enjoyable project that exposed me to the necessary knowledge and techniques that I hope build on and leverage in the future. I still need to make up a protective case, and will probably continue to see needed fixes and touchups before she (hopefully) is put in a place of rest. I would like to thank this entire community for the ongoing help, support and encouragement - without which I would not have reached this point.
Few pictures to celebrate, apologies that these aren't exactly studio quality.
-
 Beef Wellington reacted to Landlubber Mike in Benjamin W Latham by jwvolz - FINISHED - Model Shipways - 1:48
That's some really nice rigging Joe, excellent job!
-
Beef Wellington reacted to jwvolz in Benjamin W Latham by jwvolz - FINISHED - Model Shipways - 1:48
Rigged the spreaders and the spring stay. The spreader lifts are fully served and secured with lanyards. Lots and lots of serving...
-
Beef Wellington reacted to NovaStorm in Benjamin W Latham by jwvolz - FINISHED - Model Shipways - 1:48
What a fantastic job you are doing. The details and scale with the wire (metal) work and the fully served shrouds looks great.
-
 Beef Wellington got a reaction from MEDDO in HMS Snake by Beef Wellington - FINISHED - Caldercraft - Scale 1: 64 - First wooden ship build
Ensign...conclusion:
A tiny bit of steam was used to soften the ensign while various "rounded implements" with different radii (dowel, metal file shafts etc.) were used to try and introduce various folds. I'd love to be able to describe a reproduceable scientific process, but thats not what happened. It was really just a continual serious of tweaks, leaving to dry and most importantly trying not to introduce creases. Steam worked fine to initially soften and allow the structural folds to be introduced, but isn't really a good ongoing solution as it tends to undo any previous work. Real care is also needed to not 'over wet' the painted flag, not sure I was completely successful here. Final tweaking was done by wetting very gently any tools used and trying to hold in position while it dried and the fold takes.
...and with that milestone, I'm declaring this build FINISHED!
This was my first wooden ship build, and first model I've built for over 30 years. Its taken probably 8 years to get this far off an on (probably 7 years more than it should), but I have to say I'm glad I was able to finish her. I've come to realize that I enjoy the journey more than the destination, and I certainly experienced moments when I could easily have put her aside permanently, mainly due to me recognizing unfixable mistakes or compromises that that could so easily been enhanced had I known more at the time. Given the length of time taken to complete, this progression in knowledge and execution is very apparent to me, but I hope is less apparent to others. All in all, this was a most enjoyable project that exposed me to the necessary knowledge and techniques that I hope build on and leverage in the future. I still need to make up a protective case, and will probably continue to see needed fixes and touchups before she (hopefully) is put in a place of rest. I would like to thank this entire community for the ongoing help, support and encouragement - without which I would not have reached this point.
Few pictures to celebrate, apologies that these aren't exactly studio quality.
-
 Beef Wellington got a reaction from Barbossa in HMS Snake by Beef Wellington - FINISHED - Caldercraft - Scale 1: 64 - First wooden ship build
Ensign...conclusion:
A tiny bit of steam was used to soften the ensign while various "rounded implements" with different radii (dowel, metal file shafts etc.) were used to try and introduce various folds. I'd love to be able to describe a reproduceable scientific process, but thats not what happened. It was really just a continual serious of tweaks, leaving to dry and most importantly trying not to introduce creases. Steam worked fine to initially soften and allow the structural folds to be introduced, but isn't really a good ongoing solution as it tends to undo any previous work. Real care is also needed to not 'over wet' the painted flag, not sure I was completely successful here. Final tweaking was done by wetting very gently any tools used and trying to hold in position while it dried and the fold takes.
...and with that milestone, I'm declaring this build FINISHED!
This was my first wooden ship build, and first model I've built for over 30 years. Its taken probably 8 years to get this far off an on (probably 7 years more than it should), but I have to say I'm glad I was able to finish her. I've come to realize that I enjoy the journey more than the destination, and I certainly experienced moments when I could easily have put her aside permanently, mainly due to me recognizing unfixable mistakes or compromises that that could so easily been enhanced had I known more at the time. Given the length of time taken to complete, this progression in knowledge and execution is very apparent to me, but I hope is less apparent to others. All in all, this was a most enjoyable project that exposed me to the necessary knowledge and techniques that I hope build on and leverage in the future. I still need to make up a protective case, and will probably continue to see needed fixes and touchups before she (hopefully) is put in a place of rest. I would like to thank this entire community for the ongoing help, support and encouragement - without which I would not have reached this point.
Few pictures to celebrate, apologies that these aren't exactly studio quality.