


Beef Wellington
-
Posts
2,245 -
Joined
-
Last visited
Reputation Activity
-

 Beef Wellington got a reaction from CiscoH in HMS Jason by Beef Wellington - Caldercraft - 1:64 - Artois-class frigate modified from HMS Diana 1794
Thanks for all the 'likes', and Greg, Pat, Mike, Christian, Bob, Tom, Hamilton, Michael, Mobbsie - I really appreciate your thoughts and interest, the good news is that I don't need to decide right now. I got a little over-obsessive on Snake using the kit supplied materials which bogged things down a bit, I'm sure I'd enjoy rigging more with better quality line and be happier with the result. What I'm hoping is that I can leave my options open even after things get closed up when the quarterdeck and f'csle go on (e.g. mast stumps that could easily be replaced with full masts and yards at some point)
BE - your Victory, despite just looking fantastic, presents yet another interesting alternative. I too like that look a lot.
Coamings
Moving on a little, have started on the coamings and gratings. I had ordered some of Chuck's gratings some time ago and these were relatively painless to make up. The coaming dimensions were taken from AOTS with a few small adjustments to ensure the edge of the coaming met the wider binding strakes as illustrated. I did go the whole hog and build these as per TFFM which was good practice, if not slow. Not really much else to say.
Where the companionways are, I did do bit more fiddly work to try and simulate the beams and carlings that would be visible. I'm sure there must be a better way, but the approach I took was as follows:
Build up the bottom of the companionway coaming by 1mm to account for the thickness of the deck (as coamings would sit on the beams/carlings, not the deck) 0.5mm sheet was applied to the side faces to simulate the recess on the interior face Boxwood sheets and strips attached to simulate the beams/carlings. This was not hard once the approach had been figured out as this all still needs to slide in through the holes in the deck (which had to be enlarged a bit). I did decide to paint these black, as is shown to good effect on the contemporary Winchelsea model. I was tempted to leave these natural, but as I had made these out of pear, I felt that another wood tone would be distracting. In any event, black appears to have been quite commonly used toward the end of the century to aid safety by making the companionways more visible against the deck. Bit of a Frankenstein's monster from underneath, but to my eye looks convincing enough when in place.
All the coamings and gratings have been made up and just need some finishing. I was pleased that the coamings lined up with the butt pattern of the planks, because as irregular as they looks, they do correspond with the theoretical placement of the beams below.
The third photo shows the difference in appearance with the added depth in the companionway, vs the coaming simply sitting on the deck for comparison. The last photo shows everything in place. One slight fudge I'm making here is to put a grating into the foremost of the two rearmost openings. This should really be a companionway down to the wardroom, but the keel former realistically presents this being represented, and given that this will barely be glimpsed, a grating went on top instead. The kit plans omit this feature entirely.
-
 Beef Wellington got a reaction from popeye the sailor in Santísima Trinidad by Sjors - OcCre - 1:90
Really nice finish, you also managed to sneak in the tricky planking at the stern. 🙂
-
 Beef Wellington got a reaction from Piet in Santísima Trinidad by Sjors - OcCre - 1:90
Really nice finish, you also managed to sneak in the tricky planking at the stern. 🙂
-
 Beef Wellington got a reaction from John Cheevers in HMS Jason by Beef Wellington - Caldercraft - 1:64 - Artois-class frigate modified from HMS Diana 1794
Thanks for all the 'likes', and Greg, Pat, Mike, Christian, Bob, Tom, Hamilton, Michael, Mobbsie - I really appreciate your thoughts and interest, the good news is that I don't need to decide right now. I got a little over-obsessive on Snake using the kit supplied materials which bogged things down a bit, I'm sure I'd enjoy rigging more with better quality line and be happier with the result. What I'm hoping is that I can leave my options open even after things get closed up when the quarterdeck and f'csle go on (e.g. mast stumps that could easily be replaced with full masts and yards at some point)
BE - your Victory, despite just looking fantastic, presents yet another interesting alternative. I too like that look a lot.
Coamings
Moving on a little, have started on the coamings and gratings. I had ordered some of Chuck's gratings some time ago and these were relatively painless to make up. The coaming dimensions were taken from AOTS with a few small adjustments to ensure the edge of the coaming met the wider binding strakes as illustrated. I did go the whole hog and build these as per TFFM which was good practice, if not slow. Not really much else to say.
Where the companionways are, I did do bit more fiddly work to try and simulate the beams and carlings that would be visible. I'm sure there must be a better way, but the approach I took was as follows:
Build up the bottom of the companionway coaming by 1mm to account for the thickness of the deck (as coamings would sit on the beams/carlings, not the deck) 0.5mm sheet was applied to the side faces to simulate the recess on the interior face Boxwood sheets and strips attached to simulate the beams/carlings. This was not hard once the approach had been figured out as this all still needs to slide in through the holes in the deck (which had to be enlarged a bit). I did decide to paint these black, as is shown to good effect on the contemporary Winchelsea model. I was tempted to leave these natural, but as I had made these out of pear, I felt that another wood tone would be distracting. In any event, black appears to have been quite commonly used toward the end of the century to aid safety by making the companionways more visible against the deck. Bit of a Frankenstein's monster from underneath, but to my eye looks convincing enough when in place.
All the coamings and gratings have been made up and just need some finishing. I was pleased that the coamings lined up with the butt pattern of the planks, because as irregular as they looks, they do correspond with the theoretical placement of the beams below.
The third photo shows the difference in appearance with the added depth in the companionway, vs the coaming simply sitting on the deck for comparison. The last photo shows everything in place. One slight fudge I'm making here is to put a grating into the foremost of the two rearmost openings. This should really be a companionway down to the wardroom, but the keel former realistically presents this being represented, and given that this will barely be glimpsed, a grating went on top instead. The kit plans omit this feature entirely.
-
 Beef Wellington got a reaction from Hennie in Santísima Trinidad by Sjors - OcCre - 1:90
Really nice finish, you also managed to sneak in the tricky planking at the stern. 🙂
-
 Beef Wellington reacted to matiz in French 74-gun ship by matiz - scale 1:56 - Tiziano Mainardi
Hi, the work continue on the openings of the second deck
-
 Beef Wellington got a reaction from mtaylor in Santísima Trinidad by Sjors - OcCre - 1:90
Really nice finish, you also managed to sneak in the tricky planking at the stern. 🙂
-
Beef Wellington reacted to matiz in French 74-gun ship by matiz - scale 1:56 - Tiziano Mainardi
Good morning
-
Beef Wellington reacted to Sjors in Santísima Trinidad by Sjors - OcCre - 1:90
Thanks Piet
Here are the promises pictures with the tung oil.
In the mean while I've bin busy with some other stuff.
I have place the upper stern part.
Easy to glue
Next thing are the top bow batten and bottom bow batten.
I hope it will work because I have to bend again.
But we shall see.
Sjors
-
 Beef Wellington got a reaction from mobbsie in HMS Jason by Beef Wellington - Caldercraft - 1:64 - Artois-class frigate modified from HMS Diana 1794
Thanks for all the 'likes', and Greg, Pat, Mike, Christian, Bob, Tom, Hamilton, Michael, Mobbsie - I really appreciate your thoughts and interest, the good news is that I don't need to decide right now. I got a little over-obsessive on Snake using the kit supplied materials which bogged things down a bit, I'm sure I'd enjoy rigging more with better quality line and be happier with the result. What I'm hoping is that I can leave my options open even after things get closed up when the quarterdeck and f'csle go on (e.g. mast stumps that could easily be replaced with full masts and yards at some point)
BE - your Victory, despite just looking fantastic, presents yet another interesting alternative. I too like that look a lot.
Coamings
Moving on a little, have started on the coamings and gratings. I had ordered some of Chuck's gratings some time ago and these were relatively painless to make up. The coaming dimensions were taken from AOTS with a few small adjustments to ensure the edge of the coaming met the wider binding strakes as illustrated. I did go the whole hog and build these as per TFFM which was good practice, if not slow. Not really much else to say.
Where the companionways are, I did do bit more fiddly work to try and simulate the beams and carlings that would be visible. I'm sure there must be a better way, but the approach I took was as follows:
Build up the bottom of the companionway coaming by 1mm to account for the thickness of the deck (as coamings would sit on the beams/carlings, not the deck) 0.5mm sheet was applied to the side faces to simulate the recess on the interior face Boxwood sheets and strips attached to simulate the beams/carlings. This was not hard once the approach had been figured out as this all still needs to slide in through the holes in the deck (which had to be enlarged a bit). I did decide to paint these black, as is shown to good effect on the contemporary Winchelsea model. I was tempted to leave these natural, but as I had made these out of pear, I felt that another wood tone would be distracting. In any event, black appears to have been quite commonly used toward the end of the century to aid safety by making the companionways more visible against the deck. Bit of a Frankenstein's monster from underneath, but to my eye looks convincing enough when in place.
All the coamings and gratings have been made up and just need some finishing. I was pleased that the coamings lined up with the butt pattern of the planks, because as irregular as they looks, they do correspond with the theoretical placement of the beams below.
The third photo shows the difference in appearance with the added depth in the companionway, vs the coaming simply sitting on the deck for comparison. The last photo shows everything in place. One slight fudge I'm making here is to put a grating into the foremost of the two rearmost openings. This should really be a companionway down to the wardroom, but the keel former realistically presents this being represented, and given that this will barely be glimpsed, a grating went on top instead. The kit plans omit this feature entirely.
-
 Beef Wellington got a reaction from Blue Ensign in HMS Jason by Beef Wellington - Caldercraft - 1:64 - Artois-class frigate modified from HMS Diana 1794
Thanks for all the 'likes', and Greg, Pat, Mike, Christian, Bob, Tom, Hamilton, Michael, Mobbsie - I really appreciate your thoughts and interest, the good news is that I don't need to decide right now. I got a little over-obsessive on Snake using the kit supplied materials which bogged things down a bit, I'm sure I'd enjoy rigging more with better quality line and be happier with the result. What I'm hoping is that I can leave my options open even after things get closed up when the quarterdeck and f'csle go on (e.g. mast stumps that could easily be replaced with full masts and yards at some point)
BE - your Victory, despite just looking fantastic, presents yet another interesting alternative. I too like that look a lot.
Coamings
Moving on a little, have started on the coamings and gratings. I had ordered some of Chuck's gratings some time ago and these were relatively painless to make up. The coaming dimensions were taken from AOTS with a few small adjustments to ensure the edge of the coaming met the wider binding strakes as illustrated. I did go the whole hog and build these as per TFFM which was good practice, if not slow. Not really much else to say.
Where the companionways are, I did do bit more fiddly work to try and simulate the beams and carlings that would be visible. I'm sure there must be a better way, but the approach I took was as follows:
Build up the bottom of the companionway coaming by 1mm to account for the thickness of the deck (as coamings would sit on the beams/carlings, not the deck) 0.5mm sheet was applied to the side faces to simulate the recess on the interior face Boxwood sheets and strips attached to simulate the beams/carlings. This was not hard once the approach had been figured out as this all still needs to slide in through the holes in the deck (which had to be enlarged a bit). I did decide to paint these black, as is shown to good effect on the contemporary Winchelsea model. I was tempted to leave these natural, but as I had made these out of pear, I felt that another wood tone would be distracting. In any event, black appears to have been quite commonly used toward the end of the century to aid safety by making the companionways more visible against the deck. Bit of a Frankenstein's monster from underneath, but to my eye looks convincing enough when in place.
All the coamings and gratings have been made up and just need some finishing. I was pleased that the coamings lined up with the butt pattern of the planks, because as irregular as they looks, they do correspond with the theoretical placement of the beams below.
The third photo shows the difference in appearance with the added depth in the companionway, vs the coaming simply sitting on the deck for comparison. The last photo shows everything in place. One slight fudge I'm making here is to put a grating into the foremost of the two rearmost openings. This should really be a companionway down to the wardroom, but the keel former realistically presents this being represented, and given that this will barely be glimpsed, a grating went on top instead. The kit plans omit this feature entirely.
-
 Beef Wellington got a reaction from zappto in HMS Jason by Beef Wellington - Caldercraft - 1:64 - Artois-class frigate modified from HMS Diana 1794
Thanks for all the 'likes', and Greg, Pat, Mike, Christian, Bob, Tom, Hamilton, Michael, Mobbsie - I really appreciate your thoughts and interest, the good news is that I don't need to decide right now. I got a little over-obsessive on Snake using the kit supplied materials which bogged things down a bit, I'm sure I'd enjoy rigging more with better quality line and be happier with the result. What I'm hoping is that I can leave my options open even after things get closed up when the quarterdeck and f'csle go on (e.g. mast stumps that could easily be replaced with full masts and yards at some point)
BE - your Victory, despite just looking fantastic, presents yet another interesting alternative. I too like that look a lot.
Coamings
Moving on a little, have started on the coamings and gratings. I had ordered some of Chuck's gratings some time ago and these were relatively painless to make up. The coaming dimensions were taken from AOTS with a few small adjustments to ensure the edge of the coaming met the wider binding strakes as illustrated. I did go the whole hog and build these as per TFFM which was good practice, if not slow. Not really much else to say.
Where the companionways are, I did do bit more fiddly work to try and simulate the beams and carlings that would be visible. I'm sure there must be a better way, but the approach I took was as follows:
Build up the bottom of the companionway coaming by 1mm to account for the thickness of the deck (as coamings would sit on the beams/carlings, not the deck) 0.5mm sheet was applied to the side faces to simulate the recess on the interior face Boxwood sheets and strips attached to simulate the beams/carlings. This was not hard once the approach had been figured out as this all still needs to slide in through the holes in the deck (which had to be enlarged a bit). I did decide to paint these black, as is shown to good effect on the contemporary Winchelsea model. I was tempted to leave these natural, but as I had made these out of pear, I felt that another wood tone would be distracting. In any event, black appears to have been quite commonly used toward the end of the century to aid safety by making the companionways more visible against the deck. Bit of a Frankenstein's monster from underneath, but to my eye looks convincing enough when in place.
All the coamings and gratings have been made up and just need some finishing. I was pleased that the coamings lined up with the butt pattern of the planks, because as irregular as they looks, they do correspond with the theoretical placement of the beams below.
The third photo shows the difference in appearance with the added depth in the companionway, vs the coaming simply sitting on the deck for comparison. The last photo shows everything in place. One slight fudge I'm making here is to put a grating into the foremost of the two rearmost openings. This should really be a companionway down to the wardroom, but the keel former realistically presents this being represented, and given that this will barely be glimpsed, a grating went on top instead. The kit plans omit this feature entirely.
-
 Beef Wellington got a reaction from rusty b in HMS Jason by Beef Wellington - Caldercraft - 1:64 - Artois-class frigate modified from HMS Diana 1794
Thanks for all the 'likes', and Greg, Pat, Mike, Christian, Bob, Tom, Hamilton, Michael, Mobbsie - I really appreciate your thoughts and interest, the good news is that I don't need to decide right now. I got a little over-obsessive on Snake using the kit supplied materials which bogged things down a bit, I'm sure I'd enjoy rigging more with better quality line and be happier with the result. What I'm hoping is that I can leave my options open even after things get closed up when the quarterdeck and f'csle go on (e.g. mast stumps that could easily be replaced with full masts and yards at some point)
BE - your Victory, despite just looking fantastic, presents yet another interesting alternative. I too like that look a lot.
Coamings
Moving on a little, have started on the coamings and gratings. I had ordered some of Chuck's gratings some time ago and these were relatively painless to make up. The coaming dimensions were taken from AOTS with a few small adjustments to ensure the edge of the coaming met the wider binding strakes as illustrated. I did go the whole hog and build these as per TFFM which was good practice, if not slow. Not really much else to say.
Where the companionways are, I did do bit more fiddly work to try and simulate the beams and carlings that would be visible. I'm sure there must be a better way, but the approach I took was as follows:
Build up the bottom of the companionway coaming by 1mm to account for the thickness of the deck (as coamings would sit on the beams/carlings, not the deck) 0.5mm sheet was applied to the side faces to simulate the recess on the interior face Boxwood sheets and strips attached to simulate the beams/carlings. This was not hard once the approach had been figured out as this all still needs to slide in through the holes in the deck (which had to be enlarged a bit). I did decide to paint these black, as is shown to good effect on the contemporary Winchelsea model. I was tempted to leave these natural, but as I had made these out of pear, I felt that another wood tone would be distracting. In any event, black appears to have been quite commonly used toward the end of the century to aid safety by making the companionways more visible against the deck. Bit of a Frankenstein's monster from underneath, but to my eye looks convincing enough when in place.
All the coamings and gratings have been made up and just need some finishing. I was pleased that the coamings lined up with the butt pattern of the planks, because as irregular as they looks, they do correspond with the theoretical placement of the beams below.
The third photo shows the difference in appearance with the added depth in the companionway, vs the coaming simply sitting on the deck for comparison. The last photo shows everything in place. One slight fudge I'm making here is to put a grating into the foremost of the two rearmost openings. This should really be a companionway down to the wardroom, but the keel former realistically presents this being represented, and given that this will barely be glimpsed, a grating went on top instead. The kit plans omit this feature entirely.
-
 Beef Wellington got a reaction from kier in HMS Vanguard by RMC - FINISHED - Amati/Victory Models - scale 1:72
I would have to say yes - last time I was there I was dragging my kids around as well but they had a blast, between Victory, Warrior and the multiple museum exibits, harbor tours etc there is plenty to see and do just in the dockyard. Add to that walks along the waterfront and the other historical sites (not forgetting maybe a few stops at 'The Still and West' pub) there's a lot to experience if the weather cooperates. Of course depends on your pace, but everytime I have been I've never felt I had enough time to get around everything at a comfortable pace.
-
Beef Wellington reacted to Mirabell61 in Eagle of Algier 1753 by Mirabell61 - FINISHED - 1:48 - Chebec - Nils Langemann
Hi Denis,
thanks for your word...
the lower deck was not really difficult...., first a template for each half, then cut out from ply and completely planked. Then slipped in, the (flexible) halves, through the deck beams fom above. Glue in place and then the gratings and the pillars.
Am now working on the below deck cabins wall, here also first doing a card template, the final wall will bear the doors and the wall panels. This will be visable through the open port side and though the port side main deck outcut of the ship later on...Will need to think about the color giving tones there...
Nils
-
Beef Wellington got a reaction from mtaylor in HMS Jason by Beef Wellington - Caldercraft - 1:64 - Artois-class frigate modified from HMS Diana 1794
Thanks for all the 'likes', and Greg, Pat, Mike, Christian, Bob, Tom, Hamilton, Michael, Mobbsie - I really appreciate your thoughts and interest, the good news is that I don't need to decide right now. I got a little over-obsessive on Snake using the kit supplied materials which bogged things down a bit, I'm sure I'd enjoy rigging more with better quality line and be happier with the result. What I'm hoping is that I can leave my options open even after things get closed up when the quarterdeck and f'csle go on (e.g. mast stumps that could easily be replaced with full masts and yards at some point)
BE - your Victory, despite just looking fantastic, presents yet another interesting alternative. I too like that look a lot.
Coamings
Moving on a little, have started on the coamings and gratings. I had ordered some of Chuck's gratings some time ago and these were relatively painless to make up. The coaming dimensions were taken from AOTS with a few small adjustments to ensure the edge of the coaming met the wider binding strakes as illustrated. I did go the whole hog and build these as per TFFM which was good practice, if not slow. Not really much else to say.
Where the companionways are, I did do bit more fiddly work to try and simulate the beams and carlings that would be visible. I'm sure there must be a better way, but the approach I took was as follows:
Build up the bottom of the companionway coaming by 1mm to account for the thickness of the deck (as coamings would sit on the beams/carlings, not the deck) 0.5mm sheet was applied to the side faces to simulate the recess on the interior face Boxwood sheets and strips attached to simulate the beams/carlings. This was not hard once the approach had been figured out as this all still needs to slide in through the holes in the deck (which had to be enlarged a bit). I did decide to paint these black, as is shown to good effect on the contemporary Winchelsea model. I was tempted to leave these natural, but as I had made these out of pear, I felt that another wood tone would be distracting. In any event, black appears to have been quite commonly used toward the end of the century to aid safety by making the companionways more visible against the deck. Bit of a Frankenstein's monster from underneath, but to my eye looks convincing enough when in place.
All the coamings and gratings have been made up and just need some finishing. I was pleased that the coamings lined up with the butt pattern of the planks, because as irregular as they looks, they do correspond with the theoretical placement of the beams below.
The third photo shows the difference in appearance with the added depth in the companionway, vs the coaming simply sitting on the deck for comparison. The last photo shows everything in place. One slight fudge I'm making here is to put a grating into the foremost of the two rearmost openings. This should really be a companionway down to the wardroom, but the keel former realistically presents this being represented, and given that this will barely be glimpsed, a grating went on top instead. The kit plans omit this feature entirely.
-
 Beef Wellington got a reaction from BenD in HMS Jason by Beef Wellington - Caldercraft - 1:64 - Artois-class frigate modified from HMS Diana 1794
Thanks for all the 'likes', and Greg, Pat, Mike, Christian, Bob, Tom, Hamilton, Michael, Mobbsie - I really appreciate your thoughts and interest, the good news is that I don't need to decide right now. I got a little over-obsessive on Snake using the kit supplied materials which bogged things down a bit, I'm sure I'd enjoy rigging more with better quality line and be happier with the result. What I'm hoping is that I can leave my options open even after things get closed up when the quarterdeck and f'csle go on (e.g. mast stumps that could easily be replaced with full masts and yards at some point)
BE - your Victory, despite just looking fantastic, presents yet another interesting alternative. I too like that look a lot.
Coamings
Moving on a little, have started on the coamings and gratings. I had ordered some of Chuck's gratings some time ago and these were relatively painless to make up. The coaming dimensions were taken from AOTS with a few small adjustments to ensure the edge of the coaming met the wider binding strakes as illustrated. I did go the whole hog and build these as per TFFM which was good practice, if not slow. Not really much else to say.
Where the companionways are, I did do bit more fiddly work to try and simulate the beams and carlings that would be visible. I'm sure there must be a better way, but the approach I took was as follows:
Build up the bottom of the companionway coaming by 1mm to account for the thickness of the deck (as coamings would sit on the beams/carlings, not the deck) 0.5mm sheet was applied to the side faces to simulate the recess on the interior face Boxwood sheets and strips attached to simulate the beams/carlings. This was not hard once the approach had been figured out as this all still needs to slide in through the holes in the deck (which had to be enlarged a bit). I did decide to paint these black, as is shown to good effect on the contemporary Winchelsea model. I was tempted to leave these natural, but as I had made these out of pear, I felt that another wood tone would be distracting. In any event, black appears to have been quite commonly used toward the end of the century to aid safety by making the companionways more visible against the deck. Bit of a Frankenstein's monster from underneath, but to my eye looks convincing enough when in place.
All the coamings and gratings have been made up and just need some finishing. I was pleased that the coamings lined up with the butt pattern of the planks, because as irregular as they looks, they do correspond with the theoretical placement of the beams below.
The third photo shows the difference in appearance with the added depth in the companionway, vs the coaming simply sitting on the deck for comparison. The last photo shows everything in place. One slight fudge I'm making here is to put a grating into the foremost of the two rearmost openings. This should really be a companionway down to the wardroom, but the keel former realistically presents this being represented, and given that this will barely be glimpsed, a grating went on top instead. The kit plans omit this feature entirely.
-
 Beef Wellington got a reaction from KenW in HMS Jason by Beef Wellington - Caldercraft - 1:64 - Artois-class frigate modified from HMS Diana 1794
Thanks for all the 'likes', and Greg, Pat, Mike, Christian, Bob, Tom, Hamilton, Michael, Mobbsie - I really appreciate your thoughts and interest, the good news is that I don't need to decide right now. I got a little over-obsessive on Snake using the kit supplied materials which bogged things down a bit, I'm sure I'd enjoy rigging more with better quality line and be happier with the result. What I'm hoping is that I can leave my options open even after things get closed up when the quarterdeck and f'csle go on (e.g. mast stumps that could easily be replaced with full masts and yards at some point)
BE - your Victory, despite just looking fantastic, presents yet another interesting alternative. I too like that look a lot.
Coamings
Moving on a little, have started on the coamings and gratings. I had ordered some of Chuck's gratings some time ago and these were relatively painless to make up. The coaming dimensions were taken from AOTS with a few small adjustments to ensure the edge of the coaming met the wider binding strakes as illustrated. I did go the whole hog and build these as per TFFM which was good practice, if not slow. Not really much else to say.
Where the companionways are, I did do bit more fiddly work to try and simulate the beams and carlings that would be visible. I'm sure there must be a better way, but the approach I took was as follows:
Build up the bottom of the companionway coaming by 1mm to account for the thickness of the deck (as coamings would sit on the beams/carlings, not the deck) 0.5mm sheet was applied to the side faces to simulate the recess on the interior face Boxwood sheets and strips attached to simulate the beams/carlings. This was not hard once the approach had been figured out as this all still needs to slide in through the holes in the deck (which had to be enlarged a bit). I did decide to paint these black, as is shown to good effect on the contemporary Winchelsea model. I was tempted to leave these natural, but as I had made these out of pear, I felt that another wood tone would be distracting. In any event, black appears to have been quite commonly used toward the end of the century to aid safety by making the companionways more visible against the deck. Bit of a Frankenstein's monster from underneath, but to my eye looks convincing enough when in place.
All the coamings and gratings have been made up and just need some finishing. I was pleased that the coamings lined up with the butt pattern of the planks, because as irregular as they looks, they do correspond with the theoretical placement of the beams below.
The third photo shows the difference in appearance with the added depth in the companionway, vs the coaming simply sitting on the deck for comparison. The last photo shows everything in place. One slight fudge I'm making here is to put a grating into the foremost of the two rearmost openings. This should really be a companionway down to the wardroom, but the keel former realistically presents this being represented, and given that this will barely be glimpsed, a grating went on top instead. The kit plans omit this feature entirely.
-
 Beef Wellington got a reaction from mort stoll in HMS Jason by Beef Wellington - Caldercraft - 1:64 - Artois-class frigate modified from HMS Diana 1794
Thanks for all the 'likes', and Greg, Pat, Mike, Christian, Bob, Tom, Hamilton, Michael, Mobbsie - I really appreciate your thoughts and interest, the good news is that I don't need to decide right now. I got a little over-obsessive on Snake using the kit supplied materials which bogged things down a bit, I'm sure I'd enjoy rigging more with better quality line and be happier with the result. What I'm hoping is that I can leave my options open even after things get closed up when the quarterdeck and f'csle go on (e.g. mast stumps that could easily be replaced with full masts and yards at some point)
BE - your Victory, despite just looking fantastic, presents yet another interesting alternative. I too like that look a lot.
Coamings
Moving on a little, have started on the coamings and gratings. I had ordered some of Chuck's gratings some time ago and these were relatively painless to make up. The coaming dimensions were taken from AOTS with a few small adjustments to ensure the edge of the coaming met the wider binding strakes as illustrated. I did go the whole hog and build these as per TFFM which was good practice, if not slow. Not really much else to say.
Where the companionways are, I did do bit more fiddly work to try and simulate the beams and carlings that would be visible. I'm sure there must be a better way, but the approach I took was as follows:
Build up the bottom of the companionway coaming by 1mm to account for the thickness of the deck (as coamings would sit on the beams/carlings, not the deck) 0.5mm sheet was applied to the side faces to simulate the recess on the interior face Boxwood sheets and strips attached to simulate the beams/carlings. This was not hard once the approach had been figured out as this all still needs to slide in through the holes in the deck (which had to be enlarged a bit). I did decide to paint these black, as is shown to good effect on the contemporary Winchelsea model. I was tempted to leave these natural, but as I had made these out of pear, I felt that another wood tone would be distracting. In any event, black appears to have been quite commonly used toward the end of the century to aid safety by making the companionways more visible against the deck. Bit of a Frankenstein's monster from underneath, but to my eye looks convincing enough when in place.
All the coamings and gratings have been made up and just need some finishing. I was pleased that the coamings lined up with the butt pattern of the planks, because as irregular as they looks, they do correspond with the theoretical placement of the beams below.
The third photo shows the difference in appearance with the added depth in the companionway, vs the coaming simply sitting on the deck for comparison. The last photo shows everything in place. One slight fudge I'm making here is to put a grating into the foremost of the two rearmost openings. This should really be a companionway down to the wardroom, but the keel former realistically presents this being represented, and given that this will barely be glimpsed, a grating went on top instead. The kit plans omit this feature entirely.
-
 Beef Wellington got a reaction from egkb in HMS Jason by Beef Wellington - Caldercraft - 1:64 - Artois-class frigate modified from HMS Diana 1794
Thanks for all the 'likes', and Greg, Pat, Mike, Christian, Bob, Tom, Hamilton, Michael, Mobbsie - I really appreciate your thoughts and interest, the good news is that I don't need to decide right now. I got a little over-obsessive on Snake using the kit supplied materials which bogged things down a bit, I'm sure I'd enjoy rigging more with better quality line and be happier with the result. What I'm hoping is that I can leave my options open even after things get closed up when the quarterdeck and f'csle go on (e.g. mast stumps that could easily be replaced with full masts and yards at some point)
BE - your Victory, despite just looking fantastic, presents yet another interesting alternative. I too like that look a lot.
Coamings
Moving on a little, have started on the coamings and gratings. I had ordered some of Chuck's gratings some time ago and these were relatively painless to make up. The coaming dimensions were taken from AOTS with a few small adjustments to ensure the edge of the coaming met the wider binding strakes as illustrated. I did go the whole hog and build these as per TFFM which was good practice, if not slow. Not really much else to say.
Where the companionways are, I did do bit more fiddly work to try and simulate the beams and carlings that would be visible. I'm sure there must be a better way, but the approach I took was as follows:
Build up the bottom of the companionway coaming by 1mm to account for the thickness of the deck (as coamings would sit on the beams/carlings, not the deck) 0.5mm sheet was applied to the side faces to simulate the recess on the interior face Boxwood sheets and strips attached to simulate the beams/carlings. This was not hard once the approach had been figured out as this all still needs to slide in through the holes in the deck (which had to be enlarged a bit). I did decide to paint these black, as is shown to good effect on the contemporary Winchelsea model. I was tempted to leave these natural, but as I had made these out of pear, I felt that another wood tone would be distracting. In any event, black appears to have been quite commonly used toward the end of the century to aid safety by making the companionways more visible against the deck. Bit of a Frankenstein's monster from underneath, but to my eye looks convincing enough when in place.
All the coamings and gratings have been made up and just need some finishing. I was pleased that the coamings lined up with the butt pattern of the planks, because as irregular as they looks, they do correspond with the theoretical placement of the beams below.
The third photo shows the difference in appearance with the added depth in the companionway, vs the coaming simply sitting on the deck for comparison. The last photo shows everything in place. One slight fudge I'm making here is to put a grating into the foremost of the two rearmost openings. This should really be a companionway down to the wardroom, but the keel former realistically presents this being represented, and given that this will barely be glimpsed, a grating went on top instead. The kit plans omit this feature entirely.
-
 Beef Wellington got a reaction from JesseLee in HMS Jason by Beef Wellington - Caldercraft - 1:64 - Artois-class frigate modified from HMS Diana 1794
Thanks for all the 'likes', and Greg, Pat, Mike, Christian, Bob, Tom, Hamilton, Michael, Mobbsie - I really appreciate your thoughts and interest, the good news is that I don't need to decide right now. I got a little over-obsessive on Snake using the kit supplied materials which bogged things down a bit, I'm sure I'd enjoy rigging more with better quality line and be happier with the result. What I'm hoping is that I can leave my options open even after things get closed up when the quarterdeck and f'csle go on (e.g. mast stumps that could easily be replaced with full masts and yards at some point)
BE - your Victory, despite just looking fantastic, presents yet another interesting alternative. I too like that look a lot.
Coamings
Moving on a little, have started on the coamings and gratings. I had ordered some of Chuck's gratings some time ago and these were relatively painless to make up. The coaming dimensions were taken from AOTS with a few small adjustments to ensure the edge of the coaming met the wider binding strakes as illustrated. I did go the whole hog and build these as per TFFM which was good practice, if not slow. Not really much else to say.
Where the companionways are, I did do bit more fiddly work to try and simulate the beams and carlings that would be visible. I'm sure there must be a better way, but the approach I took was as follows:
Build up the bottom of the companionway coaming by 1mm to account for the thickness of the deck (as coamings would sit on the beams/carlings, not the deck) 0.5mm sheet was applied to the side faces to simulate the recess on the interior face Boxwood sheets and strips attached to simulate the beams/carlings. This was not hard once the approach had been figured out as this all still needs to slide in through the holes in the deck (which had to be enlarged a bit). I did decide to paint these black, as is shown to good effect on the contemporary Winchelsea model. I was tempted to leave these natural, but as I had made these out of pear, I felt that another wood tone would be distracting. In any event, black appears to have been quite commonly used toward the end of the century to aid safety by making the companionways more visible against the deck. Bit of a Frankenstein's monster from underneath, but to my eye looks convincing enough when in place.
All the coamings and gratings have been made up and just need some finishing. I was pleased that the coamings lined up with the butt pattern of the planks, because as irregular as they looks, they do correspond with the theoretical placement of the beams below.
The third photo shows the difference in appearance with the added depth in the companionway, vs the coaming simply sitting on the deck for comparison. The last photo shows everything in place. One slight fudge I'm making here is to put a grating into the foremost of the two rearmost openings. This should really be a companionway down to the wardroom, but the keel former realistically presents this being represented, and given that this will barely be glimpsed, a grating went on top instead. The kit plans omit this feature entirely.
-
Beef Wellington got a reaction from CiscoH in HMS Jason by Beef Wellington - Caldercraft - 1:64 - Artois-class frigate modified from HMS Diana 1794
Thanks all for the "likes" and looking in. Think a point has been reached where all of the known big challenges have been addressed, or at least an approach developed, so I can start to have a bit of fun tackling some of the other odd pieces on the deck.
I am starting to seriously consider not rigging this model... the reason being that I certainly still have plenty ahead of me (and I still haven't even finished rigging 'Snake' yet) even without rigging, also the size of the hull is already quite large and adding the masts and spars will increase the needed space significantly. Curious on other's thoughts on this, hopefully it is not anathema. The other consideration is that I would like to move onto another build sooner than I realistically would if I were to fully rig. What this means is that I may spend a little extra time adding some details that I otherwise wouldn't, as I'm also wanting to leave my options open to possibly leave open some of the upper deck planking/scuttles.
4 additional standards have been added, 2 fore and 2 aft (still in process on larboard side) as these will be visible when the upper deck is in place. You can see the kit supplied riding bitts in place.
The scale of these bitts is actually pretty accurate, but I didn't like the shape so decided to make up my own...and while I was at it also made up some fore riding bitts following guidance from TFFM as the AOTS book is a little sparse on detail. These were fun little projects. I believe the forward elm battens were nailed on for easy replacement but I haven't tried to simulate that, not sure how this would be done however, or whether this is a "less is more" situation.
Previous mods allowed the bowsprit to be secured within the hull on a bowsprit step so this was also constructed. Going a little crazy some manger boards were also made up, these will not be readily (understatement) viewable but I think could add to the sense of depth when undergoing close inspection through a gun port , and help mask the obvious edge of the bulkhead against the deck. The dimensions of the bowsprit step are a little ambiguous, in retrospect I would have made it 2-3mm narrower, but given the likely visibility, this will not be redone.
The placement of the bowsprit step is a little dependent on some of the foremost beam, to be obsessive this should be a little further forward, but think it will be just fine where it is. The foremost deck beams required modification to work around some of the other alterations made up to this point but this was simple enough.
And with everything in place a couple of deck shots to get a feel for things...
-
Beef Wellington got a reaction from CiscoH in HMS Jason by Beef Wellington - Caldercraft - 1:64 - Artois-class frigate modified from HMS Diana 1794
Cheers gents.
Christian - I'm being consistent in using the Admiralty paints yellow ochre which I quite like. Constant handling of these parts seems to be no match for any paint and paint rubs off the high spots despite an undercoat. Should not be a problem to get looking OK when the time comes.
Cannon Conundrums (or "Armament Angst")
I felt I needed a bit of a change of pace while continuing to work slowly on the stern, and decided to get a head start on the cannons as I foresee these being a rather repetitive activity. Psychologically, it feels like I'm getting a head start on things a little by commencing work on these now rather than waiting until I have to do them.
The first decision was to finally decide on which barrels to go with. Photos below show 3 options, specifically left to right, Chuck's Syren offering, RB Models and the kit supplied barrels. I know I posted these pics in Andy's Diana log, but can't remember if I did here so pls forgive any repetition!
Kit provide barrels - Painful as it is, the kit provided ones just don't cut the mustard with the bore being too large, the muzzle not being the right shape and the pommel just way too big. Chuck's barrels are very nice indeed, while the length certainly works, the bore seems a little small and for a 1:64 18lb'er and overall the barrel is a little dainty to my eye RBs Models (44mm) are also very nicely shaped and to my eye seem to fit the needed proportions best. Each barrel is also supplied with a scale precut trunnion of high quality, so some labour would be saved there.
Next up, carriages. I had ordered a set of Chucks Syren carriages a while ago and finally got round to building one up in addition to a kit carriage for comparison. Pictures are self explanatory and show the kit carriage with kit barrel (left) with Syren carriage and RB models barrel (right). Making these up allowed all the possible permutations to be tried, but these are best comparison. Note - these were built over a number of very brief 10 minute sessions when I could escape to the boat yard, i.e. very quick and dirty, with quick paint job and no fittings.
Couple of things are apparent:
The kit walnut is not great, being very splintery with pronounced grain, and would require a lot of work to get an acceptable finish. The carriage is noticeably a little more squat, and the 2mm thickness of the ply looks less substantial, and the trucks a little on the small side. Similar level of finish work on the Syren laser cut parts gives a much better result. Dimensions all around look a little more pleasing to my eye.
The width of the Syren carriage were made slightly wider than the plans indicate to try and better scale to the RB barrel.
Final comparison was to place in situ. The RB/Syren combination seemed to sit nicely mid port. Placement of a quoin will need to be thought about as the barrel is probably already at approximately the right elevation. Feel the RB/Syren combo is clear winner, despite the additional investment that will be needed my view is that this will ultimately provide a more enjoyable building experience, especially as 28 of these puppies will need to be made up...
-
 Beef Wellington got a reaction from coxswain in HMS Jason by Beef Wellington - Caldercraft - 1:64 - Artois-class frigate modified from HMS Diana 1794
Gents - this is why this site is so great, everything has suddenly become clear (or at least clearer), so thank you!
Carl - All beautiful, but maybe a little fancy for the late 18th century and undoubtedly beyond my ability to carve!
Dirk - I see you had the exact same 'problem'. Despite being an avid follower of your beautiful Confederacy I somehow missed that, so shame on me! That shows the situation very clearly and was a huge help in thinking this through.
B.E. - You raise a good potential issue with the arm, I think the casting is sufficiently soft to allow that to be bent, but experimentation will be needed. In photos below you can see I've bent the arm tentatively, will need more attention but I want to wait until final profile is known to reduce the risk of it breakage due to repeated bending. BTW, I repeatedly admire your custom Pegasus stern and added figures - much better than the kit provided knights - but maybe a little too ornate for these later frigates (I may be wrong, but I believe the Artois class may have been among the last 5th rates with full figureheads)
Photos of a quick-and-dirty proof of concept, so think I know where I'm going with this...trying to ignore the horrible paint finish on the casting but there is no point in making it look good at this point...
-
Beef Wellington got a reaction from BenD in HMS Jason by Beef Wellington - Caldercraft - 1:64 - Artois-class frigate modified from HMS Diana 1794
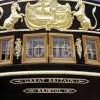
Not much progress, but I want to ask a question, so felt obliged to post a few photos
Progress made on the upper and lower counter rail. These need to follow quite a curve, more so than they appear, and were pre-bent to shape using a failed counter template I had kept. Seems very important visually to get a smooth curve. The ends of these rails will need to butt up against the side gallery rails and so were angled to approximately 45% in preparation. Using a single pin amidships proved to be the ticket here ensuring that the rail could be consistently placed while the ends were fine tuned - the small hole should be pretty easy to mask afterwards with filler. The top rail is not glued in place yet, but its possible to get a feel for the run of these rails. Overall, I'm rather relieved and pleased with how this turned out with the name placement.
So, to my question. The Diana kit provides two 'ladies' at either side of the stern fascia which are pretty good castings (represent the goddesses Hera and Athena from Jason's story) which I'd like to use. The tafferal is quite thick, and when compared to the AOTS diagram, the female figures appear to have some depth. I thought that by this time, complex carvings in the round would not be in vogue for economic reasons, so I'm wondering if what is illustrated is a simpler relief carving on an angled corner. If so, then the approach could be to simply angle the corner. The hesitation here is that after so much work on the stern, I'm wary of making a mistake...but I do like the more 'fitted' look in the AOTS picture as it seems to gradually transition the thickness of the tafferal in a visually pleasing way. Angling the corner would be easier with the upper counter rail off, but until that's decided its a roadblock to moving forward with the rest.
Opinions, thoughts and recommendations sought...