Nirvana
-
Posts
5,457 -
Joined
-
Last visited
Content Type
Profiles
Forums
Gallery
Events
Everything posted by Nirvana
-
 But your longboat is coming just beautifully!
- 100 replies
-
- 3
-

-
- model shipways
- 18th century longboat
- (and 1 more)
-
I know the Gremlins are still around....... wreaking havoc when it comes to parts...... Ne er finding the i ems you are looking for. Hey, they are ev n taking away letters. Mike, I bought deadeyes from Chuck, very nice once that I am to use. So I have extra, just in case of the Gremlins.
- 100 replies
-
- 3
-
-
- model shipways
- 18th century longboat
- (and 1 more)
-
Mike, Many thanks for the looping plier idea, I have looked them up and seems to be a Very good investment. Thanks again
- 335 replies
-
- 3
-
-
- 18th century longboat
- Finished
- (and 1 more)
-
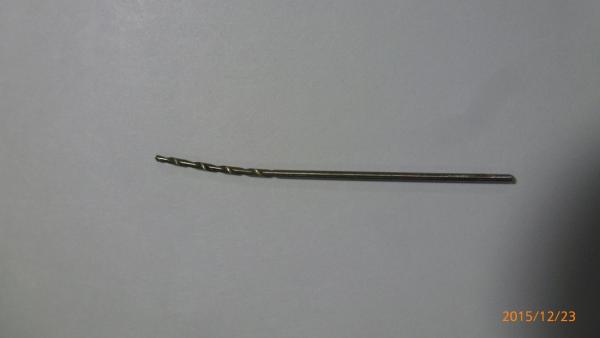
Bluenose2, I think it will be much much cheaper to dispose the drill and get another one than having it re-shaped. Think I could some 20+ drills for some the shop price, or even more...
-
I thought in order to bend a bit like this you need some heat..... maybe a carpet is good enough... The length: oh sorry, total length only 2 3/4 inches ( about 6.2 cm) long. Could have been stepped on, never felt it though......
-
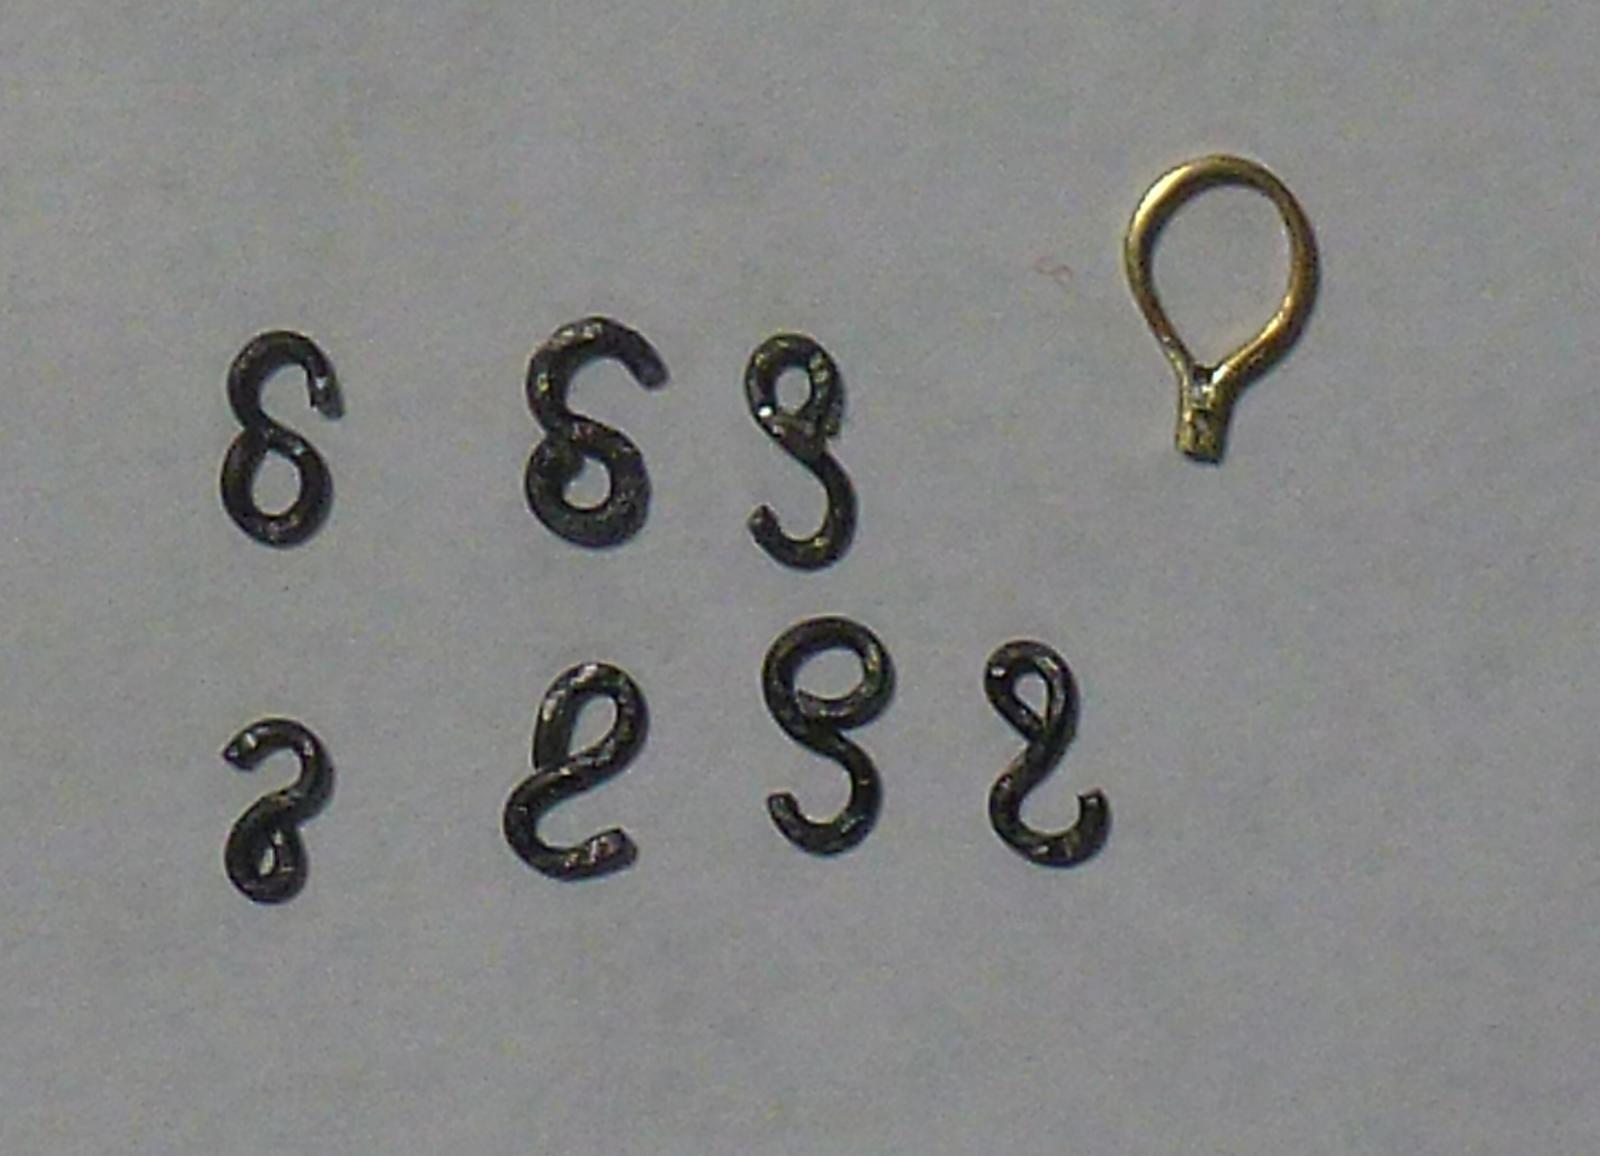
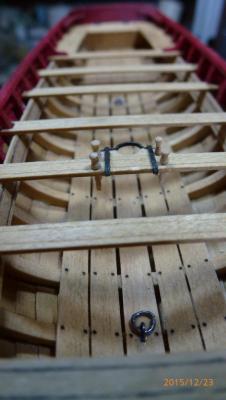
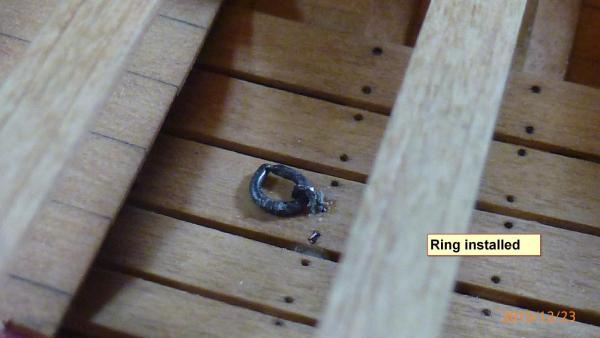
Well, my home made hooks didn't come out uniformed. Funny though they are all the same length. Seven hooks and the mast ring. It was a long time since I did some soldering, but the butan powered soldering pistol it worked out fine. Think the heat was greater than with an electric. The ring has been drilled for the boom-hook.
- 335 replies
-
- 7
-
-
- 18th century longboat
- Finished
- (and 1 more)
-
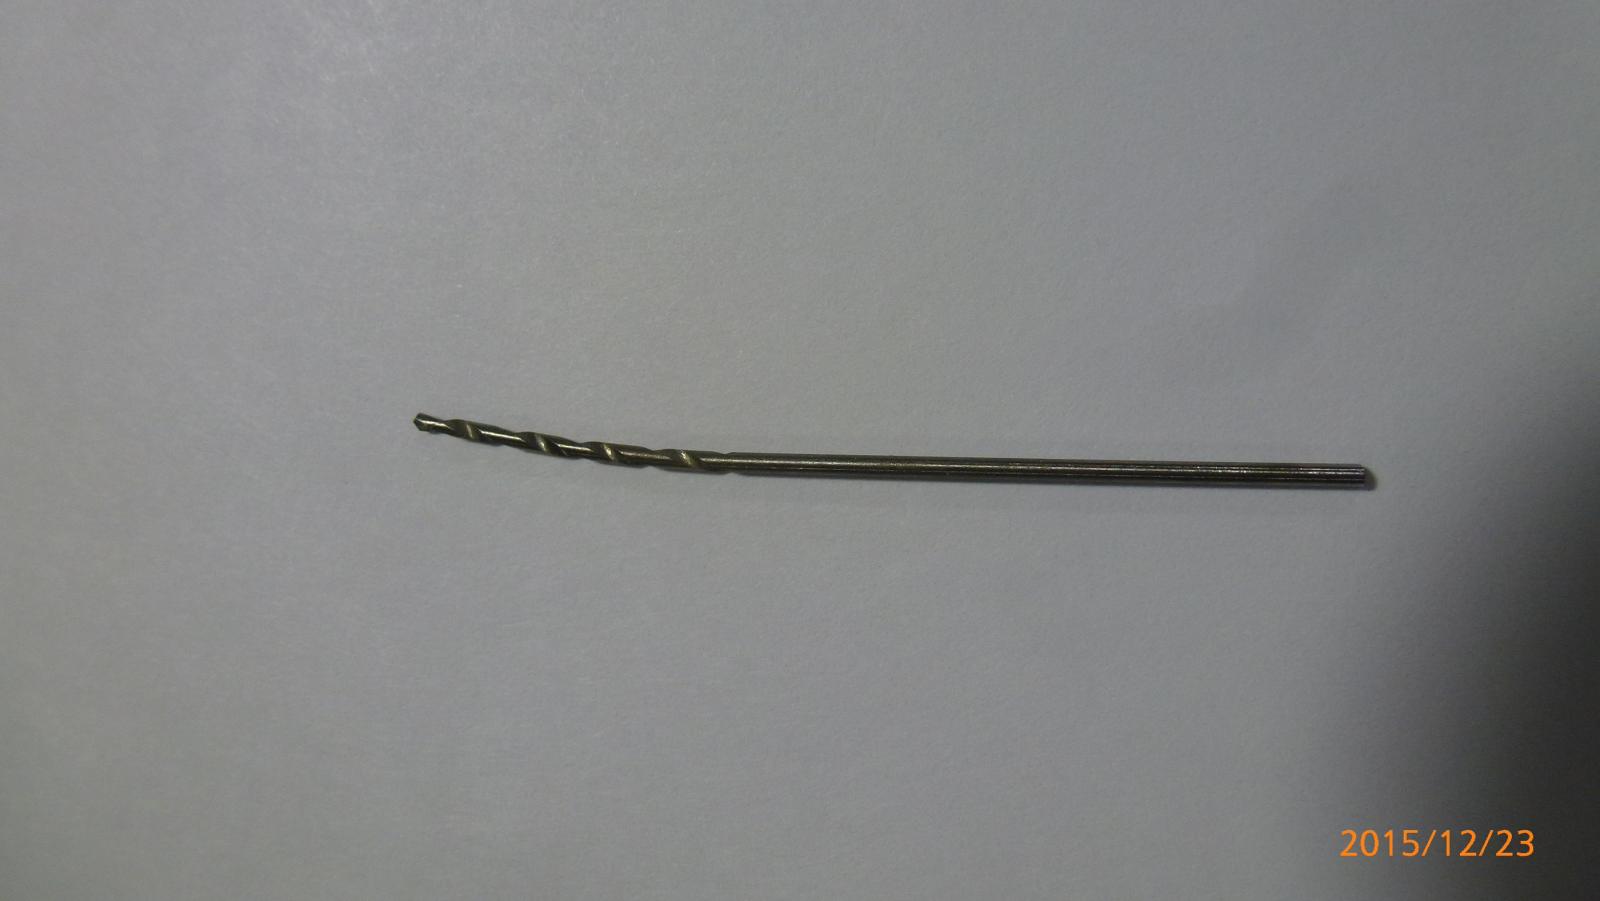
So I had done drilling and lost a one of the HSS drill bits in carpet, when I found it it looked like this. Most of my bits going of like this has been broken. Take a look and ponder about it.
-
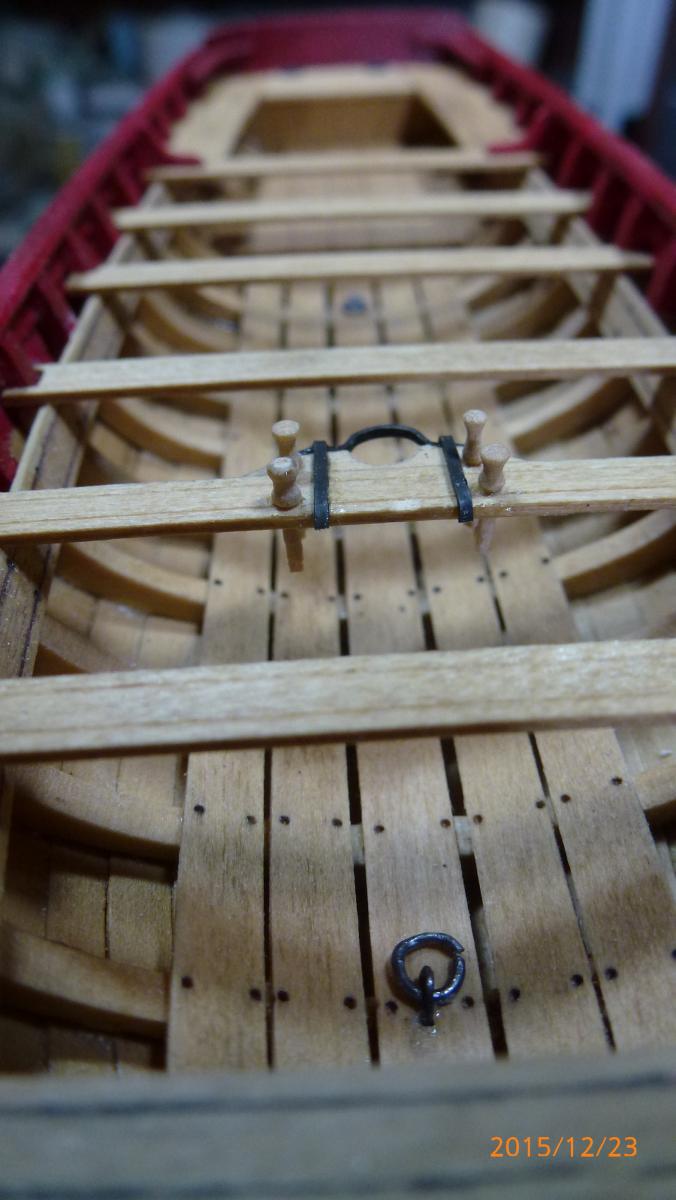
Mast seat in place and both the hoist rings.
- 335 replies
-
- 9
-
-
- 18th century longboat
- Finished
- (and 1 more)
-
The "lift rings" were hard to get round, so I settled with the second best. Now both of them are in place and not glued to the boat. They are movable.
- 335 replies
-
- 7
-
-
- 18th century longboat
- Finished
- (and 1 more)
-
Found a casket, seems to be filled with some liquid..... Smells good from it though..... well better sit down on it instead of trying to open it. Looking forward to next step.
- 203 replies
-
- 3
-
-
- artesania latina
- marie jeanne
- (and 1 more)
-
Jack, I just finalized reading through your build log, and got goose-bumps when seeing your transom part. It was like deja-vu. Back in the 70's when I built Marie-Jeanne, I was all alone on the project, And no support but that part gave me a lot of thinking. I probably re-did that part 4 - 5 times. Still it didn't turn out perfect. Besides today with internet it is so much easier to get help if stuck. Good job.
- 203 replies
-
- 3
-
-
- artesania latina
- marie jeanne
- (and 1 more)
-
So I looked up Silver Ash, Looking at the color of the wood I certainly like it too. Janos, Why did you buy the material from the US, seems like it is common wood species in Australia.... at least the little I read.
-
Hamilton, I looked at Amazon and found the Proxxon was a little higher rated in reviews than the Makita. However, it was based on very few reviews as well. Try to find local hardware stores carrying them to compare. Also, check out this website for more info. http://scrollsawreviews.com/ Don't know if it will help but at least something more to go on.
-
Echo by Maury S - FINISHED - Cross-Section
Nirvana replied to Maury S's topic in - Build logs for subjects built 1751 - 1800
Phwee, Lot's of reading and lot's of ideas. Maury, thank you very much for this part of the cross section. I am very very tempted, but have so many other on the hold. One of your build logs will truly be a great help for one of my next build. And that is your Emma C. Berry. -
Geez, can't you get a better picture? lol, Dirk, don't get me wrong..... but that picture is amazing, the detailing and depth of field. Very Nice! Can be used in other builds as well. Thank you.
- 269 replies
-
- 3
-
-
- Caldercraft
- First build
- (and 3 more)
-
New mini-mill... CNC and impressive
Nirvana replied to mtaylor's topic in Modeling tools and Workshop Equipment
Oh my, And only 4000 dollars, maybe a trip to Bozeman to pay this little company a visit. Well, it's out of my pocket as well. But thank you posting this. This is what I call enterprising. -
Tony, The Sherbourne is beautiful. I like the way you are describing by words and picture the detailing that's put in.
- 269 replies
-
- 2
-
-
- Caldercraft
- First build
- (and 3 more)
-
Mark, Seems like the bars from Lee Valley is cheaper.... which is great. Another great source for tools and draining my account.
-
Gabe, Okay ,this one is from me ...... WOW! That is a nice build log. Now I have question: Where on earth did you find those nice clamps (brass but I also saw black ones). I would like to get hold of those.
-
Very nice Mike, Hmm, using the wire instead of the rope? Great idea!
- 100 replies
-
- 4
-
-
- model shipways
- 18th century longboat
- (and 1 more)
-
Burnside63, or what your name is.... I am glad to hear you have an Admiral requesting for something different than a ship. You have great support! To bad this is not the right forum that build, but please provide us all for a link to that tram or two, I am certainly looking forward to a build log.
-
Erik, What size of hooks did you use? I think I bought to small hooks from Chuck, the 3mm. Very nice and clean job you have done.
- 222 replies
-
- 1
-
-
- 18th century longboat
- model shipways
- (and 2 more)
-
The Admiral and I are in the process of moving. Due to that I have to store my kits in another location for time being. Yes, sealing them up with plastic wrapping is to be done, but is that good enough? They have all been stored in my office closet so far. For a while the kits will be stored in a non-heated garage. Inputs would be appreciated.
-
Burnside63, That very nice. I like the warm glow. How about a christmas tree on the foredeck. All this types of ships had a tree during christmas time.
-
Mobbsie, nice start as I stood up for the first part. lol, now I am sitting with my own cup of joe. Since this is a fairly small hull kit,I would have replaced the stubborn walnut planking with basswood or boxwood. I guess it is a double planked hull?! Looking forward to next episode. Hmm, so it wasn't doubleplanked. I found several builts on youtube, some shorter other longer.
- 129 replies
-
- 4
-
-
- armed launch
- panart
- (and 1 more)