


AON
-
Posts
2,596 -
Joined
-
Last visited
Content Type
Profiles
Forums
Gallery
Events
Posts posted by AON
-
-
-
-
-
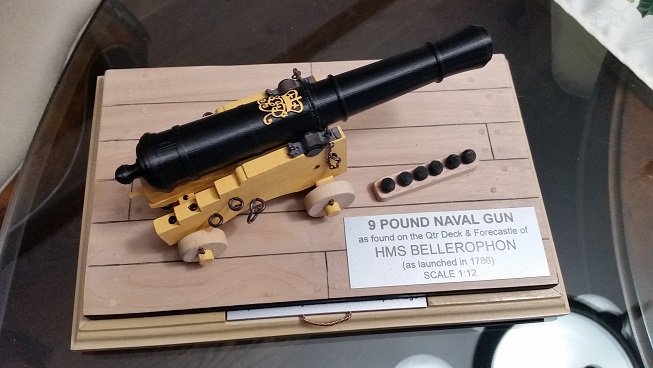
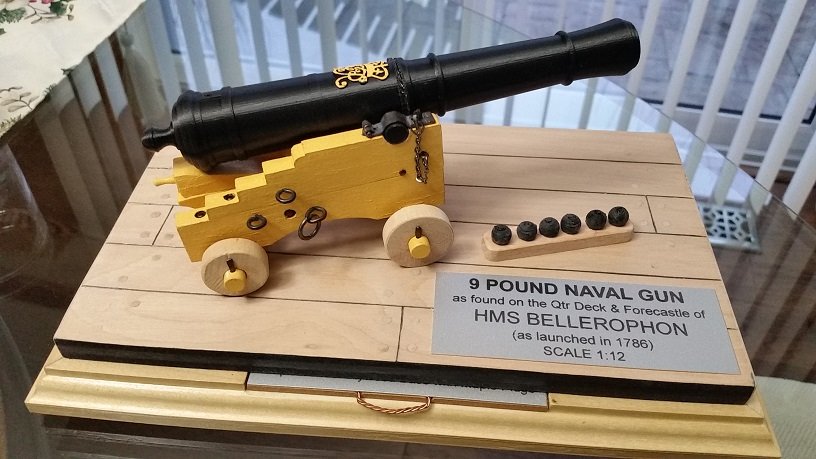
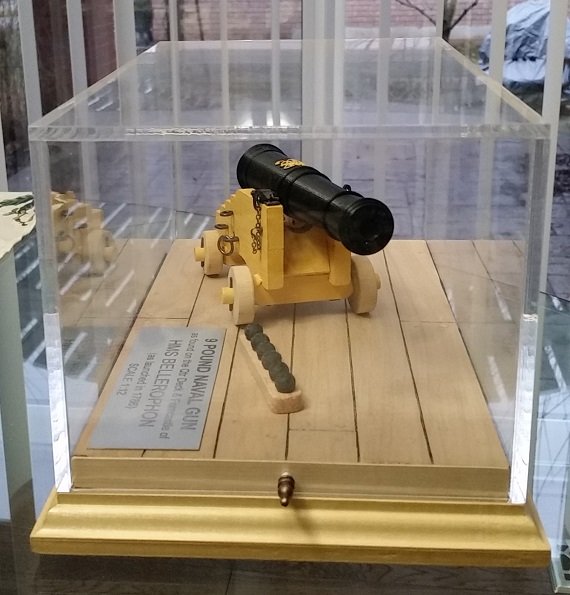
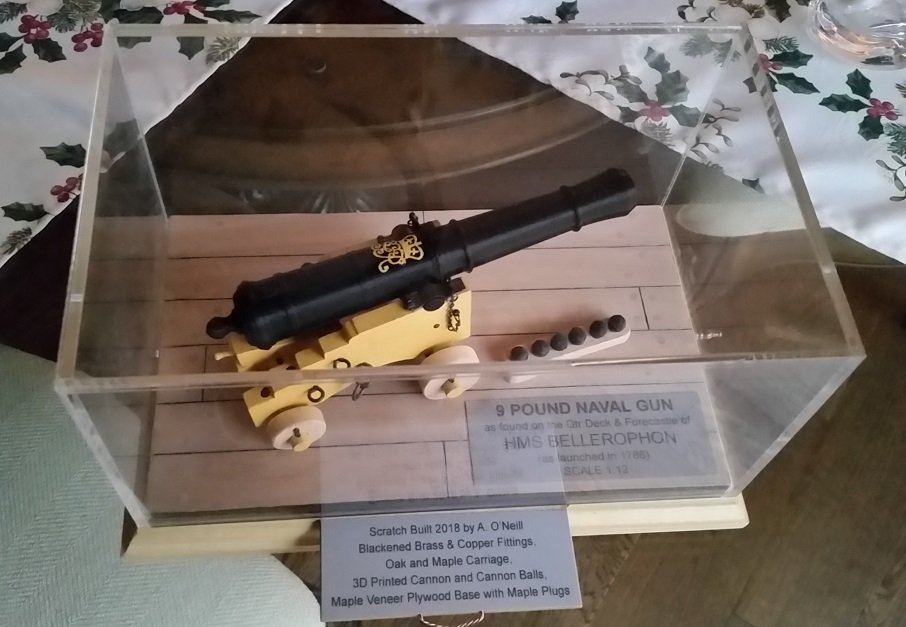
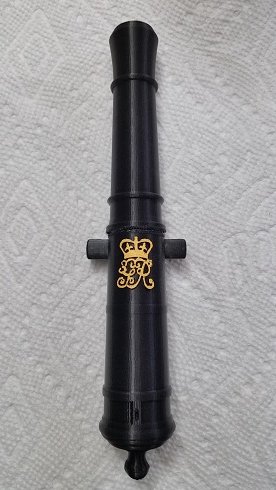
Completed.
Thank you all for following, your "likes", comments and help.
Wishing everyone a Merry Christmas and Happy New Year!

- albert, druxey, Tigersteve and 8 others
-
 11
11
-
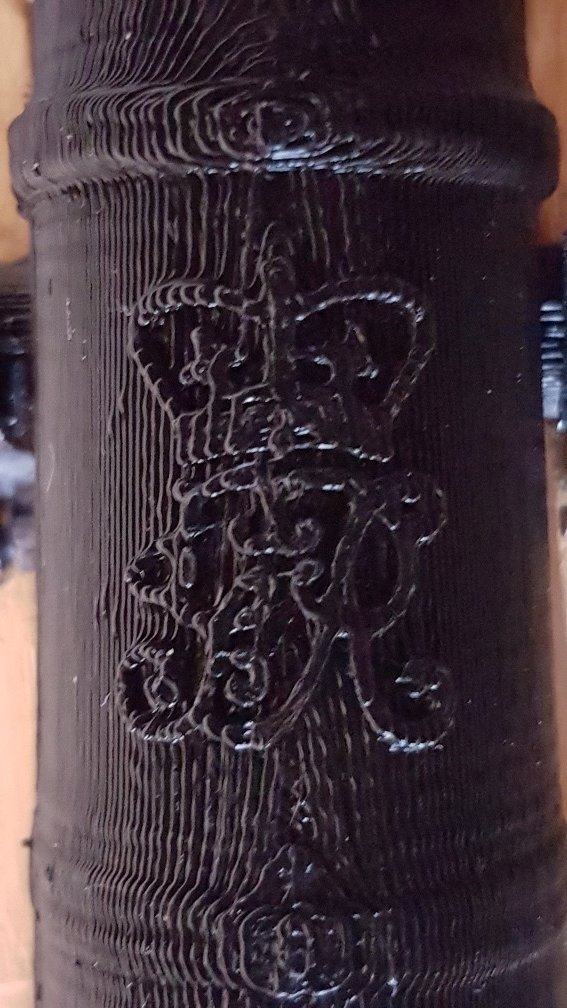
You are correct! **
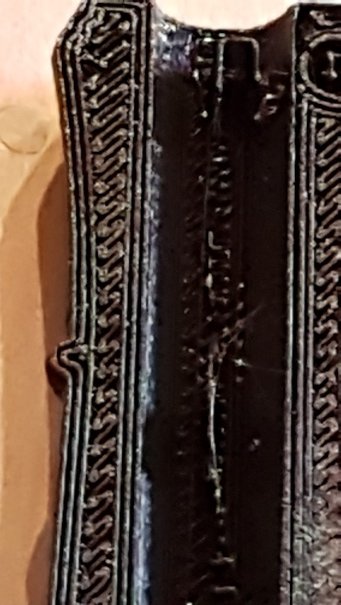
The problem is that it is practically indistinquishable in black shiny plastic on the black shiny plastic... and worse when forced at a distance (through an acrylic case).
I even strayed by making the insignia a little larger this time in the hopes it might make a difference but it did not.
What the eye cannot see (even my good eye) is sometimes unbelievable.
I learnt this lesson during my industrial heat treatment furnace designing career with safety yellow perforated machine guards. The eye will not see through them but will look through black so I would have portions of my machine guards painted black so operators and maintenance people could see motion through them.
I did not agonize over this decision as I did with a few others.
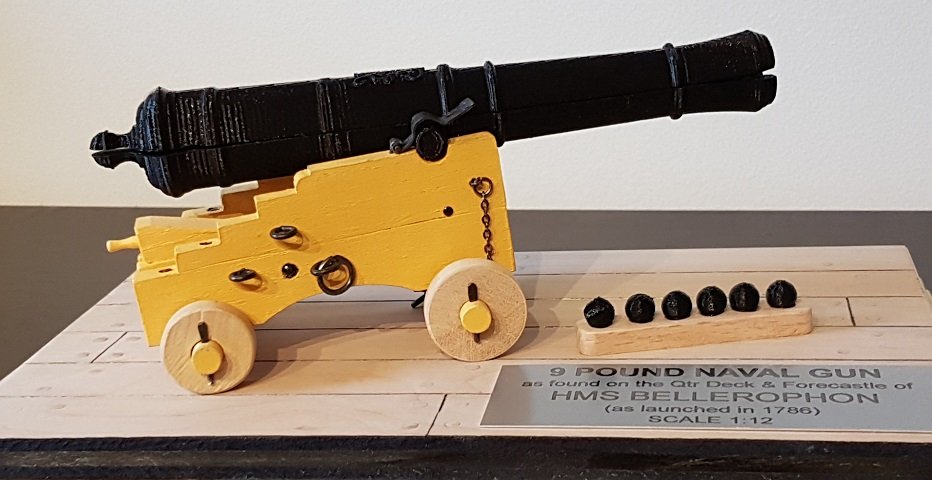
It is pretty nice looking... and I like it.
Unlike learned people like yourself and others on this forum, most people won't know and will hopefully be focused as I am at how damn good looking it is.
Father, forgive me, for I have sinned.

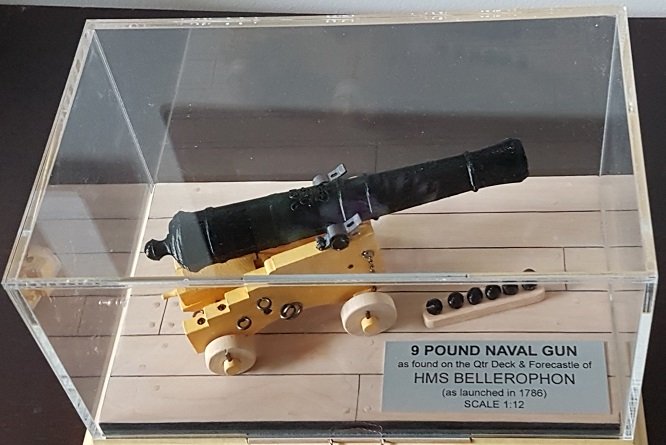
**NOTE: please see post #124 dated 26 Feb 2012 for an update on painting the royal cypher
- mtaylor, Jack12477, paulsutcliffe and 3 others
-
6
-
After recovering from my worst yet needle in the eye ....
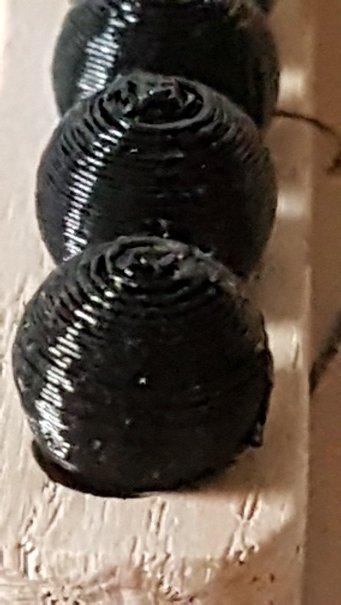
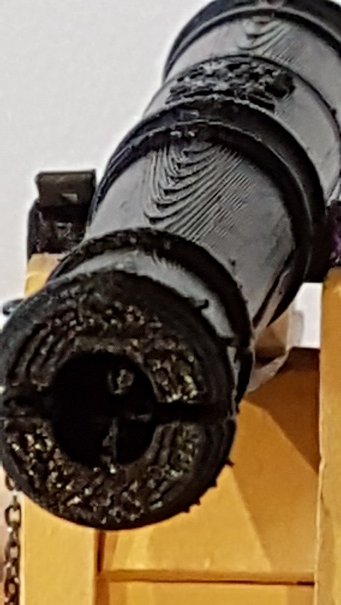
I cleaned the supports off the trunnions and glued the two pices of the cannon together. I will not be touching the piece up at all as I want it to be realized to be 3D printed. I had smoothed off the cannon balls a bit which resulted in a dull finish and they are almost unrecongizable as having been 3D printed. I am happy with them but do notwant the gun looking anything like this and do not want to have to paint it black.
We had had a presentation on Adhesives (Glues) at our September meeting of the Model Shipwrights of Niagara ( https://modelshipwrightsofniagara.weebly.com/blog ) and were told about the websites https://www.thistothat.com/ and http://www.thebestglueforplastic.com/
I found the best glue for PLA was a 2 part epoxy and it worked wonderfully.
I also painted** the royal insignia by applying a small amount of paint to my finger tip and dabbing it to the raised insignia.
Literally waiting for paint to dry now.
**NOTE: Please see post #124 dated 26 Feb 2012 for update on painting the royal cypher
- ccoyle, GrandpaPhil, Canute and 7 others
-
10
-
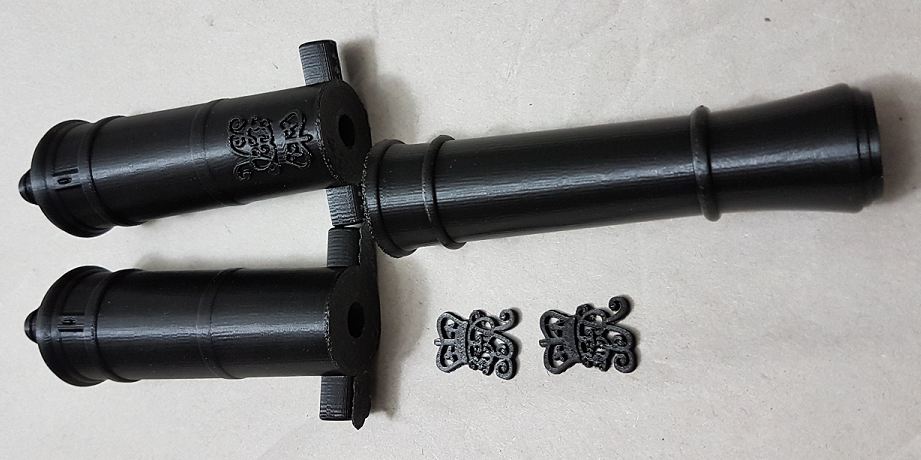
I picked up my new 3D prints from the local library this afternoon. This was extremely fast, they must have enjoyed the challenge. It was different from the usual mundane items they print.
Two sections printed vertical (standing on end). One muzzle and two breeches with one version of the breech with the insignia.
This is what was on the note they sent me:
In terms of the flat insignia, it didn't come out very clearly when we used the file's default thickness, but when we added another millimeter to its depth it came out much more clearly. You should be able to sand this thicker version down to get the look you want. The version of the breech with the insignia on it also looks surprisingly good.
All files were printed on the "Hyper" resolution setting with a layer height of 0.8mm. When printing the insignia, I slowed the print speed down to 20mm/s to ensure the details came out as precisely as possible.
They look a million times better than the earlier horizontally printed halves.
Judge for yourselves...

-
-
Had my meeting about 3D printing at the local Library this afternoon. I brought in my list of suggestions supplied by one anonymous forum member (thank you again!) and it was very helpful.
Their machine is a 2 year old commercial printer. I was told the 8 Mb file size limit is set by the Library's internet file transfer size limitation. If I bring my files in on a thumb drive (stick) they can be any size I care to save them at. By this logic I can split the gun into merely two pieces, a muzzle half and a breech half. The split will be at the edge of the 2nd reinforcing ring just past the trunnion to keep the printing supports under the trunnion short.
We discussed printing the insignia flat as the wrapped version has a maximum offset of 0.01 inches (0.254mm) at 1:12 scale. As the PLA filament diameter is 1.75mm (0.069"), or x12 = 0.828 inches full size, this would be one layer of plastic on the machine bed. They feel it would be very difficult to lift off without breaking it. They asked if I could print it thicker (taller) part as two layers might be easier to "peel" off the bed. I've just e-mailed them a couple more questions regarding this... trying to understand the difference between filament diameter (1.75mm) and layer height (0.15mm) as it relates to my build scale (1:12).
They also suggested I print a second breech end of the barrel with the insignia on. They are not sure how this will turn out but they don't have any problem with trying.
So that is what I will do. As Christmas is around the corner they are swamped with requests to print stocking stuffers. I told them mine was not a Christmas present so I haven't any problem waiting.
Meanwhile (soon) I will cleanup the parts I have, acetone slovent weld them together and paint the insignia with my version of yellow ochre. I am back to re-making frames for my 74 but won't be posting there until I have something worthwhile showing.
-
Update....
I received a PM from a forum member who took my file and attempted to print the small section at the insignia horizontally with his printer. The results were similar.
He made many suggests: print vertically, 2 to 3" long sections; divide at an top or bottom of a ring not through it. Layer height no larger than 0.2mm. Infill of 20%. Wall thickness no less than 1mm (1.2 seems to be ideal without being overkill) Print with Brim of 5-8 lines (this will be a layer surrounding the parts that helps them adhere to the bed). He concurred that printing the insignia separately and flat would likely result in better quality.
I have a considerable amount of info to discuss with the library staff. Now I need to make smaller model sections. This should be easier by reusing the original sketch.
-
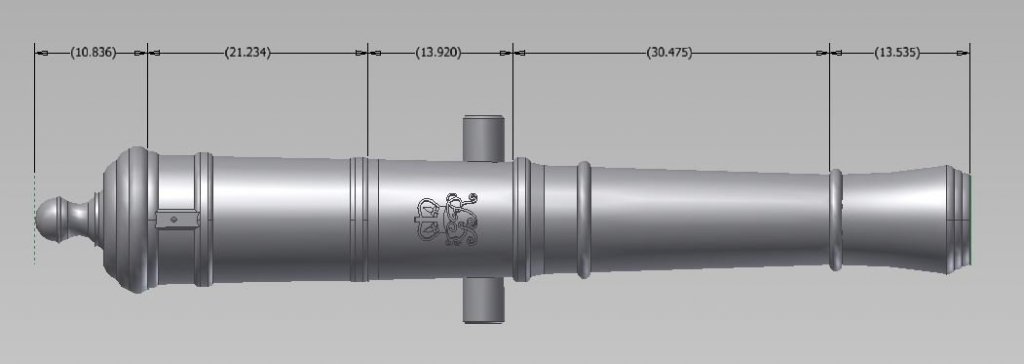
A question for people out there that have some expertise with 3D printing.
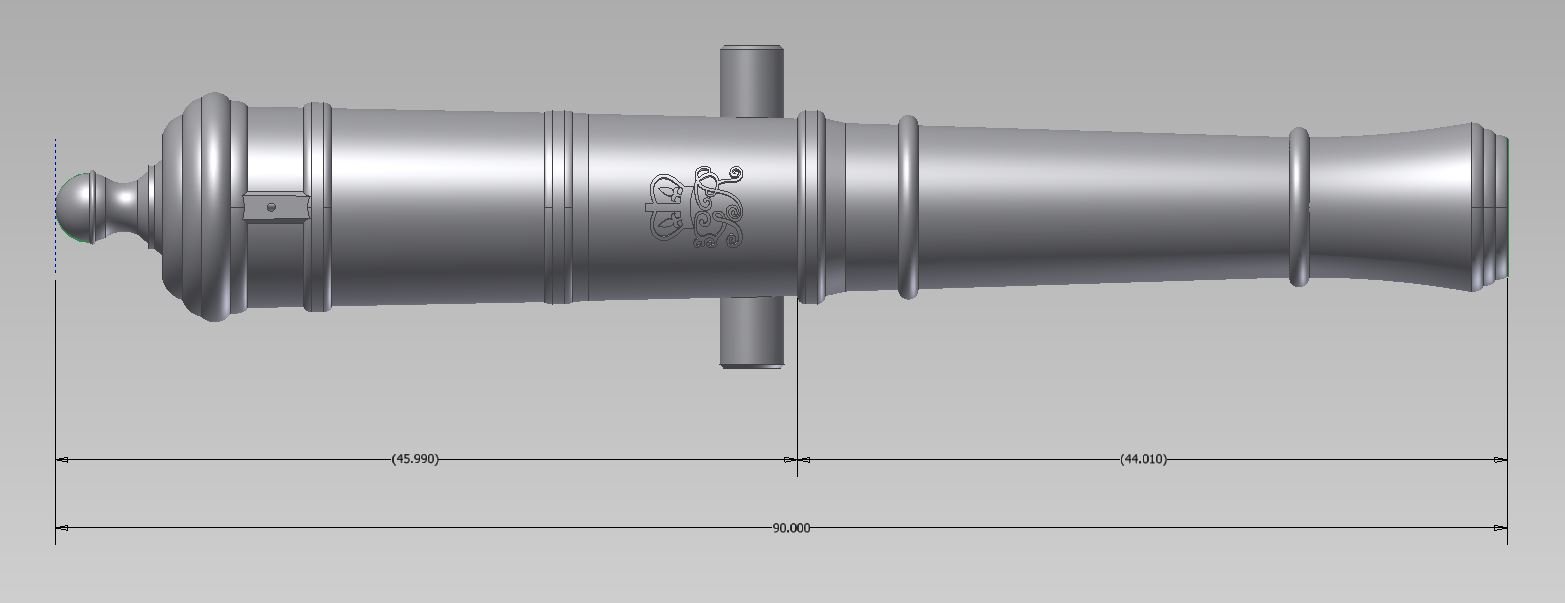
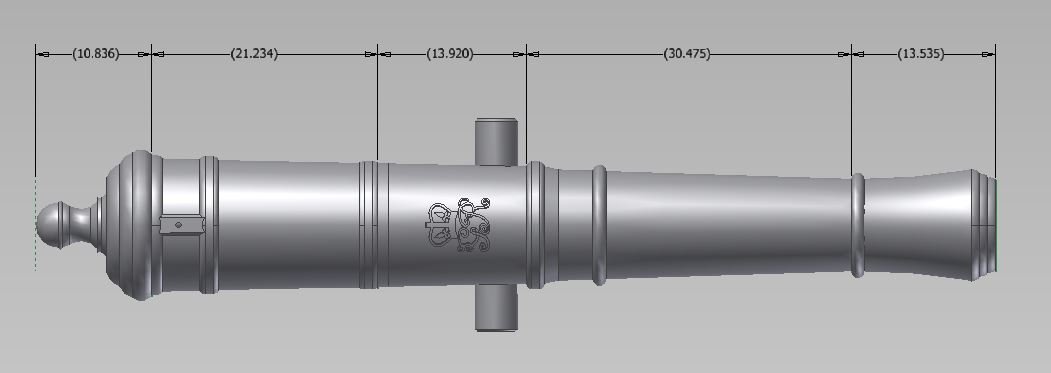
I have two sketches below.
One has the cannon divided into two pieces, almost equal halves, whereas the other has it divided into five unequal pieces.
What advantage or disadvantage is there to these divisions if presented as individual 3D vertical prints?
The first bad thing that comes to mind for me is that the ribbon of hot PLA plastic having no support at the bands when printed vertically... they may droop or simply fall away... even if they are rotated and printed upside down where possible.
The first possibly good thing is that the smaller sections allow larger detail in the 8Mb limited STL file.
Is there a better way to divide this?

-
-
-
Also... I typed 1.5 mm (0.059") but meant 0.15 mm (0.0059").
Yes... that is a huge difference. I am not comfortable with SI Units. Just barely understanding °C , forcing myself by having everything in the house display that way.
If I submit and print half the barrel (vertical or horizontal) at a time it could be saved with more detail to meet their 8Mb max limit.
They might adjust feed and speed but then they have a 5 hour max print limit.
A meeting with them should help me to understand this all better.
-
Jud
Thank you for the offer.
I will make up a short list and PM you before the weekend.
At the moment I do not know what accessories (i.e. nozzle tips) the library has or even if they are willing to make any adjustments at all.
I will contact them in a moment to arrange a meeting next week.
-
Thank you for your coment Jud!
However, I feel that would be counter to my original intent. Printed locally. Our local College has a 3D printer but they will not compete with local businesses. They cannot even offer to do a "one of" for free, even as a teaching aid. It is against policy.
I am not looking for perfection. I have yet to create perfection. I see the beauty in the rawness of this piece's imperfection.
Having said that, I would not turn my nose up to something that was prettier!
I wanted a 3D printed cannon and that is what I got. I think I will try to work with the library first before I might consider any other avenues.
I also want to say, you really have to get quite close up to see what shows up in the photos. My display case prevents that.
Or possibly my eyes need a re-alignment / adjustment.
I will get feed back regarding the aesthetics from the club this Sunday.
-
-
Druxey and Dowmer
Thank you for the comments.
The printer was set at 1.5mm layer thickness and 20% fill. I confess I do not know if this is good or bad.
Trying again vertically in two or three pieces might be worth trying. The insignia could would be applied seperately.
I've been watching numerous YouTube videos regarding gluing and smoothing.
Thank you again.
-
-
Well, the batteries in the SLR are almost dead, so while they were recharging we tried with my wife's new fangled phone camera. Following are some results.
I did not clean off any of the temporary printing supports so the fit in the carriage was not in anyway perfect.
I set the bottom half in the carriage and then placed the top half on it.
Both ends seem to bow away from each other but the good news is they pull together with very little force.
I also set the cannon balls on the rack. They do not seat properly. The flat plastic foot seemed to have spread out a bit. I measured the ball and diameter wise it is perfect enough but the flat bottom diameter measured larger than it should have been. I will sand these down to fit.
You can clearly see the stepped layers in building the pieces. Funny enough though, you only notice it when you get up quite close. Otherwise the look of it is beginning to grow on me. If I were to sand the whole thing down it would be dimensionally inaccurate... and I might possibly ruin it. The third photo shows the first layer being laid out as three outer strings and a wavey filler. So if you sand it will there be holes?
I will leave it all untouched for now but I`ve found online (YouTube) that ABS glue works on PLA plastic, and this I have. Apparently you can weld the parts together by brushing solvent (nail polish or acetone) and clamping them together. I will leave it all alone until after our club meeting this weekend.
-
Picked it up last night at about 8 pm.
Photos will be posted much later today. I think I'll need to get out the real camera and ask the resident expert photographer to do this.
The finish is nothing like resin casting. There are visible steps from the layers. Makes the finish look like wood grain.
According to YouTube it can be dry then wet sanded from 80 to 4000 grit to get it smooth.
I will not attempt this until after our meeting this weekend so the club members can see it as is for now.
The muzzle end is warped upwards a wee bit on both halves but does pull down. The plastic is at about 350°F when deposited so I imagine it happened when they slipped the spatula under it to separate it from the machine bed.
-
Inevitable everything did crack because they went from a one piece truck (wheel) tot a four piece and then added a metal retaining ring around the outboard end of the axletree.
The idea of greasing the assembly makes sense though I don't seem to notice any trace of it in photos.
Something to look into.
-
-
It has been an exciting few days.
First I realized the Royal insignia was upside down.
Then I struggled to rotate it.
Then I managed to get the new file over to the local Library via the internet and they confirmed receipt.
Then they contacted me because the STL model was less than 2" long when it should have been 7-1/2" long.
Got that all sorted out.
Then at 3 PM I get a call that they are starting my print... but they were going to use the old original file.
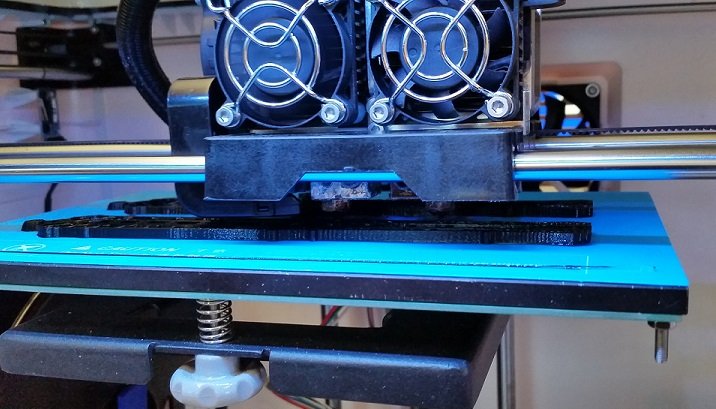
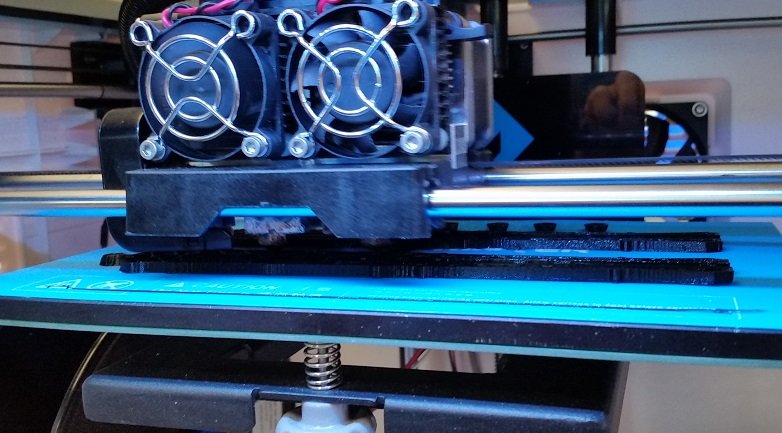
Got that straightened out and just got back from watching the print process.
They added support ribs inside the bore to keep the barrel from collapsing on itself and a couple very thin supports under the trunnion to keep them from drooping the small amount between it and the machine bed.
I am hoping for a call tonight that it is done and ready to pick up. Worst case I'll get a call tomorrow.
Here are a couple pics and a short video.
- paulsutcliffe, Canute, druxey and 3 others
-
6
HMS Bellona 1760 by SJSoane - Scale 1:64 - English 74-gun - as designed
in - Build logs for subjects built 1751 - 1800
Posted
Mark
Re making mistakes... I know this feeling well. Walking away always works so long as I remember to come back.
Druxey
Re Magic tape
After googling it I feel a bit dumber than usual. I normally call it Scotch tape or generically call it Transparant tape.
I never noticed the packaging claimed it was magic 😉