
HOLIDAY DONATION DRIVE - SUPPORT MSW - DO YOUR PART TO KEEP THIS GREAT FORUM GOING! (Only 68 donations so far out of 49,000 members - Can we at least get 100? C'mon guys!)
×

DBorgens
-
Posts
327 -
Joined
-
Last visited
Content Type
Profiles
Forums
Gallery
Events
Everything posted by DBorgens
-
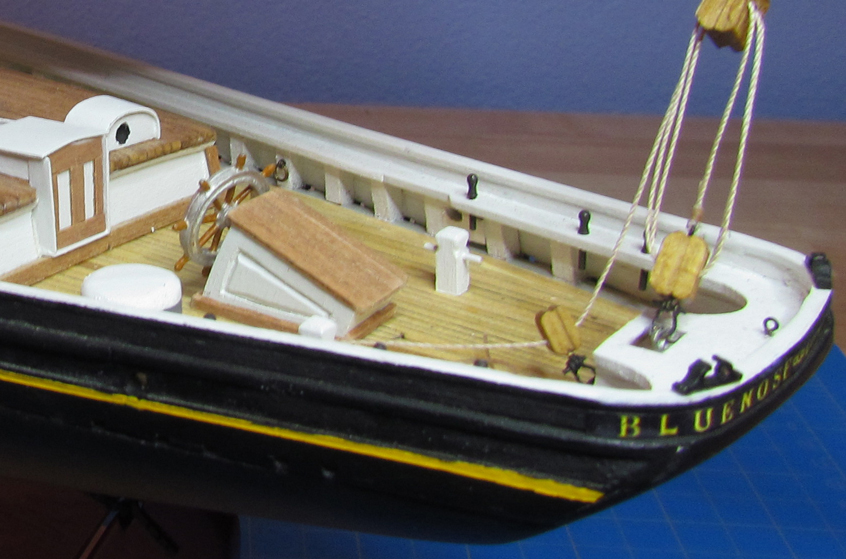
 Dave and Jon, My waterways are gray both fore and aft (between the stanchions). I do not remember if I read about gray waterways or guessed it from the Nova Scotia archive photos. At one point I was planning to put gray or white boards on the cabin roof (think overgrown cutting boards) but didn't get to it and liked the planked look. This was my first build so I was not striving for accuracy. Jon, I have the link to the 1/24 scratch build. It looks like a lot of fun. If you have a build log I would like to follow your progress. Correction, just found it. Dave, your rails look great! She is shaping up very nicely. I look forward to seeing how you will outfit the deck furniture. Have fun! Dave B
- 245 replies
-
- 1
-

-
- bluenose
- model shipways
- (and 1 more)
-
Jerry, Looking good, nice progress. I like the seizing of the shrouds, they give a nice finished look. Dave B
-
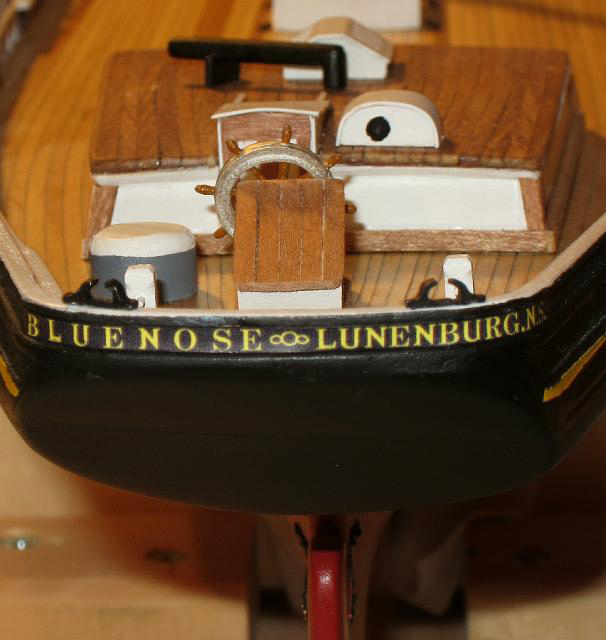
Dave, Do not fear using printed decals. The nameplates on the bow hide between the main rail and the yellow stripe. The rail and texture of the hull will help hide the decal edges, along with a small retouch of paint. I also placed the stern name and home port plate between the monkey and main rails. I liked this version better since it is understated and easier to neatly apply. Dave B
- 245 replies
-
- 6
-
-
- bluenose
- model shipways
- (and 1 more)
-
Jerry, The details sure make her start to come alive. Nice work. Don't worry about mistakes, there are no silly ones, only some we laugh about later. Sometimes I end up with two or three versions in the waste heap. Dave B
-
Glenn, I have followed your build log off and on. I appreciate your Pegasus log and will refer to it as I stert my own ( don't know when). Thank you for sharing your experience with Vanguard as well as Pegasus. Even though some logs are followed more than others, I do appreciate your posts even though I don't reply. Trying to hit the like button more often. Enjoy building! Regards, Dave B
- 101 replies
-
- 4
-
-
- victory models
- amati
- (and 2 more)
-
Dave, Just caught up with your painting. Very nice and sharp in the photos. Of course, we examine our builds and find the tiniest imperfections. Love the color of your deck? Is the photo color true? Dave B
- 245 replies
-
- 2
-
-
- bluenose
- model shipways
- (and 1 more)
-
Chuck, Thanks for the tool tip. This should be obvious but when building we (okay I) don't think laterally very well. Too task oriented. This will help when my Pinnace get's there. Still planking slowly due to many other acitvities right now. Beautiful work on your barge, you make it look easy. Dave B
- 269 replies
-
- 2
-
-
- Queen Anne Barge
- Syren Ship Model Company
- (and 1 more)
-
Hi Carl, Nice work on the masts, they look great. I am fascinated by ships in a bottle and a bit of a Bluenose fan. I look forward to seeing how your BN works out. Keep up the good work. Dave B
-
Keep raising the bar!!! You're certainly succeeding. Enjoying your posts. Dave B
- 2,191 replies
-
- 4
-
-
- confederacy
- Model Shipways
- (and 1 more)
-
Jerry, Great looking planking. I thought the difficulties I had breaking planks was beginners inexperience. I learned that at these reduced scales, wood is delicate while at the same time flexible. Each build is a learning experience (hopefully not a re-learning one). Keep up the good work! Dave B
-
Bug, Great detail work on the cats and the roundhouse. I do like your approach toward the roundhouse and will add this to my list of " how to's". Keep posting, we're enjoying your progress and the popcorn.
- 2,191 replies
-
- 5
-
-
- confederacy
- Model Shipways
- (and 1 more)
-
Siggi, I just came across your log and this is a fine barge you have. I like your solution to shaping the ladt shutter plank. I'll have to file this for future reference. I love your frieze painting, especially the Captain's seat. Nice fishes! I will enjoy following the completion of this barge. Dave B
- 58 replies
-
- 2
-
-
- barge
- ships boat
- (and 1 more)
-
Dave, You have nailed it on the mooring chocks. I skipped them. Perhaps a simpler way might be to fashion a piece of styrene or a hard wood such as box. Dave B
- 245 replies
-
- 2
-
-
- bluenose
- model shipways
- (and 1 more)
-
Dave, You are on the right track. The metal kit chocks are for the rails. Here is a picture from my BN showing the chocks and the large bitts nearby. You can just wee the port chick above the yellow line. I realized later that I had mislocated these but the holes were already drilled (I did not bother to square them up). For a first build I was happy with them. Dave B
- 245 replies
-
- 4
-
-
- bluenose
- model shipways
- (and 1 more)
-
Dave, Your deck planking looks great. I do like your every fifth method, it adds a nice touch of realism. Nice solution to the small gap. These little thinkgs that pop up keep us attentive and make nice puzzles to work out. Well done. BTW nice photos. Dave B
- 245 replies
-
- 1
-
-
- bluenose
- model shipways
- (and 1 more)
-
Dave & Jerry, The best thing I learned from the practicum was to think and plan ahead. That said, I do believe Bob has done an excellent job getting new modelers headed in the right direction. The second best thing that helped me was finding these MSW forums. I have learned much from the experienced modelers here. While you are looking, check out Bob Herman's Bluenose log. He hasn't been very active recently but he has some great tips and is very helpful. Enjoy building, Dave B
- 245 replies
-
- 2
-
-
- bluenose
- model shipways
- (and 1 more)
-
Welcome to the club. I expect we all mangle as much, no, more! wood than ends up on board. It is all part of the fun. Dave B
- 245 replies
-
- 2
-
-
- bluenose
- model shipways
- (and 1 more)
-
Dave, You fore deck looks great, nice job on the nibbing. That was as an entirely new experience, as was much of the ship. Take your time tapering quarter deck planks. I broke many and ended up leaving a "hole" under the cabin because I was runnung out of full length pieces. You may not have that problem with your plan. Your extra effort will pay off in a more scale appearing deck. We all put in the details where we deem best. It is fun to see how each of us create aslightly different model from the same sticks. Enjoy! Dave B
- 245 replies
-
- 2
-
-
- bluenose
- model shipways
- (and 1 more)
-
Metric vs English
DBorgens replied to jdiven's topic in Building, Framing, Planking and plating a ships hull and deck
Jud, for two bits I'll jump in. Just remember there are two kinds of countries in the world. Those on the metric system and those who have walked on the moon (PURELY IN JEST!) I like both systems. Dave B -
Metric vs English
DBorgens replied to jdiven's topic in Building, Framing, Planking and plating a ships hull and deck
J. While working in Germany now, I've become reacquainted with working in the metric system. It is easier to work in. But the harder part is getting a feel for the sizes or, "Just how small is 0,25 mm really?". In terms of modeling, it all comes down to scale. 1/64 or 1/48 don't lend themselves to decimals very well. I appreciate that many modelers must put up with the English system due to the predominate kit scales. Honestly, I could work either way. I would just have to get new scales and calipers. Hey, more tools! What's wrong with that? Dave B -
Dave, Looking great. You did well to reinforce the bulkheads.while I hane not heard of anyone having a problem with bulkheads flexing, better to be safe and haeve a nice rigid backbone. Your planking looks good. Bob Hunt does go a little overboard with the filler, but remember he is writing for newbees (like I was / am?) so he is extra careful. You're making great progress and I enjoy following your build. Keep posting. Dave B
- 245 replies
-
- 2
-
-
- bluenose
- model shipways
- (and 1 more)
-
Dave, The best thing I learned from Bob Hunt's practicum was to think ahead. He wrote it for beginners and it certainly helped me. If you want to mount BN on pedestals, you might consider drilling before you start planking. It will go much easier. I didn't so now mine sits on a cradle, not that I'm complaining, making the cradle was part of the fun. Keep posting, it is a good way to get help. You've made a great start! Dave B
- 245 replies
-
- 3
-
-
- bluenose
- model shipways
- (and 1 more)
-
Bug, Just tripped over this log and am amazed at the work you are doing to complete Augie's Confederacy. How did you ever rig that last gun? You're making Augie proud up there. By the way, great photos. Dave B
- 2,191 replies
-
- 10
-
-
- confederacy
- Model Shipways
- (and 1 more)
-
Hi Bob, Looking good on the framing and fairing, I am also building the Pinnace though in boxwood. I have completed about 6 planks so far and completely missed the subtle S bend Chuck highlighted. We'll see what that brings in the future. I like the look of the pear keel and transom. I will definitely check in form time to time. Enjoy your build. Dave B
-
Toni, I love your detail work and frieze painting. I too will make note of your scraper and may need to check into dental tools since my Dremmel died. Dave B