


Cap'n Rat Fink
-
Posts
829 -
Joined
Content Type
Profiles
Forums
Gallery
Events
Everything posted by Cap'n Rat Fink
-
 Hey been gone awhile witch you. So it took a while catching up with your build. Looks great!!!
 -
TALKING TO A NOVICE HERE MARK! BUT I FOUND MY PATH. Now if you can tell me how to change the title, things will be good. Well I was away for a long time. So I decided to re-read the kit practicum. To refresh this portion of the build. Glad I did, because it saved me from a lot of work and from making any mistakes. Now I have a big learning curve here. So I go with the Ol' saying "MEASURE TWICE CUT ONCE". The practicum comes with all chapters to complete the model. But only goes so far with the JIG from the kit itself. So when I read on with the process I am also looking at pictures showing the explanation with Hahn's upside down JIG. Since I have no experience with either JIG. I'm trying to figure out things with two different JiG Views. So Bob's Jig is lasered cut. Lasers cut at an angle. So I have to file the slots square, Bob also mentions that the builder must also file the slots at angles since the laser will not do this, so the stern frames line up with the wing transom. So after re-reading and finding this little tid-bit of information it cleared things up. So at this time I am filing the slots slowly and making sure the stern frames line up correctly with the wing transom. This little jig Bob added to the over all Jig helps hold the stern frames in place, where if it weren't there you would have to use a scrap piece glued to each piece tying them all together. How far can I go with this little slotted jig, before I have to remove it? I don't know. I'll go as far as I can then remove it. If I could do it all over again, I would of never glued this part of the jig in. I would of made it fit nice and snug so I could remove it and put it back in place when I needed too. It would of made things easier to measure and view.
-
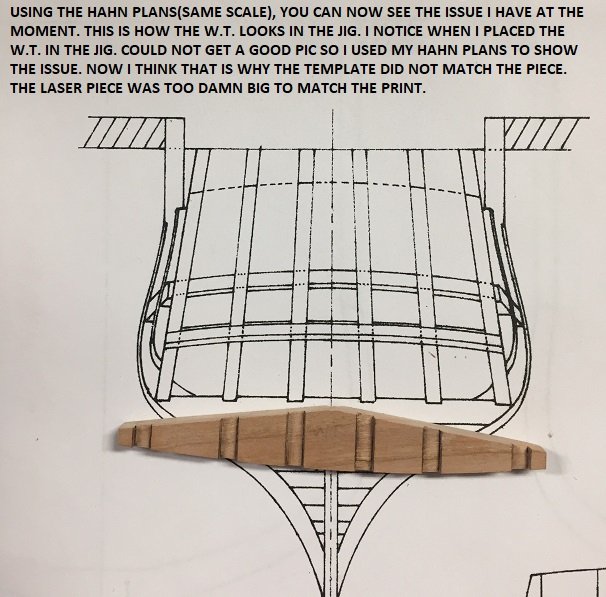
Thanks for the kind remarks.... The fairing process is on the way I am using small scrapers for a lot of the fairing process... The bow is coming out nicely, more faring to do... The stern cant frames during fairing process... An issue has cropped up... A closer look... What I am looking at to verify the issue... Even though I have this issue, to me it's not a real big problem. After I am done with the fairing of the inside of the hull I will be taking measurements. My plan is to first measure the spacing of the stern framing slots on the jig. As long has I have the spacing from first port stern frame to the second frame, and the spacing matches the rest of the stern frames I should be good. If it works out like I think it should, I'll just modify the jig a bit so when I do the glue up the stern frames it will be good. All I ask from you more experience POF builders is that my deduction is correct. The issues I run into are not frustrating, I find it as challenge and a learning experience and of course fun. Getting ready to start my first ever acoustic guitar build for my musician son. Tolerances on that will be a lot tougher. Please any advice and remarks will be very helpful.
-
It's all in the sharping cheap or expensive chisels. I have used low cost chisels. It's all in the sharping, what good are very expensive chisels if sharping is not done correctly.
-
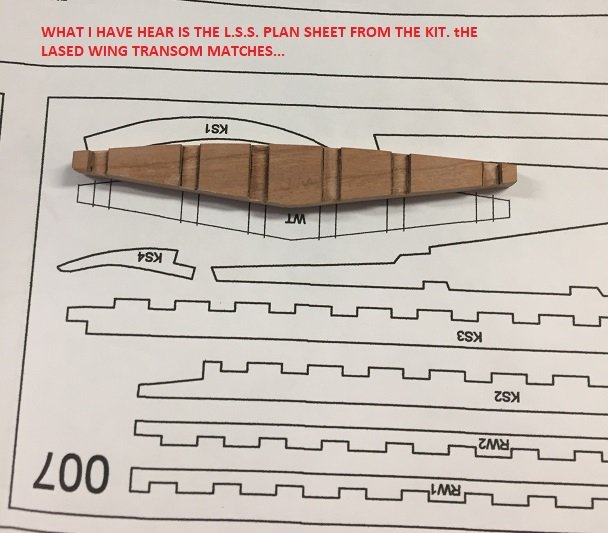
Hakan good to know your still alive like me! Thanks Mark for the PM and your advice. Being only about 14.5 inches in length(little model). Hi Dennis and Thank you. Hey John Thanks you being a 1/96 man you know small areas. Not worried about blood more like snapping those damn timbers off. Thank you Paul. Now back to more issues on the kit I have run into. I have been messing with the wing transoms fit to the cant frames. Don't I am not going to install until I have sanded the hull. Please tell me I looking at this correctly and so I con go forward. This is all new to me. Back to the shop and going to mess with hawse timber now. Bought this kit to learn POF, but with all the issues I am just hoping I get something out of this in the end.

-
So right now I am dealing with the wing transom. Got one question. Is it better to sand the hull before I install the transom??? If yes then I have to figure how to sand the inside of the hull. HAHA! All frames in, but only the cant frames fore n aft are glued in at this time.
-
Hello All, Time to raise the dead. Another one of my dead build logs. Been two years ago again. The laser cut parts at least for the frames had several issues. So I had to remake my own frames to replace the ones that did not match up to the frame drawings. Ill see how far I will be able to get before my knee surgery. Then I will have to stop until Im able to get around again.
-
John, Mark, and Zappto thank you very much !
-
Well I can call this one completed. I guess I left off 2yrs ago with a lot of all the accessories left to do. Now just a trip to the glass shop to make the lid and the case is completed. This was the very first model boat I ever did, a gift from my wife. I accomplished what I started out to do. Mamoli's description that it was Benjamin Franklin Schooner. Well I learned that B.F. had a sloop. So went with a Schooner of 1812, Named it after my wife, tried to get it as correct as possible. With one more challenge was to take a model and re-build it to see if I had the skills to do so. All things considered I think did what i set out to do. Not bad for a model I threw in to the trash can and pulled it out 20 minutes later and decided to re-build it. I'll add a few more pics in the completed model section.
-
Hi John nice to hear from you. I hope things are well with you Down Under!
-
According to my thread its been two years. HAHA! This rebuild is just about done, but been trying to find a rigging scheme of how the lifeboard/barge is rigged at the stern of the ship. its all i have left to do. For those who remember me just been busy with everyday life. I have been working on models, wood working (ex. guitar display cases, black powder guns/rifles, wood turning, raising our kids, kid activities, workin, and of course getting older). But i blew out my knee so now waiting for surgery so spending more of my time building models. Talk to you all later and Thanks for any advice.
-
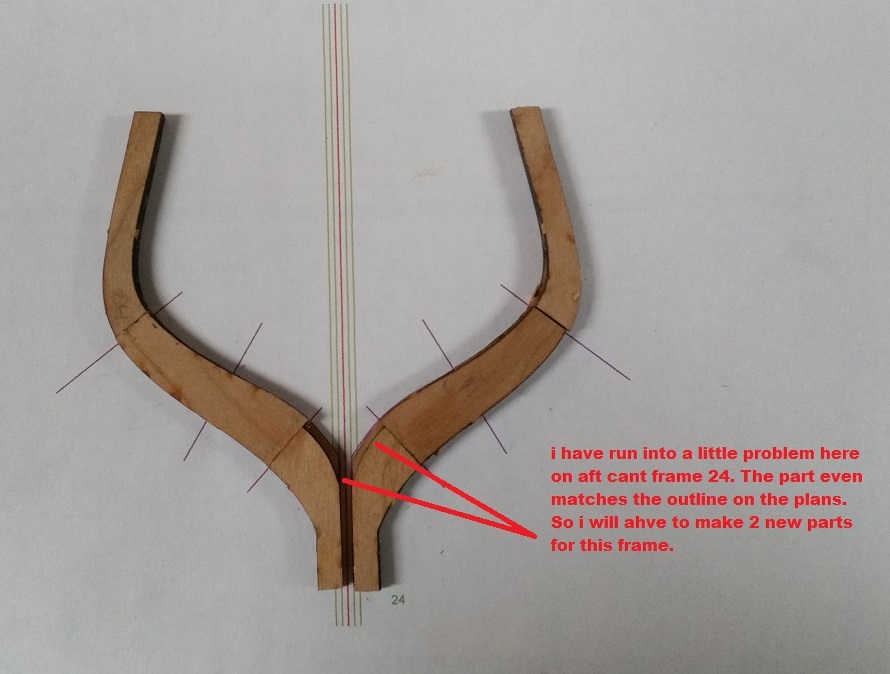
Well I thought I would do a very small update here. The forward cants are done and installed. The full frame are done. But ran into a small problem with one of the aft cant frames. #24. So I will have to deal with this one. So I have 1 picture for ya. I am just too busy right now to post pictures and update regularly. Me and my family are having a good summer. Working(after all cant have a fun summer without mooola). Been movie watching, concerts at the park, vacationing in Carlsbad South Beach. about 30 mins from were your NRG meeting is gonna be in San Diego. We are looking to retire in Carlsbad or Oceanside, because we love the beach area. Kid soccer, and adult softball that we joined. Just having fun baby. That's why no updates lately. Ah the joys of living in So. California. Over all the best weather in the continental USA. Besides this is a hobby, NOT MY LIFES BLOOD. haha! have a great summer
-
Just found this thread. Very interesting projects(barges). They will make nice kits or scratch builds if you eventually offer the plans alone.
- 269 replies
-
- 3
-

-
- Queen Anne Barge
- Syren Ship Model Company
- (and 1 more)
-
Hey Mark, Well maybe I should call you laser man. Your getting pretty handy with that thing. She is coming along nicely Chief!!!

-
Just finished reading your log Mike, Very nice model and some real nice clamps
- 943 replies
-
- 5
-
-
- hahn
- oliver cromwell
- (and 1 more)
-
So I have been busy fitting out the deck of my little schooner. Hope you like what you see. Been going over Chapelles Book like crazy. Just having some fun.
-
Marcus Thank You Very Much for your kind words.
- 25 replies
-
- 1
-
-
- chesapeak bay flattie
- Midwest Products
- (and 1 more)
-
This makes into a very nice model and a very large model, when I made it all those years ago. Have fun, and a really good start to Matt.
-
That is very nice attention to detail Dave.
- 306 replies
-
- 2
-
-
- armed virginia sloop
- Patrick Henry
- (and 2 more)
-
A very nice display of your craftsmanship you got going here Doc. I'm enjoying your progress. have fun!
- 306 replies
-
- 3
-
-
- armed virginia sloop
- Patrick Henry
- (and 2 more)
-
Hello Ian, You are doing a great job on your little lobster boat here. The choices of wood are looking really nice. Your deck also looks outstanding. I had fun with the Midwest Lobster Smack when I built one of these work boats. So have fun and I am enjoying your progress.
-
Thanks Guys for stopping by and your kind words. Thanks all for the likes. Well once I figured the story all those lines were telling me it got a whole lot easier. The starboard went a lot smoother, and I was done in about 2 hours. Now on with the hawse timber, then glue them in after finish sanding the fore and aft faces of the frames... And again please let me know if you see that I made a mistake or mistakes. This Cant making is a first for me..
- 201 replies
-
- 15
-
-
Carl, Elijah, Thank you very much for your kind words. Thank you all for the likes too...! Well it's been a while. But with my busy days, I finally had some time after work today. The kids and my wife hung out at school today for an art fair. So I was by myself. Plus I had no errands to run after work.... Well guys please let me know if you see any mistakes. Remember this is the first time I have ever modeled Cant Frames...
- 201 replies
-
- 14
-
-
You go right ahead Casey. All the power to ya. Just have fun.
- 34 replies
-
- 1
-
-
- chesapeake bay flattie
- Midwest Products
- (and 1 more)