


TBlack
-
Posts
1,311 -
Joined
-
Last visited
Content Type
Profiles
Forums
Gallery
Events
Everything posted by TBlack
-

2023 Donations drive
TBlack replied to James H's topic in Using the MSW forum - **NO MODELING CONTENT IN THIS SUB-FORUM**
My only comment is that the site won’t let you give more than $100. -
2023 Donations drive
TBlack replied to James H's topic in Using the MSW forum - **NO MODELING CONTENT IN THIS SUB-FORUM**
Got it! Thanks -
I'm looking at your painting at the bow rails and your gun tackle and thinking, "this guy has steady hands!". Remarkable! Tom
-
Kevin, the Turbo Carver looks great, but is quite expensive and requires an air compressor besides. Do you think the Foredom could do the same job as well? Tom
-
Are the oars different lengths depending on where used on the boat? Tom
- 200 replies
-
- 2
-

-
- Whaling Bark
- Charles W Morgan
- (and 1 more)
-
Patina is a word used to describe the finish on copper or bronze exposed to air, but I think that word also works well in describing the finish on that maple. Most attractive! Tom
-
Allen, Yes it’s minutiae, but also important. Thanks for your attention! I will be more attentive to this in the future! Keith, I use pear. It seems to match pretty closely. TB
- 341 replies
-
- 3
-
-
- Sophie
- Vanguard Models
- (and 1 more)
-
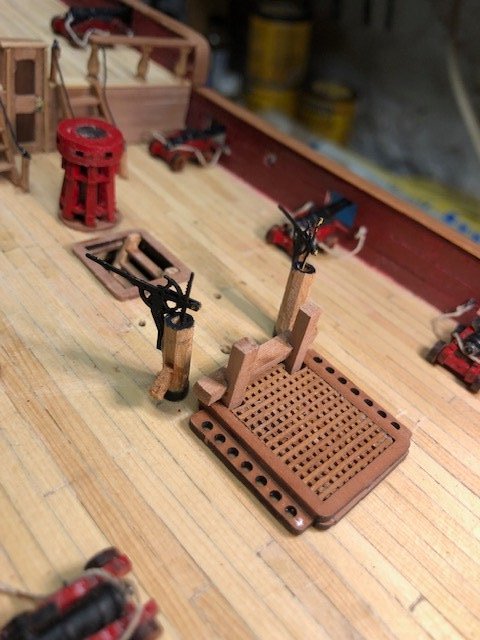
Moving right along: I think I mentioned previously that I didn't use the metal etched grates supplied in the kit, but made my own. Has a little more depth. Also, finished rigging the cannons and installed the pumps. Again. The kit supplies a dowel for the pumps, but my understanding is they are octagonal in cross section. So I built them that way. Also, the kit pumps have no discharge; easily remedied. There will be a month's hiatus now as I'm going to Maine for July and away from the shop.
- 341 replies
-
- 8
-
-
- Sophie
- Vanguard Models
- (and 1 more)
-
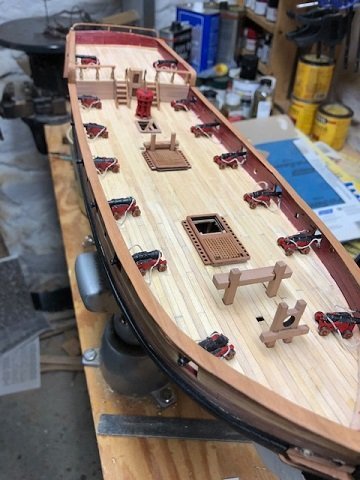
The back problem is solvable with Diclofenac and sitting down. I've gotten this far and am finishing up the rigging on the guns. I'm sorry that I painted the capstan, according to the instructions in red; I think the bulwarks in red is sufficient
- 341 replies
-
- 8
-
-
- Sophie
- Vanguard Models
- (and 1 more)
-
Boy, have I been absent? I've had a sciatica problem which makes it difficult to stand at the workbench. Other life events, as well, have taken priority. Consequently, progress has been on hold. I'm coming back, working on the final deck details. Stay tuned! Tom
- 341 replies
-
- 4
-
-

-
- Sophie
- Vanguard Models
- (and 1 more)
-
Nicely done! Looks good on the water.
-
Maybe not your technique, but you do it so well!
- 200 replies
-
- 2
-
-

-
- Whaling Bark
- Charles W Morgan
- (and 1 more)
-
T.S., Nicely done. gotta remember your technique! T.B.
- 200 replies
-
- 1
-
-
- Whaling Bark
- Charles W Morgan
- (and 1 more)
-
Dan, Every once in a while I have a good idea. But that's it for this year! Tom
-
If you go the styrene way, check out Evergreen Scale Models. Their site shows rod at .75 mm.
-
Tom, pictures are all there. Thanks. Harbor Freight? Probably not too expensive and doesn’t take up any work space!
- 200 replies
-
- 2
-
-
- Whaling Bark
- Charles W Morgan
- (and 1 more)
-
Tom, what kind of “pencil like hand engraving tool” are you using? BTW, the pictures didn't seem to come out on my computer. Am I alone?
- 200 replies
-
- 1
-
-
- Whaling Bark
- Charles W Morgan
- (and 1 more)
-
Do you apply it side to side or longitudinally?
-
Maybe after I take Greg and David’s class this October?
-
Gary, we used to keep our schooner at D.N.Kelley & Sons in Fairhaven with many of these draggers as our neighbors. Will this model be “weathered”, or as newly launched? Tom

