TBlack
-
Posts
1,313 -
Joined
-
Last visited
Content Type
Profiles
Forums
Gallery
Events
Everything posted by TBlack
-

SS Vinal Haven by TBlack - FINISHED
TBlack replied to TBlack's topic in - Build logs for subjects built 1851 - 1900
Andy, Steam blowdown muffler? Who woulda thunk it! Anyway, it's good to have you around. Google produced this How about it?: Tom
-
SS Vinal Haven by TBlack - FINISHED
TBlack replied to TBlack's topic in - Build logs for subjects built 1851 - 1900
OK, I'll take all these likes as an endorsement of my decision to follow Adrieke's suggestion. Great, but we're really not there yet. I still have some accoutrements to deal with around the funnel. Steam escape valve: On the left, what do you suppose that really looks like. The whistle on the right is no problem. Tom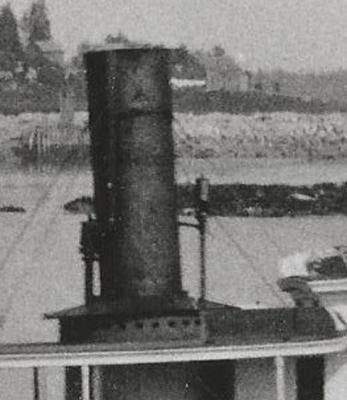
-
SS Vinal Haven by TBlack - FINISHED
TBlack replied to TBlack's topic in - Build logs for subjects built 1851 - 1900
Adrieke, This is a fabulous find, and thank you very much for the lead. Initially, I was intrigued by the tutorial on building my own eagle, but then realized they were trying to model the real bird. Of course, I'm modelling a casting of an eagle. I think the way to go is with the musket miniatures offering; the price is certainly right. Tom
- 326 replies
-
- 4
-

-
- vinal haven
- steam ship
- (and 1 more)
-
SS Vinal Haven by TBlack - FINISHED
TBlack replied to TBlack's topic in - Build logs for subjects built 1851 - 1900
Thanks, Andy, I looked at their sites and didn't see any eagles available. I think Michael's idea of the jewelry lead is a strong possibility. There's a lot to look at in that category, some very expensive and some (from China) not bad, but wholesale. While the price is right, I really don't want to end up with 90 eagles when I only want one! Tom PS I'm thinking about changing my avatar. That baby is now 3 years old. And I think Robbyn has changed hers twice in the last 3 months. Stand by! -
SS Vinal Haven by TBlack - FINISHED
TBlack replied to TBlack's topic in - Build logs for subjects built 1851 - 1900
Mark, These are terrible pictures because my camera is quite rudimentory, but perhaps you can get the idea. The eagle is 3 dimensional and probably about 12 mm beak to tail feathers in profile and 10 mm at its widest. Tom

-
SS Vinal Haven by TBlack - FINISHED
TBlack replied to TBlack's topic in - Build logs for subjects built 1851 - 1900
Michael, I didn't have any yew (BTW, nice looking piece of wood), so I substituted cherry. I'll get back to you on the eagle charms, another good idea, but lots to look at and I'm not buying gold @ $250/charm. Cap'n Bob, thanks for looking in. Tom -
SS Vinal Haven by TBlack - FINISHED
TBlack replied to TBlack's topic in - Build logs for subjects built 1851 - 1900
I made pretty good progress on the Amanda, and finished the Titanic for my grandson, so I got to try out Michael's suggestion. Duck soup! Very simple, very elegant solution: It needs cleaning up and painted flat black, and it's done! I'm delighted. Michael, you've gotten me through this process and also your help on the pilot house windows. There's just one more sticky wicket: the eagle on top of the pilot house. Any ideas? Tom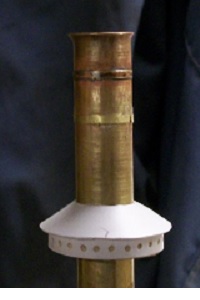
- 326 replies
-
- 9
-
-
- vinal haven
- steam ship
- (and 1 more)
-
I'm with Augie, I think it looks pretty good, too! Tom
- 382 replies
-
- 1
-
-
- stadacona
- sylvan scale models
- (and 1 more)
-
Andy, Have you tried this product? Tom http://www.testors.com/product/136637/3527C/_/Non-Toxic_Cement_Liquid_Cement
-
SS Vinal Haven by TBlack - FINISHED
TBlack replied to TBlack's topic in - Build logs for subjects built 1851 - 1900
Bob, I can't wait to see what the whole thing looks like either, but I've got to get this stack right, as it's a pretty prominent feature on the model. Also, I'm working on 2 other boats, one for my grandson and the other a restoration of a clipper ship (im getting paid for the latter, o I really need to be working on it). Tom -
SS Vinal Haven by TBlack - FINISHED
TBlack replied to TBlack's topic in - Build logs for subjects built 1851 - 1900
You just gave me an idea! What I can do is drill the 5/8" hole part way through my "yew piece". Lock the piece in position on the drill press; switch out drills to say 1/4" drill; drill through the yew piece; insert screw and tighten; mount that in the lathe; finish off the lip in the yew piece; reposition at the drill press and finish drilling out the 5/8" hole. Voila! I'l give it a try, thanks. But just because you can do it doesn't mean I can. Tom -
SS Vinal Haven by TBlack - FINISHED
TBlack replied to TBlack's topic in - Build logs for subjects built 1851 - 1900
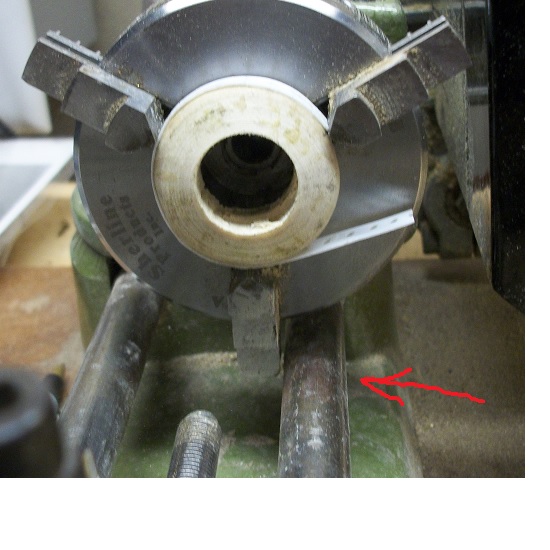
Michael, That looks fabulous, and you make it look so easy! Only one problem. I can't put the yew piece in my lathe to create the sloped edge My lathe doesn't have the clearance necessary to handle a piece of that diameter. See picture: Tom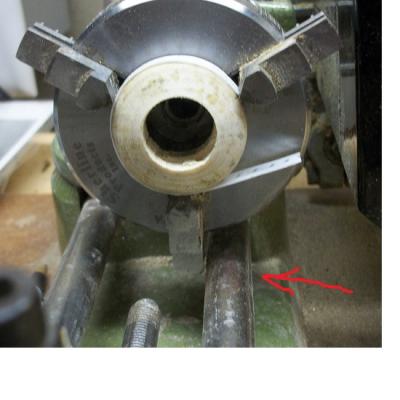
-
SS Vinal Haven by TBlack - FINISHED
TBlack replied to TBlack's topic in - Build logs for subjects built 1851 - 1900
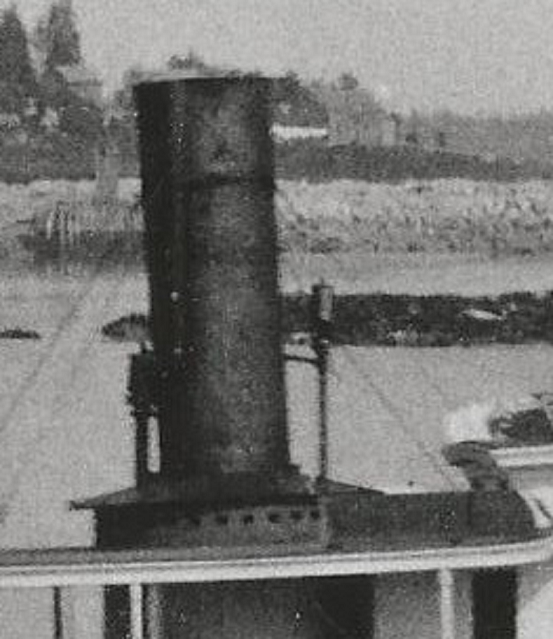
Michael & John, OK, here's another photo with more evidence. I'm hoping you can see the detail. The rings, truly, must be quite thin as they don't seem to stand out at all from this angle. I'm thinking I could use a strip of paper to accomplish the task. Also, to John's point, where the strip is strengthening the guy wires/stays, all you can see is a shiny band; there is another shiny band lower down which would validate John's observation about a second band. Finally, it looks like the top doesn't have a band around it, but rather is flared. I have no way to do that with my tools. My alternative is to put the stack back in the lathe and apply a round file to the band that rings the top. If that ends up looking hokey, then I'll just have to live with a straight stack. Tom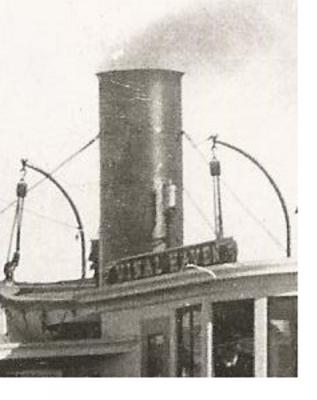
-
SS Vinal Haven by TBlack - FINISHED
TBlack replied to TBlack's topic in - Build logs for subjects built 1851 - 1900
John, You may be right. It would be easy enough to add another one. I'll have to look at my other photos. The lower of the two rings takes the four stays. So the addition of a third ring would be just for structural integrity? Tom -
Andy, Your Peggy looks like a dingy by comparison. I just finished building a resin kit of the Titanic for my grandson, and, while the assembly wasn't difficult, like your model, there was a lot of detailed painting which consumed most of my time. Good luck with this beast! Tom PS I just looked at the linked page for your RR club; it doesn't look like they're going to need your ship for a while, so at least you have time to spend on the build.
- 382 replies
-
- 1
-
-
- stadacona
- sylvan scale models
- (and 1 more)
-
SS Vinal Haven by TBlack - FINISHED
TBlack replied to TBlack's topic in - Build logs for subjects built 1851 - 1900
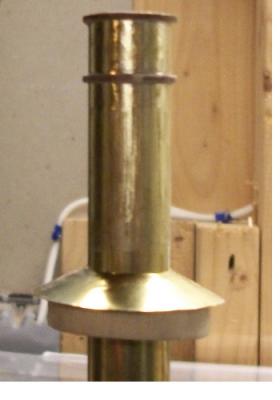
Michael, Bob, New up-date. I figured if my first attempt at rings in wood were a bust, why not stick my neck out a little and see if I could get them down to proper size. If I ruined them, no loss. Anyway, I chucked the tube in the lathe and applied file and sandpaper and got the rings down to less than .5 mm without damage (I think that's less than an inch at 1:48?). Also, I replaced the brass skirt with a styrene one. Take a look: I'm a lot happier with this arrangement. And, Bob, I'll check out Special Shapes in any event; thanks for the tip. Tom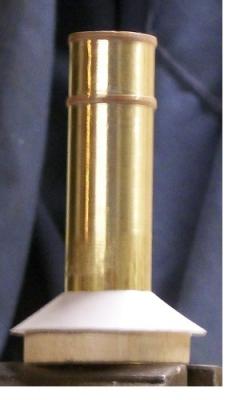
- 326 replies
-
- 2
-
-
- vinal haven
- steam ship
- (and 1 more)
-
SS Vinal Haven by TBlack - FINISHED
TBlack replied to TBlack's topic in - Build logs for subjects built 1851 - 1900
Michael, Why does life have to be so complicated? Tom -
SS Vinal Haven by TBlack - FINISHED
TBlack replied to TBlack's topic in - Build logs for subjects built 1851 - 1900
Popeye, Thanks for the support. I actually think the rings look fine, standalone; they don't look grossly over-sized. I was just comparing them to the picture. Michael, As I was reading your suggestions, I remembered that Longridge, in his book on the building of Victory, mentions using square wire in its construction. So I googled "square wire" and it turns out that jewelers use it all the time. It's available, in copper, all the way up to 8 guage. Does anybody know what the dimension of 8 guage is? Tom -
SS Vinal Haven by TBlack - FINISHED
TBlack replied to TBlack's topic in - Build logs for subjects built 1851 - 1900
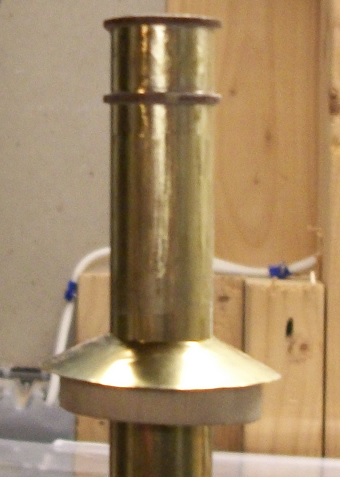
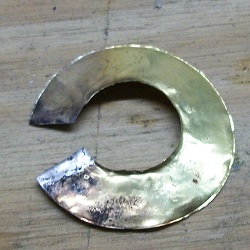
I've been struggling with building the funnel for this craft. Here's what it supposed to look like: And here's what I've come up with so far: I started with a 5/8"brass tube; fabricated a wooden plug to establish the slope of the skirt and drilled the center out to 5/8". The skirt in the picture is brass which started out something like this reject: I'm still not happy with the result, as the edges of the skirt get wobbly with all the handling. I'm going to try fabricating it out of sheet styrene. The other issue is the rings around the top. I wanted to make them out of brass strip, What's available commercially (that I've been able to find) is strip of the right thickness, but 1/4" wide. I have no way of cutting the 1/4" down to, say, .5 mm. So, first I tried styrene strip of the right size, but there is no adhesive that I could find that will bond plastic to brass. My fallback was wood. What you see in the picture is apple wood and epoxy. It's good and solid, but it's too thick compared to the rings around the stack in the first picture. I'm hoping that Michael Mott, who drops by this log occasionally, will have some recommendations on how I can "tool up" to be able to cut brass to small dimensions. Tom
- 326 replies
-
- 4
-
-
- vinal haven
- steam ship
- (and 1 more)
-
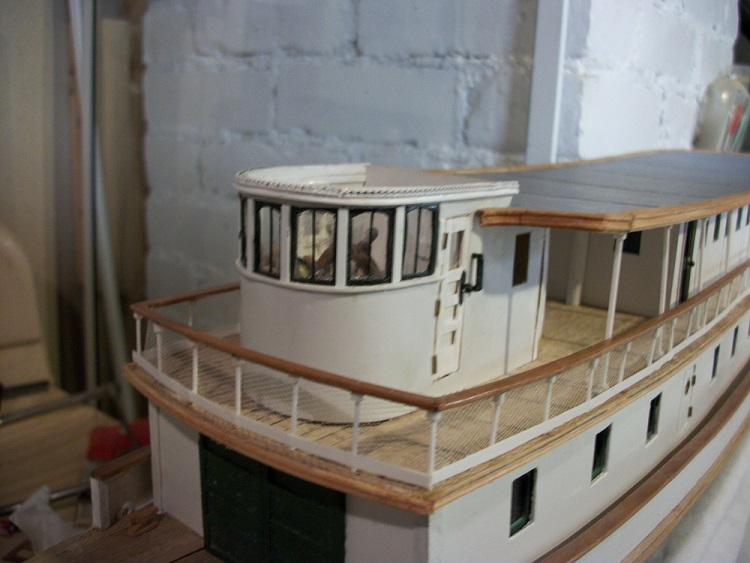
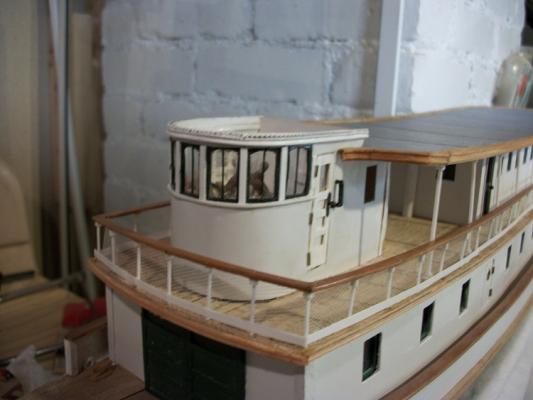
Whoa!, Cap't, a lot of progress between entry #106 and #121. I'm looking through those beautifully clear windows and seeing mahogany trim inside. I had a terrible time with my pilot house at 1:48, and you're working at 1:96! (maybe your fingers are smaller than mine?) Very nice work. Tom
-
Casey's comment is spot-on. That's a wonderful paint job; it looks like fiberglass. How do you do it? Tom
- 209 replies
-
- 1
-
-
- muscongus bay lobster smack
- midwest products
- (and 1 more)
-
SS Vinal Haven by TBlack - FINISHED
TBlack replied to TBlack's topic in - Build logs for subjects built 1851 - 1900
Andy, you have never failed me! Tom- 326 replies
-
- 1
-
-
- vinal haven
- steam ship
- (and 1 more)
-
Michael, I know I'm coming late to this party, but my thinking is like John's vis a vis the cabin top. Although I understand your attraction to "pinstripe" decking; it is attractive. That binacle and compass are truly outstanding. It's good that you put dimensions in the log entries from time to time, otherwise we get to thinking it's life-sized. I've seen for a while now that you know how to talk to brass, and apparently it answers you back! Tom
-
SS Vinal Haven by TBlack - FINISHED
TBlack replied to TBlack's topic in - Build logs for subjects built 1851 - 1900
I decided to take Andy's suggestion and buy some pre-cast dentils from an outfit in Calif. rather than try to make my own. They are made of styrene and come in 2" strips. They're close enough, and I certainly can't make anything smaller. They needed some adjustment along the top, but married to a single bead moulding along the bottom, and the whole assembly looks OK. It's not an exact replica of the prototype, but I can't get that detailed with the tools I have. To make the single bead molding, I cut the profile in a razor blade secured to the tool post of my lathe, using both the large Dremel cut-off wheel and the small Dremel cut-off wheel. The thickness of the larger wheel is just the right width for the moulding (2mm), and the thinner wheel is as small as I can get to cut the bead. It's the profile on the right. Sorry for the bluriness. So the final product still needs to be smoothed out where the joints occur and all painted. Sorry for the lack of close-ups, but my camera doesn't do it very well.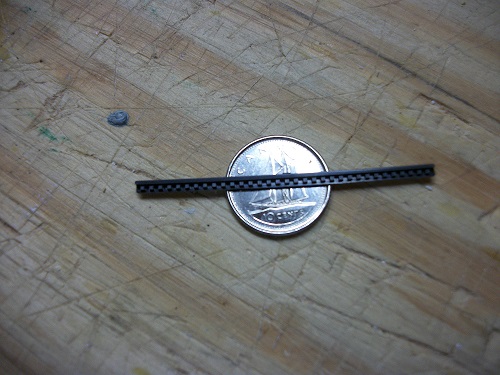

- 326 replies
-
- 6
-
-
- vinal haven
- steam ship
- (and 1 more)
-
Dan, A beautiful effort. The finish, the deck hardware immaculate! What particularly catches my eye is the cutwater and the upholstery. Very clean! Tom