TBlack
-
Posts
1,309 -
Joined
-
Last visited
Content Type
Profiles
Forums
Gallery
Events
Everything posted by TBlack
-
 Michael, Your work is superb and shows imagination and inventiveness. Rivets for screws; who would have thought! They look great. Also, your new photo looks great too! You look like a man of the sea! Tom
 -
SS Vinal Haven by TBlack - FINISHED
TBlack replied to TBlack's topic in - Build logs for subjects built 1851 - 1900
John, Michael, Popeye, Crackers, Thanks for the comments. Also, thank you to a host of others for all the "likes". I was explaining to a friend that this is getting to the bittersweet moment when I'm all done with this model. I guess I've been working on it for 3 years, and it's part of my life. I don't know what to do next, but I'm going to the New London exhibit later this month; maybe I'll get inspired! Tom- 326 replies
-
- 1
-

-
- vinal haven
- steam ship
- (and 1 more)
-
Andy, It has been a long winter. Do they tell you which ship you'll be attached to? Tom
- 382 replies
-
- 1
-
-
- stadacona
- sylvan scale models
- (and 1 more)
-
what is the ideal modelling table?
TBlack replied to AON's topic in Modeling tools and Workshop Equipment
On the lighting, make sure you place the overhead fixture so that it is behind you as you stand/sit at the bench. That way the light is cast onto your work, and there won't be any shadows. Tom -
The deadeyes in the picture below are 2mm and 3 mm. So it can be done. I used sewing thread after having taken a #80 drill bit to clean out the hole. I use beeswax on the end of the thread to stiffen it up and a magnivisor to see what I'm doing.

-
SS Vinal Haven by TBlack - FINISHED
TBlack replied to TBlack's topic in - Build logs for subjects built 1851 - 1900
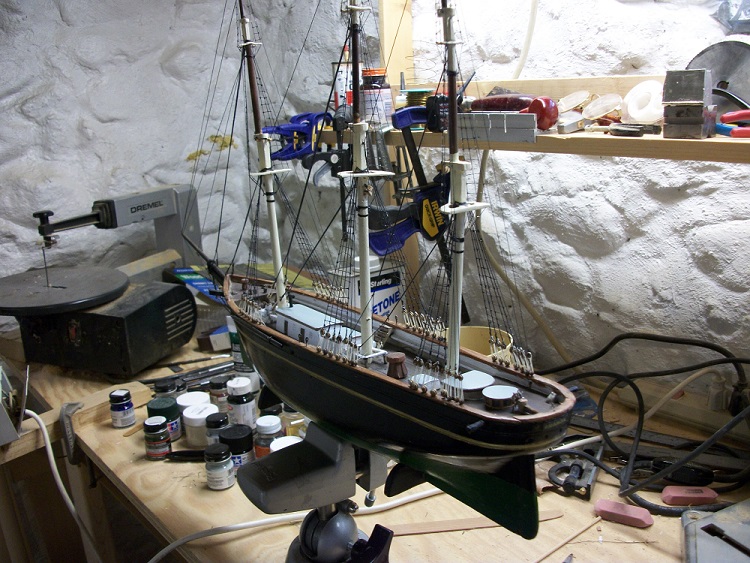
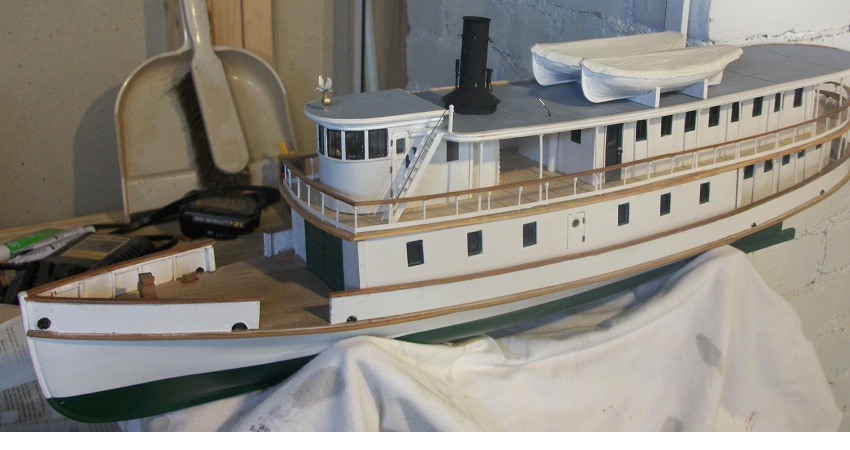
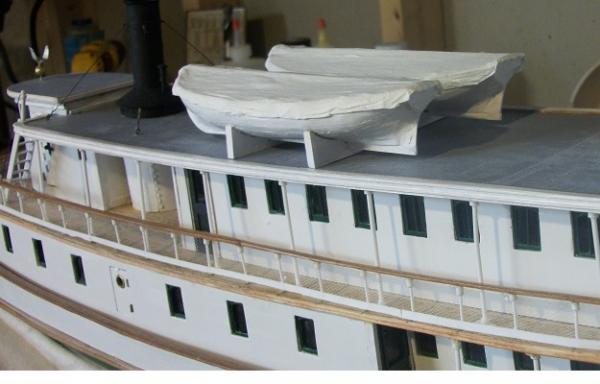
I've gotten the tie-downs for the lifeboats installed; the davits fabricated and installed; and the name boards in place. I'm waiting for some blocks from Chuck to finish off the block and tackle for the davits: I don't know why the davits look uneven in the photo, but, trust me, they are all the same.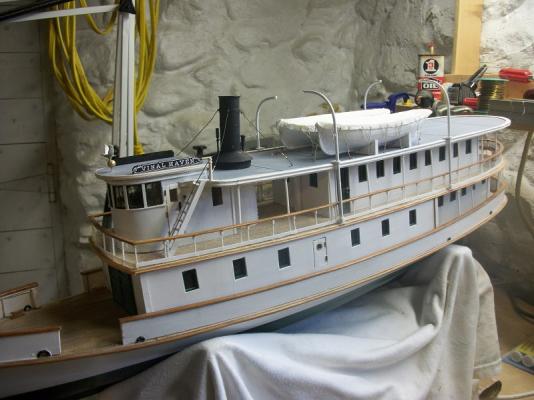
- 326 replies
-
- 13
-
-
- vinal haven
- steam ship
- (and 1 more)
-
Joe, Nice work! Very crisp! My first scratch build was of this ship. I got to the point of installing deck furniture. There are supposed to be 2 long guns on board in addition to the carronades. I couldn't figure out where to put them that would give them room for recoil. Merritt Edson built a model of the ship for the Smithsonian, so I went down there to check it out. He couldn't figure out where to put them either, so he left them off. So did I. That means the world is waiting for your solution! Tom
-
I'll add my "Bravo Zulu" to this crowd. Nice work! It also occurs to me as I've read your log, that you must have an inexhaustible inventory of brass and wood, not to mention just the right tool for each job. I'm envious! Tom
-
Michael, That's seems to work pretty smoothly. I think you've solved the issue. Tom
-
Guillemot, I'm just discovering your beautiful work. Thanks for the explanation of how to manufacture sails without the use of a sewing machine! This opens all kinds of possibilities. Also, I read that you're not entirely happy with the color of the water. That's not the first thing that catches the eye. What is more remarkable is the texture nd the way it meets the hull. That's all very realistic. Besides, the water takes on all kinds of different colors in different parts of the world; who is to say what is a correct color? Tom
- 89 replies
-
- 1
-
-
- scottish maid
- clipper
- (and 2 more)
-
Columbus by threebs - 1/72 Scale - 74-gun
TBlack replied to threebs's topic in - Build logs for subjects built 1801 - 1850
Greg, I like that workbench; the lighting looks terrific! I think you said that you got the plans from the Smithsonian and had them reduced to 1:72? Tom -
SS Vinal Haven by TBlack - FINISHED
TBlack replied to TBlack's topic in - Build logs for subjects built 1851 - 1900
Mark, That's my problem; I don't know what to do next. I have to put together a Nimitz class aircraft carrier for my grandson, but that doesn't count. I looked into doing a model of the continental frigate Randolph, but there's scant information on her. So maybe not. We'll see. Tom- 326 replies
-
- 1
-
-
- vinal haven
- steam ship
- (and 1 more)
-
Michael, It occurs to me that your solutions are always simple yet elegant, and effective. But also your presentation and photography are most complete. It's a joy to read your log! Tom
-
Bob, I haven't checked in with you for a while, and I see you've made excellent progress. The hull looks beautiful! Up to your standards. I had to make hawse holes for Vinal Haven. I decided to make just the outer lips which I fashioned to oval shape from styrene sheet. So, you need 4, 2 for each side. Drill a small hole in the styrene and enlarge with file, or knife to oval shape; then file the outside edge down to make the lip; stick it on the hull. Tom
-
SS Vinal Haven by TBlack - FINISHED
TBlack replied to TBlack's topic in - Build logs for subjects built 1851 - 1900
John, There's a picture of the boat on the bottom of page 18. The tie-downs are "Y" shaped and I need about 20 "eyes" on the deck to tie them down. I'm doing that chore now. Then on to davits and tackle. After that, its a smoke stack on the starboard side, running lights and name boards and I'm done! Tom- 326 replies
-
- 1
-
-
- vinal haven
- steam ship
- (and 1 more)
-
SS Vinal Haven by TBlack - FINISHED
TBlack replied to TBlack's topic in - Build logs for subjects built 1851 - 1900
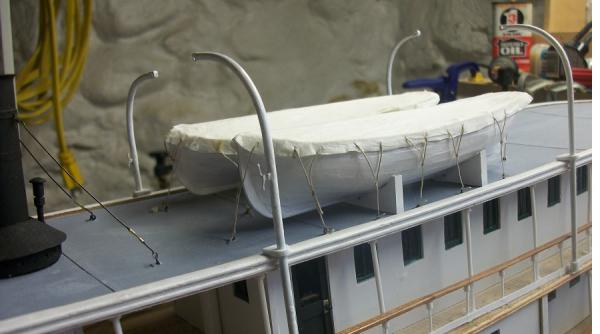
I finished the boats. I need to install the tie-downs and trim up the "canvas" covers. The "canvas" is 2 pieces of kleenex soaked in a solution of glue and then draped over the boat to dry. I've been slow to work on this boat this winter, maybe because I'm coming to the end of the trail, and I don't know what to do next! Tom
- 326 replies
-
- 9
-
-
- vinal haven
- steam ship
- (and 1 more)
-
Old Salt, Wooden sails? Maybe a solution for those of us who have no access to a sewing machine, let alone know how to use it. Maybe you could give us a tutorial on how to manufacture and shape a wooden sail? I love the real boat. Neat looking craft. Did she have a topsail as well? Tom
-
SS Vinal Haven by TBlack - FINISHED
TBlack replied to TBlack's topic in - Build logs for subjects built 1851 - 1900
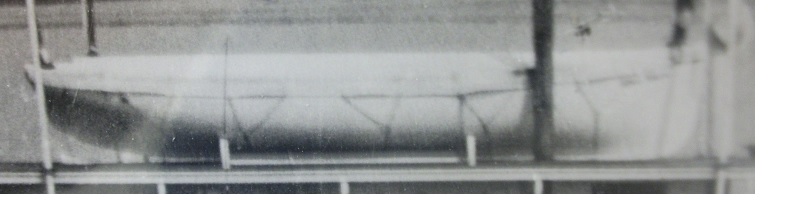
John, That eagle was due to a suggestion from Andrieke (the benefits of community). It comes from a supplier to the model railroad guys. I'm delighted with the result, and a pretty easy solution, too. Popeye, That's it; bulkheads around a former and then cover the whole thing with "canvas". Here's the real thing: Tom
- 326 replies
-
- 1
-
-
- vinal haven
- steam ship
- (and 1 more)
-
SS Vinal Haven by TBlack - FINISHED
TBlack replied to TBlack's topic in - Build logs for subjects built 1851 - 1900
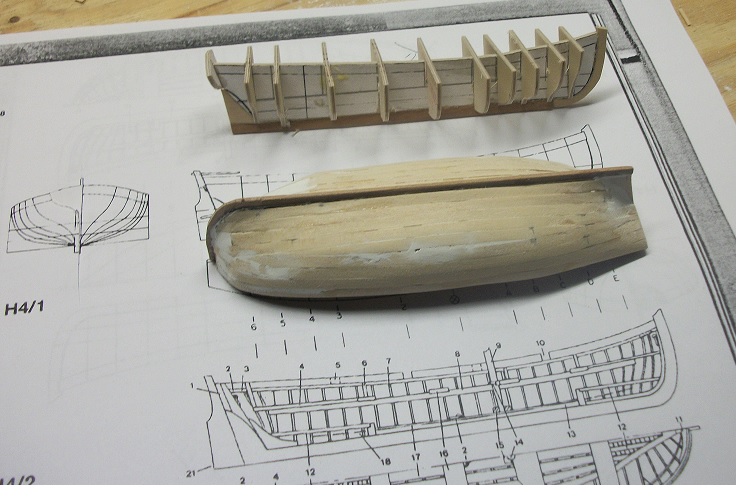
January has been a cold month here, and, with my workshop in the basement, the working conditions have not been ideal. Nevertheless, I've been (slowly) working on the life boats. I determined that they are 5.25" long. I got a plan out of a book (thank you Portia) and sized it on the copier to the proper length. Now, I'm just putting them together. They have a canvas cover over them, so I don't need to do the interiors. The stays, with turnbuckles, for the stack all came out fine. I'll see if I can get a decent photo, but I've got a poor camera for detail work. Tom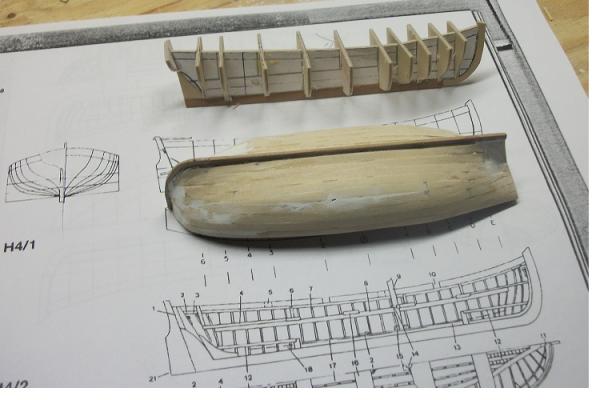
- 326 replies
-
- 8
-
-
- vinal haven
- steam ship
- (and 1 more)
-
Nils, Having already viewed the final product, I'm in awe, especially given the 1:96. A great tribute to your grandfather; a testimonial to your skill; and a family heirloom! Tom PS. And you built her in a mere 2 years!
- 113 replies
-
- 3
-
-
- heinrich kayser
- steamship
- (and 1 more)
-
Andy, Nice piece of work. I thought your original idea about construction paper sounded pretty good. It's readily available; you don't have to take any emulsion off; you have to cut to size either way. What's the problem? Tom
-
Wayne, I built this kit about 20 years ago. I can't remember the details now, but it seems to me that there were some differences in the waist between what Portia drew and the kit supplied. It was a question of how much fixed spar deck there was versus gangboards. But my memory is foggy at this point. Also, as I recall, the kit supplies pressed wood pieces for the bow and quarter gallery details. I hope you'll try your hand at kit bashing those details. It will add a lot to the finished appearance. Tom
-
Beautiful frame, Bob. The CAD serves you well. I feel like a dinosaur next to your ability with a computer. Tom
-
SS Vinal Haven by TBlack - FINISHED
TBlack replied to TBlack's topic in - Build logs for subjects built 1851 - 1900
Thanks, guys, for the support. I can't decide whether to paint the eagle or leave him alone. Tom -
I think that looks pretty slick. You're certainly the man to do this project for the club, given your background. I can't see buckling from here, but I'll take your word for it. By now, the seaway MUST have frozen over. Tom