TBlack
-
Posts
1,309 -
Joined
-
Last visited
Content Type
Profiles
Forums
Gallery
Events
Everything posted by TBlack
-

SS Vinal Haven by TBlack - FINISHED
TBlack replied to TBlack's topic in - Build logs for subjects built 1851 - 1900
Popeye, The first attempt got lost to the floor. I thought, by inserting a black wire in the middle of the tube , that in filing down the outside of the tube I would come to the black wire and know to stop. Actually, what happens is that the flashing from the filing covers up the black wire and you end up filing straight through the tube! Second attempt: file a little bit and plunge the black wire back and forth cleans out the flash and you know when to stop filing. Anyway, all 4 turnbuckles done. But I think I need #3 piano wire for the stays to ensure that they are straight. In the meantime, I've been working on the ladder and eagle. This is Andrieke's eagle, by the way. A terrific tip and a huge saver! Tom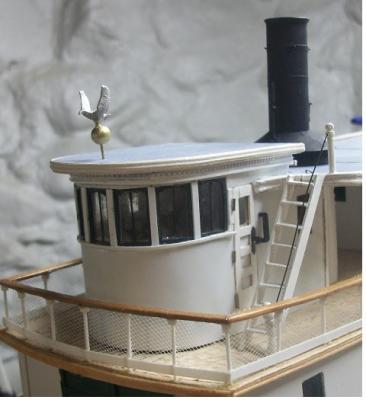
- 326 replies
-
- 6
-

-
- vinal haven
- steam ship
- (and 1 more)
-
You're a very generous fella; I hope there is no timeframe. Tom
-
Jon, I drop in from time to time to watch your progress. You may think the model is not perfect, but you're the only one who knows that, so keep it to yourself. She looks pretty good to me. With regard to installing blocks later, I'm sure it doesn't matter one way or the other, but be aware that you'll need to get your pin vise down on the deck to make holes for the eye bolts. You might want to put the holes in now while you've got swinging room for the drilling. Tom
- 974 replies
-
- 1
-
-
- rattlesnake
- mamoli
- (and 1 more)
-
Schooner Yacht by kiwiron - RESTORATION
TBlack replied to kiwiron's topic in - Build logs for subjects built 1851 - 1900
Oh, I forgot to mention preserve those sails. As ratty as they may be, they'll serve as patterns for the new ones. It's a lot easier to recruit a seamstress if you have a pattern and supply the cloth. Tom -
Wes, I'm with Mark in having a keen interest in your approach to the hull construction. You may be on to something. There is a second Portia Takakjian book that pre-dates the AOTS book, simply called Essex, Building a Plank-On-Frame Model that she wrote in 1985. It's along the lines of a practicum on building the model. It's a Phoenix publication. It would be a big help to you if it's still available. Tom
-
Schooner Yacht by kiwiron - RESTORATION
TBlack replied to kiwiron's topic in - Build logs for subjects built 1851 - 1900
I've done a couple of restorations in my time. One very similar to your project. I took a hint from another of our members here and asked the owner what did he want it to look like when all done. Did he want a brand new boat, or did he want to maintain the "antique" quality? If the latter, I'm not sure I'd take all the paint off, but rather try to repair what was there. I think you'll have your hands full cleaning up the metal fittings (if they haven't degraded too much), matching the rigging line, installing a new bowsprit, etc. Are all the blocks still present? If you really feel the urge to paint, tackle the foretop. It looks like it's been replaced previously and the staining doesn't match the other spars. Anyway, just a few observations. Also, take lots of pictures now so when you start to take the boat apart to clean it, you can get it all back together again in the right order. Otherwise, she's a nice looking pond yacht with a history. Go to it! Tom -
SS Vinal Haven by TBlack - FINISHED
TBlack replied to TBlack's topic in - Build logs for subjects built 1851 - 1900
Amen to that, John. Michael, thanks for all your help on the pilot house, the stack, the turnbuckles. You've gone way out of your way to aid me. Andy, I think those dentils look pretty good. You certainly can't tell they're plastic, thanks for the suggestion. And guys, thanks for all the "likes", BTW, Wacko, what are you doing up at 3:40 AM? If my work looks pleasing to you, a large part of that is due to this website. It inspires me to try just a little bit harder and not to be afraid to throw out a first attempt, or even a second until I've got what I want. Tom- 326 replies
-
- 1
-
-
- vinal haven
- steam ship
- (and 1 more)
-
SS Vinal Haven by TBlack - FINISHED
TBlack replied to TBlack's topic in - Build logs for subjects built 1851 - 1900
Michael, This was only my second try, but I think I've gotten it. Sorry for the fuzzy picture, but my camera doesn't do close-ups. The flip side of the turnbuckle looks like the side you're viewing. The wire in the center (28 gauge) is a good idea if only to stiffen things up while filing. Also, I decided to paint out the moulding around the boat deck. It looks big and clunky to me next to the moulding around the pilot house, and it's less obvious if painted. Also, the real boat didn't have brightwork up there. I promise never to use bass wood for moulding again!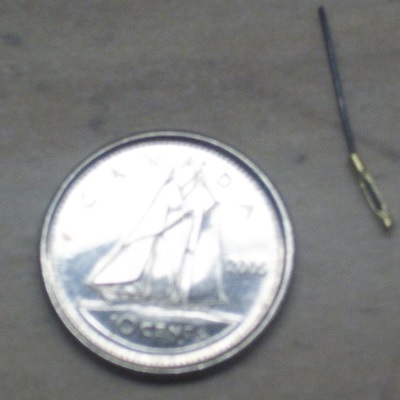
- 326 replies
-
- 8
-
-
- vinal haven
- steam ship
- (and 1 more)
-
John, If that little slip-up is all you have to worry about......well, you'll not get any sympathy from me! BTW, a 1:48 must seem enormous to you. And will this model be in pristine condition, or will it have freight and laundry cast about the deck? Tom
-
Amanda by Tblack - FINISHED - RESTORATION
TBlack replied to TBlack's topic in - Build logs for subjects built 1851 - 1900
Thank you, Harvey, Bob, Mark, Woodrat, and Piet for your compliments. Now I can devote all my time to Vinal Haven. Tom -
Amanda by Tblack - FINISHED - RESTORATION
TBlack replied to TBlack's topic in - Build logs for subjects built 1851 - 1900
I haven't given a step-by-step in this log, largely because there hasn't been anything unique or problematic in the rebuild of this model that I thought might be remotely interesting to you all. If I'm wrong, and you have questions, please let me know, or as they say, forever hold your peace! I've done about all I can do for this model and I hope the owner will be happy. It should be good for a few more generations. Tom
- 40 replies
-
- 4
-
-
- restoration
- finished
- (and 1 more)
-
Bulkhead to keel assembly
TBlack replied to gthursby's topic in Building, Framing, Planking and plating a ships hull and deck
Graham, I use little wooden blocks that have all right angles like this: I'm not familiar with your particular kit, but, in general, the top of the bulkheads should be just even with the top of the "keel". Tom
-
QA, They do have serrated jaws, but you can always file them down. My principal problem with them is that their gripping pressure is very strong and prone to damaging delicate wooden parts. Use selectively Tom
-
SS Vinal Haven by TBlack - FINISHED
TBlack replied to TBlack's topic in - Build logs for subjects built 1851 - 1900
We'll, Pete, my wife asked me tonight what was I going to do with the boat when I'm done. I dunno; I've got 4 of my models sitting in a neighbor's basement for lack of any other space. Tom- 326 replies
-
- 2
-
-
- vinal haven
- steam ship
- (and 1 more)
-
SS Vinal Haven by TBlack - FINISHED
TBlack replied to TBlack's topic in - Build logs for subjects built 1851 - 1900
Nils, Thanks for the compliment. Vinal Haven used to sail out of Rockland, Maine servicing the islands in the Penobscot Bay area from 1892 to 1938. She's a typical configuration for steamers of that era. Also, thanks to all of you for the "likes". I appreciate the support.. While I'm waiting for the turnbuckle brass to arrive, I'm turning to the boats. They're big, 5.25" long, but no interior, as they are covered. I thought I would build them POB style. I think it might be easier for me to make sure they are duplicates. Tom- 326 replies
-
- 1
-
-
- vinal haven
- steam ship
- (and 1 more)
-
SS Vinal Haven by TBlack - FINISHED
TBlack replied to TBlack's topic in - Build logs for subjects built 1851 - 1900
OK, I'll bite.....How do you know? Regardless, it's good advice. Anyway, I had to order on line. $1.75 for the rod and $8.00 for shipping. Something is out of whack, and it won't get here until Jan 7. I'll work on the boats until then. John, I'm looking at the time of your latest encouraging remark, and realizing that there's a 14 hour difference between your place and mine. That means you posted at 6:30 AM? Early riser? Tom -
SS Vinal Haven by TBlack - FINISHED
TBlack replied to TBlack's topic in - Build logs for subjects built 1851 - 1900
Bob, Thanks for noticing my attempt at corny humor. I'm on to turnbuckles/bottlescrews now. I've located a source for 1/32" brass tubing. I think I can file out the middle to achieve this look: Let's see what happens. Tom
-
SS Vinal Haven by TBlack - FINISHED
TBlack replied to TBlack's topic in - Build logs for subjects built 1851 - 1900
John, I think that was back in MSW 1.0, because the log is gone now, darn it! -
SS Vinal Haven by TBlack - FINISHED
TBlack replied to TBlack's topic in - Build logs for subjects built 1851 - 1900
John, And isn't Nareau done at 1:96? Those bottle screws look very good. In fact, everything in the picture looks very good. Whatever happen to your build log? Andy, those turnbuckles look good, and thanks for the link, but I think I'd like to see what I can fabricate. Tom -
SS Vinal Haven by TBlack - FINISHED
TBlack replied to TBlack's topic in - Build logs for subjects built 1851 - 1900
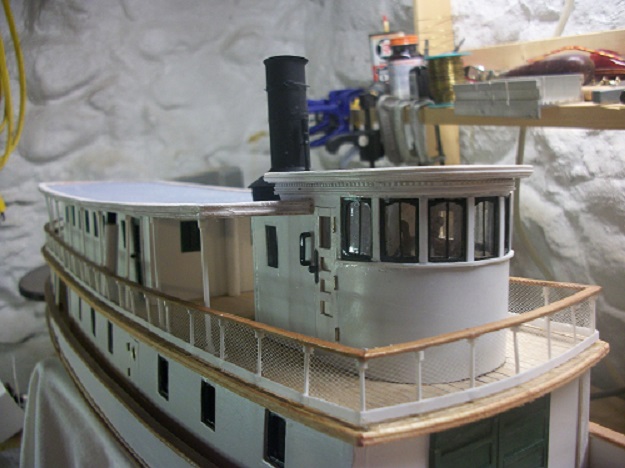
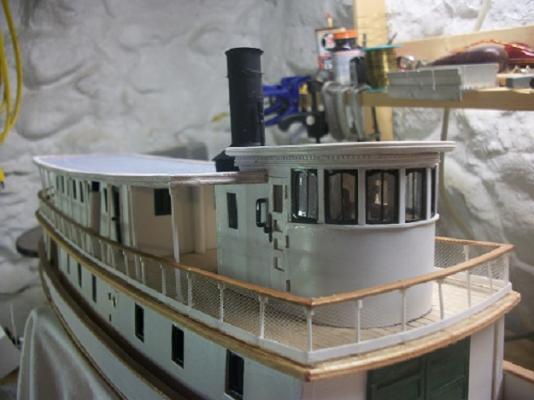
A little more progress. The funnel assembly has been painted, but Ive spent most of my time on trying to get the moulding around the pilot house roof correct. A picture: There are four stays to support the funnel that need adding. These have turnbuckles at their base. At first, I thought I might be able to fashion something in brass, but then realized that their diameter is 1-1.5" which, in scale, is less than a mm. So I'm not sure I can add a lot of detail there. The other thing I notice in this photo is how gross the moulding is around the boat deck edge compared to what I did on the pilot house: It took me 5 tries to do this, 1 in cherry, 3 in basswood, and finally, deciding not to be so cheap, the final one in boxwood. Works much better Wish I'd done that with the rest of them. Anyway, there it is. Here's the overall: One final point: Those are Andy's dentils on the pilot house. His dentist and I are good pals now! Tom


- 326 replies
-
- 10
-
-
- vinal haven
- steam ship
- (and 1 more)
-
Cap't Bob, Like Keith, I'm also full of questions, but of a different sort: what lumber did you decide to pick up for this craft? And the profile piece has some interesting markings that I can't figure out. Forward of bulkhead 10 and forward of bulkhead 5 it looks like outlines for the masts, but they're raked, and in the photo they look pretty upright. Also, there's another "mast" outline up by bulkhead 3. What's going on? Tom
-
Richard, Love the close-ups. Very intricate planking to bring out the beautiful shape of the hull. Not for the faint-hearted. Well done! Tom
-
Pete, That may be true, but it sounds like you have to adopt me first!
- 209 replies
-
- 1
-
-
- muscongus bay lobster smack
- midwest products
- (and 1 more)
-
Pete, How do I get on your Christmas list? Tom
- 209 replies
-
- 1
-
-
- muscongus bay lobster smack
- midwest products
- (and 1 more)
-
Ron, That plug looks fabulous. A really good piece of work, so it's with some trepidation that I make the following suggestion: if the plug were of the dimensions of inside the frames then you could lay the frames on the plug and not have to cut slots for them. Wouldn't that be easier? Tom PS. I know I just dropped in on your build and have just looked at your artistry with the deck furniture. You clearly know what you're doing. Maybe I ought to just shut up.