usedtosail
-
Posts
2,421 -
Joined
-
Last visited
Content Type
Profiles
Forums
Gallery
Events
Everything posted by usedtosail
-
 Congratulations Ed and a hearty Thank You for taking the time to educate those of us that want to improve our skills in this great hobby.
- 3,618 replies
-
- 2
-

-
- young america
- clipper
- (and 1 more)
-
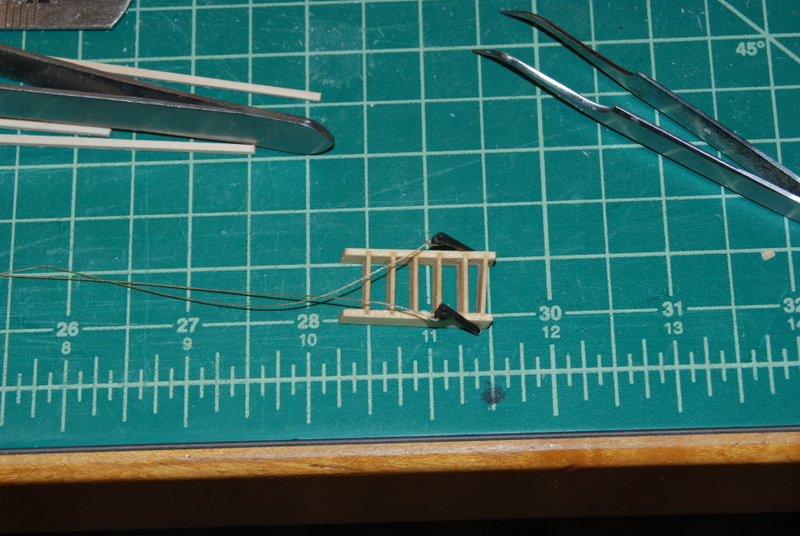
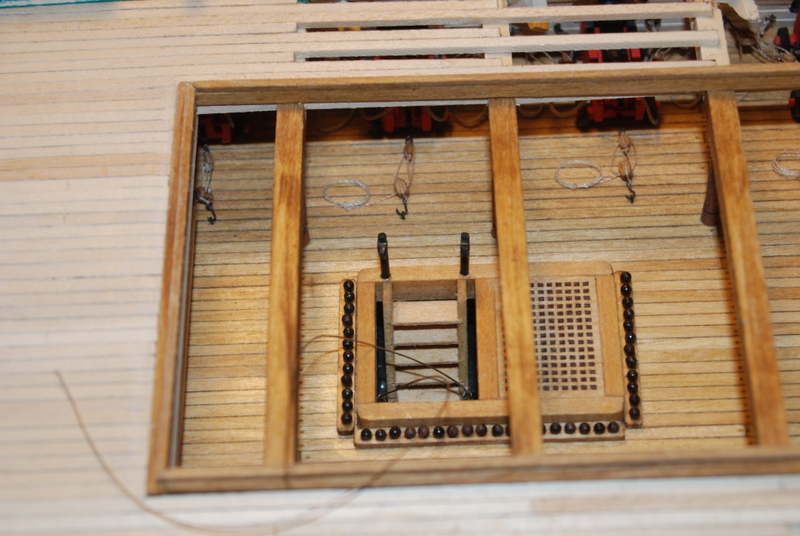
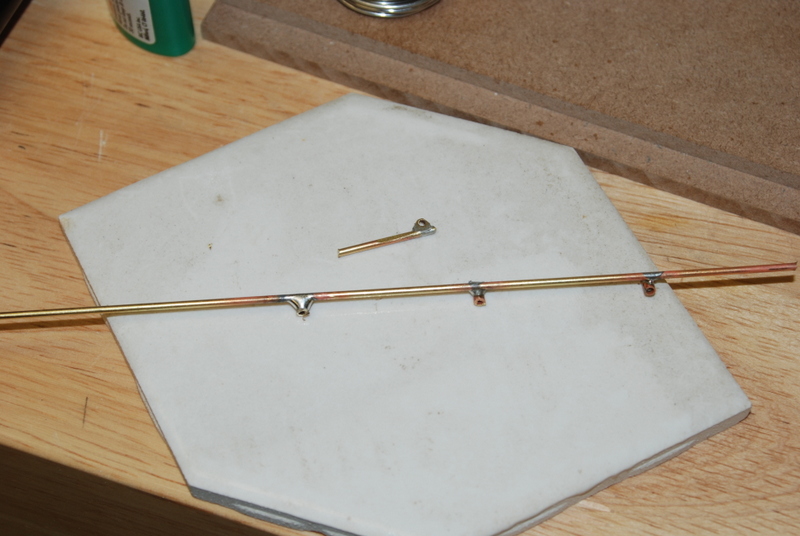
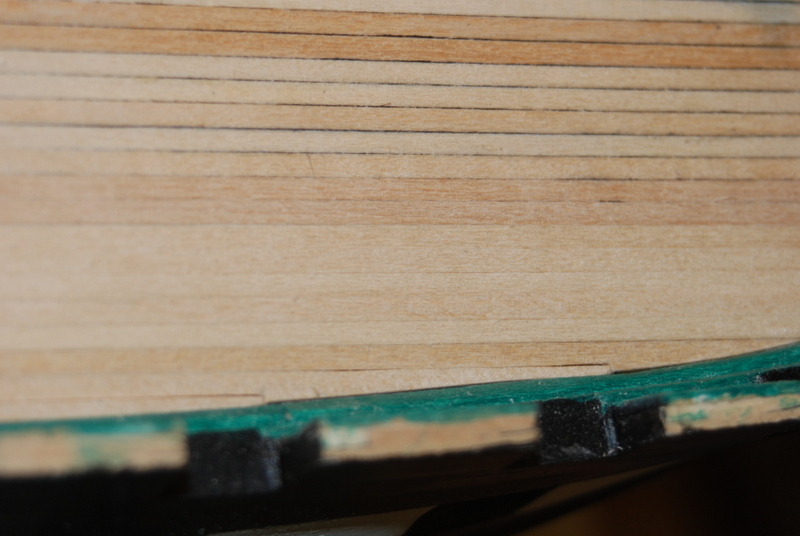
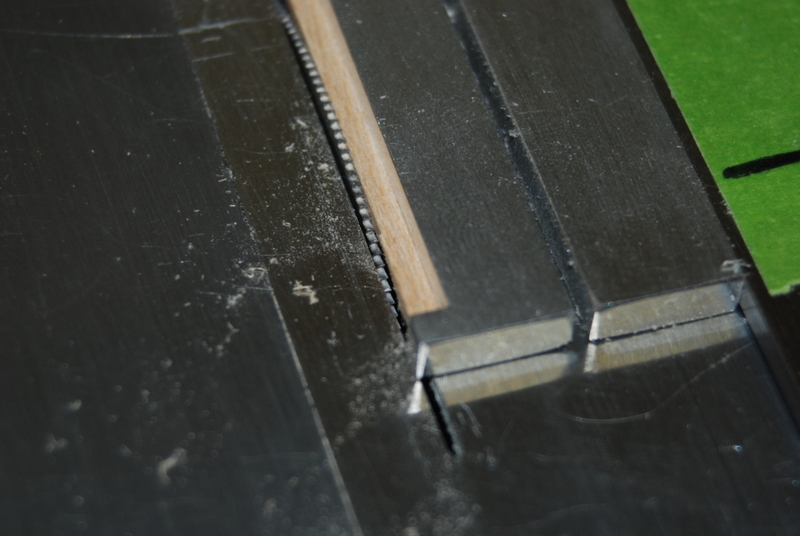
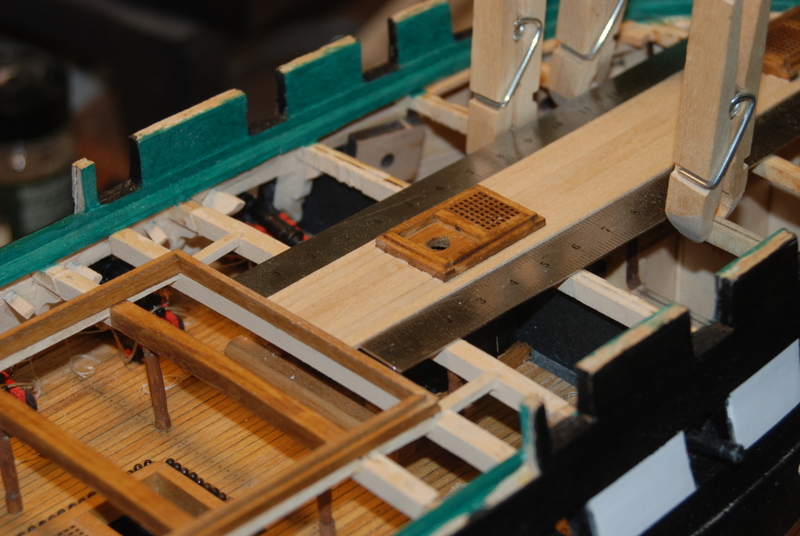
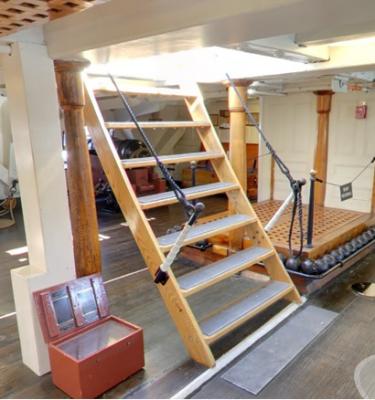
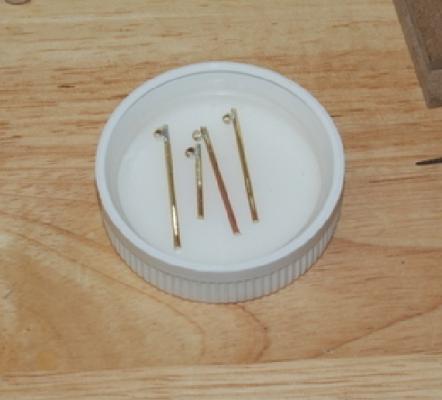
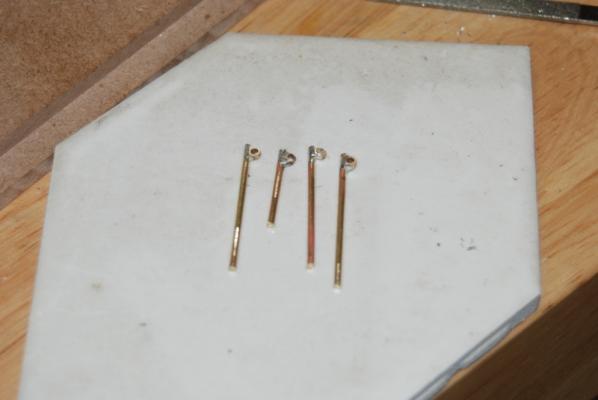
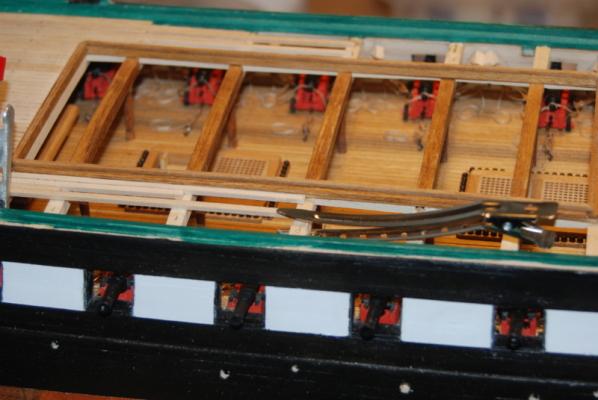
The planking along the port side was getting a little wonky, so I stopped and remeasured the remaining gaps at each bulkhead and came up with a plank count and width for the planks that will go all the way to the transom. I did end up removing a few planks to redo them with less width in places.The tricky part, I found, was setting the tapering jig to these widths, but I eventually just cut a plank by hand using a straight edge, then used that plank to set the taper jig angle and distance from the saw blade. This worked well and I was able to cut a bunch of planks using the saw. I dry fit all these and adjusted an area that was a bit too wide by sanding each of the planks, then glued them in place. Time for some wedges: In between planks, I continued working on the hand rails for the stairs to the berth deck. I first blackened the supports I made using Birchwood Casey and they blackened nicely, even in the solder areas. I was able to remove the ladder from the hatch with a little tug, then I glued two hand rail supports to the sides of the ladder at an angle, like this picture from the current ship. I tied some line to the supports and glued the ladder back into place. I then drilled holes in the hatch coaming and glued the two top supports in place. When these dried, I tied the lines to them using a little glue to hold the knots. Now I have to make four more posts for the ladder from the spar deck to the gun deck.


- 1,354 replies
-
- 9
-
-
- constitution
- model shipways
- (and 1 more)
-
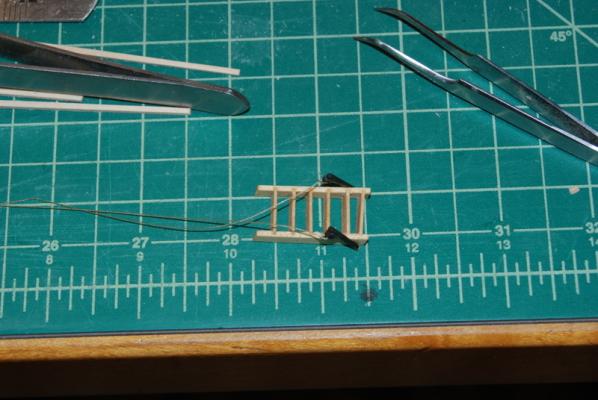
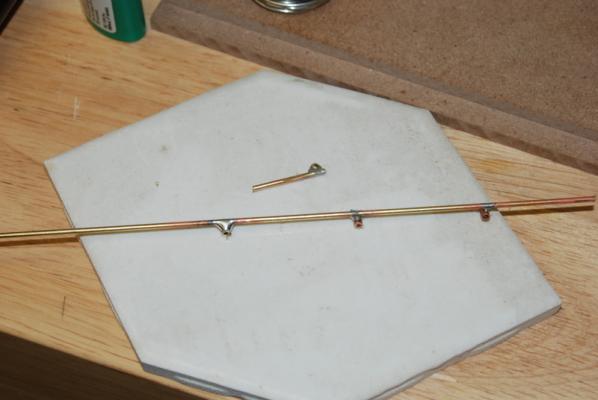
Thanks George, Tim, and Bill, and the likes. Jay - thanks for the picture and I see what you mean about using the blocks. Somewhere back in this log I show a clamp I made out of two pieces of angle aluminum to hold a plank at an angle so I could taper it with a plane or sanding block. It worked OK, but the tapering jig on the Byrnes saw works the best for me for these deck planks. I completed the bow planks on the spar deck and gave them an initial sanding. I have to add the tree nails to them give them a final sanding, but I will probably wait until all the deck planking is completed then do them all at once. I continue planking the port stern side and reached the edge of the main hatch coaming last night. I came up about 1/32" short of the corner, so I will have to notch the next plank to get a tight fit at the corner. I totally spaced on the hand rails for the two ladders I will be showing, so in between planks last night I experimented with making stanchions for the hand rails from brass. I silver soldered pieces of brass tube to a thin brass rod, then used the belt sander and files to thin down the brass tube and remove excess solder. They still need more cleaning up and either blackening or painting, then I have to figure out how to rig them and get them in place. The ladder from the gun deck to the berth deck is accessible through the main hatch opening, but it is still going to be tricky. Silver soldering is the way to go I have found. I have tried this sort of thing with soft solder, but it is usally a pain to get teh solder to flow nicely and the joints usually don't hold up well to lots of work on them afterward. These joints held up through all the sanding and filing no problem and the soldering itself was fairly straight forward. I used the solder that comes with a bottle of liquid flux with a butane pencil torch, and as long as you use the flux the solder flows nicely. I do have to learn to not use too much solder though, as you can see in the pictures. I did redo a couple of joints that were heavy on the solder.


- 1,354 replies
-
- 6
-
-
- constitution
- model shipways
- (and 1 more)
-
Yes, I would suggest painting the hull before adding the cooper plates. This way you will get a nice crisp line at the top of the copper. I didn't do this when I built this model and was not happy about it at the time.
- 32 replies
-
- 5
-
-
- phantom
- model shipways
- (and 1 more)
-
Brig Eagle by robnbill - 1:48
usedtosail replied to robnbill's topic in - Build logs for subjects built 1801 - 1850
Those guns look fantastic, Bill. -
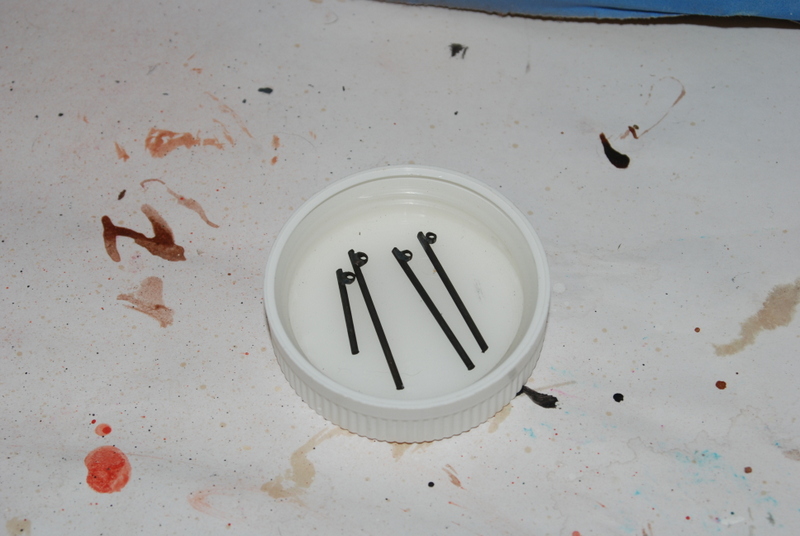
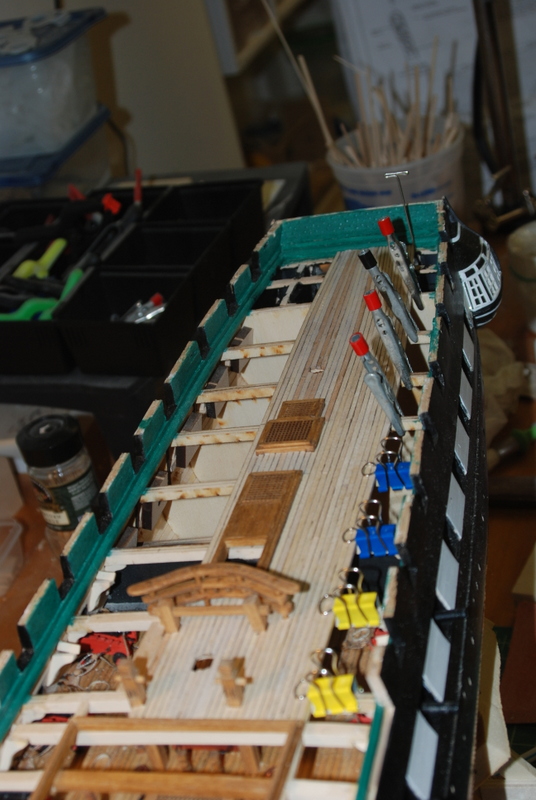
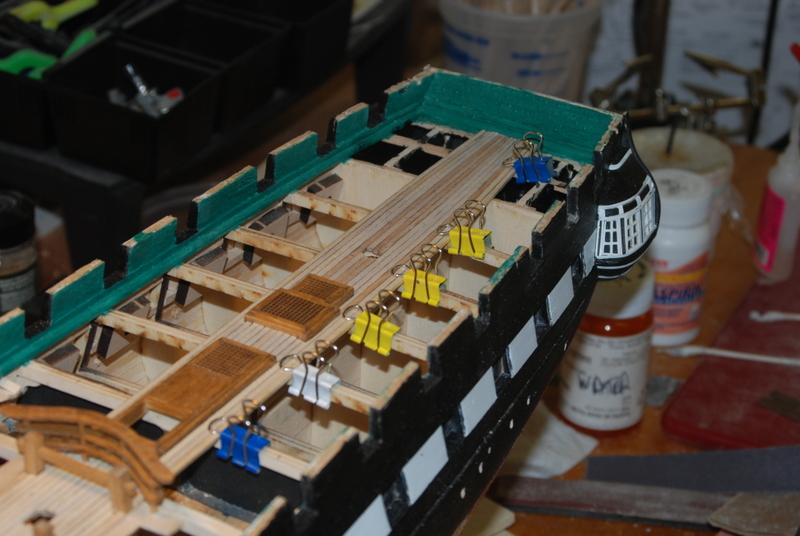
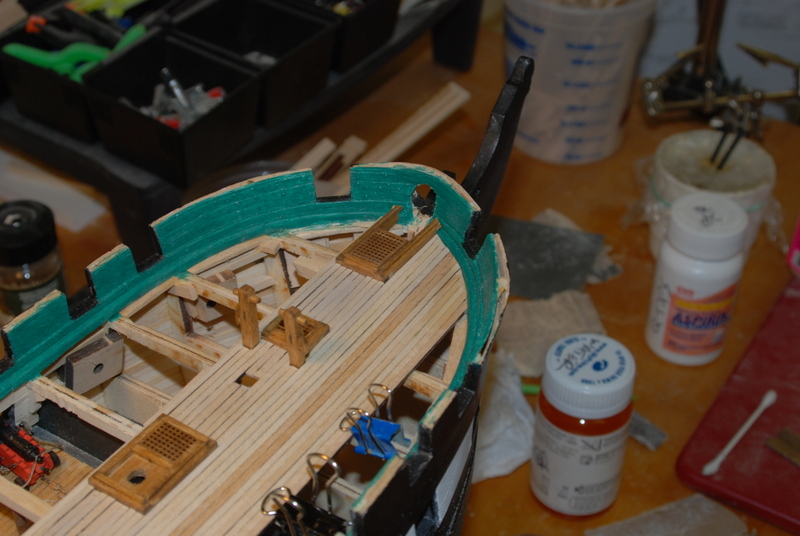
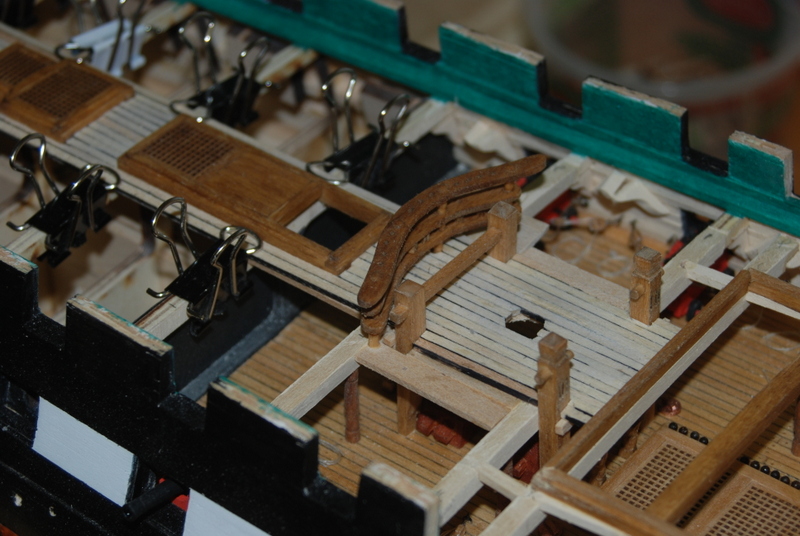
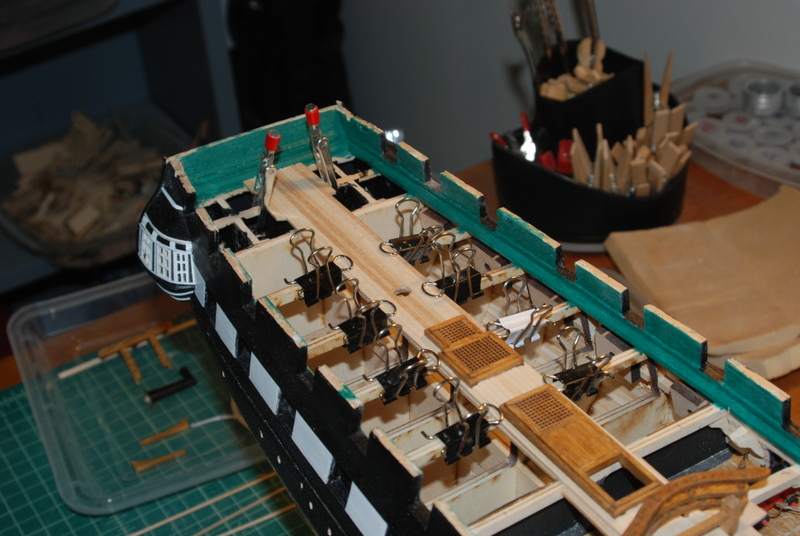
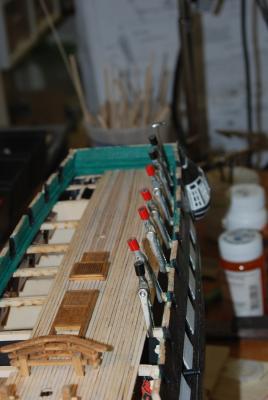
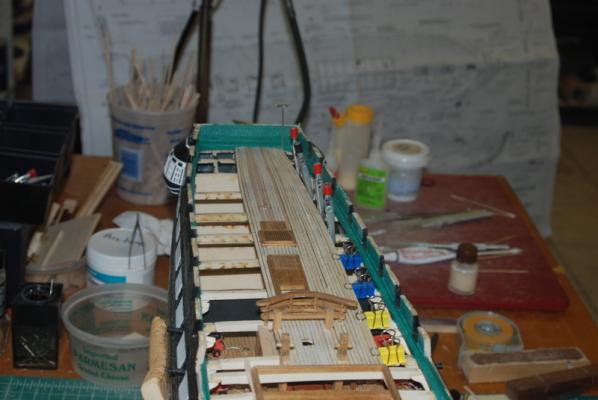
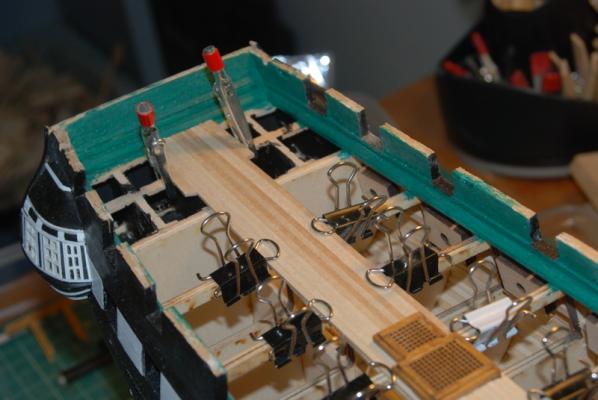
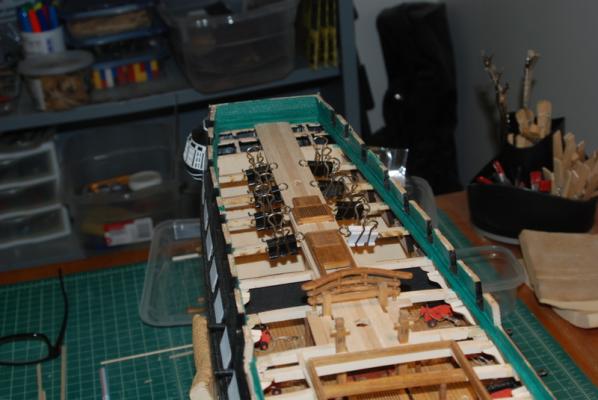
Back at work this week after a week off at the lake. It was a nice vacation. Still planking the port side bow and added a few planks to the port side stern. I cut planks at the stern to the edge of the main hatch coaming and it looks like I have another good fit there, as I did on both sides at the bow. I haven't tapered these planks yet at the stern but it looks like my tapering scheme will work out. I have to thank Danny for the idea to use these hair clips as clamps. They work super in certain situations, such as this. I have also seen others use them by bending them into different angles and shapes. Planking continues...


- 1,354 replies
-
- 9
-
-
- constitution
- model shipways
- (and 1 more)
-
Brig Eagle by robnbill - 1:48
usedtosail replied to robnbill's topic in - Build logs for subjects built 1801 - 1850
Nice job on those barrels Bill. How did that file from Amazon work out? -
Boyd - I agree with you on Jay's suggestion for tapering planks. Up until recently I was doing most everything by hand and I still do a lot by hand. I know I will be using that technique in the future. George - my feeling exactly. Welcome back Nick and thanks. Planking the spar deck continues, albeit slowly. I am gluing each plank, clamping it and letting it dry for about 15 minutes before adding the next one, so only about a half dozen planks per night. That is after I shape each plank to begin with. No hurry though, since it has already been a year and a half. I won't be working on it at all for a week or so due to other commitments.
- 1,354 replies
-
- 2
-
-
- constitution
- model shipways
- (and 1 more)
-
Brig Eagle by robnbill - 1:48
usedtosail replied to robnbill's topic in - Build logs for subjects built 1801 - 1850
Nice work on the Eagle, Bill. I know you will love that new saw. -
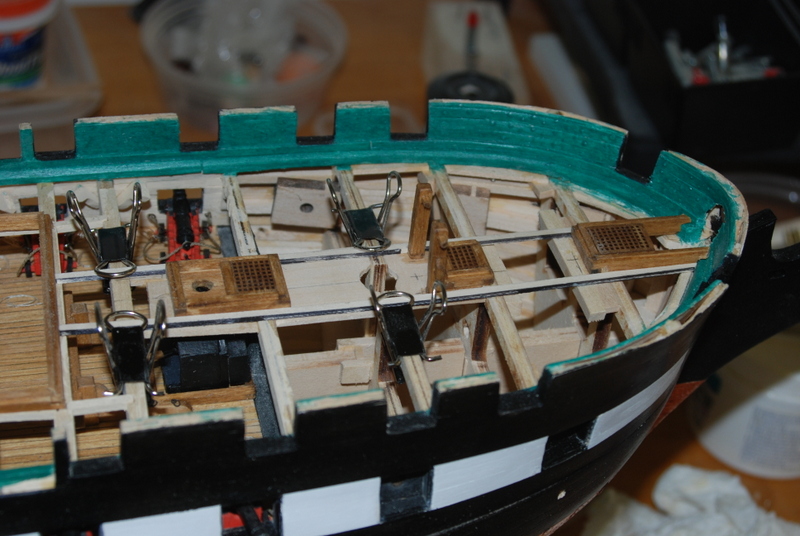
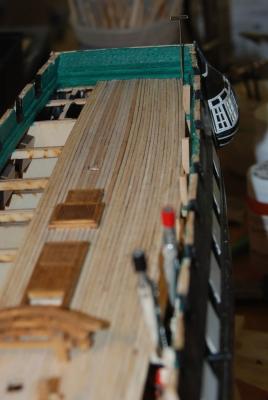
Jay - Thanks for the advice on tapering. So far I have been using the table saw with the tapering jig which has worked really well. I am sure I will be eye balling things as the space gets filled up. For the planks along the waterway, I started filling those in on the starboard side last night. I got to a point where they were getting very pointy, so I decided that a nice hook scarf joint was needed. I used a wider plank, fit it to the waterway at the front, then used the table saw to cut the rest of the plank back to 1/8" wide. I would not attempted this if I had to do it by hand, as getting a nice straight edge over the length of the planks would have been difficult. I did have to cut the ends of these planks at the hook scarf by hand, because I did not want to get my hands too close to the blade (see current posts on this subject). I am happy with the way these came out, even if they may not be historically correct for the Constitution. My feeling is that the decks have been replanked many times so just because they don't have hook scarfs now doesn't mean they didn't back in the day. Of course, if one of you knowledgeable folks tell me that the US at the time never used them, that is a different story. Nothing is glued down yet. I may use some of these hook scarfs near the stern too, as these side planks could get very narrow. At least it is an option. I sanded the planks near the front of the main hatch coamings to even them out some, and they will get more sanding as I do the rest of the planks later. In this shot we can start to see how much of the gun deck details will be able to be seen after the spar deck is planked. The stove is just about completely hidden now. Good thing it has that big stack on the spar deck to show where it is.


- 1,354 replies
-
- 8
-
-
- constitution
- model shipways
- (and 1 more)
-
Just found your build log Wayne, and you look like you are off to a good start. Thanks guys for the endorsement, but Wayne I feel like you most of the time - my work just doesn't look as good as what I have seen in other logs. But, I do end up reworking almost everything at some point and the way I look at it, it just makes that build that much more interesting. I certainly relied on others logs before I started too, like: Jeff Toma (http://modelshipworld.com/index.php/topic/94-uss-constitution-by-jeff-toma-model-shipways-scale-176/?p=564) Modeler12/Jay (http://modelshipworld.com/index.php/topic/103-uss-constitution-by-modeler12/?p=676) and Bob Riddoch (http://modelshipworld.com/index.php/topic/423-uss-constitution-by-bob-riddoch-model-shipways-scale-176/?p=4442)
-
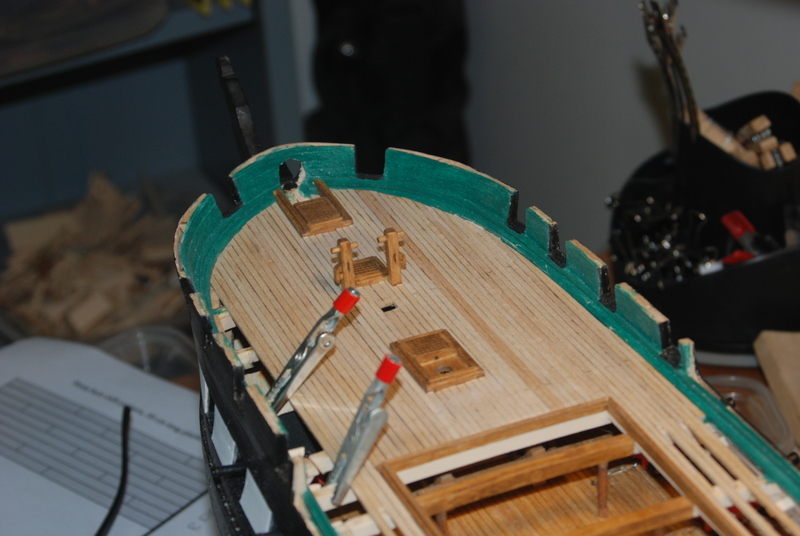
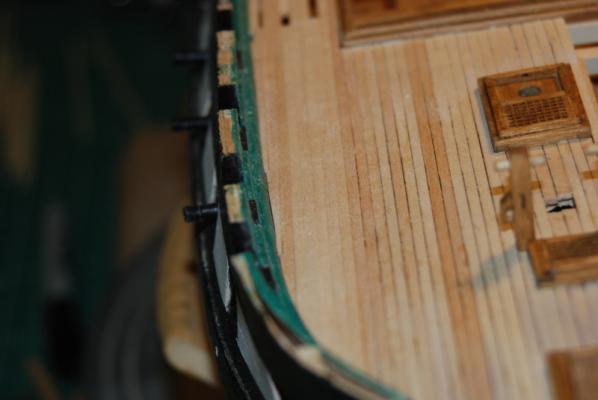
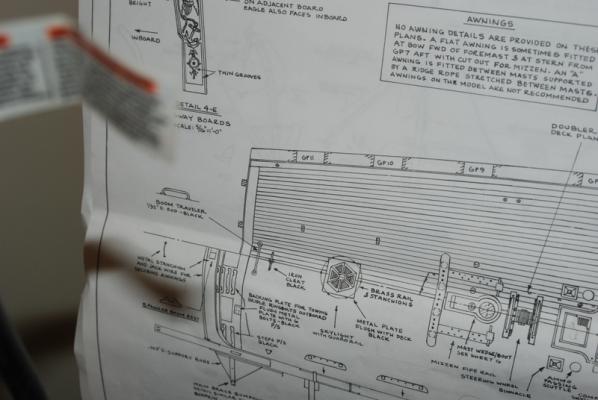
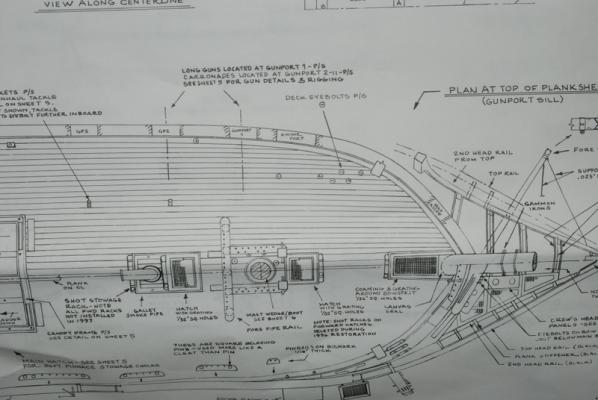
Thanks Tim, George, Sal and the likes. The planks are only tapered at the stern, so that does make it much easier at the bow. And they are not joggled either, just cut at an angle to the waterway. Here are the plans for the bow and stern and you can see what I mean. I continued planking on the starboard side of the bow. I was a bit worried about where the planking would end at the edge of the main hatch coaming, but I got lucky and it ended right at the edge of the coaming, almost as if I had planned it. The heights of the planks along the front edge of the hatch coaming are a bit uneven in height so will require some sanding to even them out.


- 1,354 replies
-
- 7
-
-
- constitution
- model shipways
- (and 1 more)
-
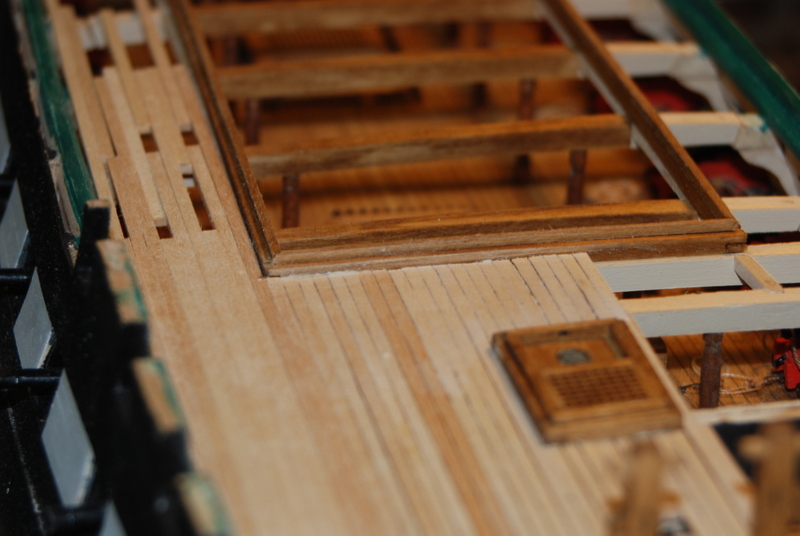
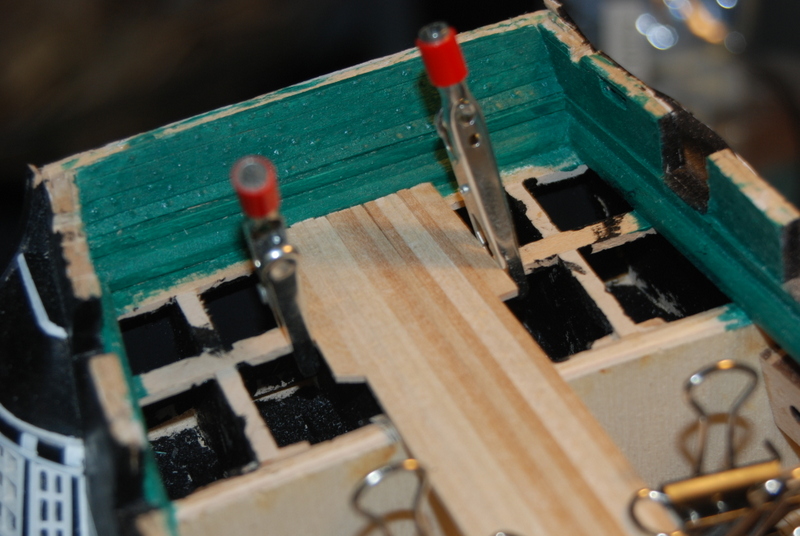
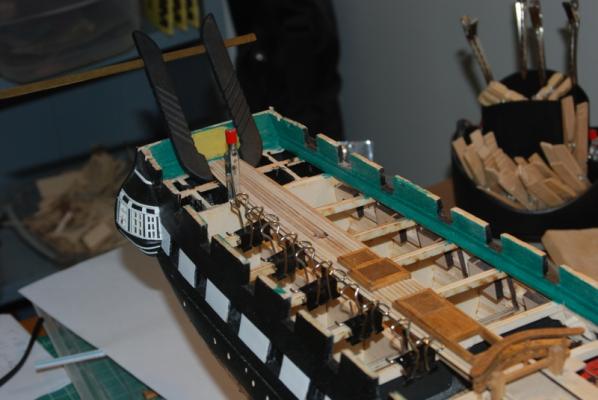
Dry fitting the planks is one thing, but actually getting them all back in place and glued down is another thing entirely. I first had to figure out in what order to glue them down. Should I start from the center and work out, but then the tight fit along the coamings may not come out right. Should I glue the planks along the outsides of the coamings first, but then I have to make sure I have the ends at the right place on the transom, since they bent in. I chose the second option, but first I put a piece of masking tape on the transom and marked the locations of the middle and two outside planks before removing all of the dry fit planks. I almost screwed this up because I had added one plank outside of the planks along the coamings, which I caught a little too late but not late enough to fix. Once these planks were glued down, it was just a matter to fill in the planks between them. A few of the very middle planks needed a bit of sanding along their edges to fit into the remaining space, but not much. I use a Sharpie to mark one edge of each plank as I glue them down. I don't use it on the ends of the planks, though. I used this technique on the gun deck planks too, which you can see in some of the pictures. Once the planks are leveled and sanded, the effect is not as dramatic as these seen on these raw planks. I then used the same method on the bow area. This picture was taken the other night with just the two outside planks glued in. The rest have been filled in, but the picture is still on the camera. I am not sure how interested the next few posts are going to be, just more planks being added until I fill up the spar deck. It keeps me motivated to continue to record the progress, but feel free to skip them until I get to more interesting stuff, like the deck fittings and carronades.


- 1,354 replies
-
- 8
-
-
- constitution
- model shipways
- (and 1 more)
-
Sal, try using a hemostat to hold the cleats while you file them. It works pretty well for me, anyway.
- 659 replies
-
- 3
-
-
- syren
- model shipways
- (and 1 more)
-
Thanks George and Jp, and the likes. Jparsley - you can see the taper jig in the first two pictures of my last post, on the saw. It is basically a sled that has an angle adjustment that rides along the fence of the saw.
- 1,354 replies
-
- 2
-
-
- constitution
- model shipways
- (and 1 more)
-
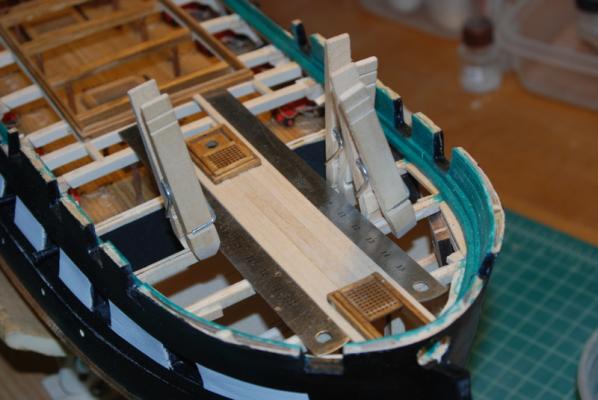
Thanks George and Dan. For the tapering of the deck planks at the transom I did end up using the tapering jig on the Byrnes saw. It worked great. I set the jig to a 1/2 degree angle and set the fence so that the end of the plank would end up at 2mm. I couldn't run the plank all the way through because the jig has a piece that pushes the plank, which would have hit the blade. I used a piece of tape to mark the location I needed to stop the jig, and then I used a sanding block to remove the little nub at the end of the plank. I like this set up because I can cut the planks to length first then put the taper on them. I replaced the two wide planks in the center with three regular width planks, and I like it much better. I tapered all of the planks that go to the transom so far. These are edge bent slightly at the transom and the joints look pretty tight, so I am happy with this method. Oops, I forgot to cut the planks for the mizzen mast hole. Simple fix. I will be using a three butt shift with around 20 cm long planks, like I did on the gun deck planking. I have to figure out where to start this with the planks I have already cut.


- 1,354 replies
-
- 9
-
-
- constitution
- model shipways
- (and 1 more)
-
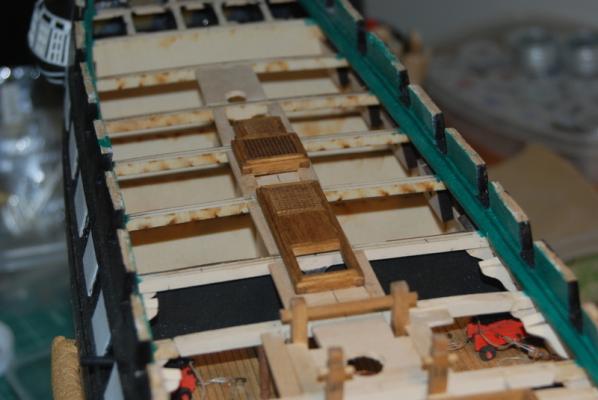
Thomas - yes that little lathe really comes in handy. I am using it more and more. I continued cutting planks for between the coamings. I used a small round file to notch the planks around the U shaped pin rail supports. I lucked out that I didn't have a plank with the support right in the middle. I used wider planks for the two center planks, but now I am going to replace them with three regular width planks, because they look too different. I also measured the widest portion of the spar deck to determine that there will be 41 planks across the width of the deck, so I have to fit all 41 into the 8.4 cm at the transom, since these planks are tapered at the transom. That means each plank at the transom needs to be 2.04 mm wide. I have to figure out the best way to taper these planks, since this area will be very visible and not painted, so I can't hide my flaws. I recently bought the tapering jig for the Byrnes saw, so this may be the time to break it out/in. I am open to other suggestions too. For hull planking I have been cutting the planks with an X-Acto knife and sanding them afterwards, but I don't always get nice flat edges that way. Here are some pics of the planking progress. None of the planks are glued down yet, and I have yet to mark the edges of these, for which I have been using a Black Sharpie on one edge.

- 1,354 replies
-
- 8
-
-
- constitution
- model shipways
- (and 1 more)
-
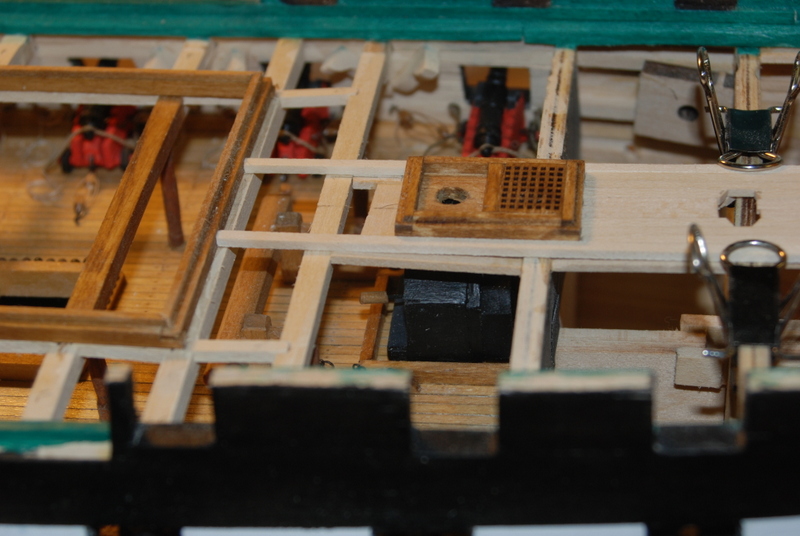
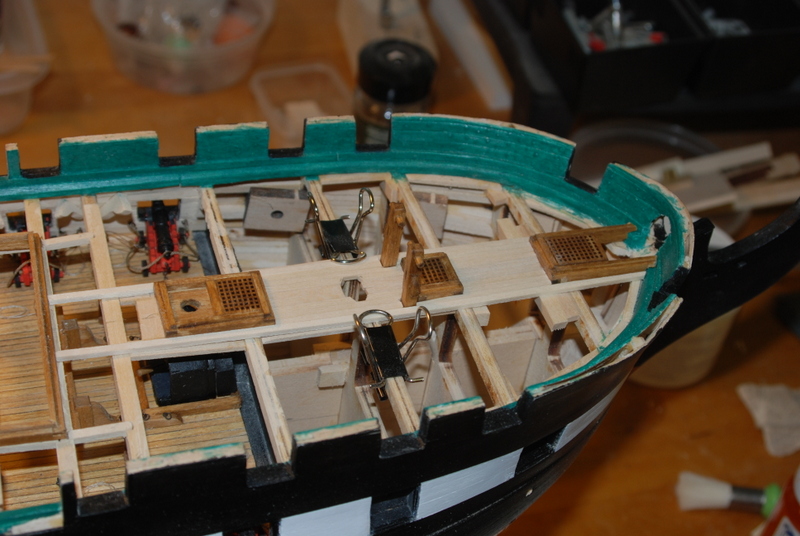
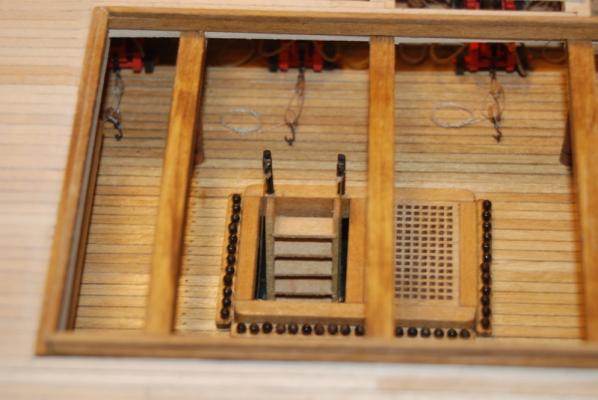
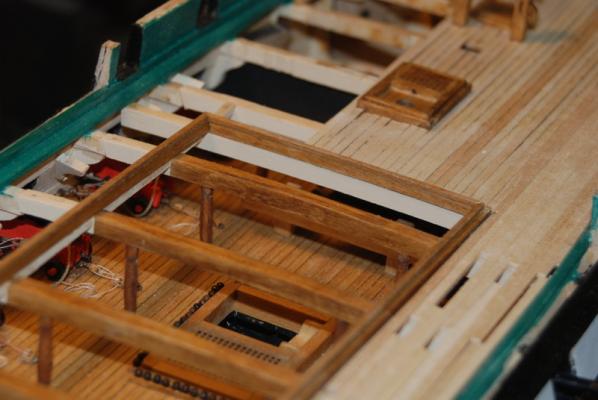
Thanks George, Dan, and Jay, and thanks for all the likes, guys. Dan - I am an old guy too, so we old guys need to keep inspiring each other. I hope you get to start your Conny soon and I will enjoy following along. Jay - Thanks. I wanted something a bit different and when I saw how the bulkheads were shaped, I figured I could pull this off. Also, since ME sells the extra guns. I think others in the past have modelled the gun deck too. You are doing a great job on the cross section and the research especially is very useful. Your full model is pretty terrific too. As for the stove placement, here is what I have. The part of the gun deck I modelled includes only the back of the stove, but you can see where it is in relation to the riding bitts aft of the fore mast on the gun deck and the fore mast location. I think maybe I moved the bitts a bit further back to make room between it and the stove, but to me it looks workable. And here is what I worked on last night, cutting planks to fit around the forward coamings. These are just dry fit, but they are the right size planking now. The fore mast hole is too wide, so I have to replace the four outer cut planks with two full planks.

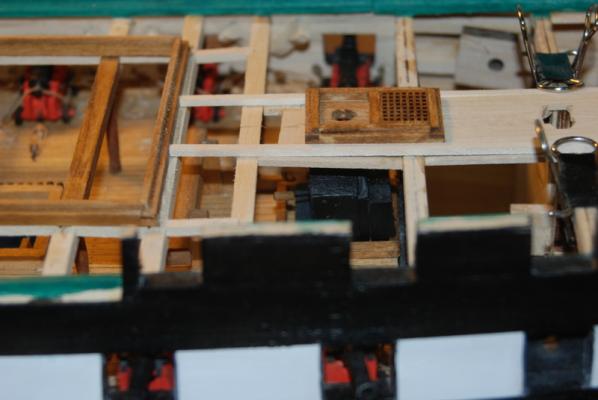

- 1,354 replies
-
- 8
-
-
- constitution
- model shipways
- (and 1 more)
-
Nice job on the painting. Your waterline looks great.
-
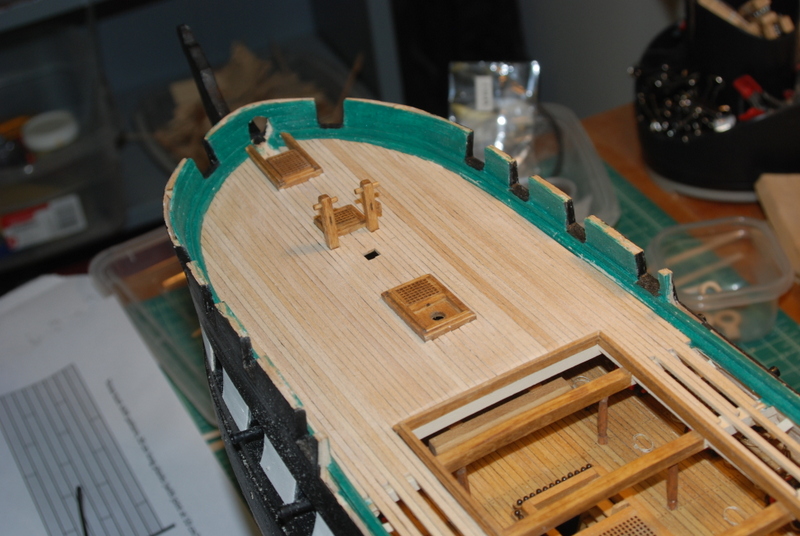
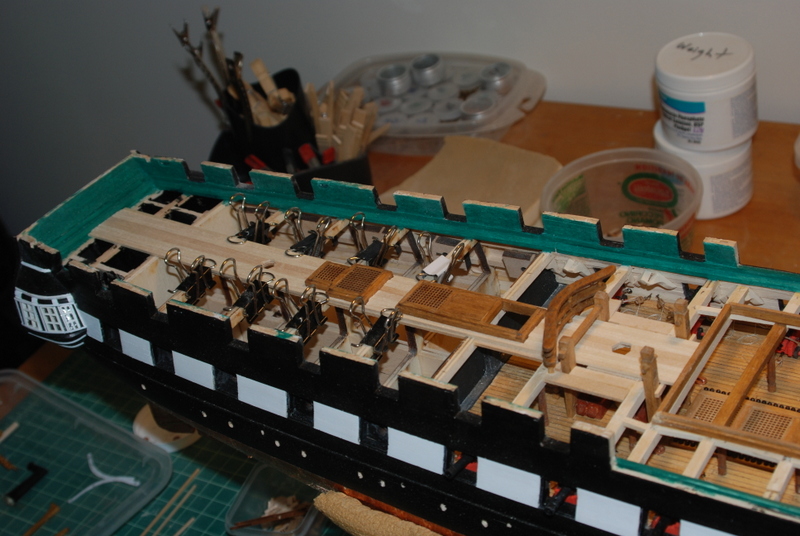
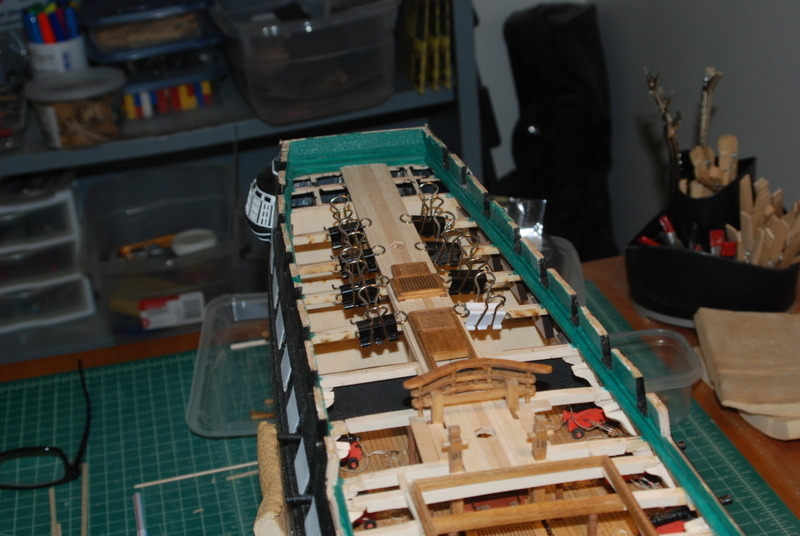
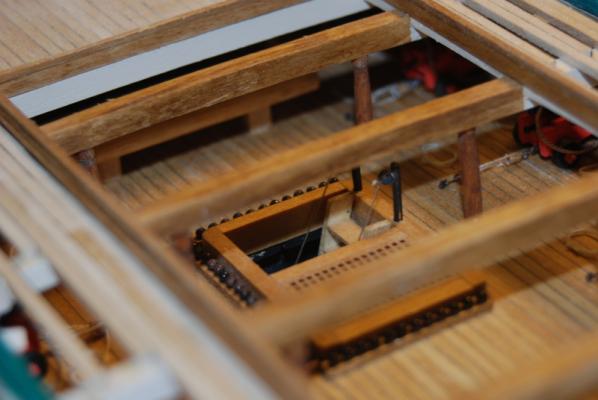
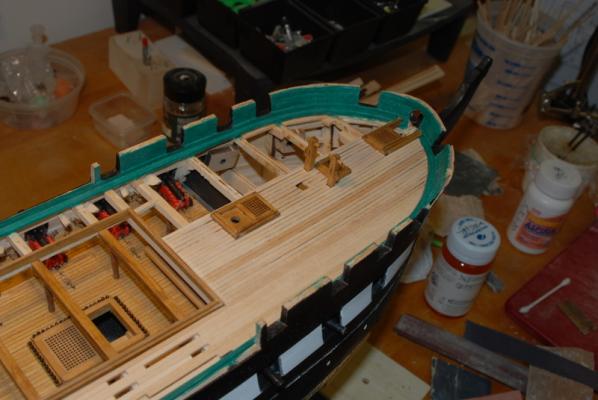
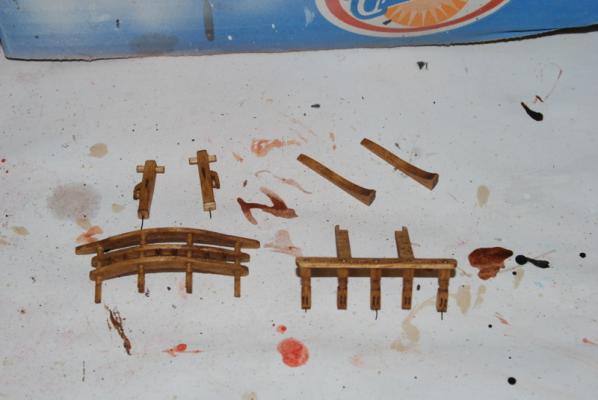
I thought this was going to be a better update than it is, but I do have some progress to show. First, here is the U shape main pin rail dry fit in place before finishing. It was a bit challenging drilling those four holes in the right places, but I took my time and measured many times before drilling. You can see how much sturdier this rail will be being glued into those sub deck support pieces. I then gave the fore and main pins rails and the bitts a coat of pre-stain and two coats of oak stain. I then positioned and glued most of the coaming hatches in place. There is one small one that goes just in front of the fore bitts, but I want to wait until the bitts are in place to get it in the right spot. I started measuring and dry fitting deck planks between the forward coamings, but after I took these pictures I realized that I was using the wrong size planking strips, so I basically have to redo all of this. Not a big deal, but I did loose about an hours work. its all practice for the rest of it though, right? I was happy with the way the planks line up along the coamings. This has not always been the case on previous builds.


- 1,354 replies
-
- 10
-
-
- constitution
- model shipways
- (and 1 more)