usedtosail
-
Posts
2,421 -
Joined
-
Last visited
Content Type
Profiles
Forums
Gallery
Events
Everything posted by usedtosail
-
 That is a nice jig, Popeye. I am glad it worked so well.
- 165 replies
-
- 2
-

-
- united states
- revell
- (and 1 more)
-
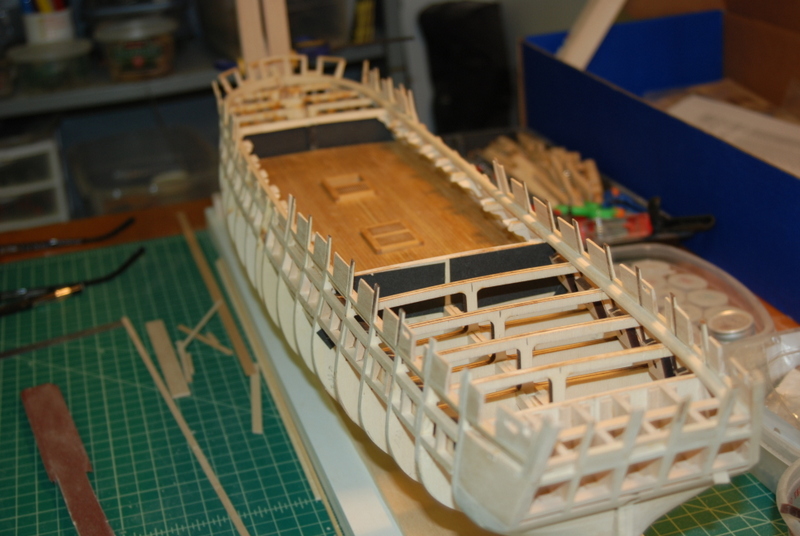
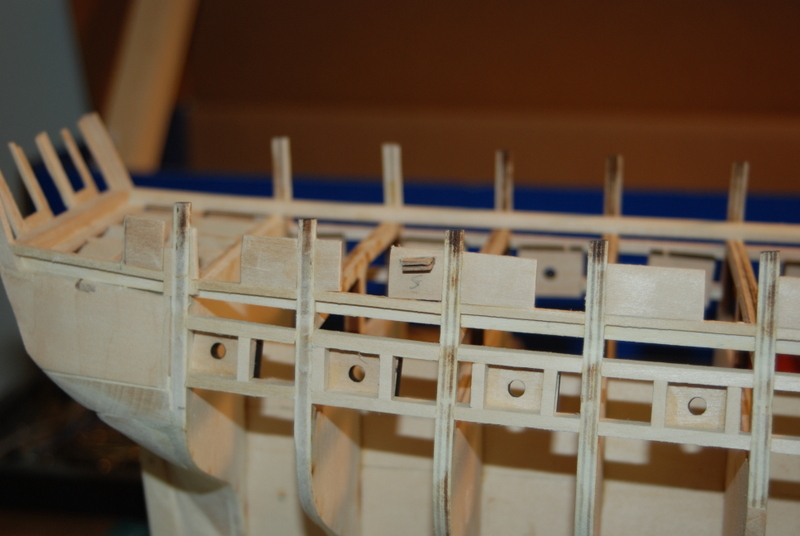
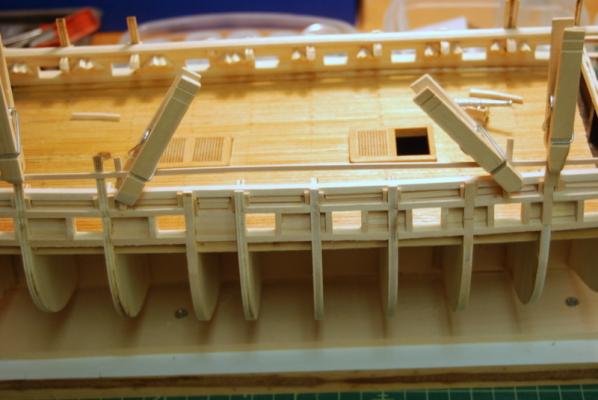
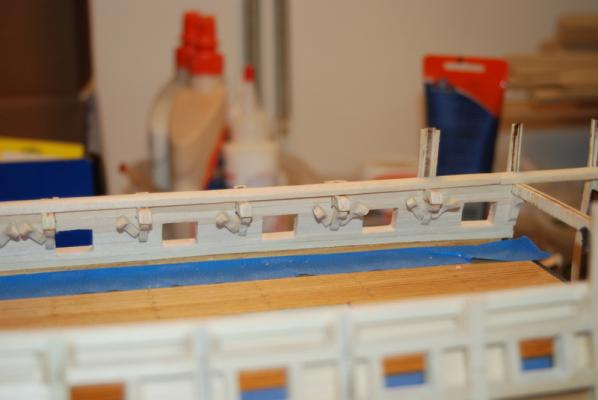
Thanks Pete and Patrick, and all the Likes. Moving to the port side, I added the plank sheer and the solid pieces between the gun ports on the spar deck, and sanded everything flush to the bulkheads. I tried to make sure the profiles on each side of the gun ports are the same so they will look symmetrical. I am going to install the through bulwark sieves and paint the insides of the gun ports, then it will be ready for planking.


- 1,354 replies
-
- 7
-
-
- constitution
- model shipways
- (and 1 more)
-
Looks great Patrick. Now you have me worried that I didn't spend enough time getting my bulkheads right. You are doing a fantastic job.
-
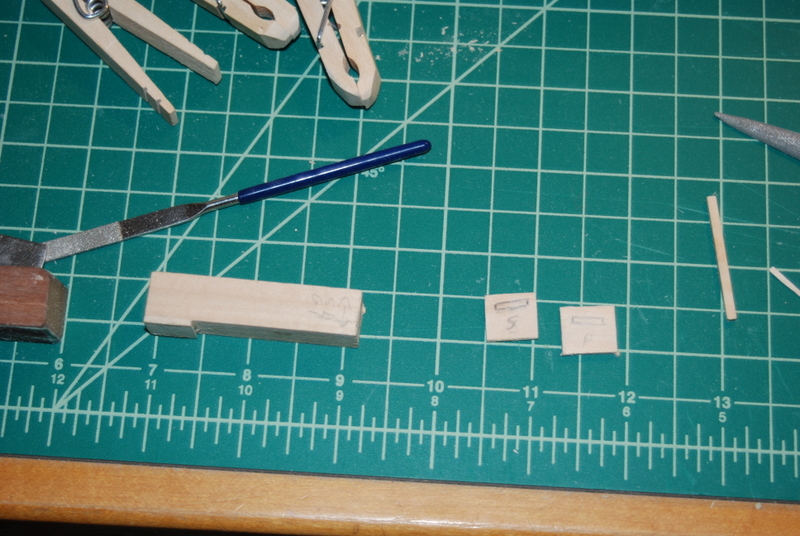
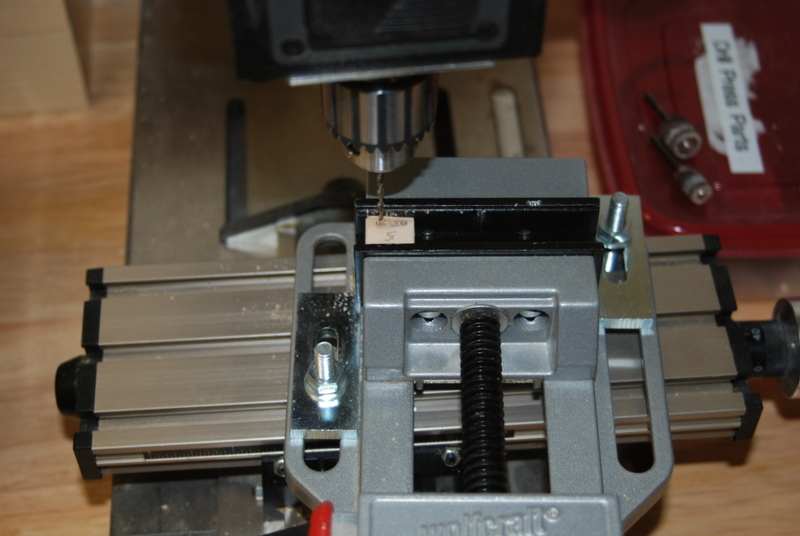
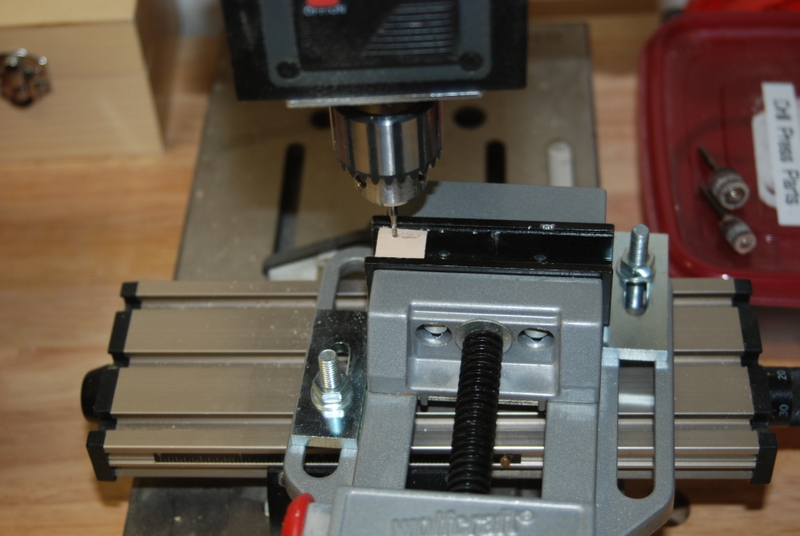
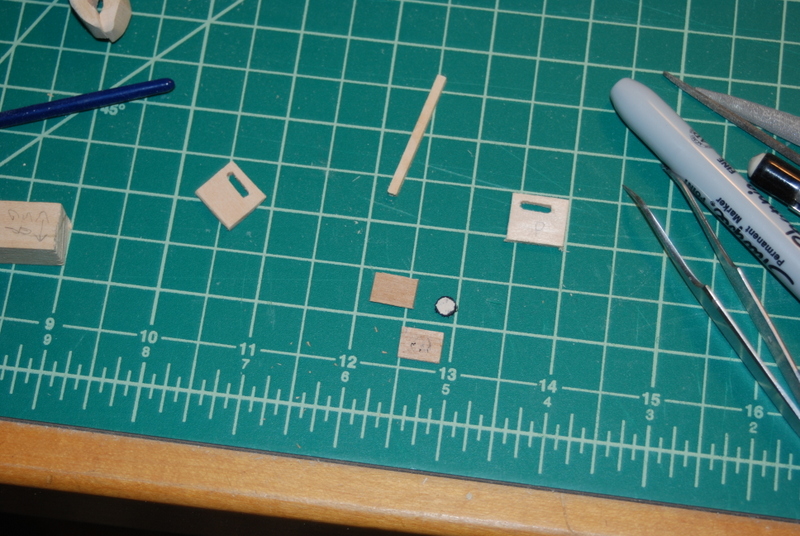
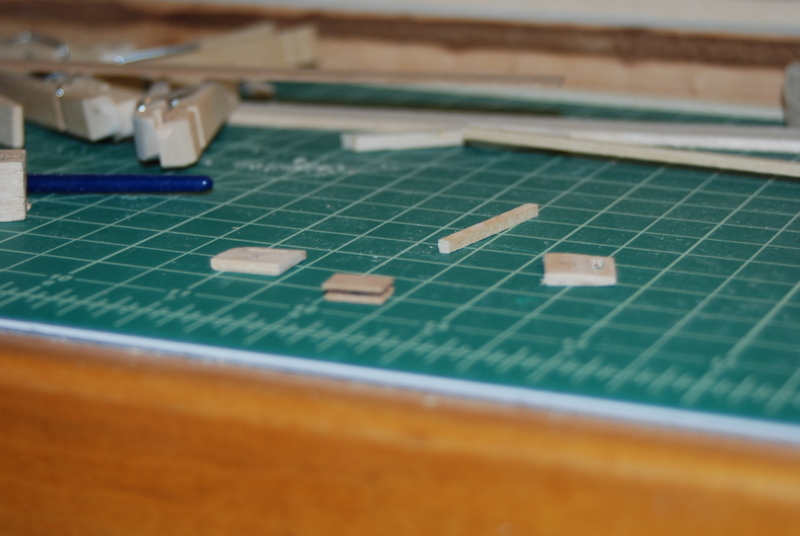
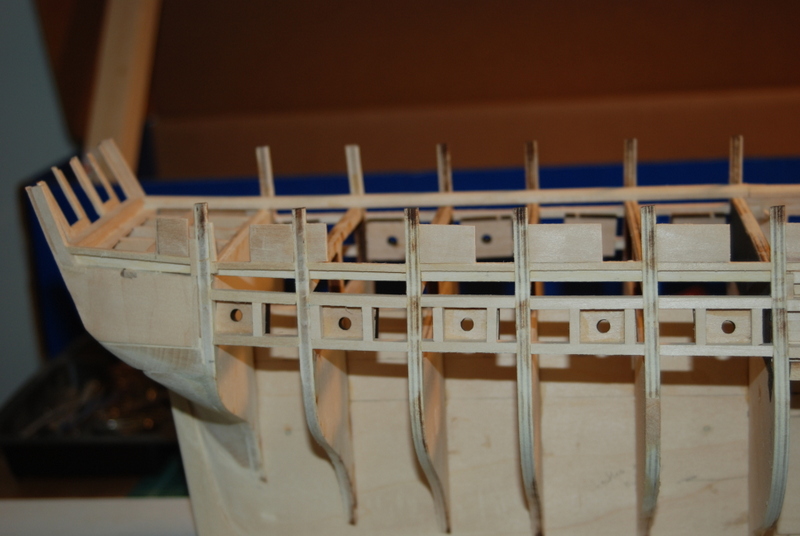
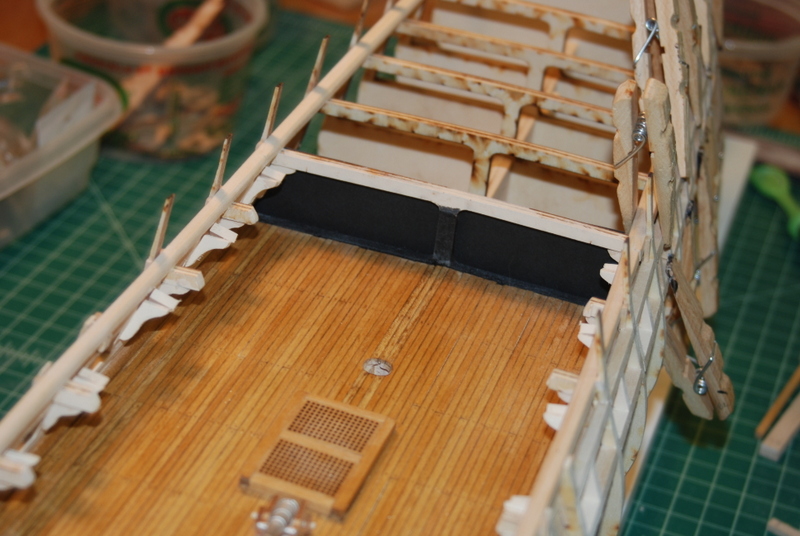
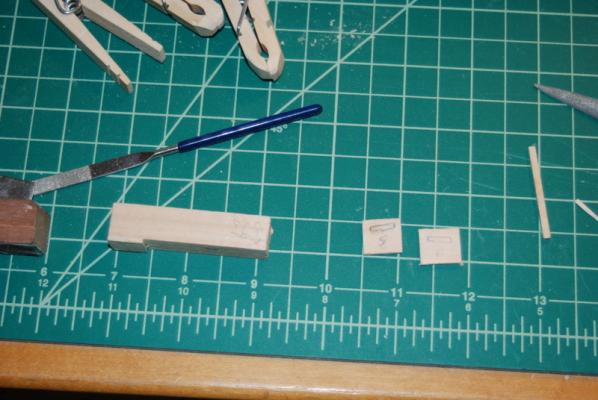
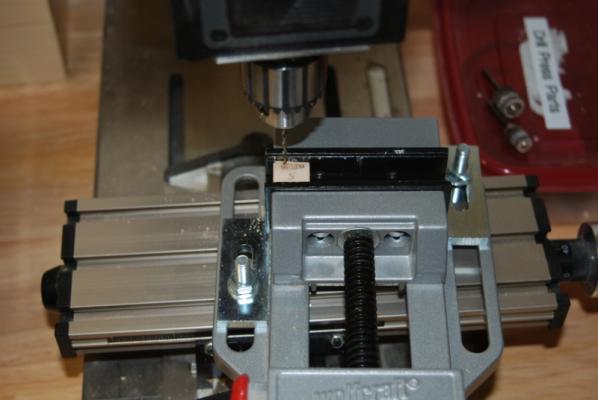
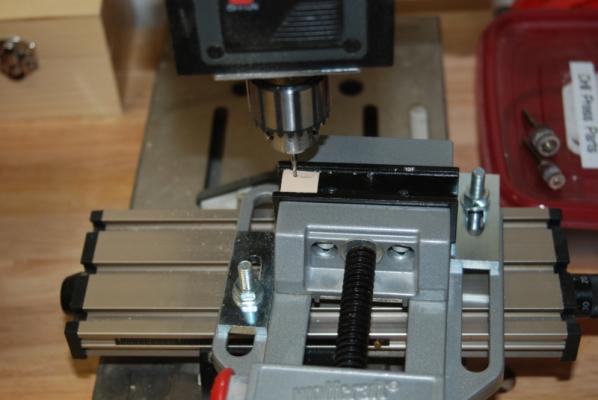
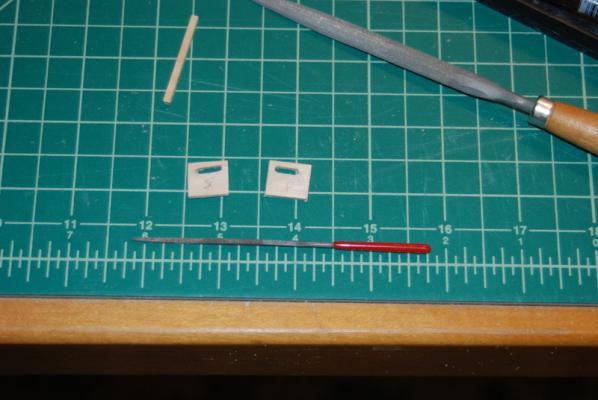
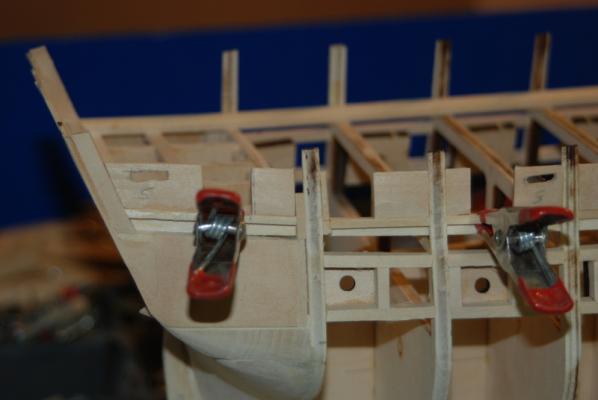
I had planned to add the four through the bulwark sieves, but again had to think about how to frame them and hold them in place before planking the bulwarks. The solid pieces solved this problem by giving me a solid surface to mill out to hold them. I milled the port and starboard pieces at the same time so i had a better chance that would come out the same. I first marked the pieces: Then put them in the drill press vise, which I angled so that the slot corresponded to the X direction of the XY table. I have both pieces in the vice back to back so I could cut them at the same time. I drilled a series of holes along the slot: Then used a small end mill bit to square up the slot: And finished with a small square file: To make the sieve, I sliced the end of a dowel into very thin slices that I glued between two thin pieces of wood. The wood is wide enough to be oversized, even when these pieces are planked on both sides, so I can sand them flush to the planking later. I blackened the edges of the dowel pieces with a black Sharpie. I then sanded the short edges and the top and bottoms of the sieves to fit into the slots: I'll add these later after I have glued these solid pieces in and sanded them flush with the bulwarks. So, I glued the two starboard side pieces in, as seen here: But, I had forgotten to add the notch for the stern bumpkins, and I did not leave enough room for it on the first pieces. I remade those two rear pieces with the sieve slot a little more forward and the notch for the bumpkin, which I made by just drilling out a hole and squaring it up with the square file. Now I just need to repeat adding the plank sheer and solid pieces to the port side.


- 1,354 replies
-
- 6
-
-
- constitution
- model shipways
- (and 1 more)
-
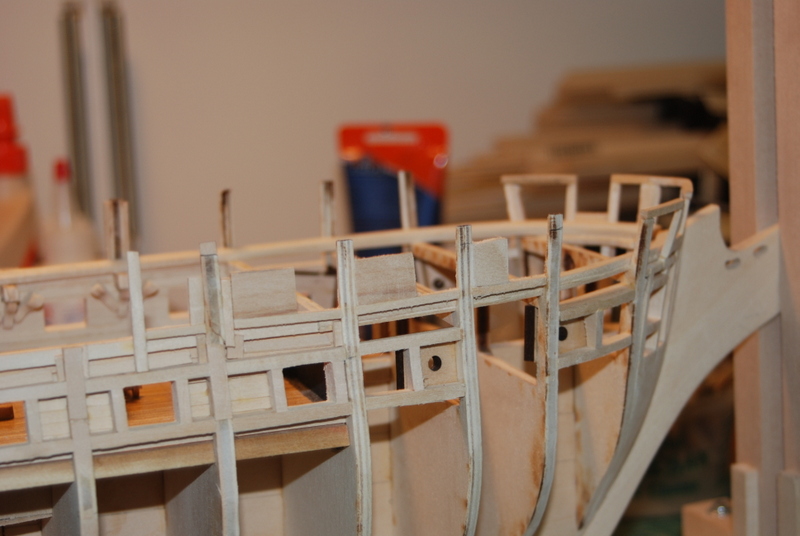
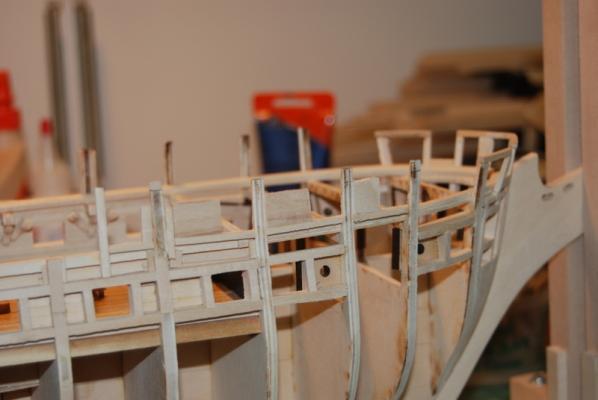
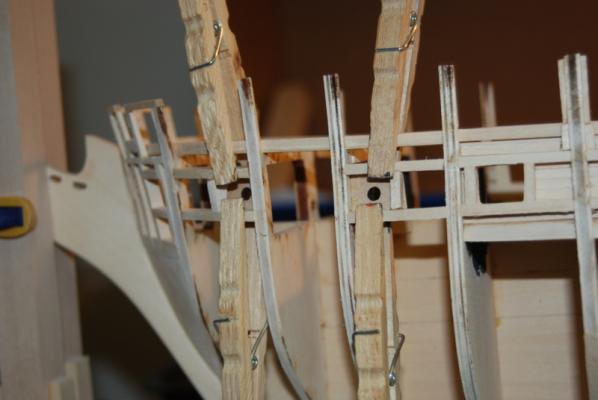
Some progress from over the weekend. I have been dealing with family issues since then. So, I needed to frame the spar deck gun ports, which I could have done the same as the gun deck gun ports except that the tops of these will be framed by the rail. One way I could have gone was to add vertical frames at the sides and horizontal frames between the bulwark extensions and these vertical frames, but only on the parts of the bulwarks that will be planked over. This seems too complicated and fragile, so I went with a simpiler (at least to me) solution - solid pieces that will be planked over in the parts of the bulwarks that are not gun ports. These are sanded to have the same shape as the bulwark extensions so each side of the gun port will look the same. They are glued to the plank sheer on the bottom and the bulwark extension on one side, so they are pretty solidly attached. I let these dry overnight, then sanded them flush with the bulkheads on the outside. When I installed them, I made sure that they were flush with the inside, so I did not have to sand them (much) on the inside. As you will see in the next post, this method also helped out with the next step.

- 1,354 replies
-
- 6
-
-
- constitution
- model shipways
- (and 1 more)
-
Thanks Pete and Patrick. Before I can start planking, I need to finish the spar deck gun ports, Then I am going to try to add the through hull shieves, then paint the insides of the gun ports, then the planking can start. I will probably plank the outside hull down from the bulwarks to the wales, around all the gun ports., then the transom, then up from the keel. We will see how that plan holds up.
- 1,354 replies
-
- 2
-
-
- constitution
- model shipways
- (and 1 more)
-
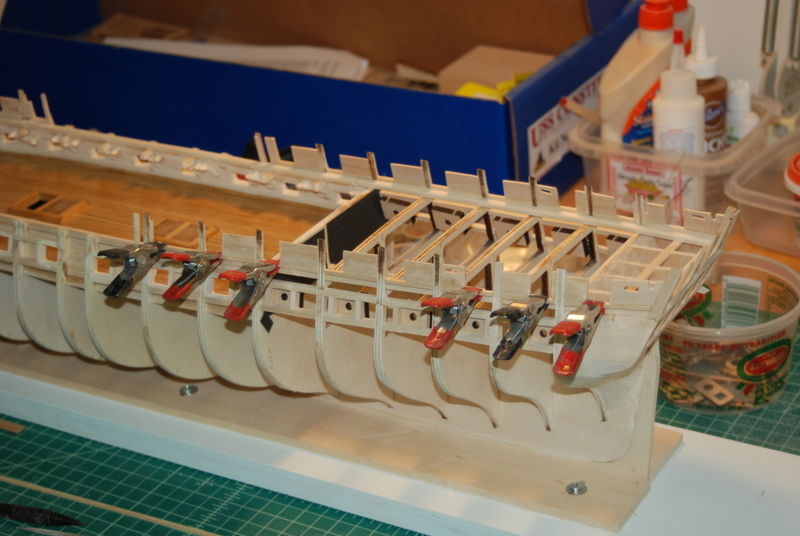
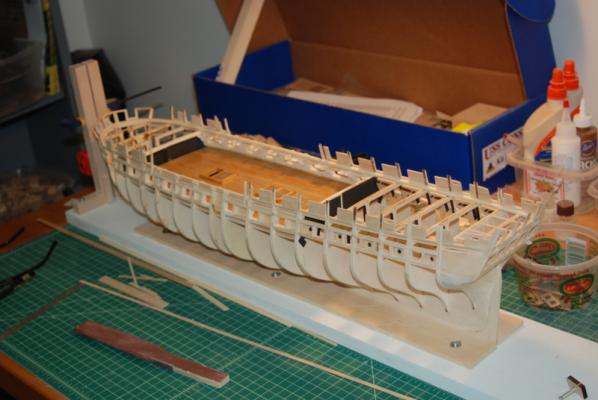
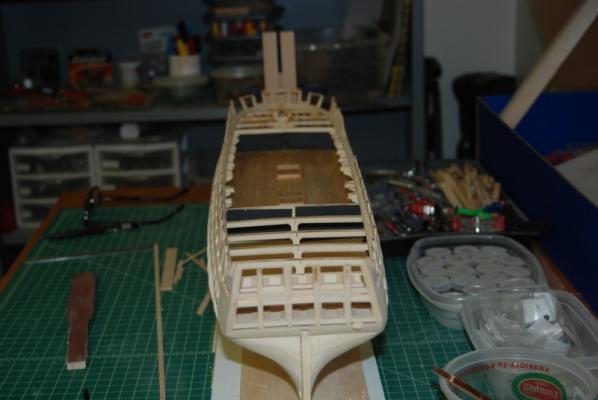
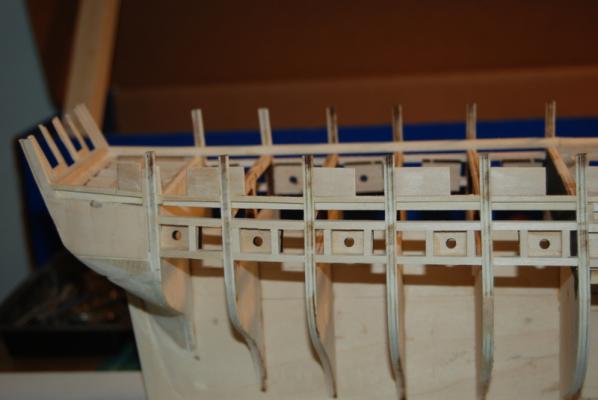
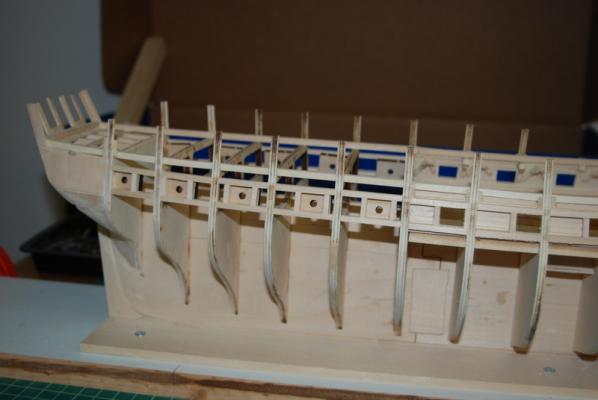
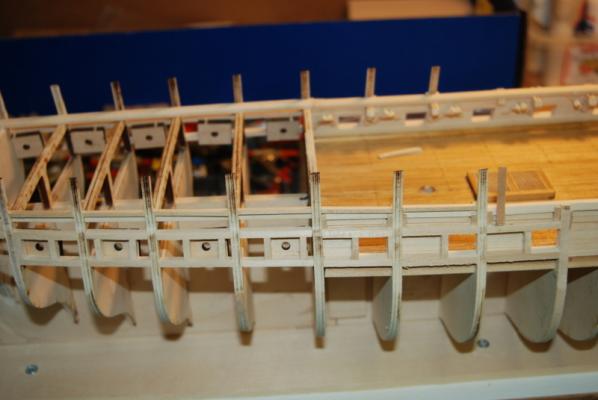
Now some updates to show. I finished the dummy gun ports on both sides and have sanded them flush to the bulkheads. Now I could turn my attention to the spar deck gun port framing, which will get me very close to start planking. Since I am showing the open waist, I needed to add new bulkhead extensions at the ends of the forward and rear bulwarks, which do not line up with existing bulkheads. I marked these out on the tops of the gun port framing, as these will be the bases for these extensions, which will also be glued to the back of the spar deck waterway. I then needed to make the extensions, but they are not shown on the plans directly, but they are indirectly in the shapes of the bulkheads. I found the sheet that contained the bulkheads closest to these new locations and used them to trace the shape of these extension pieces onto some basswood strips, then cut/sanded them to shape. I used the cut out to test the shape. I glued these in place, using a batten to hold at the right position to the rest of the extensions. I then did some fairing of these and the neighboring extensions. I made all four of these but so far have only added them to the starboard side. These will be used for ends of the bulwark planking and will also support the trail boards. I then added the plank sheer pieces between the bulkhead extensions which will be the bottoms of the spar deck gun ports. These have not been sanded flush with the bulkheads yet. I did not have to add these between bulkheads that will not have gun ports. I am glad there were not any gun ports at the bow because there the plank sheer needs to curve. It would have been very difficult to match the curves in these between pieces and the inner plank sheer pieces. Once these bottom frames are ready, I will add the sides of the gun ports. The tops will be the main rail when that is put on. I will have to add horizontal support pieces next to the gun ports to support the vertical gun port sides, but these will be planked over when I plank the bulwarks.


- 1,354 replies
-
- 6
-
-
- constitution
- model shipways
- (and 1 more)
-
How intriguing. I can't wait to see what you have in mind.
-
I went pretty close to the line on the template, then finished it up after it was glued to the hull. I thought I had taken too much off, but it turned out the transom piece was a little too big, so I sanded that down to match. You just want to make sure you have a smooth transition between pieces, as if they are one piece.
-
Thanks Patrick. No progress to show here. Just got back from New Orleans to visit my daughter for our birthdays. Got to the NO Jazz Fest this weekend. What a great show. I would recommend to anyone to check it out if you are in the area around this time of year. I did have a lot of time to read while flying, so I got through most of A Most Fortunate Ship book and found out a bunch of things that will affect my build. First off, all that fussing with the anchor port/gun port on the gun deck will be for naught, as these were not cut in until September of 1812. I am going to just plank over those openings. The three gun ports in the transom were cut in in June 1813, so I don't think I will have any gun ports on the transom now. Finally the white strip did not go all the way around to the bow in 1812. I am still working on the starboard gun ports for the dummy cannons. Should have them done soon then on to the spar deck gun ports.
- 1,354 replies
-
- 1
-
-
- constitution
- model shipways
- (and 1 more)
-
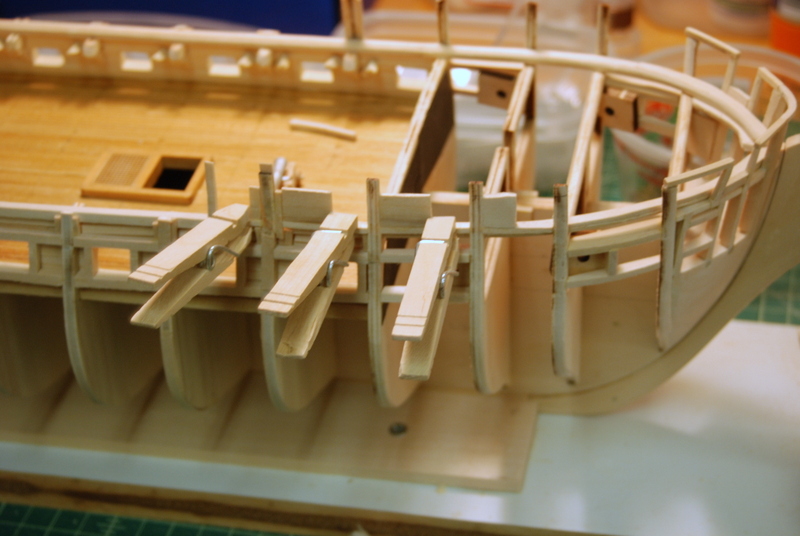
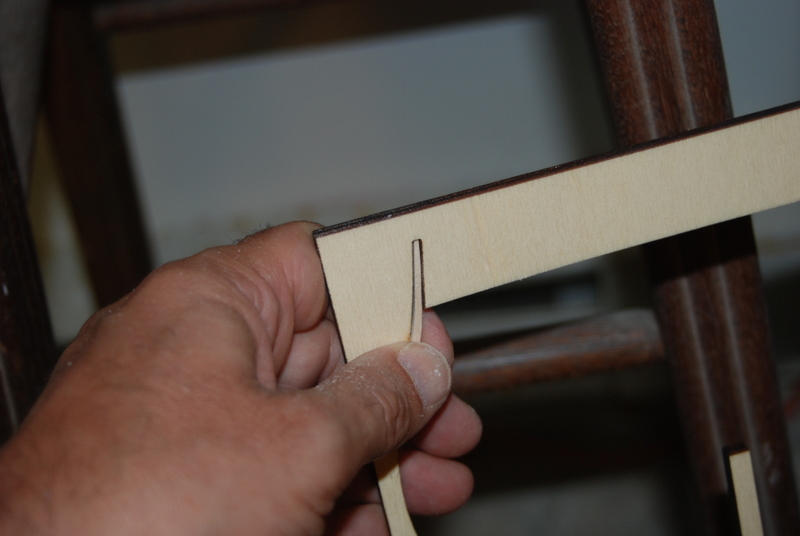
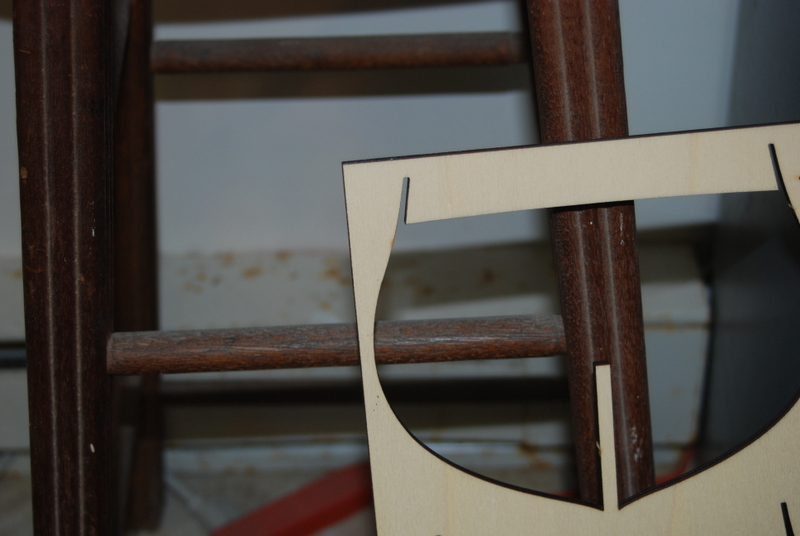
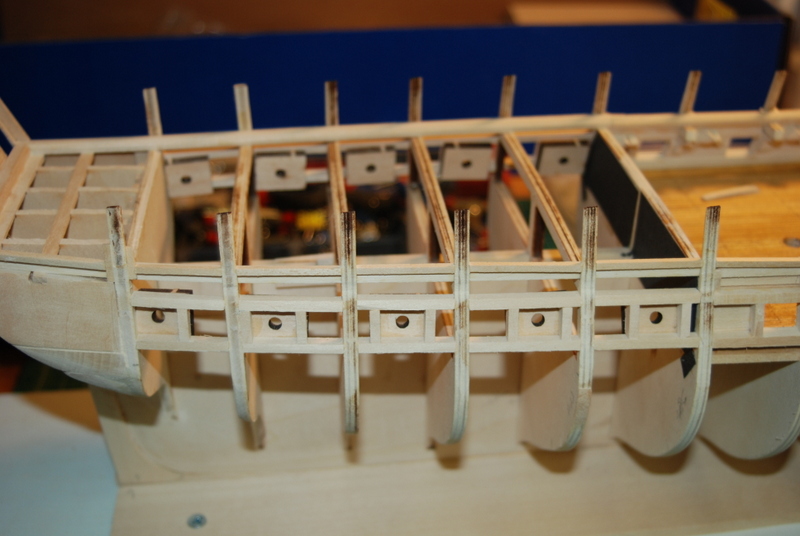
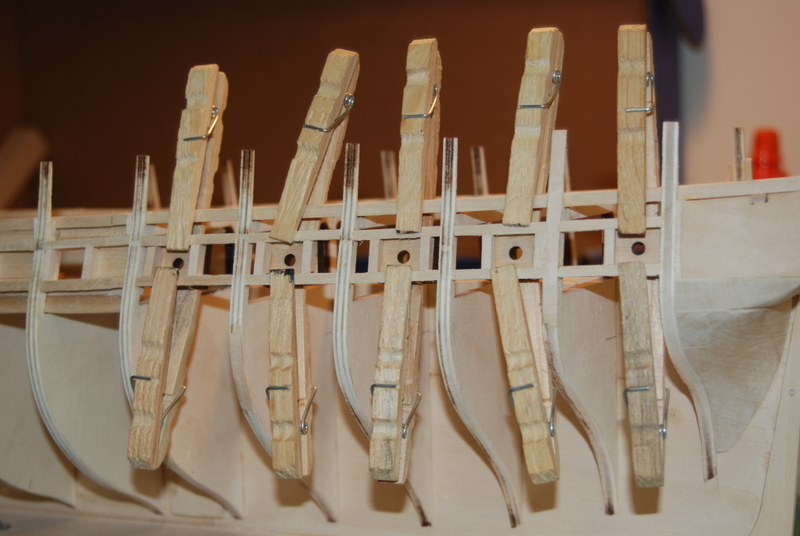
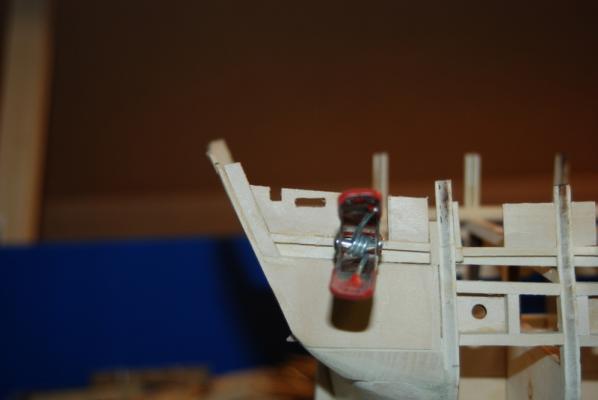
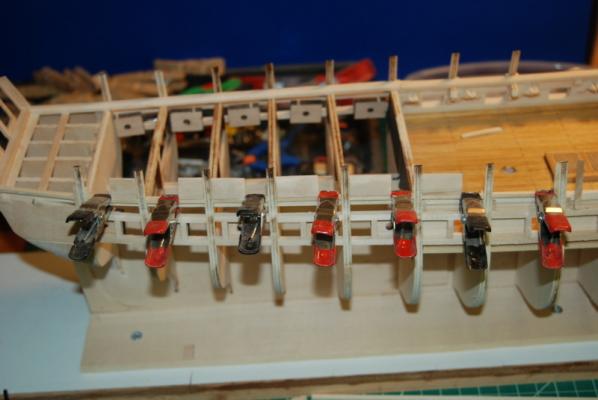
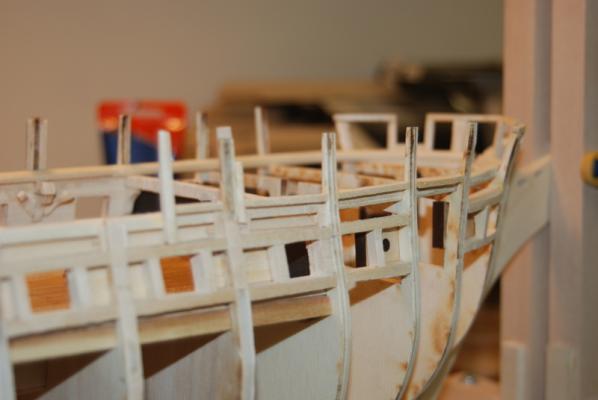
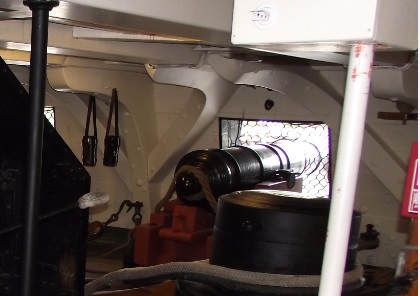
Thanks Al and Patrick. Yes, I have so many pictures already, more than any previous whole build. These will make a nice record of what's been done and what may be hidden. Still thinking about the gun carriage color, but I have lots of time to decide. In between framing I have put together 5 of the 16 gun carriages that I need for the gun deck, although these are still pretty rough. There are a lot of steps for creating each carriage and more later when they are rigged. I have been working on the dummy gun ports. These will have the dummy barrels in them with the gun port lids closed. The main concern here is to have the barrels exactly in the center of the ports and at the same angle as the real cannon barrels. I first made up the tops, bottom and sides of the ports, using different widths of 1/8" strips. I glued these in so that the rear edges of the tops and bottoms held the backs at the correct angles. Each gun port was just a bit different. I then sanded the front edges flush to the bulkheads, making sure that there was a slight curve between bulkheads to match the fairness of the hull. This is especially important near the bow, where there is a sharp curve between bulkheads. Here are the sanded frames with the backs being glued in place: And here is a simple tool I made up to center the backs. It is just a thin piece of wood that is the same shape as the gun ports glued to a piece of dowel that is the same diameter as the dummy gun barrels. The dowel fits snugly in the hole in the backs, so I inserted the tool into the gun port and slid the back piece on from inside the hull and pushed it tight to the frames, after applying some glue around the edges of the back pieces. I held it in place while I removed the tool and placed the two clothes pin clamps in place. Here are the three ports at the bow. The one in the middle was the tricky one that needed thick tops and bottom frames to get the curve of the bow into them. The first ones I put on were too thin so it made the frame too flat. I also had to trim the back piece at an angle to fit close to the bulkhead. The front gun port needed some work too. This was actually added weeks ago when I framed the bow area. Unfortunately, the plans either were not right or I misinterpreted them. First off, in the current configuration this is not a gun port but an anchor port, but in 1812 this was a gun port from what I have read. On the plans it says that this opening is the same shape as the other gun ports, which is how I should have built it, but from the shape shown in the detailed plans, this opening comes out square. Also, the top and bottom of this port were too low in the detailed plans, so it did not line up with the other ports. So, I removed the top and bottom pieces and glued them in at the right heights, then used a file to widen the sides to the correct width. I am thinking that I will have the gun port lids on this front port but no cannon barrel sticking out, mainly because there is no room behind it to get a back piece in and to hedge my bets on what type of port this is. I did add a thin piece of wood as a backing just to block any light from coming in from behind. Speaking of light, I got to looking closer at the ends of the gun deck and realized that some of the other bulkheads may be seen through the openings. I first thought to just paint them all black, but then came up with a simpler solution, which was to just close up the ends with some black construction paper. I think this will look better in the long run. These are all pictures of the port side gun port frames. I am still working on the starboard side frames.


- 1,354 replies
-
- 11
-
-
- constitution
- model shipways
- (and 1 more)
-
I need advice on a rotary tool
usedtosail replied to jdiven's topic in Modeling tools and Workshop Equipment
I have a Dremel and I bought a foot control that is just an on/off switch, so I use the speed control on the tool and the foot switch to start and stop. I don't think this set up will burn out the rheostat. -
I agree with the others - excellent build so far, Steve.
- 625 replies
-
- 1
-
-
- bounty launch
- model shipways
- (and 1 more)
-
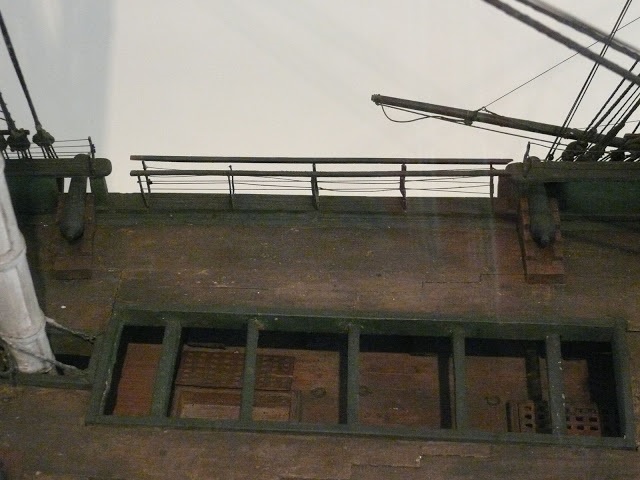
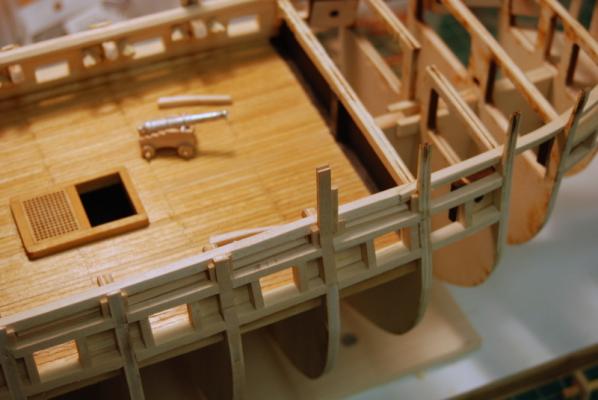
Thanks Patrick. I am hoping she has a good waist too. Speaking of waist, here is the picture of the Hull model that shows both the open main hatch and the open bulwarks at the waist. CaptainSteve - I like your idea but I think that is a bit too ambitious for me this build. Someday I would like to build a true plank of frame like Dan and EdT are doing, but not this one, even a small portion. The guns on the gun deck will be visible somewhat through the gun ports, and the deck itself and bits near the centerline through the open hatch, like the picture above shows. That is, if I leave the ships boat off the hatch, which I may just do. I had thought about making the boat removable, but this beast is going to be inside a very large case which I will not be opening and closing. Someday, I would also like to make a model with an exploded deck view. I have seen some pictures of models with their spar decks suspended in the air on supports so you can see inside the gun deck. I think it is a cool way to display those details, so I may try my hand at that in a future build. Always have to leave something different to try in the future, right?

- 1,354 replies
-
- 2
-
-
- constitution
- model shipways
- (and 1 more)
-
Sherry, I just caught up with your log. What a gorgeous ship you are building. And your carving skills are out of this world. One question - what did you use for the gold paint? It looks fantastic. Thanks.
-
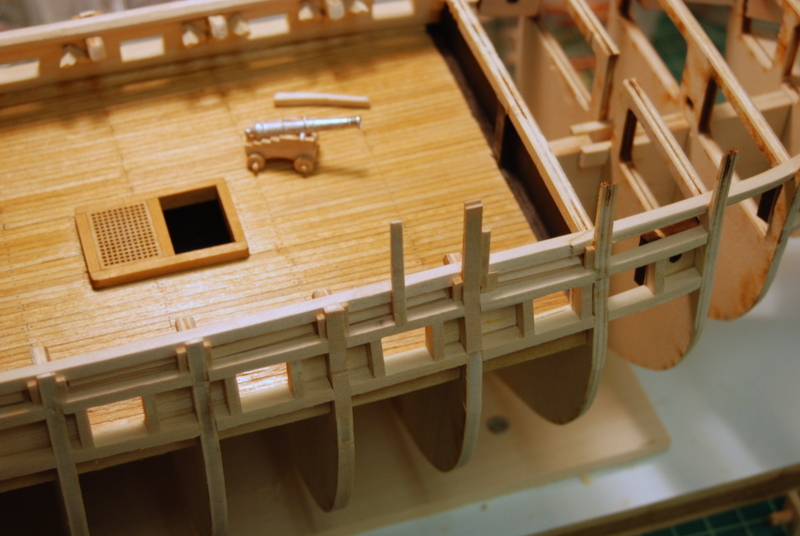
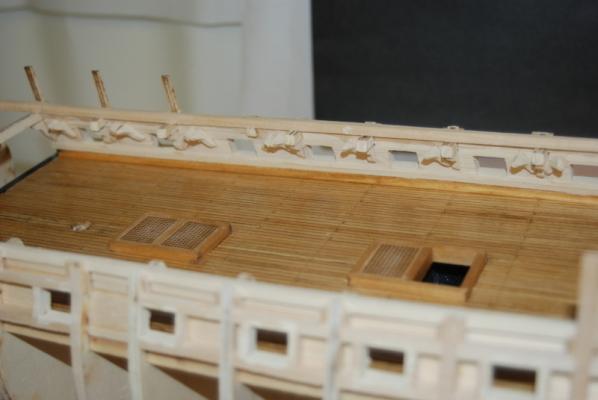
Augie - Thanks for looking in. Your Confederacy is a really beautiful build. Geoff - I don't know about that. I am just trying to add a little more detail than some. Your Constitution build is a real inspiration for me and was one of the reason I decided to build it. It is fantastic. Tim - thanks and I hope it comes out the way I envision it. A problem I always seem to have is keeping something I had already done from getting messed up by further steps. I am hoping that doesn't happen when I add the rest of the details to the gun deck. A small update. I installed all of the knees on the gun deck walls, with vertical knees under the beam ends and diagonal knees in between. They look a little funny without the carlings in place, but once the spar deck is planked the tops of these knees won't be visible. I put some masking tape on the deck to protect it while gluing up the inside planks and the knees, and I managed not to get any glue on the deck (so far). When I removed the masking tape, some stain was lifted from some of the planks, but I was able to restain them and blend it into the rest of them. I painted the inside walls, knees, and inside the gun ports with an off white that I mixed up. I also managed not to get paint on the waterways or deck, at least not any that I was not able to wipe off before it dried. It really helped to paint that bottom plank before installing it. I also gave the deck, hatch coamings and gratings and waterway a coat of Tung oil. I know this may interfere with gluing details to the deck later, like guns, but I plan to pin all those down so they don't come loose later. I will also scrape the glue areas before gluing. Here is how the gun deck looks so far: I have been making up gun carriages as I wait for other things to dry. I have no idea what color these carriages should be. The carriages on the current ship are a pinkish-red, but I don't think that would have been the case in 1812. They could have been red like the British ships of the time, black, brown, yellow even, but I really don't know. I am open for suggestions from all you Connie experts out there. Thanks so much.
- 1,354 replies
-
- 10
-
-
- constitution
- model shipways
- (and 1 more)
-
Just caught up with your log, Auggie. What a fantastic job you have done.
-
Looks good Mundie.
-
Thanks Patrick, Tim and dragzz. Tim - Thanks for the information. I made most of the diagonal knees the same size as the vertical knees. I did make three on each side a little longer for a longer span between gun ports. I was not able to get them to meet above the gun ports as they would have been really long, so I fit them so they looked OK to me. I have some pictures of them installed soon.
-
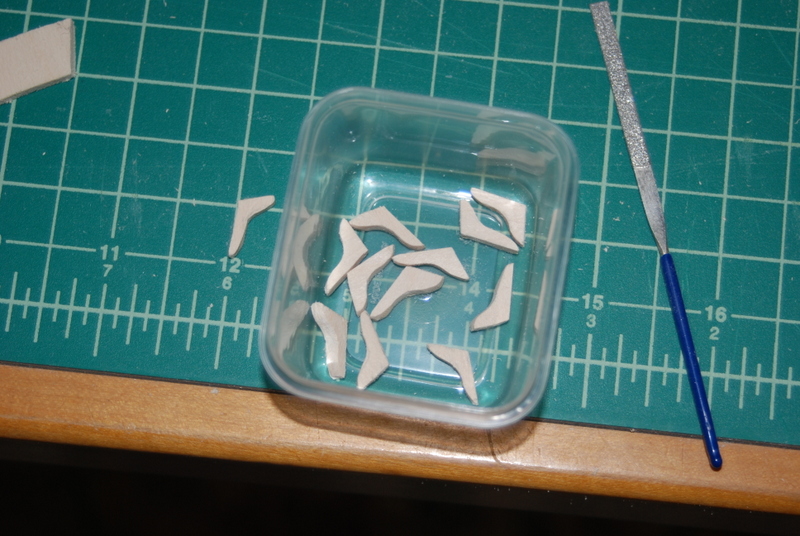
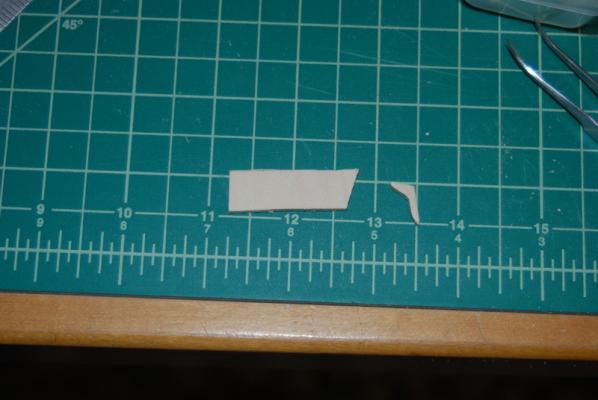
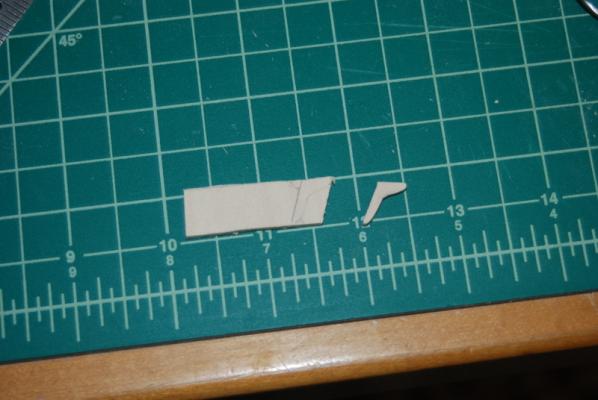
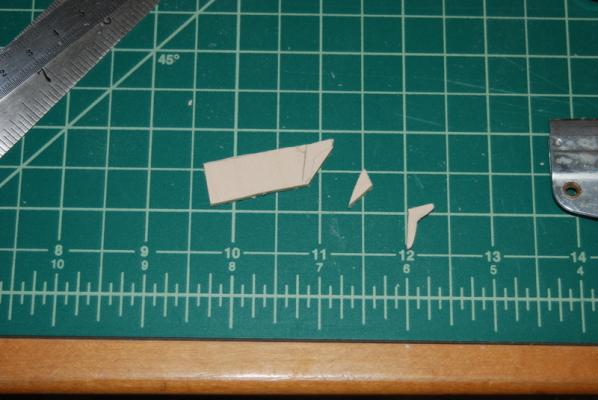
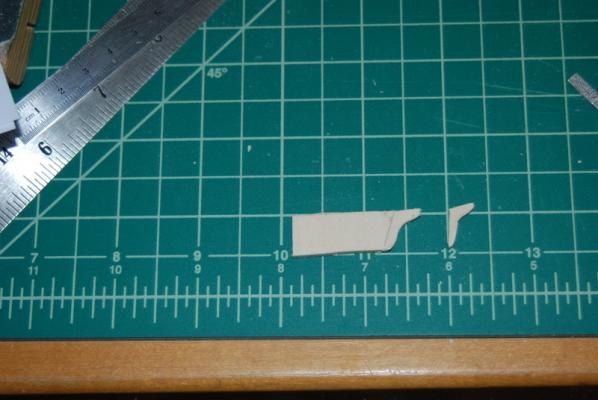
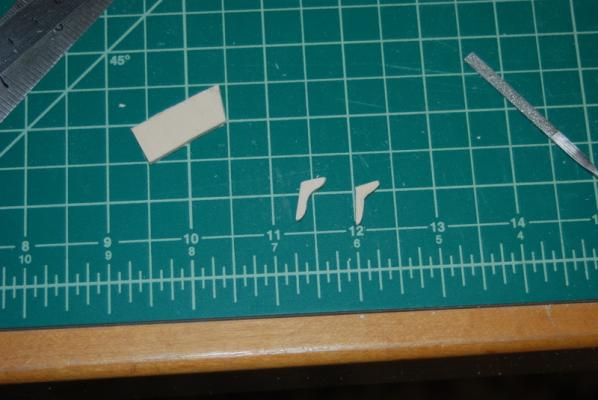
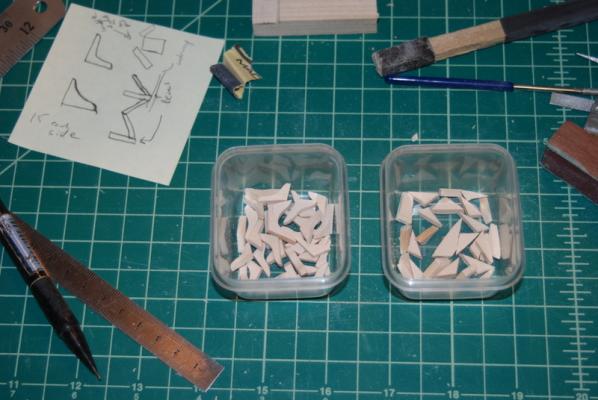
Thanks Patrick. I am happy with that solution, since they will be painted anyway. If I ever try to build a model in all natural wood someday, i will be in real trouble. I am going to add the vertical and diagonal knees to the gun deck walls. I am not sure if these were in the 1812 version, but here is what they look like on the current ship. There is a vertical knee under each beam and the diagonal knees meet between the beams, probably at a carling (if that is the right term). Since I won't have any carlings, I will just have them end under the spar deck planking. I made one from some 1/8" basswood sheet to use as a template for the rest: I made this template a little thinner than the knee I wanted, because I have found in the past that once I trace it, it gets fatter in the end, so by starting smaller, it should come out close to the right size. I used the template to trace the shape onto some basswood sheet that I cut close to the correct height. I traced these so the curved edge was always on the short side of the blank, so I could use the blank as a handle when sanding it. I cut off the excess with a razor knife, which left a nice triangular piece that I put aside to use to make the quoins for the gun deck cannons. I then used a Dremel sanding disk in the drill press to sand in the curves: I cleaned up the knee with small files and some sand paper. Then cut it away from the blank with the razor knife: I got into a good rhythm and was able to crank each one out about every couple of minutes, so it took less time than I thought it would. And here is how it will look as a vertical knee: The trick is getting them all to look similar, so here are the first 10 or so and I think they do look similar: And here are 33 of them, which is getting closer to the number I need, but not there yet. And the triangular waste pieces too. Tonight I will figure out exactly how many I need and finish making them, then start attaching them.


- 1,354 replies
-
- 10
-
-
- constitution
- model shipways
- (and 1 more)
-
Nice fix for the galleries. She is looking great.
- 1,756 replies
-
- 1
-
-
- constitution
- constructo
- (and 1 more)
-
Nice tutorial on distressing those planks. I will have to try that sometime. Thanks.
- 625 replies
-
- 1
-
-
- bounty launch
- model shipways
- (and 1 more)
-
That's a good idea. I plan to leave the main hatch will be open without any gratings, but a boat will be placed on top of the beams. I could make the boat removable though. I'll have to think on that one.
- 1,354 replies
-
- 1
-
-
- constitution
- model shipways
- (and 1 more)
-
It may be flea surgery, but you seem to have mastered it. That rudder and hardware look great.
- 1,756 replies
-
- 1
-
-
- constitution
- constructo
- (and 1 more)