


popeye2sea
-
Posts
1,934 -
Joined
-
Last visited
Content Type
Profiles
Forums
Gallery
Events
Posts posted by popeye2sea
-
-
-
-
-
-
-
Studding sail booms were not always mounted forward of and above their respective yards. Some were mounted as you suggest and others were mounted above and behind the yard. In the mid 17th century the Dutch and the French tended to carry their stuns'l booms abaft the yard where the English carried them before the yard. The boom irons also changed around the beginning of the 18th century.
The proportion of the length of the yardarms also got larger when reefs started to be taken in the the sails. The longer yard arms allowed a better lead for reef tackles.
Since the Prince de Neufchatel, I believe dates to 1812. She probably carried her stuns'l booms above and before the yard.
-

I might add that the way the 'foot of the topsail is spread' is by having the sheet of the topsail go through a sheave in the mizzen cro'jack yard and then back to the mizzen mast. The same as all other sheets for square sails above.
In addition, having a course sail on the mizzen interferes with the spanker sail and spoils the wind going around the spanker when on a reach. I think that is more of a problem than stealing the wind from the main course. But I may be wrong, Henry.
You are probably right on that account
-
I think there are a couple of reasons. The first goes back to when the lower sail on the mizzen was a lateen sail. It acted more like a fore and aft sail and the lower forward part extended before the mast. The lowest square sail on the mizzen was then the topmast. Tradition then just carries on from there.
The second reason is that the gap between the main and mizzen is often smaller than that between the fore and main. A full square sail for the mizzen course would 'steal the wind' or blanket the wind from the main course. It would not add that much driving force. The sails of the main and mizzen are considered after sails and balance the effort of the forward sails which are the foremast and jib sails.
-
I believe I am druxey. I'm following the diagram in Peterson's rigging book. But then again, I could be doing it perfectly; just backward. I will give that a closer look. If you picture the two deadeyes as facing you (like little smiley faces) and you are looking at their outboard face, I have the triangle of holes opposite each other -- the upper deadeye's top hole being up and the channel deadeye's being at the bottom. So there is the maximum distance between these holes. And the other two holes then line up straight up and down to their counterpart hole on the other channel.
Looking at it this way, I've started with a stopper knot on the inside of the upper deadeye's left hand hole, run the lanyard through it and through the lower deadeye's left hand hole from inside to out. Then I've strung to the outside of the upper deadeye's center hole, back down to the lower center hole (coming in from the inside and out on the outside), then back up to the upper right hand hole (outside to in) and finally back to the lower right coming from inside to outside. The rest of the lanyard is then strung back up and threaded through the stropping of the top deadeye, wrapped around the shroud two or three times and tied off.
Like I said, I'm following Peterson's diagram but maybe its the inside outside sequence or the left to right sequence that is causing the twist cause maybe that's not in opposition to the lay of the shroud. Or, as I've just realized while writing this, perhaps it comes down to which side of the boat you're looking at (or rigging). What I've described here was facing the starboard side, with forward being on my right hand and aft being to the left. So if I start by stringing the left hand holes first and finish with the right hand holes, I'm stringing aft most first and working the lanyard forward. But if I do the same thing on port side, still starting with the left hand holes and finishing to my right, then I'm really stringing the lanyards different from the starboard side -- on port side this would mean I'm starting with the forward most holes and ending with the aft most holes. Since the shroud's lay is the same whether port or starboard, this could mean something. Or maybe it means nothing?

BTW, we talk a lot of the 'lay' of the rope (or thread) and I know its either right hand or left hand lay. But how do you tell one from the other? If you look at the rope it has lay lines running from the upper right to the lower left. Is this right hand or left hand lay? If you twist this same rope counter clockwise, it will open the strands. If you twist it clockwise it tightens it. Does this mean its right or left hand lay. Is the vast majority of rope and thread now right hand lay?
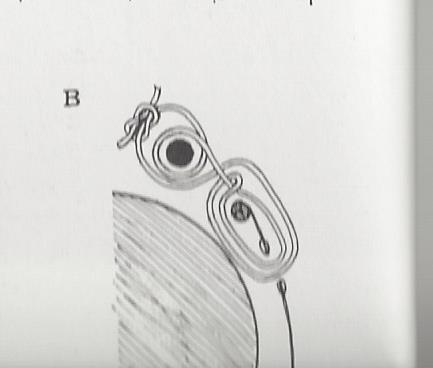
One thing I noticed about your method, and it shows in your picture below, is that you seem to cross over the laniard from inside to outside. When you reeve the laniard you should always be passing from inboard out on the upper deadeye and from outboard in on the lower. The laniard should not be crossing from inboard to outboard between the deadeyes. That could be introducing some twist also.
-
Interesting side note: there were two hammocks for each pair of hooks. Every crewman had his own hammock but there were two men assigned to each "space". So when one man got up he unhooked one side of his hammock to hang "folded" from a single hook while the man coming off watch "unfolded" his into the same spot.
Hope that makes sense. Hard to describe, easier to show.
Regards,
-
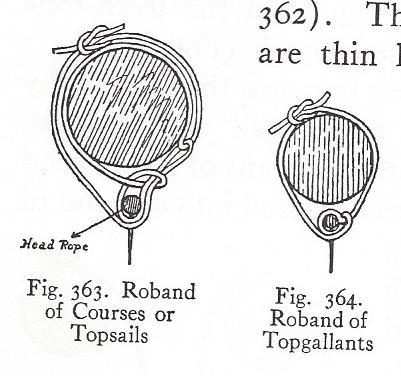
I am sorry to derail this thread but can anyone tell me how to thread the sails to the yards? Thank you.
Sails are attached (bent) to the yards by robands. Depending on the era of the ship they were either bent to the yards directly or to a jackstay above the yard. There were usually two robands per sail cloth, sometimes both placed between the seams, and somtimes, one on the seam and one halfway between. The photos below show the two methods.
-
1812 Marines musket drill
It's kind of a sloppy drill. We were loading musket balls and they were supplied to us separate from the cartridge so some of us had to pull the musket ball out from pockets or where ever we could stash them while firing. Normally the ball is enclosed with the powder in a paper cartridge and the drill is much smoother with everyone in unison.
-
I think, that the barrels that Heller supplies are meant to be for that - even if they are way too small ...
I agree. The halyard tubs that are supplied with the kit are useless for the lengths of halyard involved here. I am going to have to come up with a way to lash the halyard up in a coil against the mast
Regards,
-
The information that I have shows that the main yard tye should be the same thickness as the shrouds and the halyard 3/4 of the tye, so it is a pretty big rope. Everyone is saying the line looks too thick, perhaps I have miscalculated the size?
Main stay circumference = 1/2 the diameter of the main mast; mast diameter 0.43" / 2 = 0.215 0.215/3.14 = 0.068" dia.
Main shrouds = 1/2 main stay ; .068/2 = .03"
Main yard tye = 0.03" (0.76mm)
Halyard = 0.02" (0.5mm)
Scaled up that gives a 2" diameter rope. Still workable by hand.
Please correct me now before I start rigging this whole thing incorrectly.
Regards,
-
Where is this block used and/or what is its purpose? I have not heard of a triple sister block, and the description of a four legged stanchion for it is puzzling me.
-
Still doing musket drills and demonstrations in the Navy yard. The ships upper deck is open to the public. I have the added benefit of getting into the dry dock every once in a while to check whats going on with the refit.
Not much going on with my build at the moment. That pesky employment thing keeps getting in the way.
Regards,
-
-
There may be a false stay set up beneath the stay. It would have an eye spliced in to its upper end that would be seized to the stay just below the mouse. The lower end could be set up with deadeyes or blocks just inboard of the stay on the bow sprit, or below the stay on the foremast.
Regards
-
-
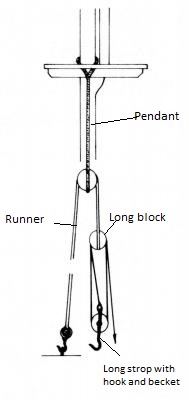
The description is exactly what you see in the last diagram. A long block is much like a sister block. It looks like two single blocks end to end. In some versions the upper sheave is larger than the lower to give some clearance between the parts of the fall.
A long stropped single block simply means that the strop is longer than you would find on a regular block. It is what you see for the lower block of the tackle in the last diagram. One end of the strop holds the thimble with the hook, the other end is the becket loop where the tackle fall is bent on.
Hope that makes a little more sense.
-
-
I can't find any reference to a score block.
-
That ship is the indicator loop cable layer USCG Pequot (ex army minelayer General Samuel M. Mills). Built in 1909 and transferred to the Coast Guard in 1922. She was transferred to the Navy and stationed in Boston during WW II. She was decommissioned in Boston in 1946 and sold for scrap in 1947.
Indicator loop cables were laid on the ocean floor to detect submarines.
Regards,
Henry
-
Someone may offer corrections on this because I am not as familiar with fore and aft rigs, but I believe your answer is both were used. There has to be a means of hoisting the yard up into place. That is the halyard, whether it be rigged as a tye or jeers. Once the yard was hoisted to its proper height the slings were passed. Often the jeers were slacked off slightly so that the yard hung mostly by the slings. This relieved the strain on the tackles. Since this yard is not often struck or shifted the sling is semi-permanent and set up with lashings. The slings had the added benefit of holding up the yard if the halyard was shot away in battle.
Regards,


Le Soleil Royal by popeye2sea - Heller - PLASTIC - 1:100
in - Kit build logs for subjects built from 1501 - 1750
Posted
The madness continues...
Working on getting the lower sail rigging set properly before the fo'c'sle is set into place. The lines involved are the main sheet, main tack, fore sheet, and sprit sail sheet. The basic idea I am following is to get the proper working length of line coiled on to the kevels so that the sail can be set or furled and the yards braced around as needed. So looking at the rigging plan uncovers some problems.
The standing part of the main brace is made fast at the flag staff and the working end leads through a block on and eyebolt well aft then inboard over the rail to a belaying pin. Meanwhile an unused kevel is on the round house deck just forward of the poop deck (kevels are designed to carry heavier lines like braces).
This lead is completely wrong. No brace would ever be fixed to the flag staff.
My fix: The standing part of the brace will be seized to the eyebolt that formerly held its leading block. A new fairlead hole will be drilled through the side close by the un-used kevel on the round house deck and the main brace will belay on the kevel.
The plan has the main tack and the sprit sail sheet leading through the same fairlead hole and belaying on the same kevel. There is not enough space in the fairlead or on the kevel for both lines.
My fix: drill a new fairlead hole for the sprit sail sheet directly below the fairlead for the fore sheet. The sprit sail sheet will belay either on the same kevel as the fore sheet or on the kevel just forward of that. The only problem is (and this is probably the reason Heller did it that way) the forward kevel is well under the fo'c'sle deck and nearly inaccessible after the deck is placed. So I have to make the decision where to belay this line now.
Not shown on the photo above: The fore tacks both lead through a single hole on the stem below the figurehead. I will drill an additional hole so that each tack has its own fairlead hole.
While we are on the subject of the tack lines. For this ship the tacks run single and the end of the line was terminated in a tack knot which was put through the strops of the sheet and clew garnet blocks at the clew of the sail. The knot was actually a double wall and crown knot. Below is my attempt at the tack knots for the main sail. The knot is tied and set up so that the ends lead down through the knot then they are tapered, marled down, and served over. The line is 1.0 mm morope.
Until next time...
Laissez le bon temps rouler!