
MORE HANDBOOKS ARE ON THEIR WAY! We will let you know when they get here.
×
.JPG.ca33079f5815b861e67b9c2cccd37982.JPG)

Blue Ensign
-
Posts
4,564 -
Joined
-
Last visited
Content Type
Profiles
Forums
Gallery
Events
Everything posted by Blue Ensign
-
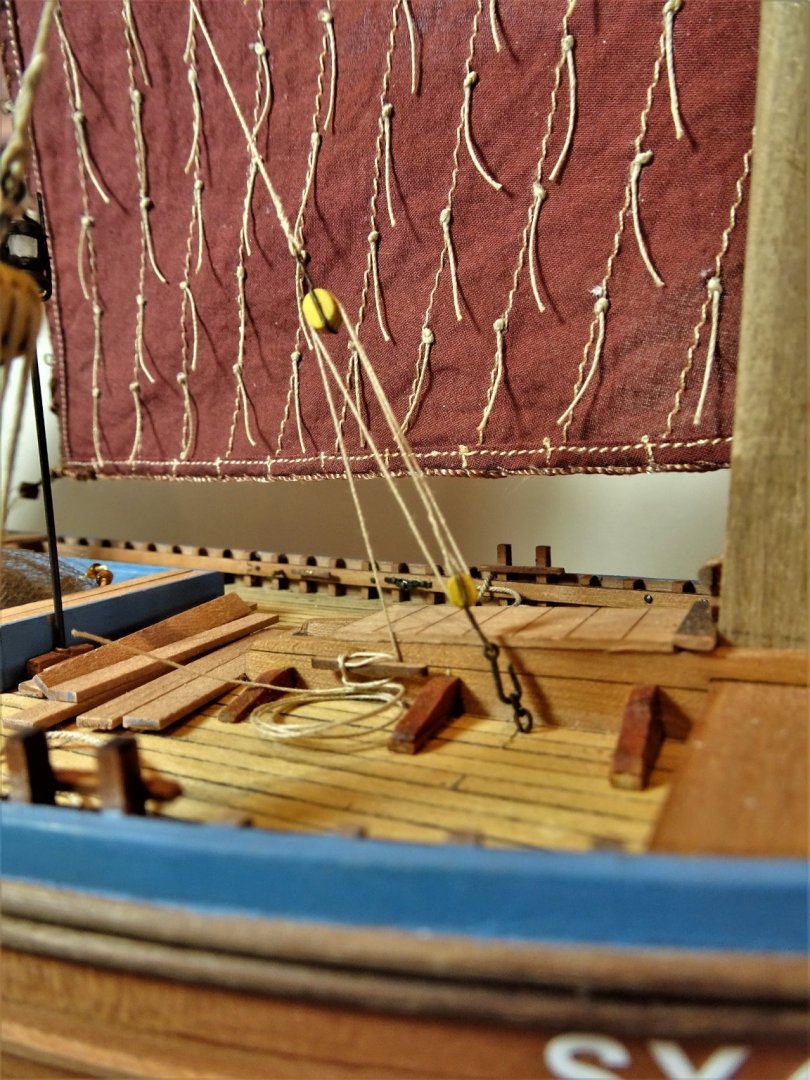
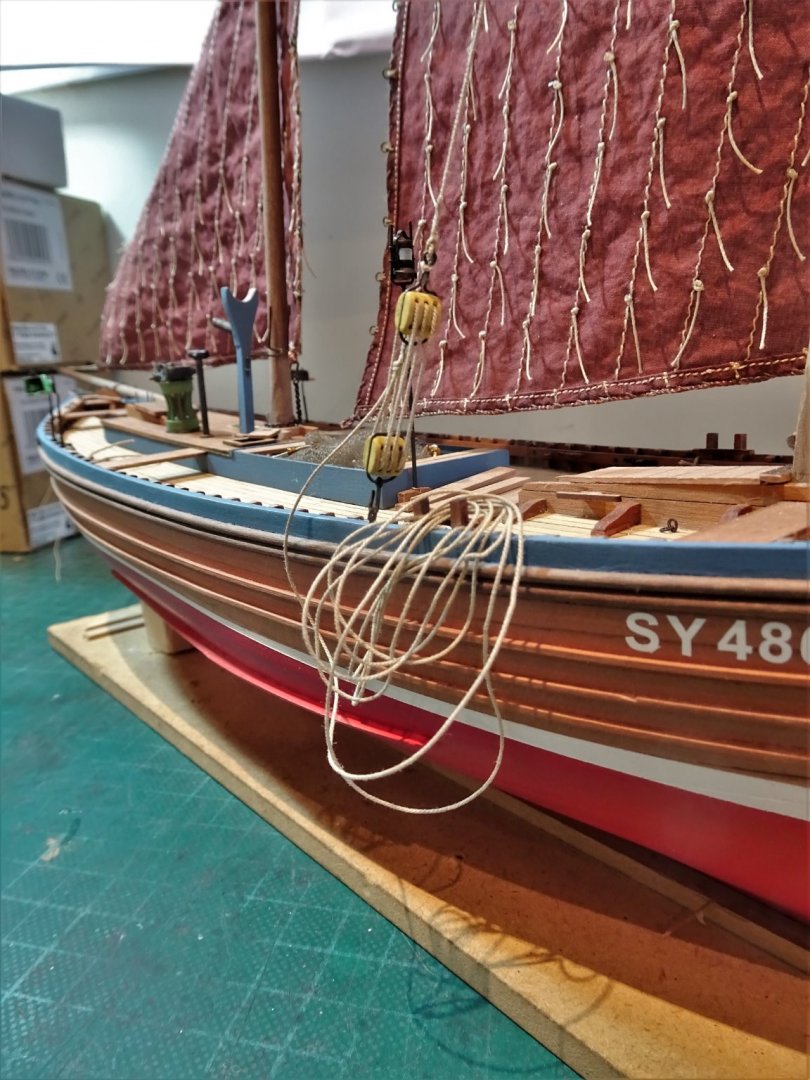
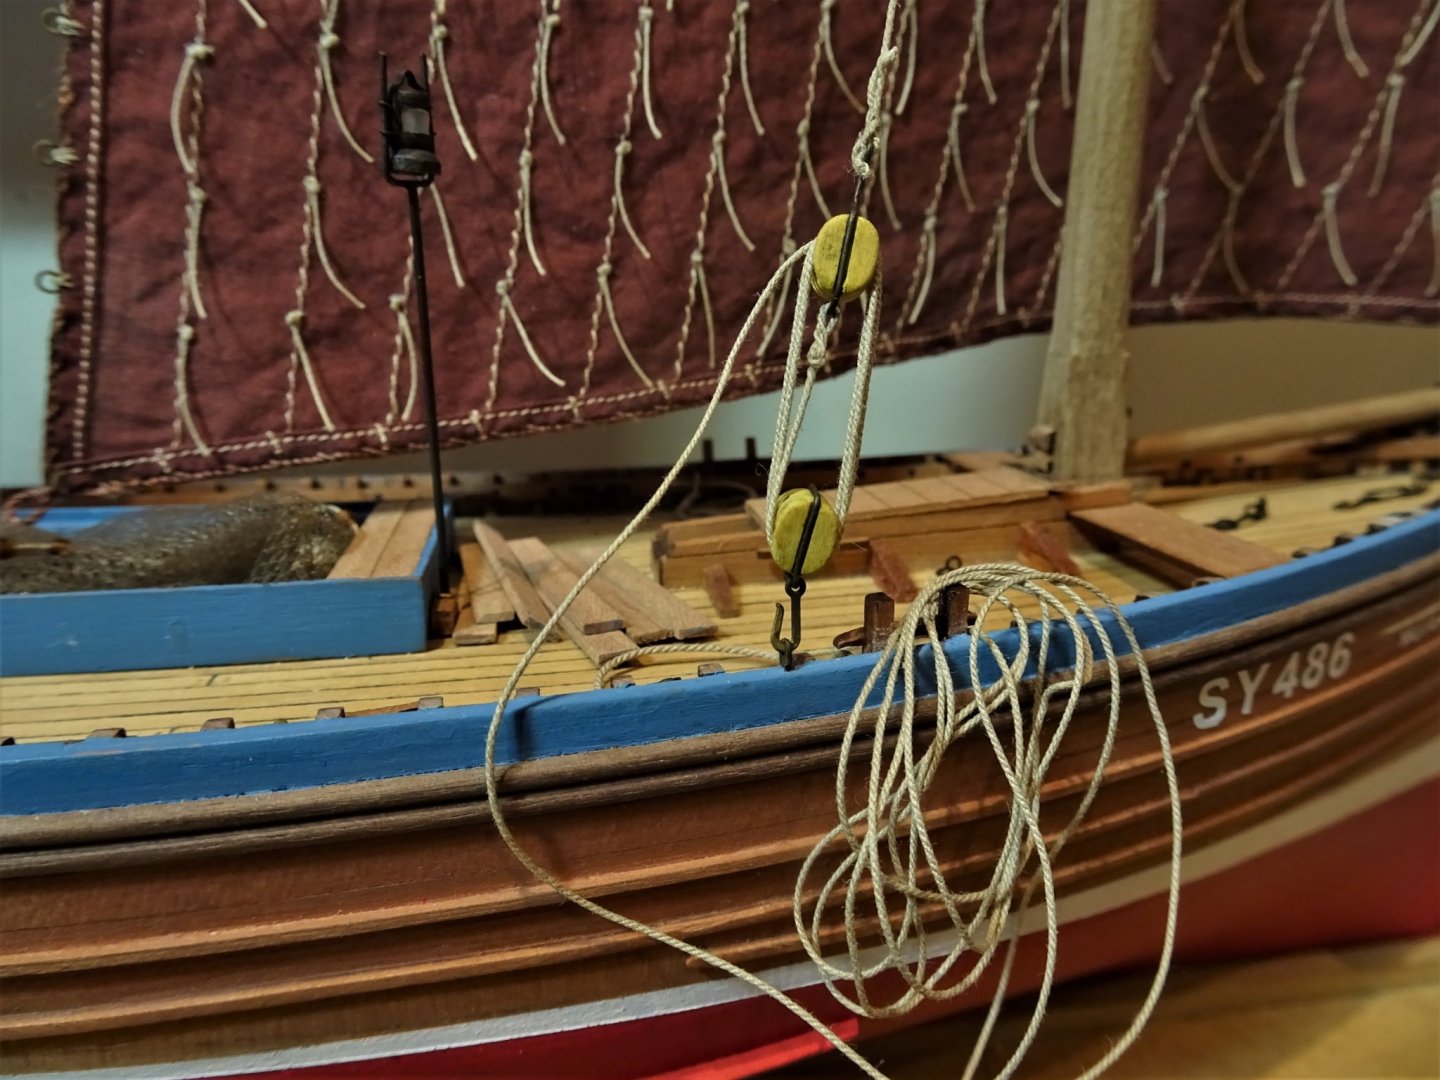
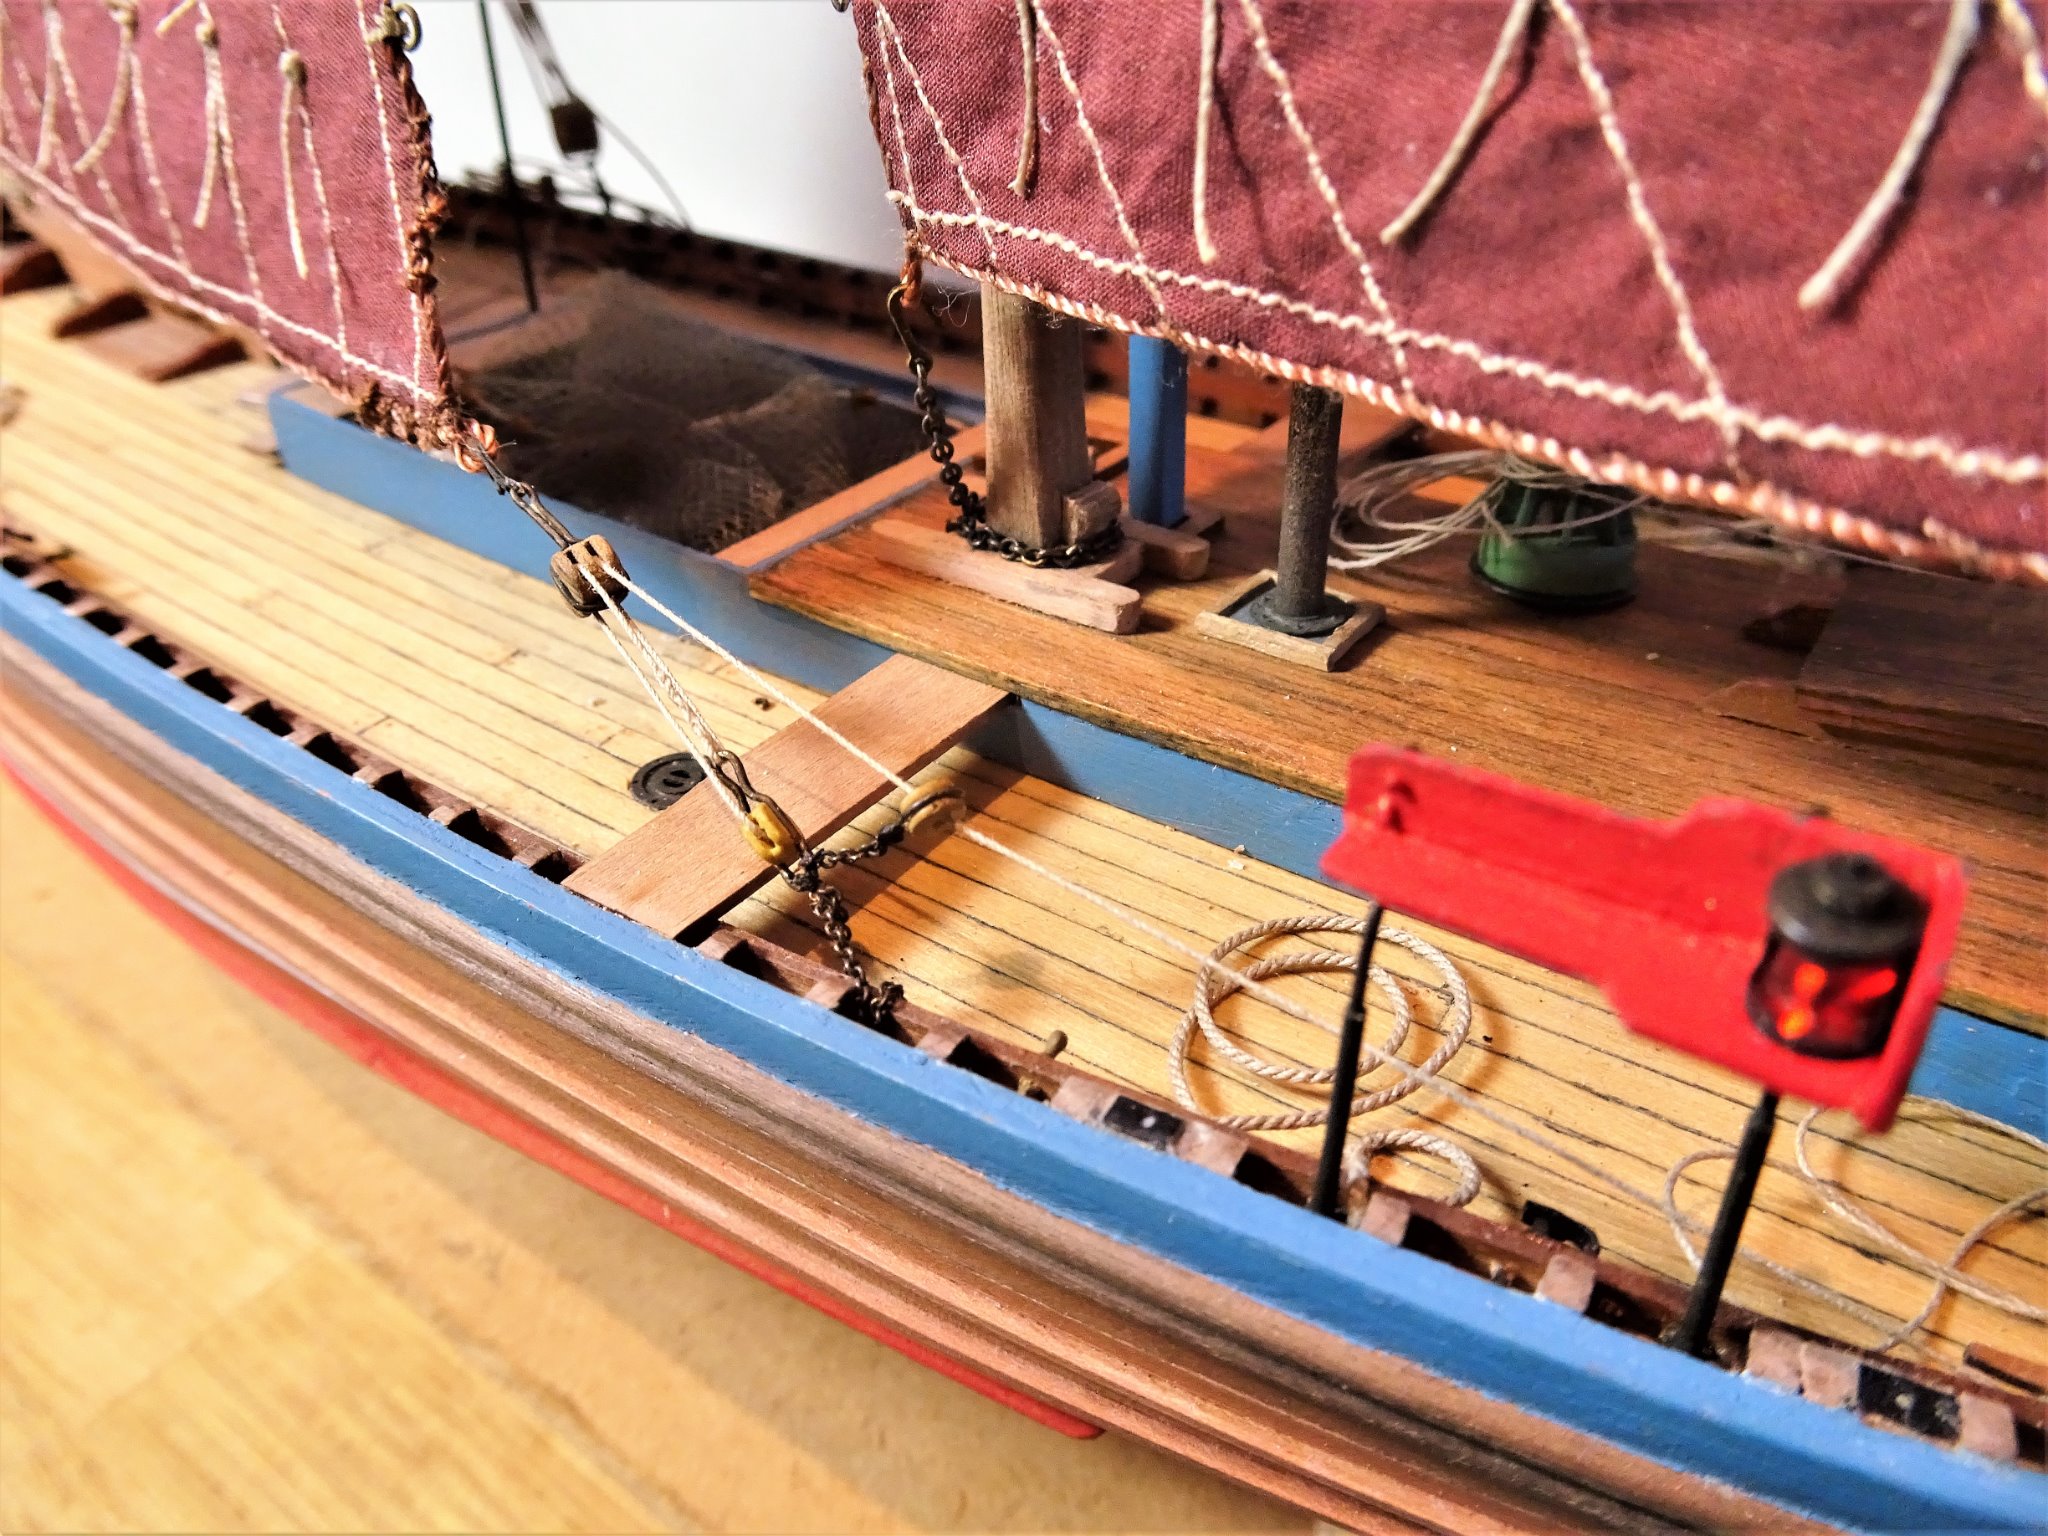
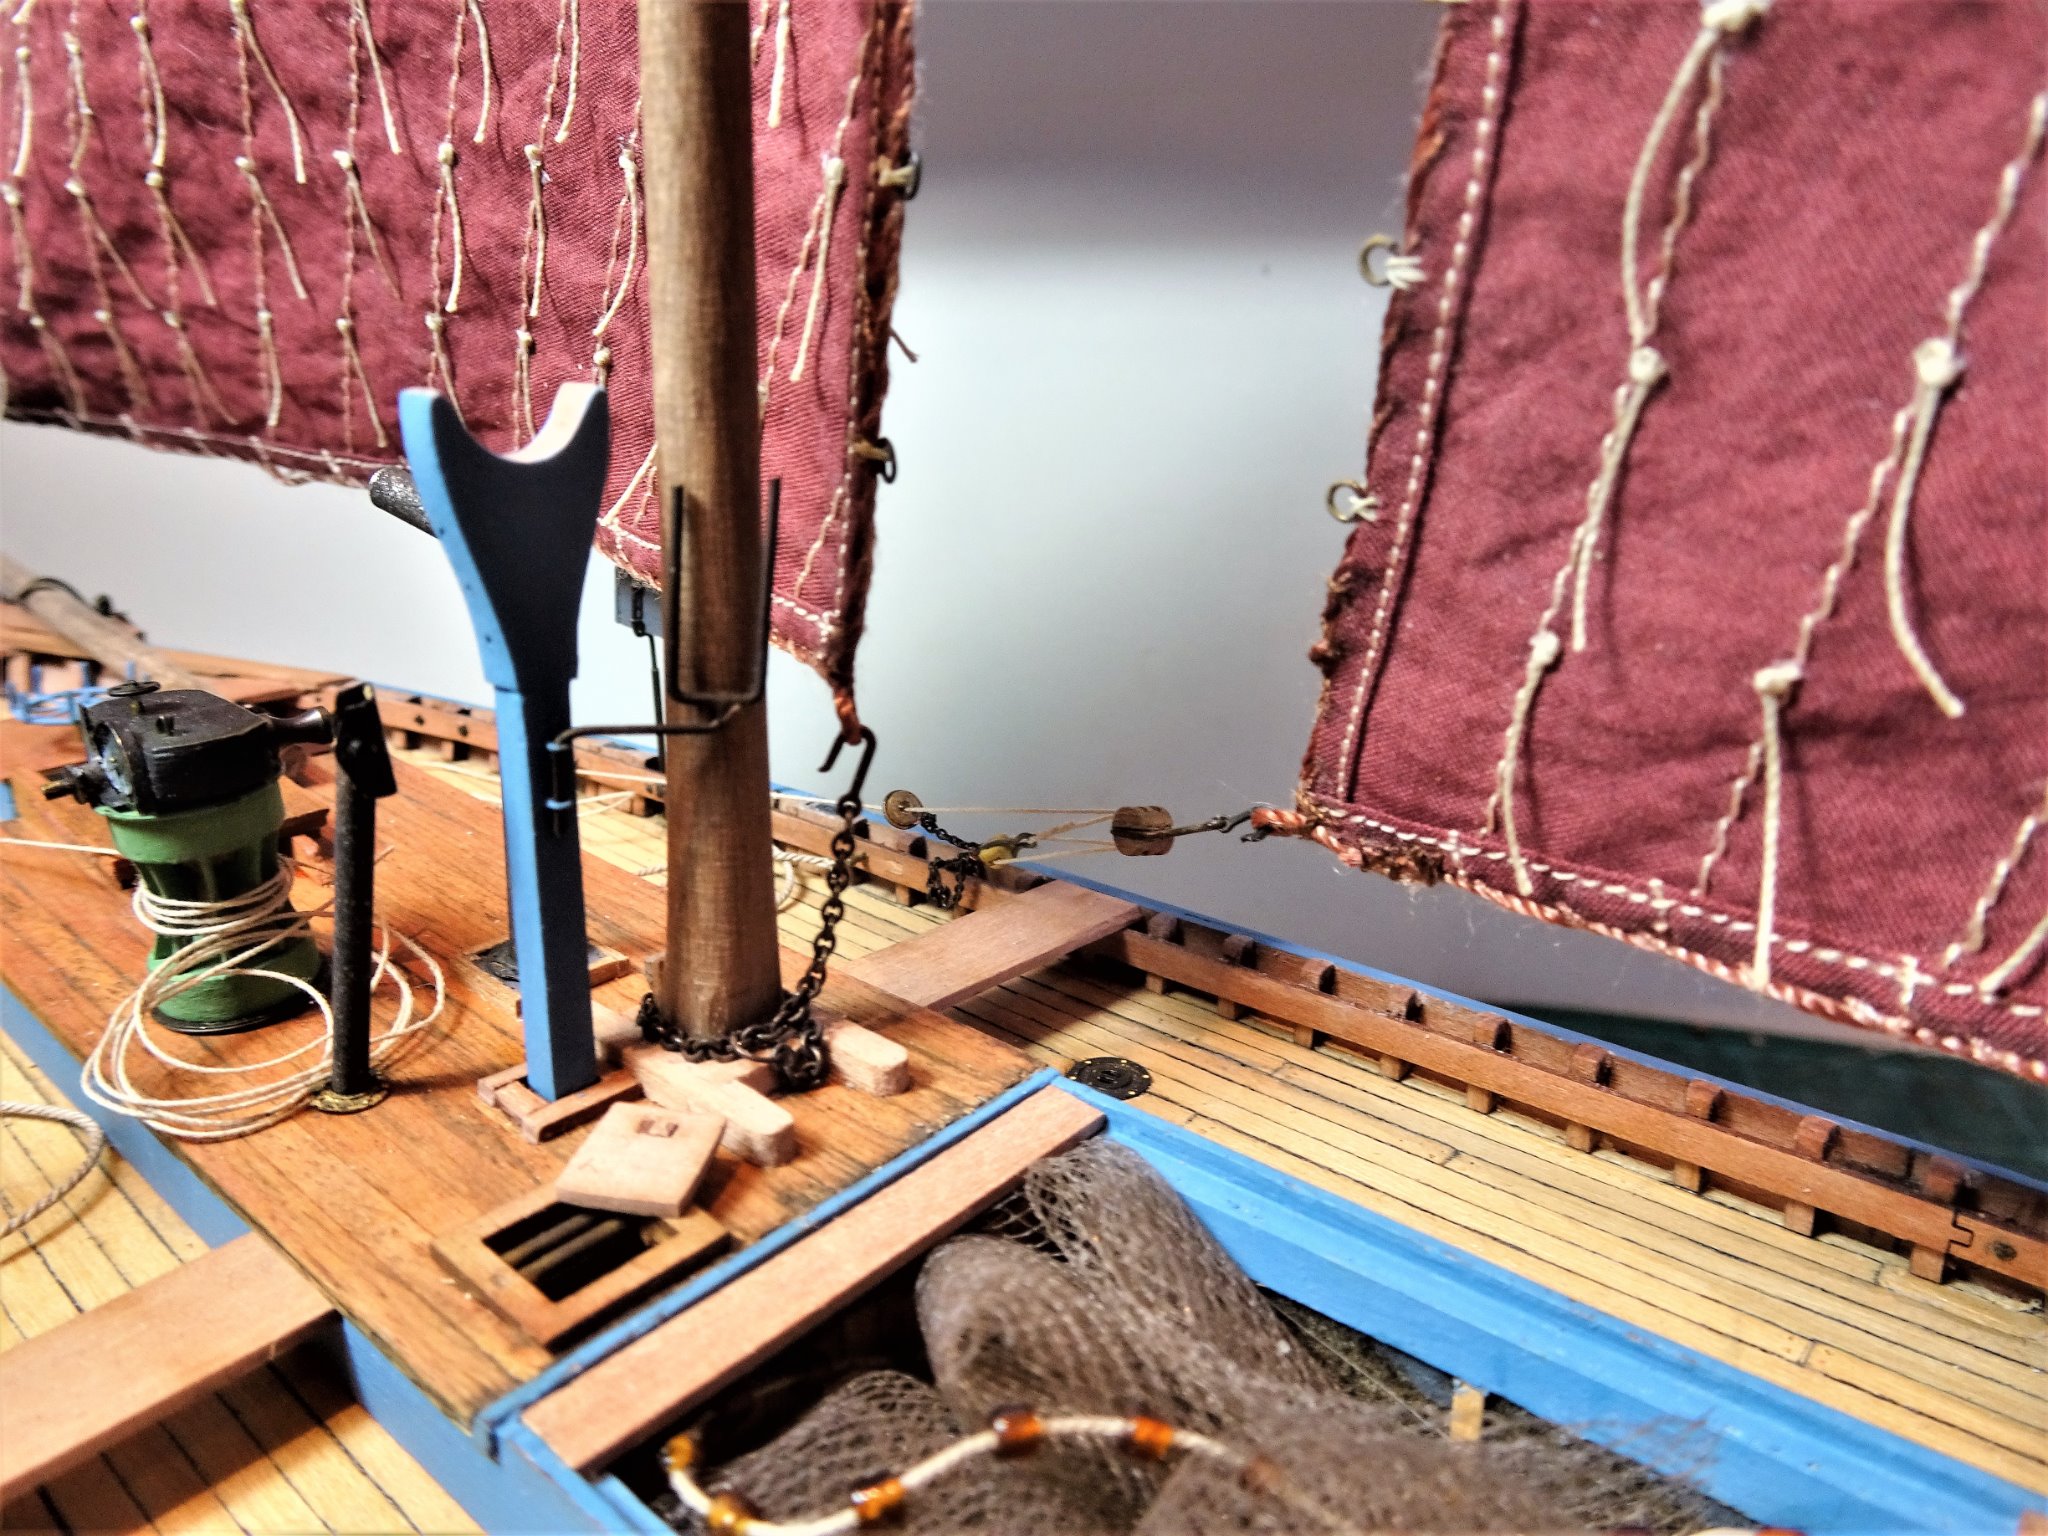
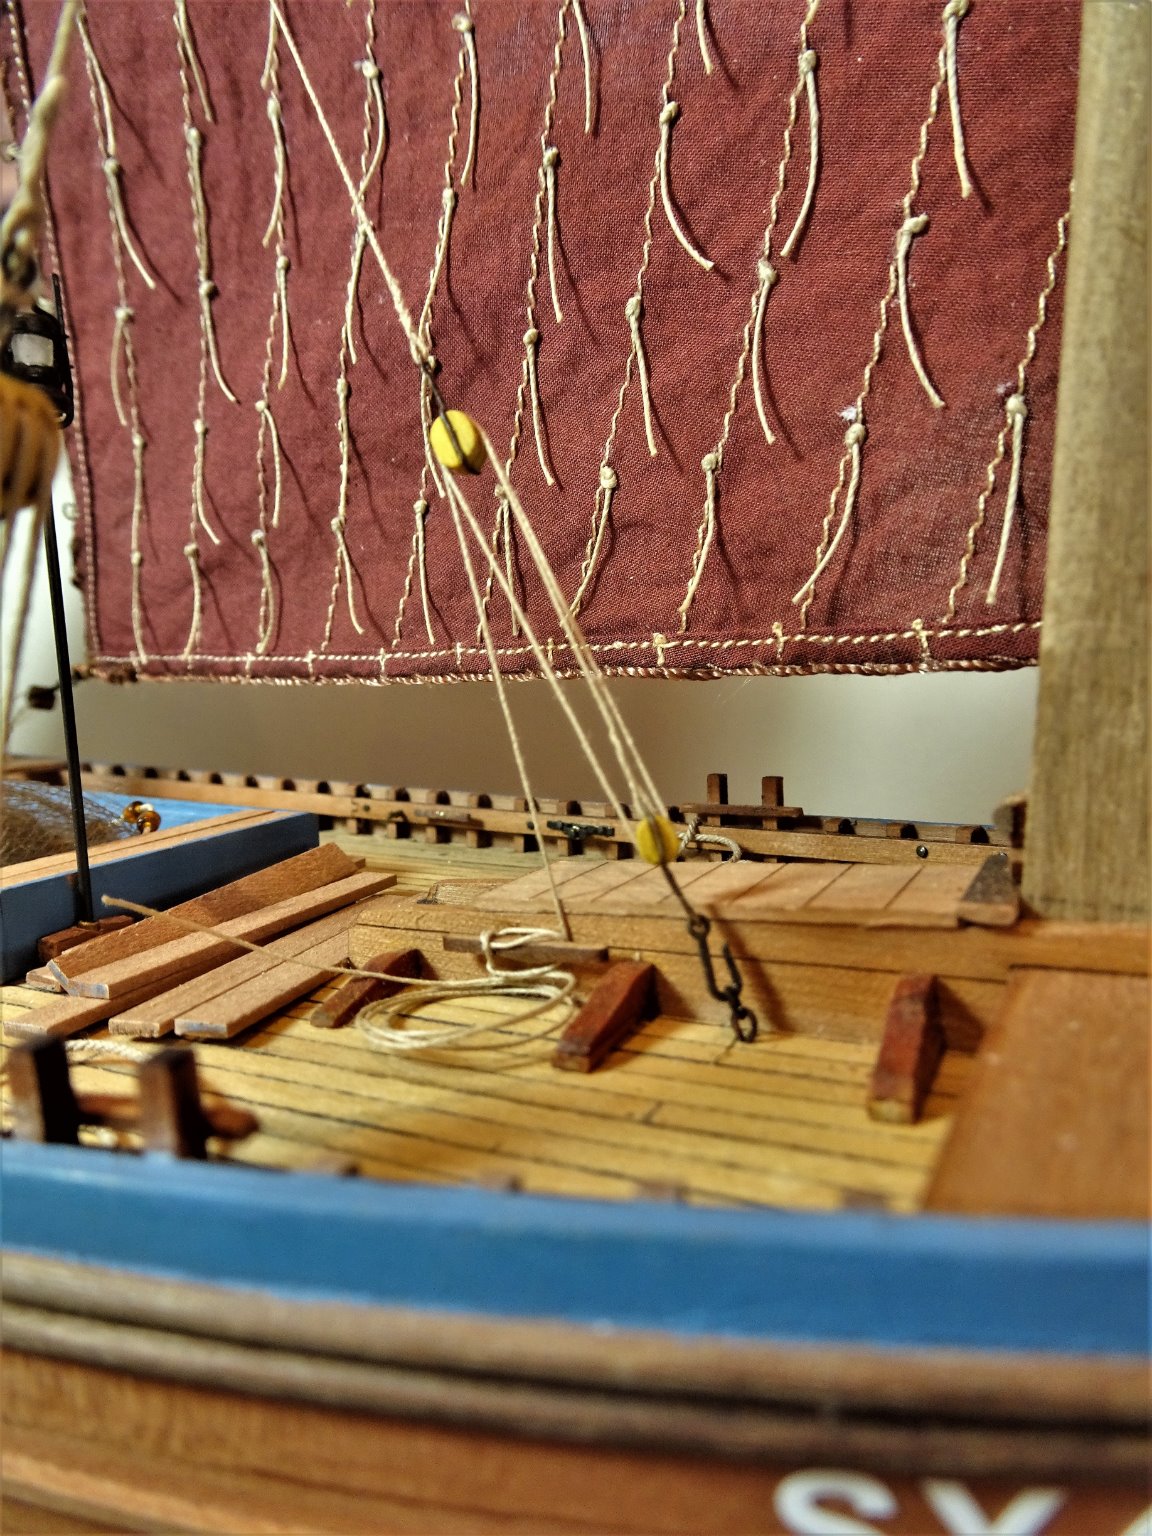
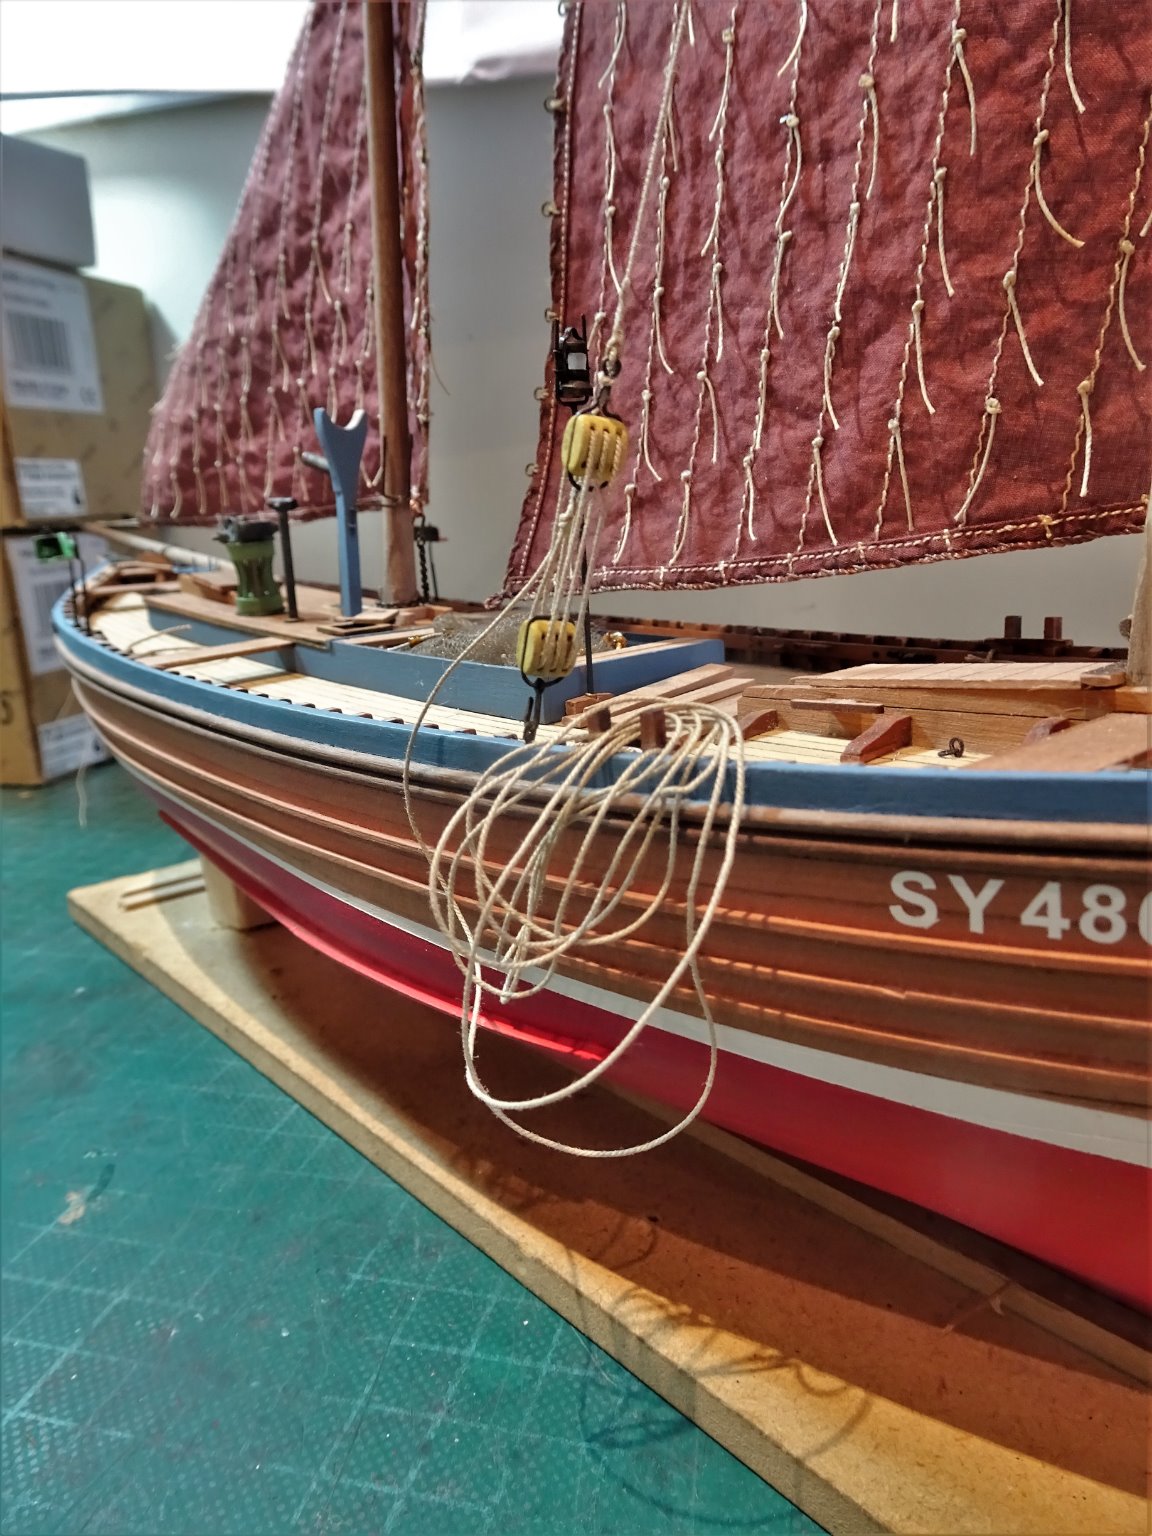
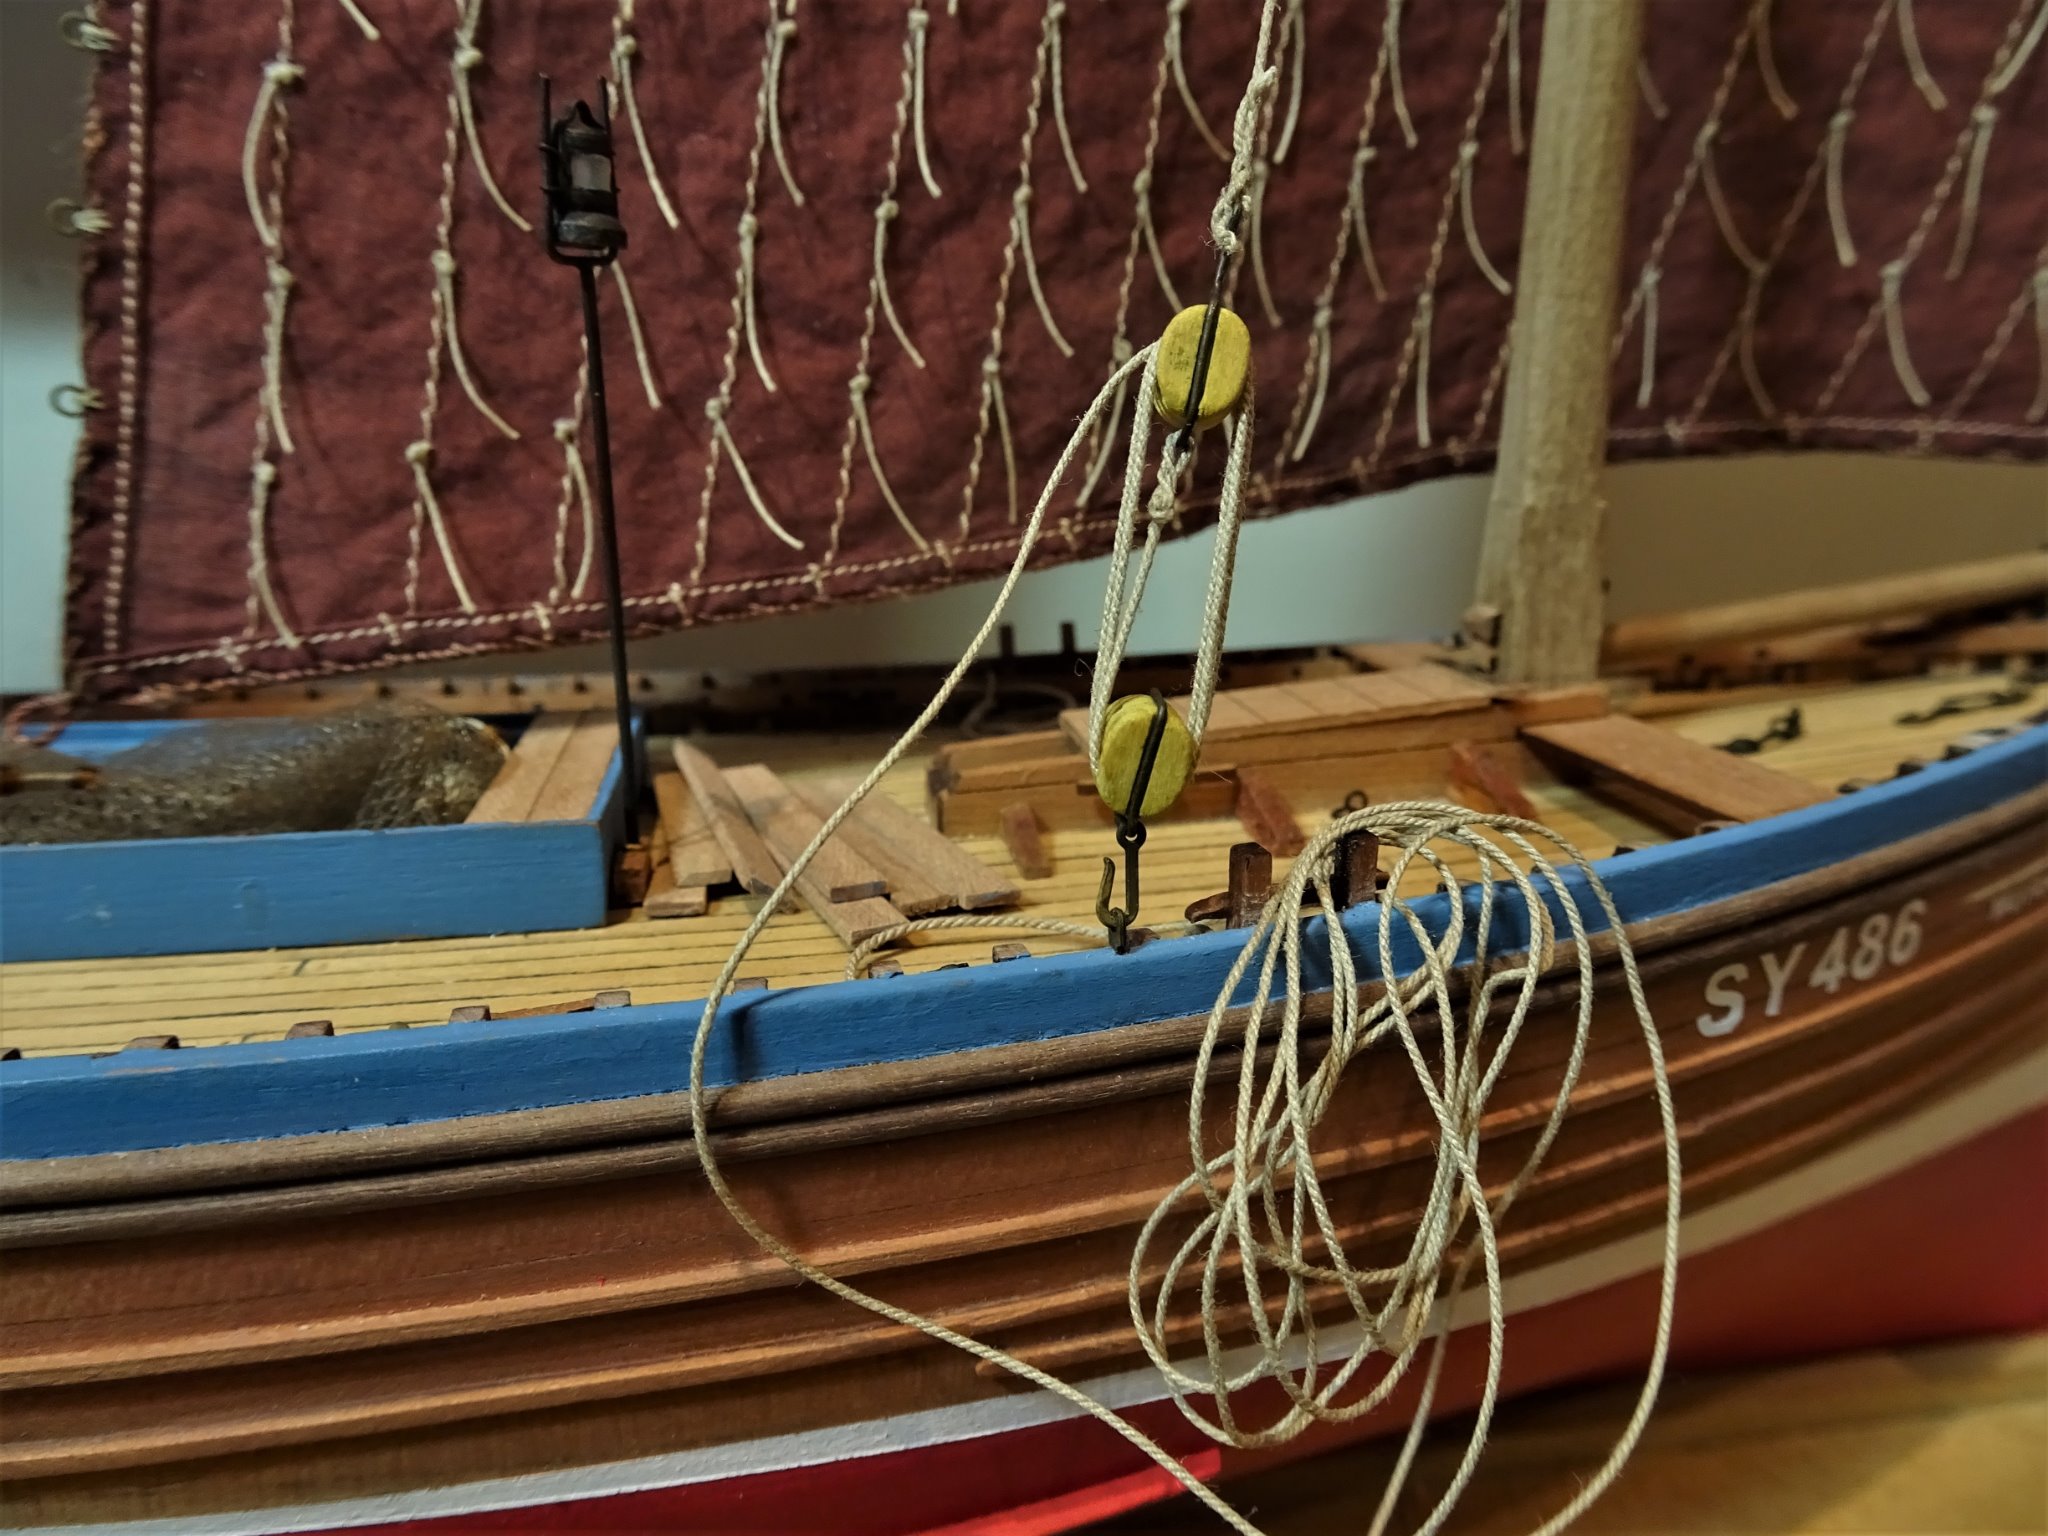
 Thank you Rusty, Bob, and Richard. @ Richard - I'm not too sure about the intricate workings of the capstan but I think there would be a pawl system on it. Sailing Drifters is a good read, so many snippets about life in a fishing community around the turn of the century, even down to the cost of a pint of ale! I have now bought the sister volume on Sailing Trawlers. Post 48 The rigging Part Three The Fore sheets also have an interesting configuration. Fore Sheets 1⅞” manilla - 0.20mm ø line used. The tackle consists of a 3mm Double block combined with a (lower) single block. (A deadblock according to the Underhill Plans). 9391 The top block is hooked to the clew, the lower block is attached by a chain necklace to the portside stringer with the running line passing thro’ a bullseye chained to the lower block, and the fall secured around a belay pin, and tied off at a cleat. 9396 9406 9393 Fore sheet from the starboard side. In the Fore ground is the ‘Tuckle chain securing the Mizen tack. 9404(2) Burton Pendents These were of 2” circ wire but I am using 0.3mm ø line. I start with the Mizen as this falls inside the other rigging. The Mizen pendent with a luff tackle (6” blocks) is secured in the deck adjacent to the mast partners (skegs) and the fall belayed to a cleat in the partners. 9400 The tackle comprises a 3mm double block and 3mm single hooked block. For the falls I have used 0.20mm ø line. 9403 Mizen Burton Pendent secured but not finally belayed. 9402(2) Fore-mast Burton Pendent. This has a different arrangement to the Mizen set up. The pendent is of wire (.30mm line in my case) Edgar March describes it as a runner and luff purchase, and there is mention of a sister hook, something new to me. Sister block I’ve heard of Sister Sledge, and Dr Hook, but that’s a different story. 9420 A 3mm single block is seized in the end of the pendent, a line runs thro’ this which also has a 3mm block attached to its upper end, and the running end is hooked to an iron bolt thro’ the stringer. 9421 A runner passes thro’ this block, one end is hooked to the bolt adjacent to the pendent line. This is where the sister hooks come into play but I can’t quite see how the two lines attach. At the scale involved I have used two separate hooks to secure these lines. 9417 The running end is secured to the stringer a short distance aft. 9423 Moving on to rigging the jib, the final element. B.E. 17/12/2020


.thumb.JPG.11acab2e072c47cdb0b86d915b4a2ceb.JPG)
.thumb.JPG.ae0aff12a80779d4df215652dcdd50af.JPG)

- 261 replies
-
- 18
-

-
- muirneag
- vanguard models
- (and 2 more)
-
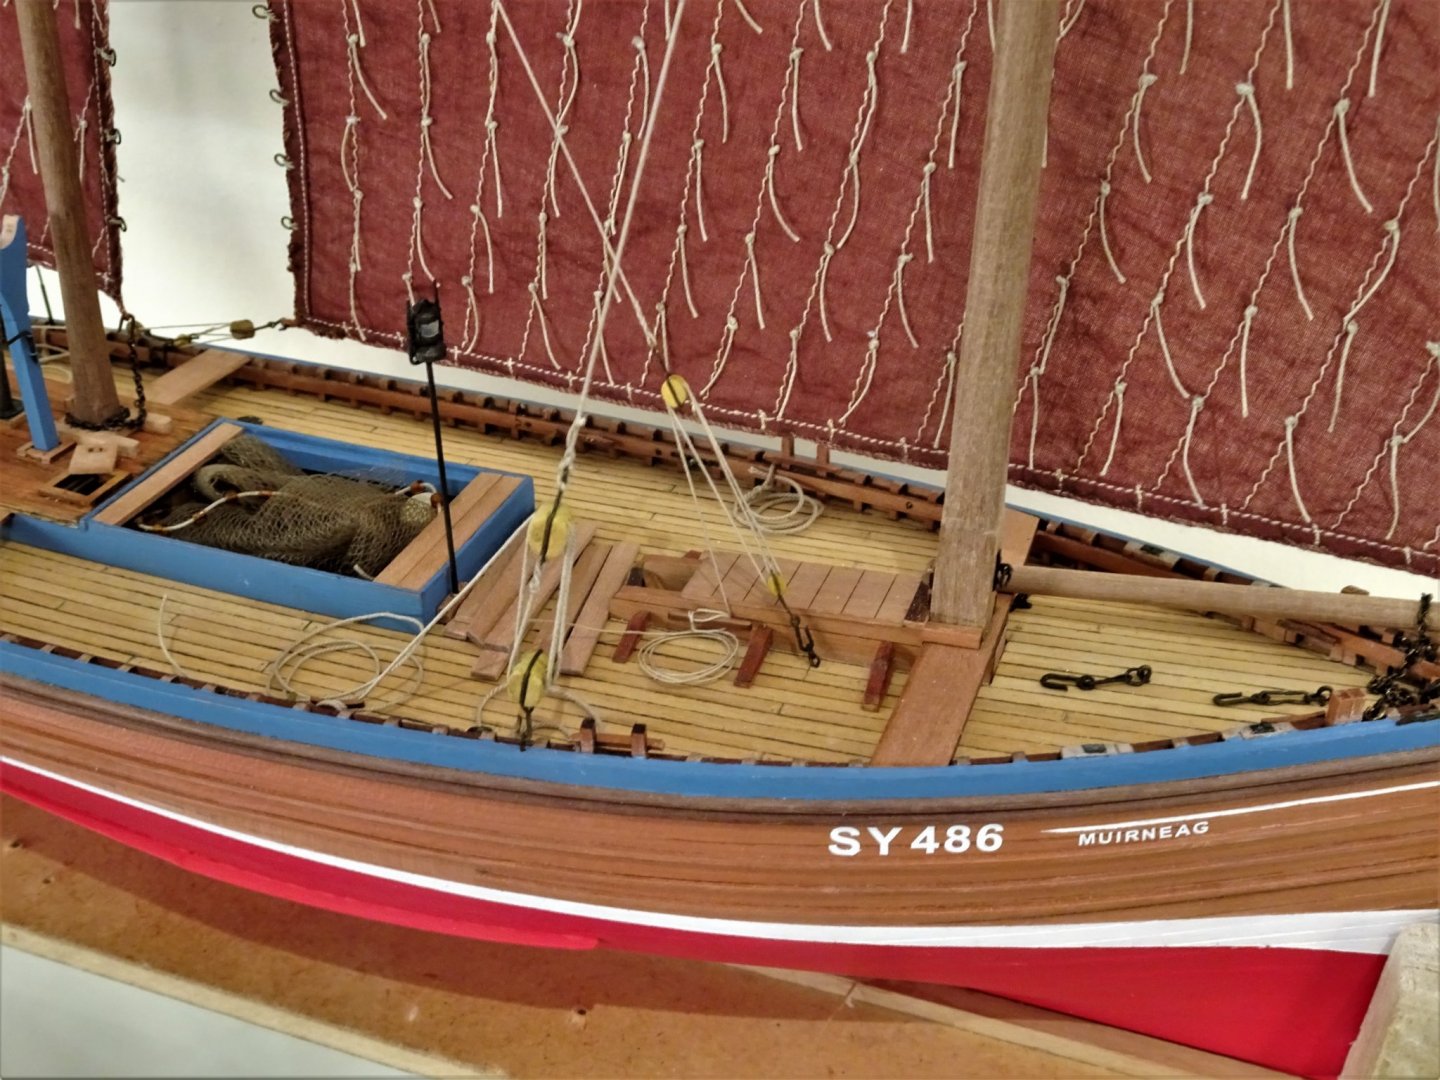
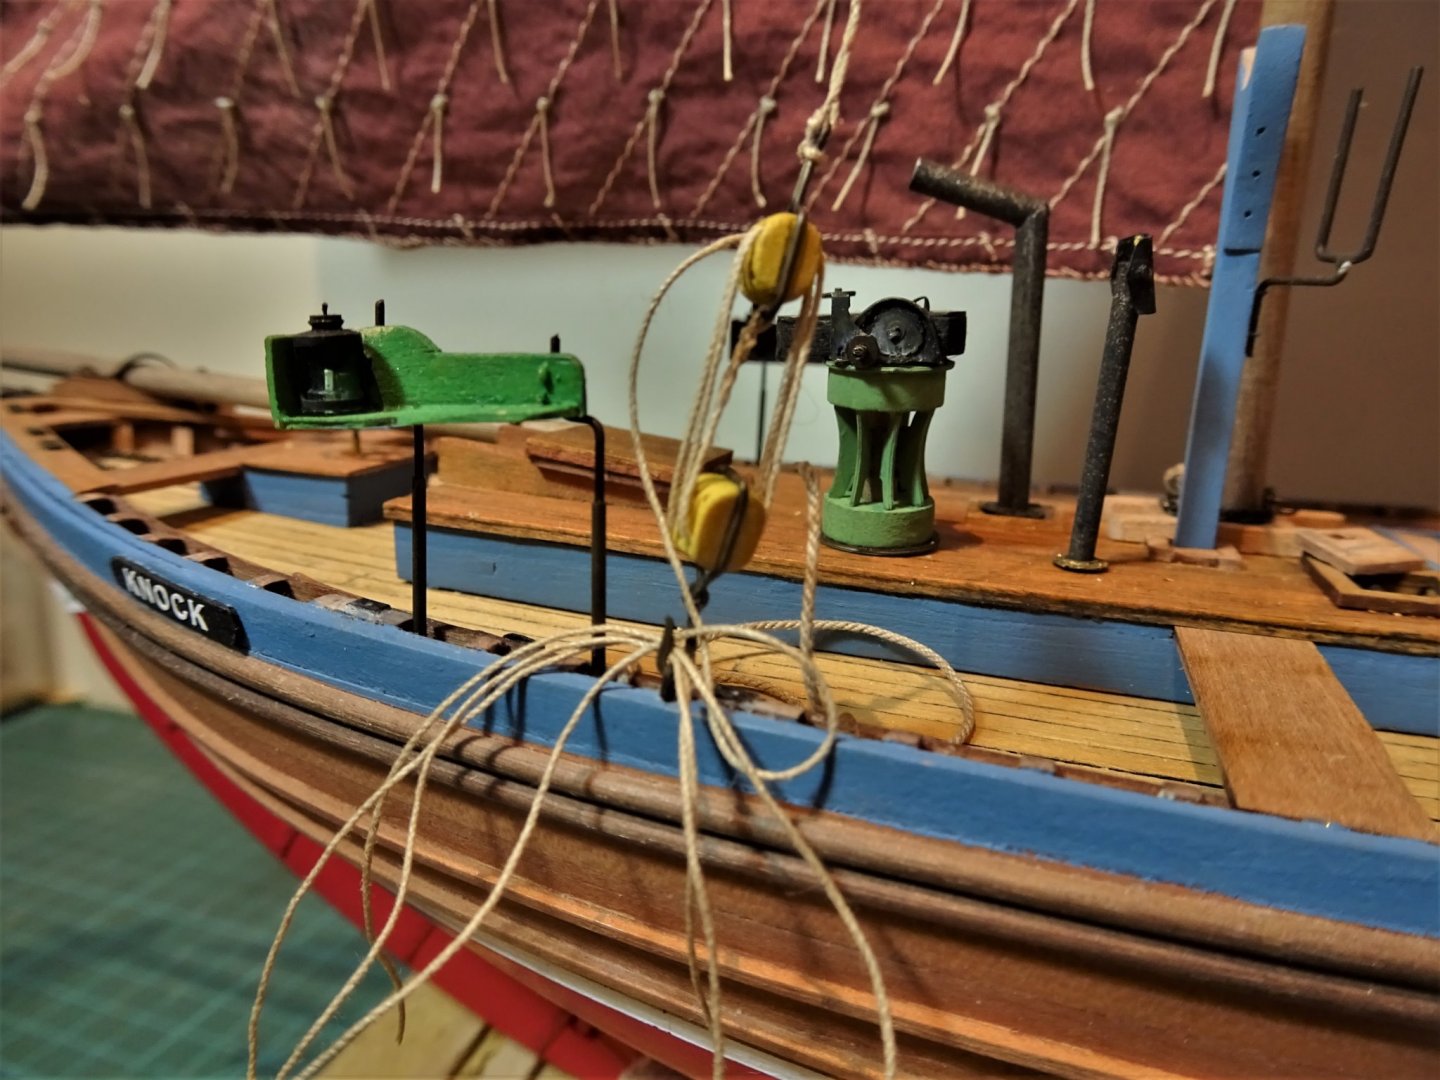
Thank you Nils, good to hear from you, I hope you and yours are keeping well. Post 47 The rigging Part Two The Fore and Mizen sheets both have interesting features and a take a little bit of fiddling to set up. I start with the Mizen sheets which are slightly less fussy. The provided kit plan also includes this feature albeit in a more simplified form. Mizen sheets - (2) 6” double blocks (⅛” Syren) The sheet is of chain hooked to the clew and is shackled to the first block, the second block is hooked to an eyebolt in the starboard side wale at the stern. The tackle is of 0.20mm ø line and runs inboard thro’ an iron snatch block secured to the bulwark stringer with a chain necklace. The fall then runs to the capstan. 9369(2) Rigging block and chain combination. The chain is quite fine being 48 links to the inch. 9372 With the tackle in place the snatch block with its securing chain can be fitted. 9373(2) Forming the chain necklace. 4376(2) The fall for the purpose of the model is expended around the Capstan. 9385(2) The completed set up. 9386(2) 9387(2) Moving on to the Fore Sheets. B.E. 14/12/20
.thumb.JPG.90e5c5950a4f94131b3db879eb6107bc.JPG)
.thumb.JPG.446efb16d72c13a888a79315362cff89.JPG)
.thumb.JPG.c6b844304217827ec5cbb62db7a2395c.JPG)
.thumb.JPG.b98c5dbca9d3106fb6829387418ae0e3.JPG)
.thumb.JPG.172793afc98923161b91194be132cc72.JPG)
.thumb.JPG.4bfb3eeebf0873ddf8ebc1fb865a4212.JPG)
- 261 replies
-
- 17
-
-
- muirneag
- vanguard models
- (and 2 more)
-
Thank you John, Grant and Glenn. @ Grant - Once I have formed the wire around the block I remove it to solder the bottom join, and hope it will stretch a little to allow re-fitting with a snug fit. The important thing is to make sure the cut joints meet so that the solder will form a strong bond. Regards, B.E.
- 261 replies
-
- 1
-
-
- muirneag
- vanguard models
- (and 2 more)
-
Post 46 The rigging begins. This starts with raising the large Fore dipping Lug sail which involves rigging the Tye and Halyard. The given information is that the tyes were of wire; I did trial using 0.5mm braided wire but fore-saw problems with the attachment to the tackle block which requires to be done insitu on the model. 9338 Braided wire halyard It is fairly straightforward to silver solder an eye for the attachment of the tye hook, but that option disappears when it comes to the upper halyard block, that is if I wish to avoid setting the model on fire. So, Syren thread it is. For the Fore and Mizen yard Tyes I am using Syren 0.30mm ø line. Fore halyards 3” manilla - 0.45mm ø line. Mizen Halyards 2¼” manilla - 0.30mm ø line. The significant blocks on the otherwise simple rigging set-up are the Halyard tackles for the Fore and Mizen yards. Two 15” wire stropped triple blocks on the Fore and two 11” triple blocks on the Mizen make up the tackles. The lower blocks are hooked. For the makings I am using Syren Boxwood 1/4” and 3/16th” Blocks. The strops are made from 0.5mm ø brass wire and are formed around a block before the joint is silver soldered. 9264(2) The eye is firstly formed and a short section below soldered together; the ends are then formed around the block using mini pliers and the bottom ends trimmed to meet. 9281(2) I blacken the ‘iron’ with the block in place. I have determined from previous tests that this has no detrimental effect on the blocks and eliminates the risk of marking the block or blackening during the fitting process. 9344 Fitting the upper halyard block. 9355 9361 Fore Halyard tackle completed. 9360 Mizen Halyard tackle. 9357 The rigging will continue in the next post. B.E. 13/12/20
.thumb.JPG.681062f4f61a29e7ea33b937098439a3.JPG)
.thumb.JPG.cd0a94472076ae02cffec5d2a82782f3.JPG)


- 261 replies
-
- 18
-
-
- muirneag
- vanguard models
- (and 2 more)
-
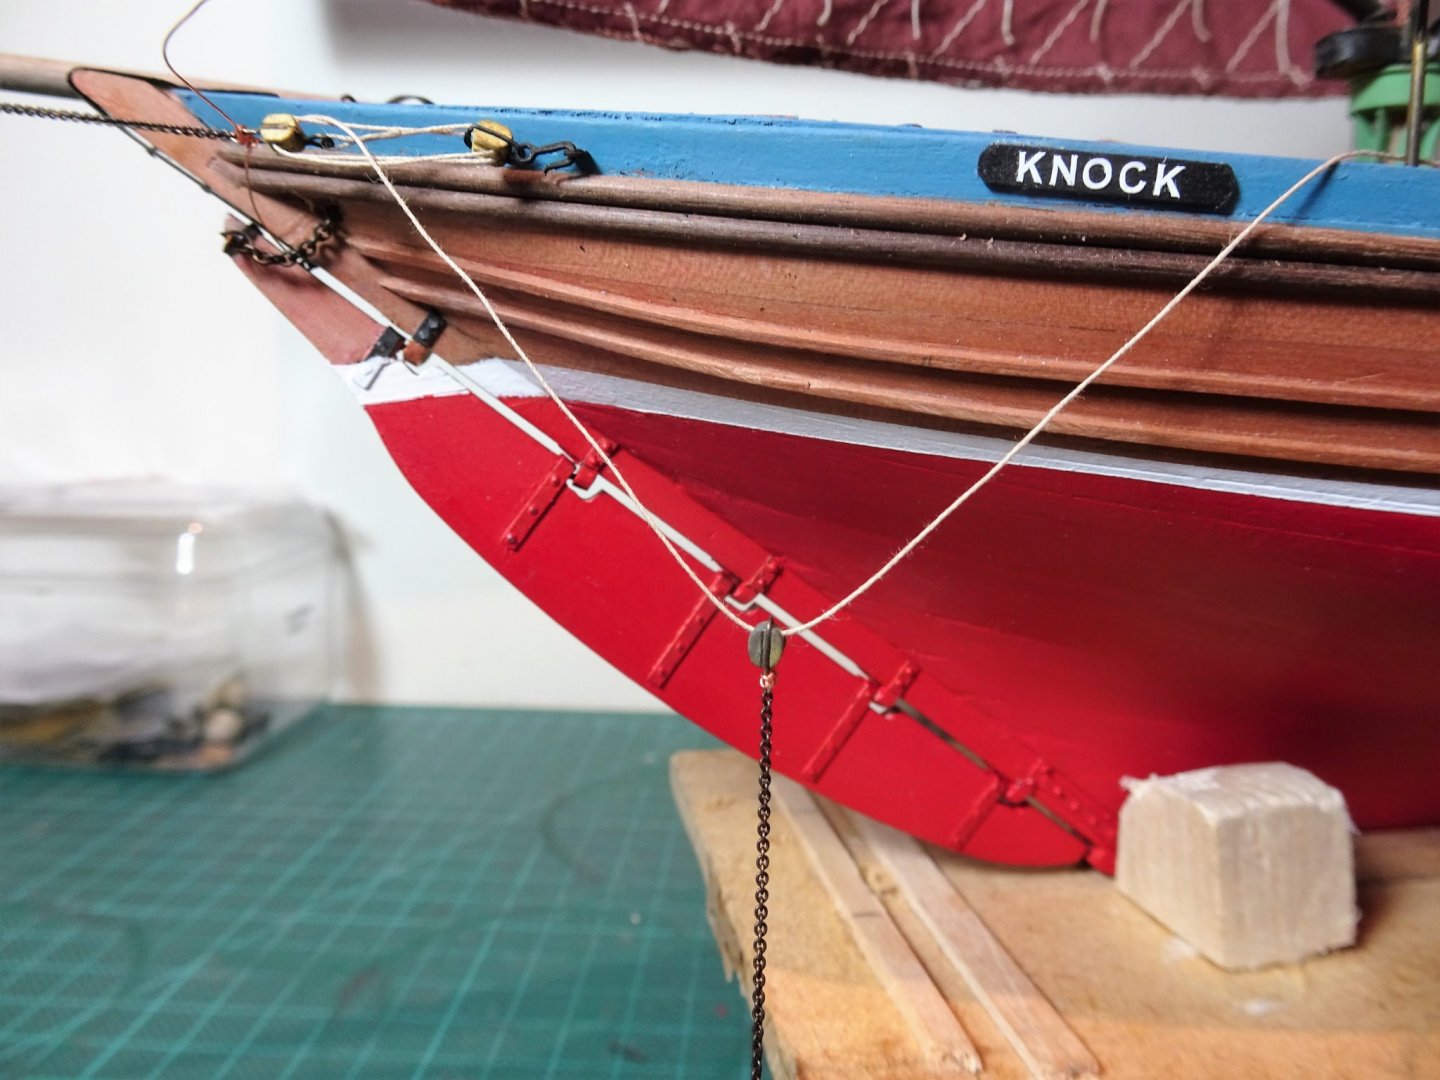
I looked at a lot of model photo’s and of the real thing John, and regardless of the regulation the position I chose reflects what appears to be the general arrangement. I only came across one old photo where the registration number looked a fair bit lower. I think it looks ok tho’ B.E.
- 261 replies
-
- 5
-
-
- muirneag
- vanguard models
- (and 2 more)
-
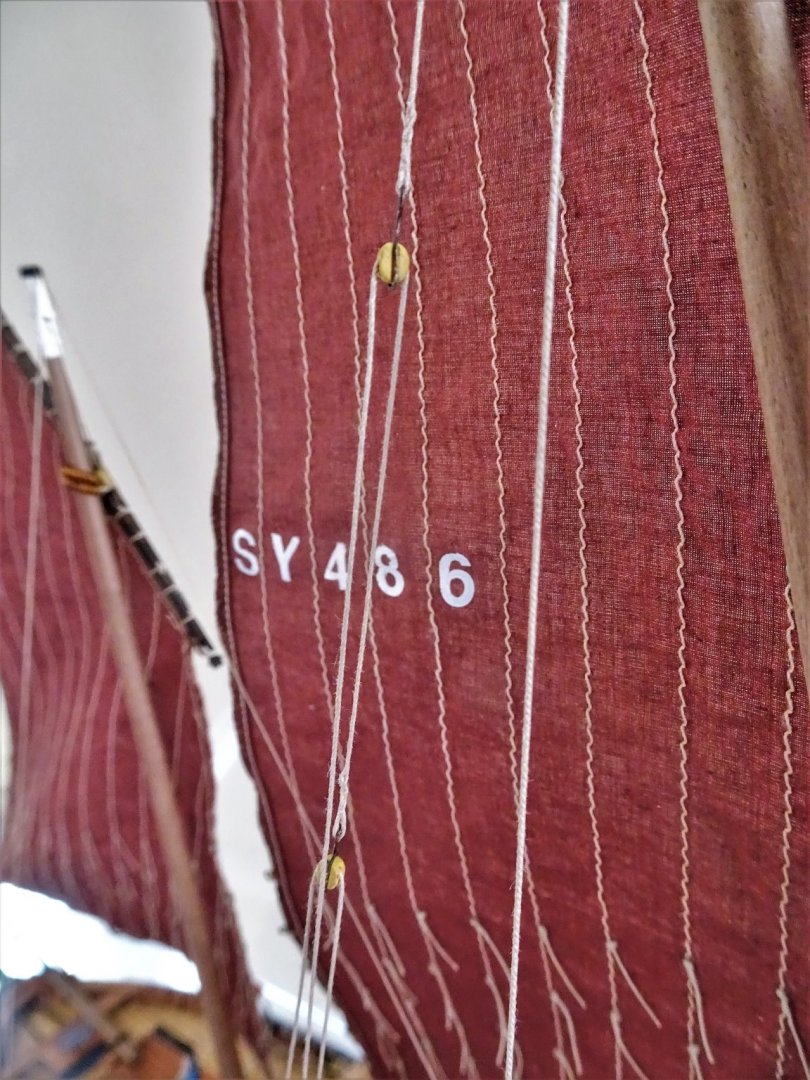
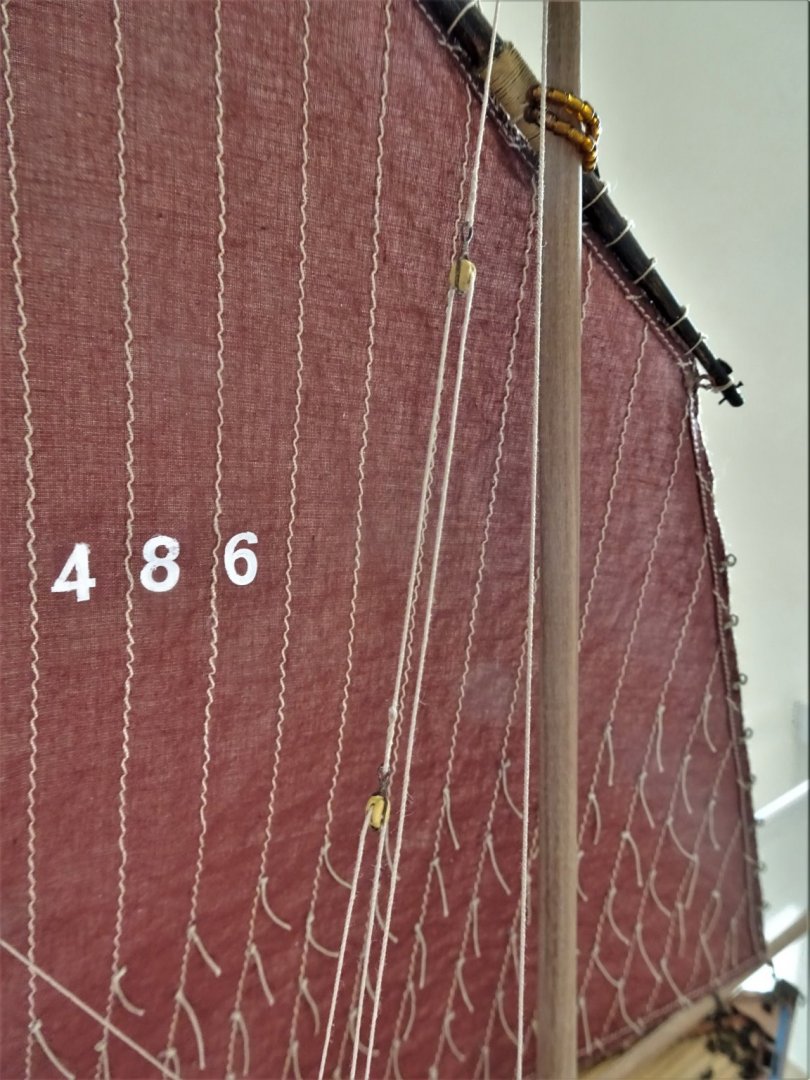
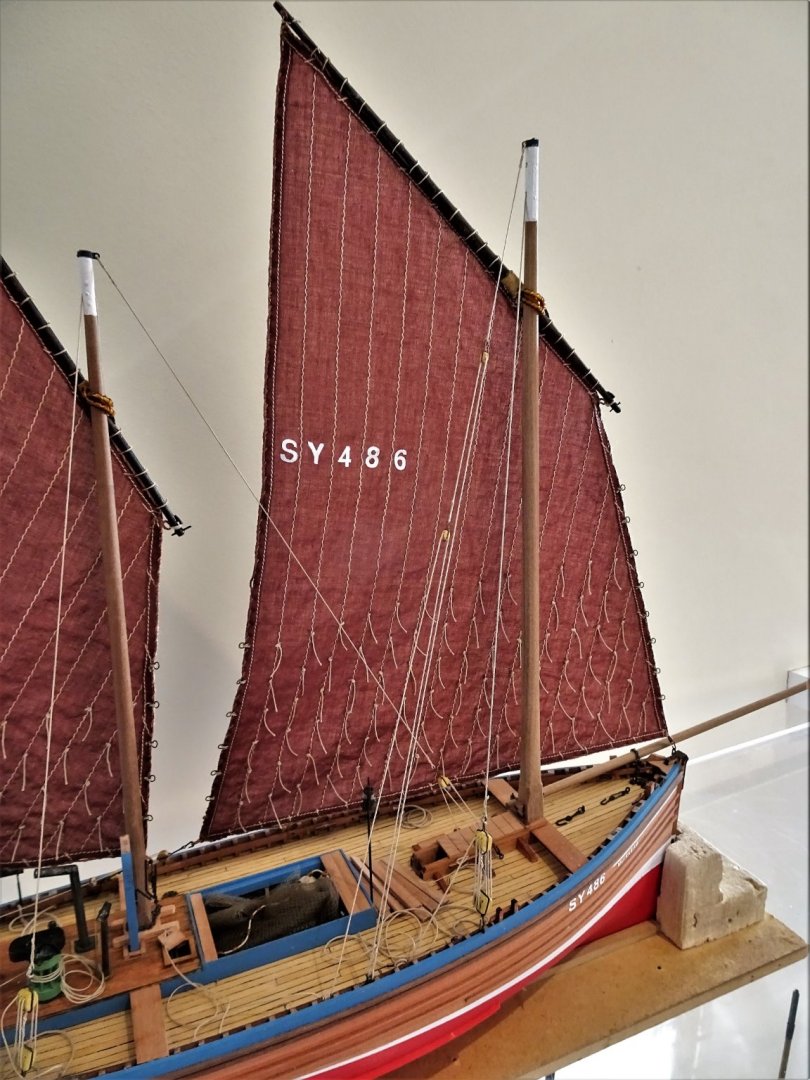
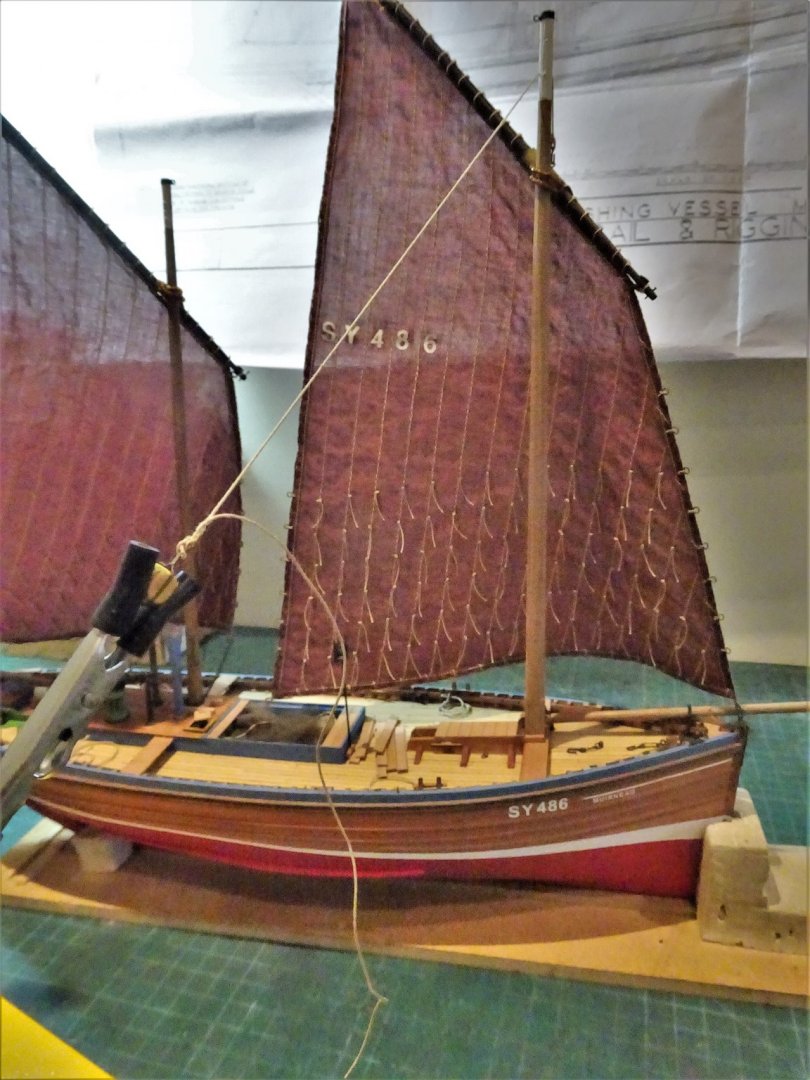
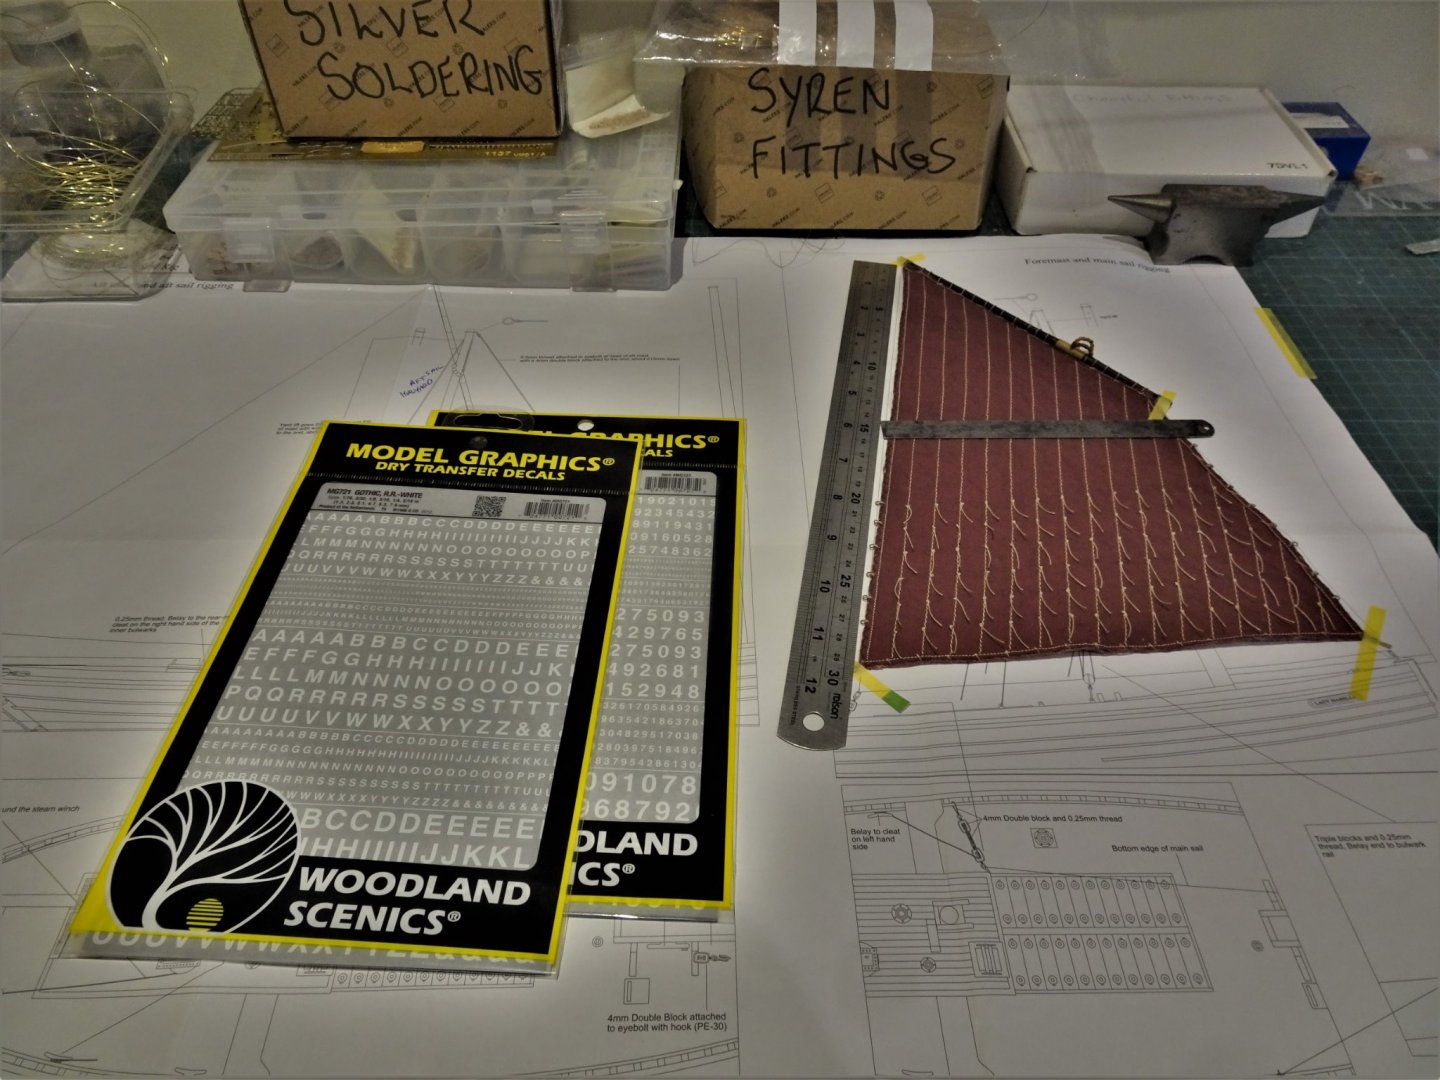
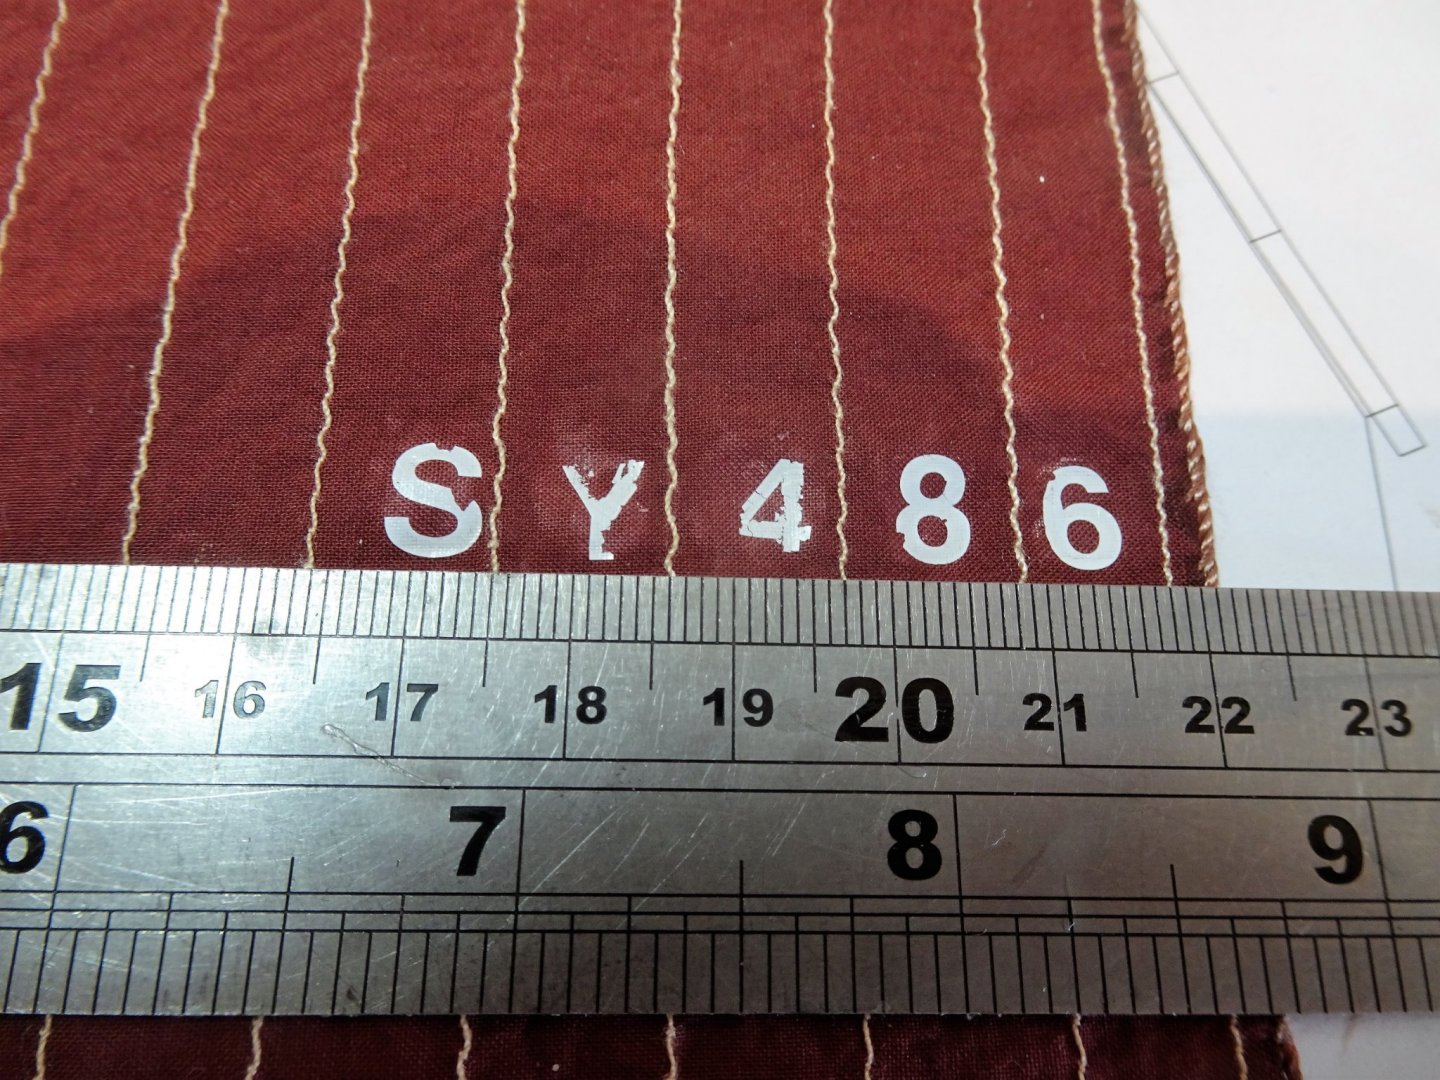
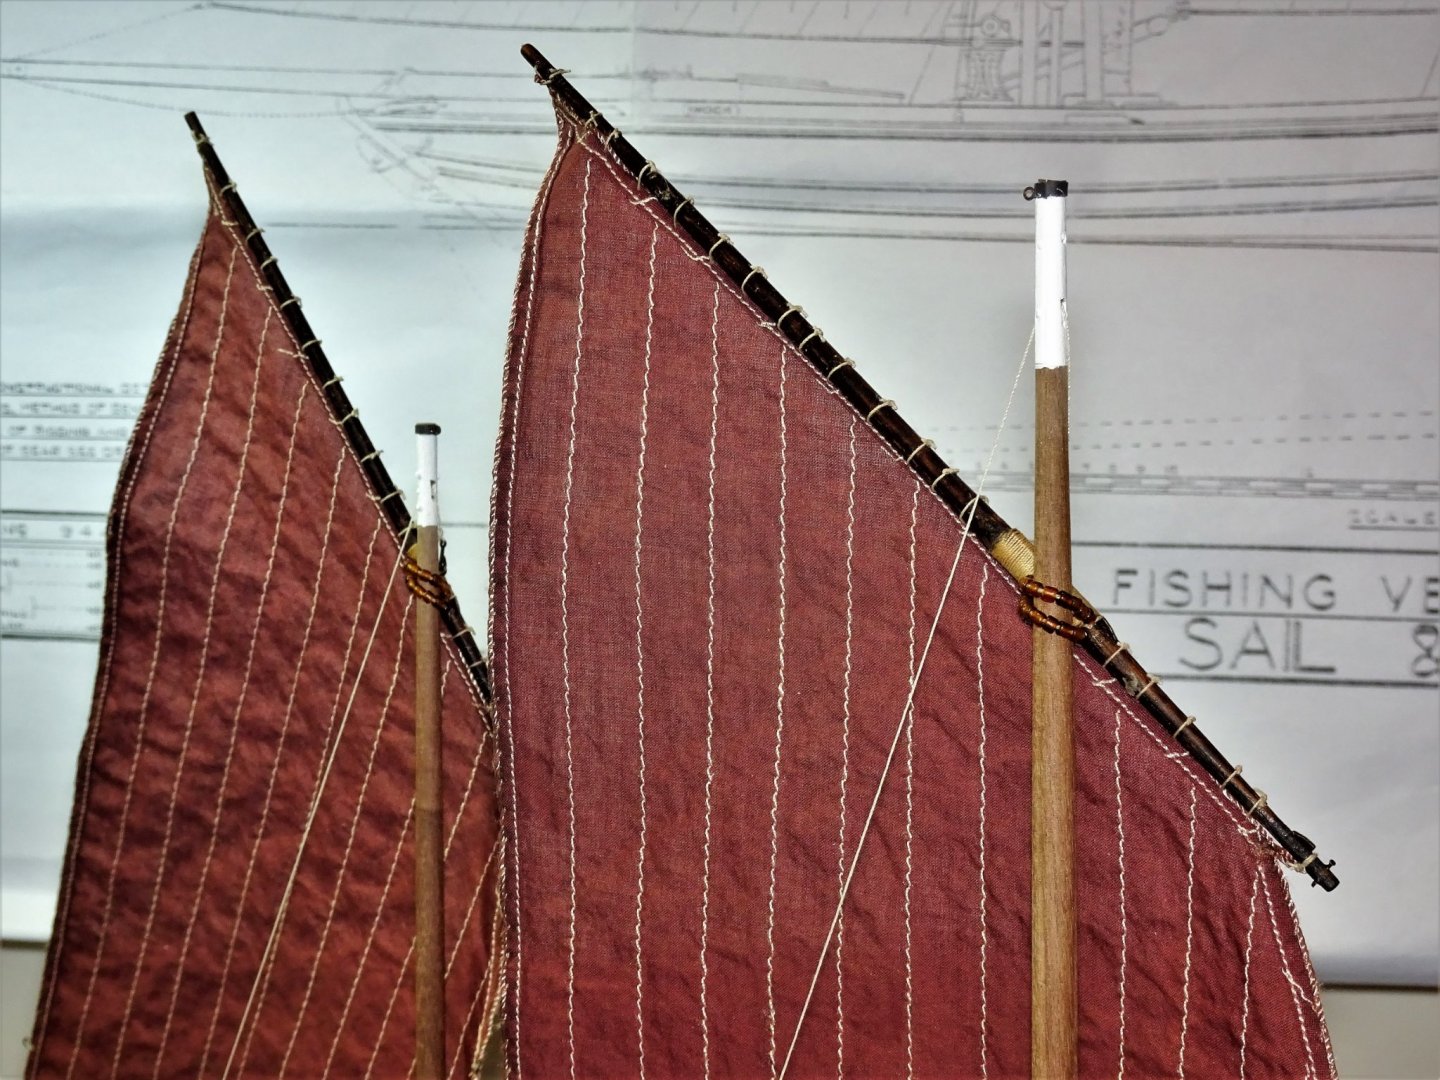
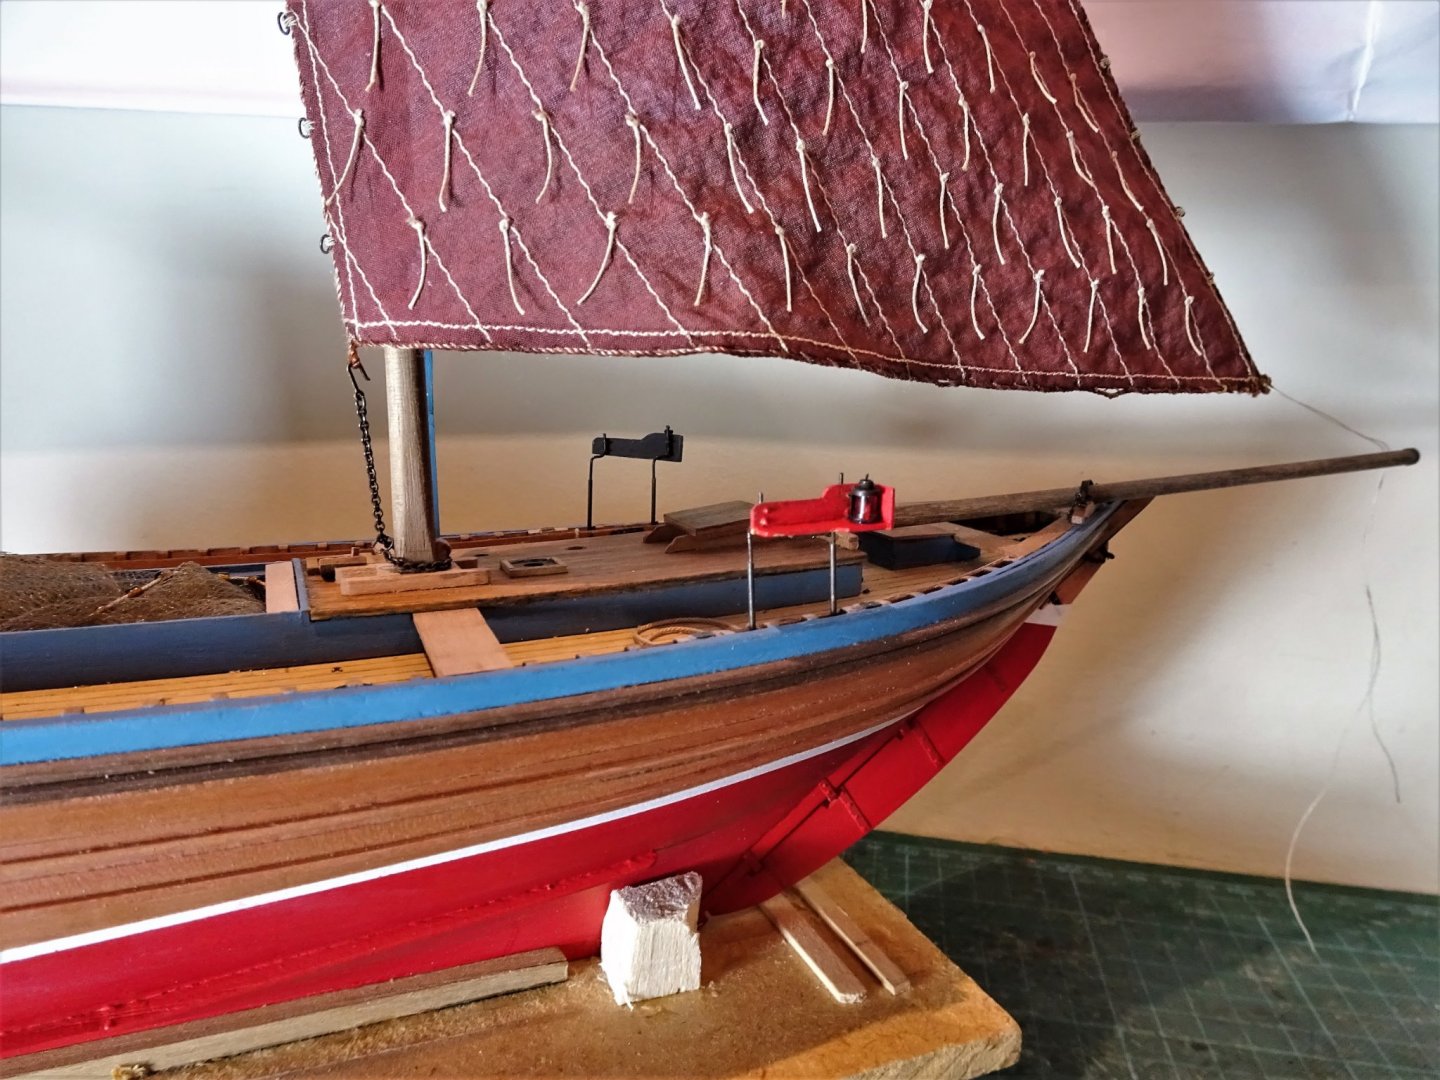
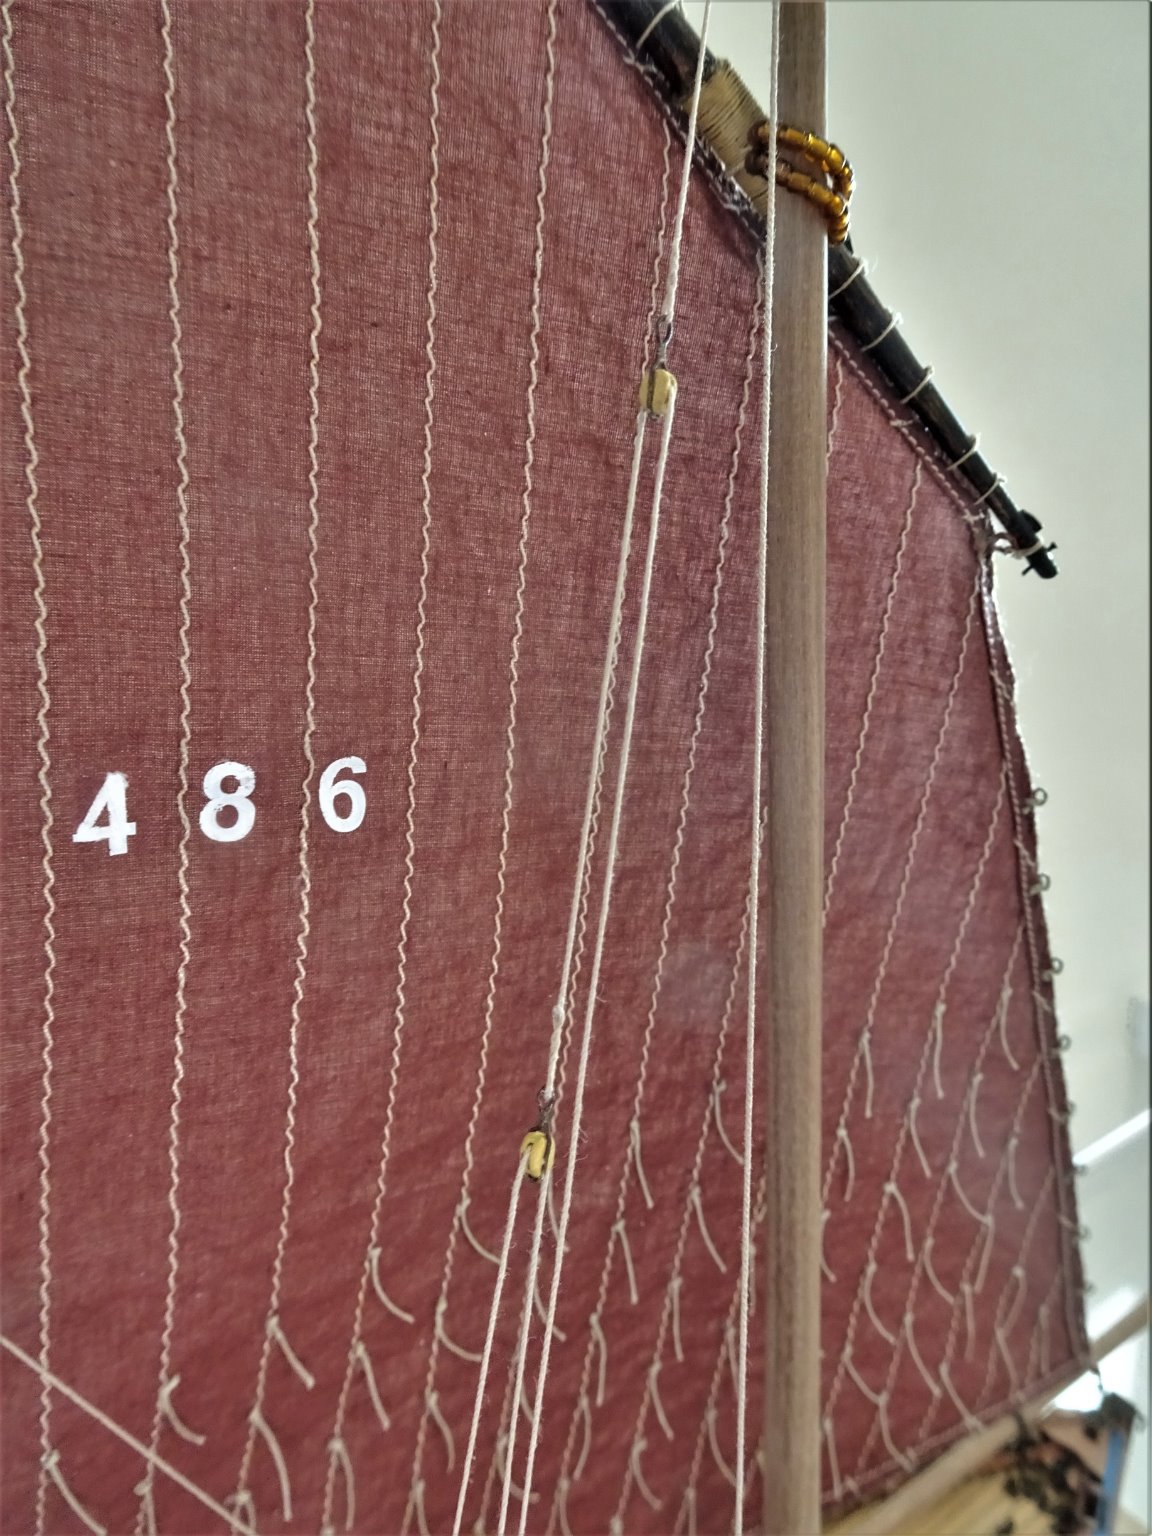
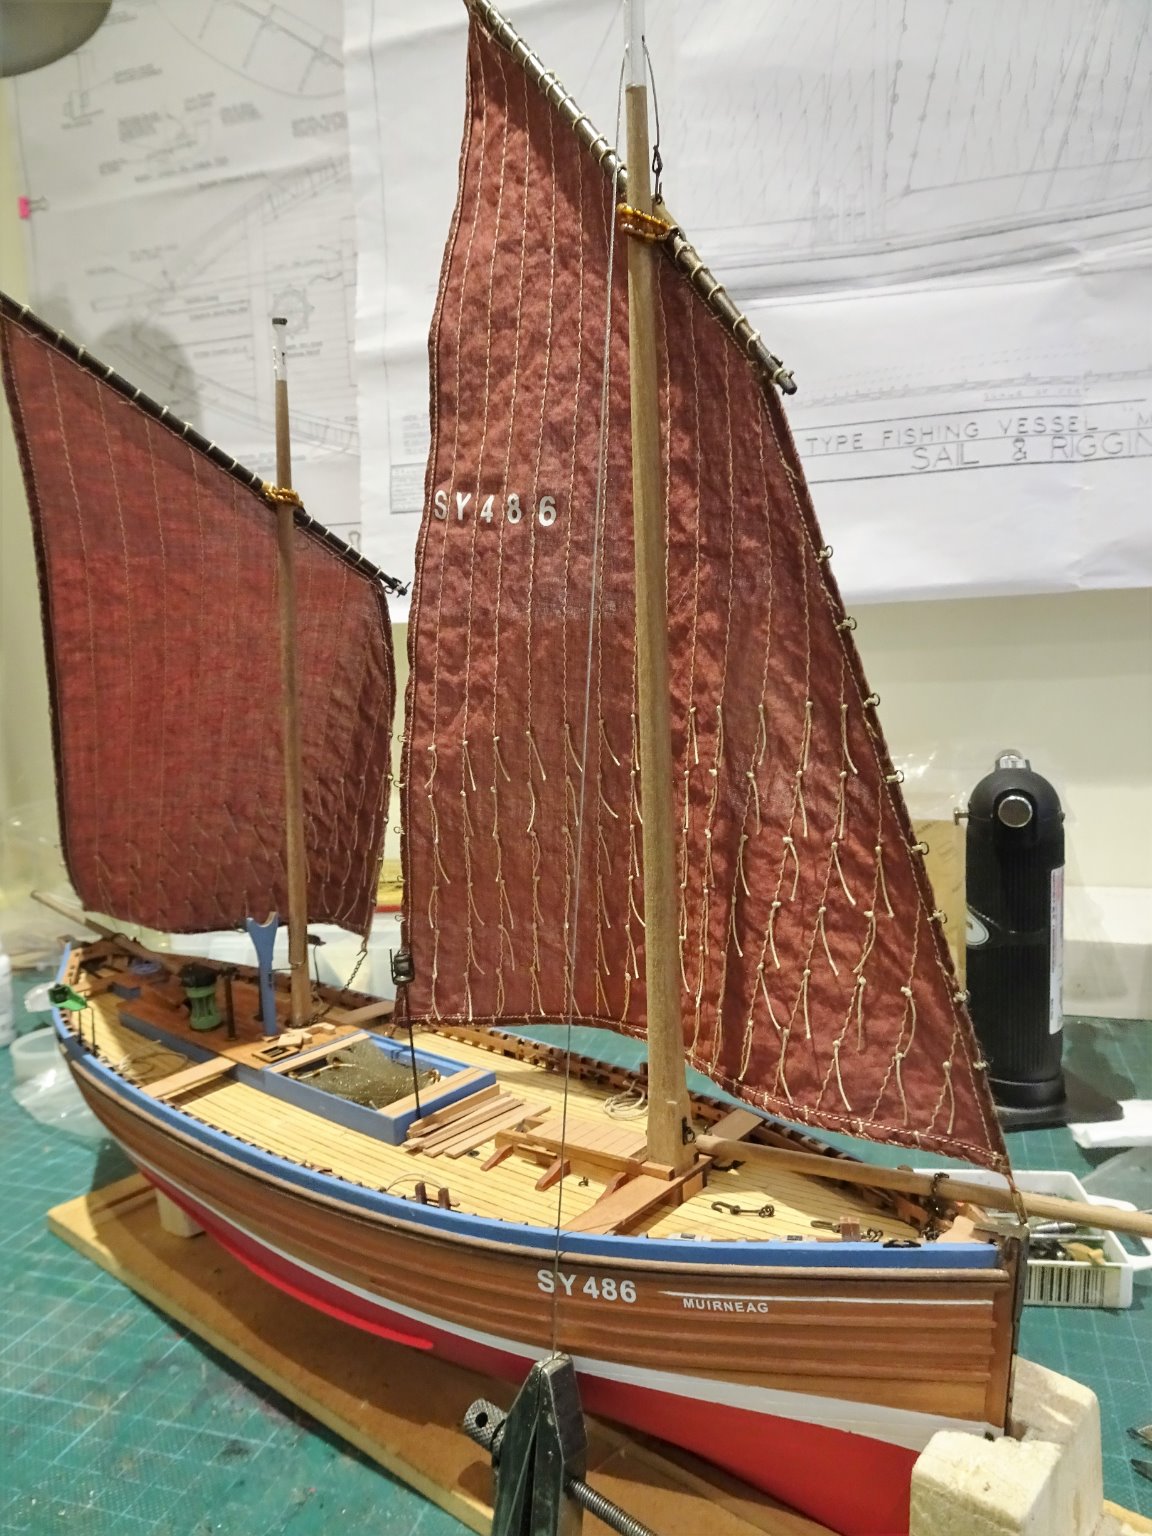
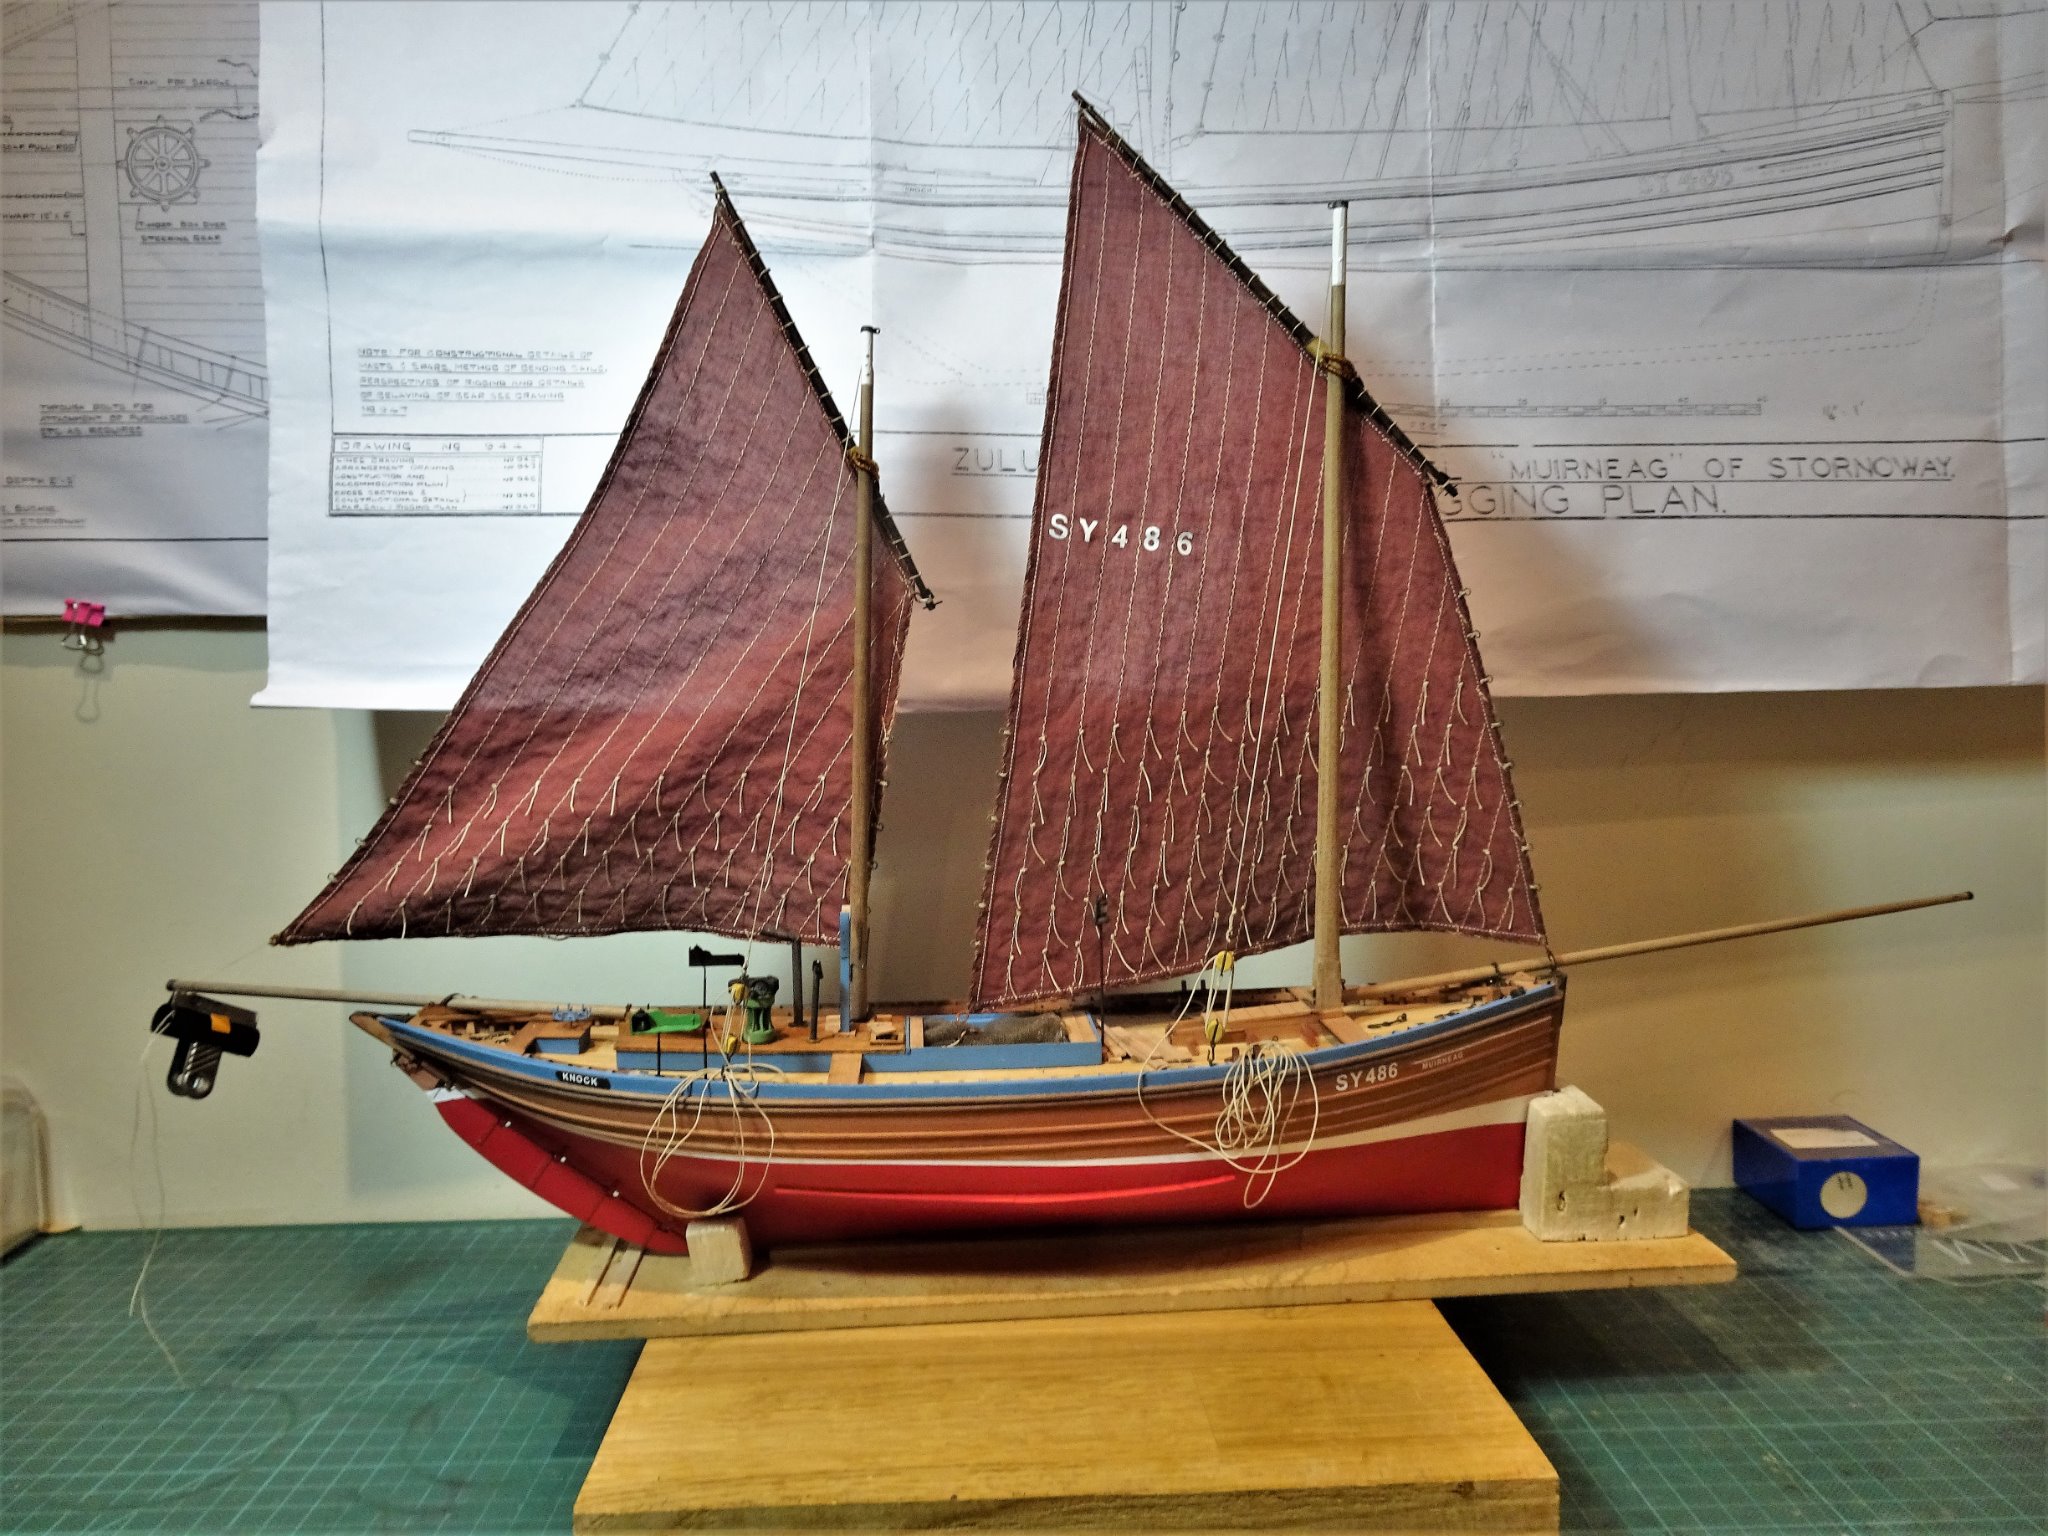
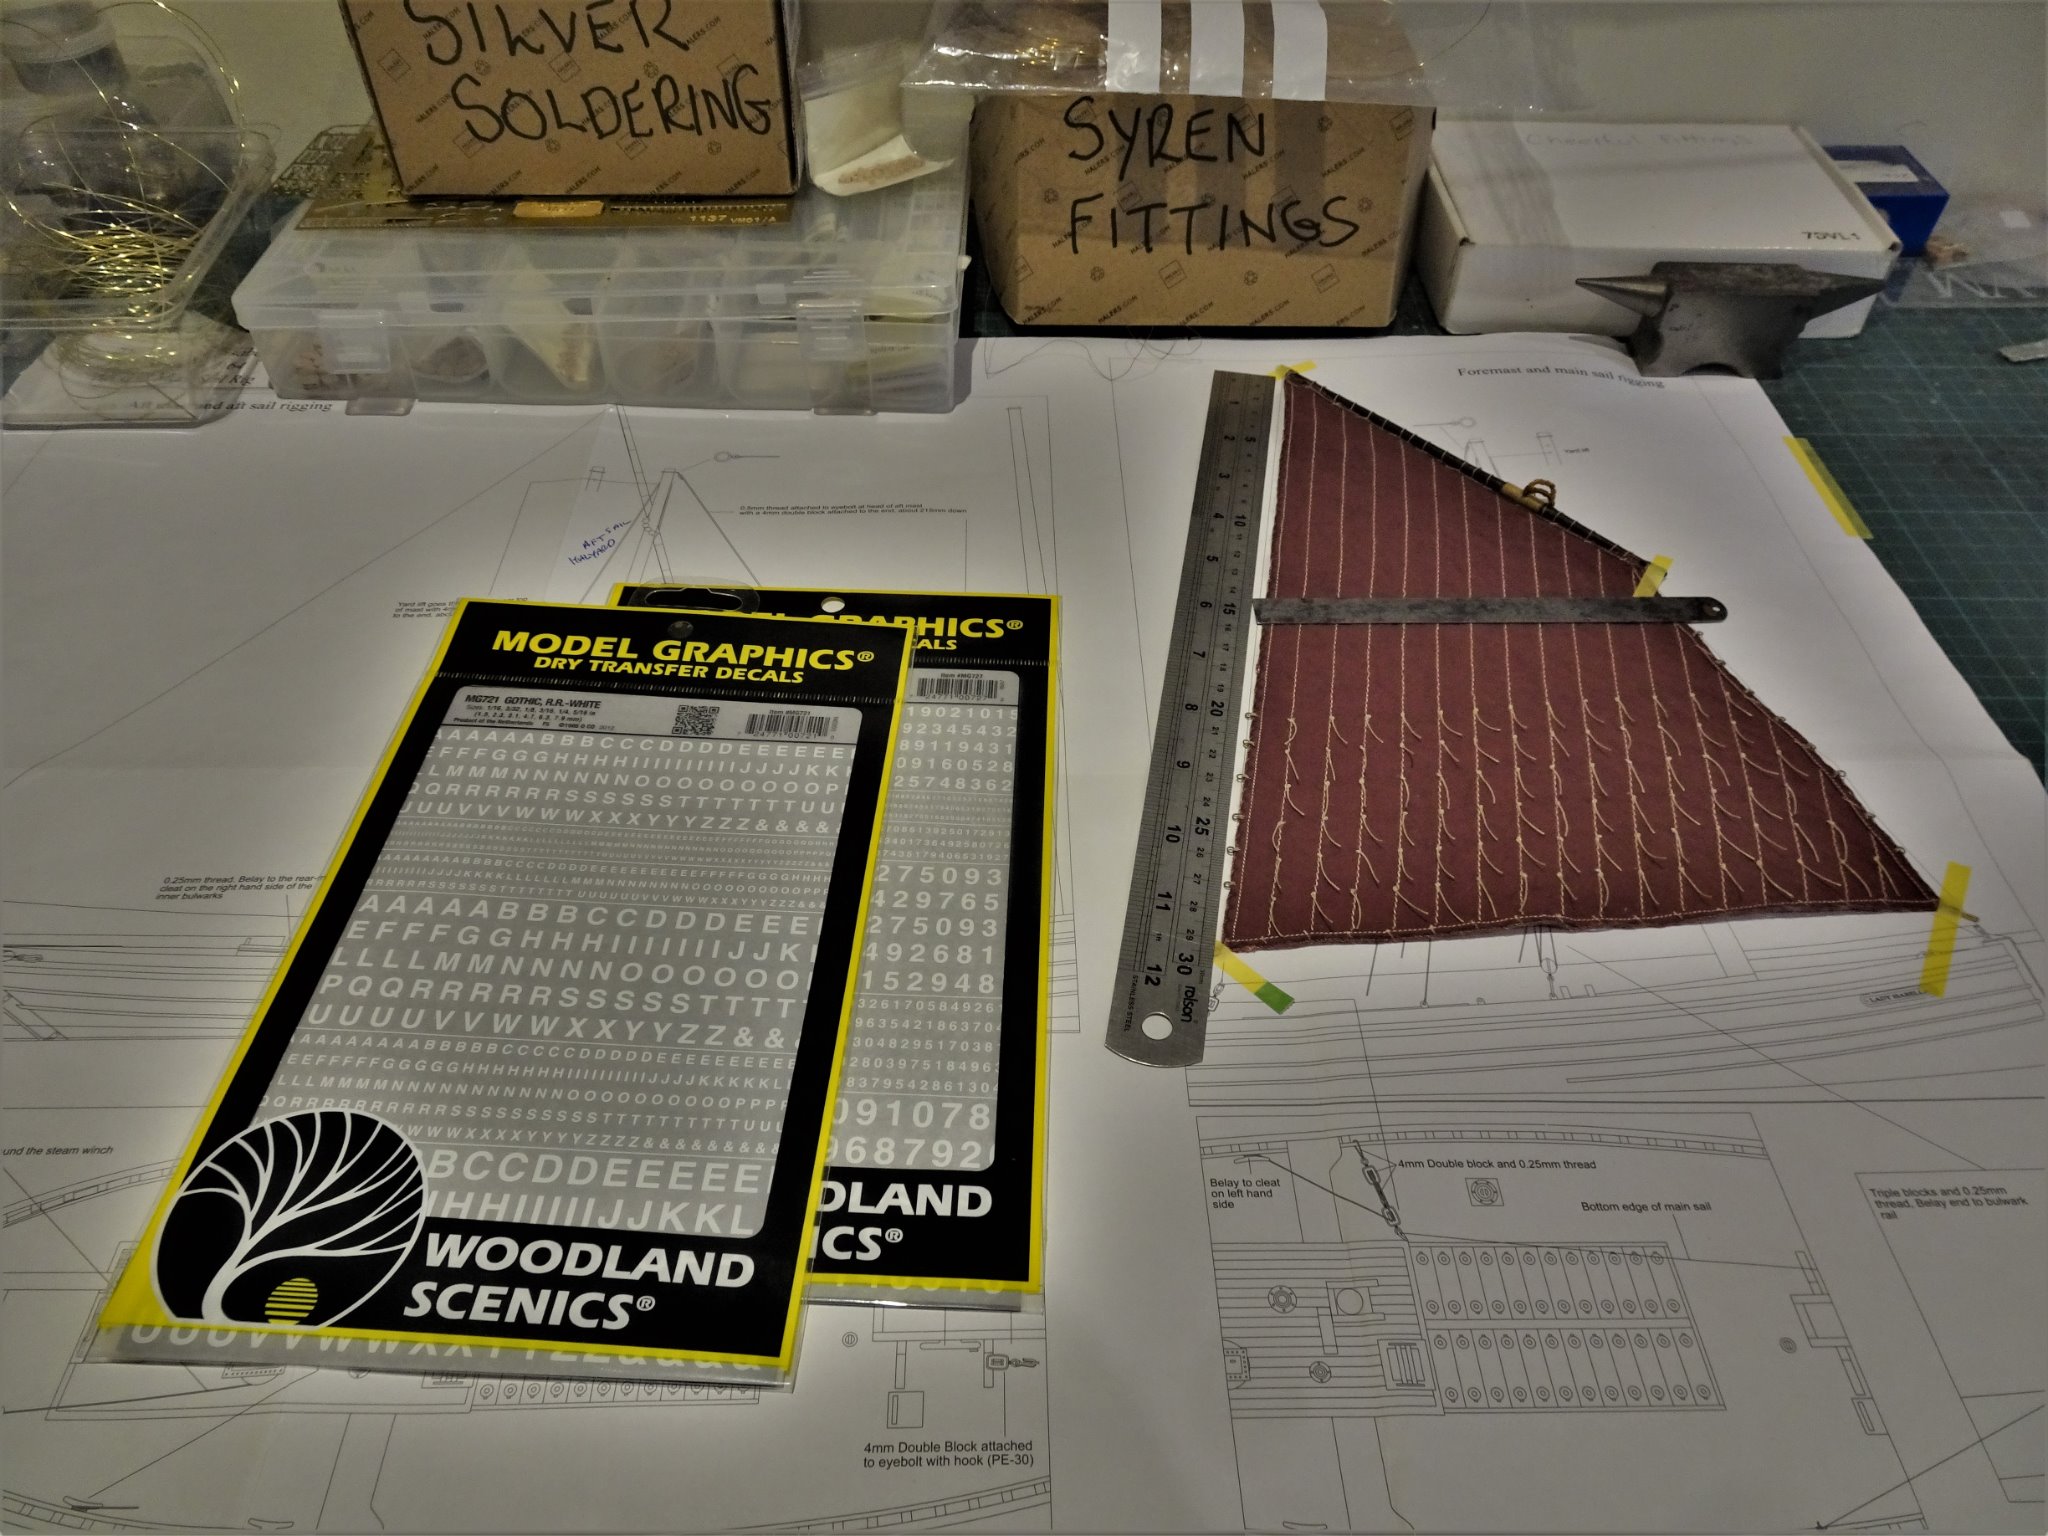
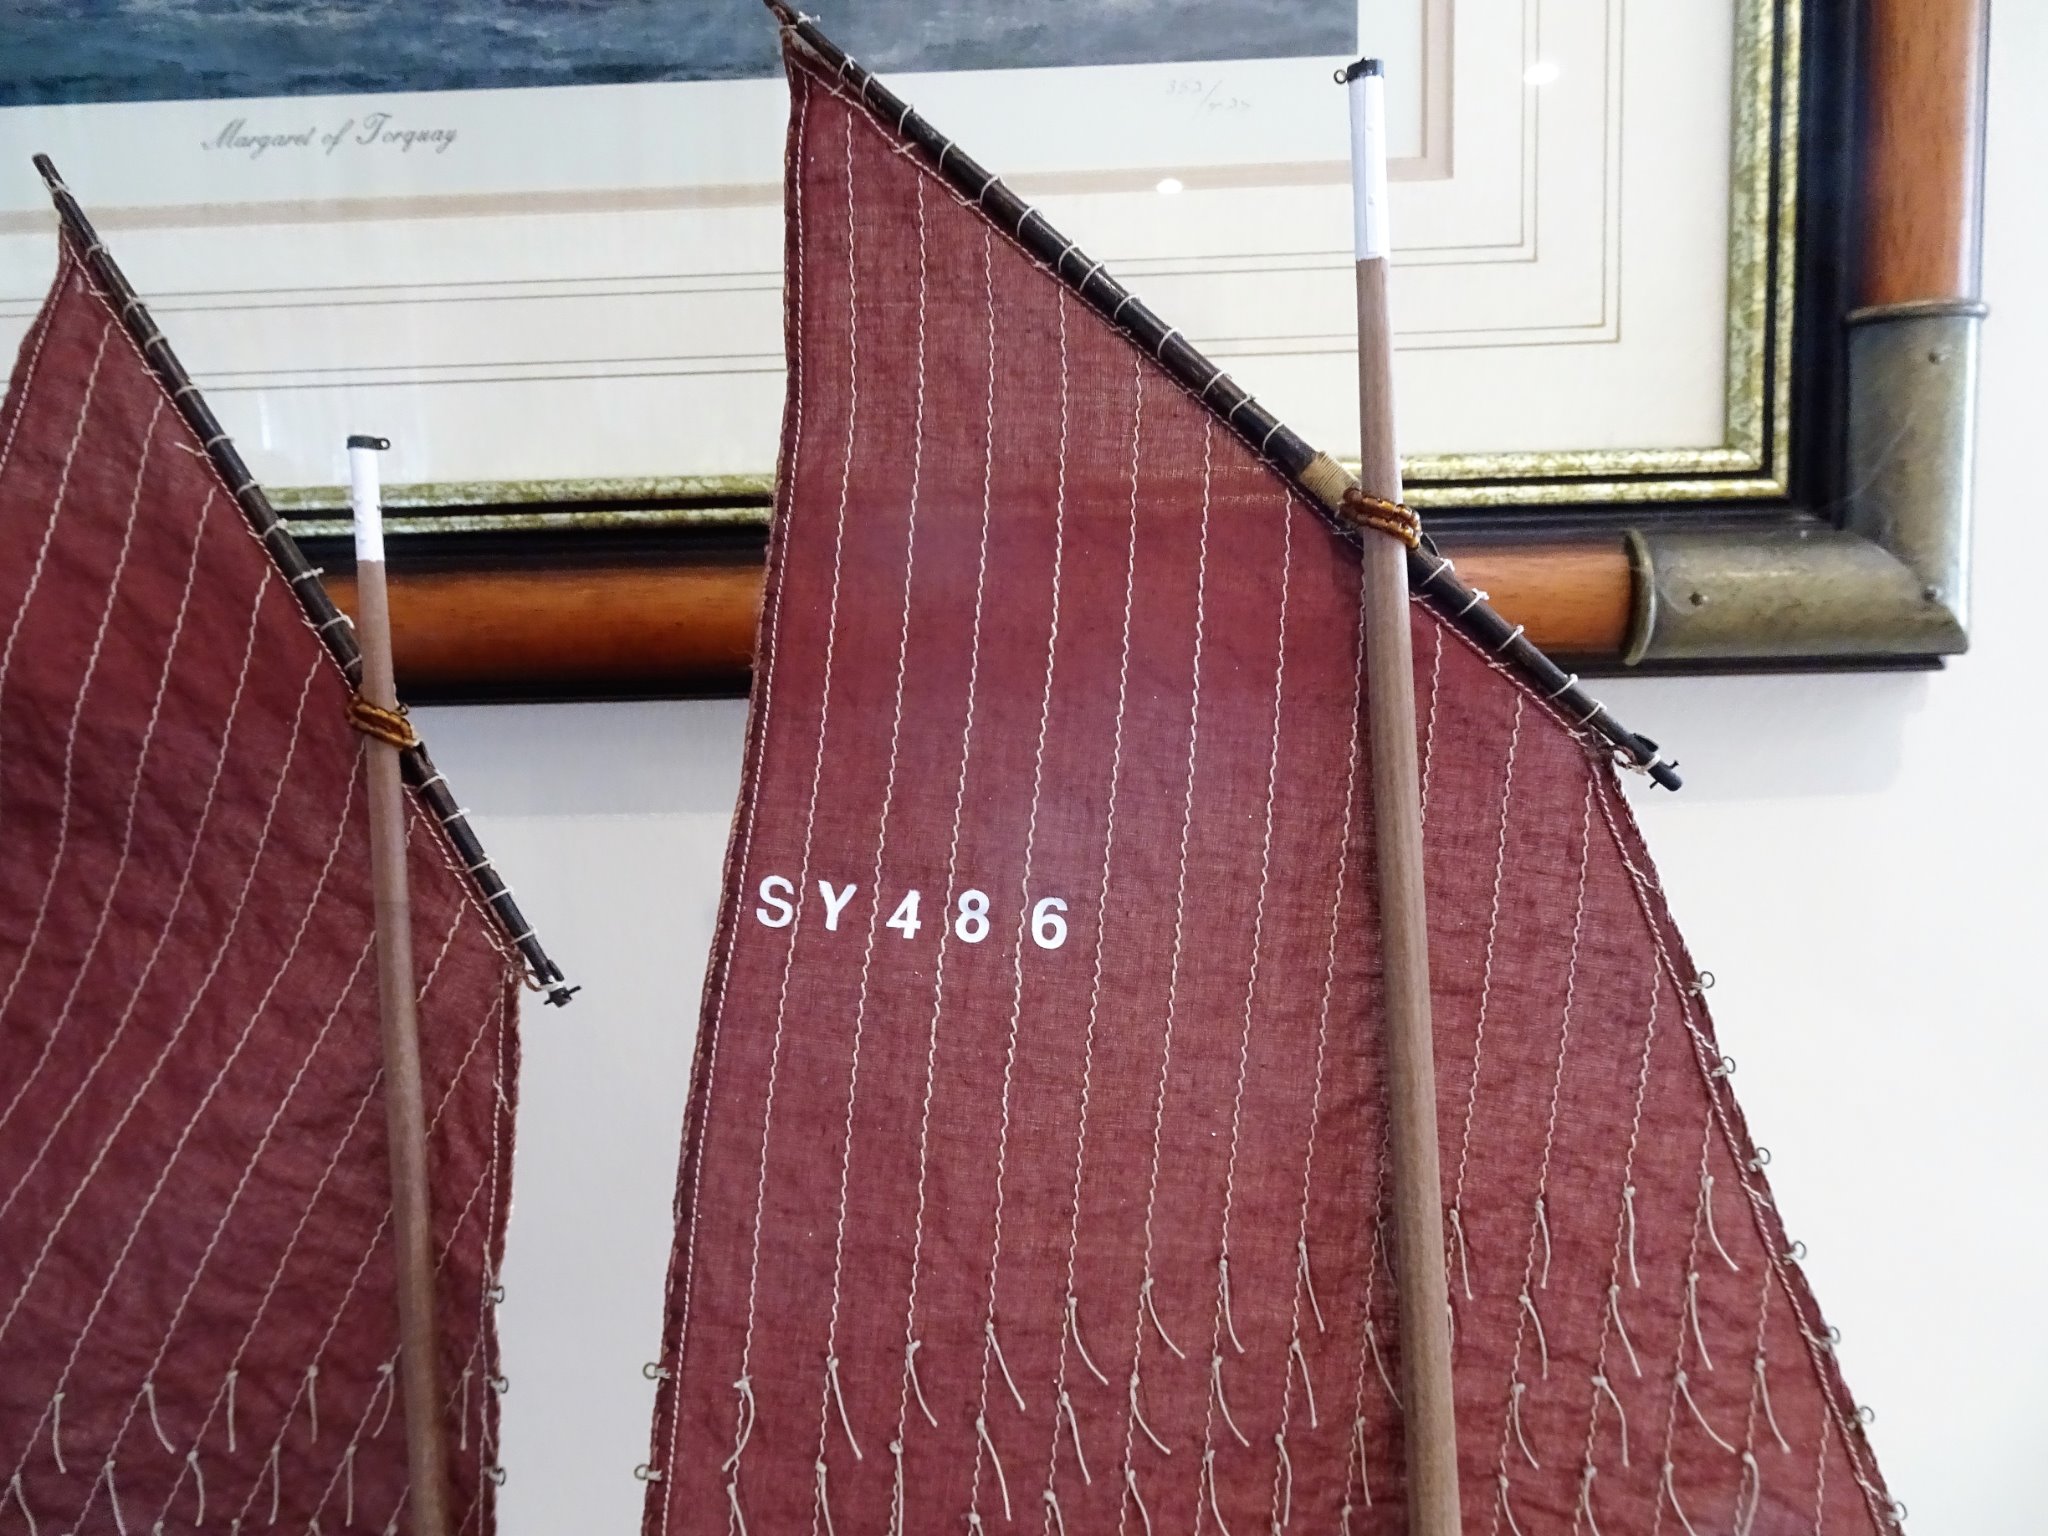
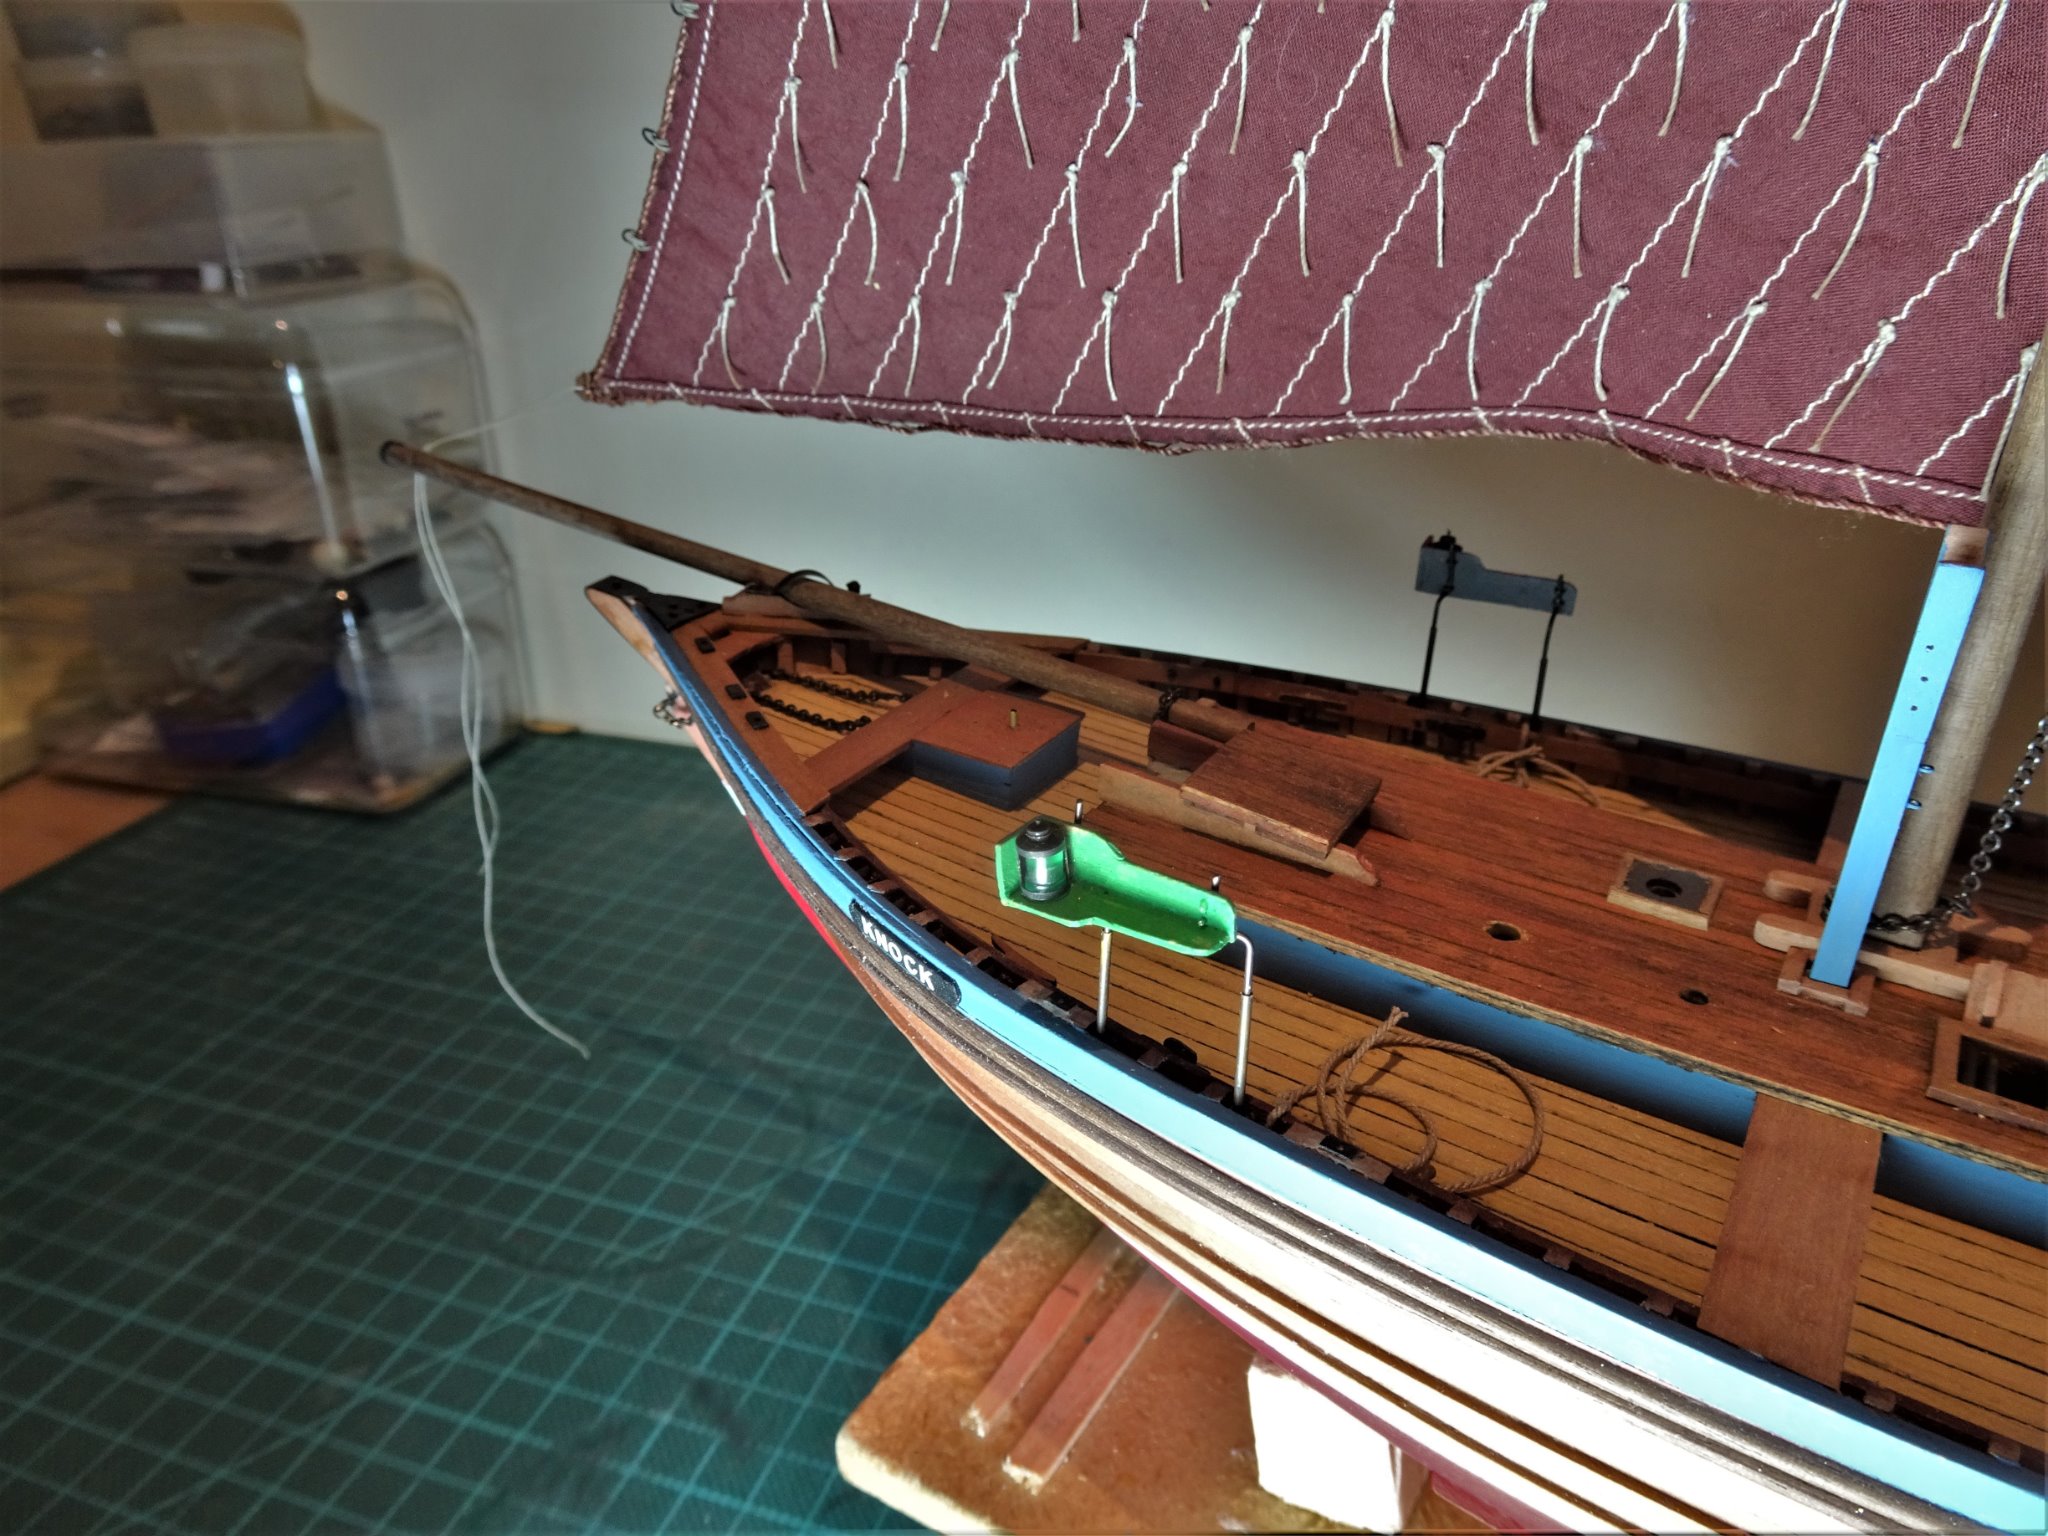
Post 45 Registration numbers on sails I have been pondering for a while the why and how to apply the Registration number to the sails. The why is easy, it is required under the Sea Fisheries Acts 1843, 1868, and 1883. The requirement is also mirrored in the Merchant Shipping Act of 1894. The requirement is that on ‘Barked’ sails such as carried by Muirneag white lettering is to be used of a size 30% greater than that of the Registration numbers on the Bow. In scale terms that is around 7mm in height. I have gathered quite a collection of dry rub lettering over the years, by Letraset, Conte, and W.H Smith, in various sizes, but not 7mm and not in white. It is always the way, dozens of screw sizes on hand except the one required for the job in hand. I have trialled Letraset dry rub lettering on fine cotton material and I think it should give a reasonable effect. It will also take a degree of abuse before it starts to flake off, but best not to test it. 9314 I picked up from Erik’s (EKE) log that he used Woodland Scenics dry rub lettering and I managed to obtain some from a UK supplier. The position of the numbers on the sails is something else that may be open to interpretation, as I notice there are differences evidenced by photo’s old and new, and models and drawings. Here’s the Law: SEA FISHERIES ACT, 1883. ARTICLE VI. The same letter or letter and numbers shall also be painted on each side of the mainsail of the boat, immediately above the close reef, in black oil colour on white or tanned sails, and in white oil colour on black sails. Such letter (or letters) and number on the sails shall be one third larger in every way than those on the bows of the boat. The letter or letters and numbers on the sails shall be one-third larger in every way than those painted on the bows of the boats. By a subsequent Declaration of 1st February,1889, the paragraph was replaced by the following provision: – The same letters and numbers shall also be painted in oil colour on each side of the mainsail of the boat, immediately above the close reef, and in such a manner so as to be plainly visible; they shall be painted, on white sails in black, on black sails in white, and on sails of an intermediate shade in black or in white as the superior competent authority shall deem the more effective. …. and you think we are bedevilled by regulations in our modern times! In terms of positioning there are examples of horizontal to the reefs, and degrees of downward slope. The most pleasing position to my eye is around the half way point between peak and clew which in terms of Muirneag is 145mm. down from the peak. 9321(2) I opted for the angled approach where the numbers followed the line of the sail panel seams. A steel ruler is used to guide the application. I was somewhat edgy about doing this for fear of spoiling the sail, and the application proved more than a little tricky. The letter ‘S’ ‘Y’ and the number ‘4’ proved particularly stubborn to release cleanly and each took several goes to apply and then not entirely satisfactorily. 9335 No matter how I secured them and burnished them bits did not take. 9332 In the end I accepted the situation and had to resort to painting over the deficiencies. This didn’t work out too badly with the shapes mostly there to follow, but it was a one shot exercise as any paint overspill would not be easy to remove. 9333(2) 9336(2) A little more touching-in once the paint on both sides is set, and then I can raise the sails and begin the rigging. B.E. 12/12/20
.thumb.JPG.4957fb7d1c7fbab919bf46b146d80a76.JPG)

.thumb.JPG.8e18834e8119c5dbbdd744ce7848420a.JPG)
.thumb.JPG.c66ddce5ed28545651c4636ad94ec8d5.JPG)
- 261 replies
-
- 15
-
-
- muirneag
- vanguard models
- (and 2 more)
-
You're doing a fine job on an interesting subject Yves, I really like the look of her. B.E.
-
She looks great Richard, beautiful display model in her home country. Well done. B.E.
- 49 replies
-
- 1
-
-
- Lady Eleanor
- Vanguard Models
- (and 1 more)
-
The Ensign halyard usually passed thro’ a small block attached to an eye in the end of the Gaff. I would think that with the Gaff lowered and secured to the boom the halyard which was essentially a loop with a toggle attached to the flag when required may well have been removed and neatly coiled somewhere conveniently at the stern. B.E.
-
In that situation I doubt the Ensign would be displayed. Ensigns were not routinely worn during voyages, unless action was imminent and an enemy was to be engaged. What would be worn is the Commissioning pennant at the mast head, this would be in place for the duration of a commission. A smaller (Harbour)Ensign may be displayed if the ship was at anchor, worn at the gaff or perhaps otherwise on a staff at the stern sheets. Still a well presented Ensign provides a nice touch of colour on a model, and there must have been times when it was displayed to meet a particular situation. B.E.
-
Cheers Guys, and thanks for posting the explanation Grant. For those particularly working with kits where the scale is given, 1:64, 1:48, 1:72 etc it is simply a case of converting the full size of a fitting or rope to the measurement system being used, inches or mm and dividing by the ratio number. The only extra calculation concerns scale rigging line which is usually given in fractions of an inch or millimetres diameters. Full size lines of the 17th/18th/19th centuries are invariably given in inches circumference, so dividing by Pi (3.147) gives the full size diameter, to which division by the ratio number will give the scale line size. B.E.
- 261 replies
-
- 5
-
-
- muirneag
- vanguard models
- (and 2 more)
-
Thankyou Bob, It helps to have a written confirmation of actual sizes, and in relation to the Zulu build there is a wealth of written detail in the Edgar March book. For instance there is a reference to fishing nets being 60 yards long. This equates to 2160 inches x 25.4 = 54846mm ÷ 64 (scale of model) = 857mm Of course in scale terms this would simply not fit on the model so some circumspection needs to be applied. Other fittings such as oars are given as 18’ long with blades of 7’ x 5” This would produce a scale version of 85.75mm (18 x 12 x 25.4 ÷ 64) Blades would be 33.3mm x 2mm and this looks right for scale. 6272 Scale built oars for the Fifie build. In working out rigging sizes there is an additional step. Ropes are usually given in inches circumference where model lines are invariably given in mm or inches diameter. There is reference to Fore Halyards being of 3” manilla This would scale to 0.38mm ø which is a good fit for the model. 3 ÷ 3.142 (Pi) = 0.955 (ø) x 25.4 = 24.25 (mm) ÷ 64 = 0.38mm (ø) scale line. Scale lengths of line is a different matter. True scale lengths are rarely fitted on models, there simply isn’t room. The Fore halyards are given as 60 fathoms (360ft) this would scale to 1715mm of length, a difficult fit on the model. Hope this helps, B.E.

- 261 replies
-
- 12
-
-
- muirneag
- vanguard models
- (and 2 more)
-
Thanks Erik, Tulle is widely available on the net from material suppliers, it is cheap to buy and the minimum quantity of a yard or so will give you a lifetime supply. For one model you could probably get away just ordering a sample. 🙂 B.E.
- 261 replies
-
- 3
-
-
- muirneag
- vanguard models
- (and 2 more)
-
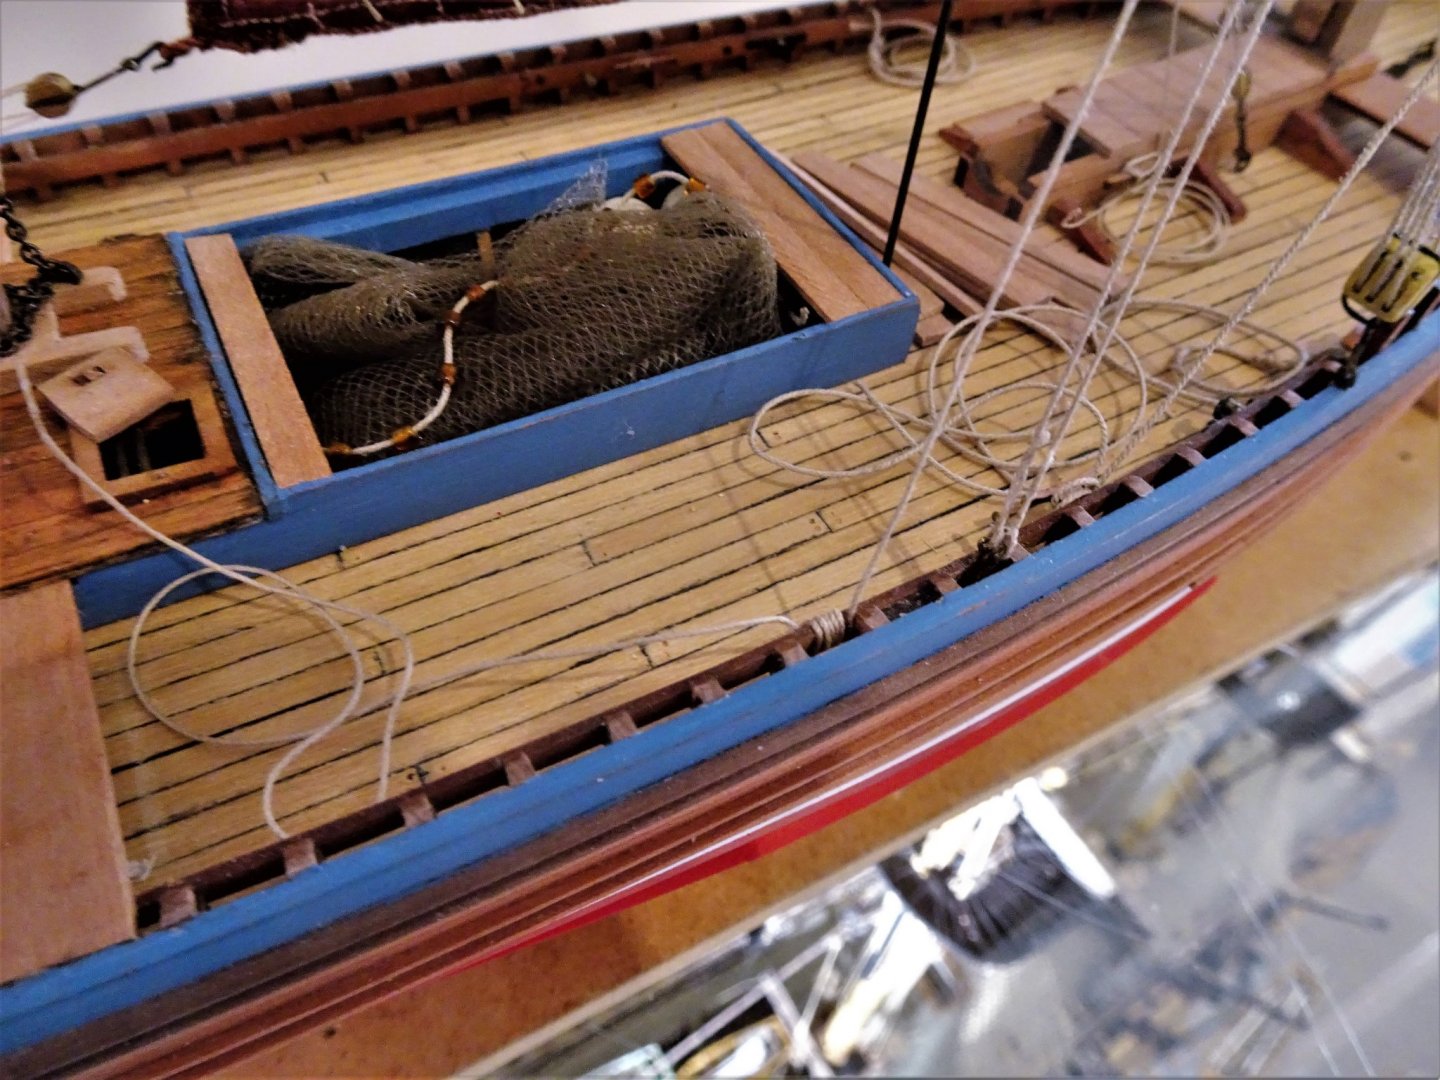
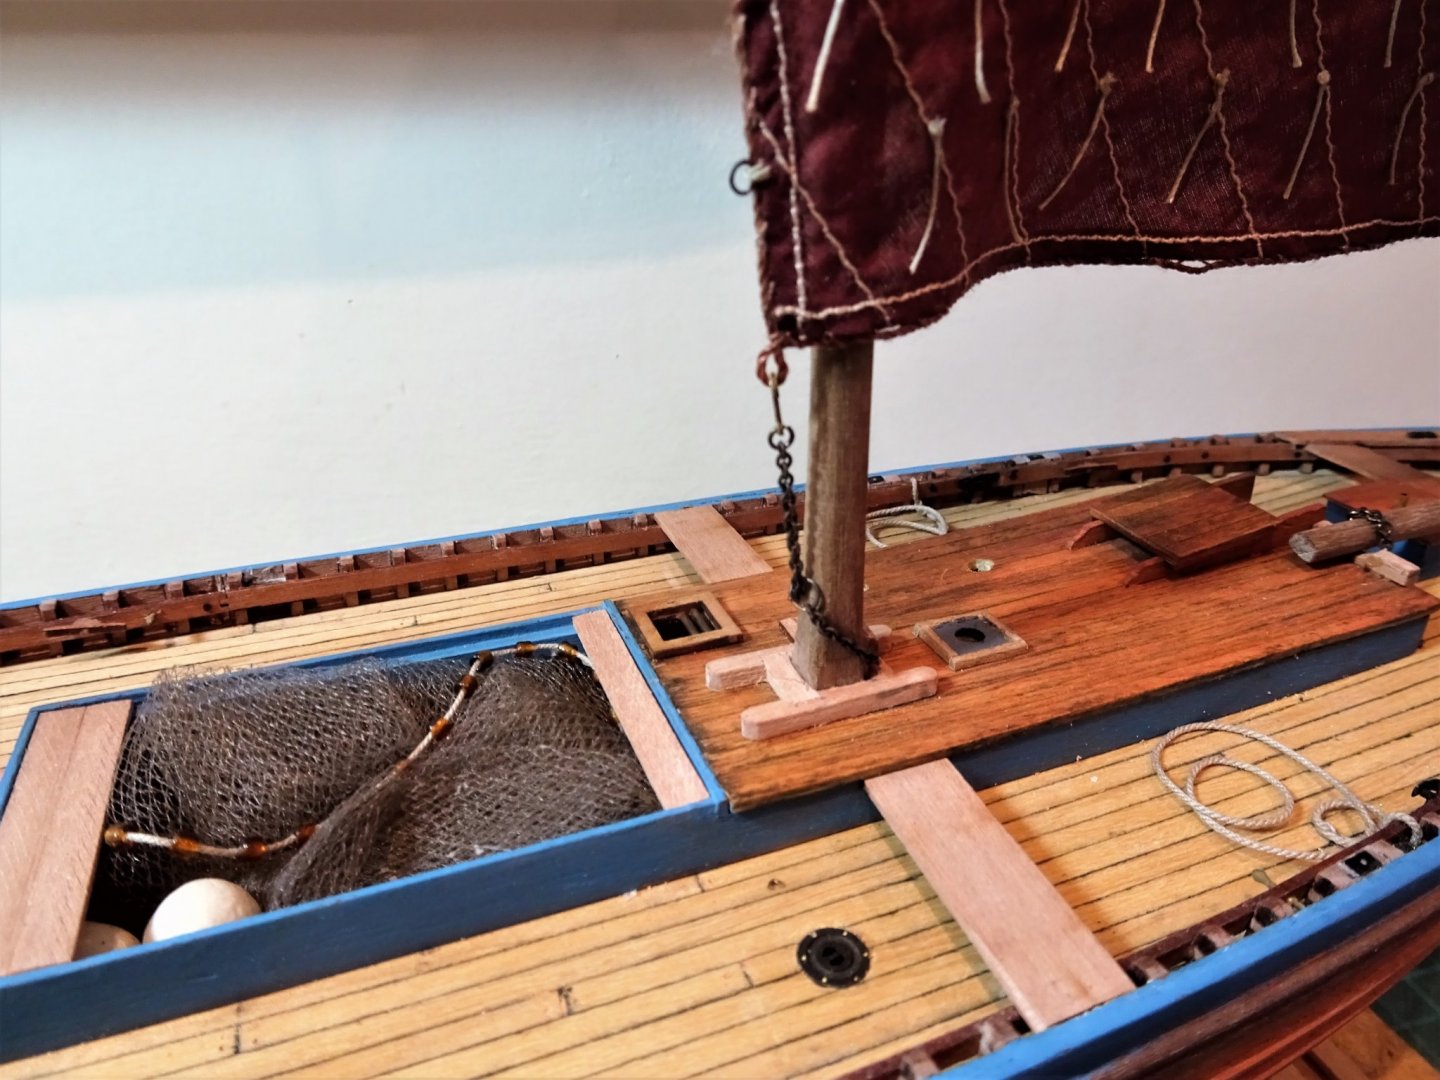
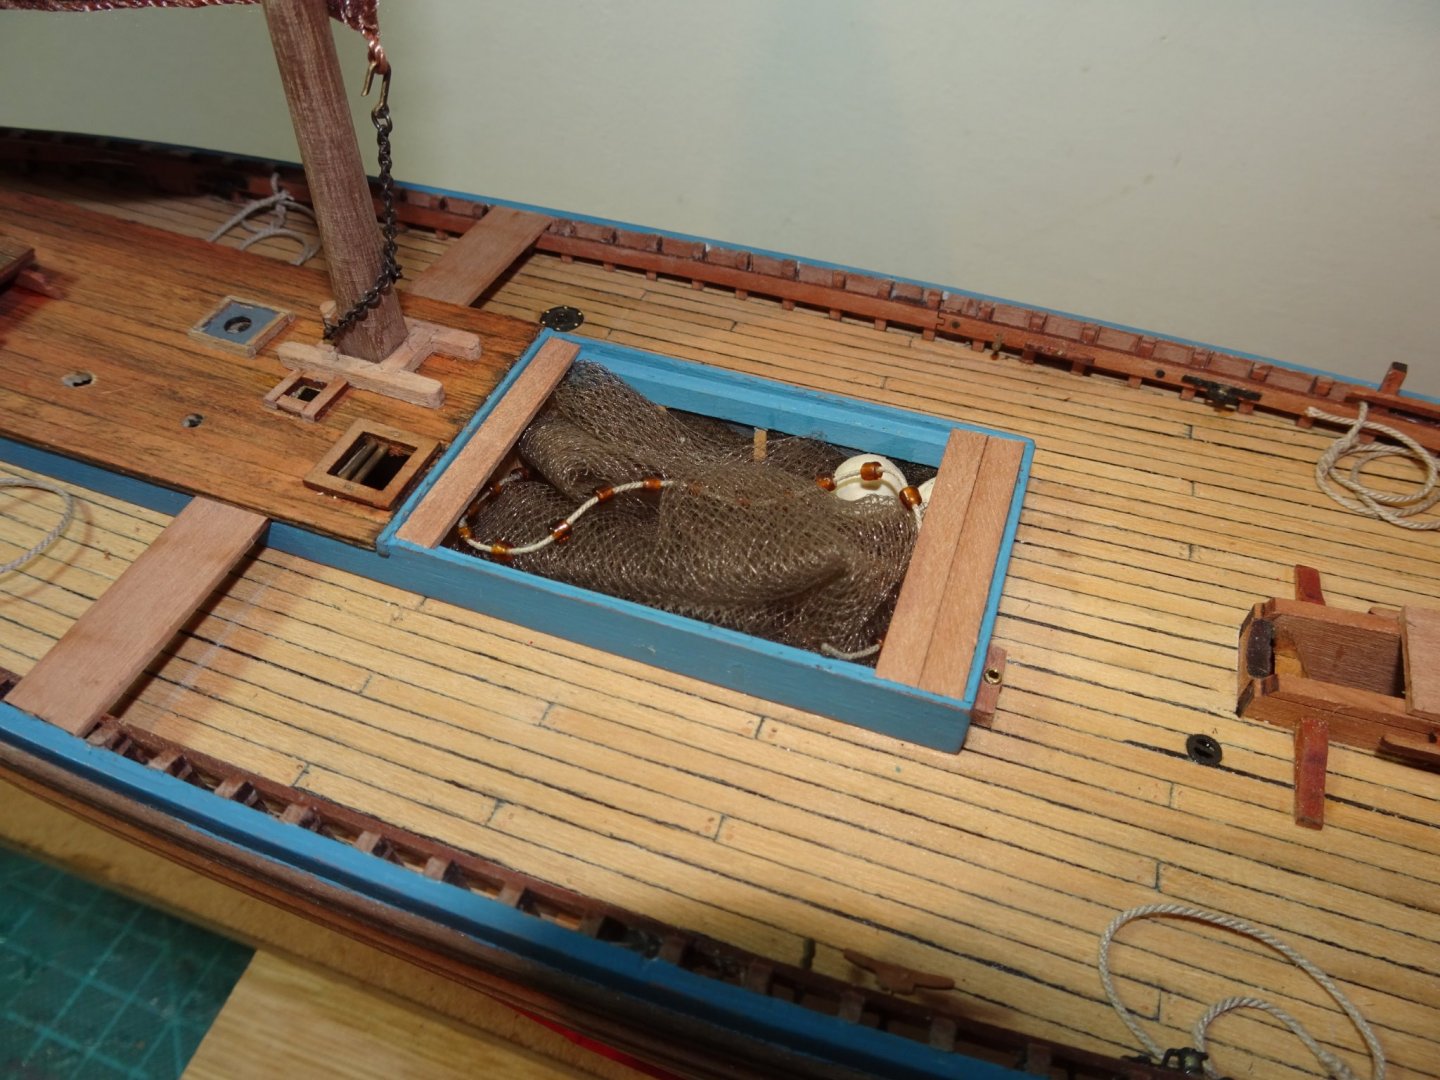
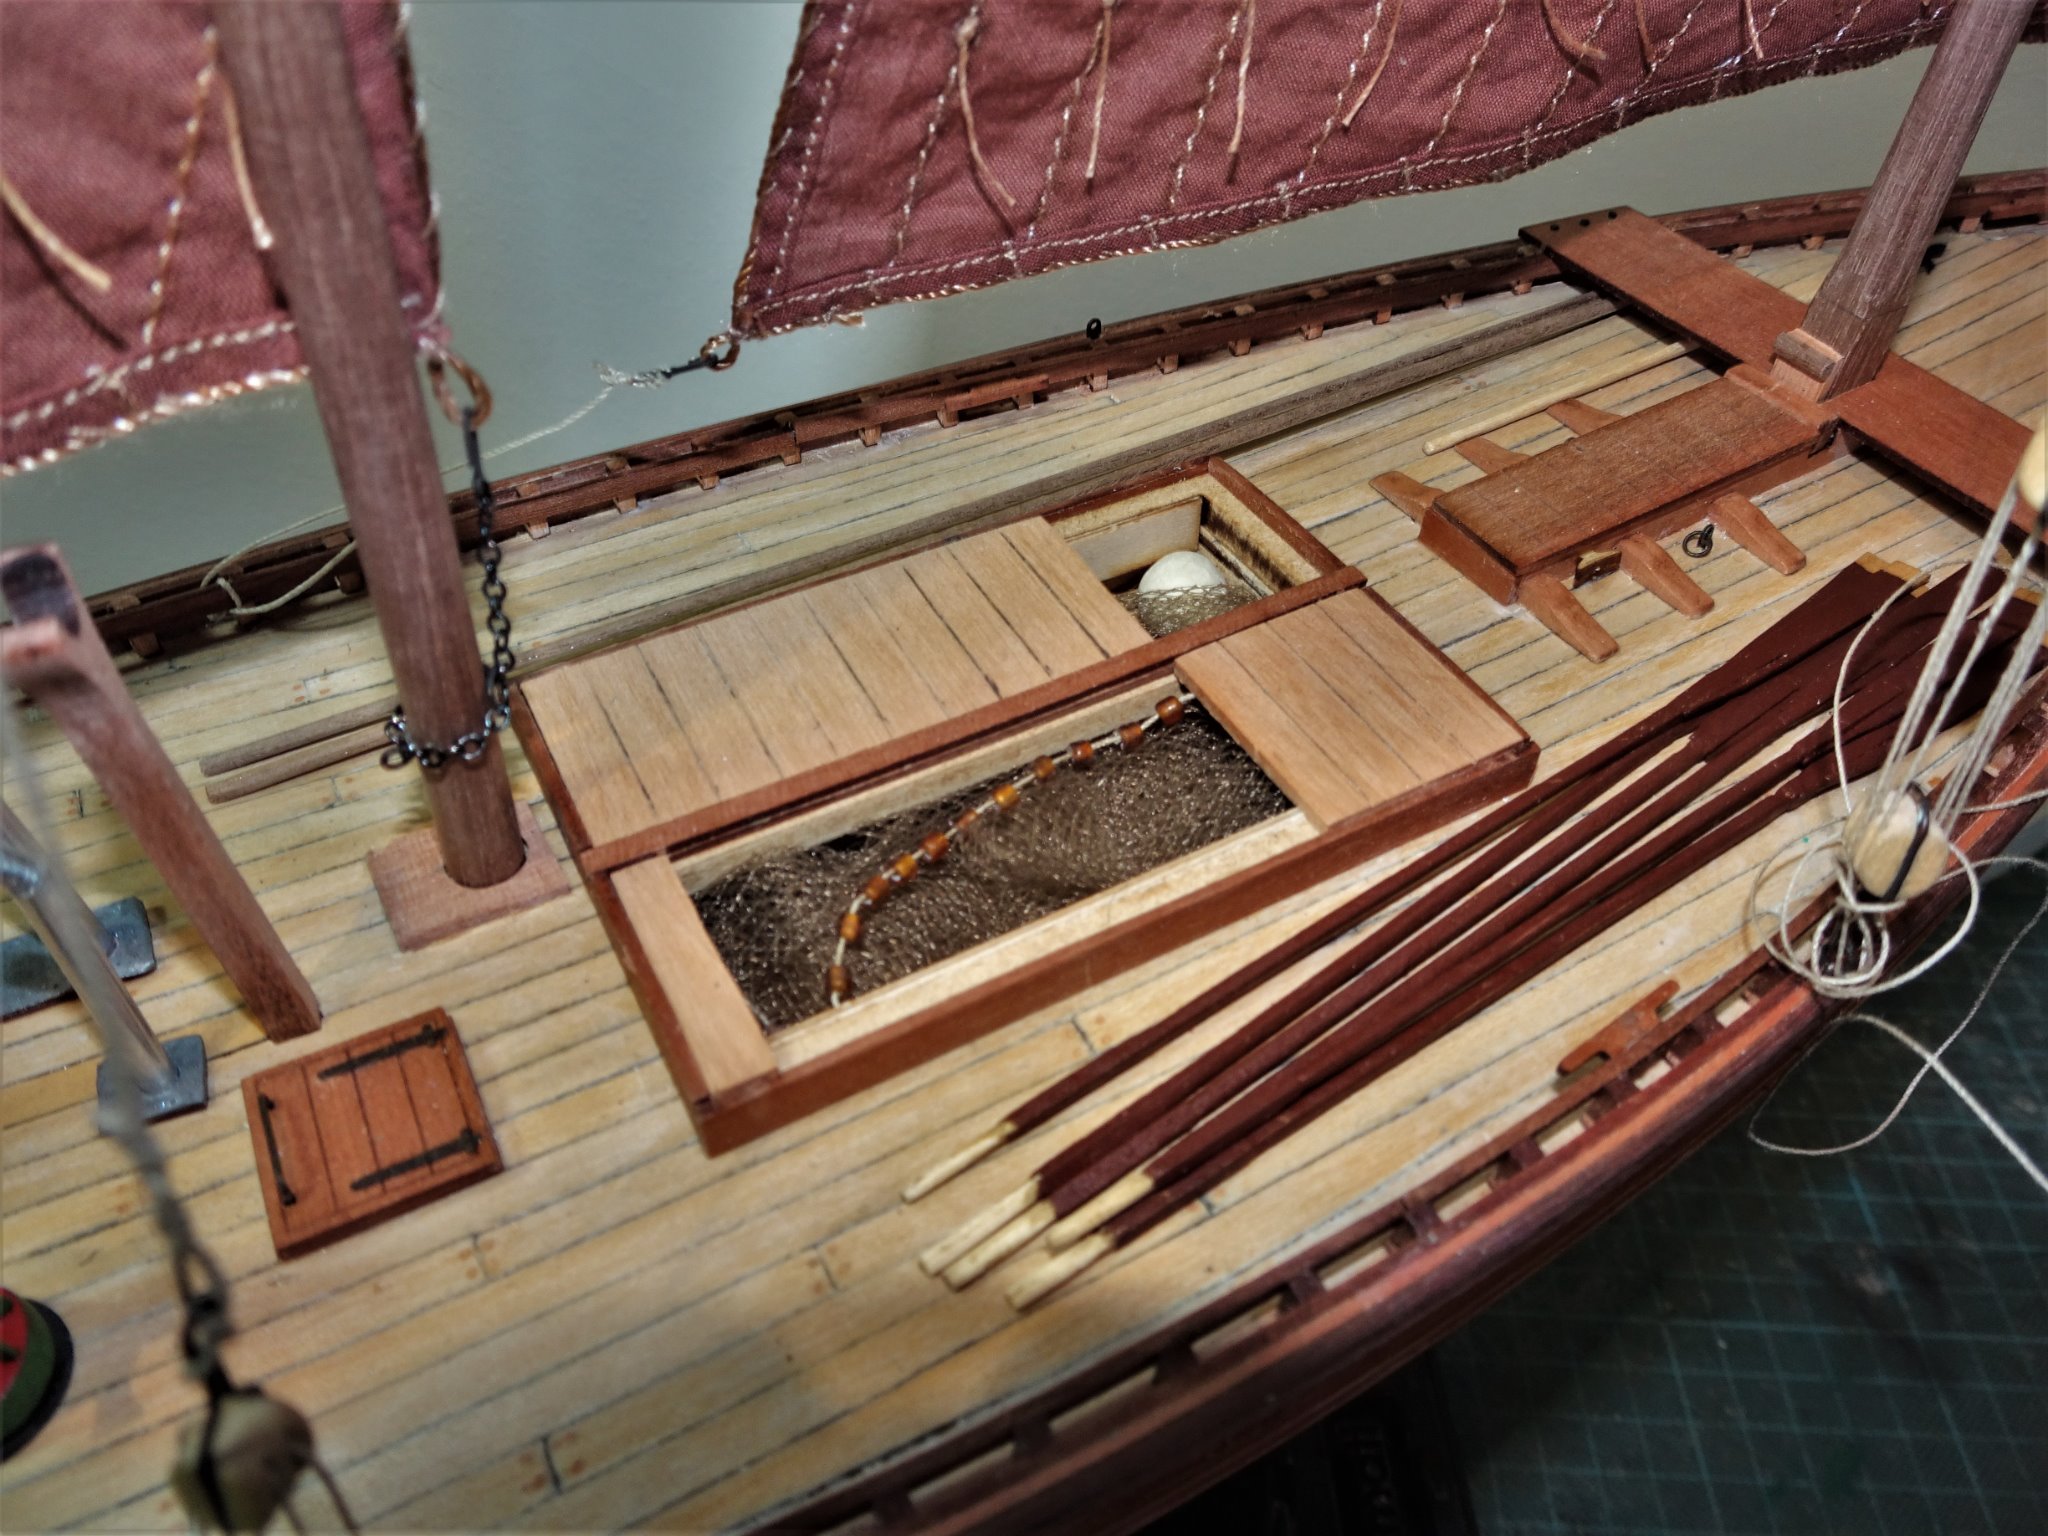
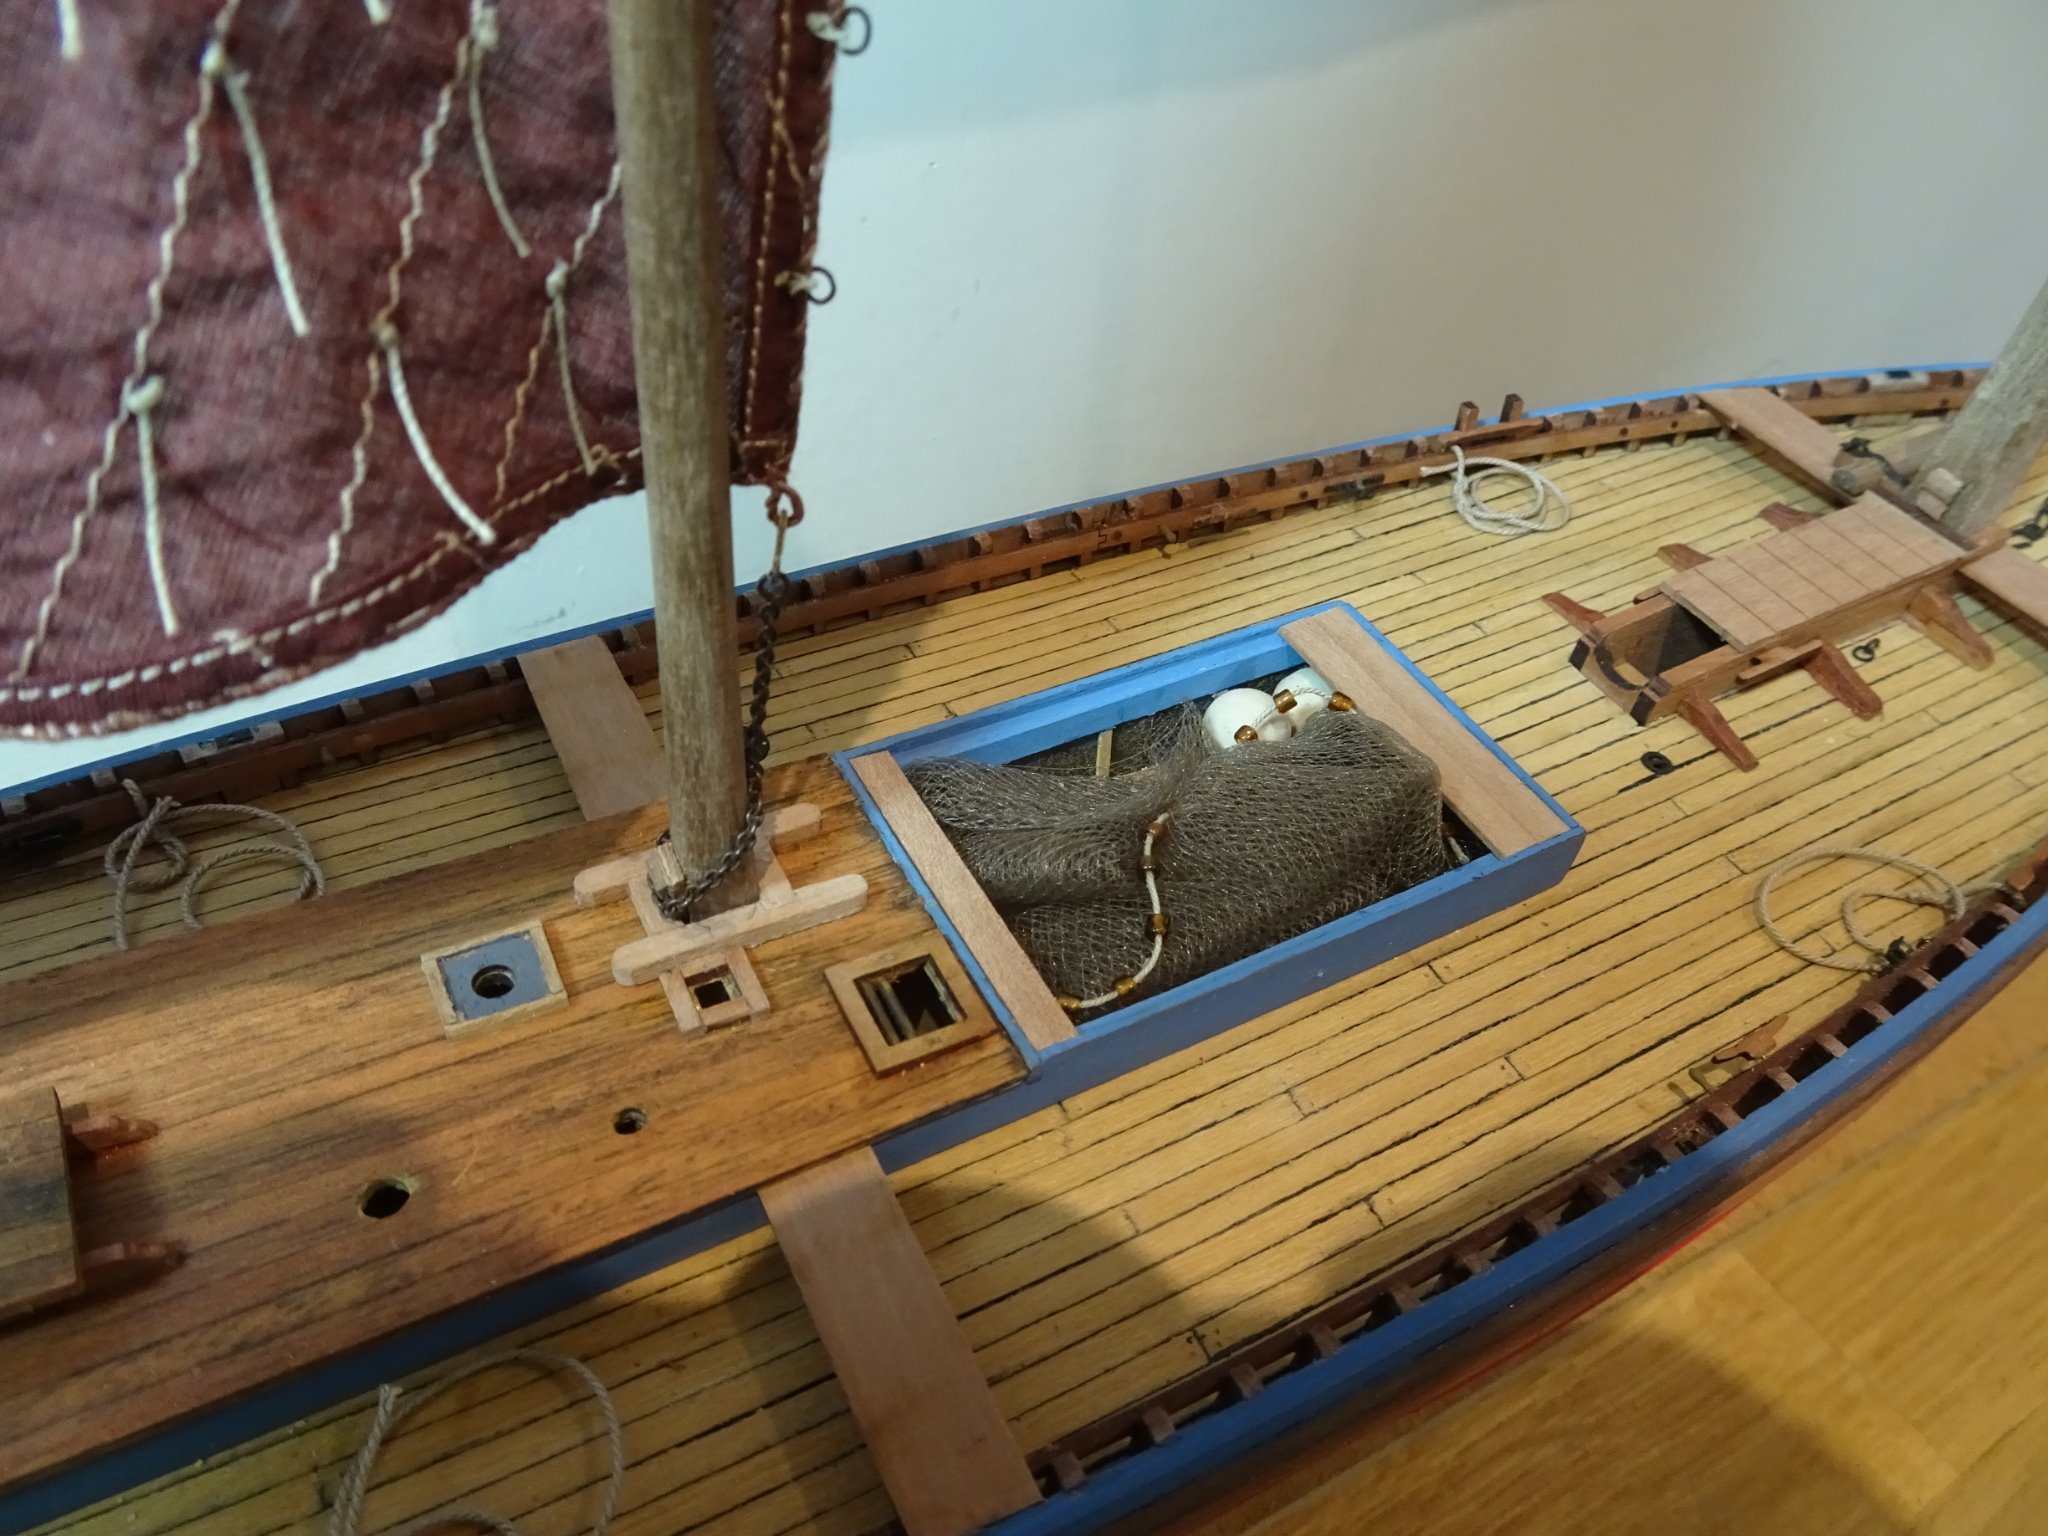
Post 44 This post concerns a mixture of those little finishing off tasks that progress a build towards completion. Parrels For these I use slightly elongated tubular beads of 2mm ø and 1.75mm in length. 9189 9187(2) Parrels attached, not a difficult job with the yards in place. Tuckle chain. This secures the tack of the Mizen Lug and is fastened around the mast foot. Those with a copy of the Edgar March book can see a photo of this detail on Muirneag in his book Sailing Drifters. 9180(2) The ring and hook are silver soldered to the chain. 9193(2) Testing the fit of the Tuckle chain. 9198 Thinking about nets It is of some surprise to me to read that luggers the size of Muirneag carried around 70 nets, each about 600 square yards which when strung together extended nearly 2 miles with a catching area of 33,000 square yards. In our scale terms each net would be 860 mm in length. 9203 To represent the nets, I am using Tulle material in a fetching shade of peat brown. 9201 Excellent for scale and the only issue with Tulle is that it is quite a springy material so a touch of pva in the folds helps to hold it in shape. 9199 A glimpse of the floats, aka Baking Beads which do the job at the scale involved. Navigation lights I have got around to completing the light boards which now have the lanterns installed. 9214 On the advice of John (Jim lad) I did try to impart a blueish green tint to the Starboard lamp by misting it with a rattle can spray of Ocean blue auto paint but it wasn’t really effective. I couldn’t get the lightness and clarity I would have liked. 9210 These are too delicate to leave insitu and will be one of the last things to be fitted on the model. 9219(2) 9224(2) I’m quite pleased the way things are going and I can now turn my attention to the rigging line and blocks. B.E. 04/12/20
.thumb.JPG.68afd48f2850174b24432c711125cf05.JPG)
.thumb.JPG.e3f4eb63038a7a06cc9735e9eefaba91.JPG)
.thumb.JPG.410eab7892cbcff697203f07e0bc6383.JPG)


.thumb.JPG.09882bddcfbc5f448c1720f841294c6b.JPG)
.thumb.JPG.cadd87764368dd4093488e95a33324f1.JPG)
- 261 replies
-
- 17
-
-
- muirneag
- vanguard models
- (and 2 more)
-
Thank you Erik, I have been thinking about adding the Registration to the sails but haven’t quite decided how to go about it. I would want the lettering to appear to be painted on and not appear too stark against the sail. The requirement to show Registration details on Fishing Boats has been in force since the Sea Fisheries Act of 1843. In summary the letters and numbers are to be painted on the Main Sail either in Black or white depending on the colour of the sail and be one third larger than those on the bow of the boat. If you want to read up on the various acts and regulations here’s the link. https://www.maritimeviews.co.uk/west-cornwall-luggers-and-mfv/the-lettering-and-numbering-of-fishing-boats/ Regards, B.E.
- 261 replies
-
- 4
-
-
- muirneag
- vanguard models
- (and 2 more)
-
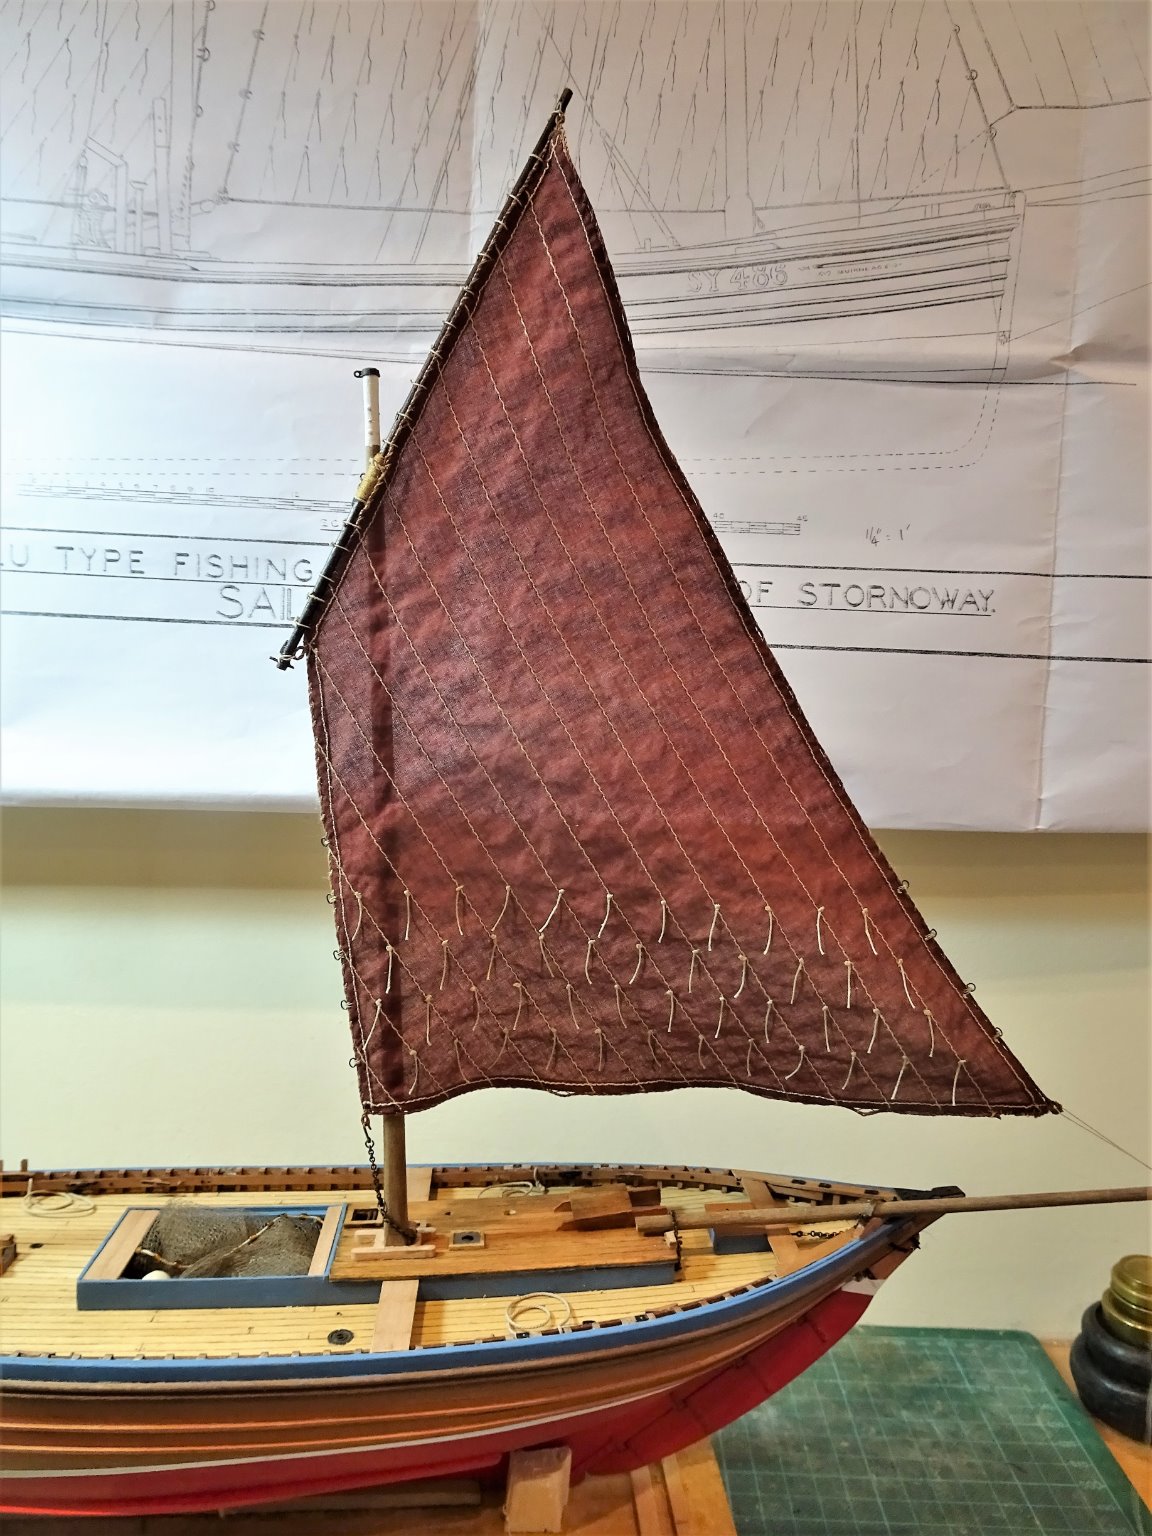
Post 43 Bringing sail and yard together Completing the Mizen sail took less time altho’ I did have to repair the clew loop which became unravelled. Once again, the Quadhands proved a very useful and flexible aid. 9140(2) Use of these magnetised arms is not restricted to the provided base. Distances can be increased using any old piece of ferrous metal, in this case a steel rule. With the sails completed it is time to test the fit on the model with a jury rig. 9152(2) 9153(2) 9156(2) 9162(2) 9157 9160 I can now attend to the parrels. Once in place the yards can be removed as they will slip easily over the masthead. B.E. 02/12/20
.thumb.JPG.6456487010c0c3e1a9a71f372849bc64.JPG)
.thumb.JPG.3fa8093ce3987ffce0275e0f5b434b02.JPG)
.thumb.JPG.2a94c94fe4336e46afeb50345bf34db7.JPG)
.thumb.JPG.7d739416d35a5460f5ae29cdfcd8d0e1.JPG)
.thumb.JPG.94290786f441a06b34e4daa1981b2db0.JPG)
- 261 replies
-
- 19
-
-
- muirneag
- vanguard models
- (and 2 more)
-
Try Abe Books Erik
-
You won’t be disappointed Richard, it’s a great read apart from the technical stuff, I would go so far as to say that Edgar March is to fishing vessels what C.N Longridge is to Victory. Loads of copies available in the U.S. of A. Erik, hint, hint. 😉 B.E.
- 222 replies
-
- 1
-
-
- First Build
- Lady Isabella
- (and 2 more)
-
Well Erik you may as well name her Fidelity as you say the plan is so close to the kit layout as makes no difference, and it's nice to represent a real vessel. Had I not bashed the kit into Muirneag, I would have gone for Fidelity. 🙂 B.E.
- 222 replies
-
- 2
-
-
- First Build
- Lady Isabella
- (and 2 more)
-
Hi Tony, In my primary reference book Sailing Drifters by Edgar J March He gives information directly from a Zulu builder William McIntosh who worked in his father’s yard in 1894. Masts were of Norwegian white wood and the yards of Larch. As far as the model timbers are concerned, I would have used Walnut for the yards, but I didn’t have the right size for the Fore lug. I reluctantly used one of the whitewood dowels, but knowing how tricky they are to stain evenly I first coated them with sanding sealer, two coats rubbed down in between. I then use a Medium oak stain followed by Dark Jacobean oak. I painted this on rather than wipe it on and off, and after a couple of coats with a fine rub down in between what you see is the result. Cheers, B.E.
- 261 replies
-
- 3
-
-
- muirneag
- vanguard models
- (and 2 more)
-
Looks superb Erik, a great paint job. I think dry transfer is the way to go, it's my preferred option if I can get hold of them which is getting more difficult over here. Have you decided on a 'port' yet, the name of which is usually carried on the Starboard stern quarter. Regards, B.E.
- 222 replies
-
- 1
-
-
- First Build
- Lady Isabella
- (and 2 more)
-
Thank you Thomas, The sails are an (expensive) extra with the kit, but the material is as fine as I have seen for model purposes. They are obtained from Master Korabel in Russia. Chris Watton has only recently confirmed to me that the material is cotton, and the sail bolt ropes and stitching are of polyester. This does mean that the sail cloth takes a dye very well but the polyester not so. It could possibly be got around with a more complicated dye process, but I simply resorted to staining the bolt ropes with a waterproof marker. The panel stitching is fine and beautifully done and I left it well alone. B.E.
- 261 replies
-
- 5
-
-
- muirneag
- vanguard models
- (and 2 more)
-
Not quite done yet Richard, I have the whole process to repeat again on the Mizen sail. Having struggled for years with various methods of holding things this QuadHands is a wonder, every serious ship modeller should aim to add one to their tool stock. B.E.
- 261 replies
-
- 5
-
-
- muirneag
- vanguard models
- (and 2 more)

.JPG.0674808dc4df0d4815d5a5252ed9b307.JPG)

.JPG.858c4cdc82d76e9b1c70d3494f9285a3.JPG)


.JPG.2eb35f2138a23093dc32c17af0b189af.JPG)

.JPG.ee87c755b668d2eba56d2ccc1c7e8652.JPG)
.JPG.0a6bab04ccb7bf5ba2534176766b2581.JPG)
.JPG.e0fdbf90213bb095a4865103d5bf9232.JPG)
.JPG.d849edf1ee66c1cff376350e9cd6cfa8.JPG)
.JPG.f0112501c0b142b4af7fb75d266119e7.JPG)
.JPG.4da2919db93b9b92c02fc8b4b5f4341a.JPG)
.JPG.a95196b6d37983c573ab2bc734c3e256.JPG)


.JPG.864d0a1f8426ea2f3f74c0389dd7189a.JPG)
.JPG.1c2b08d6dfad73806a3684adf95e2629.JPG)

.JPG.0a68267ac0061c745b054f7f4a4c5a16.JPG)
.JPG.83df96743c86be23ebcd7f2dc49cebce.JPG)
.JPG.fcfb88613360b560ffcf288b9f4186f1.JPG)

.JPG.7696146ebab8885ae67d6990d03ef232.JPG)


.JPG.0f7a293b5810647c08b4cc25a918b161.JPG)
.JPG.9517b85f69918ed20eb0d8e0818b109b.JPG)
.JPG.43caee482270e86ba40a6759e484ff4c.JPG)
.JPG.dd6d2cb88f36857476adeeb1812757b4.JPG)
.JPG.6e8c44e518439fadd93140957af1a71d.JPG)
.JPG.f1d8ec9bdadc4ad69270b9f5dde3016b.JPG)
.JPG.562a7bbb278e24ee8eeab5436a72d6bc.JPG)