


Chuck Seiler
-
Posts
1,876 -
Joined
-
Last visited
Content Type
Profiles
Forums
Gallery
Events
Everything posted by Chuck Seiler
-

Staining
Chuck Seiler replied to Eindride's topic in Painting, finishing and weathering products and techniques
Am I hearing this correctly?- 1. If I intend on staining all or part of a model's hull I need to stain the planks BEFORE I affix them to the frames/bulkheads? 2. A coat of Minwax stain is thicker than paint and therefore is out of scale? I'm skeptical on both. -
IIRC, British admirals were graded by seniority (Rear, vice full) and within grade (red, white, blue). At Trafalgar, Nelson was vice admiral of the white. Ships directly under the command of that admiral would fly the admiral's colour. Since ships operating independently and squadrons under command of a non-admiral worked for a particular admiral or area commander in chief, they would fly his colour.
-
I have attached all frames and am about to start the planking. The non-cant frames look great and will not pose any future problem (I hope). The cant frames DID take some patience. If I were to do this again, I would NOT make the cant frames in the provided jigs and, instead, make them off model and install when the rest of the frame is in the framing jig. These frames must be beveled on both sides to accommodate (a) the eventual planking and (b) attachment to the keel/tab. The bottom of frames 1 and 24 are extremely small and required much care in sanding. Once I could seen EXACTLY what kind of bevels I needed, the task became easier. That being said, it does take patience, but not much more than you would need to correctly make any model. This certainly is not a slap-it-together model...but I think the end result will be well worth it.
-
What news everybody? I have started the shallop in earnest. I am making it while manning the shipmodeling booth at our county fair. I assembled and faired most of the frames prior to the fair, but I didn't want to assemble the framing jig until I got there. I will eventually do a build log, but not until I get further along. That's my story and I'm stickin' to it. The cant frames are really giving me trouble. I was able to make 1 and 2, but had trouble getting them into the jig. It seems as though the keel slots and the slots for the 2 pieces in the jig are not exact, so over the length if they line up at the bow, they are a MM or so off at the stern. Frame 22 wasn't bad, but I am having trouble fitting it into the jig. Frames 23 and 24 will have to be assembled in the jig. Sadness reigns. What have you guys come up with?
-
Howdy! And welcome aboard.
-
Doesn't this also apply at the human (or any organism) level. Human cells die and are replaced regularly. While the frequency varies from organ and cell type to another they are all eventually replaced within a few years. Quite literally, "I ain't the man I used to be", but I am still me.
-
A tool/resource/attribute often overlooked is 'patience'. There will be times when things are not progressing fast enough, or things are not working out as planned. Those are the times when you back away and either not worry about the speed of the progress, or slow down and work out how to solve the issue, and/or have a beer.
-
I think they were placed there simply to perplex future modelers and researchers.
-
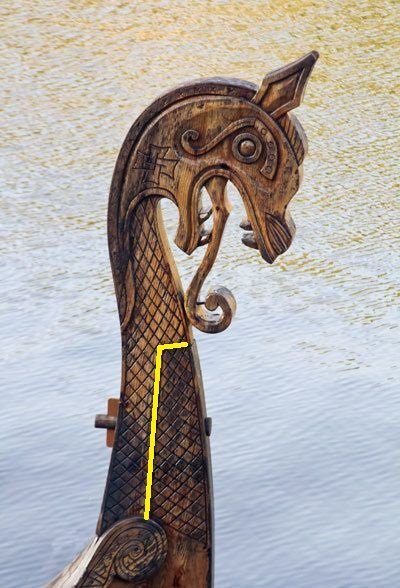
Which one is Ragnar? A couple suggestions, if I may. 1. I recommend using a harder, finer grained wood than basswood. I personnaly like boxwood, but I am sure there are others. Folks here can advise better than I. Rockler, or other stores in your area might have small pieces of a suitable wood (for practice and final version). Alternative-check with the wood vendors that are MSW sponsors. You may be able to get suitable sized boxwood custom cut, rather than getting a big hunk. B. Be sure to scarph your figurehead. See attached (yellow lines highlight scarphed seams).
-
Next NRG Conference
Chuck Seiler replied to YankeeClipper's topic in NAUTICAL RESEARCH GUILD - News & Information
Sadly so. We are still hiding from COVID. -
Frank, You are only talking about the cant frames, correct?
-
Nooooooo. Not CA. If there are issues, it is much harder to unglue. I recommend regular wood glue, but holding in place until it sets. I find that my hands are the best clamps I have. Its a bit tedious, but you can hold it whilst watching TV.
-
Jerry, What is/are the issue(s) with the frames? Bad angle? Too wide?
-
Also check out Chris' article about starting out. If you want to get as much as you can out of this hobby, you will be doing alot of research and questioning. You found an excellent website for that. After you settle on the model you want, you will want to know which tools to get. That topic also exists. Happy modeling...and remember, you can never have too many clamps.
-
Try Amazon. I have purchased individual AK paints from there.
-
What will the final size be for that? By my calculation, it appears to be a little over a foot at the deck. Is that right?
- 57 replies
-
- 1
-

-
- Trial
- Vanguard Models
- (and 1 more)
-
Looking good! "Pointy end" "Other pointy end"
- 56 replies
-
- 5
-
-

-
- Sea of Galilee Boat
- SE Miller
- (and 1 more)
-
It sounds like you walked away from the first attempt with not much more experience, but alot more wisdom. The fact that you are trying again tells me much. This hobby is very much about going back and fixing things that went wrong. As mentioned above, sanding here or there, making a new piece, adding another layer of planking. I am a big fan of going back, ungluing something that is not right and doing it over again. This includes a large swath of planking. The first time around you find out how NOT to do it and hopefully gain insight on how TO do it. As Keith said,sometimes when you hit a snag you just have to set it aside. Sometimes I will do that for a couple days and my mind will work on the problem. As a friend and fellow modeler once told me 'if you can draw it, you can make it'. It need not be an engineers dream diagram, but sometimes if you pencil it out it makes more sense. No screw up is a complete lost. I had an old schooner ENTERPRISE model (y'all know the one) I screwed up. I kept it and later used it to experiment on before I tried the same thing on a "keeper" model. Good luck and remember, patience is one of the most important tools in our kit.
-
Do we know what kind of ship it was? Hulk, caravel, carrack? 1495 was only three years after Columbus "discovered" America, but managed to NOT find a route to the Indies (where many of these spices came from). I don't recall if the Portuguese had established a route around Africa by then, or not. I don't think so. As a result, all trade from the spice areas was dominated by the Arabs/Muslims and subject to significant price hikes. The king and extremely wealthy were likely the only ones to afford them.
-
Looking good Jerry. Be careful not to sand down too much or else it may throw off the alignment. I noticed that with the frame jig the charring was in ridges. I think if you lightly sand the charring to where the ridges are smooth but you still have some color...AND...smoothing the frame faces, you will get a snug (but not too snug) fit. Little at a time. You can always take more off. Harder to put more back on.
-
Knowing that I am easily distracted, I attempted to make it semi-foolproof. On a piece of paper I made a side diagram of two frames. I marked one bow and one stern, so I would remember orientation. Then I marked :face up" or "face down". As I said, for me this is only critical at the ends. The middle frames will be left unbeveled until I get them into the frame. I them marked next to the end 3 or 4 frame slots on the jig "Face up" or "Face down". We'll see how that works out.
-
I have the 'John Smith SHALLOP". It appears to be a good representation based on the reproduction in the Chesapeake Bay Maritime Museum. I have ordered, but not yet received, the Oseberg Drakker. The laser etchings on the bow and stern look superb. So far, I am happy with the quality of the SHALLOP. The instructions are a bit light on verbiage, but oherwise complete. Email responses from "Pavel" have been quick (although so far I have only dealt with Denis...not Pavel). As noted above, shipping is pricey. Another issue is that it takes a long time to get the package, It took over a week for them to send the package and several weeks to arrive. Part of this is due to the war. IIRC, this is a small operation so they only crank out a few kits at a time. It is even slower when bombs are dropping around you and knocking out your electricity. Also, it is my understanding that there is no commercial air currently in Ukraine, so everything has to go by ground until it gets to a place with air.
-
The micro drill bits Mark is talking about run from size 60 (largest) to 80 (smallest). I tend to mostly use 72 and 76, which (coincidentally) are the years I graduated from high school and college. I normally work in 1/64 or 1/72 (or there abouts) and they work well for me for eyebolts and such. I get mine on Amazon.
-
I heartily agree with Cap'n Birdseye in his recommendation. While it might not be a "first model" it makes a good early learning model. If done well, it can be a good presentation model as well. I would recommend substituting Alaskan Yellow Cedar for basswood planking.
-
Now that the St. Paddy's Day beer has worn off... I checked my pieces-parts, and it appears (with my kit) if you install the parts in the jig as directed (left and right futtocks) frame 19 is face up while frames 20 and 21 are face down. Anybody else with the kit, please confirm or refute these findings.

