


Landlubber Mike
-
Posts
4,543 -
Joined
-
Last visited
Content Type
Profiles
Forums
Gallery
Events
Everything posted by Landlubber Mike
-
 Yep, it's 1/32. Has some pretty interesting marking options - maybe I'll start mine shortly while inspired by your build: http://www.silverwings.pl/de-havilland-dh82a-tiger-moth.html I got mine at a pretty steep discount on one of the FB auction sites. Not only did the auction have the kit, but it also had a ton of aftermarket detail pieces from CMK and Eduard for the 1/32 ICM kit. Not sure I'll need them, but nice to have.
 -
Really cool subject! I just picked up a Silver Wings kit of the Tiger Moth so will be following your build with much interest! Great start!
-
Wow, that came out great! Hope you're feeling better.
-
That came out really great Craig, fantastic job! Amazing work on the yellow - not an easy color to paint!
-
stagecoach by kgstakes - FINISHED - 1/8th scale
Landlubber Mike replied to kgstakes's topic in Non-ship/categorised builds
Wow, that's amazing!! Great job! -
You must not be married? My wife would kill me if she saw me working on a project like this. All kidding aside, this looks like a really epic project. Looking forward to following along (and living vicariously through you)!
-
Just caught up with your log David. Looks like a fun kit! Nice start!
-
Looking forward to following this one. I didn't realize Flyhawk did vehicles either.
-
Very cool subject! Nice start!
-
Wow Andy, that came out really nicely! Love the color - painting yellow is not easy and you did a fantastic job!
-
Great update Dan - I'll echo that the landing gear came out fantastic!
-
That came out really great Andrew! Colors came out really nice and complementary on this one!
-
Really nice job Joelle! Those 12 pounders look fantastic! I like your use of the figures. I've bought figures from a few different suppliers, and I really like the ones from Ion as well. I haven't used the 1/200 scales ones, but the ones in 1/350 and 1/700 are very nice.
- 210 replies
-
- 2
-

-

-
- Russo-Japanese War
- Mikasa
- (and 2 more)
-
Beautiful work Chris! I've probably said it a dozen times before on your logs, but it's impressive how you can manage the complicated compound curves. This is looking really great! The aftermarket will really kick it up a notch! It's nice that the AM is from 3D printing, as resin parts can add considerable weight. I'm realizing that the nice thing about these card kits is that you can horde them and have a stash 5% of the size of a similarly numbered plastic/resin/ printed kits. On top of that, you don't necessarily need to outfit yourself with an airbrush, compressor, spray booth, etc. - things that take up a lot of space.
- 112 replies
-
- 11
-
-
Thanks guys! It's been an interesting project, especially with the copper wire tie construction method. Learned something new on this one.
- 47 replies
-
- 3
-
-
- Annapolis Wherry
- Chesapeake Light Craft
- (and 1 more)
-
That sliding rowing seat contraption looks pretty cool - he's moving across the water fairly quickly!
- 47 replies
-
- 4
-
-
- Annapolis Wherry
- Chesapeake Light Craft
- (and 1 more)
-
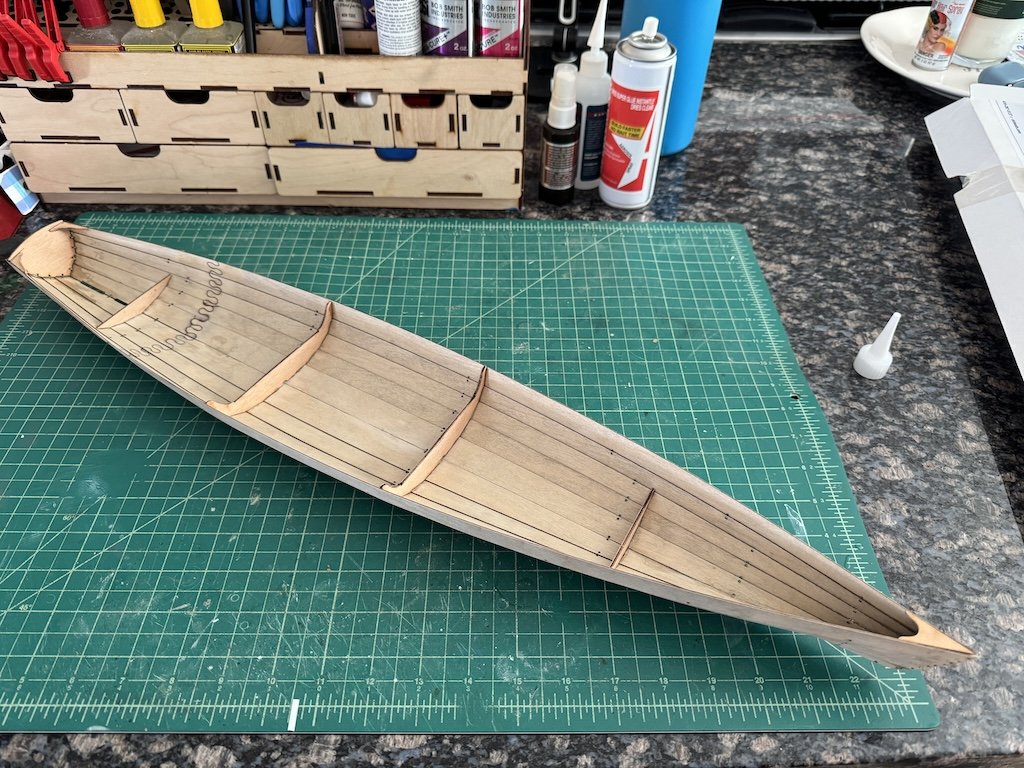
I had some time this weekend for a change, and managed to get some good progress in on the wherry: glued the stem and transom in, installed the breasthook and quarter knees, and glued all the strakes together and removed the brass staples The stem and transom were fairly tricky to glue, as the staples didn't necessarily orient the strakes in the right position. For the stem, I found I had to glue them in pairs starting from the keel up to get the stem lined up correctly. Thankfully there seems to be enough material on either side to sand back to get a straight stem. The transom on the other hand gave me fits, as I couldn't seem to get it to sit square with the center line. I found I had to loosen the staples on one side, and hold the transom in position and glue the other side in, then slowly glue each plank on the loosened side in place. I even had to pop the top strake off third bulkhead to make the strake sit better along the hull. Eventually things fell in line, and I was able to proceed with the third step and run a thin bead of CA along the planks from the exterior to lock everything in place. At this point, there's not much more to add to the wherry besides the skeg, seats, and outwales, followed by the sliding seat assembly and the oars. I think I might do a few things out of order from the instruction manual - namely, fill the holes, sand down the exterior and interior of the hull to remove extra CA and have a nice smooth surface for eventually painting (outside) and staining (inside), and then attach those other items. I've tried to be fairly careful with the CA, especially on the visible interior areas, but i'm not exactly looking forward to all that sanding work so i might as well get most of it done in one shot. On a more fun note, I ordered some spray paints for the model. The manual suggested gloss white for the exterior and a varnish on the interior, and semi-gloss black for the sliding seat. I decided to go a little differently, rather than a shiny white accented by a stark black. So, I'm going with an heirloom white (more of an off-white) for the hull, and a charcoal gray for the sliding seat. I have some stains I'll test on the interior, and then will probably go with a semi-gloss finish. Thanks for looking in!
- 47 replies
-
- 11
-
-

-
- Annapolis Wherry
- Chesapeake Light Craft
- (and 1 more)
-
Just caught up with your log BE, really well done as per your usual fine quality of work. Looks like a fantastic kit!
- 332 replies
-
- 1
-
-
- Harpy
- Vanguard Models
- (and 1 more)
-
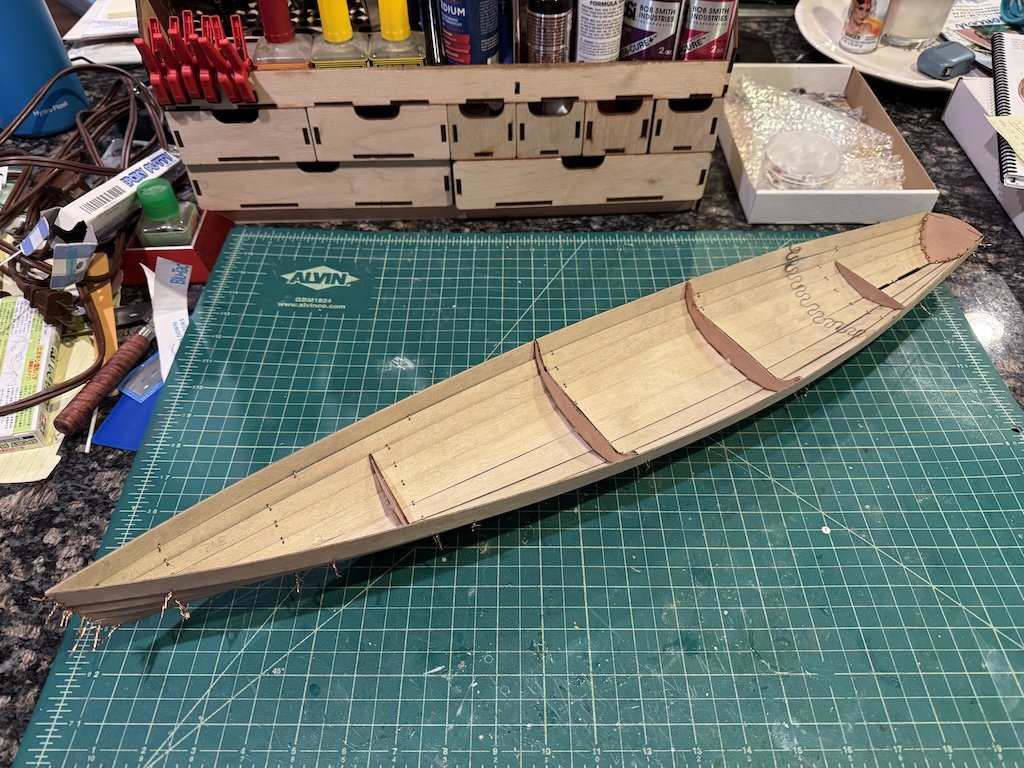
I made some good progress last night, installing the last two pairs of strakes on the wherry. It actually looks like a boat now The next stage involves gluing the stem and stern transom in. With the copper wire ties, it's a little tricky getting the planks to line up properly. The stem is in fairly good shape and will probably just need a little work to get the planks to line up. The transom is quite a bit more difficult, and I'll probably have to slowly glue each plank individually as the ties make it a bit awkward to get the transom in the right orientation when the strakes are overlapping. Hopefully it's just a matter of loosening some ties and tightening others to get it to sit right. Thanks for looking in!
- 47 replies
-
- 12
-
-
- Annapolis Wherry
- Chesapeake Light Craft
- (and 1 more)
-
Thanks for your thoughts Rob. I agree with a lot of what you said and feel on modeling. I'm less interested in the destination and more interested in the journey. I should try rating myself as a failure for not finishing kits and maybe I won't have as many 50-75% completed builds floating around I do plan to circle back to them when the mojo strikes - someday.... It's funny, I got into plastic modeling in part for quick palette cleansing builds after some of the grinds in wooden ship modeling, but then got into AM, trying to improve accuracy, dioramas, etc. and those turned out to be much longer builds than I would have originally expected. I thought participating in group builds would push me to start and finish more models rather than jump around. That really hasn't been the case though. On LSP, I was moving along pretty quickly on the Walrus for the "wet" build but sorta hit a standstill when it came to figuring out how to do the rigging. I ended up finishing my JRS-1 but only after an extra two months was added and many late nights before the deadline (not fun but did push me to finish). For the sandbox build I probably bit off more than I could chew with two separate dioramas and missed the deadline as well. I too am only competitive with myself, and I figure as long as I'm enjoying and challenging myself, who cares if I finish a build.
- 47 replies
-
- 4
-
-
- Annapolis Wherry
- Chesapeake Light Craft
- (and 1 more)
-
Andrew, many thanks for your kind words. I’ve enjoyed your builds as well - am really liking your Sparkler! Hope you are feeling better these days! Warmer days are around the corner (hopefully) so would love to see you continue work on her!
- 47 replies
-
- 4
-
-
-
- Annapolis Wherry
- Chesapeake Light Craft
- (and 1 more)
-
Thanks Rob! For some reason, I tend to lose interest in builds as I get near the finishing point. Part of it I think comes down to hitting a point where I feel like I want to figure out how to approach something I've never done before - so rather than hit build paralysis, I just pick up something else. Part of it might also be avoiding finishing the build, as it seems anticlimactic, if not depressing, as it is like saying goodbye to an old friend. A more recent development for me is that my mother-in-law passed away a couple of years ago, so my father-in-law is living with us in a spare bedroom in our basement. My power tools and airbrush are down there, so it's difficult to put much work into models in late evenings like I used to as he tends to go to bed early. It's much easier for me to do early construction parts of builds upstairs, so that's a big reason why I have a number of kits in various stages of completion. Along those lines, I started a Planet Models 1/72 Gamma a week and a half ago. It's a quick build, and I'm already at the painting stage. Given the size, I can run downstairs in the early evening to throw some paint on, then work on other things in the later evening. That was originally my palette-cleanser build, but got stuck with the painting. I probably won't put a build log on here or LSM as it's not particularly topical or likely interesting for folks, but I have a project log on Scalemates going so that I can remember what I've done on builds -- or re-live some of the painful moments
- 47 replies
-
- 6
-
-
- Annapolis Wherry
- Chesapeake Light Craft
- (and 1 more)