
HOLIDAY DONATION DRIVE - SUPPORT MSW - DO YOUR PART TO KEEP THIS GREAT FORUM GOING!
×


Martin W
-
Posts
1,412 -
Joined
-
Last visited
Content Type
Profiles
Forums
Gallery
Events
Everything posted by Martin W
-
 Beautiful work Nils. That soldering is really outstanding. And the crewman with the binoculars must be proud to serve on such a handsome vessel. Cheers, Martin
- 2,625 replies
-
- 6
-

-
- kaiser wilhelm der grosse
- passenger steamer
- (and 1 more)
-
Very nicely done, Bob. Those treenails really add a neat (and tidy) touch. Cheers, Martin
-
Oh, and I just remembered, another very useful book on planking is by Jim Roberts, available in the US from Model Expo -- and I think they'll ship to England. Here's a link: http://www.modelexpo-online.com/product.asp?ITEMNO=MSB113 cheers, Martin
-
Hi Mark -- I looked at the Little Machine Shop mill, and I bought some of their attachments (which did not match my MM mill). I think their mill is probably one of the best. BUT Sherline seems to have won just about everyone over as holding the top position. Whenever your HMS Visa gets back to her home port (unless she's been caught with mine in the Bermuda Triangle) load er up! What I've learned from my MM mill (and you're right, it is the smaller one -- I thought I was being frugal!!) is that it could be a very useful tool, but those tiny slots handicap terribly. I keep hoping it'll find it's way to the middle of the road and get run over. Maybe we should form a Micro Mark support group. I like your jigs -- they definitely warrant further study!! Cheers, Martin
-
You should take a look at the planking tutorial that's available on this website. It will give you lots of information about what to anticipate for the planking -- and how to anticipate it. The first planking can serve as a practice run, so you can see what happens as the planks have to curve around the hull. So you might want to take plenty of notes and photographs to help you through the second planking. Congratulations on those *%#&&@@@*^ ing gunport strips. They really are a pain, and I don't think anyone has avoided having some kind of problem with them. Cheers, Martin
-
Love the jig, Mark (I have the smaller MicroMark mill, so I'm happy to see some with the big brother version). So let me ask you a basic question: How did you shape the wood you're using for the jig? It seems the accuracy for that piece would be at least as important as for the one you'll put on the model, eh? And have you had any problems getting your clamps to fit into the T-slots of the x-y table? Mine are tiny, and require metric bolts, so that getting clamps secure has often been a challenge. Great work as always! Martin
-
That planking looks pretty doggone good to me, Bob. The "inevitable creep" is something that made me learn to gnash my teeth in new ways as I planked the Fly, but golly I think we understand creepiness in different measures. Cheers, Martin (The Creepiest)
-
Hi Nils -- It's always a pleasure to check in and see what detail you've added. Those brass windows are wonderful, and I'm glad you didn't just paint them on. Cheers, Martin
- 2,625 replies
-
- 4
-
-
- kaiser wilhelm der grosse
- passenger steamer
- (and 1 more)
-
Hi Peter -- America? That's quite a new direction isn't it? No more 18th Century? Still, I'm glad to see you keeping at it, your builds and your commentaries are always a pleasure. Cheers, and let us know when you're starting the new build. Martin
- 293 replies
-
- 1
-
-
- pickle
- caldercraft
- (and 1 more)
-
Thanks, BE, and thanks for the likes guys. BE, I don't have to mention, I'm sure, how much I studied your own rudder detailing. And now I'm stealing myself for the pintles & gudgeons. Cheers, Martin
- 467 replies
-
- 1
-
-
- fly
- victory models
- (and 1 more)
-
Good looking ribs, Mike. A friend of mine here left two weeks ago for a trip to Buffalo -- he told me he plotted his route to try out as many famous rib places along the way as possible. You might listen for his knock at your door. Cheers, Martin
-
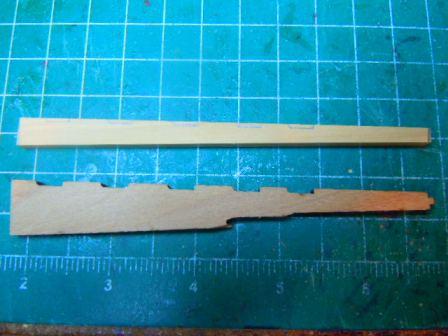
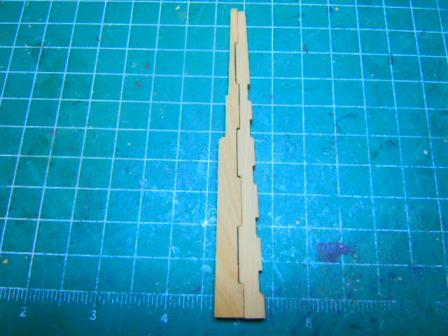
Once again, the Oklahoma heat drove me indoors yesterday, and once inside I decided that I'd drifted rudderless too long in this sea of ship modelling. I've been looking at the sections on the rudder in FFM 2, and in Greg Herbert's build, FFM 3. What I find appealing is the detailing in the matter of the tabling that brings the 2 sectional lengths together. Essentially, this is a type of joinery designed to endure stresses both longitudinally and horizontally. Even though my micro mill is out in the un-air-conditioned workshop, I still thought I would give it a go, to see if I could cut a boxwood rudder. First step was to cut 2 blanks from the stock. For this, I simply used the rip-taper jig on the Byrnes (I used a template to determine the angle.) Next, I traced the pintle slots on the foreward edge of the forward piece using the kit's rudder as my guide: Then, I traced the pattern of the tabling on the matching edges of the two pieces, allowing for an interlocking alternation. I also cut the upper taper on the aft piece, finishing off the 2 hances with chisels & files. For the bearding, I used a little thumb plane to trim the angle. And here it is, without any of the metal work, and, for that matter, basically un-sanded, and untrimmed along the bottom to match the keel (and I noticed the tip of the keel needs a bit off as well). I've located the photo-etched pieces for the pintle & gudgeons, and will probably spend the next several evenings fretting over their placement, and then (I hope) finally breaking down and putting them all on. The rudder itself will go into safe keeping, since I'm sure I'd break it off if I set it in place. (LL Mike: let me buy you a beer sometime and we can both weep over how many times we've knocked those guns out of place -- grrr! ) So I'm now assured of sailing in a direction -- even if I'm not sure which way it is. Cheers, Martin
- 467 replies
-
- 3
-
-
- fly
- victory models
- (and 1 more)
-
Hi Mike -- I must correct you on one point: you claim the deck planking came out "pretty well" No Sir, it came out bloody fantastic! Where did you find those Zona Berna clamps? I've had the same complaint about the Irwin clamps, and would really like something akin to a micro bar clamp. I, too, like the maple. Cheers, Martin
-
Herb -- I'm going to add my voice to those encouraging you to take the strips off again rather than cutting the ports. I don't recall what kind of glue you used on them, but generally some isopropyl alcohol will loosen it enough to avoid damaging the bulkheads. Don't use screws this time around. Soak the strips, then clamp them into place and let them dry overnight before gluing them. Line them up at the stem as closely as you can, and keep an eye on the placement of the ports -- vertically & laterally. I left the aft strips off my build for quite a while, so I could take care of various details up at the front half. If you cut open the ports, you might find you'll have a hard time keeping the planking level. It's surprising how much of a lump can grow from just a little discrepancy. These strips are a royal pain. I don't think any one has gotten through their installation without some infuriating problems. Good luck, and enjoy France. Martin
-
Hi Ken -- you might have a look at Blue Ensign's log, where he shows how to make a false eye-splice, a VERY useful technique, and shockingly simple. It will save you lots of time. That's a nice, taut stay. Cheers, Martin
- 481 replies
-
- 2
-
-
- rattlesnake
- model shipways
- (and 1 more)
-
Hi Bob -- Great treenailing. I'm glad to see you didn't shy away from setting dark treenails in -- I personally think that contrast looks terrific. Cheers, Martin
-
Whew! Glad to see you got that annoying step out of the way. That's really the Swan Builder's initiation rite: if you get those gunport strips on without throwing the whole build out the window, then you're in for the duration. Bravo, and Well done. Martin
-
Thanks guys, your support means a lot. BE, that's a good suggestion. I have some clear plastic (from egg cartons) that I used on the Rattlesnake with fair effect. I'll give that a try here, but the "glazing" would be set pretty far behind the wood mullions. But there's only one way to tell how it'll look. Cheers, Martin
- 467 replies
-
- 1
-
-
- fly
- victory models
- (and 1 more)
-
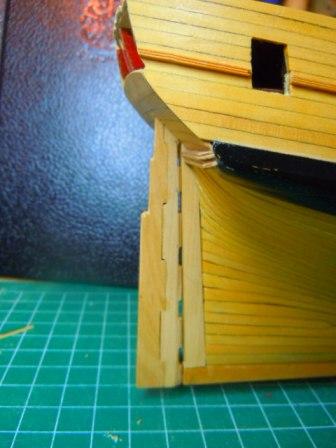
The summer temperatures here in Oklahoma have one benefit, and that is driving people like me indoors. As a consequence, I got to spend a few uninterrupted hours at the work bench yesterday, and finished the clerestory lights. I took Blue Ensign's hint of using some styrene, which has the nice quality of cutting easily (and filing). I would have been happier if the styrene was thinner, but I used what I had on hand, left over from the stove. Once I cut the basic shape of the top line and the individual lights, I set the styrene in the coamings and attached thin strips of boxwood. Here's the result: The individual lights are not glazed, primarily because with the thickness of the wood on top of the styrene, I just couldn't see adding yet another layer (excuses, excuses ). I also managed to cut the pieces for the ladder, using the jig designed by Alan Yedlinsky, which makes a snap out of this little job. I'll post a photo of that soon -- right now it's in clamps. Cheers, Martin
- 467 replies
-
- 9
-
-
- fly
- victory models
- (and 1 more)
-
That contrast between the walnut & holly looks really good. I've pretty much looked away from walnut, since it's so splintery to work with, but now, I'm going to start thinking of how to make such a handsome contrast somewhere on the Fly. Great work Bob. Martin
-
Hi Ken -- It's always great to see a good-looking build coming together. You've done some careful work on your Ratt, and have every reason to be happy with it. I really like your figurehead. Cheers, Martin
- 481 replies
-
- 1
-
-
- rattlesnake
- model shipways
- (and 1 more)
-
Hi Peter -- I just wanted to mention that I had a great time on The Constitution. She was in drydock, so I got a pretty good look at her hull, and the sorts of repairs (beginning with sailors using sledge hammers to knock off chunks of the stem). And, following your hint, I dropped a good sized bundle in the bookshop. Now I'm back on the dusty prairie, still thinking about those clerestory lights. When (if) I ever get anything worked out (following BE's advice about the plastic), I'll post the results. Cheers, Martin
- 467 replies
-
- 1
-
-
- fly
- victory models
- (and 1 more)
-
Congratulations on reaching this milestone Mike!! The planking looks great, those fixed blocks are very neatly done, and that redheart does indeed make for a nice contrast. I'm impressed that you were able to get it to work, and intrigued by what you say about soaking it. And I appreciate your reflections on the care involved in working with tools, and in building a model. Here's hoping that your twins pitch in to give you something good for Father's Day (maybe you could pick it out for them?) Cheers, Martin
-
It's ironic, Nils, that you should succeed at such a high level in building KWdG, only to get tripped up with modern conveniences like digital cameras. Fabulous work as always. That railing is outta this world! Cheers, Martin
- 2,625 replies
-
- 4
-
-
- kaiser wilhelm der grosse
- passenger steamer
- (and 1 more)
-
Hi Nils -- It's been a few days since I've checked in, and as always find myself astonished at how much and at what quality you're able to do. Cheers, Martin
- 2,625 replies
-
- 4
-
-
- kaiser wilhelm der grosse
- passenger steamer
- (and 1 more)