HOLIDAY DONATION DRIVE - SUPPORT MSW - DO YOUR PART TO KEEP THIS GREAT FORUM GOING!
×


Martin W
-
Posts
1,412 -
Joined
-
Last visited
Content Type
Profiles
Forums
Gallery
Events
Everything posted by Martin W
-
 Great work, Jon. As for the question about the flag, I agree that it does seem like the finishing touch to a long build. I haven't put a flag on either of my builds, don't know why exactly, I just chose to avoid the very dilemma you're facing. Looking at a few other builds (I just now went back and glanced at the Pickle being built by Peter/Flyer), I would say that the flag halliard belays on cleat down at the bulwark. Your logic about it belaying on the boom also makes sense, however. Captain's Choice? Martin
 -
Hi Nils -- Great work on those winches; and it's also impressive that you're able to create multiple pieces with consistency. Very Nice! Cheers, Martin
- 2,625 replies
-
- 4
-

-
- kaiser wilhelm der grosse
- passenger steamer
- (and 1 more)
-
What a beauty, Nils! Every photo is more stunning than the last. Sorry about that herniated disk -- several friends of mine (including my wife) have gone through the agony, but have found the resolution to be complete and relatively easy. Best wishes! Martin
- 2,625 replies
-
- 4
-
-
- kaiser wilhelm der grosse
- passenger steamer
- (and 1 more)
-
Yes, Peter, that is a good-looking flag. Those light breezes you get on the Swiss Sea give it just the right loft and fullness. Cheers, Martin
-
Very handsome, Ken. The windows look nice and neat. That's a stern to be proud of! cheers, Martin
-
Hi Spy -- thanks for this, the link is very useful. Actually, the lengths & sizes of the bitts and pins haven't caused much of a problem yet, because I've mostly been making new ones so that I can stay with the boxwood (ie castello). The cross piece for the riding bitts does seem pretty big to me, but I based my dimensions on FFM. I haven't installed the main gallow bitts yet, because I understand their height depends on that of the quarterdeck; I've cut and shaped them, and have left them quite long with the expectation of trimming them to size. Your advice to check the size of kit pieces is well-heeded. Now, I do have to wonder about the dimensions of pieces like the stove & the capstan, both of which I scratch built. They interfere with the beams, and the capstan particularly would seem to involve a design problem. My false decks weren't terribly a-symmetrical. I did have to trim both of them quite a bit as they were seriously oversized, and that might be why they didn't seem problematic otherwise. As I get ready to plank the quarterdeck, I'll definitely be re-reading your log along with the other Swan logs just to try to anticipate any problems -- almost always when I do that I find some detail I'd forgotten about or some trick I'd never imagined. Cheers, Martin
-
Here's a brief update. As I prepare to conceal everything on the maindeck, I'm adding all the furniture that will forever be hidden. Up in the front I've installed the bitts, the stove, and the manger. Now here's a little difference between the Pegasus and Fly: in Blue Ensign's account of the manger, a bulkhead extension goes from the bow to the fore bitts, but that's absent in the Fly. So simulating the chock for the bowsprit becomes a slightly different matter; and yet it's necessary to have something for the manger boards to butt into (and so that the cow won't get out). So I simulated the bitt pins and fastened a very thin piece of cherry between them. Voila: And with that, I think (or maybe I should say I "think," since I'm not wholly sure) that I've installed everything necessary to be hidden. Now, I'm sanding the plywood false decks for the Quarterdeck and the forecastle. Cheers, Martin
- 467 replies
-
- 3
-
-
- fly
- victory models
- (and 1 more)
-
I have to echo everyone else here: good work on those carvings. I like the idea of the contrasting background. Keep at it! Martin
-
Lovely headrails, Vitus. And I have to admire your pumps as well, especially since I'm starting on that detail myself. Cheers, Martin
- 218 replies
-
- 1
-
-
- victory models
- fly
- (and 1 more)
-
Cutter Cheerful 1806 by rafine - FINISHED
Martin W replied to rafine's topic in - Build logs for subjects built 1801 - 1850
Hi Bob -- Every time I look in on your work I'm amazed at how tidy your work is. A real inspiration. Cheers, Martin- 525 replies
-
- 3
-
-
- cheerful
- Syren Ship Model Company
- (and 1 more)
-
Lovely sails, Peter. And those full shots show what a lovely vessel Pickle is -- the close-ups show what a craftsman you are. Cheers, Martin
- 293 replies
-
- 1
-
-
- pickle
- caldercraft
- (and 1 more)
-
What a treat it is to have so many prominent Swan builders dropping by! Thanks everyone, I really do appreciate your comments. Alistair -- It's great to hear from you again. I hope you're enjoying summer in your beautiful land (I remember those pictures you posted of your family expedition to a secluded inlet with blue waters -- Oh my). Yes, you hit the nail on the head: I used the kit's pumps as the basis for the boxwood, and that did increase the dimensions. It's always astonishing how 1/32 here and there can suddenly be big. BE -- Thanks for compliment -- coming from you that means loads. Going back to page 24, I realize that I'd looked over that page a few times before, though not the discussion of the chain pumps, but rather the gallows. Your strategy with the piece of cotton thread is ingenious. But what strikes me in looking at your pictures (apart from all the skillfully executed details -- I had to remind myself not to get sidetracked by studying your work on the gang boards & knees) is that your chain pumps are just almost as close to the cross piece as mine. Now, I did fit the cross piece a bit more deeply into the pins to make room, but now I'm wondering (hoping?) that maybe, just maybe I'll have enough room to belay one or two lines. Though when I look at the kit's rigging plan, I couldn't work out much of anything that belays there -- they all seem to go on the main topsail sheet bitts. I hope to see you posting your own progress soon -- and maybe some pictures of William romping and taking charge in the New Wing? And looking at your picture, Peter, I'm both hopeful and concerned again. You did manage to pass the jeers down and belay them, but then I also think my pumps inadvertently got wider as well as thicker -- if so, then I would have difficulty just belaying them on the outer portion of the cross beam. As for the fingers that will be doing the rigging, you must be thinking of someone else, since I'm sure that those thick inflexible logs at the ends of my hands could never be called "nimble" (be happy that you've never had to hear me at the piano ). Bob -- Hidden details add to the sport of modelling, don't you think? And if they're hidden from view, their precision only grows in our imagination. Nils -- I like a lot of the builds I've seen (like yours!) that have the cutaway sections, but those entail advance planning, and the knowledge to determine (in advance) how to accommodate the structure, as in support. Perhaps I should have taken some courses early on in structural -- or naval -- engineering, but I never anticipated at age 20 that I'd be infatuated with these little floating architectural monuments forty years later. Cheers to all! Martin
- 467 replies
-
- 5
-
-
- fly
- victory models
- (and 1 more)
-
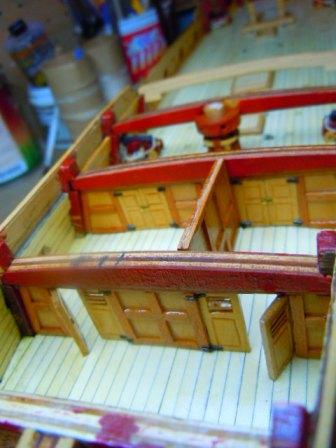
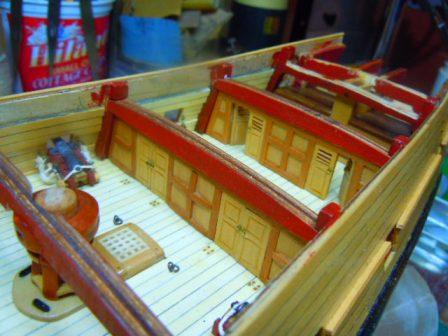
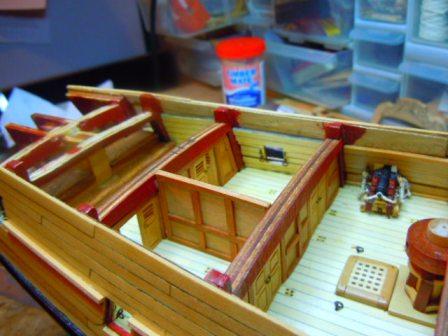
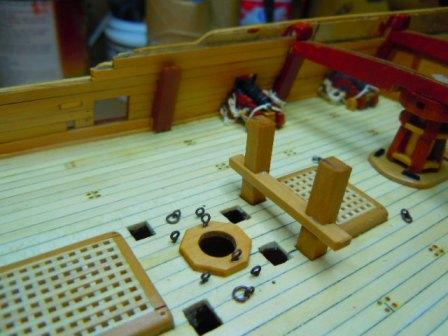
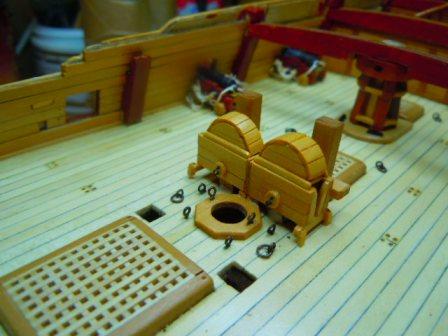
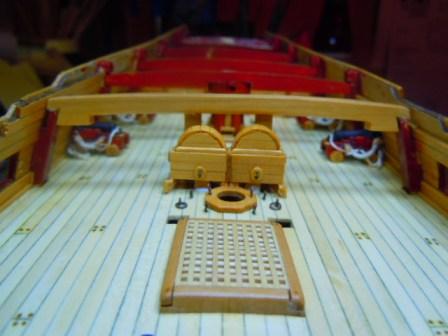
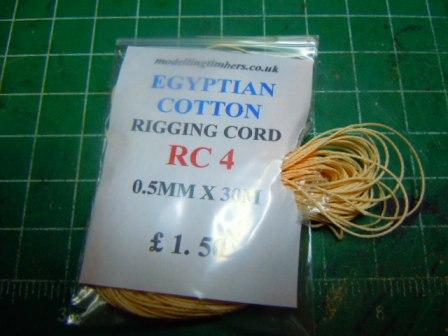
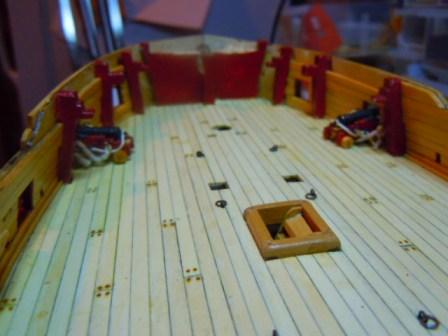
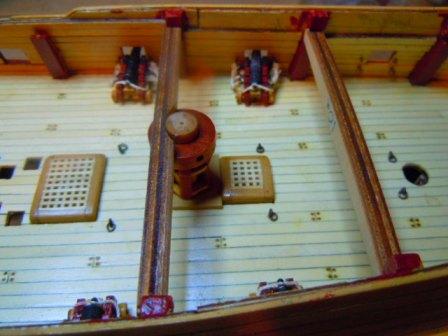
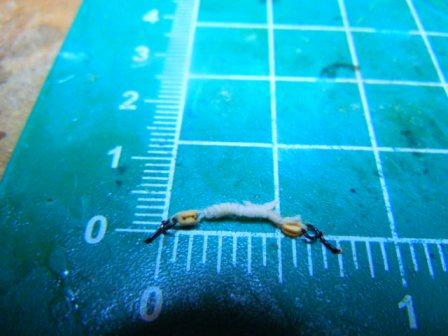
Bulkheads & Bitts Moving ever closer to getting the Quarterdeck in place, I've been adding some of the soon-to-become invisible pieces. So here are a few views of the two main bulkheads forming the Captain's cabin and the officer's cabin: These I made just about a year ago and then put away, so it's nice to see them again, if only briefly. As I mentioned before, I want to make the one visible Quarterdeck beam from boxwood, so I cut it and shaped it by following the pattern of the kit's version. But before putting it in place I needed to install the Mainmast bitts, which are pretty plain, and serve the purpose of supporting the foremost Quarterdeck beam. Here they are: What I next discovered is that these bitts had better not serve much more of a purpose beyond their supporting role, because the cross piece wanted to be smack up against the backs of the chain pumps. Yikes! I hope I don't find myself trying to belay some rigging line there. And here are the chain pumps, with the bitts and the beam all in place. Speaking of rigging, as I was checking out my supply recently, I found this: I'm suspecting one of my little grey friends (har! where's that trap?) Cheers, Martin

- 467 replies
-
- 5
-
-
- fly
- victory models
- (and 1 more)
-
Woohoo, Ken! That snake looks terrific! You're lucky to have access to a good modelling club, and to folks like Chuck. That's terrific advice about laminating carvings onto a background -- the carving I did for my Rattlesnake was a thrilling discovery of doing something I enjoyed but had never thought I'd be capable of. As I've been contemplating the carving for my Fly, I've begun to consider the idea of doing laminated pieces, which would avoid the anxiety of ruining one complete decoration. Seeing your work has convinced me that's the way to go. So did you carve the snake with hand tools or with a Dremel? Martin
-
Very, very nice Ken. Your build is looking lovely. Like Jon, I used wood for those lower transom pieces. I just traced the 2 curves on a piece of thick stock, cut one curve somewhat roughly, then the second -- both using the jeweller's saw -- and then I trimmed it with chisels & files. It was a bit tricky, and I never got them to fit the upper decoration as well as I'd have liked. But I think they look better than clay. Cheers, Martin
-
That's such a terrific workshop that I'm sure the humidity & lighting issues will become things of the past. Am I just a wee bit jealous? Cheers, Martin
-
Great work, Peter. Can't wait to see the sails up in the breeze. And how about sending some of your skilled crew over my way? I have to rely on one guy with sausage fingers who's blind in one eye and can't see out of the other. Cheers, Martin
- 293 replies
-
- 1
-
-
- pickle
- caldercraft
- (and 1 more)
-
Great stuff, Nils, as always. So many details done with so much mastery! Wow. Martin
- 2,625 replies
-
- 4
-
-
- kaiser wilhelm der grosse
- passenger steamer
- (and 1 more)
-
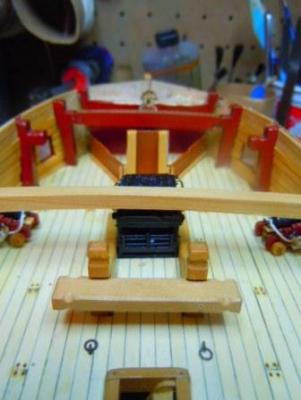
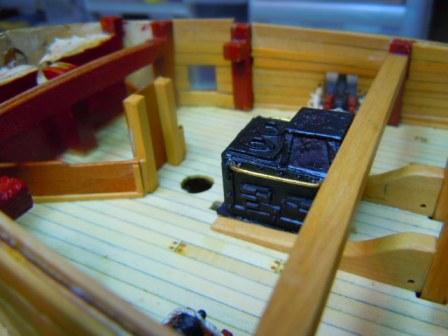
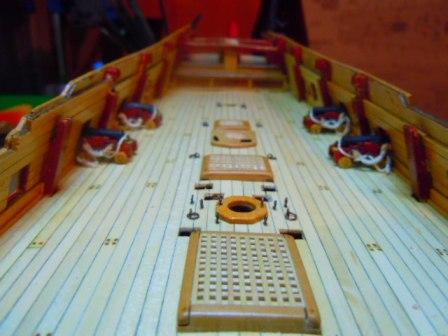
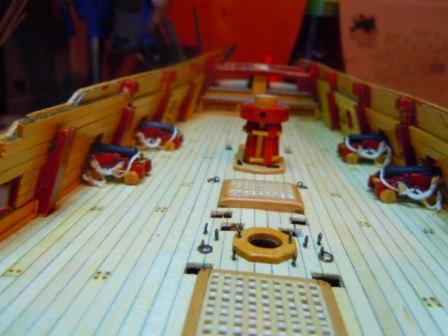
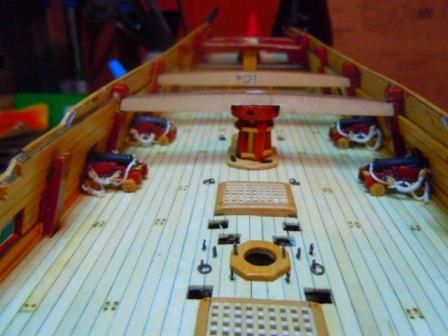
A brief update on the guns: the three on each side that need to be installed before I can advance on anything else are done. Here are the four aft guns: And here are the two foremost guns: With these 6 in place, I can at last begin installing some of the other deck furniture, most of which I've been building and storing away in various safe places (so safe that sometimes I have to hunt for them). First off is the capstan, which I made quite a while ago out of redheart: In putting this in place, I recalled that Blue Ensign had to trim the Quarterdeck beam (#9) to allow the barrel to pass upward toward the Q-deck. The same proved to be true in my case: But then I found that I had to cut even more to make room for the trundle head: And even though I did build this from scratch, it does match the size of the capstan shown on the kit's plans (sheet 5). And now I'll start putting in the bitts, and other items. And I'll need to make the elm-tree pumps. Cheers, Martin
- 467 replies
-
- 6
-
-
- fly
- victory models
- (and 1 more)
-
Nice capstan (and gypsies). Looking from this side of the build (by far the easier one), I have to say that the positive part of reading that you've encountered a problem with the breakwaters will be seeing how ingeniously you solve it. Can't wait. Martin
- 2,625 replies
-
- 4
-
-
- kaiser wilhelm der grosse
- passenger steamer
- (and 1 more)
-
Best wishes to you for taking on this challenge, Bug. It's a fitting salute to a much admired member. Martin
- 2,191 replies
-
- 10
-
-
- confederacy
- Model Shipways
- (and 1 more)
-
Very nice work on a handsome ship! The detailing around the head is lovely. Cheers, Martin
-
Good repair, Peter. I decided while battling the deadeyes on the Rattlesnake that they've been mis-named: the correct term should be, "*#@%*** little buggers." Or maybe just "Murphy's Taunts at Modellers."
- 293 replies
-
- 2
-
-
- pickle
- caldercraft
- (and 1 more)
-
You got that right, Mike. Loads of parts, details, improvements, changes of mind & strategy. And also a non-stop education for the eyes and fingers.
- 467 replies
-
- 1
-
-
- fly
- victory models
- (and 1 more)
-
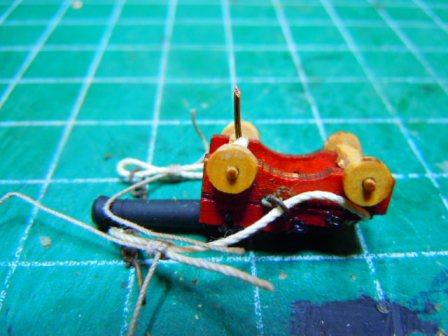
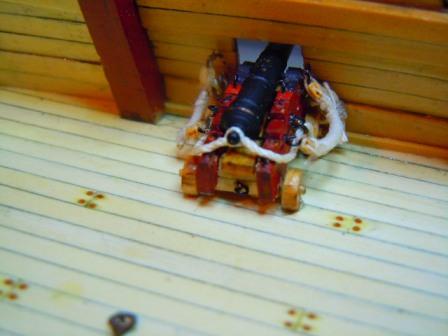
Greetings Friends -- Once again I have to apologize for my laggardly log updating. As long as I have a job, a house, a horse & and a wife, I suppose my modelling time will continue to be impeded. I am nearing the end of the gun-rigging, in hopes of being able to set in the 6 guns that go under the quarterdeck and forecastle; and then I can install all the other deck furniture that will go in after the guns are secured (it seems to make more sense to take care of the outer most items first). The conversation with Blue Ensign about driving a wire through the gun's bed that then fits into a hole in the deck made me really want to try something similar, even though I'd already set the barrels in place, and therefore blocked access to the bed from above. I tried putting a nail in the bed from below, thinking that the sharp point would enable me to mark the spot on the deck for a hole. That had the effect of loosing the bed. Next I set a nail in the front axle, hoping that it's sharp point would allow me to mark the spot on the deck for the corresponding hole. This was a pretty good idea, except with the nail in place I couldn't fit the barrel through the port hole. My next try (no picture) was to put the nail in the rear axle. The next step was to rig the side tackle. I opted to frap these. My experience with the Rattlesnake proved that this tackle needs to be pretty doggone short, and at the same time to show some thickness in the frapped line. I didn't even attempt to make hooks for the blocks, since I'm using Chuck's 2mm blocks, which are roughly the size of sesame seeds. So I seized an eye bolt at the end of the block, then used the seizing line to create the thickness between the blocks, which I frapped with .2mm line run through each of the blocks. This was actually my first effort, and I assure you the others are neater. So here is the first gun, fully rigged and in place. This is the aftermost gun on the port side. The side tackle is still too long, even at only 7/16 inch, so the others have been shortened -- and several in the waist will have the knees for the gangway to contend with, so they'll be even shorter still. Cheers, Martin
- 467 replies
-
- 6
-
-
- fly
- victory models
- (and 1 more)