


Martin W
-
Posts
1,412 -
Joined
-
Last visited
Content Type
Profiles
Forums
Gallery
Events
Everything posted by Martin W
-
 Peter -- It's more than good of you to accede to the wishes of your captain. Isn't there an old saying about a "Rudderless Ship"? A crowded deck is a busy deck. Cheers, Martin (who've been referred to as "rudderless" a few times)
- 293 replies
-
- 2
-

-
- pickle
- caldercraft
- (and 1 more)
-
Great work, and an especially nice detail to add! Glad you had a good time in Mystic -- I didn't make it this year since an important professional conference was scheduled for the same weekend (yes, I do have to keep working). Cheers, Martin
-
Happy birthday Nils. I'd swear you weren't a day over 20! Cheers, Old Man Martin
- 2,625 replies
-
- 4
-
-
- kaiser wilhelm der grosse
- passenger steamer
- (and 1 more)
-
Thanks for that, BE. I tried out an RB barrel on the Syren carriage, and found that it didn't fit well at all. I measure Syren's length at 29.82 mm, and its base width at 4.01 mm, which makes it considerably slimmer. The real problem I had with the RB kits lay with its overall appearance -- the slots for the trunnions are set well back behind the front axle tree, and the trucks are simply enormous. Still, the RB turned brass barrels do look nice. I'll be rooting aroung the other place quite a bit as I work through these guns. Your log remains the most complete narrative of a Swan build, and of absolute ingenuity in solving numerous problems. I still haven't started the soldering yet, but am thinking seriously of setting the base eye-bolt for the ring bolts into the brackets as semi-circles; that would seem to adhere more closely to the description in FFM of the eyes being embedded. If that's at all clear. Cheers, Martin
- 467 replies
-
- 2
-
-
- fly
- victory models
- (and 1 more)
-
Great work. These are some of the places where all those different lines come in from different angles to pile up on each other. You've don a fine job of keeping them all aligned and tidy. I assume you'll be heading off to Mystic at the end of the week? If so, have fun, and I hope you pick up lots of neat tricks. It's always good to hang out in a room full of like-minded modelers. Cheers, Martin
-
Thanks for the vote of approval, and confidence, BE. I've read over your account of those ciphers several times and can't help but feel daunted. The sheet I got from Daniel has 2 sizes of ciphers, but I thought -- without actually measuring -- that the smaller ones would be appropriate for the Syren barrels. As I recall, you were able to use Pegasus kit's barrels with RB carriages, right? I have some RB barrels, and they are also larger than the Syrens, though not as large as the Fly kits. Thanks for coming by, Martin
-
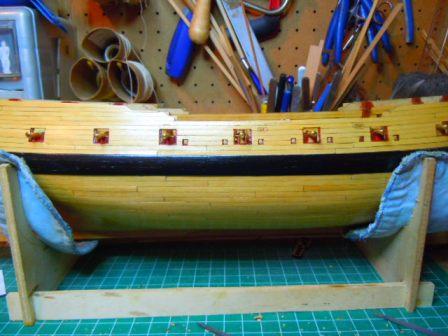
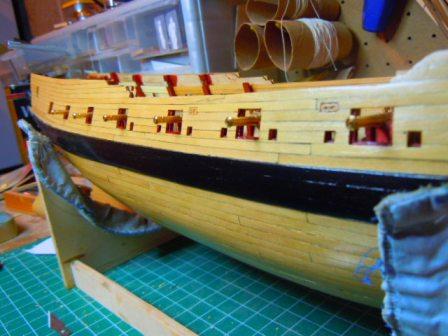
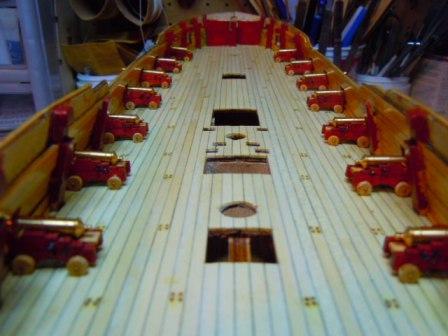
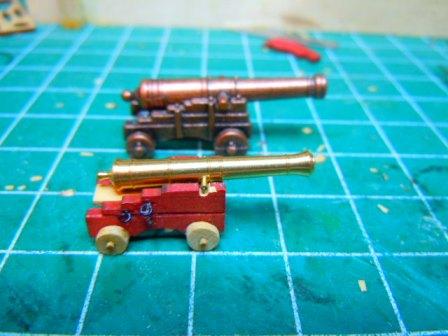
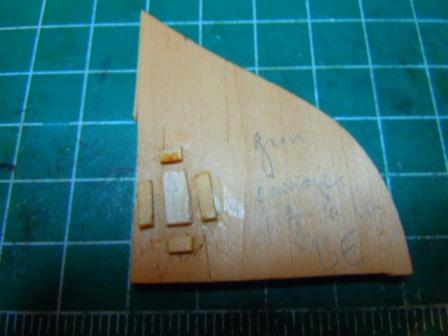
A quick update on the carriages. I've been filing, cutting, trimming just about everywhere I can think -- and I have to thank everyone for their suggestions of bits and places to reduce. Here are the results. First the broadside view. Next, a closer view looking forward. Here you can see that the gun barrels follow the sweep of the deck. That worried me for several evenings, but I have come to think it's inevitable. And here are the guns on deck, all in place. Of course there remain loads of details to add. I followed BE's advice and gave up on the quoins: no matter how much I cut them down, they still angled the barrel significantly downward. It's now time to start on the ring bolts. The eyebolts that I've already put in place are 28 gauge wire, and are very flimsy. In fact I broke several off while trimming around the carriages. But that's the size Chuck says to use in the kit instructions, so who am I to deviate. For the ring bolts, however, I really think I'm going to have to sneak in something a wee bit thicker, say 24 gauge, which I think is .5mm. I suppose these will need to be soldered in order not to fall off -- a process I don't especially anticipate with glee (it entails putting the boatyard through a serious cleaning to get up all the dust from sanding -- I wouldn't want Mrs W to come home to an incinerated me). In addition, I've looked at the GR emblems I got from Daniel, and can't fathom how I'll manipulate those tiniest of tiny thinglings onto the barrel. Finally, just for comparison, here's the Syren carriage and barrel next to the kit version: I have a recollection that Alistair had a picture of the kit setup, but I think it's worth remembering just how, ahem, crummy it is -- the barrel is too long, the "carriage" is more of metaphor than a carriage. Cheers, Martin

- 467 replies
-
- 4
-
-
- fly
- victory models
- (and 1 more)
-
I have to join in with Peter: I am eating my liver with envy. Oh, oh, oh. Off Fiji!!! That hard-luck "bed"!!! Those blue waters!!! The measurements I have to leave to you guys (not surprisingly). Cheers, Martin
- 293 replies
-
- 1
-
-
- pickle
- caldercraft
- (and 1 more)
-
Very nice, indeed. Those stanchions are delightful little details. cheers, Martin
-
Glad to see you're still around, Ron. I hope "soon" comes by soon. Cheers, Martin
-
Peter -- I believe the 45 degree joint is called a miter joint, and the one with the two ends overlapping each other is a lap joint. I'm no expert, but that's just what I think. At any rate, those hatches do look good. Cheers, Martin
- 293 replies
-
- 1
-
-
- pickle
- caldercraft
- (and 1 more)
-
Ahh, I can only imagine trying to make miters at this scale. You clearly have very nimble fingers, and a mighty shipload of patience.
- 293 replies
-
- 1
-
-
- pickle
- caldercraft
- (and 1 more)
-
That's nice detailed work, Joel. It's all very impressive. Show us more, more! Cheers, Martin
-
Thanks Nils. Coming from a Real Craftsman like you, with such an eye for detail, that means a lot. I'm still hoping to lower the aft gun barrel by just a bit to get it closer to the center, and possibly even get it to point less downward. Since I've embarked on this path of obsession, I might as well become obsessed! Cheers, and thanks to all the likes! Martin
- 467 replies
-
- 1
-
-
- fly
- victory models
- (and 1 more)
-
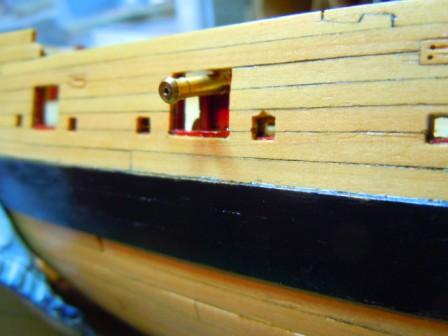
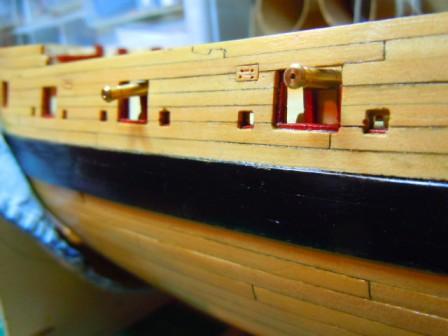
Woohoo!! Alistair -- it's great to hear from you again, and to hear that you're getting the taste back. Yes, I have gone over your pages on the guns and have wondered over and over where my problems lie. Maybe it's that blasted plywood strip that I might have set just a millimeter or two low???? But now I have to deal with it. My kit's guns are metal, Spy. They're an odd sort of bronze color, about twice the size of the carriages from Syren, and the barrels are easily twice as big. The RB barrels are not as big as the kit's, but they're still thicker than Syren's, which measure 1 11/64" in length. I've been taking lots of photos, really just to give myself an objective view of how the guns look when run out, so I can know whether or not to trim more. Here are a few -- first the kit barrel poking out: I'd like to say that the Britannia carriage is just too ugly to be photographed, but the truth is that I just haven't taken it's portrait yet. Maybe in a later posting. Here are 2 guns whose carriages I've been trimming -- as I believe I mentioned, I'm pretty much going to have to customize each to its own port. Am I there yet? Hmm, not quite. But you guys have all been so encouraging that I'm invigorated to persevere! I can't wait to see postings by both of you, Alistair & Spy! Cheers, Martin


- 467 replies
-
- 5
-
-
- fly
- victory models
- (and 1 more)
-
Thanks for that suggestion, jbshan. It would affect the appearance of the Syren carriage, but maybe not so drastically as to violate historical accuracy. I see, for example, that the bracket depicted in FFM vol 2, p 136 has only three steps above the bottom piece. I might just try this out. So far I have tried filing the trucks to a narrower diameter (by a full 1/32"), deepening the slot in the brackets that holds the axletrees, and deepening the groove on top for the trunnion. All that and I find that the barrel is still well above center. No pictures this time, since they would show relatively little progress. But I am pushing on! (which is to say that any more suggestions would be welcome!) Cheers, Martin
-
Well done on carving that walnut piece for the railing -- that's a lovely detail. Cheers, Martin
- 218 replies
-
- 1
-
-
- victory models
- fly
- (and 1 more)
-
Not only did you buy the machine, Toni, I see you bought a few attachments to along with it. Bravo on that wise decision. And bravo on going Sherline. And bravissimo on the work! Cheers, Martin
-
Thanks for the comments, guys. jbshan -- the center of the gunport makes absolute sense as an ideal, and as a practical measure to aim for. Right now, it seems a pretty hard standard to achieve. Brian & BE -- thanks for the suggestions, all of these are real possibilities to achieve the standard jbshan suggests. Trimming both the transom (I've done nothing to it yet, and all the illustrations I can recall show a U-shaped top in which the barrel rests), and the trunnion notches will certainly make a difference. I began experimenting last night with sanding the bed to reduce its thickness, but was called away before I got very far. Rebating the underside of the bed makes even more sense, and that's something I'll definitely try out this evening. Brian, you're right that I laid the barrel on the bed upside down -- I didn't pay any attention to its proper setting, since I hadn't even put the trunnion in. That was just a mock-up to see how the elements were coming together. Your keen observation will go far, however, in helping me to line up all the pieces to a proper symmetry. Thanks. And as you say, BE, this is a problem that will have to be addressed -- and just by the little bit of playing around I've done, setting the mock-up in different ports, I can see that it'll probably entail customizing each gun to its own port. But, hey, isn't that how it all should be? -- I think I do have some of the RB barrels, but I don't remember how they fit on a carriage from Syren. A conversation like this really, really does make the whole enterprise of a build much more interesting. Thanks for the suggestions, you guys. Cheers, Martin
-
So you actually hire your crew? Do you conduct interviews to assess their seaworthiness? Peter, I failed to comment on the Dublin pub you visited: from the looks of it, I would say the beer there tasted GREAT! Is the Pickle's name painted wooden letters? Cheers, Martin
- 293 replies
-
- 1
-
-
- pickle
- caldercraft
- (and 1 more)
-
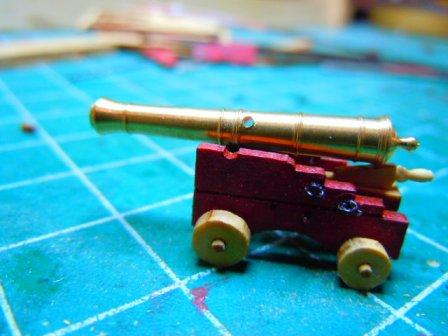
Thanks for checking in, guys, I appreciate it. Brian, a very rough version of the wire solution is what I used before, but I was never successful with getting the glue built up in a way that it looked like anything more than glue, and the wire always looked to me like wire (maybe because I knew what it was). There is the problem here, that you suggest, of turning the handle down so small that it ceases to exist (and to my old eyes, that doesn't have to be so terribly small). BE, your comments about the appearance of the gun barrel when run out set me thinking (or worrying). Running out the guns would be an excellent test. And here are the results: This is a gun with the quoin untrimmed. This next shot says it all: The gun closest to the camera has no quoin, and the barrel does indeed lie at a much better angle (unless the Fly gunners were shooting at the Kraken). And I was surprised that these guns just barely fit through the port -- if the carriages were any higher at all, there would be problems. So here's a question: that little piece of wood that goes on top of the rear axle strikes me as odd in the way it is supplied in Chuck's set-up: of all the pieces in this very nice kit, it's the one that I have to trim the most, as in almost half its length. Perhaps it is also too high, so that the addition of the bed and quoin on top of it make the rear of the barrel too high. In other words, maybe I can still have quoins if I trim that odd piece of wood down a might. Eh? Thanks again, guys, your comments give me plenty to mull over. Cheers, Martin
- 467 replies
-
- 1
-
-
- fly
- victory models
- (and 1 more)
-
Nils -- So, I go away for just a few days, and when I get back my head spins at how much you've done!! Don't you sleep? Fantastic work, with real care for the fine details. Cheers, Martin
- 2,625 replies
-
- 4
-
-
- kaiser wilhelm der grosse
- passenger steamer
- (and 1 more)
-
Jon -- That is a really, really nice traveller. Well done, well done, indeed!
-
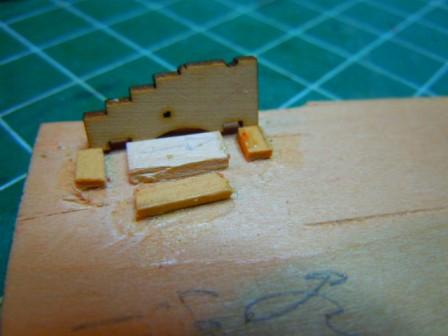
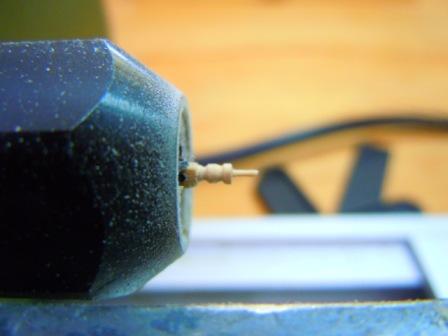
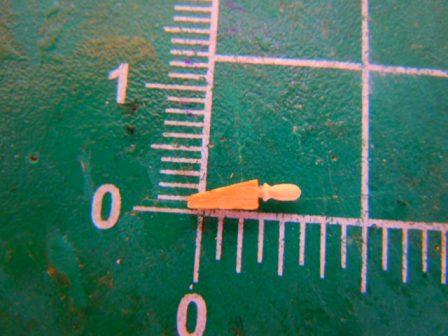
Hello all -- I've been away for a bit, and find that I have loads of catching up to do with other build logs. First, though, I have a small update on Fly, in that I have been puttering a bit with the gun carriages while I decide what to do next with the deck furniture. First, inspired by Blue Ensign, I constructed a rough jig to hold the axles in place in order to set the brackets on them -- my experience with the other 2 builds I've done reminded me that this is about the trickiest step. Basically, the jig consists of pieces glued onto a base that will hold the axles at the distance of the notches on the brackets, and then will hold the 2 brackets in place as the builder (ie, me) tries to get everything aligned. I should add here that this is BE's patented jig -- BE, I owe you a merlot. And I might also mention that I thought I had some shots of when I actually used the jig with the stained brackets & trimmed axles, but guess, not; so I simulated the process with an un-finished set. The next step I want to record is making the handle for the quoin. Now, this is a tiny tiny little speck of a detail, and one that I simply have never been able to work out with the exacto. But I did just happen to invest in a Proxxon lathe a few months ago from John at Texxn5, and decided to give it a whirl. Spyglass, this is for you, pal. That lathe is a dream. The turning tools that came with the lathe are much too large for a little piece like this, so I used a square needle file. Even though I did manage to get the 1/16" kit-supplied stock down quite a bit, I'm afraid that the handle looks somewhat on the large side. Here's the view with the barrel lying on the carriage: To my eye, the handle shouldn't really go any further back than that round dealie (forget the term) at the rear of the barrel. Could I have carved something like this? Maybe, but with 16 to do, they would probably take me at least 16 full evenings, and 32 gashes on my fingers. I'm also a bit uneasy about the eyebolts, which are all of the 28 gauge coated wire I had on hand, and therefore not soldered. They're pretty flimsy. For the ring bolts, I do have some uncoated wire, though it is quite a bit thicker, at 24 gauge; but that ring will just have to be soldered in order to stay on. Now, to catch up with all the other great builds! Cheers, Martin

- 467 replies
-
- 5
-
-
- fly
- victory models
- (and 1 more)