
HOLIDAY DONATION DRIVE - SUPPORT MSW - DO YOUR PART TO KEEP THIS GREAT FORUM GOING!
×


Martin W
-
Posts
1,412 -
Joined
-
Last visited
Content Type
Profiles
Forums
Gallery
Events
Everything posted by Martin W
-
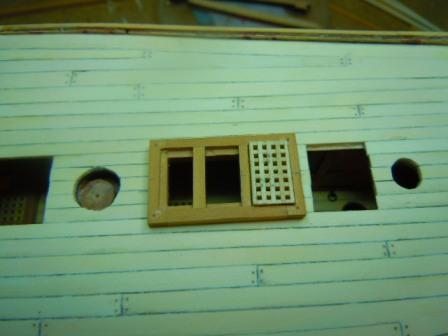
 Hi guys, thanks for checking in. Here's the latest: while working on the capstan partners yesterday evening, I began looking at the tripartite hatchway, and could only decide that it was too ugly for words. If I posted a picture of it in the completed state, I'm sure I would be sanctioned by the FCC for offensive practices. I ripped it out to do over, and didn't even throw it in the scrap pile, but used it to create the new Ugly Pile of Rejects. Mrs W & I will be off to Maine in a few days. But I will try to post something when we get back and I'm able to sneak off to the boatyard, even though my camera will be full of shots of lighthouses, lobster boats, and the USS Constitution (we'll be passing through Boston, so I absolutely have to make a pilgrimage). I also want to mention, though, that I've spent some time looking at BE's clerestory lights, and wonder, just wonder if I could, should try my own unskilled hand at something similar? Cheers, Martin
- 467 replies
-
- 2
-

-
- fly
- victory models
- (and 1 more)
-
Hi Mike -- I commiserate with you on this (and I think anyone building from the kits would as well). The problem with the stem was one of the reasons I pulled the gunport strip off repeatedly. In the end I decided that the alignment of the guns in the ports would matter more, and so I sought a consistent distance from deck to bottom of port. Even that led to numerous problems, but it did have the positive effect of taking my mind off the stem. cheers, Martin
-
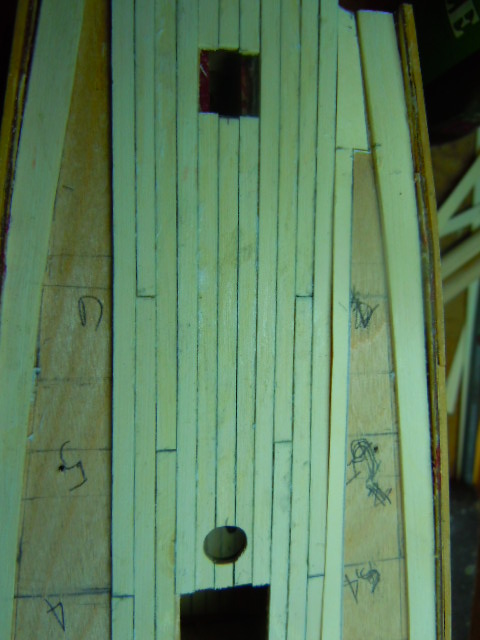
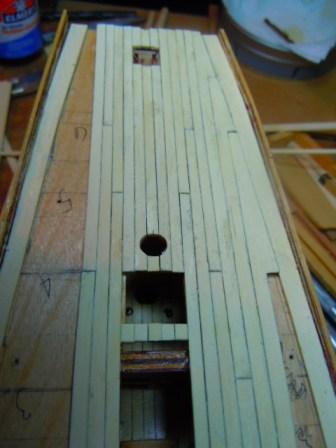
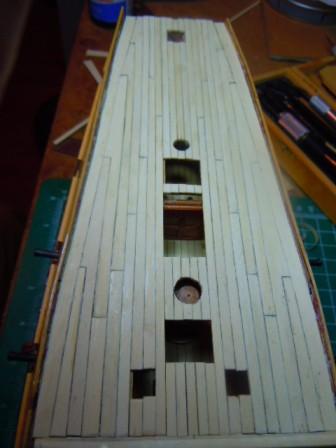
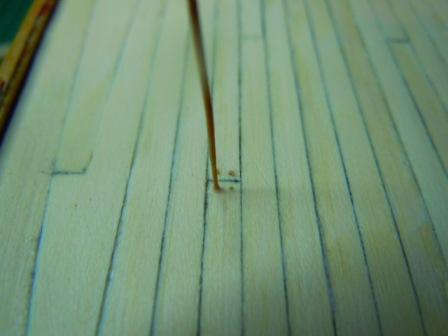
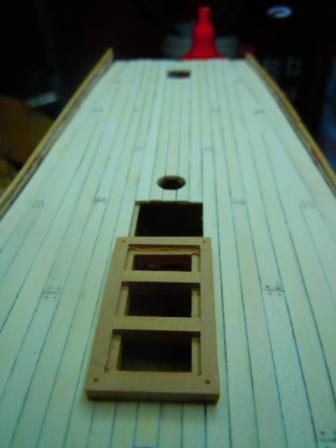
Hello Everybody -- In my desultory fashion, I am adding this update. I should have posted this back in April, but my work has taken over my life so much that the waters of professional obligation are threatening to close overhead. I have a hard September 1 deadline, and so will probably prove even more desultory than usual in providing updates. But I'll try whenever I can manage to come up for air. For now, the Quarterdeck. The planking went fairly smoothly, measuring out the margin planks, and setting in the regular planks down the center. After defining the space in this way for the hooked planks I began the more technical work of measuring, cutting, and shaping the hooked planks. Here is the template for the first hooked plank: Next, you can see the fairly logical progression of the hooked planks filling in the space of the deck as they move forward. And here are both sides fully planked: The hooked planks look a might wide to my eye, but I decided to go with them, mostly because my efforts to map out narrower versions created new problems. Since I treenailed the main deck, I felt obligated to do the same here. I know the trend is for treenails that are barely visible, but I have to confess that I like a bit of contrast. I do assure you that this does not necessarily mean that I wear two-tone shoes, but sometimes I can't resist a bit of flash: my horse is generally recognized as the most chromacious in the pasture. For the treenails, I used some Swiss Pear that I passed through the draw plate down to the smallest gauge, then set that into predrilled holes: And here's the result of the fully treenailed quarterdeck (unsanded): Next up was the coaming (ie coamings & headpieces) for the tri-partite gratings. For this I used some boxwood (castello), framed with lap joints, and with a rabbet cut along the bottom: After some preliminary sanding (the real sanding will come after the gratings are all set in), I put treenails in the four corners: And finally, I made up the gratings using the kit's supply of ready-cut pieces (they seem to be basswood). Here's the first: And that's more or less where I am. Since we've gotten some rain (something rare out here in the prairie), my lawn has made some work for me this evening. I do hope to spend some happy evenings relaxing in the boatyard (where hours can pass by in mere seconds) ahead. And I even hope that I can get another update posted before Mrs W & I head up to Maine (she has already been informed that I will be bringing work along). Cheers (or Glub, glub), Martin


- 467 replies
-
- 7
-
-
- fly
- victory models
- (and 1 more)
-
By the way, Mike, congratulations on your power tools. The Sherline is the best. I'll be interested to hear how you put that and the sander to work. Cheers, Martin
-
And I'll re-echo at least part of what's been said. I had to pull my strips off more times that I care to remember because when they looked right from one angle, I'd find from another perspective that something was off. The patience you bring to bear at this step will make your life easier when you plank. cheers, Martin
-
That's good progress, Herb. Your planking this time through looks nice and regular. Chances are with that skewed grating that the perspective of your camera is responsible. If it looks good to your eye (and your Beloved's), then it is truly Good. Cheers, Martin
-
Very nice work indeed on those belaying pins. It's those little details that make a build special, since they become your signature! cheers Martin
- 481 replies
-
- 1
-
-
- rattlesnake
- model shipways
- (and 1 more)
-
Sorry about that mishap, Ben, it's one of those things we all fear. Onward is the word! Cheers, Martin
-
Ahh, Toni -- I have to admire your skill in painting the frieze on that step. And how delightfully clever, too! And by the bye, I got my cutting disks from Otto Frei. I also found they fit nicely in my mill with the razor blade set tightly in a clamp -- I got more accurate results than I ever did just holding my Dremel in my hand (happily for the rest of the world, I am not a surgeon). Cheers, Martin
-
Great work, Nils. All those details are coming together very nicely. Bravo! Martin
- 2,625 replies
-
- 3
-
-
- kaiser wilhelm der grosse
- passenger steamer
- (and 1 more)
-
Hi Doug -- I have just now found your build log, and enjoyed reading up on your progress. As others have said, the Fly / Pegasus is a nice kit. Those gun port strips are about the worst part, so once you get them done to your satisfaction, you should find everything coming together with less agony. And they look good to me -- if you're going to use the kit-supplied guns, then they'll serve as your ultimate measure; but if you want to substitute, with Chuck's guns from Syren, for example, the measurement could shift a nudge. But, really, if the strips line up, if they're even, and they come together at the bow properly, then voila! It's always good to have another Swan builder on board! I'll be looking forward to your progress. Cheers, Martin
-
My word, Nils, what progress you make! Always impressive in your attention to detail. And I have to comment that the picture of your work space in its "untidy" state shows a neatness greater than when my own space is pristine. Cheers, Martin
- 2,625 replies
-
- 3
-
-
- kaiser wilhelm der grosse
- passenger steamer
- (and 1 more)
-
A neat conclusion to a great build, Peter. I've enjoyed your log every step of the way! Cheers, Martin
- 293 replies
-
- 1
-
-
- pickle
- caldercraft
- (and 1 more)
-
Very nice! Splendid details. Martin
-
Absolutely ingenious, Nils. Those lanterns are so neat that I had to laugh with delight. I also stash little -- and big -- things away. I've begun to suspect that the reason I can't find them afterwards is that Mrs W has gotten to them first and tossed them out. Cheers, Martin
- 2,625 replies
-
- 6
-
-
- kaiser wilhelm der grosse
- passenger steamer
- (and 1 more)
-
Nice work, Peter. Your hold is going fill up pretty fast with those anchors, the grog for the crew you've worked so hard, and the delectably dried pease. Have you settled on Pickle's berthing spot? Martin
- 293 replies
-
- 1
-
-
- pickle
- caldercraft
- (and 1 more)
-
Indeed, indeed, it's good, great, terrific to see a master come back to his craft. Fantastic! Martin
- 2,625 replies
-
- 4
-
-
- kaiser wilhelm der grosse
- passenger steamer
- (and 1 more)
-
Hi Nils -- It's been a while since I've checked in. The work on the winches is, of course, spectacular. I hope your neck starts feeling better soon. Have you worked with a physical therapist? After a few horse accidents, I found that the therapists who taught me how to move and how to hold my head and shoulders did more than doctors and pills to alleviate the pain in the long term. Best wishes, Martin
- 2,625 replies
-
- 5
-
-
- kaiser wilhelm der grosse
- passenger steamer
- (and 1 more)
-
Terrific work, Peter, as always. Those sails really do create a sense of a living ship! If the end is approaching on this delightful build, what thoughts do you have for the next project? Cheers, Martin
- 293 replies
-
- 2
-
-
- pickle
- caldercraft
- (and 1 more)
-
Hi Bob -- Great to see you picking it right up again. Your thought process shows a clear deductive process operating, counselor. Sjors, pass that popcorn! Martin
-
Cutter Cheerful 1806 by rafine - FINISHED
Martin W replied to rafine's topic in - Build logs for subjects built 1801 - 1850
Hi Bob -- Wonderful and ingenious work as always. I appreciate the clarity of your narrative and of your photos. I can't even begin to count the number of times I've referred to your log of the Cheerful and the Essex to work out some detail or other. I'm off now to track down your Granado build. See you there! Martin- 525 replies
-
- 3
-
-
- cheerful
- Syren Ship Model Company
- (and 1 more)
-
Peter -- I love these details. I see you even used some hooks to belay the rigging to the ring bolts -- Very Nice! And, yes, we do get the occasional tornado through here, and we're entering that time of year when they spring up. A curious detail, though, is that they tend to pass either to the south or north of my town, so there will be a lot of roaring and banging, but so far no actual levelling of houses. Even when they're a full ten miles away, they can be scary. And that's why most houses here come with either a safe room (as in my case, which is where I have the boatyard set up) or underground shelters known in the local parlance as Scaredy Holes or Fraidy Shelters. The very first bottle of wine I drank in its entirety was a Merlot del Ticino, though it wasn't in Lugano but in Verzasca Valley, just after I dove off the Ponte dei Salti. The water was cold, as I recall, and the wine helped me recover. The more important matter is the Pickle, and the research you've put into her. Great work! Martin
- 293 replies
-
- 3
-
-
- pickle
- caldercraft
- (and 1 more)
-
Hi Ken -- Nice looking buckets that will add a terrific detail. Did you make them from basswood? I tried my hand at buckets for the Rattlesnake, using birch dowels that I tapered at one end, cut slots in vertically to simulate the slats, and then wrapped blackened strips of paper around for the iron bands. The hardest part for me was the rope handle -- yours are better by far with those nice little knots on the outside. In the end, I didn't make the frame, but just set the buckets between guns. I don't know if the effect is historically or nautically accurate, but my deck was already pretty crowded. There's an informative article in the Shipwright annual for 2013 on making buckets for Royal Navy ships. They include the cyphers such as those that would go on guns. I don't think the US or continental navy had those cyphers though. Cheers, Martin
-
Watching your work through these issues, Peter, provides the rest of us with good instruction on the process of sail-making & rigging. It's also nice just to admire your work in the pictures. And I might also mention that in Oklahoma there is an occasional wind (as in constantly). Cheers, Martin
- 293 replies
-
- 2
-
-
- pickle
- caldercraft
- (and 1 more)
-
A neat solution . . . and that's why this forum is so good.
- 974 replies
-
- 1
-
-
- rattlesnake
- mamoli
- (and 1 more)