
HOLIDAY DONATION DRIVE - SUPPORT MSW - DO YOUR PART TO KEEP THIS GREAT FORUM GOING! (Only 20 donations so far - C'mon guys!)
×


Martin W
-
Posts
1,412 -
Joined
-
Last visited
Content Type
Profiles
Forums
Gallery
Events
Everything posted by Martin W
-
 That crew has been rowing for quite a while -- say about 210 years -- although the Bosun doesn't seem to have missed many meals, eh? Great work, Peter. I have to point to those bars on the lights and say, wow! wonderful detail. Those nice touches are what make a build special. And I agree with you on the oak stand, it's a lovely choice. This morning I announced to Mrs W that I would spend no more than 2 hours in the study, then out to the workshop to do some carving, then to the boatyard just in time for the beer hour to begin. That is a pure holiday! Cheers back to you, Peter, and happy holidays! Martin
- 293 replies
-
- 1
-

-
- pickle
- caldercraft
- (and 1 more)
-
That's a real eye-catcher, Nils. My word, the details that fill her out are astonishing. Bravo! Martin
-
Very nice work, Peter, very nice indeed. I tried forming bands with brass strips once, and after 3 nights of frustration threw them away and pulled out some paper. Now I don't even think twice about any lack of purity (ahem). Love to see your progress. Cheers, Martin
- 293 replies
-
- 1
-
-
- pickle
- caldercraft
- (and 1 more)
-
Pretty indeed, Peter. And I find that with rum a harness just gets in the way.
- 293 replies
-
- 1
-
-
- pickle
- caldercraft
- (and 1 more)
-
That's a nice workspace! I'm eyeballing your table saw and band saw -- I always have to drag mine out onto the driveway.
-
Hi Ken -- I finished my Rattlesnake about a year and a half ago, and recall that the 4th kevel that Jon points out caused me some headache. Like you guys, I didn't spot it on the plans till late, and then had to set it in when I'd already created plenty of obstacles. It ends up that some lines only look right if they're belayed there. So if I were you, I'd bite the bullet and put one in. Cheers, Martin
-
Bravo on the new work bench, Jon! Your old one looks a lot like mine, and I have suffered under the very same problem of too much clutter. I built a very large one out in my workshop, but it's been taken over with the clutter of other non-nautical projects. Seeing your photos of the Ratt, I'm reminded of what a lovely ship she is, and how nice the contrasting wood looks. Your updated rigging looks great. Have fun in Florida, and don't forget your sunblock. Cheers, Martin
-
Ola Peter! Yes, we can only hope about that ending of the embargo, that the rum will still fortify a sailor and the cigars will still come straight from the hand that rolled them! -- I can only imagine that the seaman on the masthead had his fair tot of rum and is hiding behind the mast in order not to share his smoke. Cheers, Martin
- 293 replies
-
- 1
-
-
- pickle
- caldercraft
- (and 1 more)
-
Nils -- I honestly don't know what to say . . . these pictures are utterly stunning. And any other comment is insuffucient. And now more work on the Pegasus?! Fantastic, can't wait to see what magic you work there. Cheers, Martin
- 2,625 replies
-
- 6
-
-
- kaiser wilhelm der grosse
- passenger steamer
- (and 1 more)
-
Hi Mike (and my best post-turkey wishes to you and yours!) -- That planking just looks fantastic! I'm really impressed that you mastered the spiling technique so quickly and with such fine results. You're absolutely right that the curvaceous hull requires some extreme shaping, and the T&B had to have given you another challenge on top of that. In the end, this will be a hull that draws people's eyes just for the interest in the planking. As for the work space, I would strongly urge you to put a fridge down in your cellar (and why not a TV too?). I have a dedicated beer fridge in the safe room where I work, and it means that I have no more than a single step to a cold one. Of course Mrs W occasionally expresses horror at what she chooses to deride as the "clutter" of the area, but I'm old enough to go deaf at critical moments. Cheers -- can't wait to see more progress! Martin
-
Well done Mike! Even if you do 2 rows of T&B, they'll look spectabulous, and make you all that much more proud of your build. Bravo! Martin
-
Fine, careful work as always, Nils. And of course I'm amazed at how you can move along so expeditiously. And it just occurred to me that you aren't facing a rigging job on this beauty, so you'll be getting to the home stretch pretty soon. Bravissimo! Cheers, Martin
- 2,625 replies
-
- 6
-
-
- kaiser wilhelm der grosse
- passenger steamer
- (and 1 more)
-
So, is this going to be about an 8x12 ft space? That sounds fantastic. Have you started shopping for all the new tools you'll be able to get int there? Cheers, Martin
-
And now we can see, Toni, why all those pricey attachments to the Sherline are necessary. The problem with tools is that you can only begin to see what they make possible after you buy them. Beautiful work. Cheers, Martin
-
Hi Jon -- Great work on these tricky little details. The challenge always seems to lie in getting these lashings & splices to look right for the scale, and at 1:64 it's hard not to let things bulk up. You're getting it right, though, and congrats on that. As for fastening those double blocks to the stay, you might try the "false splice" that Blue Ensign demonstrates multiple times in his log. You basically just use a fine needle to pass the strop of the block through the stay and then serve the strop up tight. It's not at all difficult and it will hold the block in place against the tension. I think BE shows it around page 30 of his log. Cheers, Martin
-
Hey Ken -- Macro photography always shows up those details that you wish could stay invisible. What that means is that folks on MSW will see more nicks & dings than are visible in real life. I think if it nags at you, though, you could put a bit of wood filler in. Anyway, that bulkhead does look good -- I especially like the slats in the center panels, and the details of the hinges & knobs. Well done. Fish -- You can build the MS kit with Bob Hunt's practicum. MS has much, much more detailed plans that Mamoli builders always end up buying anyway. And since that practicum is a major kit bash, you'll be making most the parts yourself. (Sorry Ken, don't want to clog up your build talking to somebody else, so I won't go on any more). Cheers, Martin
-
Hi Mike -- It's great to see you back at it. I'll be very intrigued to see your t&b planking, which makes for a stunning hull. The blue tape you have down shows the curve of the hull nicely, and will make for a good guide as you work out the widths of the planks. As for the chisels -- you might just think of the sharp edge as a knife edge. That way if you set a plank that needs trimming in a vise, you can simply push the chisel along the edge of the plank to shave off what you need. Voila! it's that simple, and these chisels are delightfully sharp. Cheers, Martin
-
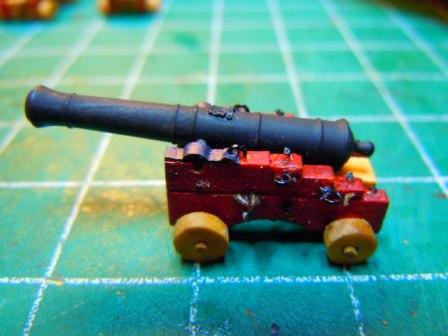
Thanks for these, BE, I actually know them well (from over yonder), and they are what made me think of chains at all. I found some 42 lpi for sale on Model Expo, but couldn't quite bring myself to buy it when the postage would have been more than the chain. And after looking at these photos again, I must say, BE, that your guns do look good in all their details. I'm thinking -- kinda -- about pulling my eyebolts out and replacing them with the style you have (and that seems more accurate according to FFM). But I also really want to move on to other matters. And I think these pictures sort of give my log some class! Cheers, Martin
-
I'll second Jon's warning. I think I knocked the lids off my gunports at least half a dozen times. You might take a look at Landlubber Mike's log on Pegasus, since he's also using redheart. Cheers, Martin
- 481 replies
-
- 1
-
-
- rattlesnake
- model shipways
- (and 1 more)
-
Thanks for checking in everyon, and thanks for the likes. BE, you're right, Daniel's cyphers are really impressive -- their detai is astonishing given their tiny size. When I peer at them through a magnifying lens held in front of my opti-visor (I'm not fooling), I can see that they are fully accurate. And I am quite surprised at how well they show up on the barrel. I hope loads of people read this and order their photo-etching from Daniel. Nils -- you're generous to compliment my detail work. Your own work on KWdG is jaw-dropping. When I described it to my wife, her response was "Don't even consider it." I comforted her only slightly by pointing out that it would take me a full year to do what you get done in a week. Thanks for coming by, Bob -- it's an honor to have someone of your caliber check in. Jason -- thanks for the kind words. Your Snake is a splendid build, and the rigging is excellent! Now I'm off to rake leaves. Cheers, Martin
- 467 replies
-
- 1
-
-
- fly
- victory models
- (and 1 more)
-
They do indeed look good, Ken. And so do those beams -- I am jealous. Cheers, Martin
-
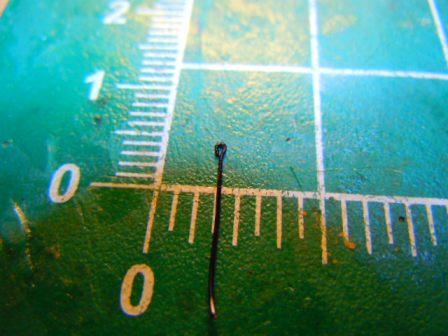
Thanks for checking in, Ken, your gracious comment is timely as I was just about to post the latest. So here goes. I glued the cyphers on with the tiniest drop of pva I could get with the point of a pin, and generally it was still too much. Before attaching them, I bent them into a rounded shape to match the barrels by squeezing them with some metal crimpers I found in the back of my drawer. They actually needed even more bending than I thought they would, but that did end up being essential to getting them to stay on the barrel. As expected, the blackening process required multiple dowsings, with cleaning in between. (No photos of this process, sorry -- it mostly entailed soaking in the blackening solution -- Blacken It -- drying, cleaning with mineral spirits, soaking again, etc.) After knocking of several cyphers -- and these little things are impossible to recover after a "fly off" -- by daubing spirits on them or trying to scrape around them with a soft brush, I cut my losses and resorted to a diluted black paint. I was afraid that even when thinned, the paint would conceal the cypher, but as you can see it does show up. (Well, ok, when showing it off to the Missus, I had to hand over my Opti-visor; but she was impressed.) As for the touch holes, they were too long, and overlapped the back most ring. When I tried timming them, I just made them look ugly. So the touch holes on these guns will require a certain effort by the Mind's Eye. For the cap squares I cut narrow strips of card that I then blackened and bent over a drill bit to form the trunnion, and then glued them onto the tops of the brackets. I wanted to add joint bolts, so following BE's lead, I simply cut some 26 gauge blackened wire loops in half, drilled one hole through the very back of the cap square and another just behind, and set the wire in there, Here's the result: FFM shows an eyebolt at the front of the cap square which has a considerably different shape, since the cap square would fit over it as a latch. In the drawing, this appears as squared eyebolt. I didn't want to go with another round eyebolt, as I thought that would be too big. Finally I hit on the idea of bending a piece of wire over the edge of an old exacto blade, and here's what I got: If you look really closely, I mean really, you can make out a sort of flattened loop at the very top of that wire. I was feeling pretty happy with this solution, until I started drilling through the front of the cap square. Again, no photo, but this is because it's just too horrible to show: I guess the space in the front is small enough that the action of the drill bit pulled up the card, twisted it, and effectively ruined my cap square. I tried again after coating the card with Humbrol, thinking that would harden it. But no. So far, then, no eyebolts in the front. And maybe that's ok, since I don't have any ultra-thin chain anyway. But that's where I've managed to get in these days of too many committee meetings. And now that the leaves have all fallen in the back yard, my weekend will probably be spent mulching them then griping about my aching back. Cheers, Martin

- 467 replies
-
- 5
-
-
- fly
- victory models
- (and 1 more)
-
Hi Ken -- Beautiful work on this lovely ship. I love the look of your stern with the expertly done planking. Are the beams you set in for the forecastle also in redheart? I used that wood for the capstan in my Fly, and had thought of using for the gun carriages as well, but found it so crumbly that I gave up and resorted to paint instead Cheers, Martin
- 481 replies
-
- 1
-
-
- rattlesnake
- model shipways
- (and 1 more)
-
Hi Soren -- It's great to see another Swan Class build starting up. You're absolutely right that the Pegasus is a good kit (I'm building the Fly, which is pretty much the same), and there are some excellent logs on MSW -- I know because I've followed them closely. I'll be looking forward to your progress! Cheers, Martin
-
Hi Mike -- It's great to hear from you, and that you are still at the Pegasus! I divided my planking into 3 bands, and started the lower band first, going from the keel upward, then I did the top band from the wales downward. That left me with the well-defined middle band (and it alerted me to the trouble spots where planks were threatening to become too narrow or too wide). And I found that spiling was an absolute necessity, one that was made easier with those nice chisels from Veritas, but still made the overall task go on much, much longer than I had anticipated. In hindsight, I think that if I had invested in a proportional divider I might have been able to look ahead better. In foresight, I am promising myself that, as with every step in modelling, experience provides the best education. I like the look of copper on a lot of the builds I've seen on MSW. But I decided that I wanted this one to be as much a boxwood build as I could make it. Can't wait to see the latest update to your Pegasus! cheers, Martin
- 467 replies
-
- 1
-
-
- fly
- victory models
- (and 1 more)