DONATION DRIVE - SUPPORT MSW - DO YOUR PART TO KEEP THIS GREAT FORUM GOING!
×


Shazmira
-
Posts
1,303 -
Joined
-
Last visited
Content Type
Profiles
Forums
Gallery
Events
Everything posted by Shazmira
-
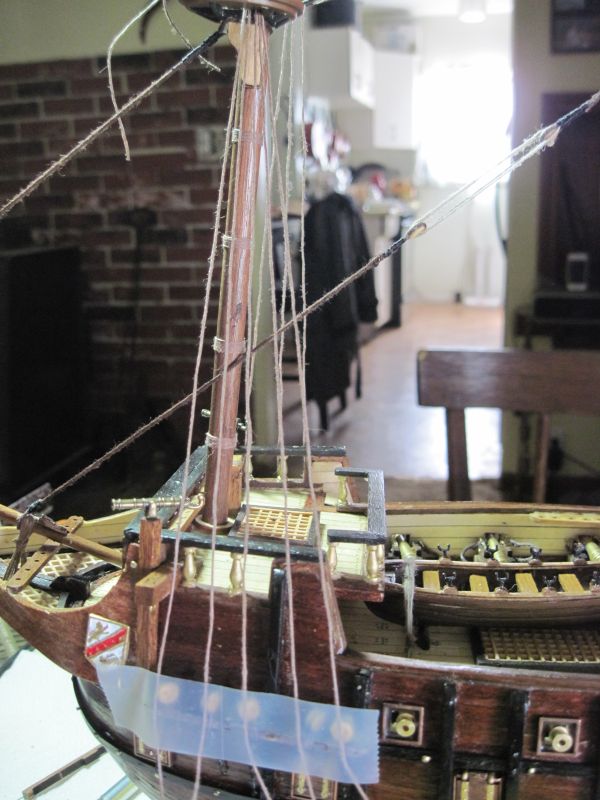
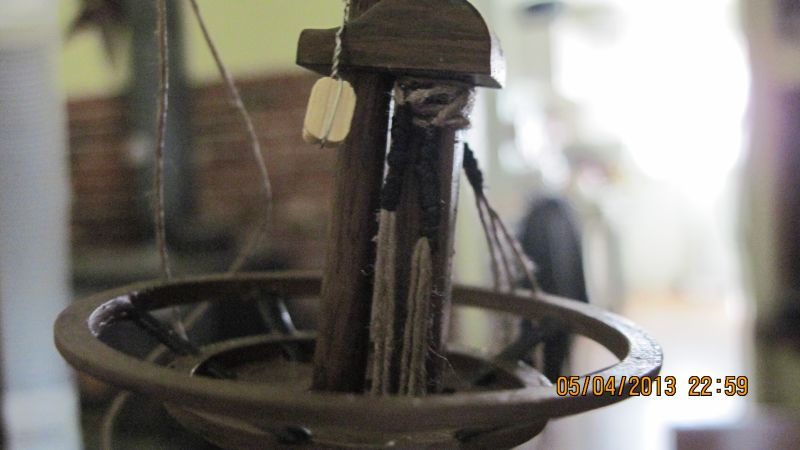
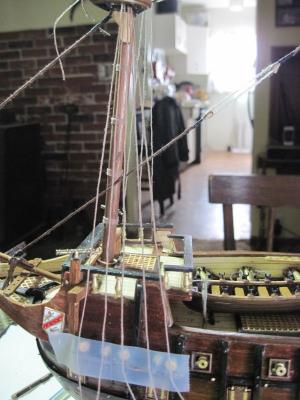
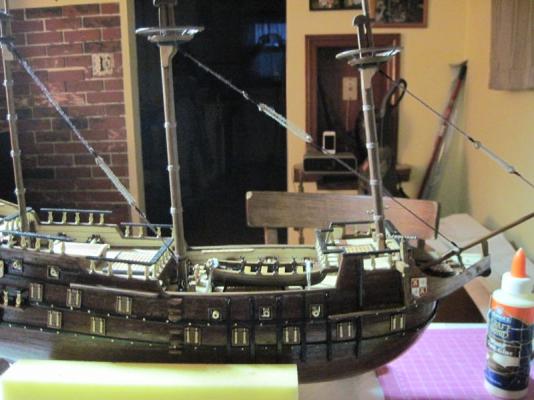
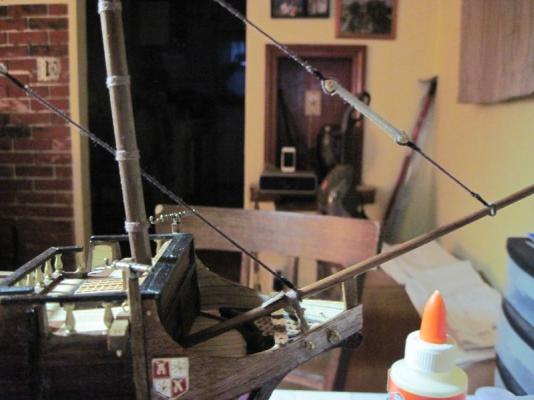
 My high tech little chainplate jig. I know, I know, I should have made proper chain plates, but you know what....I didn't want to fuss with them. I have seen others just use the galvanized wire on their builds, and personally I think it looks fine on this ship. Only concession I made was to use some black, jewelry beading wire instead of the galvanized since paint always makes it look bad, and I have no blackening agents. first set of shrouds in place Now, before I go any further as just doing the foremast took me 3 hours...does this look acceptable, or have I done something completely wrong? Toatally amazing to me how in a close up picture there are so many fuzzies visible. I ran each shroud line through the beeswax 6 times.
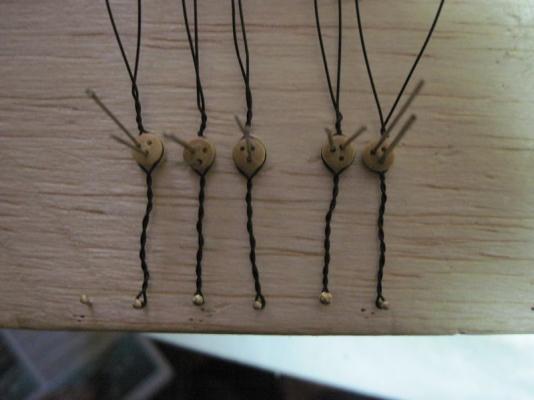

-
Just a verbal update atm.I read through Chucks instructions in the Syren instructions. Sorry Sjors, I only removed the instructions and plans (in case I needed to refer to them) then I quickly closed the box back up. I held my breath so I wouldn't smell the wood, and I plugged my ears so I couldn't hear the Syren call I have finished installing the chainplate deadeyes, and am now preparing the shroud lines. Once I have them served I will post a pic.
- 773 replies
-
- 1
-

-
- san francisco ii
- artesania latina
- (and 1 more)
-
Sounds like heaven to me Andy!
-
Please make sure you let us all know when blocks and rope will be available. Summer is fast approaching (so the calendar says, if not the thermometer) I am anxiously in line waiting to purchase both!
-
So sorry it took me so long to finally read your log Buck. To say I am impressed is an understatement of gigantic magnitude!!! I am so happy you live in Kansas....you just might receive a visitor for some tutoring on how to do this finish properly. My hat off to you, you truly are an artist


- 515 replies
-
- 1
-
-
- artesania latina
- whaleboat
- (and 1 more)
-
I love that last picture, it really shows how she is starting to come together nicely!
-
Spectacular work as always. I am just so impressed by all the intricacies...lovely ( is that the right word to use when talking about a rudder) to look at, it gives me chills.
-
Well, wow, I had no idea you created it Russ. Now you are in trouble as I WILL be asking you questions!
-
Alright....DOH!!! As someone just very wisely reminded me, I have in my possession one of the greatest tutorials on shrouds, and it even includes instructions for a jig! Thanks Augie! Sjors, look out! I am opening the Syren box and reading the tutorial....
- 773 replies
-
- 2
-
-
- san francisco ii
- artesania latina
- (and 1 more)
-
Ok, so I am stupid!!!! I looked at Grants little jig...thank you for the link. The jig I made I had copied from a different log and it only held the pair of deadeyes...made me believe I needed to do the lanyards between them first!! So just call me an idiot. Guess I wont be moving on as quickly as I thought. This rigging thing is more complicated than I ever dreamed But I will persevere
-
Now you just confused me further Bedford. You are making it sound like I do my shroud lines attached to a deadeye. Then I connect that deadeye to the one in the channel??? If I do that then I cant use the jig. I guess I am not understanding how your wire (which sounds easier than the jig) works exactly...or when it works maybe is what I am trying to ask
-
Wayne, thank you, between you and the others I understand a bit more now. But I still have a bit of confusion. I wish I knew how to put my own little drawing in, but i will just have to try and explain with words. So I did my dead eyes correctly 2 eyes up(top) 2 eyes down (bottom). GJ, I did make myself a little jig so all my pairs/sets of deadeyes will be the same. Buck, that thing from ME would have been really nice to have read BEFORE I had my masts all assembled, definitely would make all of this part much easier. Ok, let's see if i am grasping this,,,,ONE piece of string from first deadeye, up around the mast (serve this) same string back down to next deadeye in line (on the same side of the ship). Shroud line is served at both deadeyes as well. I also think I get that i do one pair on one side of the ship (Port or starboard), then do the corresponding pair on the opposite side (port or starboard). I do this so that I don't pull the mast to one side or the other I am assuming. Wayne your instructions speak of a deadeye lanyard....I have no idea what that is One last question...I hope....doing this in pairs of deadeyes works fine for my channels at the stern, which has 4, and the channel in the middle, which holds 6. However, my channel at the bow only holds 5 shroud lines, so do I do the middle one just from the deadeye up to the mast?
-
Geez these guys are just as bad as Sjors, when it comes to tempting people to do things lol. Wayne, 42rocker and several others have been trying to lead me down that dark path too. Like you I know it is in my future...but I wanna see that Confederacy FIRST!!!!
-
Thanks Russ, I feel I have my head wrapped around both the use and the NEED for the conditioner. I expect to be starting that longboat in the next week or so, and I want to make sure I do it right!! I know Chuck told me to use the conditioner instead of replacing the basswood with something else, but now I see why. I am also hoping in 10 days, as soon as school is out YIPPEE, I can get out to the barn to cut that plywood for the battle station. Did you build it as well Russ? Don, yes, we picked up something like 6 inches, but it was gone the next day thank goodness. I keep hoping spring will actually arrive!!!
-
Ok need help. I understand how the dead eyes are attached to the chainplates, run through the channels and then nailed to the hull. Next step is to thread the next set of deadeyes that attaches to these on the chainplates...following me so far? First question, lower eyes...2 up...upper eyes 2 down. Is that correct? Ok, big question. once the double set of deadeyes are all attached, I am supposed to run my shroud (?) lines from each of the upper deadeyes up to the masts. I believe I attach the shroud line to the dead eye, the same way I did on the stays. Meaning I wrap the line around the deadeye and then serve the end, right??? That all seems logical so far, then I run into trouble. the plans and instructions say to run my shroud lines up through the space provided on my "crows nest" and I am supposed to take the shrouds up to where the widest part of my mast ends and is connected to the next thinner part of the mast (OMG I hope you understand what I mean). But what the heck do I attach the shrouds to??? Are they just tied around the mast? I mean wrapped and served? Do I do them individually? or bring each strand together and then attach them somehow????? There are no close up pictures in my instructions for this step, and the plans only show directions of the shroud lines coming UP from the dead eyes and then say where to end them on the masts. I am so lost. I tried looking at other logs, but different kits seem to do them differently, or I am just not looking in the right place?
-
Thanks Don, I will look into that. I had planned to do the one on here, but had delayed it until the weather got better so i could get out in the barn and cut me a piece of plywood for the base. I was going to try this as a scratch build...but did not realize there were kits for it as well...hmmmm
-
Thank you. What I have is the minwax conditioner as well. Now i understand why it was recommended I use this for both the 18th century longboat and the Syren, as both use basswood for the planking. One last question Russ, will this change the color of the stain?
-
As far as the fuzzies go, thank you for reminding me. I have been using the beeswax on other "strings" like my mast wraps. I did not use it on my stays as I plan to use brown boot polish on them and I didn't want to do it before I attached them as I thought that would be a huge mess. But then I forgot all about it when I finished. I will go home tonight and do that right away!!! Sjors BEHAVE yourself!!!! The Syren must wait, just a bit longer! Keith, I plan to do the Pinnace as well, that is what I asked for as my birthday present. I love the looks of both those little boats, and I did not want the longboat to be lonely and be dwarfed by all the other builds I have planned, so I want to get it a little playmate!
- 773 replies
-
- 1
-
-
- san francisco ii
- artesania latina
- (and 1 more)
-
I bought a can of wood conditioner because I read in someones log about the use of it. Can someone please tell me exactly what wood conditioner is supposed to do? i have read the can, but don't really comprehend why exactly I would want or need to use this product. second question is how (meaning when, at what stage) would I use this...before sanding, after sanding??? Will I want to use it on EVERY piece of wood that will be on the exterior of the ship?
-
Okay stays are all in place and finished. Time consuming, but not near as difficult as I thought they would be. Just like most everything in life. One step at a time, and in the end it comes together. Tomorrow since I will now know the angle of my shrouds, i can do my deadeyes and chainplates!!!!
- 773 replies
-
- 2
-
-
- san francisco ii
- artesania latina
- (and 1 more)
-
Elders rotflmao...wonder if Chuck will be told about that post
-
Absolutely stunning!!!!
-
I have seen some tweezers with a rubberized tip for sale on some site or another, but sorry I can't tell you where. I swear I have been everywhere on the internet when it comes to modeling supplies and tools. I like your ladders, sailors wont have trouble with the stairs being too close to the guns now. Major diff between this kit, and one Chuck has written instructions for...in his, he has included the forethought. Instructs you to drill here, or drill there, and then 30 steps later when it is time to install something, the holes are already there!
-
Tim Thank you sir!!! Scott, have fun with work I am looking forward to the end of the semester and a bit of time off!!! Aaron don't know how wise it is to refer to my log...unless it is for what NOT to do Sjors, yes, I can see just the corner of the Syren box, peeking out in that picture...but NOPE...she is staying closed!!! Bedford, I will have to remember that on the next kit. Since all the string thing is a totally foreign concept to me, I plan to do the SF as the plans and instructions show (when they say and show anything ) this way I can use her as a learning tool so I don't screw up the Syren!
-
very nice!! and no broken bits to hide with a rope coil
- 384 replies
-
- 1
-
-
- san francisco ii
- artesania latina
- (and 1 more)