HOLIDAY DONATION DRIVE - SUPPORT MSW - DO YOUR PART TO KEEP THIS GREAT FORUM GOING! (Only 72 donations so far out of 49,000 members - Can we at least get 100? C'mon guys!)
×


Shazmira
-
Posts
1,303 -
Joined
-
Last visited
Content Type
Profiles
Forums
Gallery
Events
Everything posted by Shazmira
-
 I thought it was that rail on the hull that the lower deadeyes sit on, and the chainplates run through?? Just how the heck did you almost get caught up with me anyway??? Wow, I guess I took too much time off grading papers, and putting my garden in lol.
 -
Intricate, and beautiful work as usual Danny. I am, and will be, forever in awe!
-
Well, I'll be, wish Dan had told me about those wedges...would have solved 3/4 of my problems. You're right Sjors, something to file away for the next time! I have those regular needle threaders, need to find me the long flexible wire ones for those bottom deadeyes, they will make things much easier.
-
Beautiful planking job Sherry!!
-
Steve, thanks for the warning. I finished all my rat lines tonight, so I will be tackling those upper shrouds come tomorrow!!
-
Yes, Yes, Yes!!!! Looks awesome!!
-
I was thinking the same thing...I need to re-line an old cedar chest I picked up at an auction...wow. I am sure you will find several uses for that great pile, good luck!
-
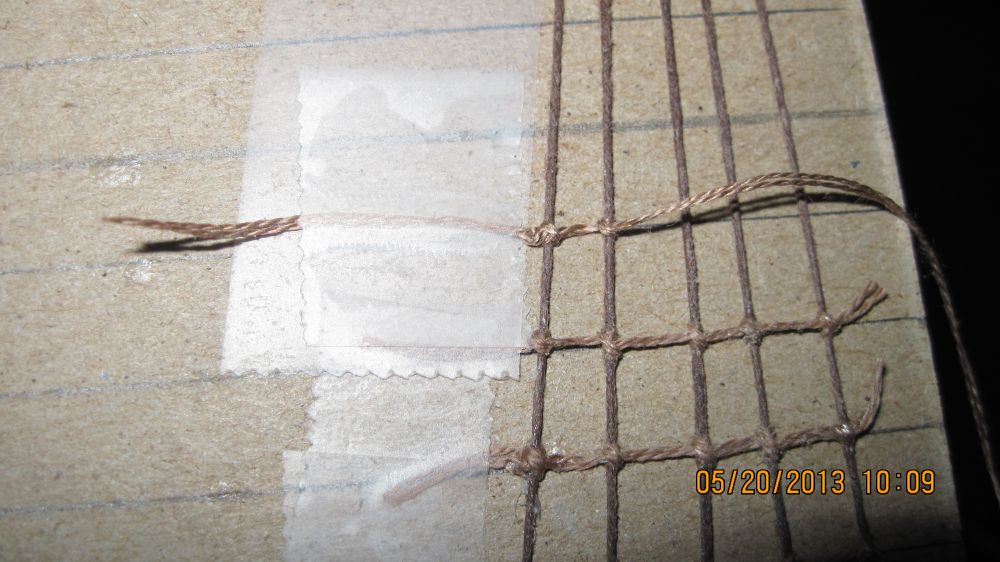
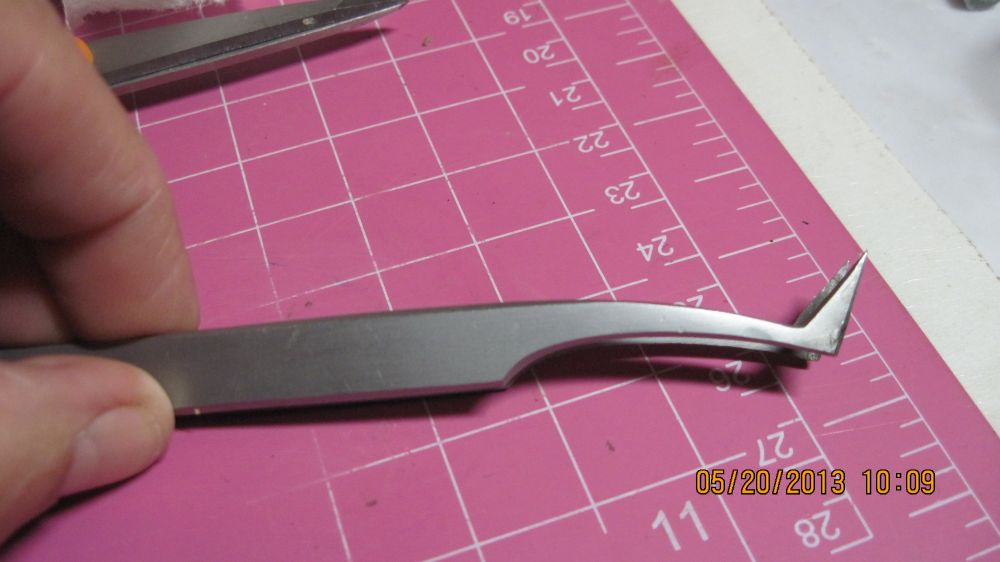
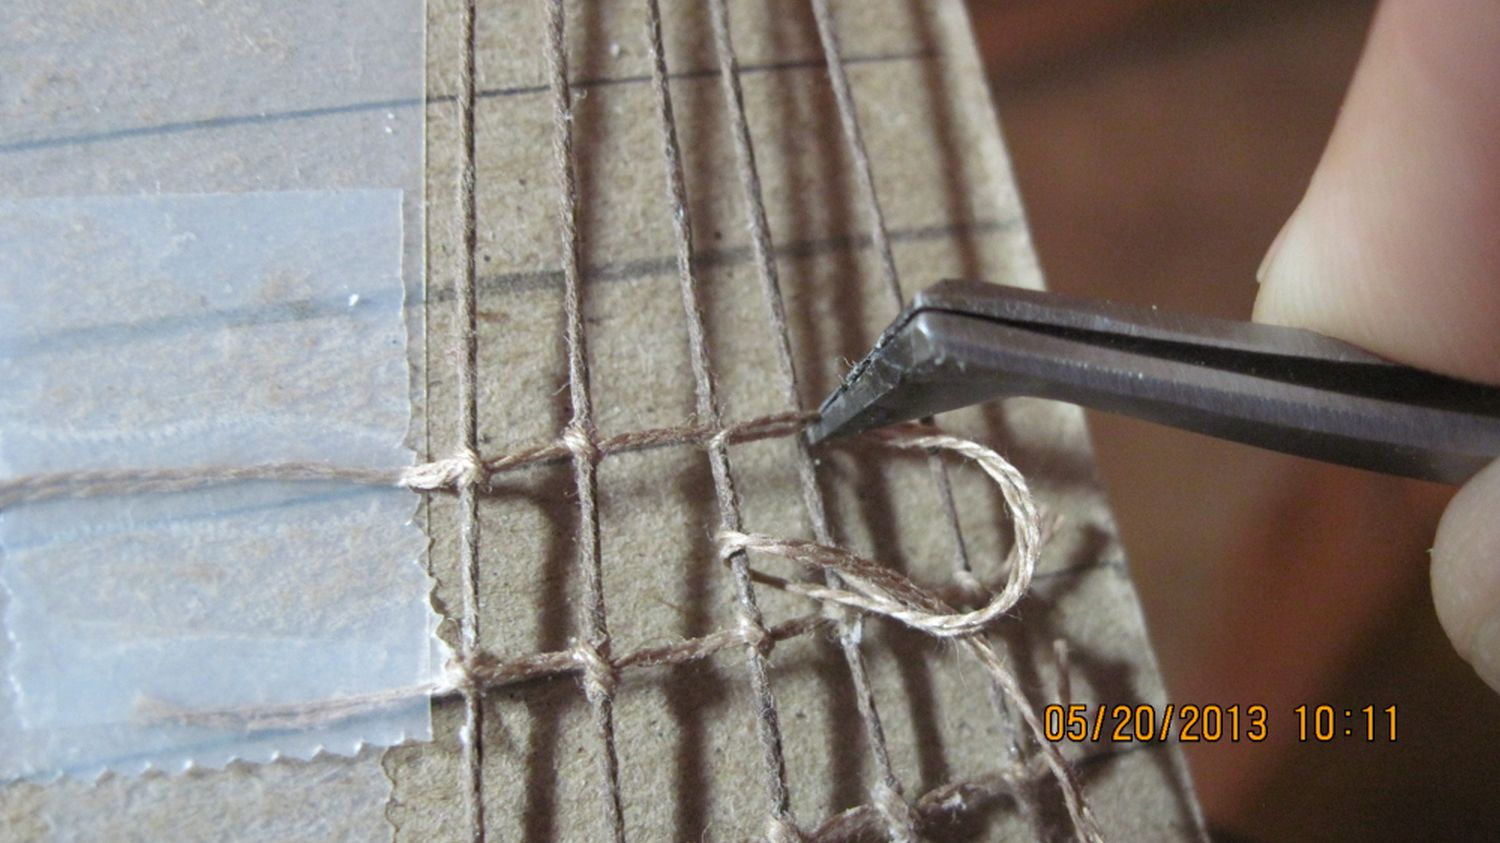
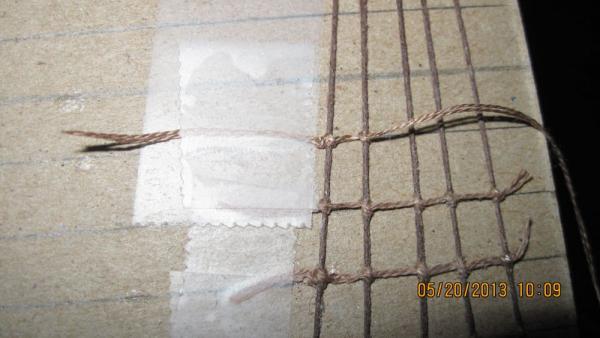
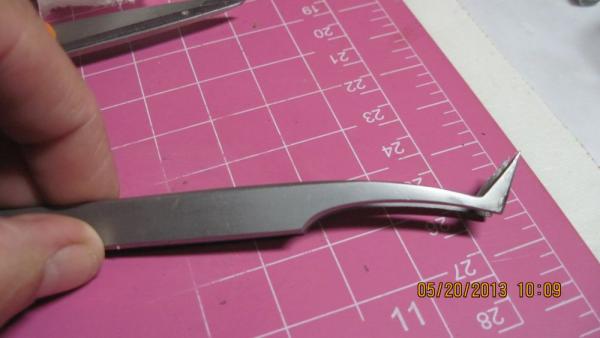
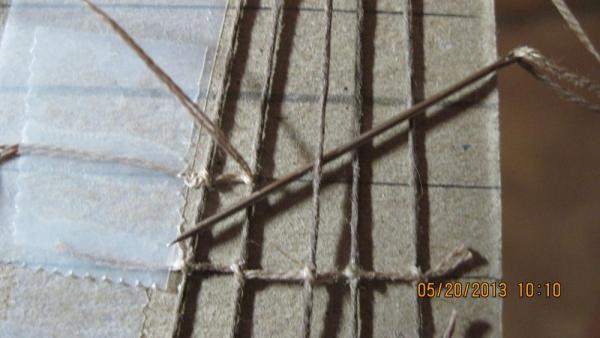
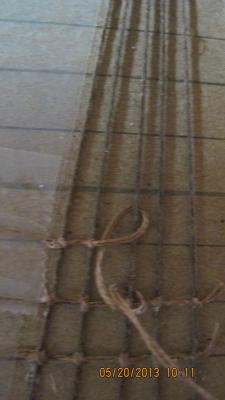
WOW Mario, now that is a good friend. His girl's loss, too bad they don't realize it For some picture clarification of the rat line process. i taped the tail onto my cardboard. Since I am now using embroidery thread I can leave a bigger tail which is speeding the process of the first knot up. These tweezers work really well for pulling the thread tight, and pulling the needle through when space is limited. Make the first loop then the second loop and only tighten partially Tighten the top half using the tweeezers I use my thumb to hold that tight and then pull the second half tight. If I am happy with everything then I use the tweezers to squeeze everything tight together. I add a drop of PVA only on the outside knots.

- 773 replies
-
- 7
-

-
- san francisco ii
- artesania latina
- (and 1 more)
-
Beautiful work Dom, thanks for posting this.
-
Excellent Eric, color me impressed. My next build I will send to you to do the shroud lines!
-
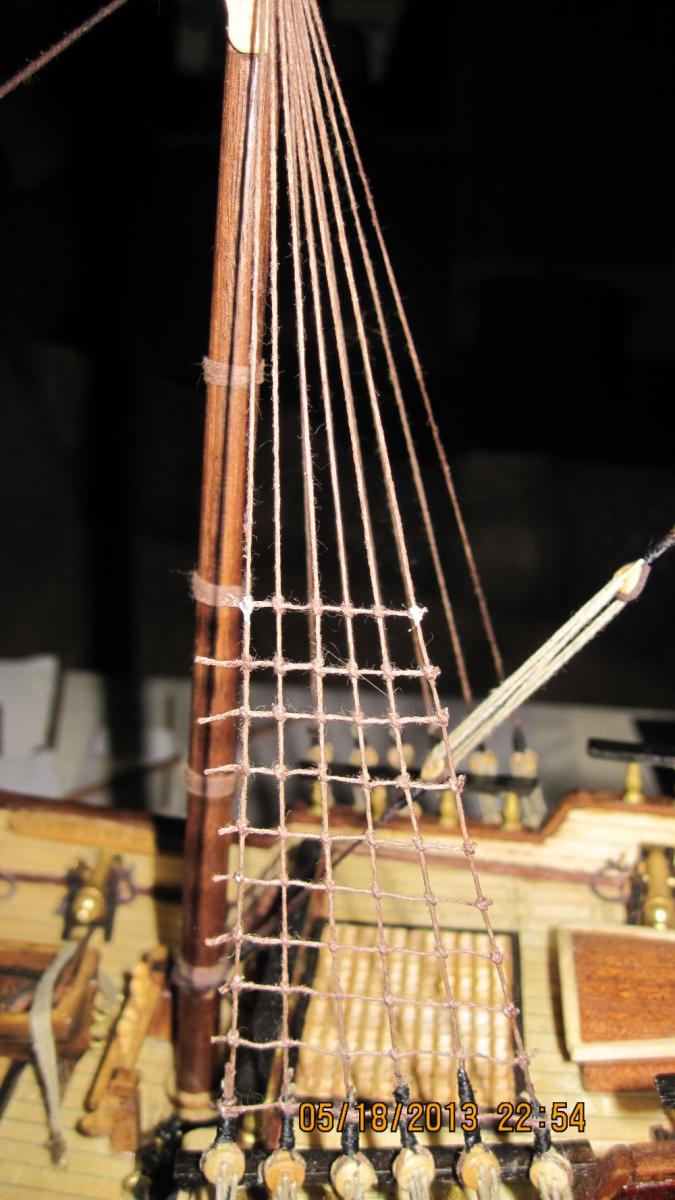
eric, I pulled my shroud lines VERY tight. My secret, thread a needle. Seriously, use a sewing needle, it makes it easier. I have a stiff piece of cardboard behind my shrouds with the horizontal lines drawn on it. mine sits tight up against the back of the shrouds, so by using a needle I can get under each line easily, pull the thread around, loop around again, make my clove hitch. I also use a pair of very sharp pointed tweezers. when I have the clove hitch formed, but not pulled tight yet, I use the tweezers to pull the first "half" of the hitch to the tension I need, old that with my thumb, and pull the next half tight with the tweezers. If I am happy with it then I pull tightly with my fingers to tighten and secure the knot. I honestly believe the needle makes it all easier. no using fingers to move and hold shroud lines (might stretch them). Wim, thank you. That Rod was my favorite from the show. Never thought a purple could look so beautiful on a car, but WOW. Robert, perfect! Thank you for the pics, that is exactly what I needed to see. my instructions and pics are not that clear. Your shrouds look much less crowded at the top than mine do...hmmm, don't know what I did wrong, but I will work with what I have. Steve, I am a land lubber!!! However, I think I made some passable ladders, at least I hope I did. thank you for your encouragement and explanation, it helps immensely.I am a bit worried about how well those next set of deadeyes are going to look when I tie them off to the top ratline...hope they look as nice as Roberts! Sjors, me too. I find having a working knowledge of some of the terminology helps, that way when I read it in instructions or on someone's log, at least I have an idea of what they are talking about. As a teacher I pride my self on constantly being a learner as well.
- 773 replies
-
- 1
-
-
- san francisco ii
- artesania latina
- (and 1 more)
-
Hey no one corrected my explanation to Randy about serving and seizing, does that mean I have my terms correct?? If so, then it is a time for a happy dance I learned something, I learned something!!!

- 773 replies
-
- 2
-
-
- san francisco ii
- artesania latina
- (and 1 more)
-
Looks great so far Randy. Enjoy the scotch, and hit the build again tomorrow!!
-
Randy, is that clear as mud??? In my mind, seizing is just a simple of way of saying the two pieces of rope are wrapped together... and seized tightly. From everyone I have talked to this is simply done using black sewing thread, which is what I used as well
-
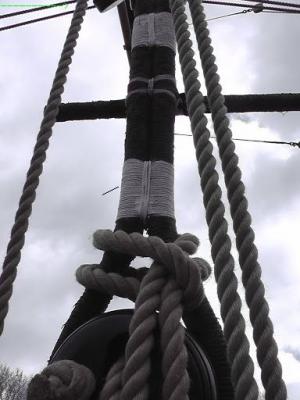
Serving is the wrapping of thread around the "rope" you are using as shroud line. You are supposed to serve the part that will rub against the mast, and then seize the two ends of the string together as well. Let me find a pic for you that will make sense. This is serving the lines. I borrowed this photo from EdT's Victory build. I failed to do this when I began because I did not do enough research before I jumped in. I did do it on the mizzen mast shroud lines, and found it a major pain in the butt to do by hand!!! http://modelshipworld.com/index.php?s=8560b2e62b33efdf060e96ea2fdaff24&app=forums&module=post§ion=post&do=edit_post&f=10&t=84&p=56365&st=990&_from=quickedit So then you take each "end" of the shroud line that forms your pair, pull it together around your mast and "seize" it together by tightly wrapping thread. Notice the white rope holding the two "sides" of the shroud line together above the dead eye. it is the same principle to do this at the top of the mast to hold your pair of lines together at the top, I just couldn't find a pic quickly of that and knew this one from Sjors trip was handy and illustrates it very well I also found this great link in another thread that I bookmarked, this way of doing the seizing works very slick and neat! It also works very well for roping your masts! http://www.shakuhachi.com/Y-BindingRepair.html

- 773 replies
-
- 1
-
-
- san francisco ii
- artesania latina
- (and 1 more)
-
Tony, already planning the case out in my head. Not only dust as the enemy, but also hoping a glass case will prevent any bits from being knocked off by curious lookers. Sjors, deal!!!
-
they are nasty little buggers aren't they. I thought the ones on the SF were tiny and hard to work with 1/4, but I see the ones on the syren are teensy tiny!!! Going to hate those!
-
Ok, the plans don't show any belaying lines from the deadeyes for the upper shrouds, but close examination of the photos in the instruction (I say that with tongue in cheek) manual do show them. Appears they are just tied off to the upper ratline, no staves included in this model. So, I will take my ratlines up to the point that "looks" acceptable. Not age Sjors, years of cross stitch, needlepoint and quilting. I just ran all my line through a decent size needle and those clove hitches fly on the shroud lines. This kind of needlework I can do well! In the future I think I will trade with someone, they can do all the reeving of deadeyes, and install all the shrouds, and I will do all their ratlines for them!
- 773 replies
-
- 3
-
-
- san francisco ii
- artesania latina
- (and 1 more)
-
Futtock staves???? My kit has no staves?? Okay, took a look at my worthless rigging plans. OMG even the plans are not to scale at all. By the plans, they have nice even ratlines from the bottom of the shroud to the top, all evenly spaced, and gee theirs stop just below the crow's nest, by all accounts exactly 6 mm below the nest. HAHAHAHAHAHAHA, yeah right!! I only have a couple of "strings" that attach to the outer shroud lines and go up to the upper standing rigging. Seems my deadeyes for the rigging above will all be attached to the crows nest on the fore and mainmast, and there is no other rigging on the mizzen, So yes, once again I will eyeball it, and take the ratlines up to where I can and just be happy with it. I forgot about that tip of doing every 4th....so far, so good, no hourglass shape, but I can start doing the 4ths now. Things on this model seem a bit off anyway, and the quality of the thread is crap, so I think I will just run the ratlines all the way across. I know I could cut them off (the ones I have done) but I hate to change anything now that might disrupt my tension and spacing. If I left the outer shroud lines out for the bottom 6 and top 6, I would only have about 6 rows that go all the way across. I will however change the direction of the knots on the outers...I think that will look better! Thanks for everyones kind words and input. Shaun, find a noobs log like mine, pair that with a builder who is not afraid to look like a blonde and ask questions...and wow, you get an awesome tutorial!!!
-
Jeez, even riverboats have protruding parts you have to be careful of? Is there nothing other than a block of concrete that would be safe? Sorry to hear about the mishap Adrieke, but I have faith you will prevail.
-
First set of rat lines going well, just dont know how far to take them up the shrouds.
-
Yippeee another one, gotta pull up a chair and watch!!!
-
Lol, I haven't counted up how many lines....let's see, 108 lines, only 546 knots. Hmmm I highly doubt I can finish these in 9 hours...but maybe...guess I will see what tomorrow brings. Question though. how high up the shrouds do I go...on the main and foremast the shroud lines are really close to each other about an inch from the top. but how close together is too close together?
-
David, hope you don't mind if I pull up a chair as well, as another noob, I especially enjoy watching new folks get started because I know how frustrating some parts can be. I would hate for someone to get discouraged because every error is just another challenge to overcome. Looking great so far and waiting to see more pics of progress.