Piet
-
Posts
3,568 -
Joined
-
Last visited
Content Type
Profiles
Forums
Gallery
Events
Everything posted by Piet
-
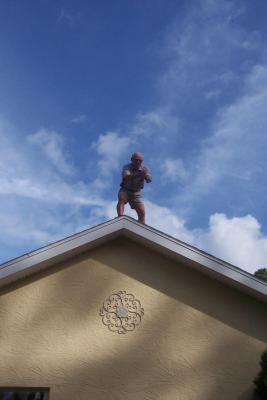
Very nice looking stanchions Nenad, that really adds to the authenticity of your model. Hey, I was on the roof of our house just last week to look for some possible damage. I have no fear of heights, don't like cole mines though Here is a pic of me ready to dive off the roof but changed my mind, no water below, just grass. Piet, the Flying Dutchman ready to take a leap. Cheers,
- 4,152 replies
-
- 2
-

-
- cutty sark
- tehnodidakta
- (and 1 more)
-
 Beautiful work Nils, I love watching your builds. Cheers,
- 222 replies
-
- 1
-
-
- gorch fock
- barque
- (and 2 more)
-
Ah yes, that looks really nice. Well done Remco! Cheers,
-
Thanks to everyone for your kind words and best wishes, does the heart good. Spend most of the day doing research on this cancer thing and with all the previous cancer research I did, after the prostate cancer thing of a few ago, I am assembling an additional but alternative regimen. The BCG method the doc will be doing is a good one for me because its only at stage Ta. All I read about this is really encouraging and I'm not in the least bit worried, well - - - just a little concerned. Like with ship model building an important part of the build is research to be able to produce a good model. This is also good advice to combat our aches and pains. So now that the research is done and I have a list of "stuff" to buy I can again devote time to the O19. Cheers to all and happy modeling,
-
Hello Boris, Great pictures my friend!
-
I want to mention to all of you on MSW that today, November 27, marks the 72d anniversary of my father's death. As I have mentioned several times, I think, he was killed this day 72 years ago during the battle of the Java Sea against the Imperial Japanese Naval forces. One of their long range torpedoes hit his ship where his battle station happen to be. I also want to report the findings of the biopsy tests done last week. I went to see the doc this morning and the verdict is that it is cancer. However, the good news is that it is not invasive. We are going to go ahead with a BCG treatment for the next 5 weeks to try and let my own immune system take care of the cancer. This treatment is not chemo but using radiated bacteria to call my immune system to action in a more aggressive way. It will cause some discomfort but hey, what are the alternatives? Plan C is the last resort - - - c for cutting out the bladder - - - I'll be known then as - - - - - the bag-man Soooohhh - - - in the meantime I'll continue with my father's submarine and all y'all have to put up with me Cheers,
-
First of all I want to thank all of you visiting and leaving your "like" votes, I really appreciate it. Hello Anthony, thank you for your very kind words even after having to look at my old ugly puss Michael Mott, so nice of you to drop by and your kind words. Yeah, I also like to see a face behind, on the side or in front of people's work. Not many do. Cheers,
-
Thank you all for your very kind words and compliments, it's overwhelming and really encouraging. @ Marc the Flying Dutchman who doesn't fly : Thank you Marc, yes, the colors look great, much different then the usual grey. @ Remco: Thank you very much and yup, we both have teeth now but I lack the guns though @ Mark T: Thank you for your kind words. Yeah, I guess it's a labor of love - - - how else can I show honor to my father, besides having been successful in my various careers. I am outranking him now so he would be saluting me and calling me sir but only in publick though @ Joe PZ: Yup, it sure was / is a great boat. She served with distinction against the JIN with a great crew. I'm glad I made her in a large scale. @ Gino: Thank you Gino for your compliment! Hmmmm, starting with the deck gun eh? Didn't think about that one. I was thinking to get all the deck stuff done first for ease of access but let me think about it. I'm sorry to hear about the loss of Frank Gimball. I would have liked talking with him, not that he knows my father but at least there is a connection. @ Wacko Joe: You are most welcome and thanks for liking my efforts. @ Daniel: Yes, she is a big model all right and even at this size many things are still difficult to do because it's not big enough. Go figure. @ Sjors: Thank you Sjors and my guess is that old Mister Wilton would get a heart attack when he would see my name My father did make their life "less pleasant" when he was assigned as the quality control officer on that sub. Actually, he cause a real ruckus because of shoddy work that had to be corrected. @ Popeye: Thank you my friend and now you and the rest of my friends know how I look like, except for John Texxn5 - - he and I shook hands and quaffed a Leffe or two. Oh, I don't know about framing me and the boat, you don't want that old puss on the same pic with this nice looking boat now, do you @ Amateur Jan: Thank you Jan for your compliment! Hmmm - - - two Leffe's eh - - - and come to think of it i still have a bottle of a very good "jonkie." yup, I like a jonge but also an ouwe klare and Berendburg! Can't get that good stuff here Now everybody will be scratching their heads - - - what are they talking about - - - @ John (texnn5): Good to hear from you and thanks for liking the looks of the boat and also thanks for thinking about tomorrow. I also hope things will look good internally, will let yuns know. @ Vivian: Hello Vivian and welcome to my shipyard. Thank you also for your very kind words and I like to think that my father would be pleased with my efforts. @ Freek: Thank you Freek. Props, hmmmm yes, props eh. I don't know yet, been thinking about it and looking at the empty shafts on and off but have not decided yet when to make them. So many things still to make and I'm sure she would look more finished with them screws on. @ John (Lad): Thanks John for your compliment, appreciate it very much. Not to forget Sailor Greg, Hexnut, Augie, Anthony, Andie, Boris and Nenad for dropping in and hitting the like button, thank you all. I spend this day tidying up my office / studio / man-cave. The Admiral has been after me to make it look more respectable for when her sister and her husband come to visit next month. Soooooohhhh - - - I did and it's looking a little better but not yet to her liking. Hmmmm - - - have to spend some more time on this so mundane work. But - - - we must try to please the Admiral, makes life so much nicer I bid you all a great tomorrow and Cheers,
-
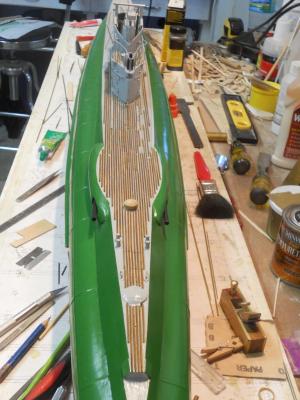
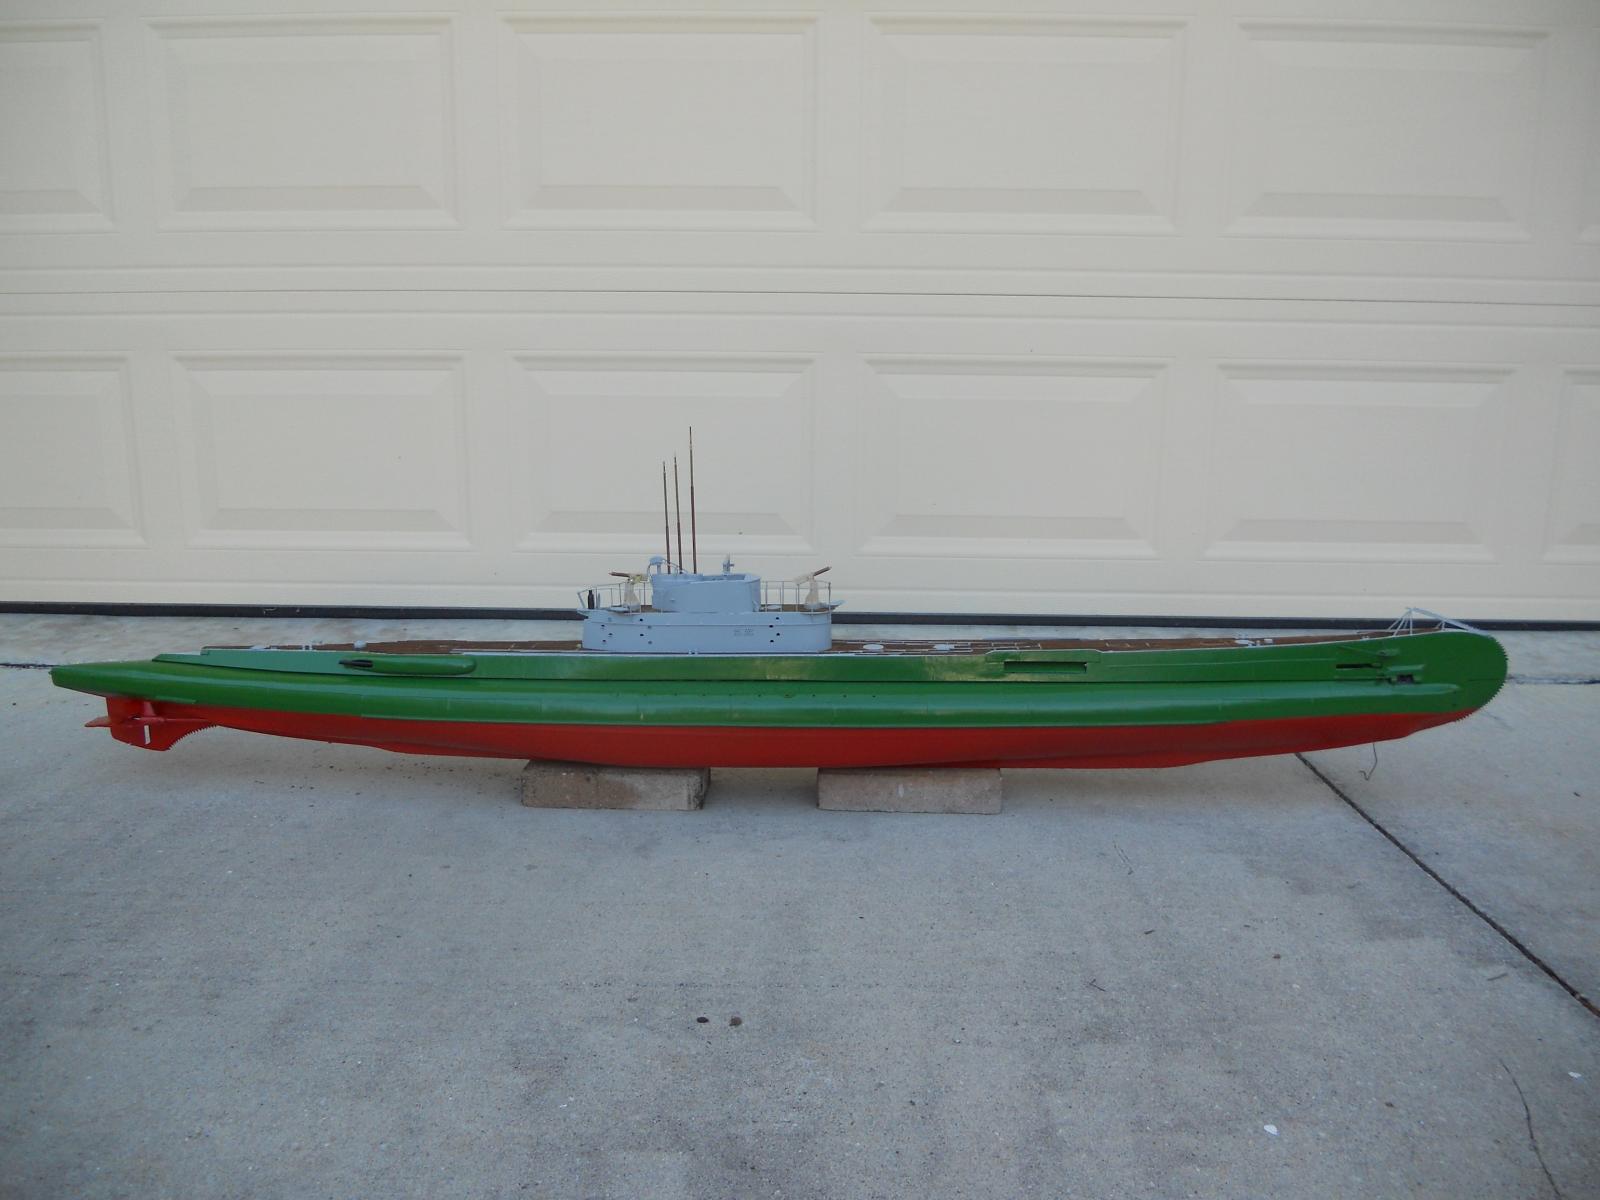
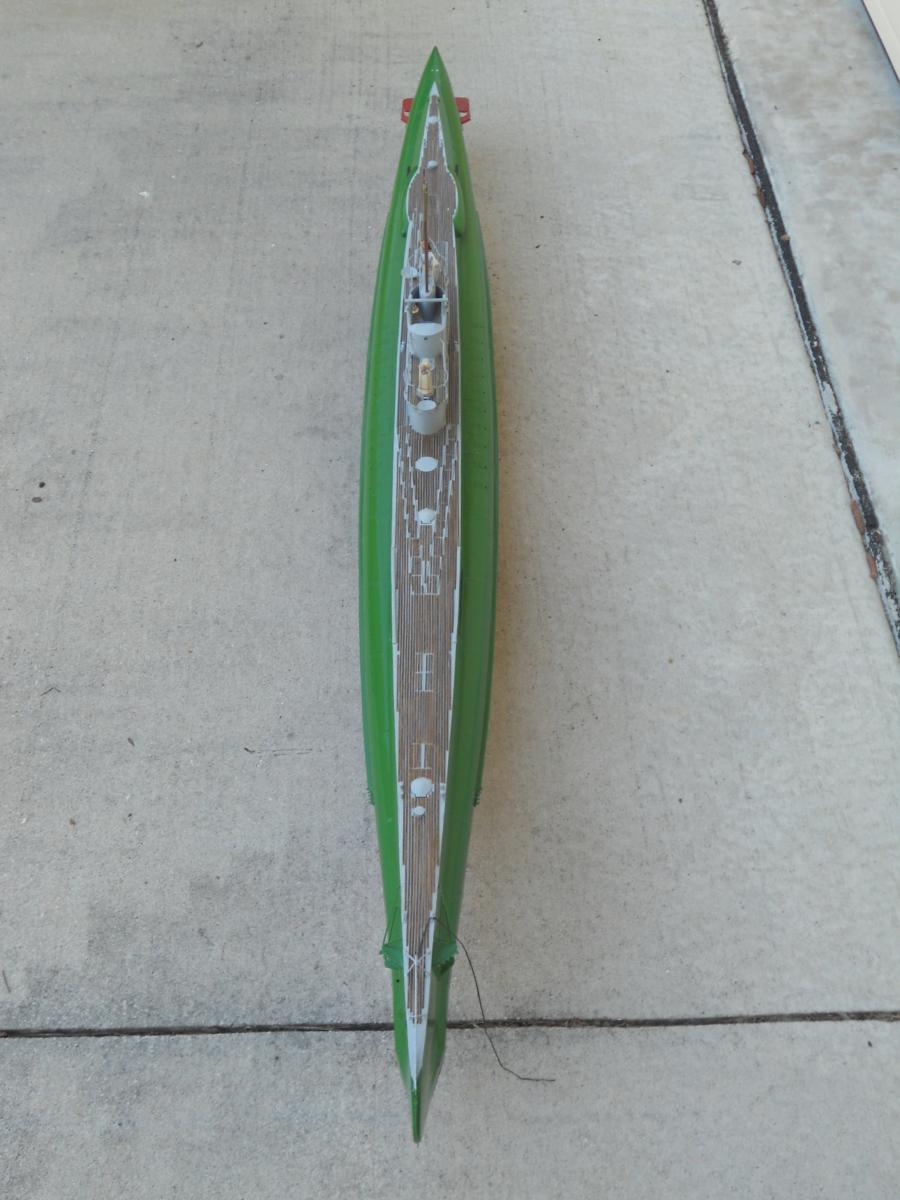
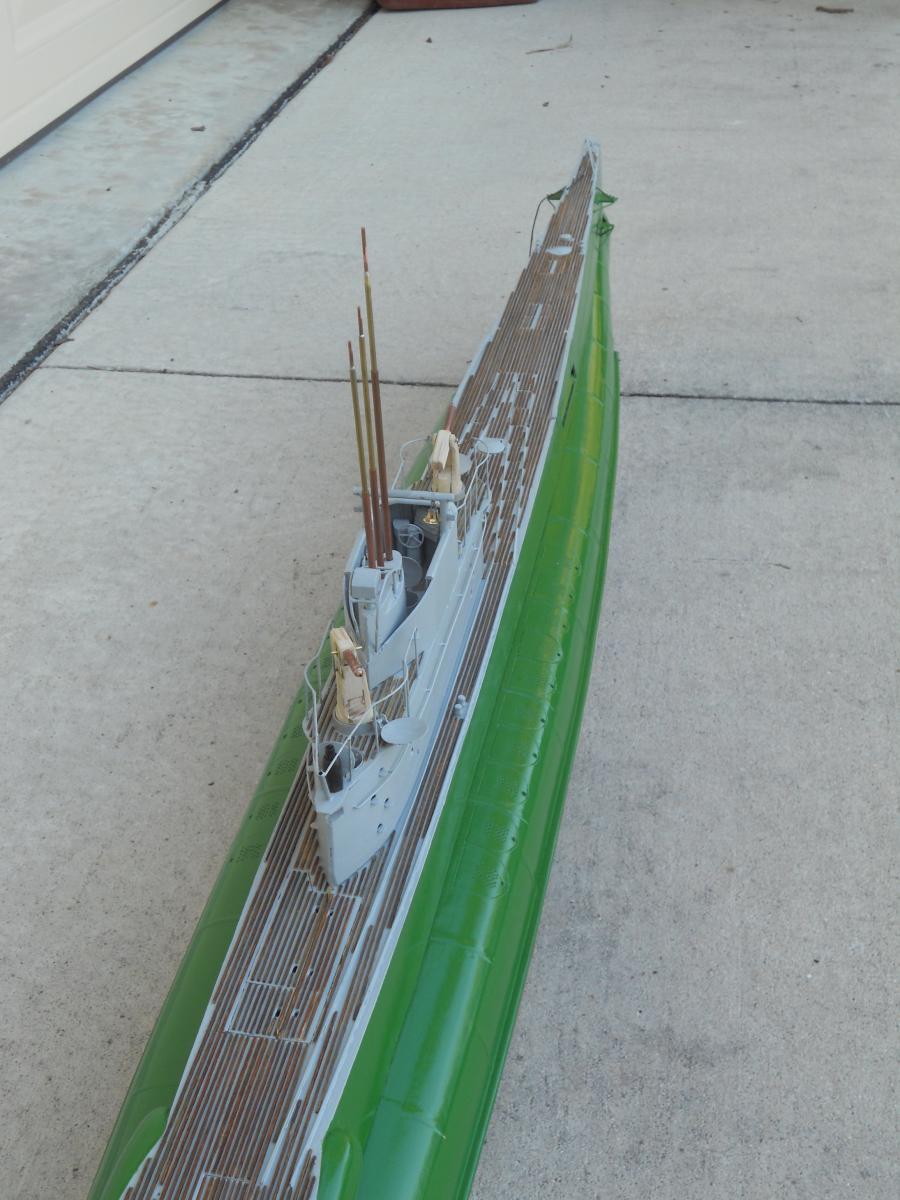
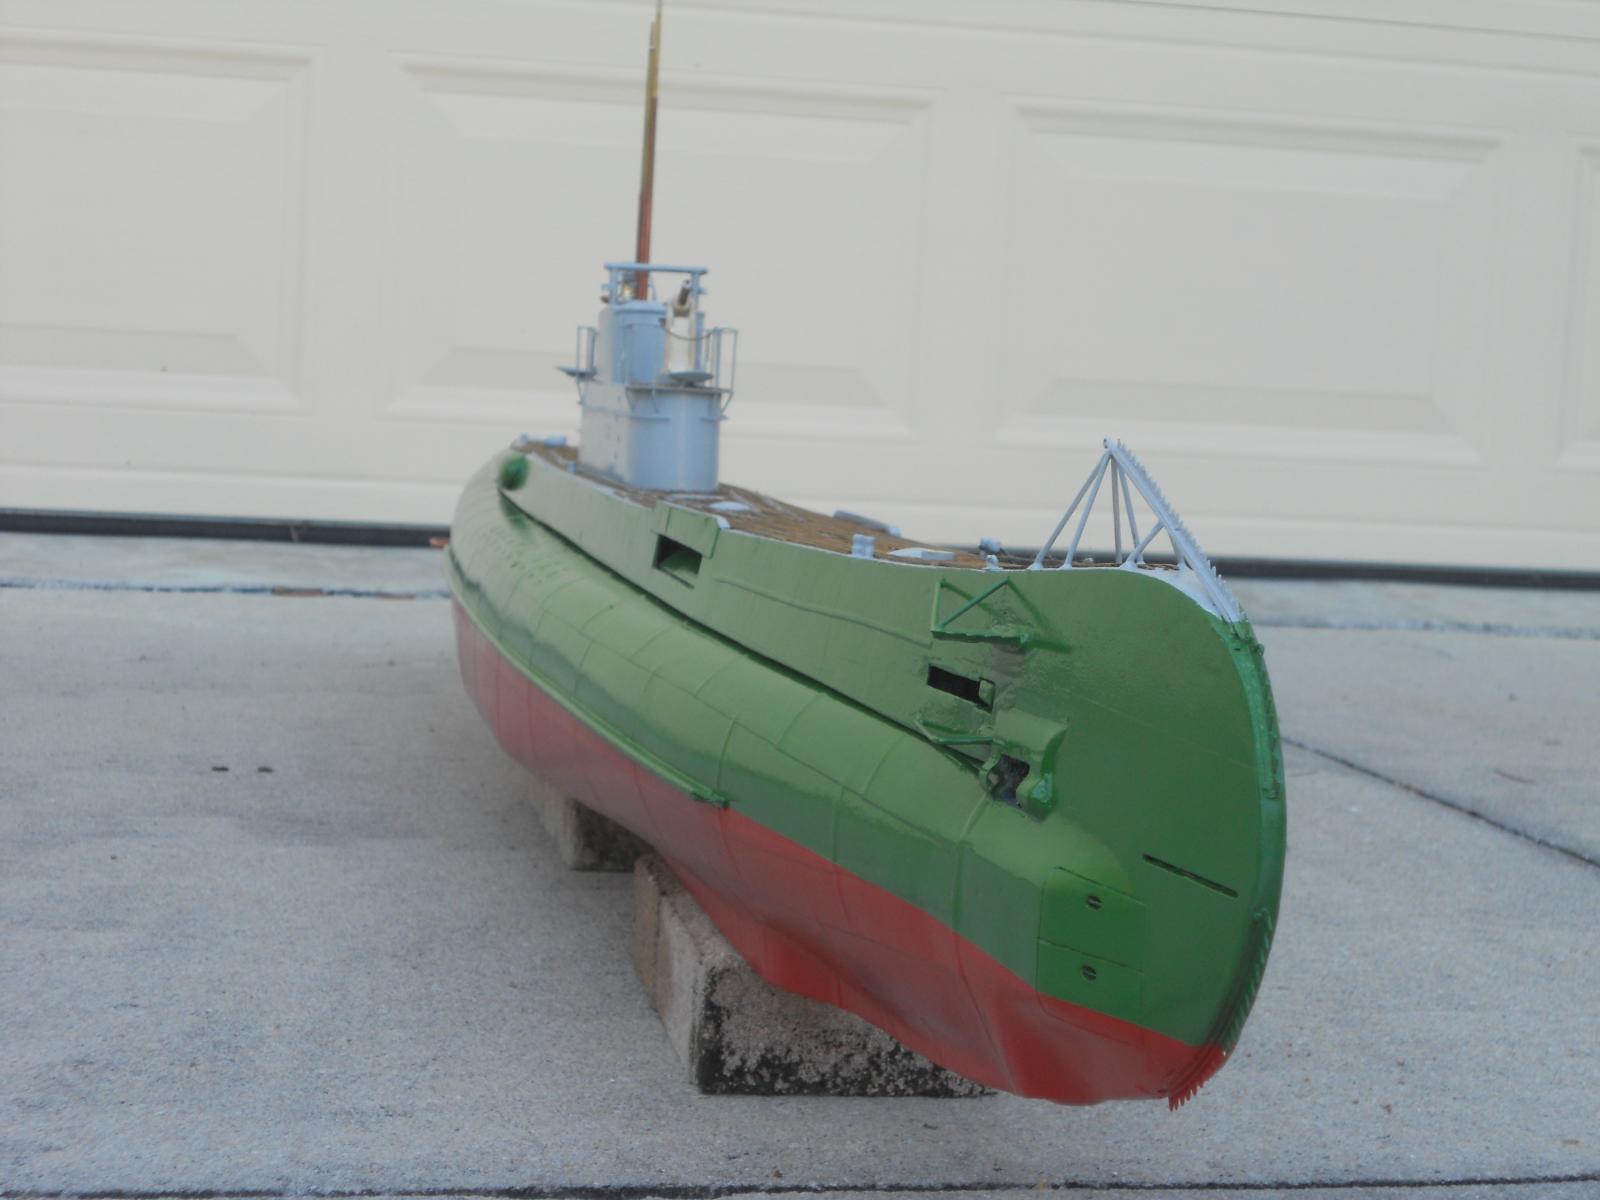
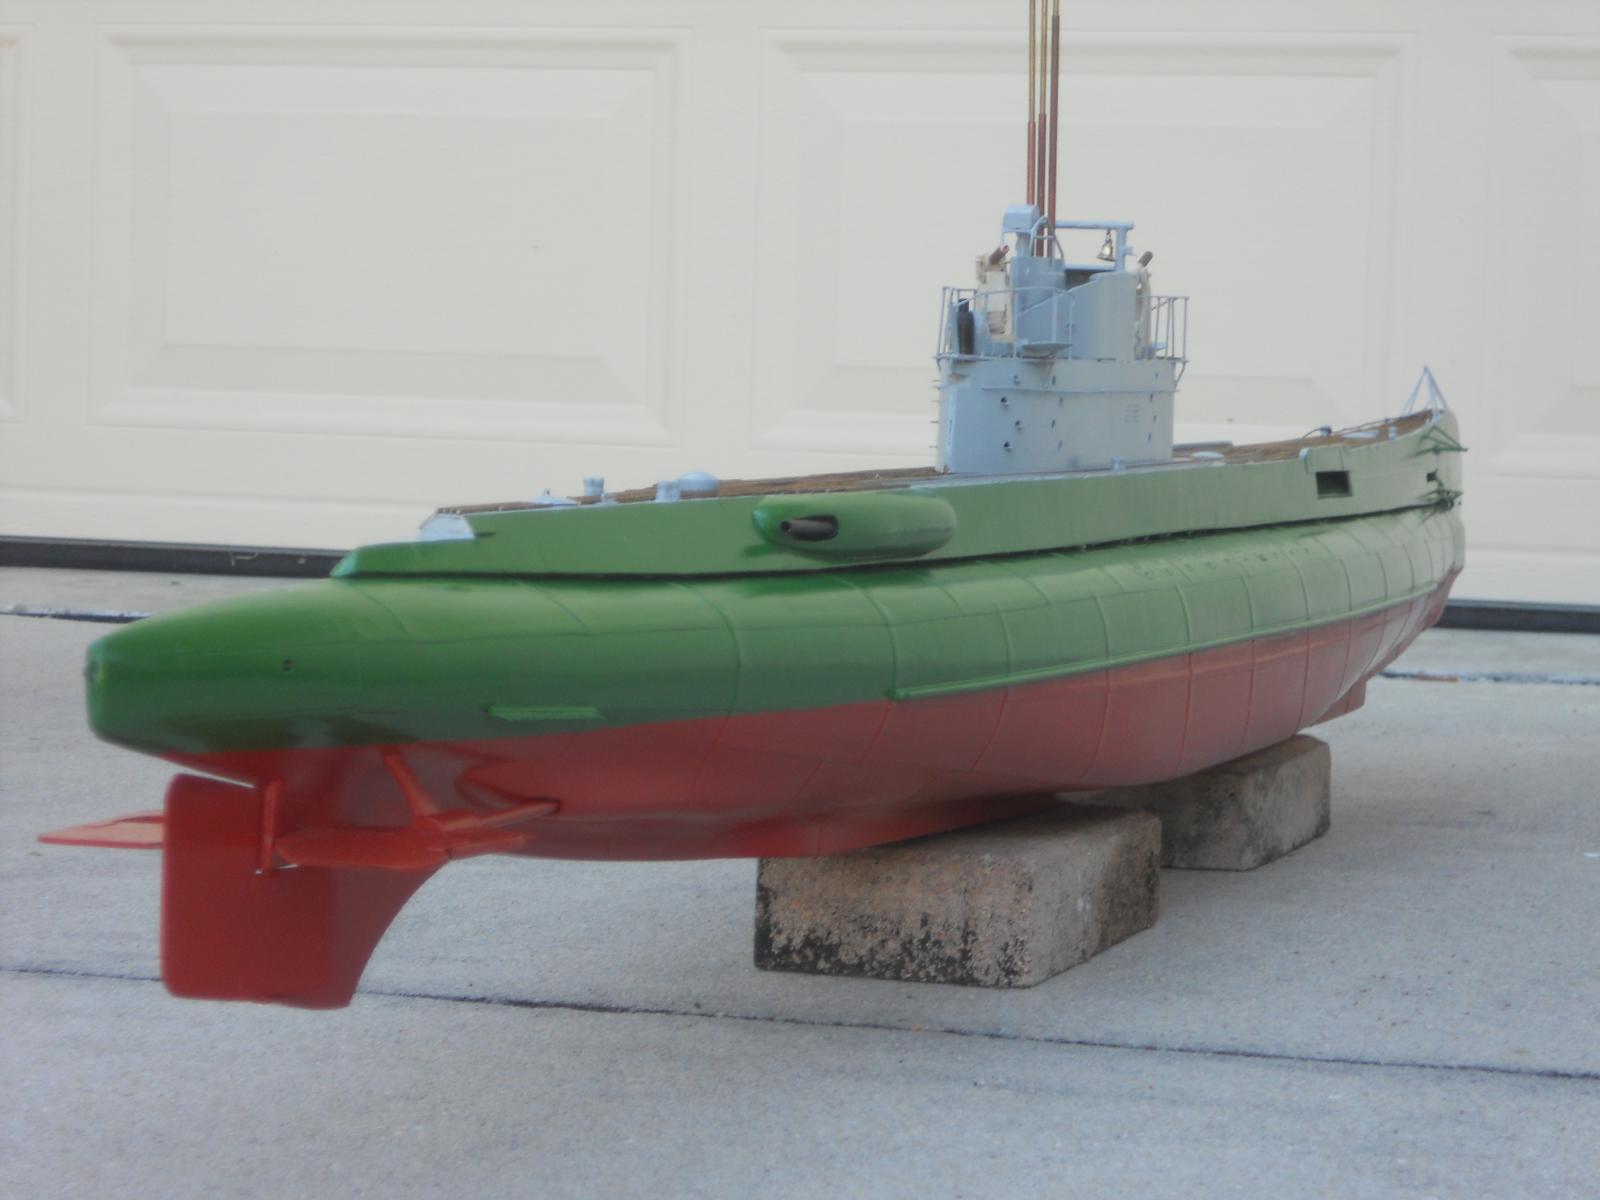
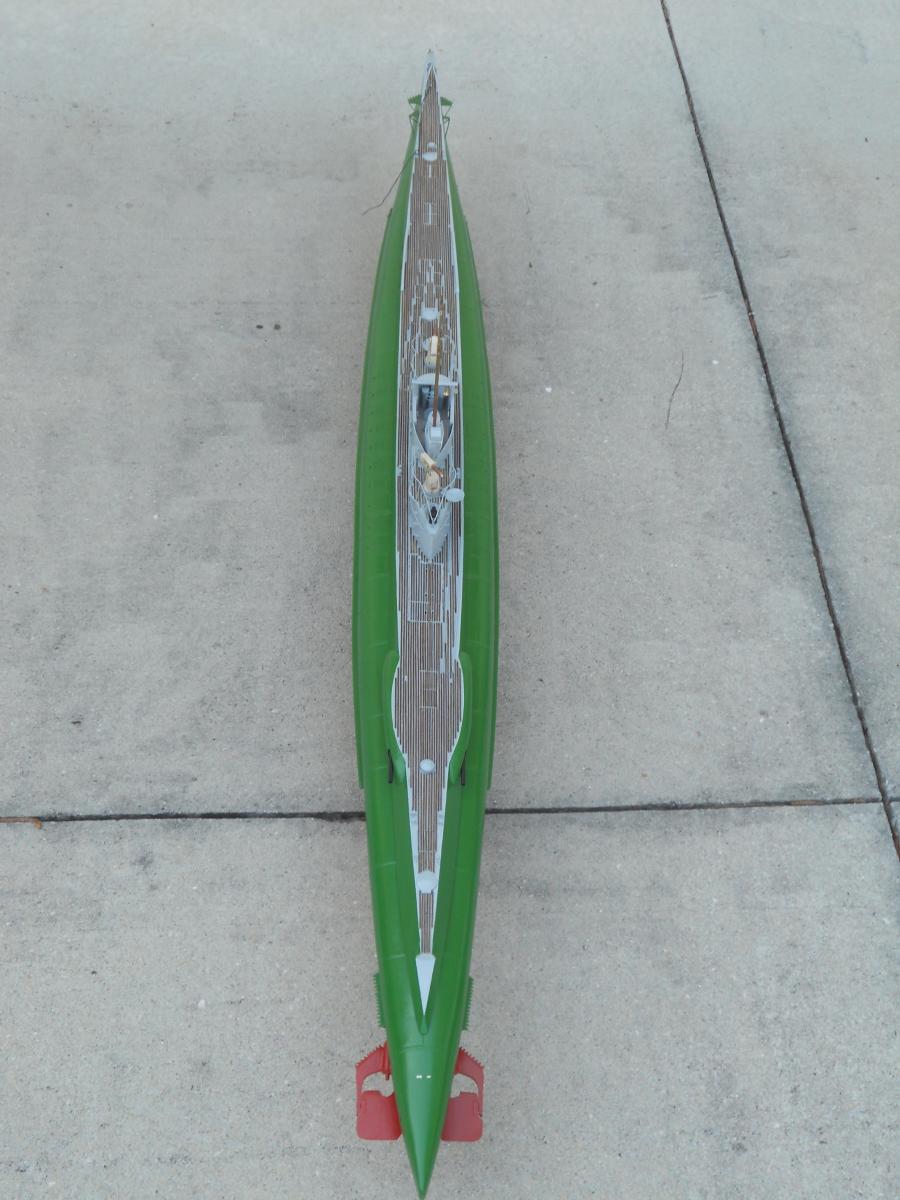
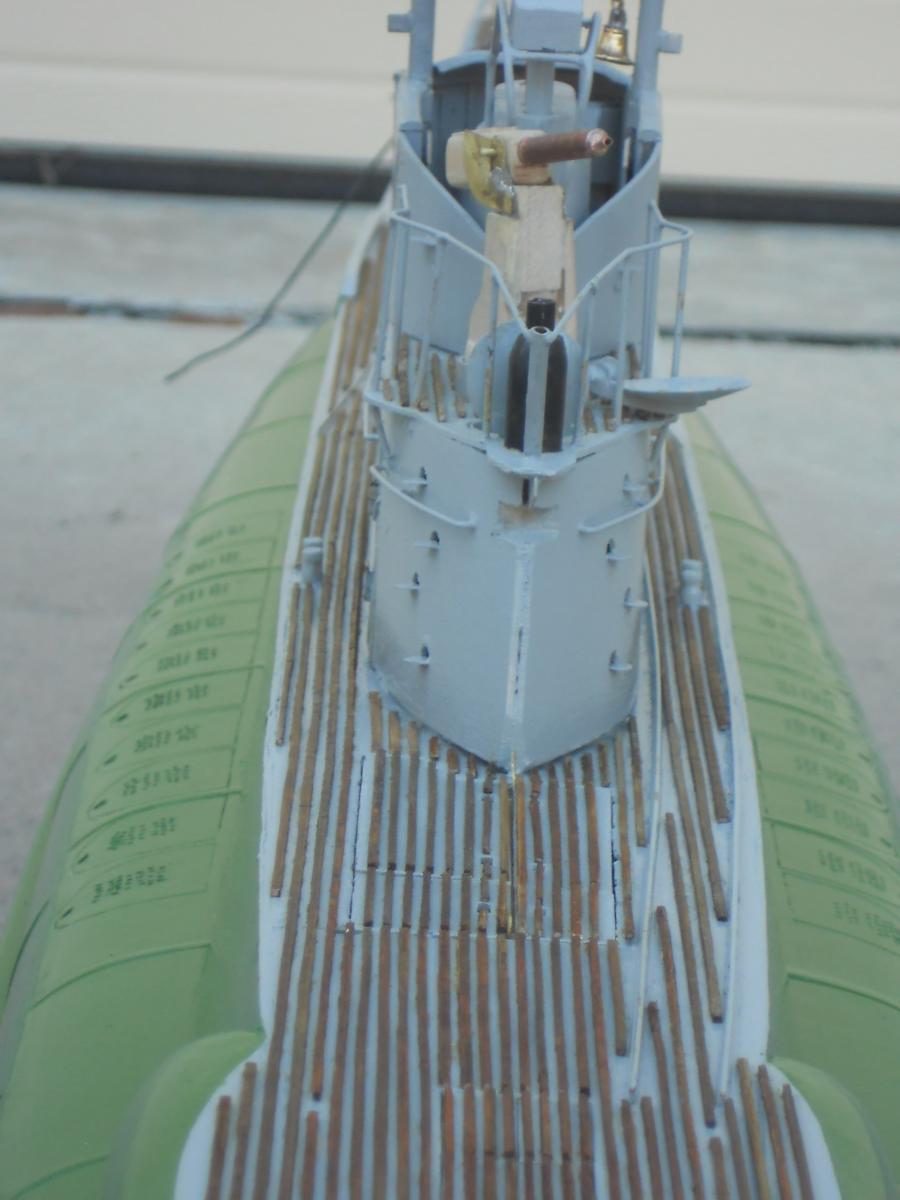
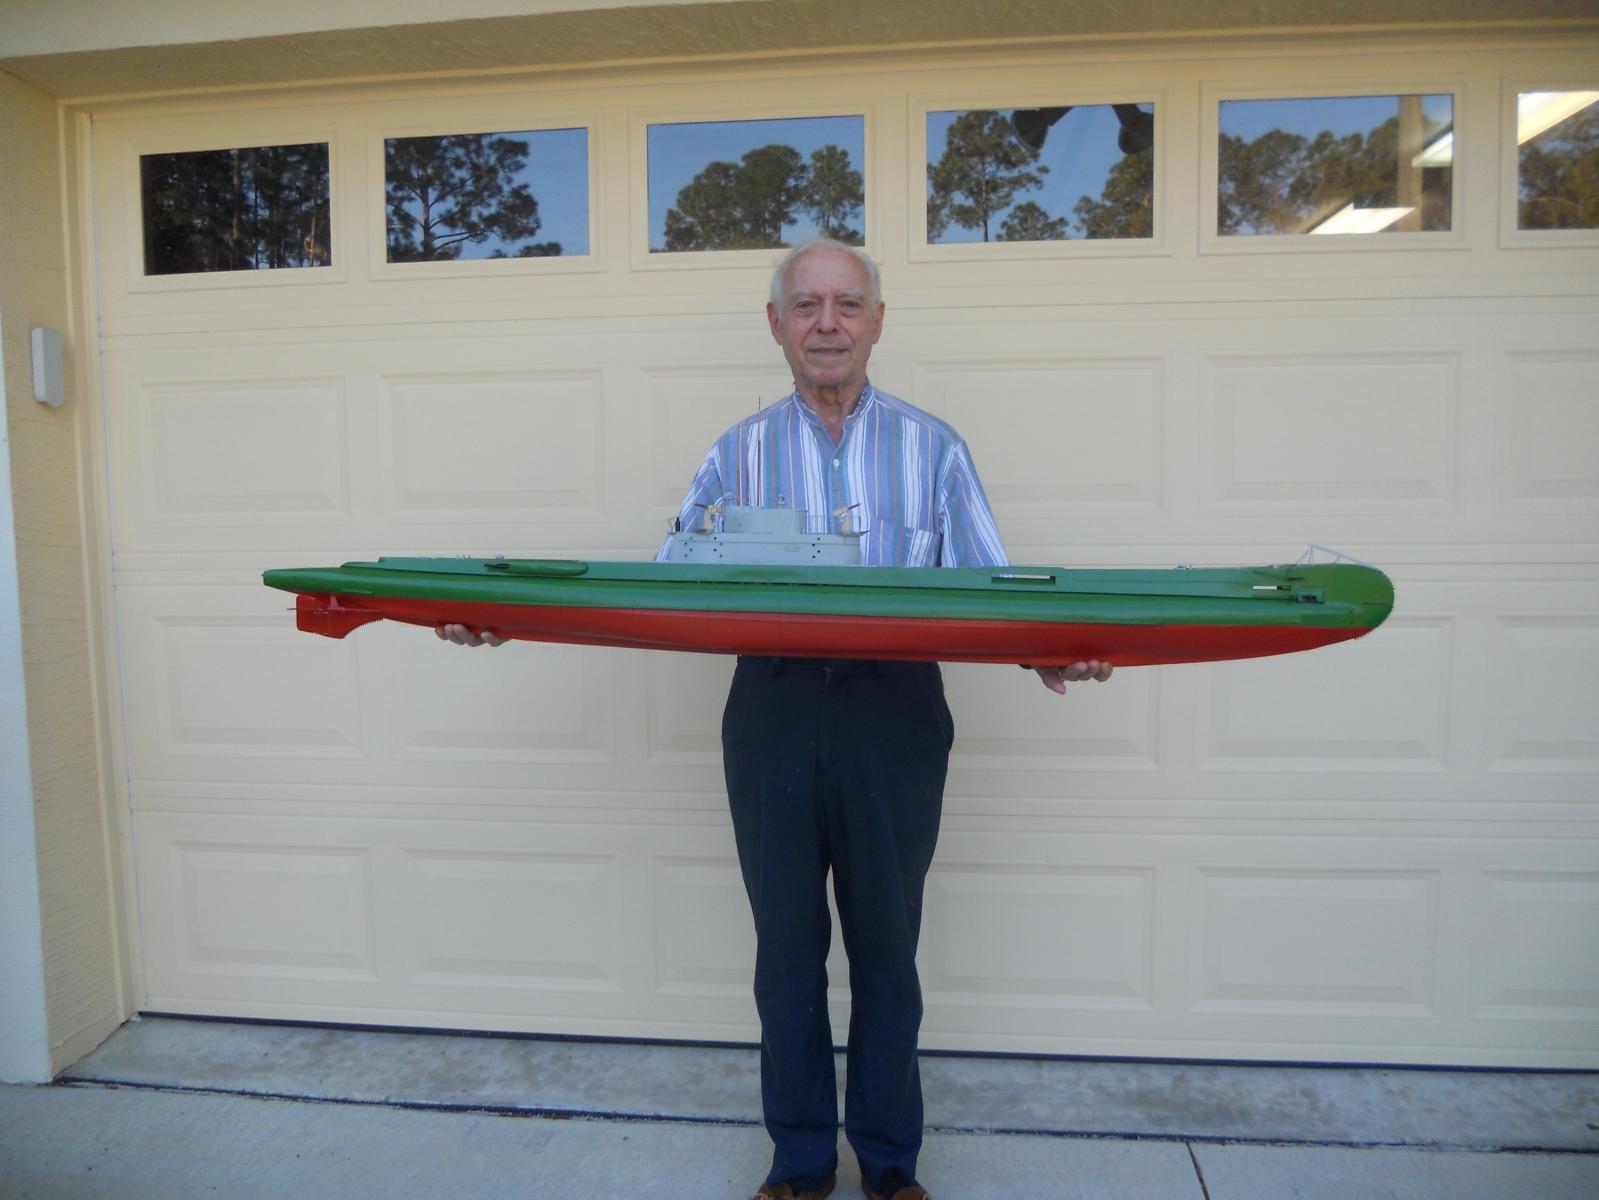
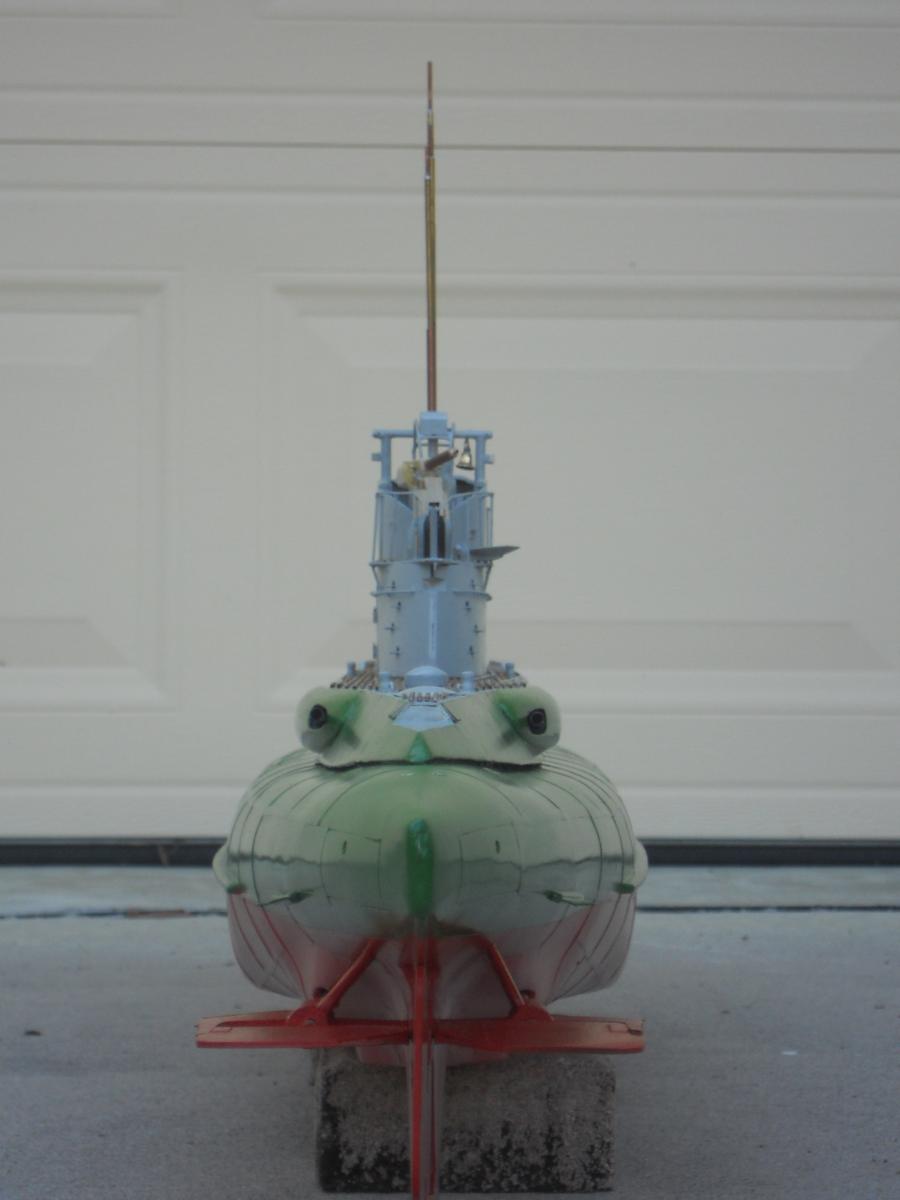
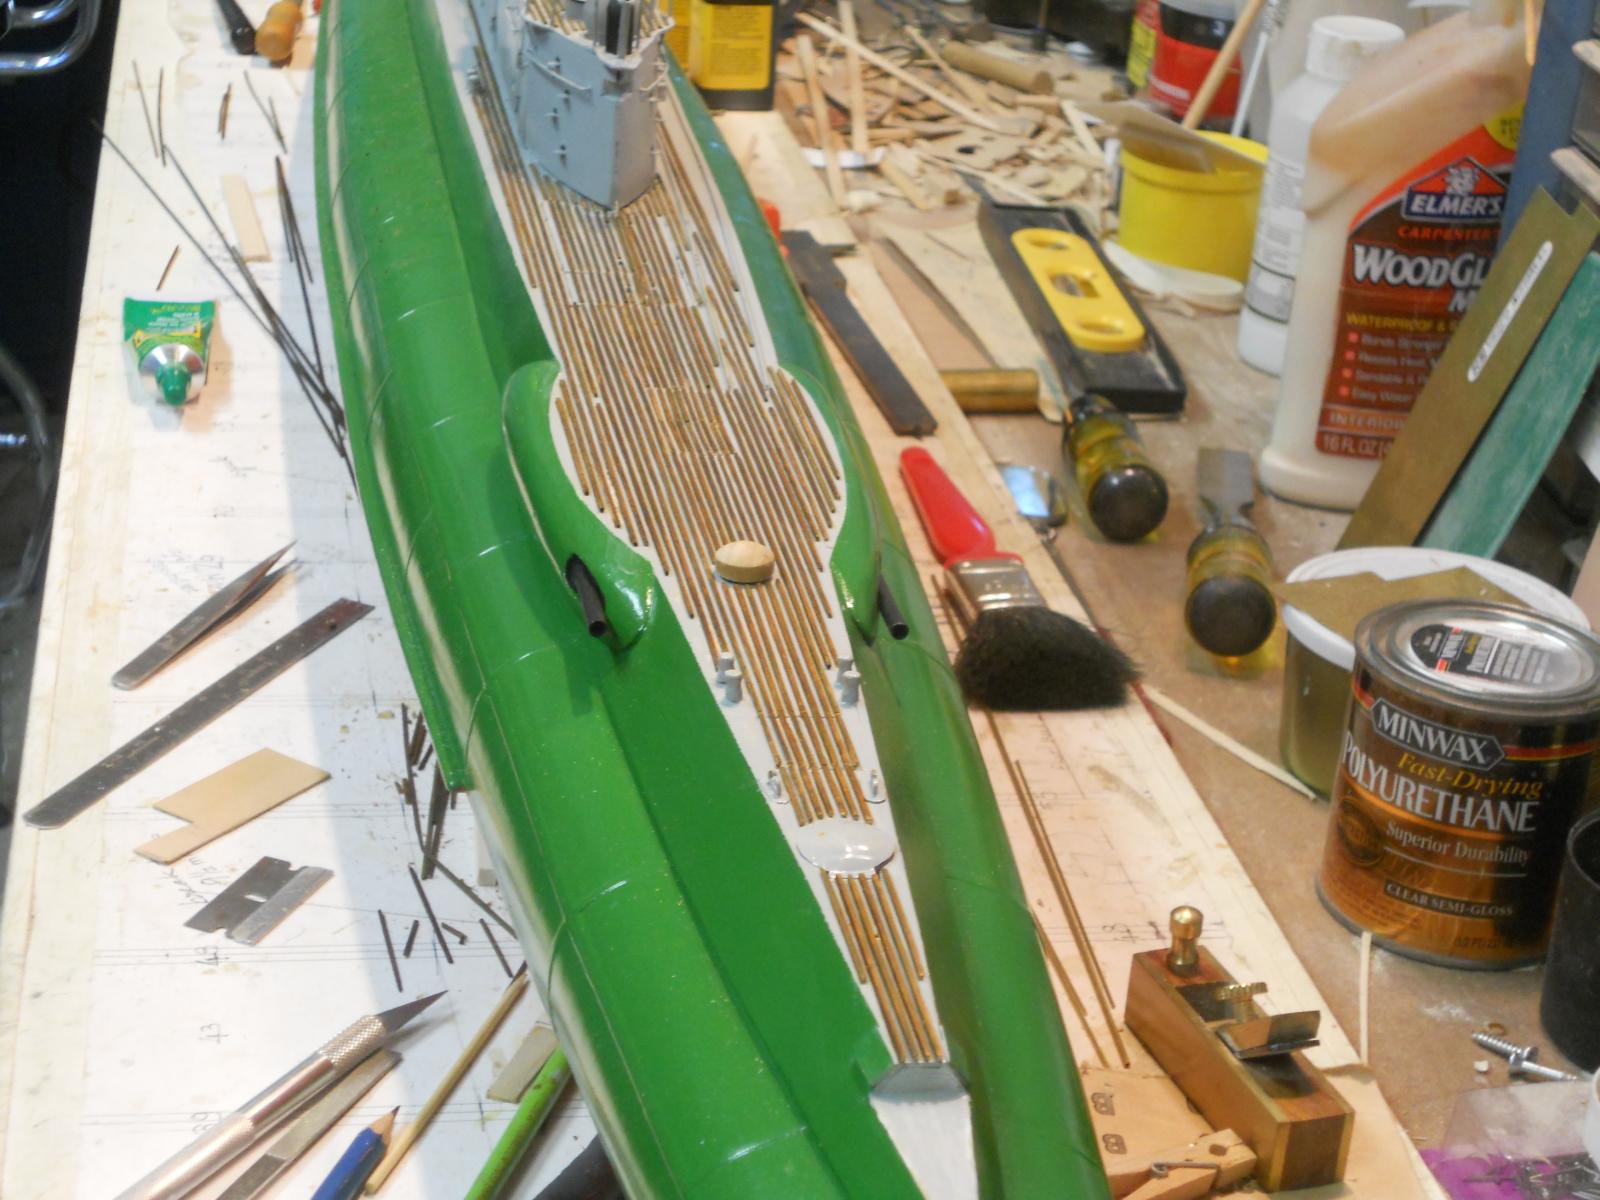
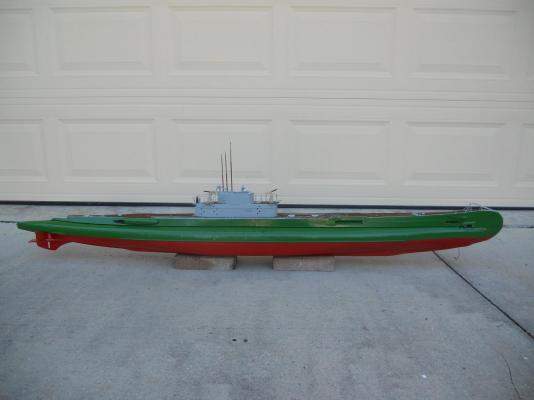
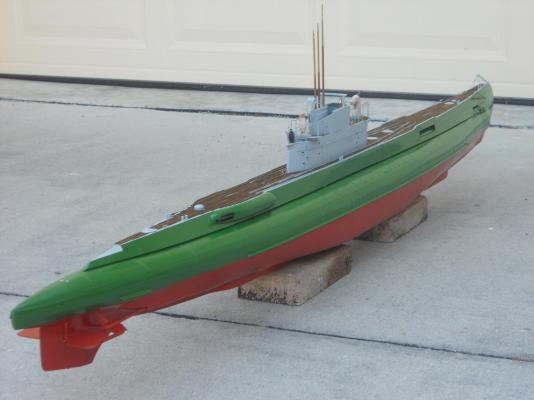
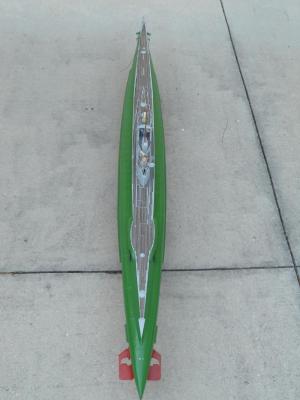
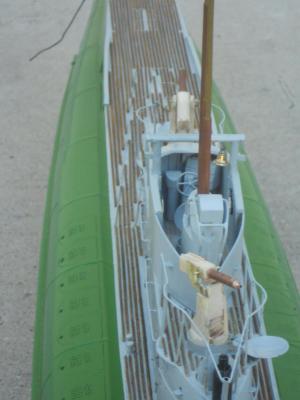
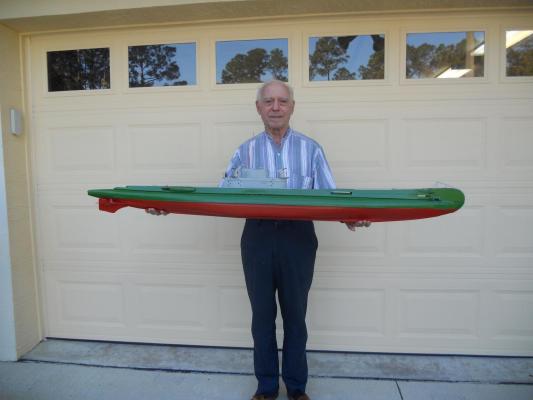
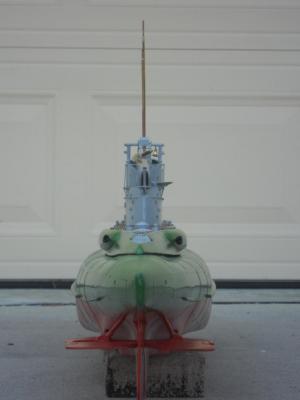
After many days cementing these small slats to the deck I finally put the last ones on this morning and added dye where needed. As far as I'm concerned it looks okay, not great but acceptable. Gwen, the Admiral, says it shows character. Now I have to make a decision what project I should tackle next. Hatch hinges? Torpedo loading gantries? Mines? Torpedoes? Finishing the AA guns? I guess it'll have to be the hinges. This'll be slow going - - - I'll be taking my time with this. Not an easy project because it's all part of an afterthought. As mentioned before, I did not plan to make certain things workable but alas, after seeing the model of the O21 I got this wild eyed idea to do something similar. Okay, I took the model outside and shot a bunch of pictures in front of the garage door. This time I put the boat on two bricks which made for better pics. I may not post all of them here - - - just too many - - - I got carried away, again. Well, I kinda like the model as she looks now Hope all yuns like them. Starboard side profile Top view from the bow Top view of forward deck from bridge area. Looking aft along the hull from the bow. Looking forward along the hull from the stern. Top view looking forward. Looking forward directly into the stern Top view if the deck looking forward. Looking at the forward deck from the bridge area. Aft deck view towards the aft side of the con. Gwen, the Admiral, took this pic to give all y'all an idea of the size of the model. I'm 5 feet 8 inches tall. Cheers.


-
Thanks to everyone following my build and also my physical condition(s) and your best wishes and prayers. This Thursday I'll be seeing the doc again and find out what's going on. Hello Doris, thank you for visiting and your kind words. Yes, I'll be keeping up with my build, still a lot of work ahead. Hey John, good to hear from you and I did have a Leffe dark this evening before dinner. Thanks for thinking about me and your prayers. I'm patiently waiting for your continuation with your Morgan. Cheers,
-
Hello everyone and thank you all for your very kind words, well-wishes and prayers, I really appreciate it. I'm hanging in and keeping a stuff upper lip. The discomfort is easing considerably and have had no "accidents" I regard all yuns in MSW as part of my family!! Next week Thursday we'll find out how things look inside and go from there. Tomorrow we can indulge in some good Dutch or Belgian brews - - - hurray, and that's hoera in Dutch I'll also try to spend a few hours in the shipyard to cement a few more deck slats to the deck. I'm working on the port side now. @ Marc, Flying Dutchman 2: Thanks for the compliment and yes, the green is the final color as is the red. Everything above the deck sheer is light grey and as discussed before the deck slats will be in a teak like color. Reason being that the green blends in against the tropical forest growth in the former Dutch East Indies and the grey blends in with the sky. The red color below the waterline tends to become rather dark end blends in with the murky coastal waters. Also, these are the colors the original builder used for their model. Remember that this is primarily a mine laying sub and operates mainly areas close to shore. Cheers,
-
Thanks everyone for your best wishes and prayers. We'll keep plugging along, what else can we do - - - right? I do spend a few hours in the dockyard but it's slow going. As soon as the deck is planked I'll take a few pics. Cheers,
-
Hello John and thanks for visiting !! The fake teak slats are satisfactory - - for now. There is still a possibility that I may replace them with something else, like what Remco suggested to use either box or castelo (sp ?) or pear and stain it. Like I mentioned before, walnut could also be used as is. My surgeon has ordered me not to imbibe in any alcoholic beverages and aspirin for the next two days - - - thus we'll have to wait with the Leffe till the weekend. He doesn't want the blood any thinner as it is. Had a biopsy out of the bladder done this morning and am on medication for the rest of the week. Bladder liner is inflamed, most likely due to the radiation treatment I underwent a few years ago. He calls it radiation induced cystitis. The port side of the forward deck is now planked and I have rotated the build dock so I can work on the starboard side. Then it's a final finishing of the deck and on to hatches. The mines will be coming in the future as well as torpedoes and an extra anchor to be placed on the display board. Cheers,
-
Hello John, good to see you getting back to ship building. Hope everything worked out okay for you regarding your "other then ship building" issues is concerned. I was ready to call the gendarmes to hunt you down. I'm hoisting a Leffe for the occasion Cheers,
- 2,250 replies
-
- 1
-
-
- model shipways
- Charles W Morgan
- (and 1 more)
-
Hi Popeye, nice going my friend, she's beginning to take shape. Question on the mizzenmast rake, are you sure you are not looking at the mast itself but at the lateen sail boom instead? Looking at the drawing it appears that the mizzenmast is either 90 degrees to the waterline or with just a few degrees aft. Crows feet and crows nests - - - you are having all the fun - - - i don't have any of those fancy things on my dad's sub Cheers,
-
Hello Joe, thanks for your comments, they are of course quite correct. Yes, sometimes what our mind sees is not always possible to use in reality. Wishing to get away from stains and or dyes may all be well and good but in model building not always practical. The upshot is that a nice dense grained light colored wood may be the logical answer, like boxwood or pear that can be stained to the desired color. Although walnut could also be a consideration to get away from stain, in my case. I'm familiar with the scale issue with wood and cloth for ship models, When I can finally get back to my VOC ship and the VOC yacht in a lamp I'll have to do some research in finding the right fabric for the sails. Right now I'm quite satisfied with the results I'm getting with the dye, as long as I rinse some of it off and lightly sand it with a fine grit sandpaper. Thank you for your positive opinion on how the model is coming along. Between some yard work I can only manage to cement a few deck slats to the model. But even a few is progress. Before we know it I'll have the deck all done and go to hatch hinges and other things. Cheers,
-
Hoi Freek, good to hear from you and thanks for your input. Well, I guess you may be right about scouring of the deck. What I was after was a little contrast against the light grey steel deck and a little artistic licence The deck scouring may have been done on the surface ships but maybe not on subs. When I visited the USS Cod in Cleveland last year her deck slats were also plain teakwood. Not that should be an indication that the O19 was also plain teak. Let's imagine that this deck is brand new and they didn't have the time to scour the deck yet The few pics I have from the commissioning ceremony I can make out the deck slats clearly being somewhat dark, making me believe that they were still in natural teak color. I hope all y'all can go along with my reasoning If yuns feel that it's still too dark I can try to lighten it up more with some 360 sandpaper before I seal it. Not much done today, had to do some, well actually a lot of trimming of our crape myrtle trees in de front yard. I did manage to cement a few slats to the forward deck though This'll be slow going because there are many hatches that require individual slats and they are all on an angle Cheers,
-
That looks very nice Nenad - graceful lines. Cheers,
- 4,152 replies
-
- 1
-
-
- cutty sark
- tehnodidakta
- (and 1 more)
-
Getoutahere !!!! No way - working drawers no less. Whadayudo, used an Ikea cabinet and treated it with Preparation H to shrink it ??? Ah, you know I'm kidding. That's just awesome Remco. Now you need to make the utensils that go into the drawers. Great job! Cheers,
-
Thanks everyone for your comments and also my thanks to to all who visited and clicked "like." @ Anthony: Thank you for your kind words and so far I have been able to keep the grim Reaper at bay. I have actually looked him in the eyes a few times in the past, scary. I'll have to make an amendment to my last will and testament. Gino did mention that he knows of a group who may be interested in having the model. @ Joe: Thanks Joe for liking the way the deck looks as of yesterday. Yeah, yeah, yeah, I know, I know, it's me who has to be happy with it but it doesn't hurt asking for all your thoughts. Right now it looks doable to me and the Admiral thinks it looks great. But that doesn't mean it'll stay. I may change my mind at a later date, who knows. @ Wacko Joe: Same answer, I know that I have to be happy. @ Mark: Same answer, and thanks for liking it, that's a daring but positive comment Dull coat?? Hmmmm, I did think about it but right now I have no idea yet. If I can find a protective clear but mat finish I may consider it. @ Popeye: Thanks for your input and kind comments. Ripping these slats off and starting over is really not a big deal, not as big a deal as Mark did anyway It's just time and now that the "grim Reaper" is still making himself shy it could very well happen at some time @ Jim: Thank you, thank you, you are most kind! Now for a few thoughts on the subject of the deck slats. I have been corresponding with Remco and boxwood came up. Yes, I could have used boxwood but decided not to and use poplar because of having to rip 1 mm planks out of a few big blocks. Long story short, his afternoon I did some additional tweaking on the slats with a tiny brush and dye and the slats are looking better and better. I'll continue with that process till I'm happy with the looks. I like the color and it is evening out quite nicely. What i really would like is to get away from is stain and dye and use real teak. If I can get real teak for the slats without going broke, I may just go that route in the future. Now that I have figured out a workable formula I'll continue with laying on the deck slats. I mentioned to Remco that I can always replace these at a later date. Come to think about it - - - oh boy, thinking - - - can get one into trouble - - - but - - - do I dare mention it - - - the Admiral has a small bench made from - - - you guessed it - - - teak! Hmmmm, - - - - - - Cheers to all,
-
By Jove, you are right, the lock is on the hinge side - - - must be a new fang-dangled invention. Is there a patent on it??? All kidding aside, it all looks fantasimacorigig. Now - - cupboards for the galley would really be the cat's meow. Go for it and with working hinges and "stuff" inside - - - I'm the ships cook and need them Cheers,
-
Now that's a rather handsome piece of work! Cheers,
-
Well hello Joe, thanks for dropping in and your kind words. My, you are quick, if you had waited another minute you would have seen the pics Well, they are right below your post. Well, the Admiral likes it and she's rather critical in things I do, so this is a good sign. Like I said, a few minor touch-ups here and there. Cheers,
-
Okay, after reworking the top of the deck slats they are now looking more like slightly weathered teak and as mentioned above, the Admiral likes it very much. Soooohhhh, I continued cementing the rest of the slats to finish the aft deck. There is still need for a few touch-ups here and there but overall it doesn't look half bad. I invite all yuns to give me your thoughts on it, and don't be polite I can always rip them off and go the boxwood route. Here are the pics I took at 17:00 hours when I punched out of the dockyard for a much needed libation, a cool glass of belgian ale Cheers,