

michael101
-
Posts
441 -
Joined
-
Last visited
Reputation Activity
-

 michael101 got a reaction from Canute in Professional Building Slip - Hobbyzone
The only thing I can say about this ..
it’s a piece of carton ! (I don't want to use ugly words out of respect for the forum)
today I worked all a day for square the main jig ! And nothing !!!!!! (I’m using the best square over the world the Kinex one !!!)
So if you working with that piece of carton don’t blame yourself why your ship it’s twisted !!!!
also it’s good for you to know about the “new model “ it’s made of 2 pieces and not from one solid piece !
so this post not relevant anymore
I’m very disappointed ! ! ! !
do a favor for yourself don’t spend your money on it !
-

 michael101 got a reaction from KeithAug in HMS Victory by michael101 - Caldercraft - Scale 1:72
Hello friend ,I hope all of you are well and safe at this days
Here is a little update for my build log,
I have done it a few month ago but not had the time for sharing with you
So now before starting the next stage on my victory I had to share with you guys a new method for drilling the holes in a perfect way inside the gunport for the cannons
until now I saw a lot of beautiful build logs and a lot ways for drilling this holes for the cannons but I wasn’t happy with non of them
I saw some people who used a water level and other who used the stand of the proxxon drill but you can’t get the perfect central hole in the middle of the gunport with this methods....(and there is also other problems with this methods ,I will speak about them later,)
So before starting expanding what I have done
I will start talking about the issues in this matter
The cannon must be in the middle of the gunport The cannon also need to be 90 degrees from the keel ( vertical ) and the problem is- the gunport is not square with the keel and each ship has his shape .... And also the cannons need to be 90 degrees horizontal from the sides of the gunport (before at issue no.2 I was talking about the 90 degrees from the keel and I was referring vertical ! and now in the second issue I’m talking about the horizontal way means the cannons must run smooth with the curves of the bow and the stern ) here you can see the issues :
So like I said I saw who the builders dill with the drill holes
some of them used a water level but this level can’t be precise for our needs , also I saw other who used the stand of the proxxon drill ,that one maybe can be ok only for the issue no.2 but not good for the other problems ....
All those issues above made me to think a lot about the solution
and after a lot of thinking I made this jig for my drill who going to resolve all those issues
I will cut the words and will show you some pictures
-
And after all here is the result :
I hope this guide will help you out
Best regards,
Michael.
-

 michael101 got a reaction from Belco in HMS Victory by michael101 - Caldercraft - Scale 1:72
Hello friend ,I hope all of you are well and safe at this days
Here is a little update for my build log,
I have done it a few month ago but not had the time for sharing with you
So now before starting the next stage on my victory I had to share with you guys a new method for drilling the holes in a perfect way inside the gunport for the cannons
until now I saw a lot of beautiful build logs and a lot ways for drilling this holes for the cannons but I wasn’t happy with non of them
I saw some people who used a water level and other who used the stand of the proxxon drill but you can’t get the perfect central hole in the middle of the gunport with this methods....(and there is also other problems with this methods ,I will speak about them later,)
So before starting expanding what I have done
I will start talking about the issues in this matter
The cannon must be in the middle of the gunport The cannon also need to be 90 degrees from the keel ( vertical ) and the problem is- the gunport is not square with the keel and each ship has his shape .... And also the cannons need to be 90 degrees horizontal from the sides of the gunport (before at issue no.2 I was talking about the 90 degrees from the keel and I was referring vertical ! and now in the second issue I’m talking about the horizontal way means the cannons must run smooth with the curves of the bow and the stern ) here you can see the issues :
So like I said I saw who the builders dill with the drill holes
some of them used a water level but this level can’t be precise for our needs , also I saw other who used the stand of the proxxon drill ,that one maybe can be ok only for the issue no.2 but not good for the other problems ....
All those issues above made me to think a lot about the solution
and after a lot of thinking I made this jig for my drill who going to resolve all those issues
I will cut the words and will show you some pictures
-
And after all here is the result :
I hope this guide will help you out
Best regards,
Michael.
-
 michael101 got a reaction from Landlubber Mike in HMS Victory by michael101 - Caldercraft - Scale 1:72
Guid for transferring lines from plans to the model
After a lot of thinking I have found the way to transfer the Wales lines from the plans to the ship you can use the same method for other things you need to copy from the plans in a perfect and exact way
So I’m happy to share my guid with you
and hop it will help you !
1. First you have to put the ship even on the desk or if it on a stand make sure the ship has the same distance from the table to the keelson at the bow and at the stern !!!!
2. Also make sure the ship is even left and right !
after the ship it’s even left and right also bow and stern are even you can start working (take the tame on this stage it’s very important to have the ship even !)
3. now you need to take a reference from the ship to a straight timber (in my case I mark the lower edge of one gunport but you can take reference from other things that you have already on the ship and also on the plan )
4. Now you need to lay down this timber on the plans on the same gunport edge (on the pictures it’s not on the same gunport because I just took pictures to show you the example ... but it must be on the same gunport
when you have it on the exact edge line , mark the water line on the timber :
After you have the waterline marked on the timber just erase the gunport edge line from your timber
now when you have the waterline marked on your timber you can start taking a perfect references from the plan!
5.now just put the waterline you have marked on your timbre on the waterline of the plan under the mark you want to transfer and use 90 degrees ruler between the timber and the waterline to be sure it’s straight
6. Simply mark the line you want to transfer on the timber in my case it’s the line of the wale:
7. When you have it marked on the timber you need to put the timber again on your table and adjust your pencil holder to be exact on the same line
8. Now after adjusting the pencil holder move it and carefully mark the dot on the model
do the same for all the dots you need then put a temporary plank on the ship and connect all the dots by runing a pencil along the plank to get a beautiful line as the plans :
here is pictures after taking the planks out :
-
michael101 got a reaction from Landlubber Mike in HMS Victory by michael101 - Caldercraft - Scale 1:72
Hello friend ,I hope all of you are well and safe at this days
Here is a little update for my build log,
I have done it a few month ago but not had the time for sharing with you
So now before starting the next stage on my victory I had to share with you guys a new method for drilling the holes in a perfect way inside the gunport for the cannons
until now I saw a lot of beautiful build logs and a lot ways for drilling this holes for the cannons but I wasn’t happy with non of them
I saw some people who used a water level and other who used the stand of the proxxon drill but you can’t get the perfect central hole in the middle of the gunport with this methods....(and there is also other problems with this methods ,I will speak about them later,)
So before starting expanding what I have done
I will start talking about the issues in this matter
The cannon must be in the middle of the gunport The cannon also need to be 90 degrees from the keel ( vertical ) and the problem is- the gunport is not square with the keel and each ship has his shape .... And also the cannons need to be 90 degrees horizontal from the sides of the gunport (before at issue no.2 I was talking about the 90 degrees from the keel and I was referring vertical ! and now in the second issue I’m talking about the horizontal way means the cannons must run smooth with the curves of the bow and the stern ) here you can see the issues :
So like I said I saw who the builders dill with the drill holes
some of them used a water level but this level can’t be precise for our needs , also I saw other who used the stand of the proxxon drill ,that one maybe can be ok only for the issue no.2 but not good for the other problems ....
All those issues above made me to think a lot about the solution
and after a lot of thinking I made this jig for my drill who going to resolve all those issues
I will cut the words and will show you some pictures
-
And after all here is the result :
I hope this guide will help you out
Best regards,
Michael.
-
 michael101 got a reaction from maddog33 in HMS Victory 1805 by Robert29 - FINISHED - Caldercraft - Scale 1:72
Just love your work!
please keep update your build log with any step that you doing
Best regards ,
Michael.
-
 michael101 got a reaction from kiwiron in HMS Victory by michael101 - Caldercraft - Scale 1:72
Thank you Kiwiron and Etubino !
now I not have much time to work on my project
but the ship not running anywhere it’s just waiting for me at the workshop
-
 michael101 got a reaction from etubino in HMS Victory by michael101 - Caldercraft - Scale 1:72
Guid for transferring lines from plans to the model
After a lot of thinking I have found the way to transfer the Wales lines from the plans to the ship you can use the same method for other things you need to copy from the plans in a perfect and exact way
So I’m happy to share my guid with you
and hop it will help you !
1. First you have to put the ship even on the desk or if it on a stand make sure the ship has the same distance from the table to the keelson at the bow and at the stern !!!!
2. Also make sure the ship is even left and right !
after the ship it’s even left and right also bow and stern are even you can start working (take the tame on this stage it’s very important to have the ship even !)
3. now you need to take a reference from the ship to a straight timber (in my case I mark the lower edge of one gunport but you can take reference from other things that you have already on the ship and also on the plan )
4. Now you need to lay down this timber on the plans on the same gunport edge (on the pictures it’s not on the same gunport because I just took pictures to show you the example ... but it must be on the same gunport
when you have it on the exact edge line , mark the water line on the timber :
After you have the waterline marked on the timber just erase the gunport edge line from your timber
now when you have the waterline marked on your timber you can start taking a perfect references from the plan!
5.now just put the waterline you have marked on your timbre on the waterline of the plan under the mark you want to transfer and use 90 degrees ruler between the timber and the waterline to be sure it’s straight
6. Simply mark the line you want to transfer on the timber in my case it’s the line of the wale:
7. When you have it marked on the timber you need to put the timber again on your table and adjust your pencil holder to be exact on the same line
8. Now after adjusting the pencil holder move it and carefully mark the dot on the model
do the same for all the dots you need then put a temporary plank on the ship and connect all the dots by runing a pencil along the plank to get a beautiful line as the plans :
here is pictures after taking the planks out :
-
michael101 got a reaction from etubino in HMS Victory by michael101 - Caldercraft - Scale 1:72
Hello friend ,I hope all of you are well and safe at this days
Here is a little update for my build log,
I have done it a few month ago but not had the time for sharing with you
So now before starting the next stage on my victory I had to share with you guys a new method for drilling the holes in a perfect way inside the gunport for the cannons
until now I saw a lot of beautiful build logs and a lot ways for drilling this holes for the cannons but I wasn’t happy with non of them
I saw some people who used a water level and other who used the stand of the proxxon drill but you can’t get the perfect central hole in the middle of the gunport with this methods....(and there is also other problems with this methods ,I will speak about them later,)
So before starting expanding what I have done
I will start talking about the issues in this matter
The cannon must be in the middle of the gunport The cannon also need to be 90 degrees from the keel ( vertical ) and the problem is- the gunport is not square with the keel and each ship has his shape .... And also the cannons need to be 90 degrees horizontal from the sides of the gunport (before at issue no.2 I was talking about the 90 degrees from the keel and I was referring vertical ! and now in the second issue I’m talking about the horizontal way means the cannons must run smooth with the curves of the bow and the stern ) here you can see the issues :
So like I said I saw who the builders dill with the drill holes
some of them used a water level but this level can’t be precise for our needs , also I saw other who used the stand of the proxxon drill ,that one maybe can be ok only for the issue no.2 but not good for the other problems ....
All those issues above made me to think a lot about the solution
and after a lot of thinking I made this jig for my drill who going to resolve all those issues
I will cut the words and will show you some pictures
-
And after all here is the result :
I hope this guide will help you out
Best regards,
Michael.
-
 michael101 got a reaction from ccoyle in HMS Victory by michael101 - Caldercraft - Scale 1:72
Here is a little update ,
very usefully jig for marking vertical lines on the ship i hope it will help other builders
so, here i have marked the bulkheads lines on the first plank and also the pattern of the butt shift system on the middle of the ship ..
but i will talk about this method later ..
here is some pictures :
Best regards,
Michael.
-
michael101 got a reaction from kiwiron in HMS Victory by michael101 - Caldercraft - Scale 1:72
And here is some pictures of the currenlty stage:
-
 michael101 got a reaction from HB17 in HMS Victory by michael101 - Caldercraft - Scale 1:72
Here is a little update ,
very usefully jig for marking vertical lines on the ship i hope it will help other builders
so, here i have marked the bulkheads lines on the first plank and also the pattern of the butt shift system on the middle of the ship ..
but i will talk about this method later ..
here is some pictures :
Best regards,
Michael.
-
 michael101 got a reaction from Bill Morrison in Soleil Royal by dziadek4444 - FINISHED - DeAgostini (Poland) - 1:70
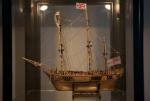
Beautiful work
-
 michael101 got a reaction from GrandpaPhil in HMS Victory by michael101 - Caldercraft - Scale 1:72
Here is a little update ,
very usefully jig for marking vertical lines on the ship i hope it will help other builders
so, here i have marked the bulkheads lines on the first plank and also the pattern of the butt shift system on the middle of the ship ..
but i will talk about this method later ..
here is some pictures :
Best regards,
Michael.
-
 michael101 got a reaction from PeteB in HMS Victory by michael101 - Caldercraft - Scale 1:72
Guid for transferring lines from plans to the model
After a lot of thinking I have found the way to transfer the Wales lines from the plans to the ship you can use the same method for other things you need to copy from the plans in a perfect and exact way
So I’m happy to share my guid with you
and hop it will help you !
1. First you have to put the ship even on the desk or if it on a stand make sure the ship has the same distance from the table to the keelson at the bow and at the stern !!!!
2. Also make sure the ship is even left and right !
after the ship it’s even left and right also bow and stern are even you can start working (take the tame on this stage it’s very important to have the ship even !)
3. now you need to take a reference from the ship to a straight timber (in my case I mark the lower edge of one gunport but you can take reference from other things that you have already on the ship and also on the plan )
4. Now you need to lay down this timber on the plans on the same gunport edge (on the pictures it’s not on the same gunport because I just took pictures to show you the example ... but it must be on the same gunport
when you have it on the exact edge line , mark the water line on the timber :
After you have the waterline marked on the timber just erase the gunport edge line from your timber
now when you have the waterline marked on your timber you can start taking a perfect references from the plan!
5.now just put the waterline you have marked on your timbre on the waterline of the plan under the mark you want to transfer and use 90 degrees ruler between the timber and the waterline to be sure it’s straight
6. Simply mark the line you want to transfer on the timber in my case it’s the line of the wale:
7. When you have it marked on the timber you need to put the timber again on your table and adjust your pencil holder to be exact on the same line
8. Now after adjusting the pencil holder move it and carefully mark the dot on the model
do the same for all the dots you need then put a temporary plank on the ship and connect all the dots by runing a pencil along the plank to get a beautiful line as the plans :
here is pictures after taking the planks out :
-
 michael101 got a reaction from Schubbe in HMS Victory by michael101 - Caldercraft - Scale 1:72
Here is a little update ,
very usefully jig for marking vertical lines on the ship i hope it will help other builders
so, here i have marked the bulkheads lines on the first plank and also the pattern of the butt shift system on the middle of the ship ..
but i will talk about this method later ..
here is some pictures :
Best regards,
Michael.
-
 michael101 got a reaction from GuntherMT in HMS Victory by michael101 - Caldercraft - Scale 1:72
Here is a little update ,
very usefully jig for marking vertical lines on the ship i hope it will help other builders
so, here i have marked the bulkheads lines on the first plank and also the pattern of the butt shift system on the middle of the ship ..
but i will talk about this method later ..
here is some pictures :
Best regards,
Michael.
-
 michael101 got a reaction from EJ_L in HMS Victory by michael101 - Caldercraft - Scale 1:72
Here is a little update ,
very usefully jig for marking vertical lines on the ship i hope it will help other builders
so, here i have marked the bulkheads lines on the first plank and also the pattern of the butt shift system on the middle of the ship ..
but i will talk about this method later ..
here is some pictures :
Best regards,
Michael.
-
 michael101 got a reaction from Heinz6672 in HMS Victory by michael101 - Caldercraft - Scale 1:72
Here is a little update ,
very usefully jig for marking vertical lines on the ship i hope it will help other builders
so, here i have marked the bulkheads lines on the first plank and also the pattern of the butt shift system on the middle of the ship ..
but i will talk about this method later ..
here is some pictures :
Best regards,
Michael.
-
 michael101 got a reaction from wefalck in HMS Victory by michael101 - Caldercraft - Scale 1:72
Here is a little update ,
very usefully jig for marking vertical lines on the ship i hope it will help other builders
so, here i have marked the bulkheads lines on the first plank and also the pattern of the butt shift system on the middle of the ship ..
but i will talk about this method later ..
here is some pictures :
Best regards,
Michael.
-
 michael101 got a reaction from allanyed in HMS Victory by michael101 - Caldercraft - Scale 1:72
Here is a little update ,
very usefully jig for marking vertical lines on the ship i hope it will help other builders
so, here i have marked the bulkheads lines on the first plank and also the pattern of the butt shift system on the middle of the ship ..
but i will talk about this method later ..
here is some pictures :
Best regards,
Michael.
-
 michael101 got a reaction from md1400cs in HMS Victory by michael101 - Caldercraft - Scale 1:72
Here is a little update ,
very usefully jig for marking vertical lines on the ship i hope it will help other builders
so, here i have marked the bulkheads lines on the first plank and also the pattern of the butt shift system on the middle of the ship ..
but i will talk about this method later ..
here is some pictures :
Best regards,
Michael.
-
 michael101 got a reaction from mort stoll in HMS Victory by michael101 - Caldercraft - Scale 1:72
Here is a little update ,
very usefully jig for marking vertical lines on the ship i hope it will help other builders
so, here i have marked the bulkheads lines on the first plank and also the pattern of the butt shift system on the middle of the ship ..
but i will talk about this method later ..
here is some pictures :
Best regards,
Michael.
-
 michael101 got a reaction from AnobiumPunctatum in HMS Victory by michael101 - Caldercraft - Scale 1:72
Here is a little update ,
very usefully jig for marking vertical lines on the ship i hope it will help other builders
so, here i have marked the bulkheads lines on the first plank and also the pattern of the butt shift system on the middle of the ship ..
but i will talk about this method later ..
here is some pictures :
Best regards,
Michael.