HOLIDAY DONATION DRIVE - SUPPORT MSW - DO YOUR PART TO KEEP THIS GREAT FORUM GOING! (Only 20 donations so far - C'mon guys!)
×


GuntherMT
-
Posts
2,213 -
Joined
-
Last visited
Content Type
Profiles
Forums
Gallery
Events
Everything posted by GuntherMT
-
Yay, it's started! Thanks for sending the note that you have begun this log, clicked follow so I don't miss anything.
- 649 replies
-
- 5
-

-
- dunbrody
- famine ship
- (and 2 more)
-
Very interesting observation Greg. I honestly don't remember that when I did mine, so I'm going to guess that I made it flush to the filler blocks. Given that the filler blocks are hand shaped to fit, I'm not sure why they would do it this way, vs. just making the filler block the appropriate size to just butt everything up against it. Seems like doing it that way will leave a gap under the end of your side planking as it hits the stern, with no way to anchor it other than butt-gluing it to the fashion piece, which strikes me as a 'bad thing'.
-
Looking good Greg. Neither actually! The fashion pieces will be on the corners, so the stern planking doesn't butt up against the side planking at all (in either direction). Both the stern and side planking will butt up against the fashion pieces. I completely finished the 2nd planking layer on the stern, and then sanded the edges flat and added the fashion pieces to the outside, which the side planking would then butt up against. There should be photo's of this in my build log if you want to see them. It took me quite a few iterations of the curved part of the fashion pieces before I was happy with them, and the two planks that you have already installed were notched to take them as needed.
-
Hemp rope is indeed very stiff when compared to modern 'soft' ropes, but I think that the perfect circular coils on the models of that era is probably more due to how the material used at scale coiled rather than how it might have looked on the real ships of the era. Hemp rope is stiff enough that it would probably coil on the deck in a nice circle, but not of a single strand thickness, rather probably 3-4 rope strands thickness could maintain a shape while stacking vertically. As for the hanging coils, the hemp probably wouldn't fall into the coils like I did on my AVS without being wrapped in the center, but I don't think they would be nearly the perfect circle that you see in those photo's of the models either. Likely they would have been closer to your coils unless they were coiled very tightly (i.e. small coils). I also imagine that the diameter of the line would have a pretty significant effect on how the rope coiled, but I'm not sure how much the greater weight would offset the stiffness of the larger diameter. And then you have the question of how much of it was coiled wet, which would also effect how it coiled!
- 1,051 replies
-
- 7
-
-
- cheerful
- Syren Ship Model Company
- (and 1 more)
-
I think the bands were the right choice. In my opinion they look much better with the bands. Nicely done.
- 306 replies
-
- 3
-
-
- armed virginia sloop
- Patrick Henry
- (and 2 more)
-
I'm going with Vallejo Model Air and/or Vallejo Model Color. The Model Color line is not specifically designed to be airbrushed, but with thinning as needed works fine. Either can be brushed as well. I'm sure there are plenty of good paints out there if you do a bit of internet searching.
-
I used MS paints on my AVS, and they are pretty bad. I'll never use them again, as it takes a lot of work, and a LOT of thinning to make them be decent to use. They are terribly inconsistent from bottle to bottle, even in the same color. As for spraying, it depends on your airbrush and how fine the tip/needle is. The MS paint can be thinned with distilled water until it is about the consistency of skim milk, and it will go through your airbrush unless your tip is fine. The paint doesn't have super fine (small) pigments like a good airbrush paint will, which is why it won't work with finer tips/needles. Use some scrap wood (like the stuff you took the laser cut parts out of) and do some test sprays and see how it works for you. You can also add in some retarder if it's drying too quickly while spraying.
-
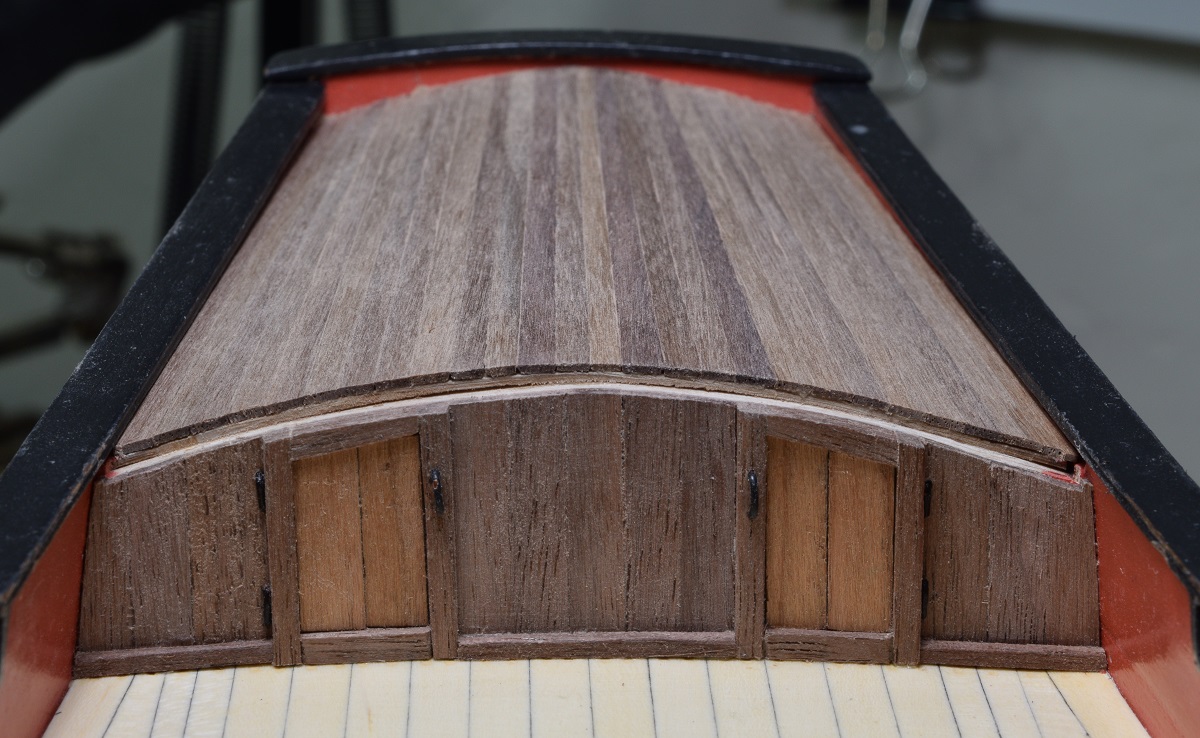
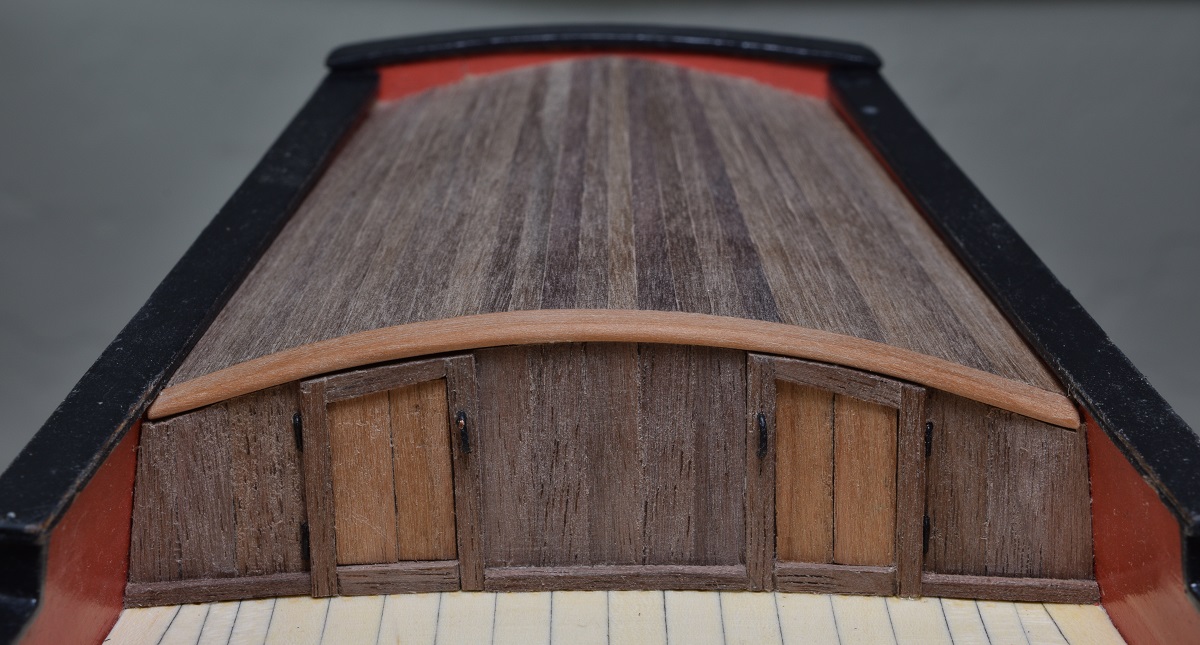
Looking great! Glad some of my documented issues are being used to make it easier for people coming along behind me. Beveling those dumb transom pieces 'in place' was a pain in the butt! On the false deck for the poop deck - you actually want it to only cover the back half of the front bulkhead - this gives you a natural 'step' for the piece of wood that goes in front of your decking here, rather than having to cut one in. I'm bad at explaining, so just look at these two pictures, one just before setting the trim piece, and one with it in place: As you can see, since the trim piece is almost exactly the same thickness as the false deck + the deck planking, leaving the step is very beneficial when you get to this point later!

-
Looks like a really solid start. Can tell you've read through others work and done a bit of studying on how to handle various issues. On the glue front, I avoid CA now, unless I need to join dissimilar materials (like brass to wood). I have tried Weldbond on Bob's recommendation, but I find that I really prefer the way Titebond works for me. Either PVA should work just fine though, and I did not use a single speck of CA on any of the wood to wood joints on the AVS, and never had any problems getting things to stay put (other than stuff I managed to knock off later, where CA wouldn't have made a difference anyway!).
-
This man speaks the truth. I used Syren line on my first model (a Constructo kit) because the kit line wouldn't even fit through the blocks after drilling them out as much as I could, the line was so out of scale. So when I opened the AVS and saw the line, and played with it for a little bit, I just threw it in the trash and ordered the line from Chuck to do the AVS. Not a single regret.
- 164 replies
-
- 3
-
-
- model shipways
- armed virginia sloop
- (and 2 more)
-
You could also contact Model Shipways and let them know you broke it and they'll send you a replacement for free if you'd rather go that route. Usually takes 7-10 days to get a replacement in my experience and what others have posted.
-
The carronade looks sort of funny on a regular gun carriage. Just not what we are used to seeing. Great job on it.
- 1,051 replies
-
- 4
-
-
- cheerful
- Syren Ship Model Company
- (and 1 more)
-
Hello David, Good to see the Connie log up and running here,and will continue to follow along as I was prior to the move.
- 117 replies
-
- 2
-
-
- constitution
- model shipways
- (and 1 more)
-
Great looking ship! Out of curiosity, what is the 'usual method' for your sheaves? Drill holes and then connect them with a cut-down area? That's really the only way I know of to do a simulated sheave (rather than drilling a hole from the side and actually inserting a pulley of some kind), but wondering if there is another method. Yours look great.
- 1,051 replies
-
- 3
-
-
- cheerful
- Syren Ship Model Company
- (and 1 more)
-
I can see why you are having so much difficulty with the line then, that stuff from MS is actually nylon/plastic stuff and probably isn't absorbing the glue/water mixture at all, and you will be relying purely on the surface stick. I refused to use it, so I can't really give you any tips on how to handle it. Good luck!
- 164 replies
-
- 1
-
-
- model shipways
- armed virginia sloop
- (and 2 more)
-
Nothing wrong with taking a bit of a break when you need to. What rigging line are you using, the terrible stuff in the kit?
- 164 replies
-
- 1
-
-
- model shipways
- armed virginia sloop
- (and 2 more)
-
That looks like a very nice kit Don, looking forward to seeing you put it together.
- 653 replies
-
- 6
-
-
- trabakul
- marisstella
- (and 1 more)
-
No, I never soak any part of the line in plain water. I 'paint' on the 50/50 water glue mix after everything is set to make sure that there are no color variations and to lock everything in place. The droop on the line between the coil and the blocks is made by just soaking that line with the mixture and shaping it a bit with the paint brush. So my sequence was to do the cannon tackle rigging on all the guns, and secure them in place. I then took the 'tail' of the tackle rigging and coiled it in place on the deck using lots of 50/50 mix and a paint brush to sort of 'paint down' the line. Once the coil was as tight as I could get it I would cut off the excess line so that it could be tucked into the center of the coil, and then place a small paint bottle on top of it to hold it in place while drying. After it was dry and the bottle removed, I would paint the mixture onto the gun tackle and shape the droop in the line between the coil and tackle as needed. I would soak the breeching line in the mixture at this point as well, and do final shaping to it, also with the paint brush.
- 164 replies
-
- 1
-
-
- model shipways
- armed virginia sloop
- (and 2 more)
-
Looking good. I solved any discoloration by soaking the entire line, including the part rigged in the tackle on the guns. I just painted it on with a brush and let it soak in. Bonus to this is that the line holds it's shape (and can be shaped when semi-dry) so you can get somewhat natural looking drop to the line where it isn't under tension.
- 164 replies
-
- 1
-
-
- model shipways
- armed virginia sloop
- (and 2 more)
-
Warning - "Good" also means "Not cheap". http://www.amazon.com/Vallorbe/b/ref=bl_dp_s_web_8502756011?ie=UTF8&node=8502756011&field-lbr_brands_browse-bin=Vallorbe Good luck.
-
You can contact Model Expo and tell them which bulkhead you broke, and they will send you a replacement. In my experience if you use their online parts replacement form, you won't get any response, but 7-10 days later you will have a package on your door with a new part (they'll ship the entire parts sheet that the bulkhead is part of). As far as the bearding line, make yourself a small piece of test planking - glue a short piece of the first planking layer (basswood) together with a piece of the final planking (the thin walnut). This is the 'depth' that your rabbet needs to be. Starting at the bearding line, cut towards the keel, so that where the false keel meets the keel the depth will make your test planking flush with the outside edge of the keel. For how to do this, I used a combination of things - Exacto blades (#22 and #11), chisels, and sanding. Work very carefully on this, taking off very small amounts, especially as you near the keel, as the false keel will only be about 1/3 of the starting thickness when you are done. In my case I worked it down to about 1/2 the final depth, then attached the keel, and then finished the rabbet with the keel in place so that I could use my test planking piece to get the depth right. I didn't really take any good pictures of this in progress, since it was my first time, but some of the photo's in this post - http://modelshipworld.com/index.php/topic/8085-armed-virginia-sloop-by-gunthermt-model-shipways-scale-148-complete/?p=242580 will sort of let you see my rabbet in progress and maybe get something out of it.
- 194 replies
-
- 6
-
-
- armed virginia sloop
- model shipways
- (and 1 more)
-
Always good to see another AVS on the bench. Feel free to ask any questions and you'll find plenty of help here.
- 194 replies
-
- 2
-
-
- armed virginia sloop
- model shipways
- (and 1 more)
-
Constructo Dos Amigos / Fair Rosemond - need instructions
GuntherMT replied to BIGMAC's topic in Wood ship model kits
Bummer. -
This is why everyone should encourage people to simply upload the images to the forum in their logs, that way they are not dependent on an outside image host and should be available for as long as MSW is available (which is hopefully for a good long time).