HOLIDAY DONATION DRIVE - SUPPORT MSW - DO YOUR PART TO KEEP THIS GREAT FORUM GOING! (Only 20 donations so far - C'mon guys!)
×


GuntherMT
-
Posts
2,213 -
Joined
-
Last visited
Content Type
Profiles
Forums
Gallery
Events
Everything posted by GuntherMT
-
Ok, perhaps my last post wasn't clear. The bed of the Sherline lathe is one solid piece of ferrous metal. The bearing surfaces are not screwed on, they are an integral machined part of the bed, and it is 100% not aluminum.
-
According to my magnets, the bed on my Sherline is steel, or at least not aluminum!
-
Good luck on your first build, and welcome to the site. The only thing left out of your title is the scale (as far as I know). I see you are from Mesa. We have a small group that meets sort of monthly in the Phoenix area (different hosts each time). If you are interested in joining us, please shoot me a PM with your email address, and I'll add you to the list for the next meeting (which we actually haven't decided on yet with the holidays coming up).
-
Beautiful result from an amazingly fast build. Your Doctor is going to love it. Congratulations.
- 209 replies
-
- 7
-

-
- cheerful
- Syren Ship Model Company
- (and 1 more)
-
Looking great Erik. On the knots, once you have them tight, hit them with your matte-medium and that will 'fix' them and keep them from coming undone. You can also use the white glue/water mix for this, but it's not as quick, but is easier to undo if you decide to make a change later. Some people use CA for this (I did in the earlier parts of my build), but there are enough down-sides that I stopped part way through. It discolors the rope, makes it stiff, is shiny, and if there is too much moisture, can form white crystals. You'll end up having to paint over any CA knots with matte-medium to get rid of the shine too.
- 222 replies
-
- 2
-
-
- 18th century longboat
- model shipways
- (and 2 more)
-
Good looking boat you have there. Seems light on rigging, is there more to come (I ask because you ask if anything is missing, but you don't actually say if it is currently complete or still in progress)?
- 37 replies
-
- 2
-
-
- model shipways
- 18th century longboat
- (and 1 more)
-
Too what degree are shrouds and stays served
GuntherMT replied to markjay's topic in Masting, rigging and sails
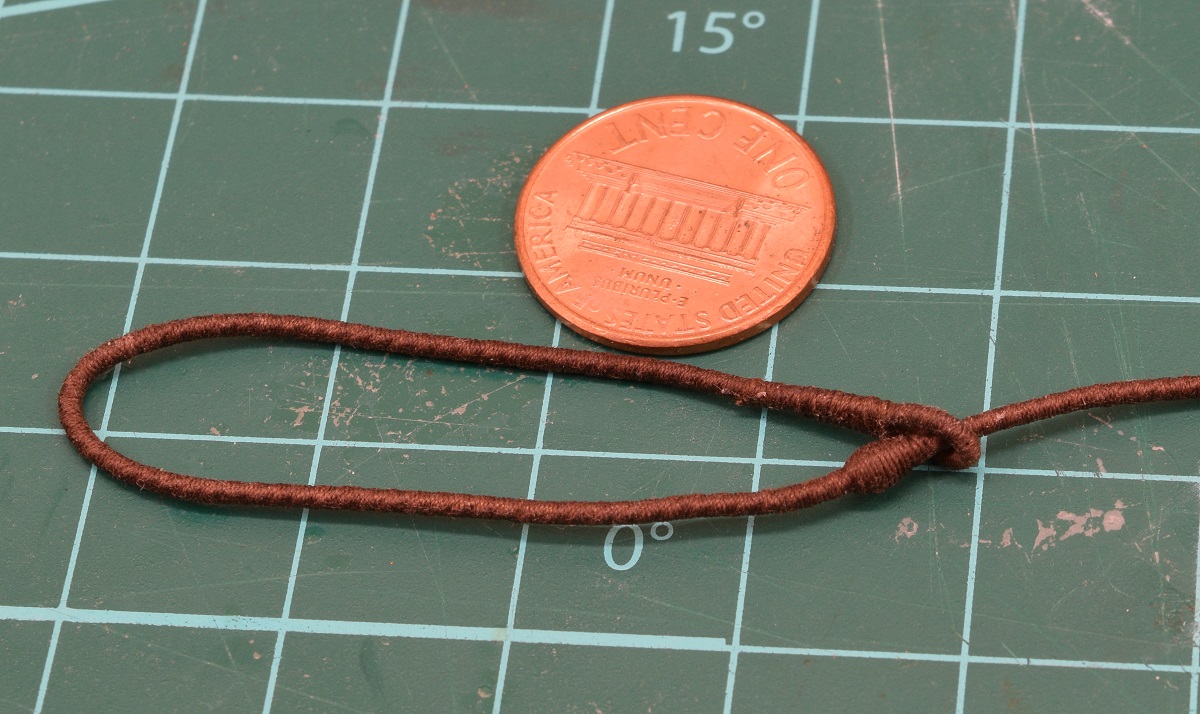
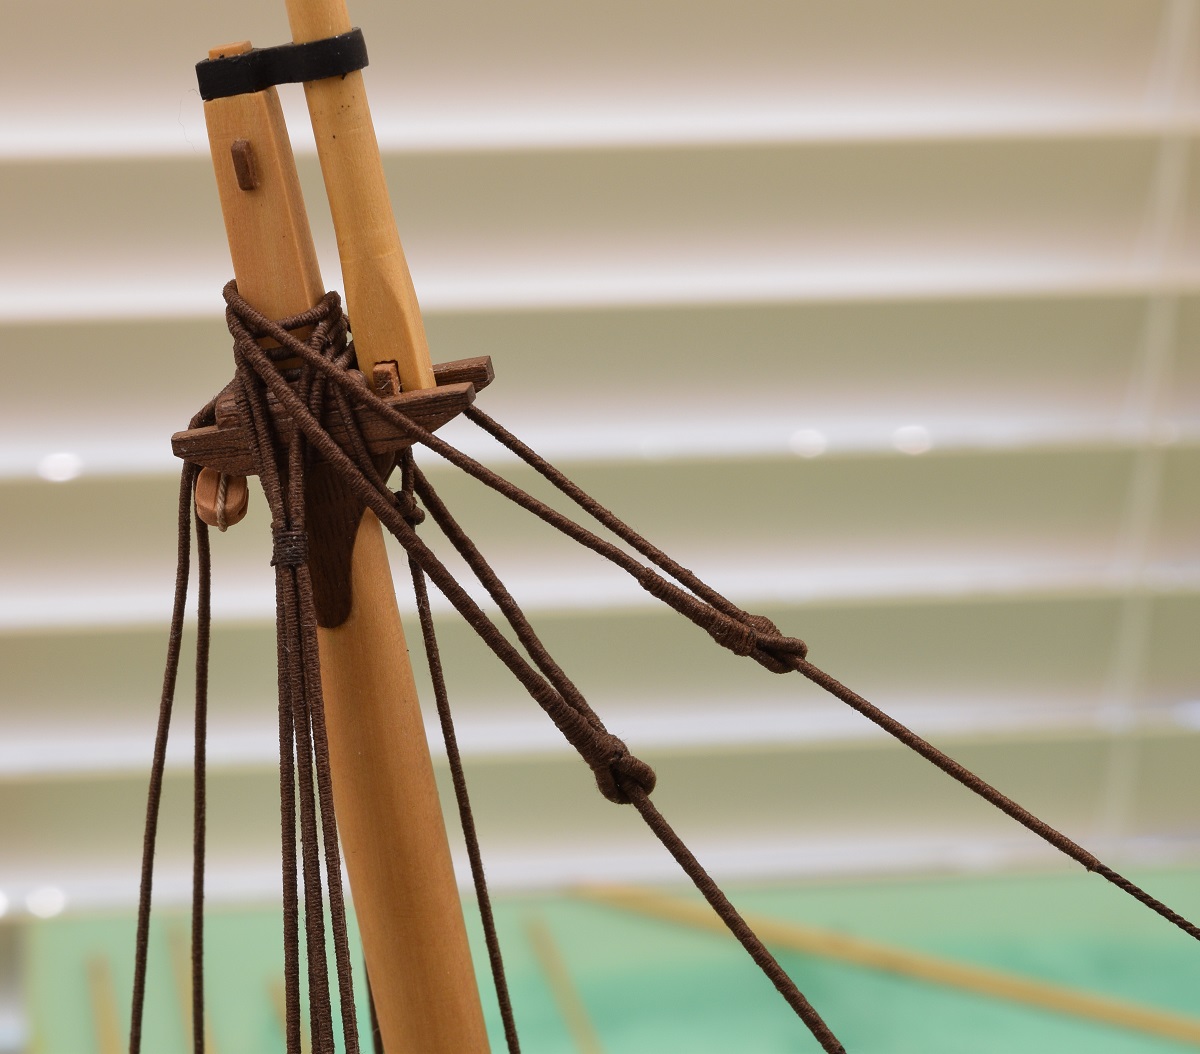
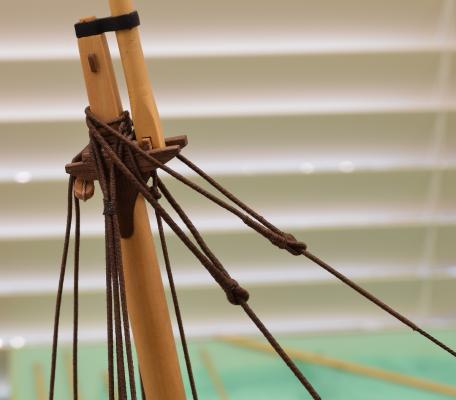
The 'mouse' is a wide spot in the stay that prevents the eye-splice from going past it, allowing it to be secured to the mast. No idea why they did it this way vs. splicing like an odd shroud, but I assume it had some advantages in strength or something. Here is my forestay with the mouse completed off the model, showing how the stay feeds through the eye-splice and is secured by the mouse. And here are the stays in place on the ship showing both stays and mouses (click for big). No idea if your current project used the same method, but it seems to be pretty common to secure stays this way. You can see a step-by-step of how I formed the mouse in the build log here: http://modelshipworld.com/index.php/topic/8085-armed-virginia-sloop-by-gunthermt-model-shipways-scale-148-complete/?p=342164
-
I have no idea why a modeler would do that, but then many people build stuff into the lower decks that will never again see the light of day either! My understanding of worming is that it was done to fill in the ****-lines of the large ropes that were to be served, making them a more 'round' shape prior to the parceling and serving. I personally wouldn't do worming or parceling of a rope I was going to serve on a model, because I agree with you on the 'why?' on that. If you have documentation that it was don on the Victory this way, then I've learned something new today. I'm still quite new to the hobby, so I have a great deal to learn, which is why I asked the question in the first place, as my understanding of worming was that it would never actually be visible. Thanks for your response, take care, and keep on keeping on!
-
Congratulations!
-
I've never seen a stand like that, it works well, both visually and as a stand. Very nice.
-
I've seen it done both ways, but I cut the rabbet so that both layers would go into it on my completely different ship.
-
It looks good, but would a stay ever be wormed without being then parceled and served? I thought worming was just the first step of the process?
-
I'm sure that's just a typo. It's really easy to check. Go to Model Expo's site, enter the code, and click the check-mark. If it's expired, it will show "Expired" under the shopping cart. If it's not expired, it will show the code. Like this: Seriously, just try stuff once in a while, takes only a few seconds to see if it works.

-
Thank you for all the kind words everyone. I'm on a bit of a break after completing the AVS, as I've decided that I was on a fairly certain road to a heart attack (or at least heart disease of some form) so I made a pretty major change in my life and joined a gym and hired a personal trainer, I believe I briefly mentioned this before. The current task is to transform my body into something less 'round' shaped, and in the progress see what happens with things like my blood pressure and cholesterol, etc. Unfortunately for the ship building, this is eating up about 3 hours per day, 6 days per week, so my time in the shop has been pretty severely cut into or eliminated completely on most days (I also work full time). I'm very slowly working on a small plastic non-ship side project that I want to complete before I start on the next ship, and at the current rate, this 'two or three day' model might be done by Thanksgiving. I've decided that the next project is going to be a ship with minimal rigging, from the Civil War, so many of you may be able to guess what it might be! Expect a build log to start somewhere near the end of November if all goes well. Thanks again for your support, encouragement and help during the AVS build!
- 831 replies
-
- 11
-
-
- Armed Virginia Sloop
- Model Shipways
- (and 1 more)
-
They look good Erik, and that's all that really matters, not how it gets done! At least in my opinion.
- 222 replies
-
- 6
-
-
- 18th century longboat
- model shipways
- (and 2 more)
-
Second Planking
GuntherMT replied to Chuckaug's topic in Building, Framing, Planking and plating a ships hull and deck
This is the method I used on the very thin walnut planking provided for the 2nd planking of the AVS, and it worked just fine. You just have to work on each plank carefully, and use a fine grit sandpaper (I used 220 grit mostly I believe) on a sanding block and work along the plank where you are supporting it. If you try to get too aggressive (either with pressure or with grit), then it will tear up the plank instead of sanding it. Let the sandpaper do the work, don't put pressure on it. -
The AVS plans show a loop, but it doesn't go around the stay like that, but rather the loop is just seized to the stay, which is how I did it.
- 974 replies
-
- 1
-
-
- rattlesnake
- mamoli
- (and 1 more)
-
It's normal to have to remove laser burn for both the reason that you already mentioned (glue adhesion) and because the laser cut is a slight cone shape, also to square up the edge of the wood. This is true of all kits with laser cut parts, and it's better that the pieces be too tight, than too loose because they all need to be cleaned up and squared.
-
Looking forward to seeing another of these kits built, and if I understand your intentions, building it mostly as the kit presents it rather than modifying it like the last (beautiful) build was done.
-
Simulated caulking
GuntherMT replied to Nirvana's topic in Painting, finishing and weathering products and techniques
I see so many complicated, messy, and/or time consuming methods for caulking on this and other ship-building forums, yet the method suggested by Chuck and others that I used worked extremely well and doesn't require leaving gaps or mixing stuff etc. #3b pencil blacken one edge, and one end of each plank before placing it. Use wood glue to affix as normal, lightly sand when complete and then seal with your finish of choice (I used min-wax poly).
-
Looks much better. Final suggestion, if you lock the lower deadeyes in place, you can tighten up the lanyards (remember, on the real ship they are quite tight to hold the mast steady from side to side) which should pull the upper deadeye in line fairly well now that the lanyards are run correctly so that they won't be trying to force a twist.