HOLIDAY DONATION DRIVE - SUPPORT MSW - DO YOUR PART TO KEEP THIS GREAT FORUM GOING! (Only 13 donations so far - C'mon guys!)
×


GuntherMT
-
Posts
2,213 -
Joined
-
Last visited
Content Type
Profiles
Forums
Gallery
Events
Everything posted by GuntherMT
-
That's going to turn out to be a beautiful planking job, even if it wasn't your first model! Excellent work and your patience is going to pay off from what I can see.
-
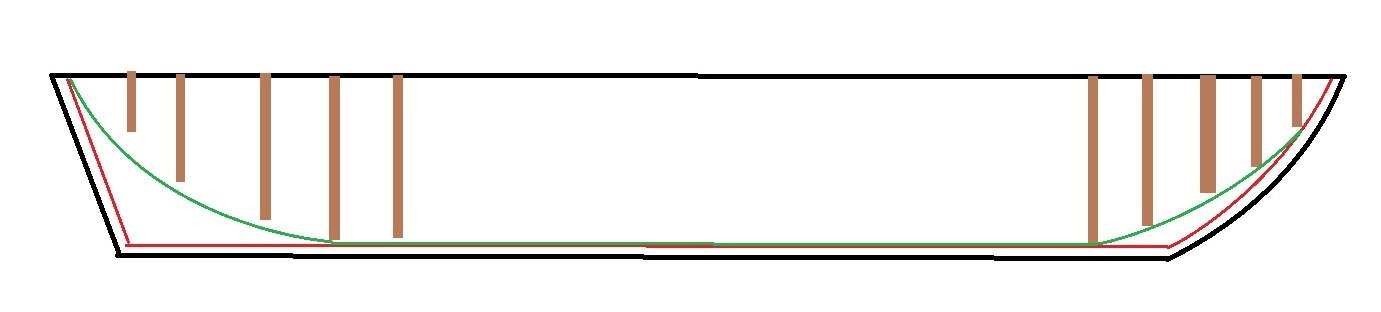
Rachel, based on those pictures, they are leaving it pretty much up to you to figure it out, but it looks like the curved line at the bottom of the bulkheads is where you should start the rabbet, and it should end (be at full depth) where the line is shown in that last picture, which is defining the 'keel'. I am horrible at drawing, but I made a horrible drawing to try to show this. In the above drawing the green line is the bearding line, where the rabbet starts, and the red line is the edge of the keel, as shown in the final picture in your post above. The rabbet would be at full plank thickness where it hits the edge of the keel (red line) and smoothly flow up to the edges of the bulkheads at the green line (my green line doesn't touch my bulkheads because I'm terrible at drawing). So along the bottom where the bulkheads angle steeply or at nearly a 90 degree angle into the false keel, the rabbet will simply be a squared off "U" or modified "V" shape, while at the bow and stern you would can cut the full depth rabbet at the red line and then remove wood at a shallow angle up to the green line so that the line of planks smoothly crosses that area. I hope that makes sense?
-
If that's what they are using as the bearding line, then it will be a fairly steep rabbet directly below the bulwarks. Can you show us the stern? if the line continues to just follow the bulkheads then I'm not sure it's really a bearding line at all and they are just leaving the modeler to wing it.
-
As Moltinmark says, it's not really defined other than by people deciding to use that term. If I build a 'Cheerful' as designed by Chuck, but decide to use all his mini-kits, is it a kit build, or semi-scratch? It depends on who you ask. If you look in the build logs you'll find those builds in both the kit section and the scratch section. My personal opinion is that using much beyond a false keel and bulkheads moves it out of scratch, but some people would argue that even using those pieces makes it a 'kit' or at the very least not scratch. Of course in the end, it doesn't really matter unless you are entering it into a competition that has actual rules about that sort of thing. If you think that doing 90% of the work from scratch is scratch, then it's a scratch build for you.
-
On that type of design, the best way to do it (too late now unfortunately) is to trace the bearding line from the full-sized plan sheet onto a piece of tracing paper, and use that to transfer the bearding line directly onto both sides of the false keel. You can then cut a full depth rabbet running along that line prior to attaching the bulkheads, and then after the bulkheads are placed you can make the cut from the full depth rabbet up to the bottom edges of the bulkheads. Since you are past the point to do it that way it will be a bit more difficult, but you can still follow the same process, you'll just have to do it with the bulkheads kind of making it more difficult. Certainly still doable with some good sharp tools and patience. Don't try to get it all in one pass, just take a little bit off at a time and check the depth between each pass.
-
I found a PDF version of the Albatross instruction manual and it's honestly not much help... haha.. Do the plans show a 'bearding line' - often a dotted line that is below the ends of the bulkheads but above the bottom of the false keel? If so, that is your guideline for the bottom edge of the rabbet. The depth of the rabbet would be the thickness of the planking (if double-planked then both layers combined). The rabbet would be cut with a chisel or hobby knife or even sanded (slow), but would start at the bearding line at the full plank depth and then lessen in depth smoothly as it reaches the bottom of the bulkheads. This means that in some areas like the bottom/stern the rabbet is a very long shallow angle while where the bulkheads are very close to the bearding line it's much more of a steep cut.
-
The best way to know if you have sanded enough is to hold a plank along the bulkheads and look at how the plank lays against the bulkhead. You are aiming for having the plank smoothly run from one bulkhead to the next while making contact along the entire edge of the bulkhead. You want the plank to run smoothly all the way from the stern to the bow without any dips or bumps, while making maximum contact with the bulkheads. Hope that makes sense. On the rabbet, read ahead in the kit instructions. Is there going to be a 'keel' of some kind placed along the bottom of the false keel that the bulkheads are attached to, or will the planking end above the bottom of the false keel and the false keel will 'be' the keel? It's really hard to say from looking in without the instructions and pictures of what this kit looks like when finished, and it's not a kit I am familiar with myself. Different kits handle rabbets/keels in different ways.
-
Hi Moltinmark, Looking nice. I don't envy you the task of placing all the running rigging with all those sails in the way! haha.. One quick thing I noticed from your pictures - the 'bands' on the anchor crosses should be painted black, as those bands would be iron. Edit: Oh, and to answer your question earlier in the thread about standing rigging, it was not loosened in port unless the ship was being de-rigged for overhaul or maintenance. It would normally be all left in place and tensioned up.
-
Hi Rachel, Welcome to model ship building, it's a wonderful hobby and I hope you really enjoy it! I always hate to be the bringer of bad news, but I'm looking at your pictures, and it doesn't look like you have faired the bulkheads nearly enough to be ready to plank yet. The goal of fairing the bulkheads (or frames) is to have them beveled at an angle that when a plank crosses the bulkhead it lays flat across the entire face of the bulkhead. That means that they should be sanded to allow a smooth plank flow across every single bulkhead that is crossed. From your pictures, your forward bulkheads are barely sanded at all, which means that if you look at the planks as they cross the bulkhead, they are just touching a corner of the bulkhead and there is almost no area for wood to wood contact which is where the glued up strength will be. Another thing this will do is cause the hull at both ends to be too 'fat' at either end where not enough wood was removed from the bulkheads to allow the planking to lay nicely across it. I hope my description makes sense. I'll attach a photo of the fairing at the front of a different model showing what I mean - you can barely see any laser char remaining on the bulkheads because they are sanded down to make a nice smooth surface for the planks. This is one of the most important parts of getting your hull shape right, and therefore your planking to lay properly and look good, is the preparation of the bulkheads by fairing, and it's very common for new builders to shortcut this step and really regret it later on. Let me know when you have seen this and I'll remove the photo that doesn't belong in your build log. Also let me know if you have questions and I'll do my best to answer them if someone else doesn't beat me to it.
-
Wood glue
GuntherMT replied to H March's topic in Building, Framing, Planking and plating a ships hull and deck
Since it won't be visible, pretty much any sort of wood filler/putty will work fine. I've seen some people even use bondo like is used on repairing bodywork on cars. I would just go down to your local Home Depot/Lowes/Hardware store of choice and pick up a small container of whatever sort of wood putty / filler they have on the shelf and you should be fine. This is only for getting a smooth surface, and as mentioned above, if it's just gaps between the planks, as long as the overall surface shape is correct and smooth, you can just ignore those on a first planking of a double planked hull. -
That's why I ripped out all the carpet in my workroom and put in hardwood flooring.. No more carpet-monster!
-
Ship's launch kits for 18th century ships - 1/60 or 1/64
GuntherMT replied to peterbrowne's topic in Wood ship model kits
The 1/64 boats are now on the Vanguard website. -
IPMS (International Plastic Modelers Society) has very strict definitions for "out of box" and "scratch". Pretty much anything that doesn't meet those two categories is considered a "kit bash" or simply "not out of box". I use IPMS in this conversation because as far as I know they are one of the largest modeling organizations around the world, and wooden ships have been allowed in all of their official competitions for many years now. For a wooden ship model, you could replace rigging line and a couple other very minor bits and still meet the definition of "out of box", but if you've replaced crappy kit wood with anything other than identical type (like to replace a warped piece), for example replacing the kit basswood deck with Holly or Boxwood, you have entered the "not out of box" realm, which is pretty much what I consider to be a kit-bash. My build of the "Carmen" qualified as out of box by the IPMS judges (but just barely - the replacement blocks were debated as to whether they were part of the rigging or not), while my AVS was clearly in the kit-bash (not out of box) category because I replaced so much of the kit wood and parts. However a 'bash' can go far beyond that. I could start with the kit for the Pride of Baltimore for example, but modify it in such a way to create a model of the "Californian" and that would not be a scratch model since I used the kit as my basis, it would be a kit-bash. Where the line is crossed from kit-bash to full scratch has been an item of much debate over the years, so I won't even go into that.
-
Personally, I like 1:48. It's just a nice scale IMO, where detailing can be done, and the parts are still large enough that I don't destroy my eyeballs. No technical reasons really, other than I'd like the blocks to be large enough I can pick them up and use them.. lol.
-
When I was drilling holes for the deck on my AVS I used the Dremel with a small drill bit. Instead of putting a piece of wood on it like you are describing, I just used a small piece of Tamiya 1/8" wide masking tape and wrapped it around the drill bit at about the max depth I wanted the holes to be. Since the depth of the holes isn't critical, I simply stopped drilling just before I got to the masking tape, it was a visual reference point, not a hard 'stop' for the bit.
-
Nice comparison. Really shows a significant difference in grain and roughness, thanks for adding this.
- 123 replies
-
- 3
-

-
- Model Shipways
- Pinnace
- (and 1 more)
-
It's looking good Eric. You are doing a good job of spotting your mistakes and learning from them, which is key! I did notice you made a comment about not having enough sawdust to mix with glue for filler. A sanding drum on your Dremel tool with the cut-offs from the planks will very rapidly fix that issue for future projects. I've found that making filler like this, mixing white glue/water mix with the sand dust from the same wood I'm planking with makes the absolute best filler and once sanded in and finished nobody will even know it's there. Will follow along as you complete this little boat. I have this kit partially completed (partially planked) and just never completed it. Maybe I'll get back to it as a side project someday.
- 123 replies
-
- 2
-
-
- Model Shipways
- Pinnace
- (and 1 more)
-
Since it's going to be painted, you should be able to make it look just fine I think. The base is solid so filling and sanding should result in a nice hull.
-
Not sure if it's better or not, but when I am fairing the frames I generally try to fair/bevel them right to the point where no laser char is visible at all. You want to make sure to be fairing with a sanding block that will stretch across at least 2 bulkheads at once, and preferably a fairly stiff block so it doesn't "round" the angle.
-
Constitution is officially sold. Thanks for the interest. Pride of Baltimore still available!
-
New To Building Ships Help and advice needed
GuntherMT replied to Richard O's topic in New member Introductions
Vanguard is getting a lot of recommendations, but I don't think (I could be wrong) that anything is in the large size range being looked for here (36"). Take a look at the Winchelsea that Chuck (Syren Ship Model Company) designed and is making. It's a larger scale and builds into a pretty good sized model. It's a work in progress but far enough along that it might be difficult to catch up and run out of instructions and things! -
A gentleman says that he has sent payment, so it's pending the receipt of payment, but I expect that he's not playing games and it's sold. Thanks.
-
Great job and congratulations on completing the Cheerful!
- 54 replies
-
- 1
-
-
- cheerful
- Syren Ship Model Company
- (and 1 more)
-
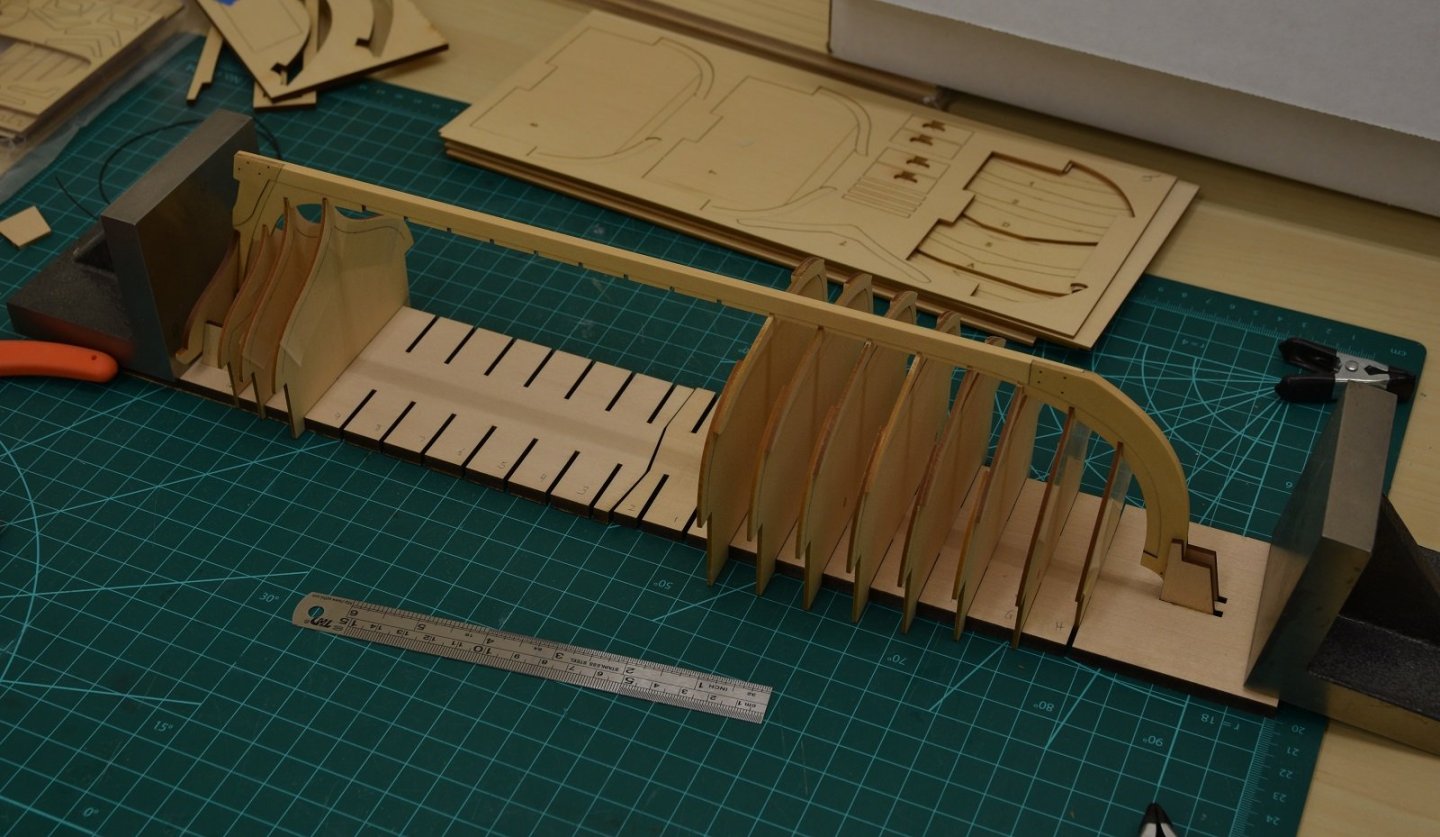
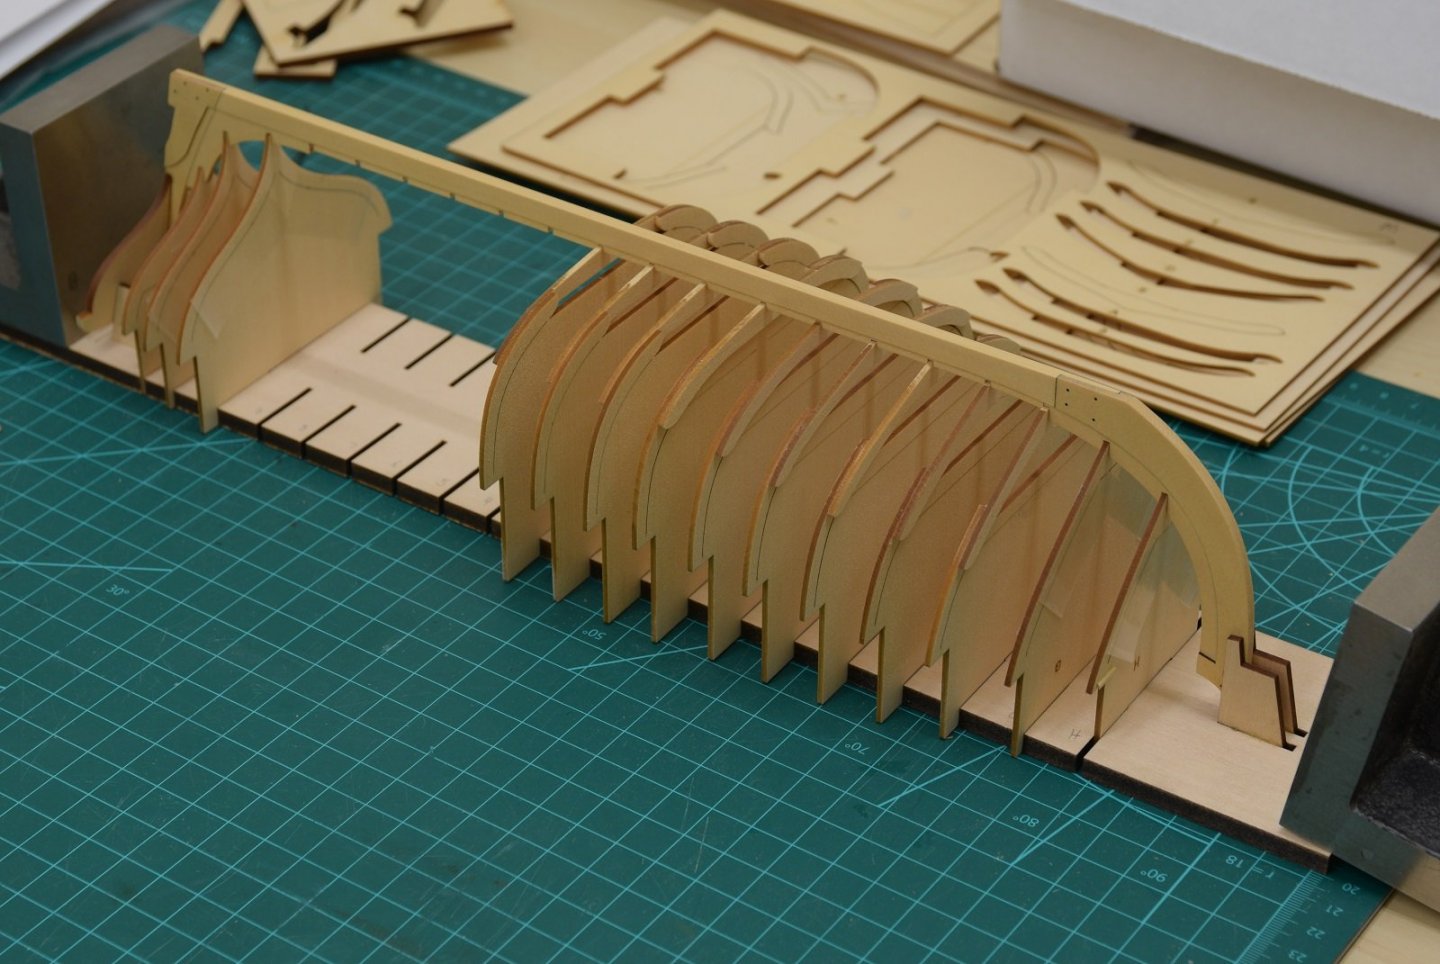
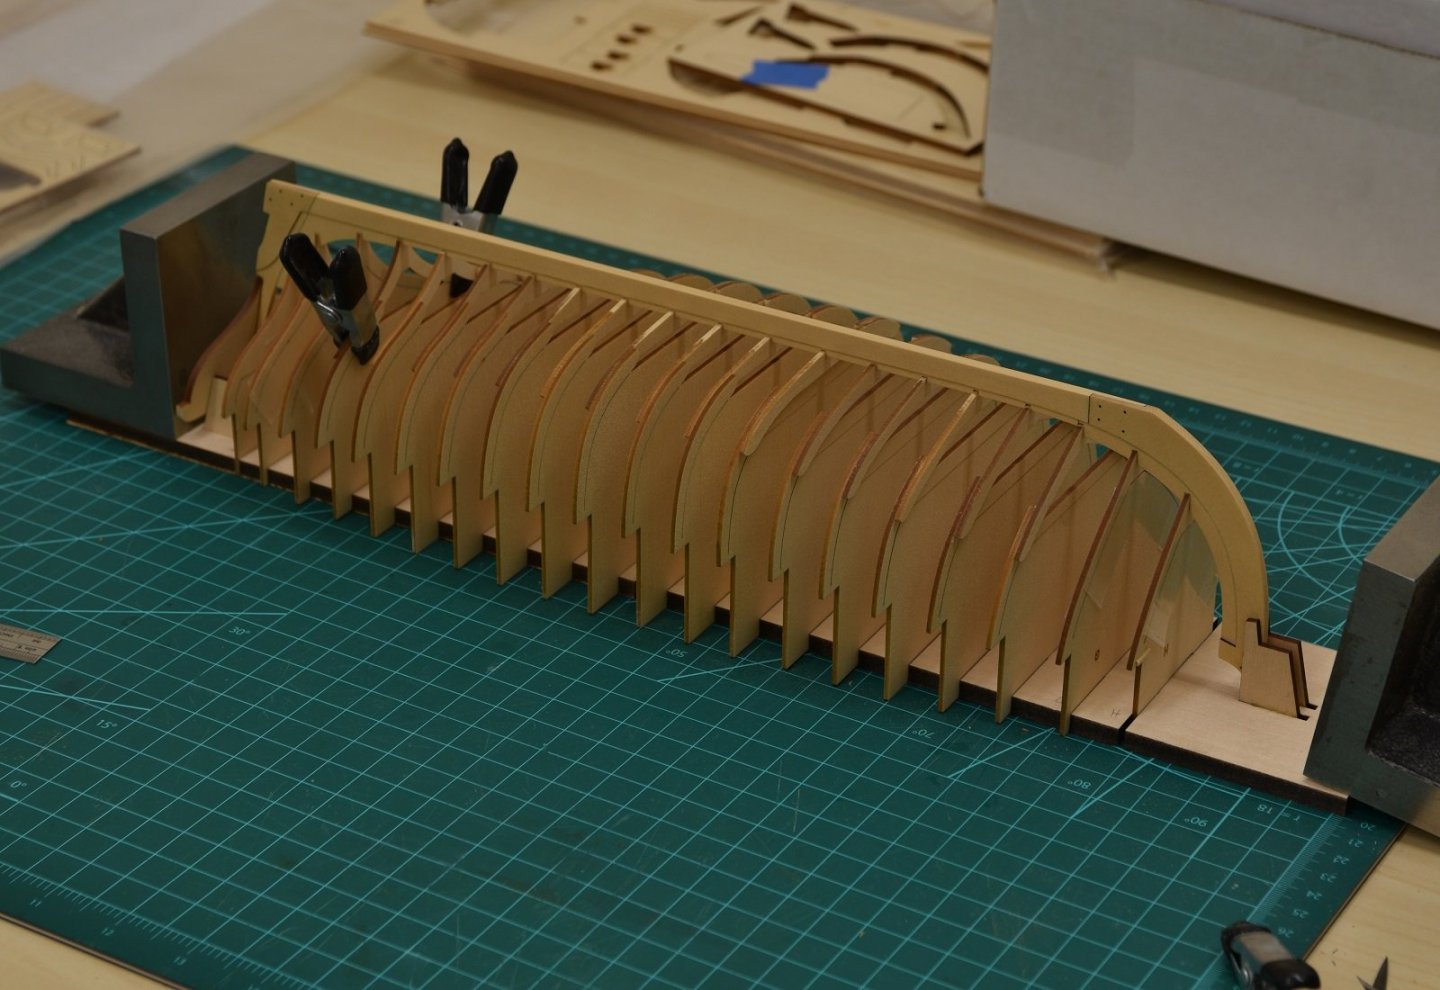
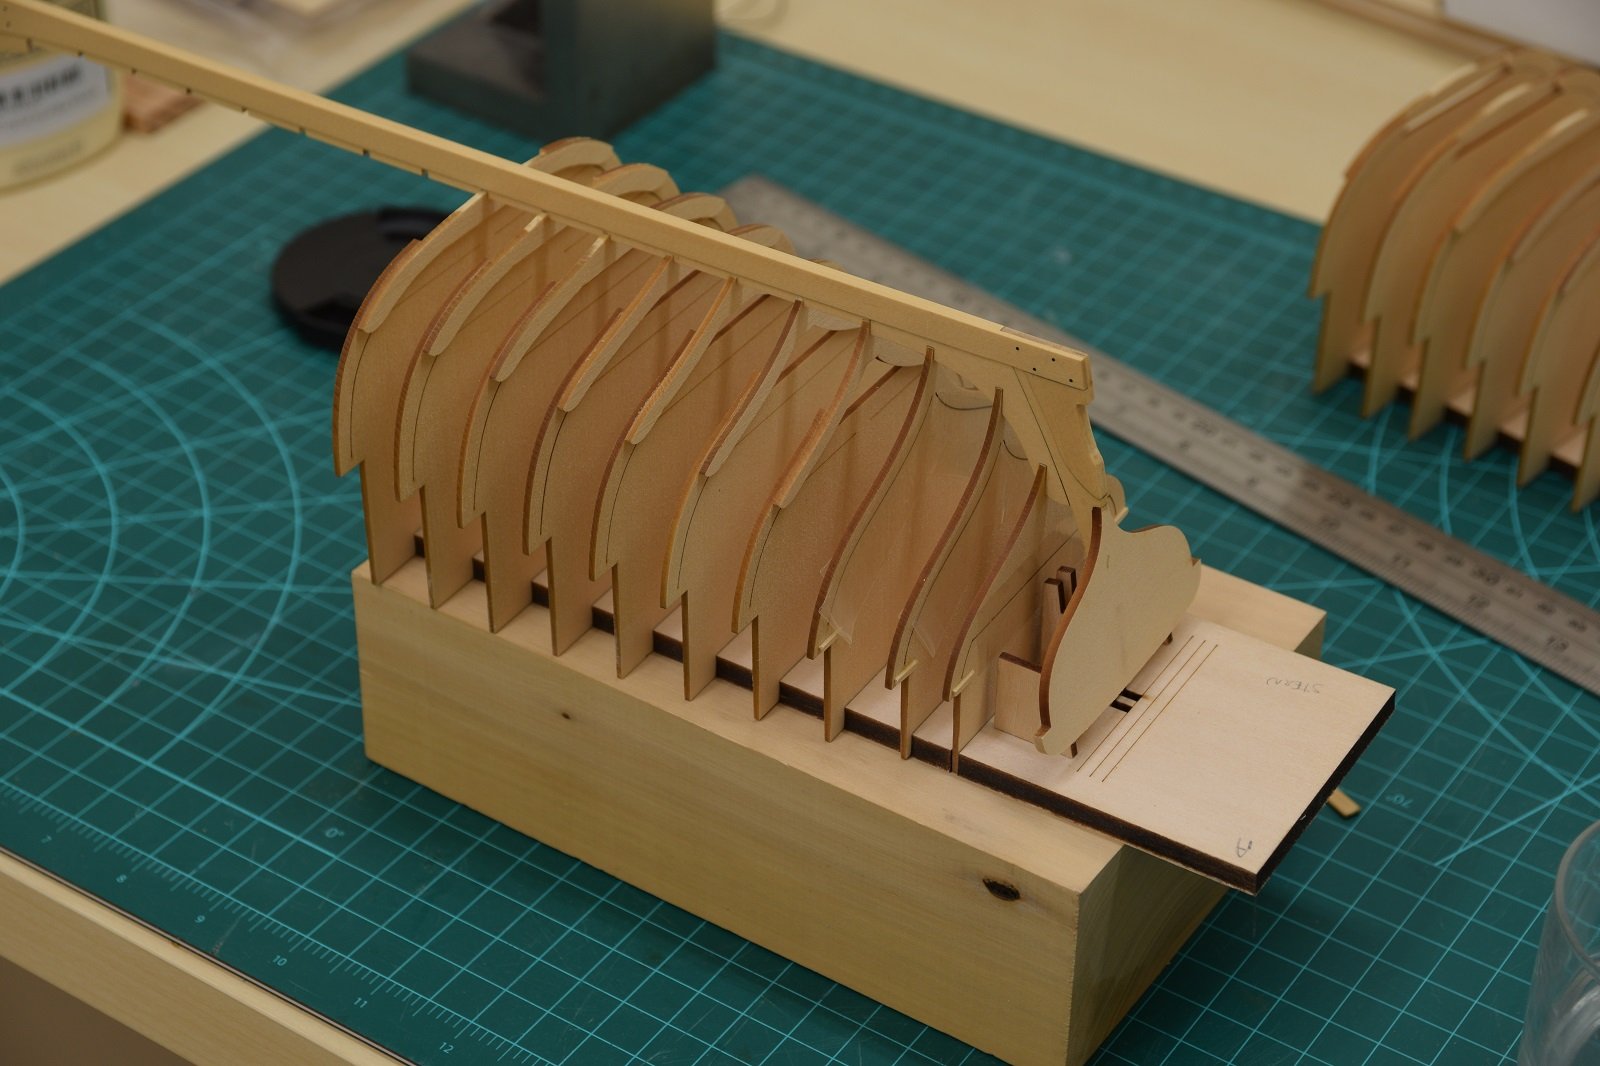
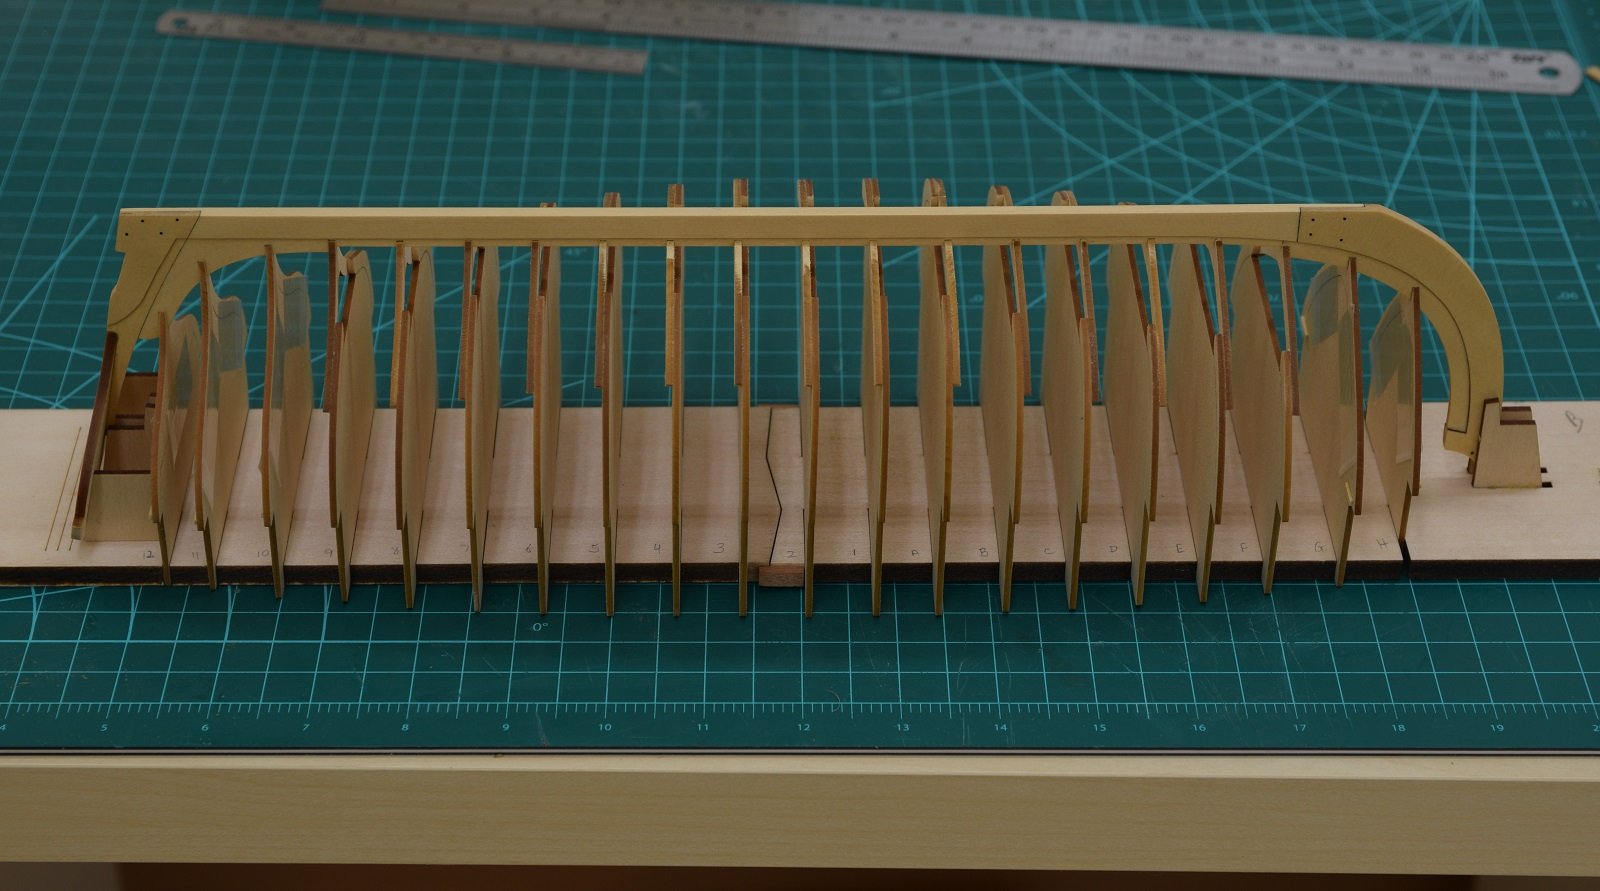
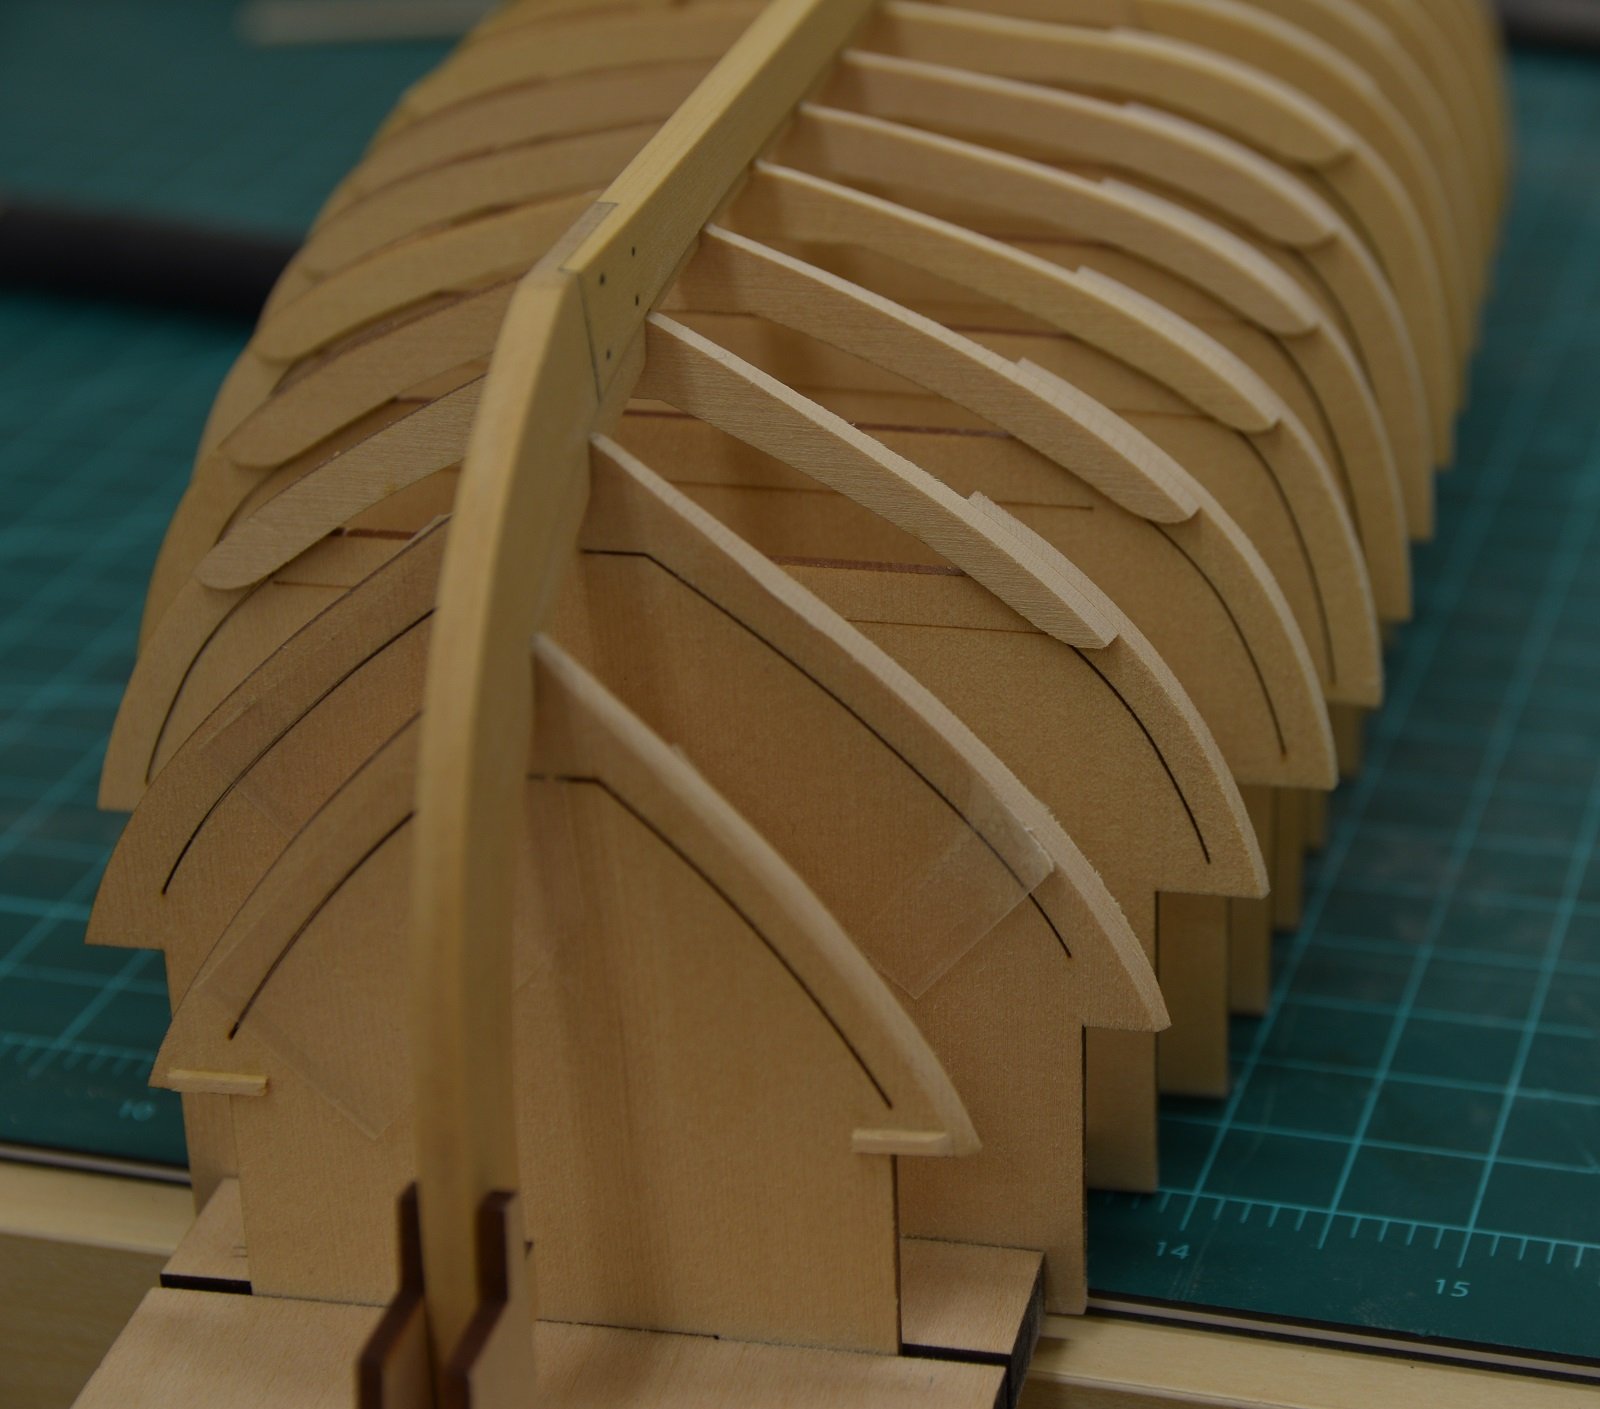
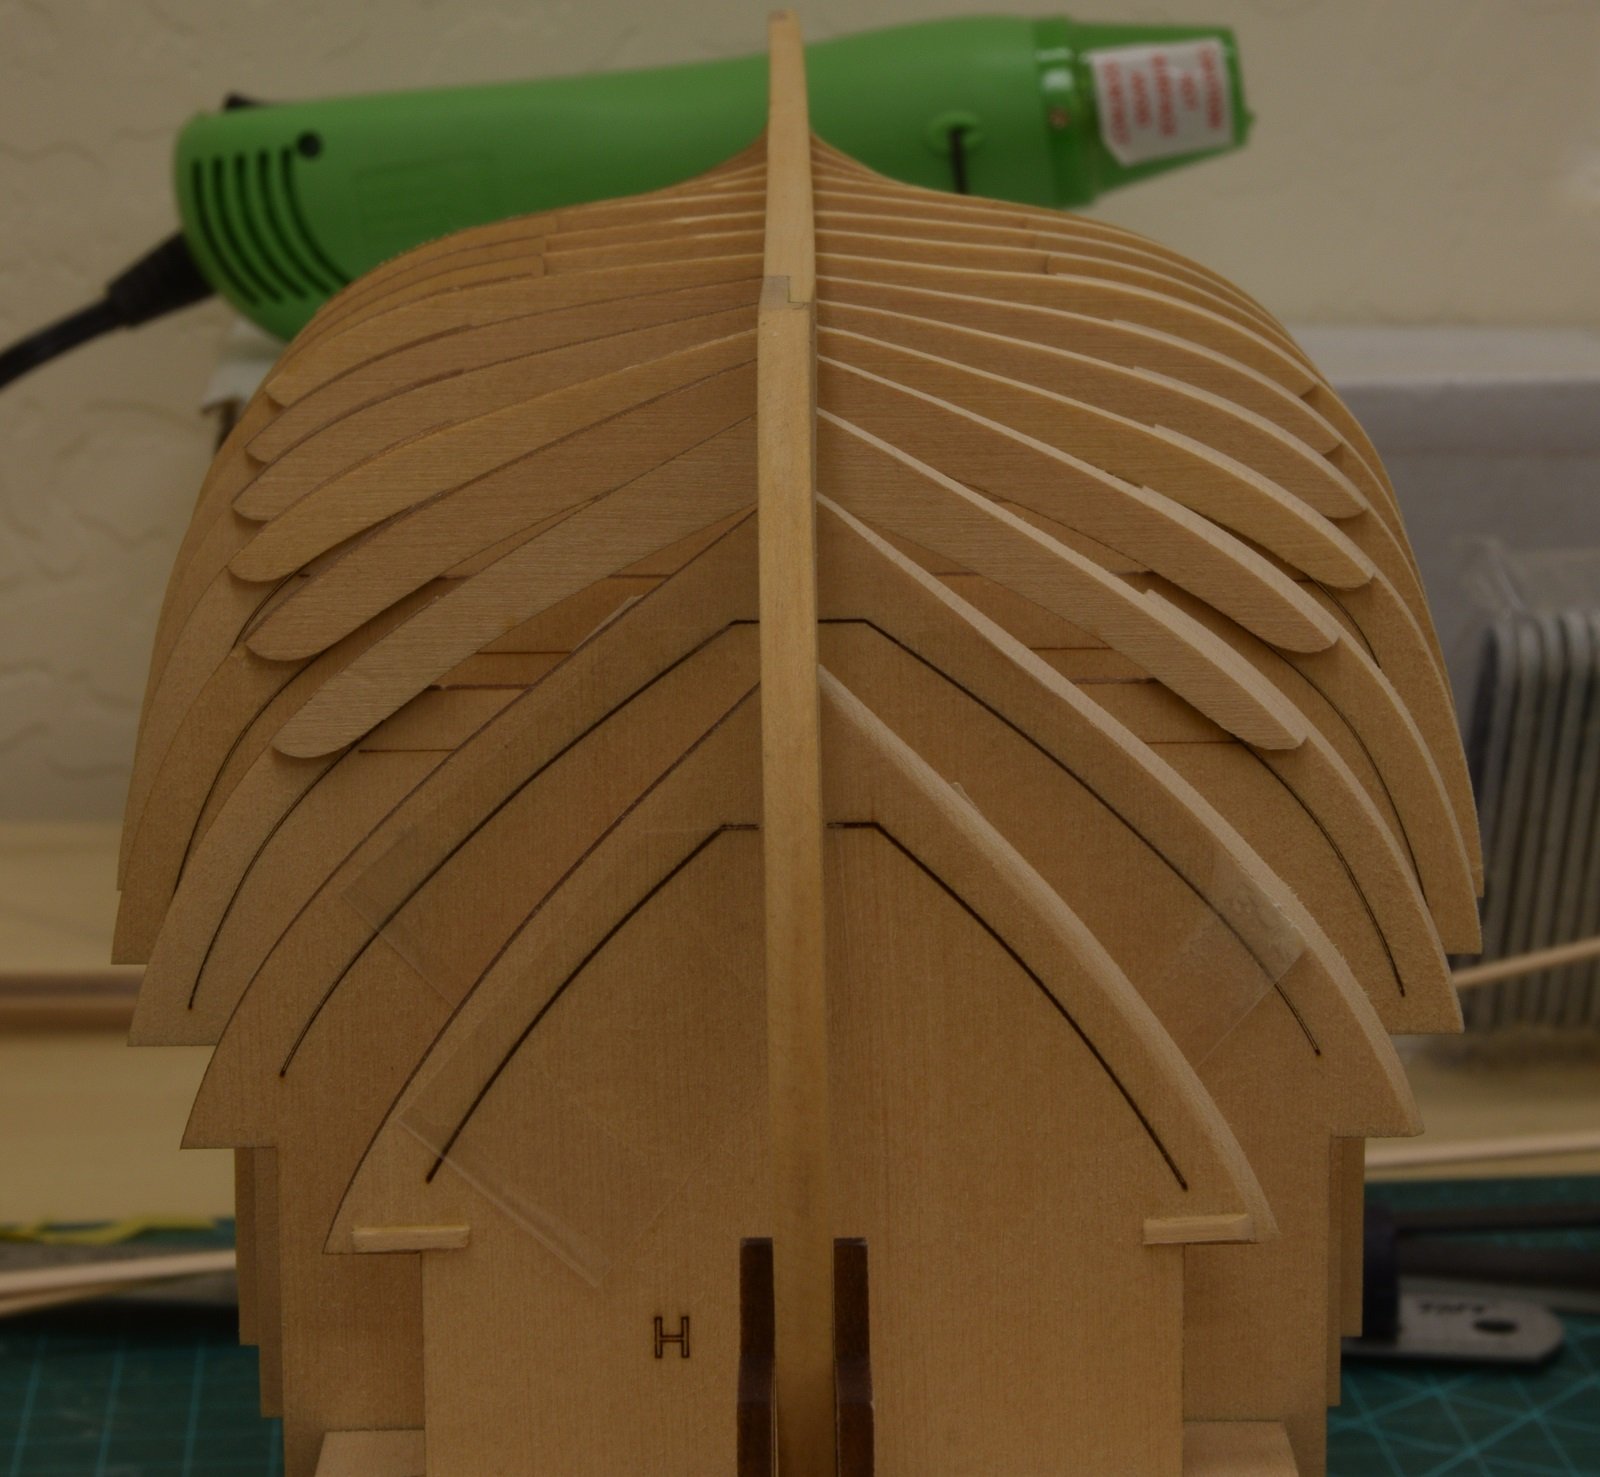
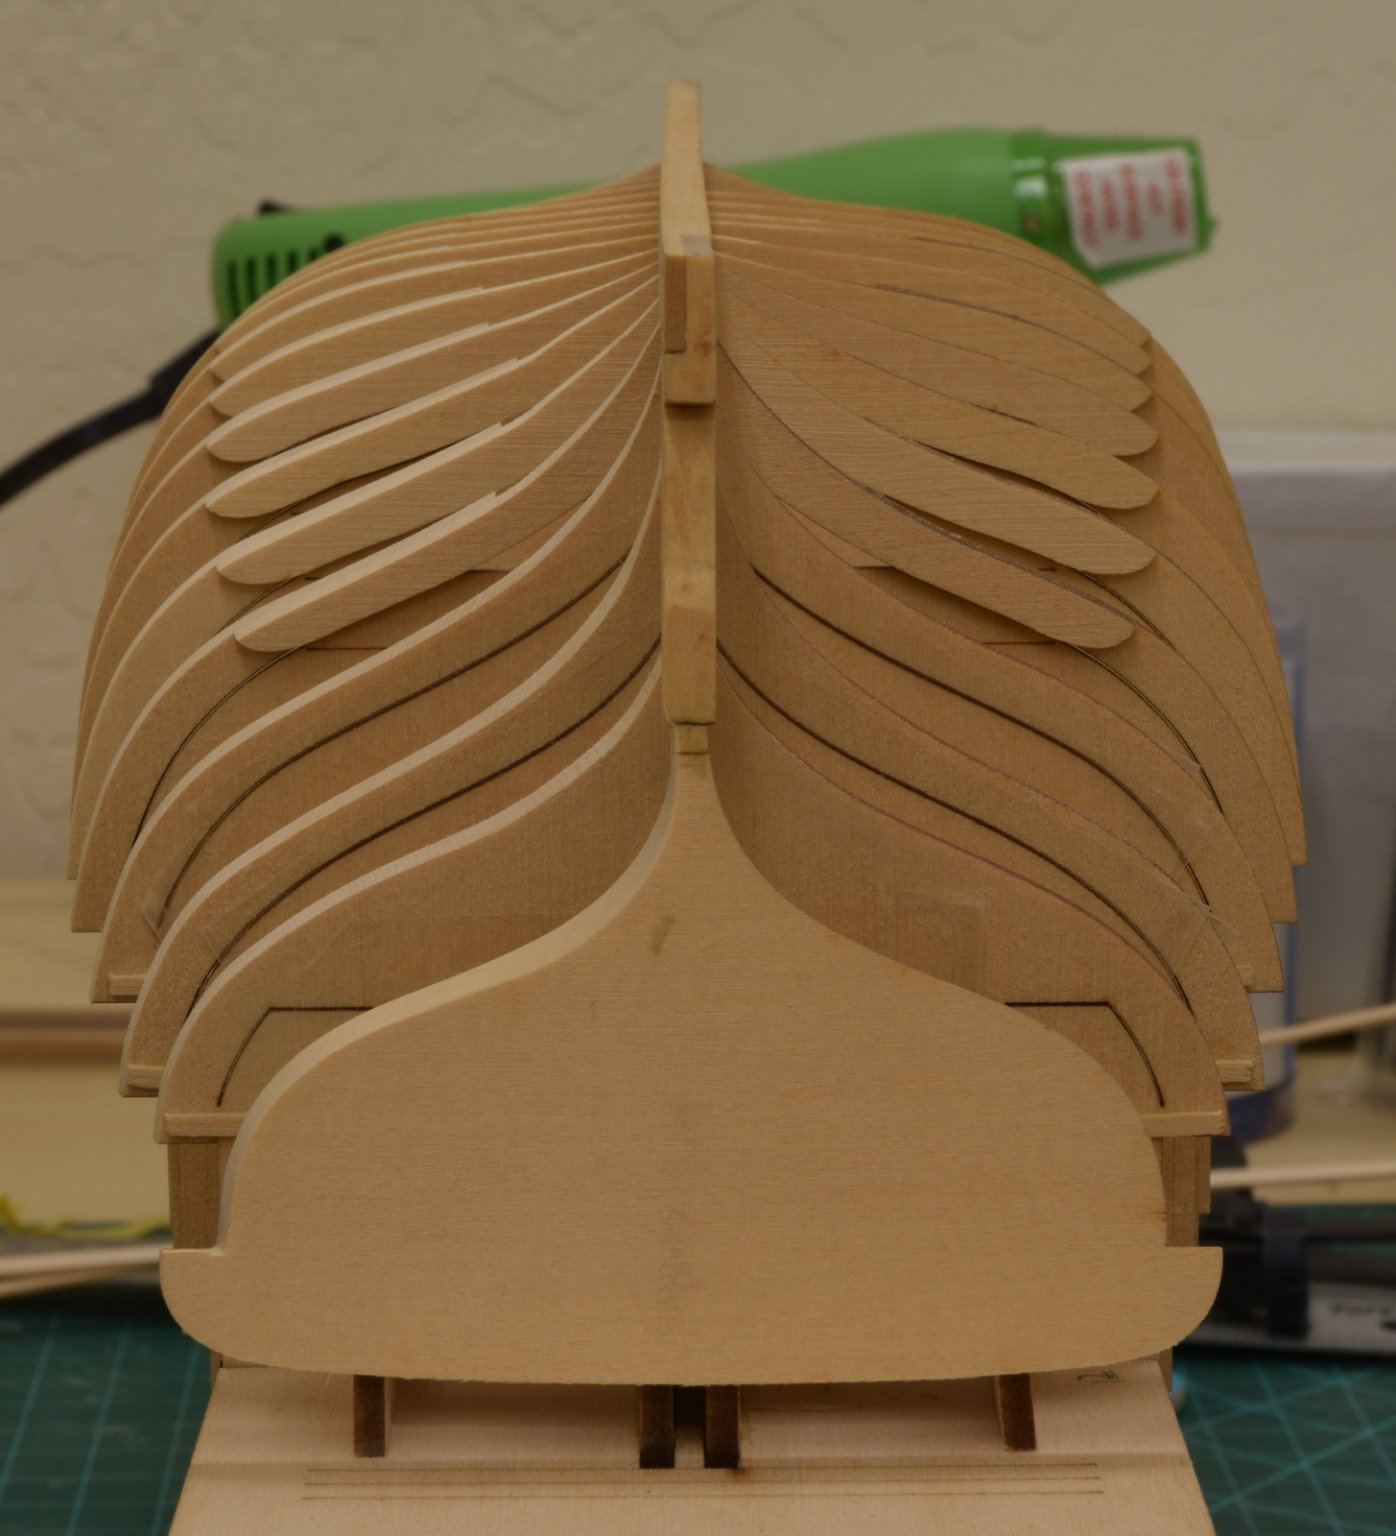
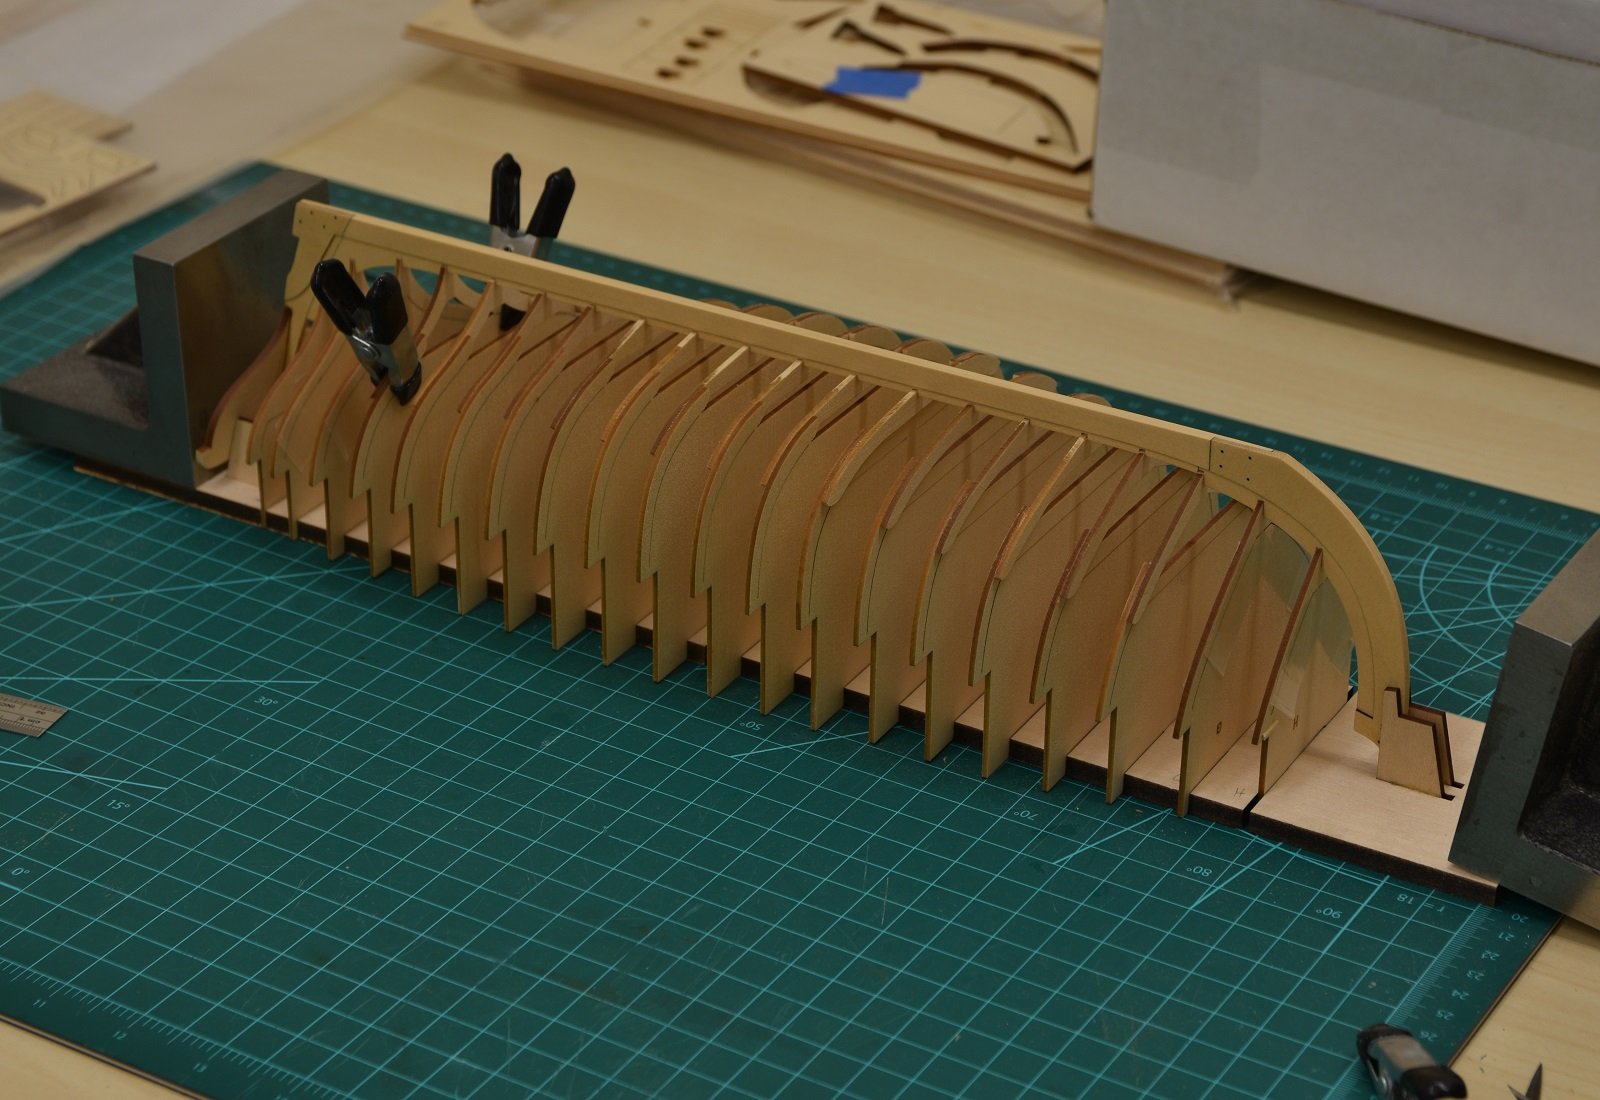
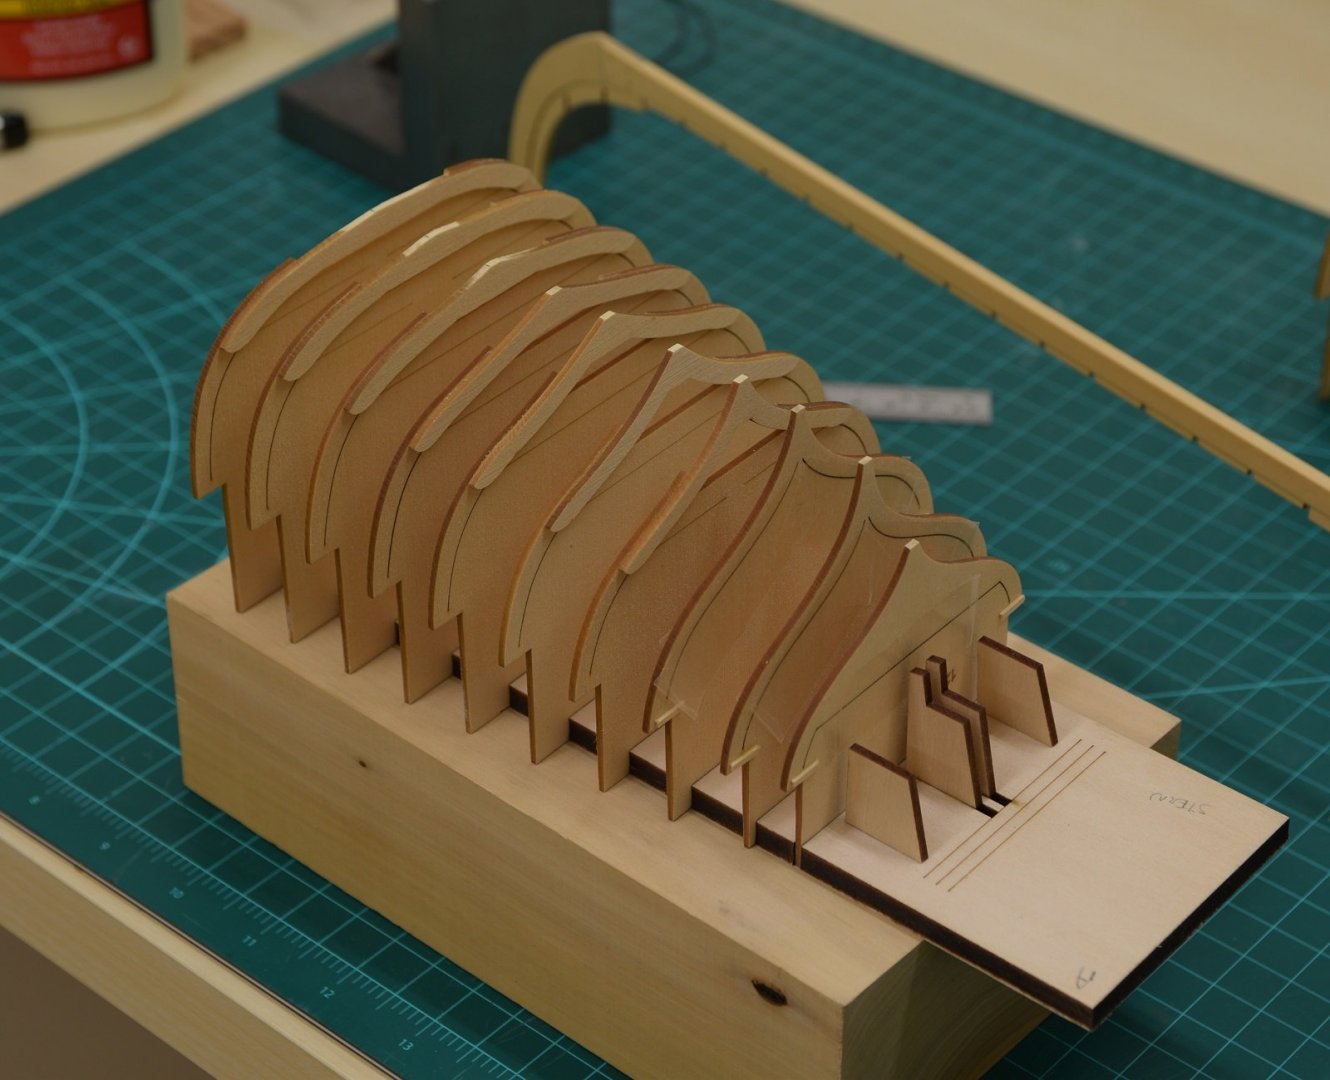
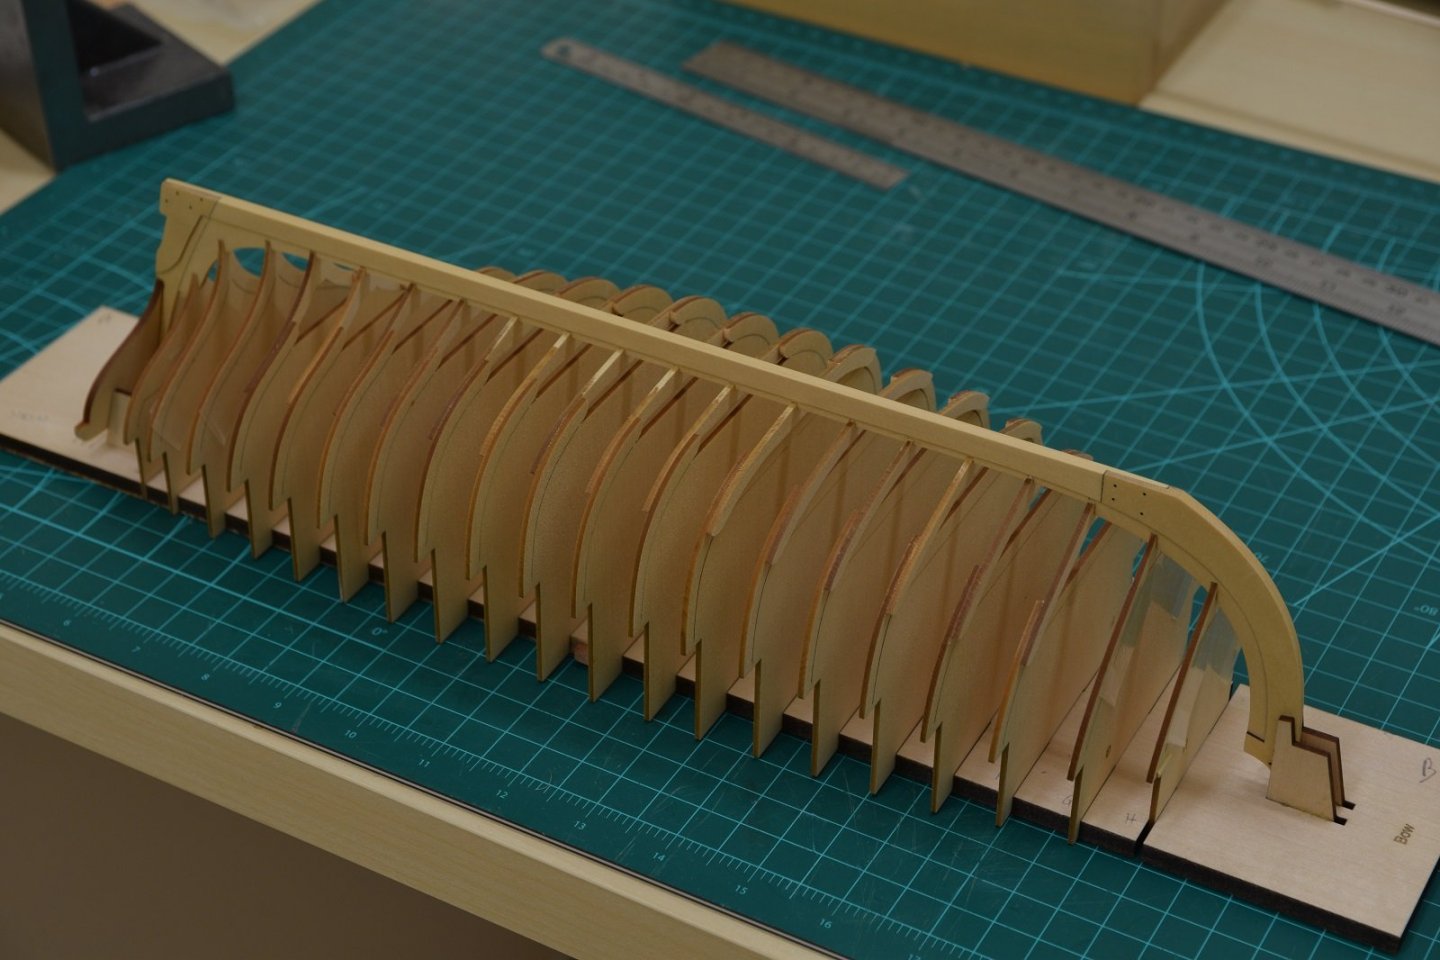
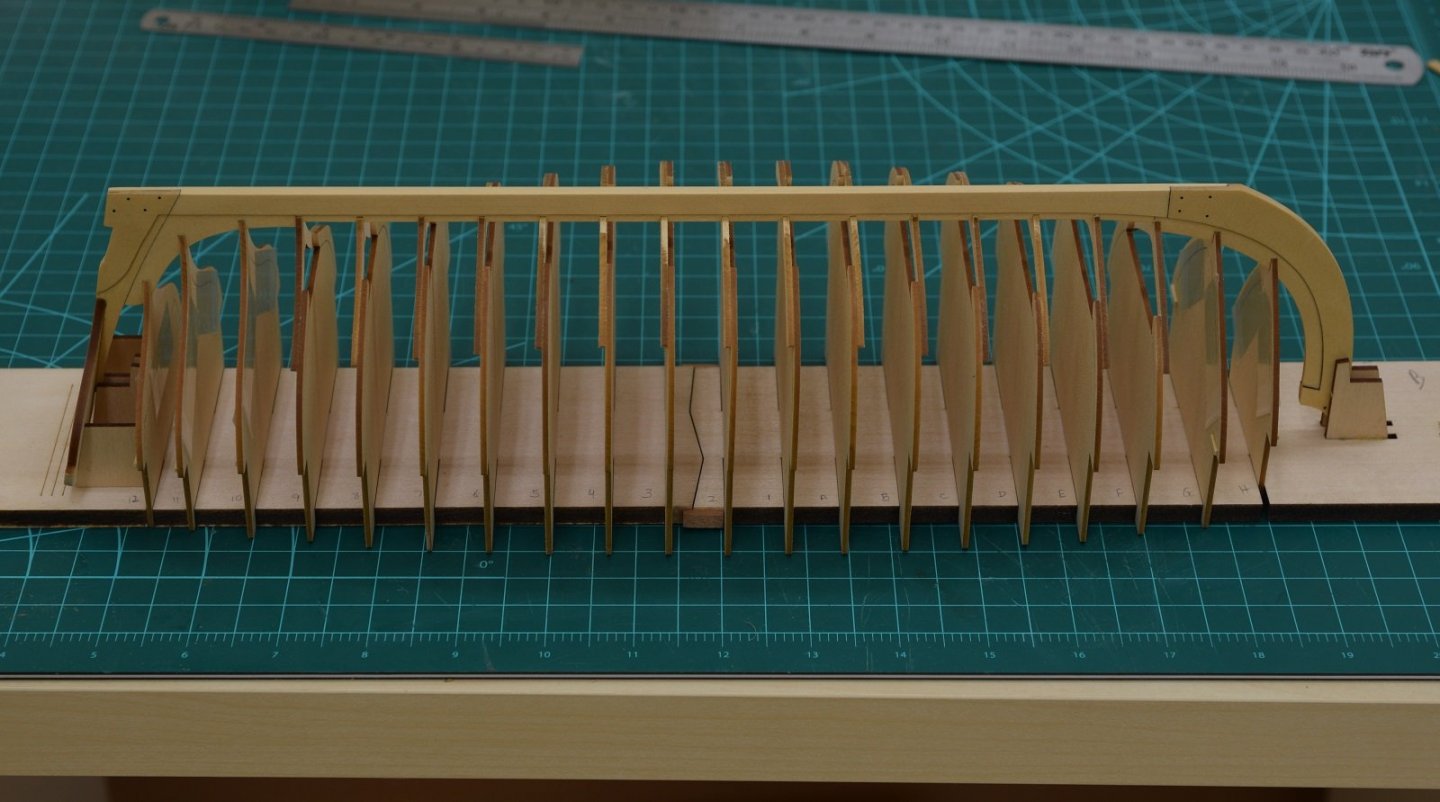
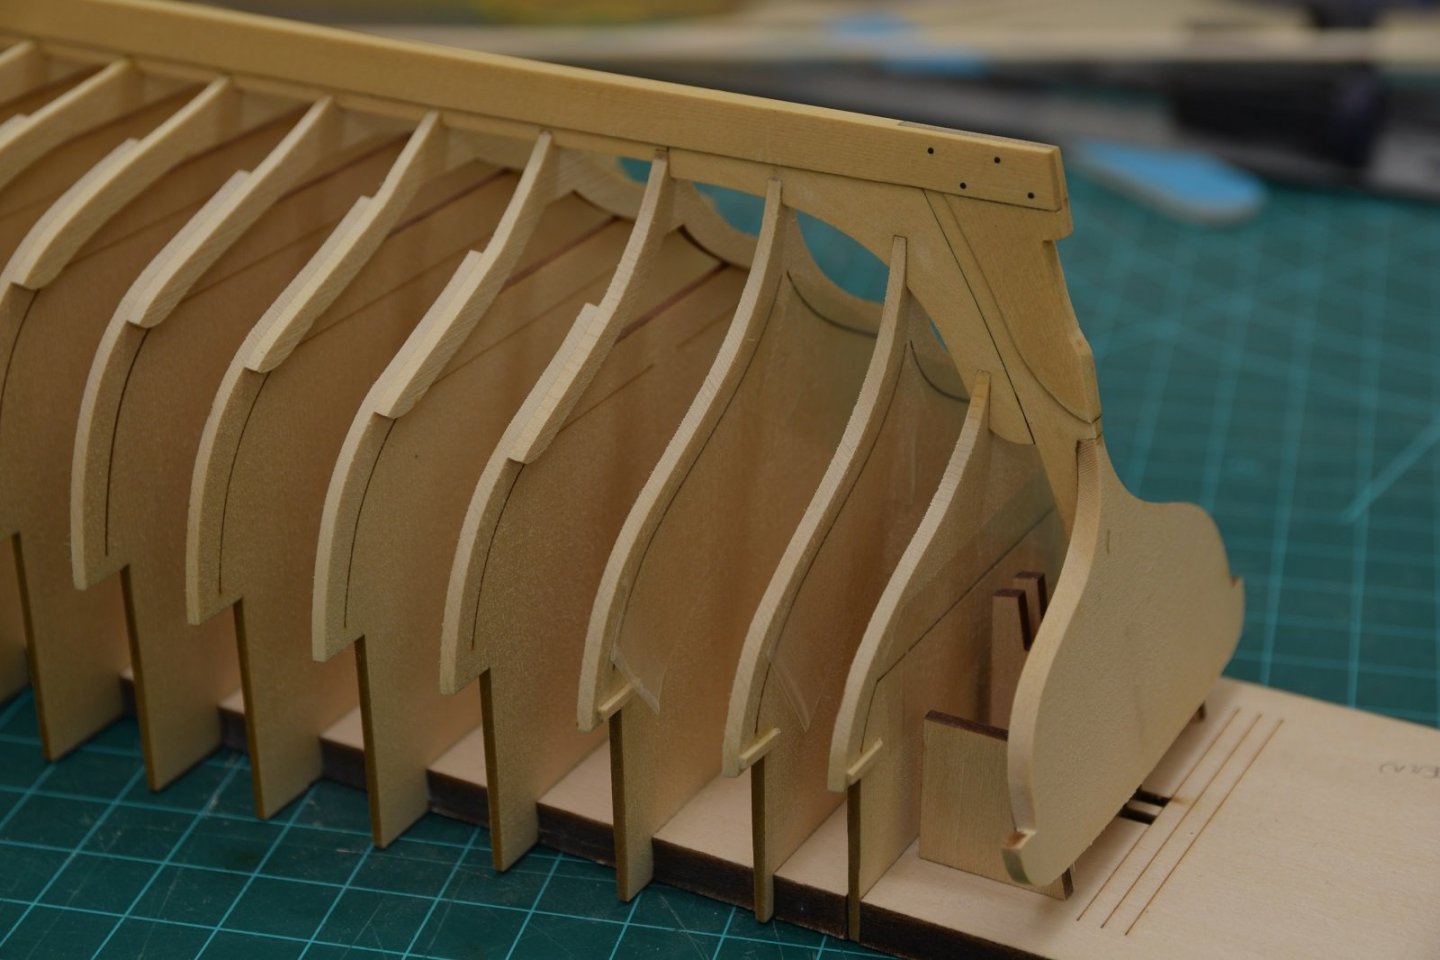
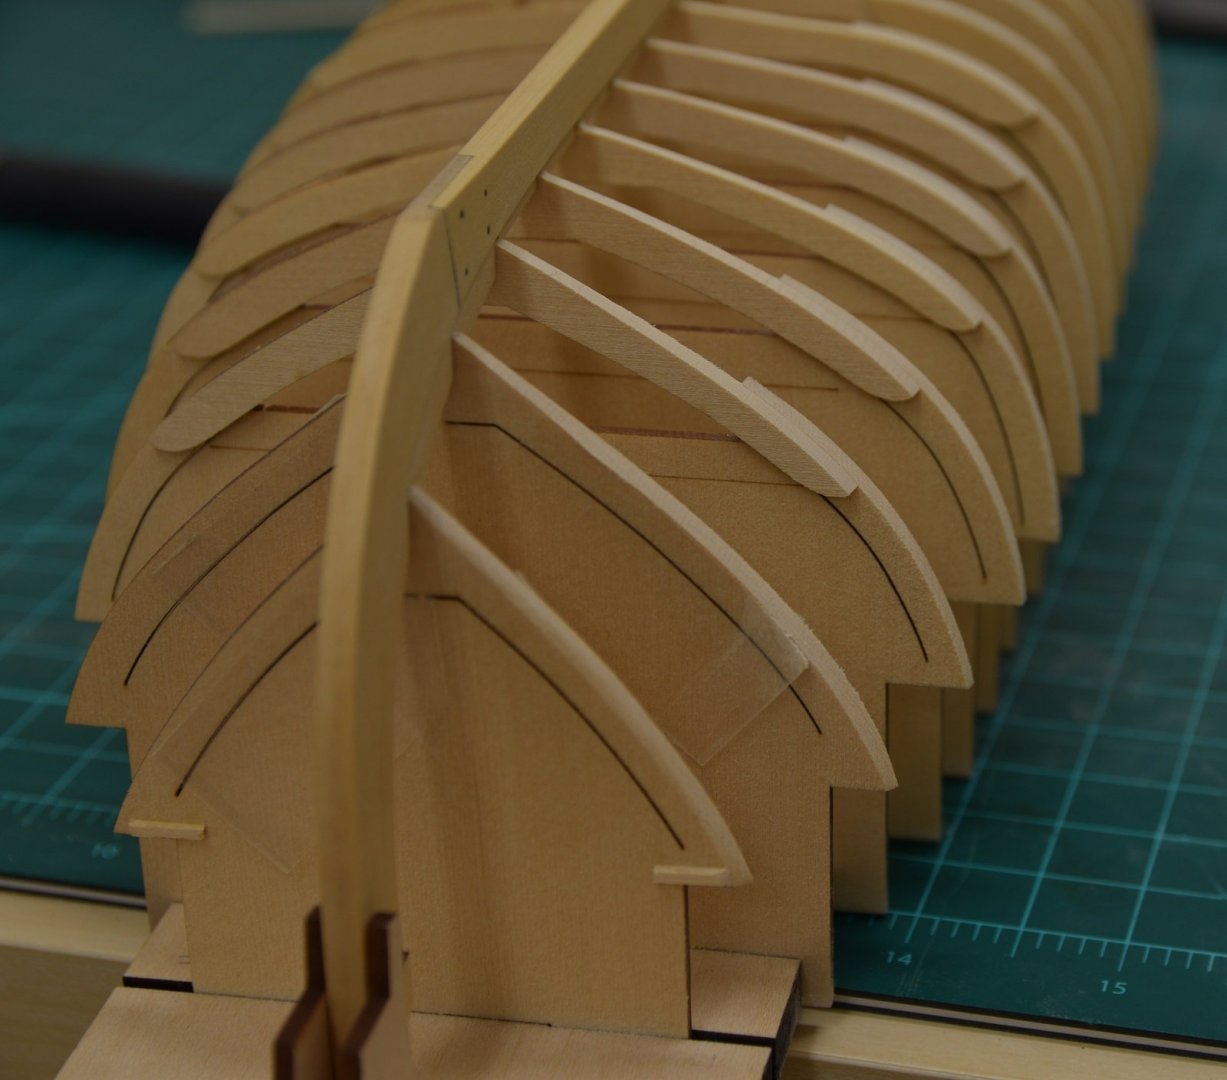
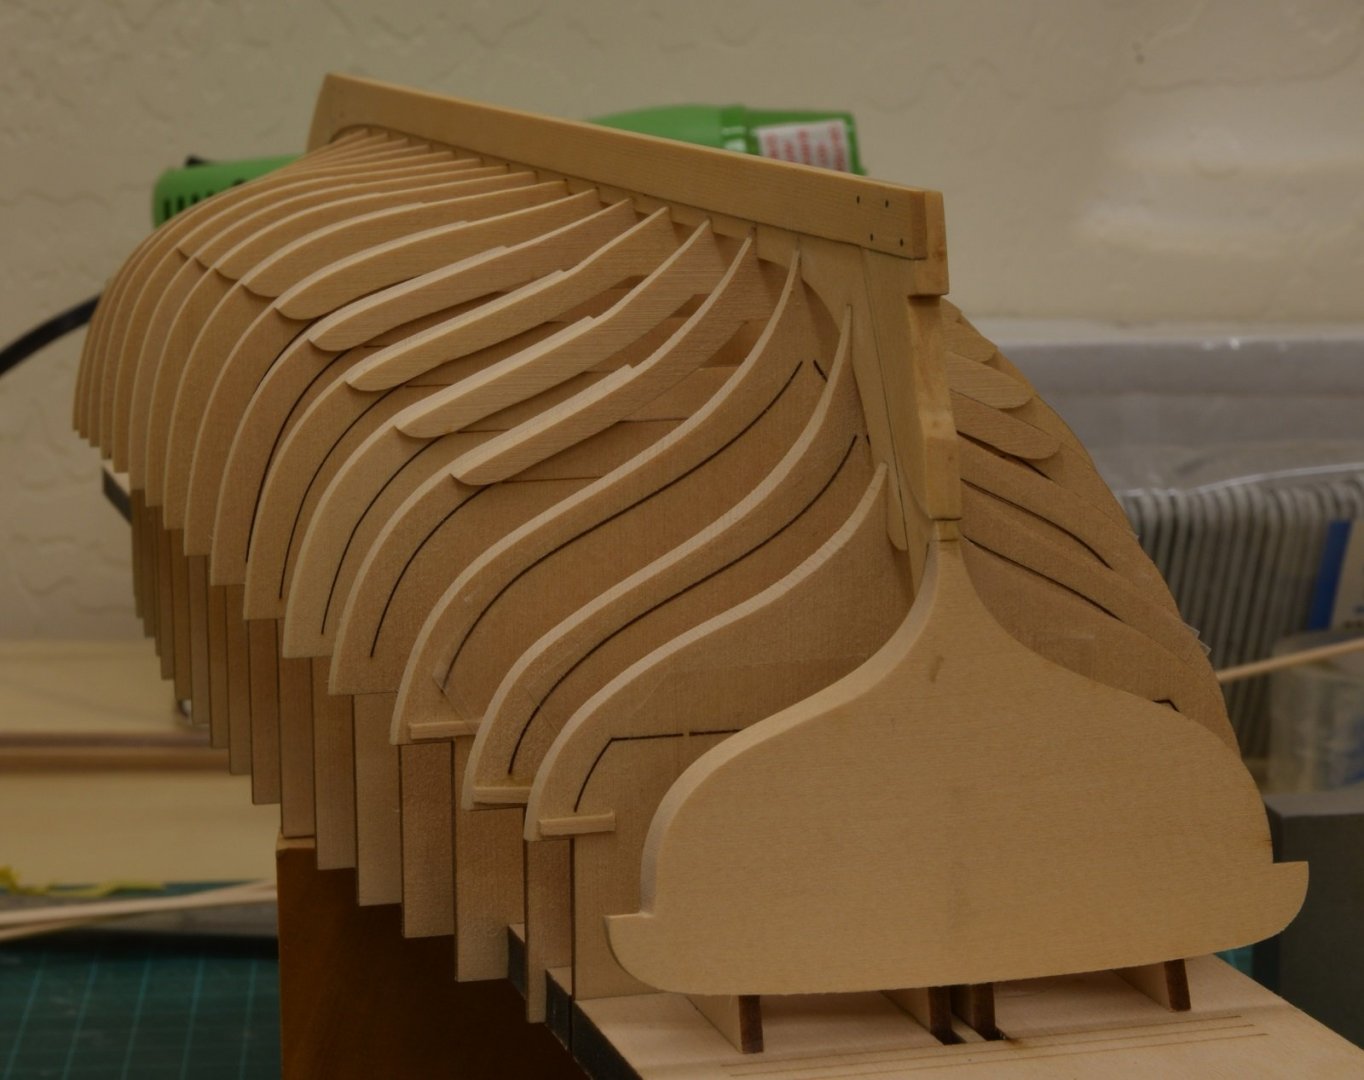
Next step is the gluing of the frames to the keel. Per the instructions I started with the aft building board, and dry fit repeatedly until I was comfortable with being able to get it all together in a reasonable period of time with the least amount of fuss. It was then left to dry overnight. After work the following day, I glued up the front frame half of the building board, and left the entire glued up frames to dry. The awesome fun part comes after this, fairing the frames. Over a couple of nights interrupted by an attempted insurrection that kept me glued to live news for far too long, I completed the fairing of the starboard side earlier this evening. Since I actually did one side completely it seemed like a cool idea to take some pictures that showed the difference between a faired and unfaired side. And that's where the longboat currently sits progress wise. I have plans that will not allow much time on fairing until Sunday, so unlikely that I'll have an update until after that. Cheers!


-
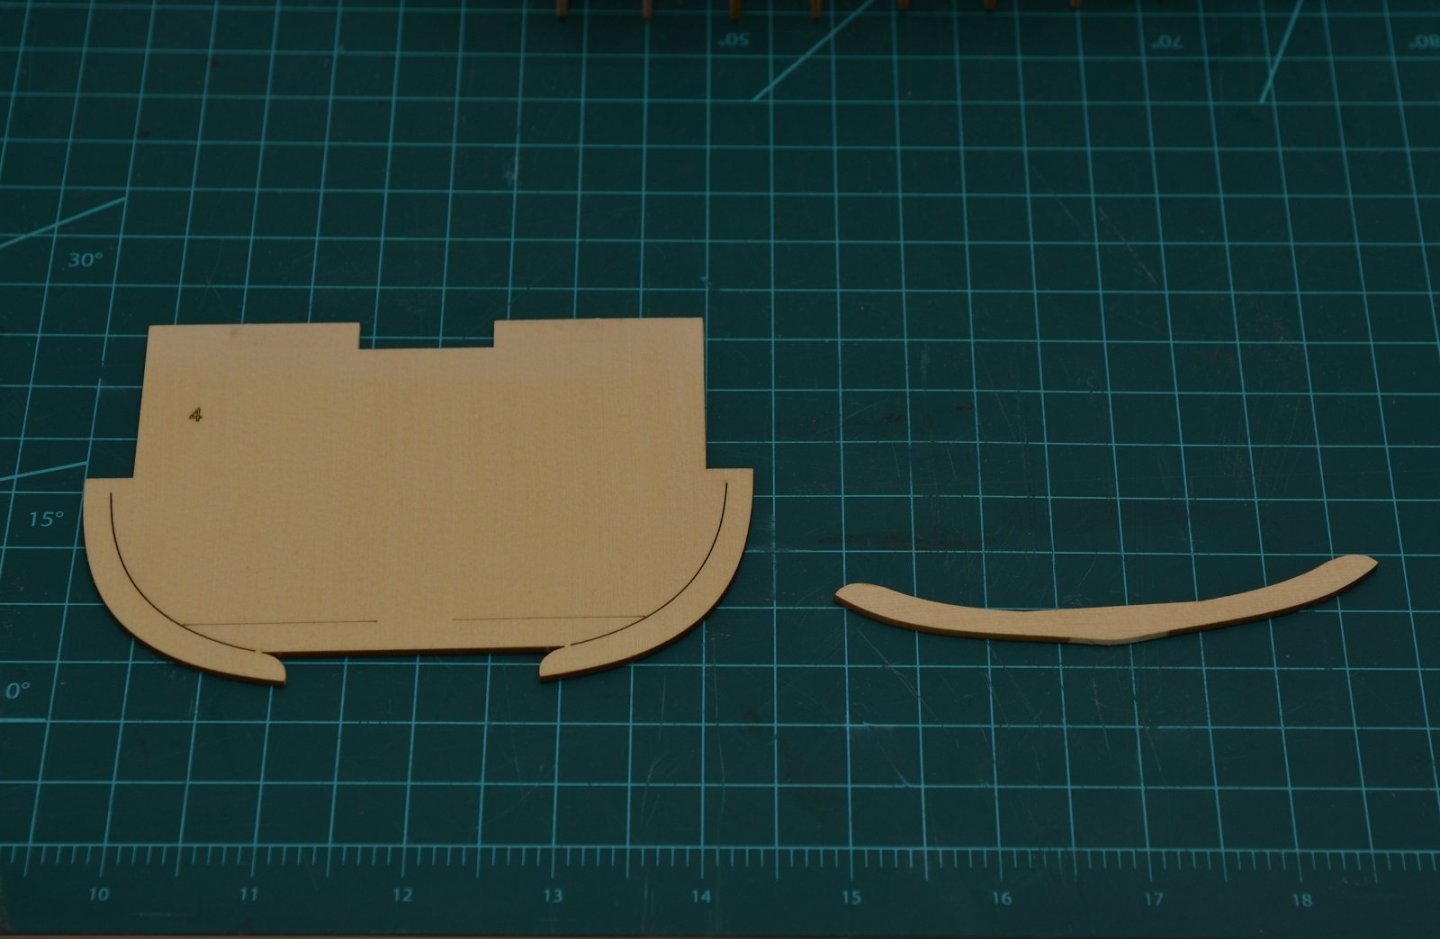
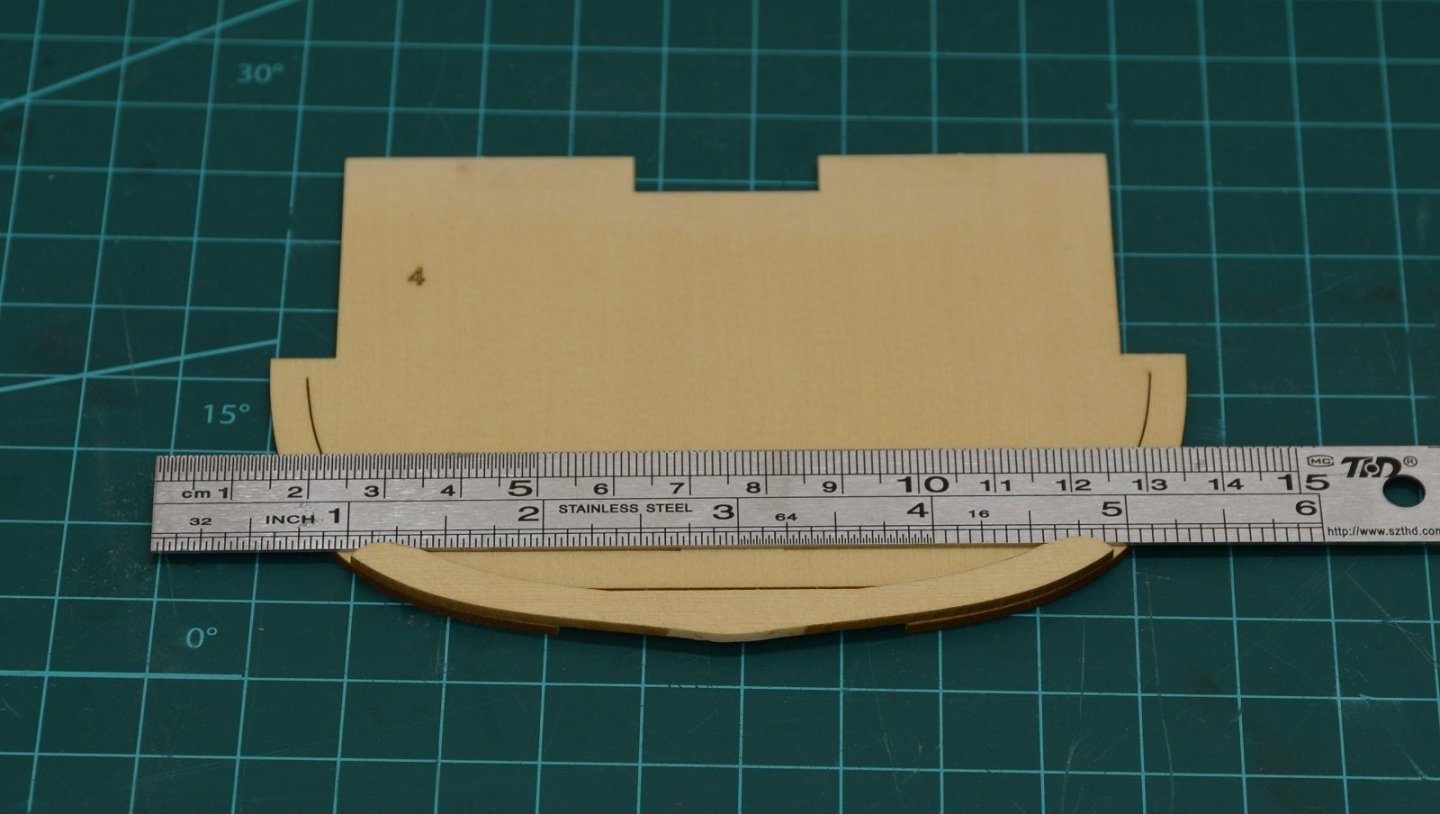
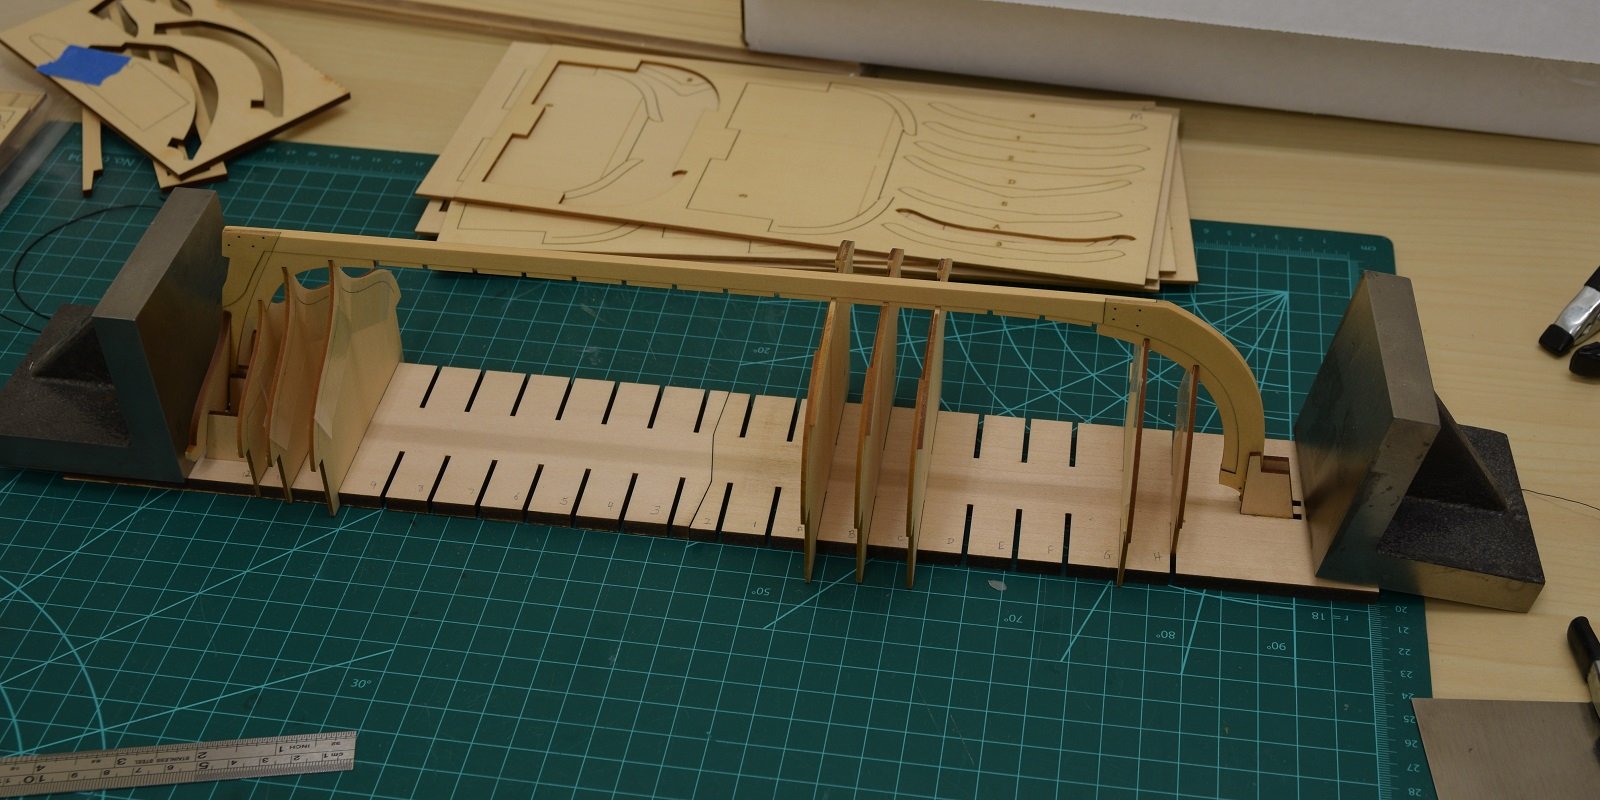
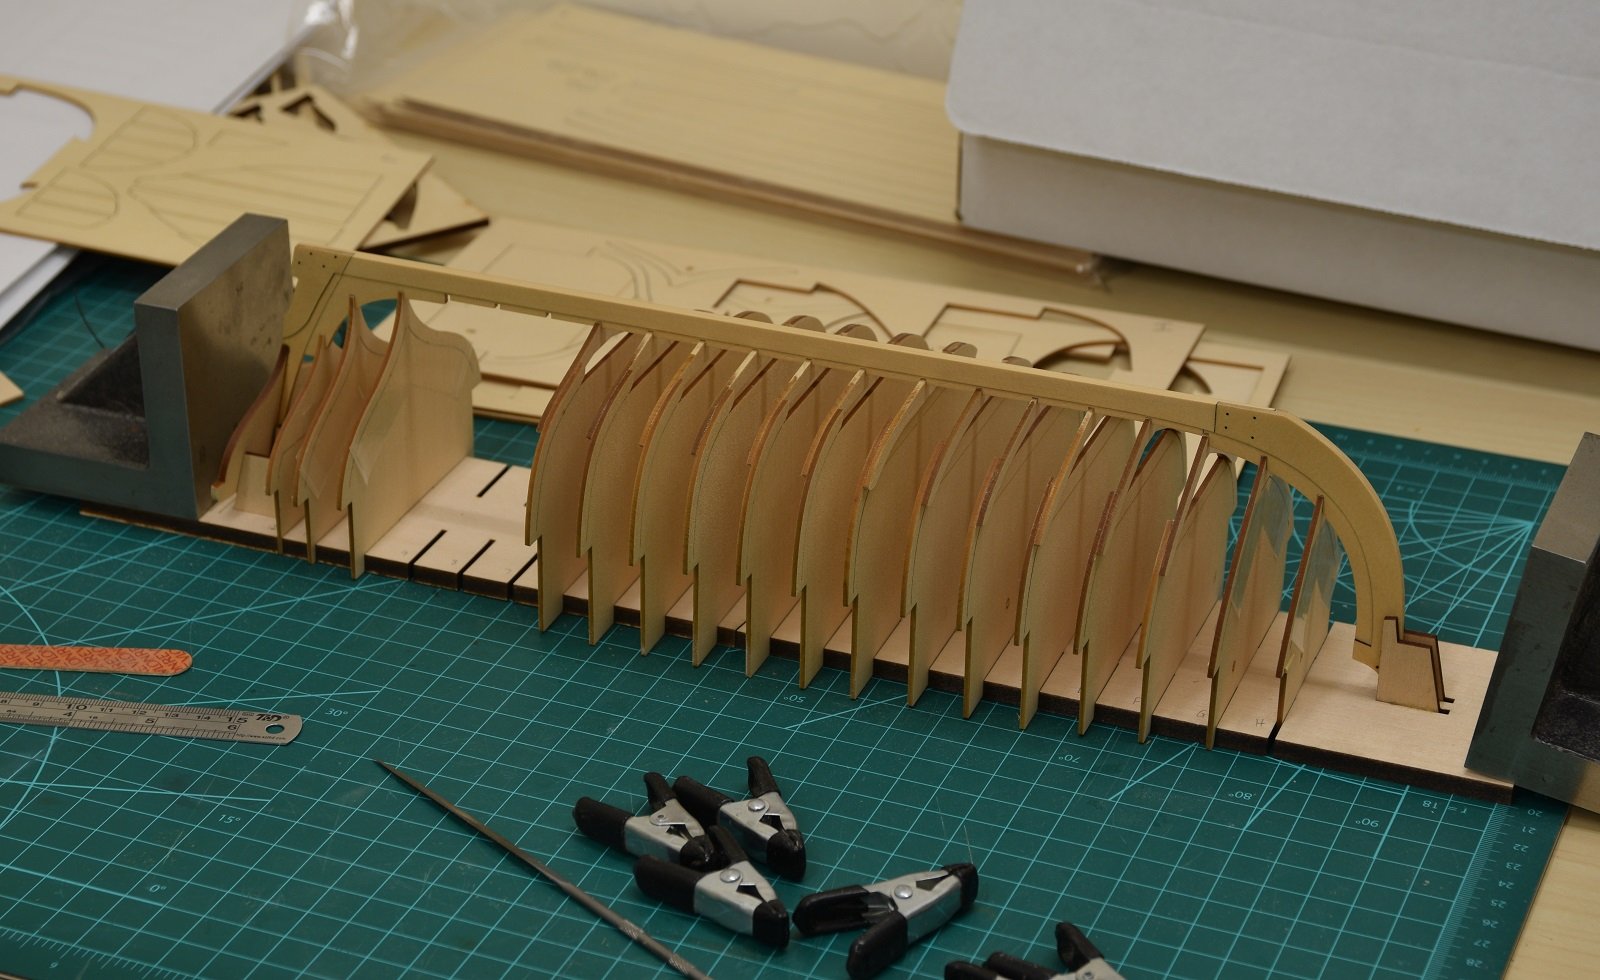
So after posting the above about this model being packed away, I completed most of the immediate preparation for my big scratch build I plan to start, and found myself with a sudden desire to get back into the shop. It will probably be at least another couple of months before I have everything I want in place to start the scratch build, so I made a few different clamps as prototypes, then for whatever reason since Chuck had posted and brought this back up from the grave after 2 years, I pulled it off the shelf and have continued the build. If I don't finish it before starting the big project, I'll try to keep it out and work on it from time to time. In any case, lets post an update! I've made a bit of progress as I didn't want to post an update and then immediately shelve it again, so this will be a fair bit of progress plopped into one post. First up, of course I needed to build the 3 piece frames, as none of them had been assembled yet. As seen in many other build logs, the assembly of these frames is very straightforward thanks to the design of this kit with the laser guide line. Cut out the pieces (1 frame at a time), clean off the char from the few areas needed per the instructions, and use a straight edge and the laser cut guide line to locate the floor. Glue up, clean up any extra glue and clamp to set. After this of course you just continue assembling frames and dry fitting them into the build board and keel. Slight sanding needed for fitment, otherwise no issues at all. I assembled the frames and fit them 3 at a time until they were all complete. Continued next post...