


GuntherMT
-
Posts
2,213 -
Joined
-
Last visited
Content Type
Profiles
Forums
Gallery
Events
Posts posted by GuntherMT
-
-
Good to see this moving forward. If I can help you with anything don't hesitate to ask. I've probably got quite a lot of photo's that I didn't post in the log, so if you are having problems with something I could very well have a picture that might (or might not) be helpful.
-
I've never done a solid hull, but Model Shipways (Model Expo) allows you to freely download the instructions for their kits in .pdf format. The solid hull kit "Sultana" has a practicum as well.
Follow this link - http://www.modelexpo-online.com/product.asp?ITEMNO=MS2016
Under the photo's, there are some tabs - click on the "Documents" tab, and you'll find the instructions and practicum chapters.
Good luck!
-
Thanks all. Was a pretty good weekend, even though I had to work about 9 hours today on a Sunday.
I finished the replacement spirketing plank, and it came out pretty good, and I think I got the scupper shaping even better on this one, so all's well that ends well.

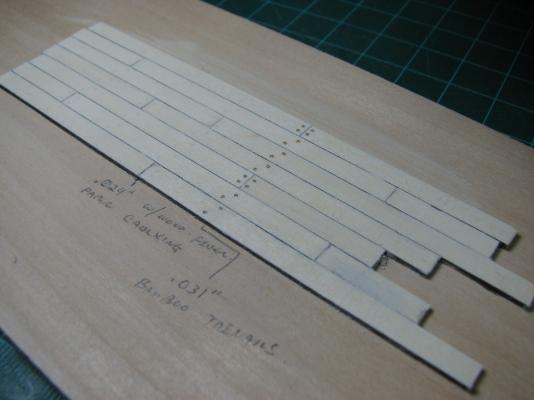
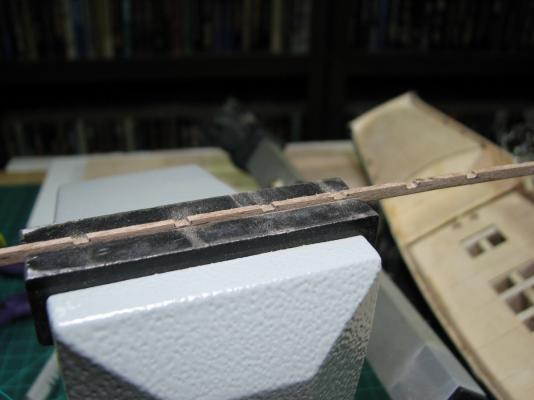
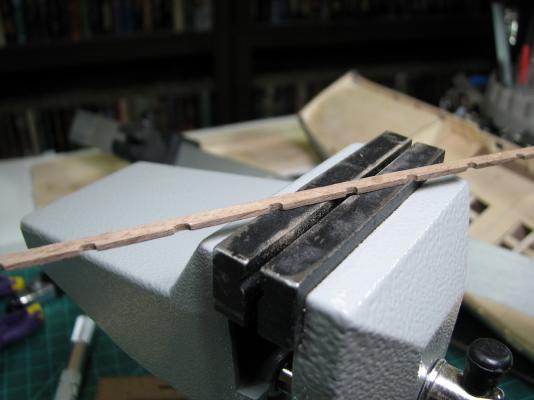
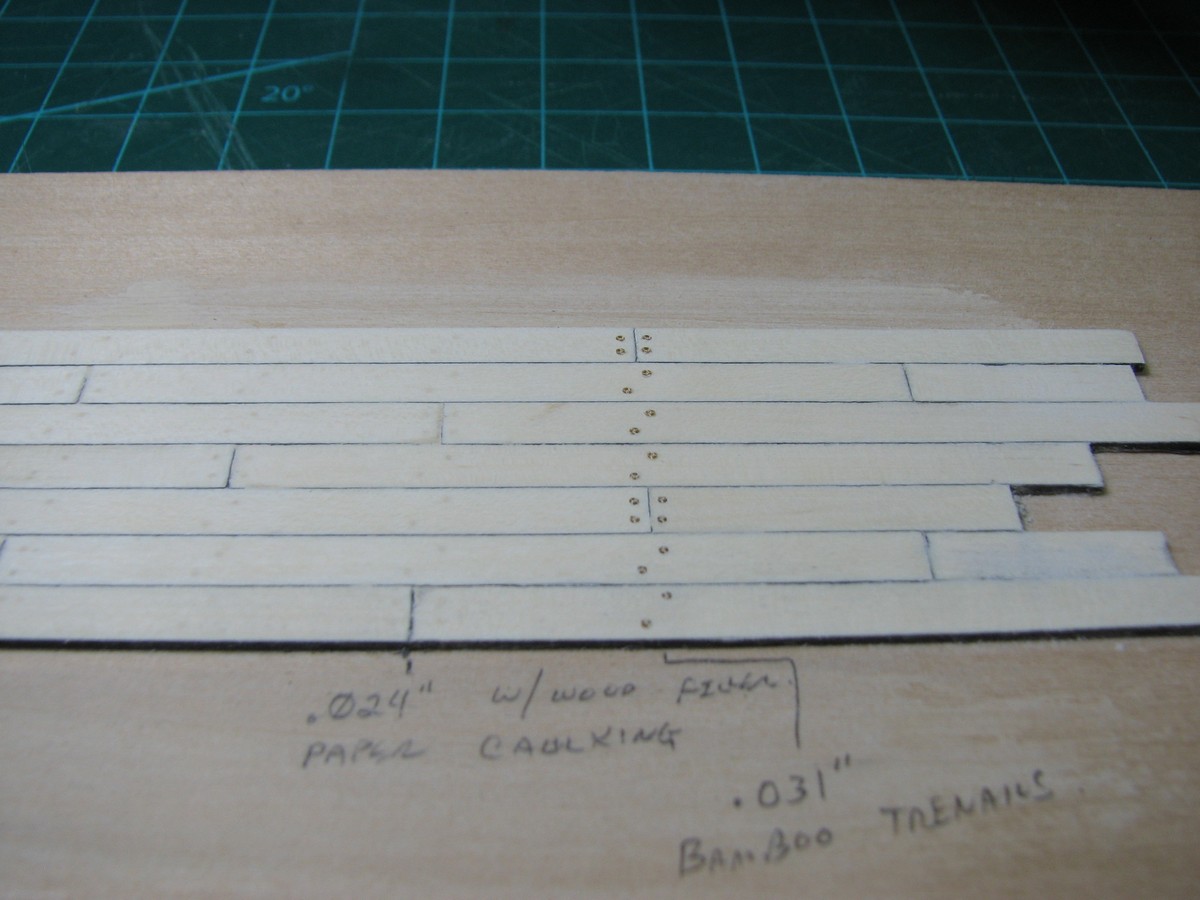
I got sidetracked (shocking, I know) and played with the holly planking sample again. I drilled out one of the lines of tree nail locations to .031" and made some bamboo tree nails and placed them.
I'm glad I tried this, but they stand out way too much, so I won't be using them on this deck. For a darker deck, like boxwood, these might work ok, but I'm not sure I like the dark 'spots' they seem to have, so I'll try using some regular wood of some kind next.

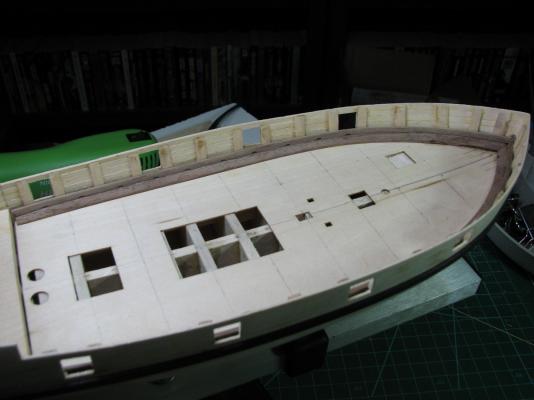
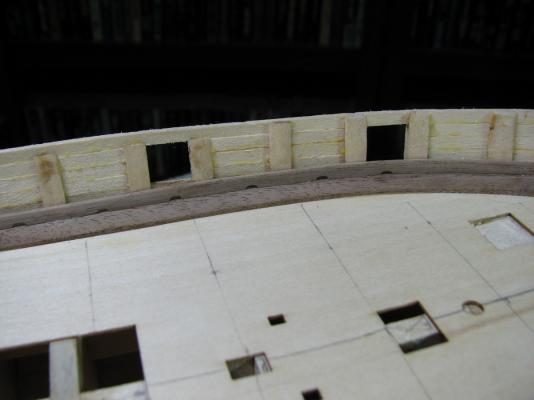
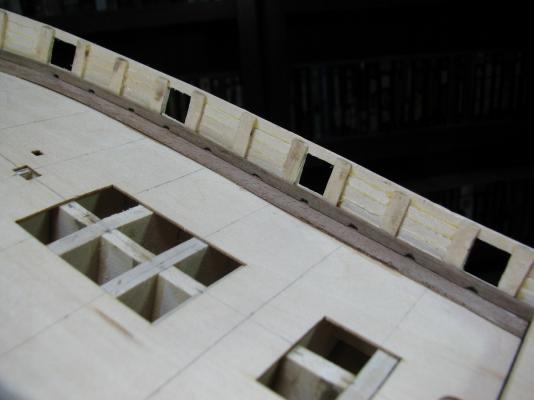
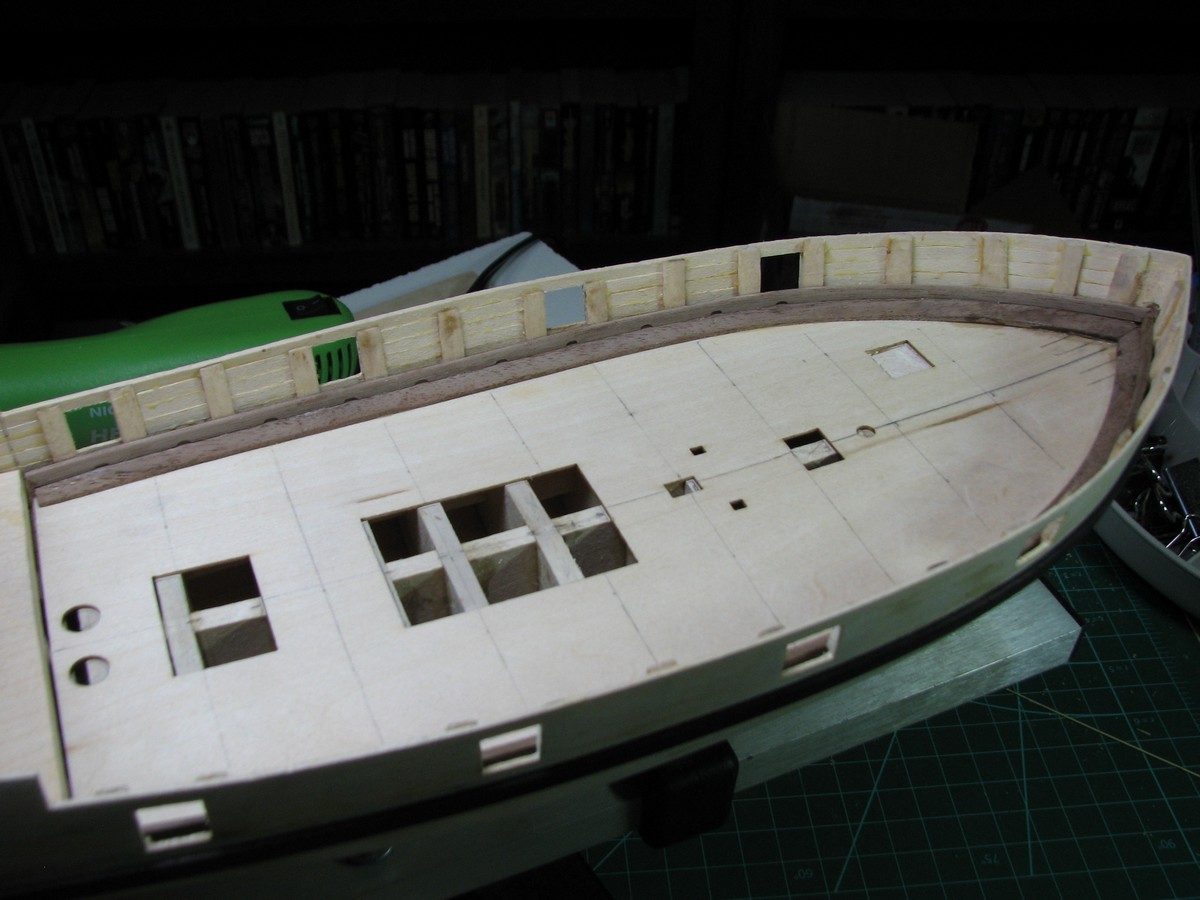
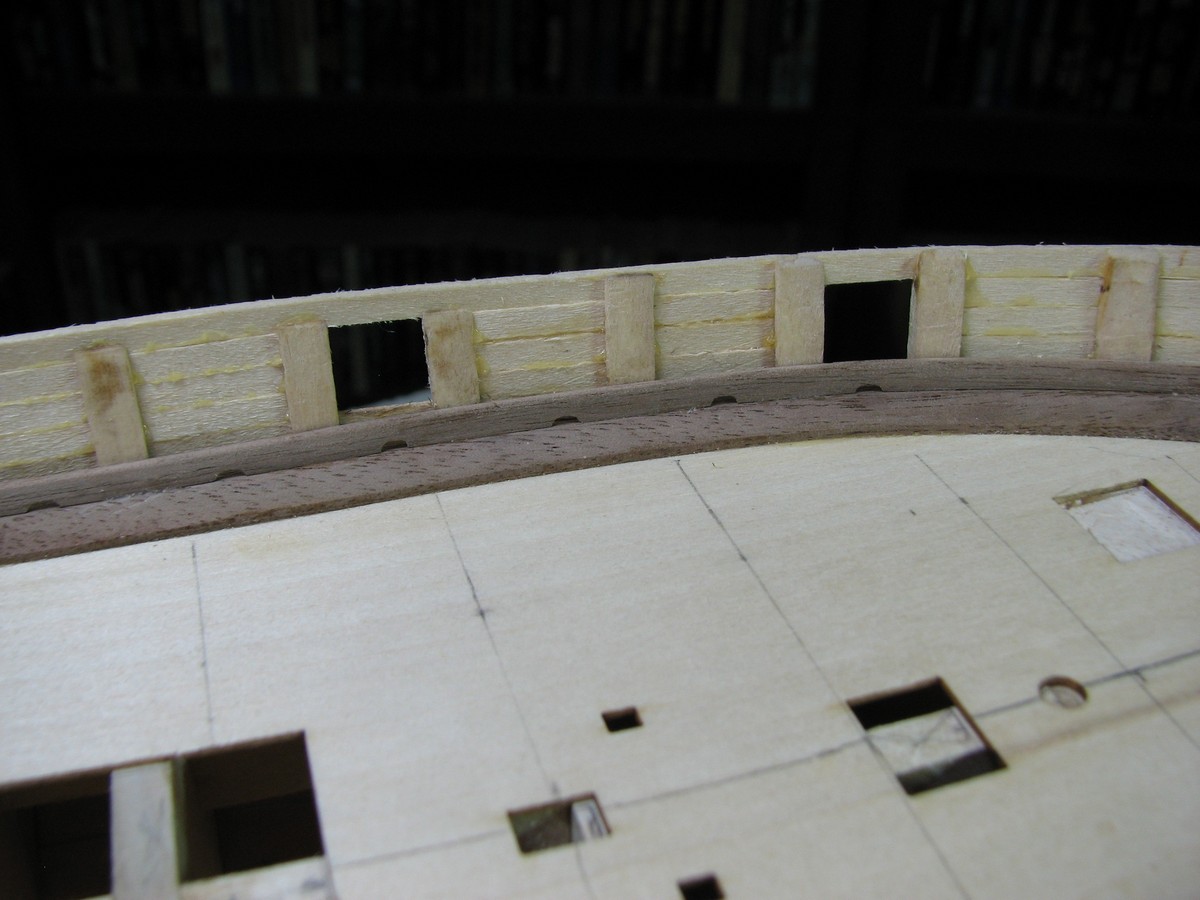
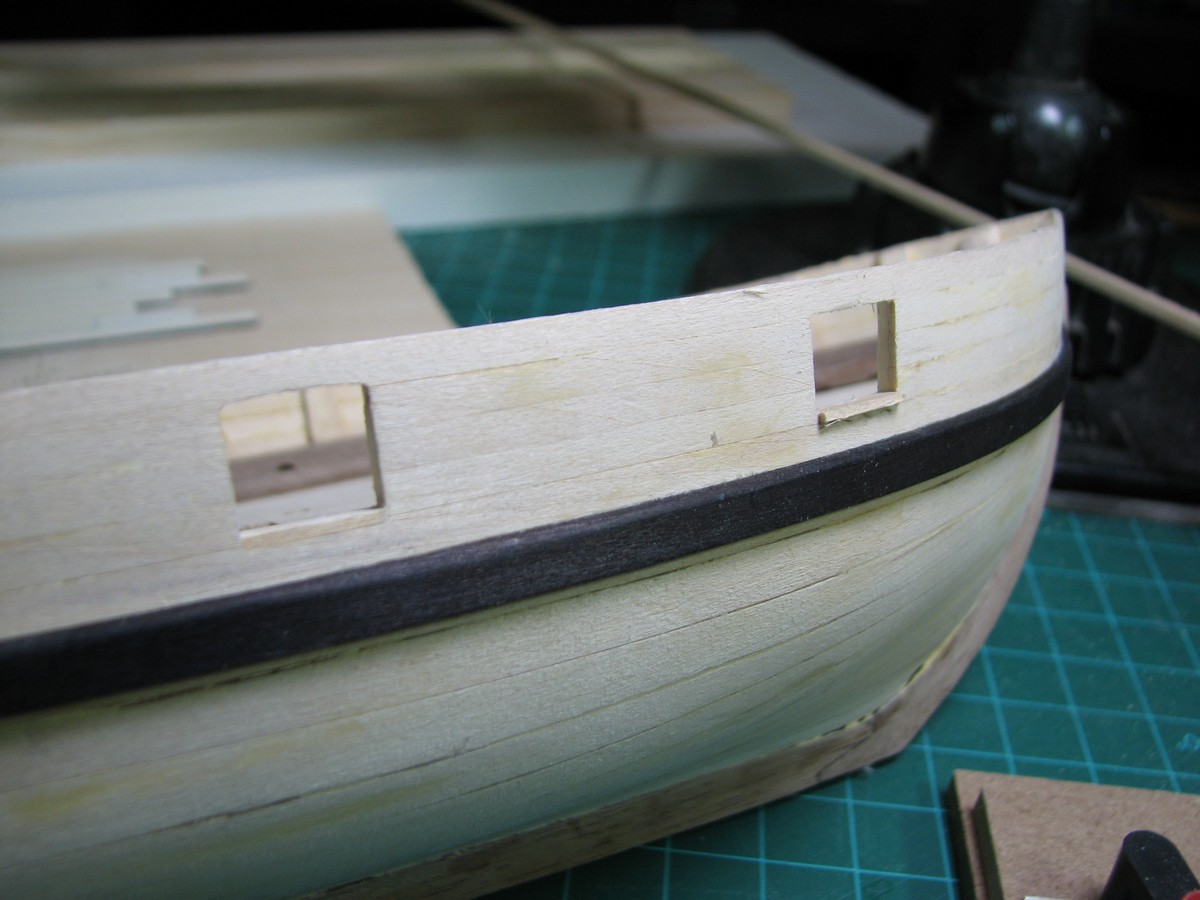
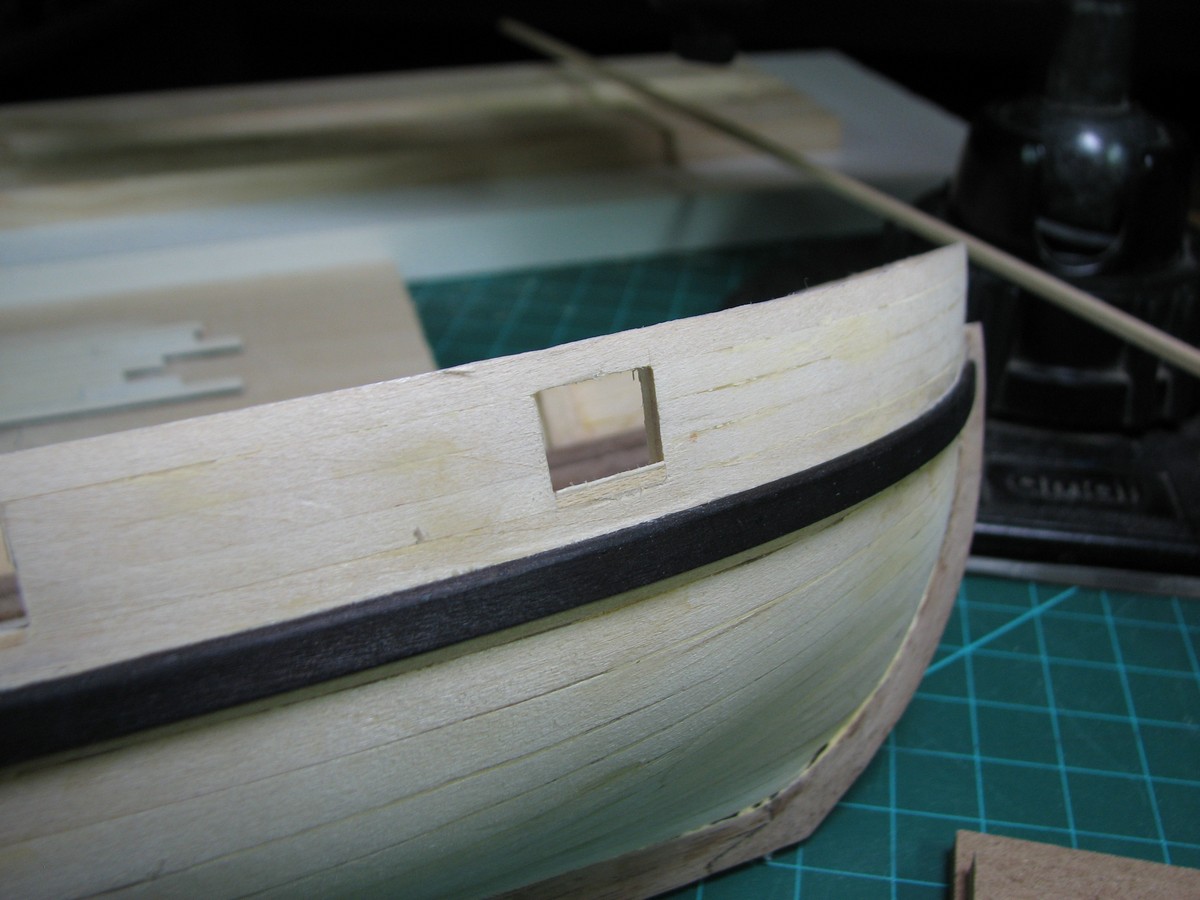
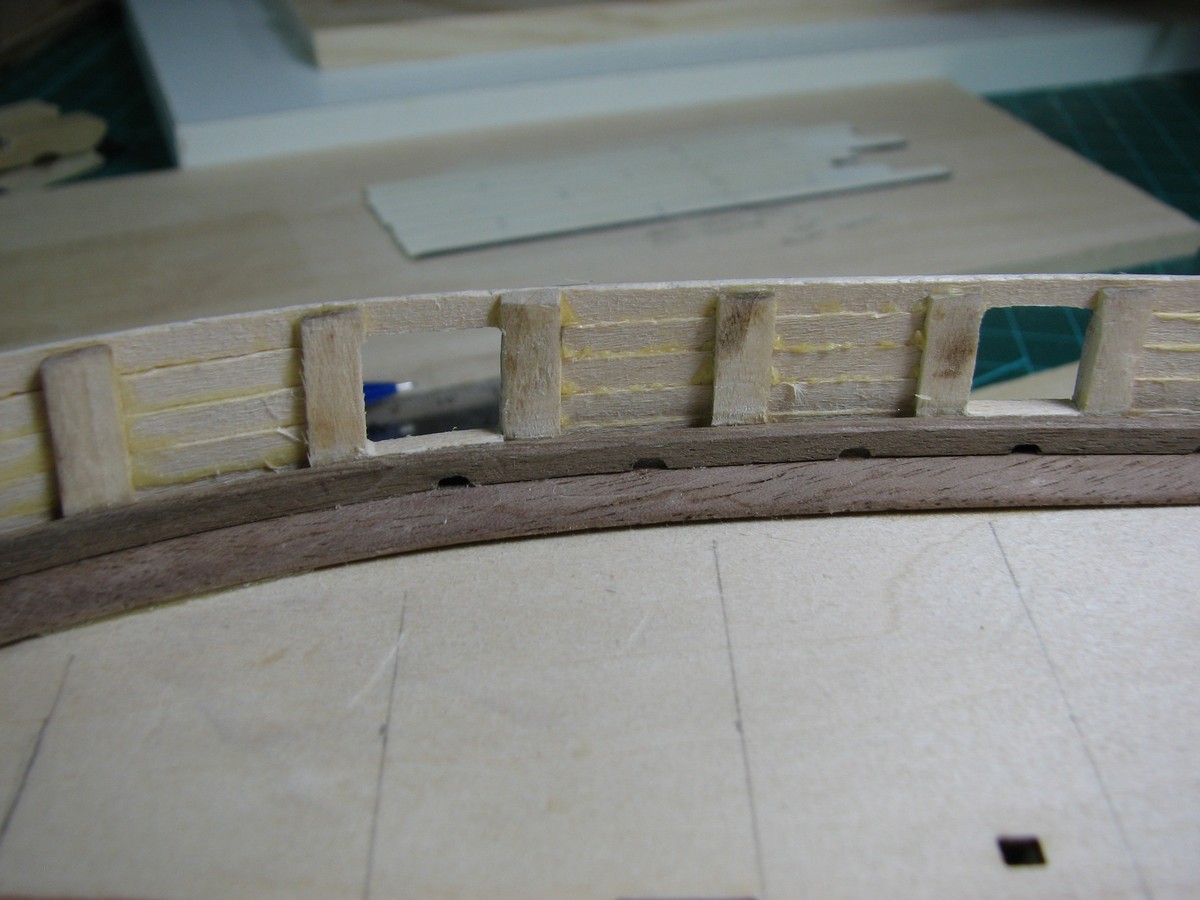
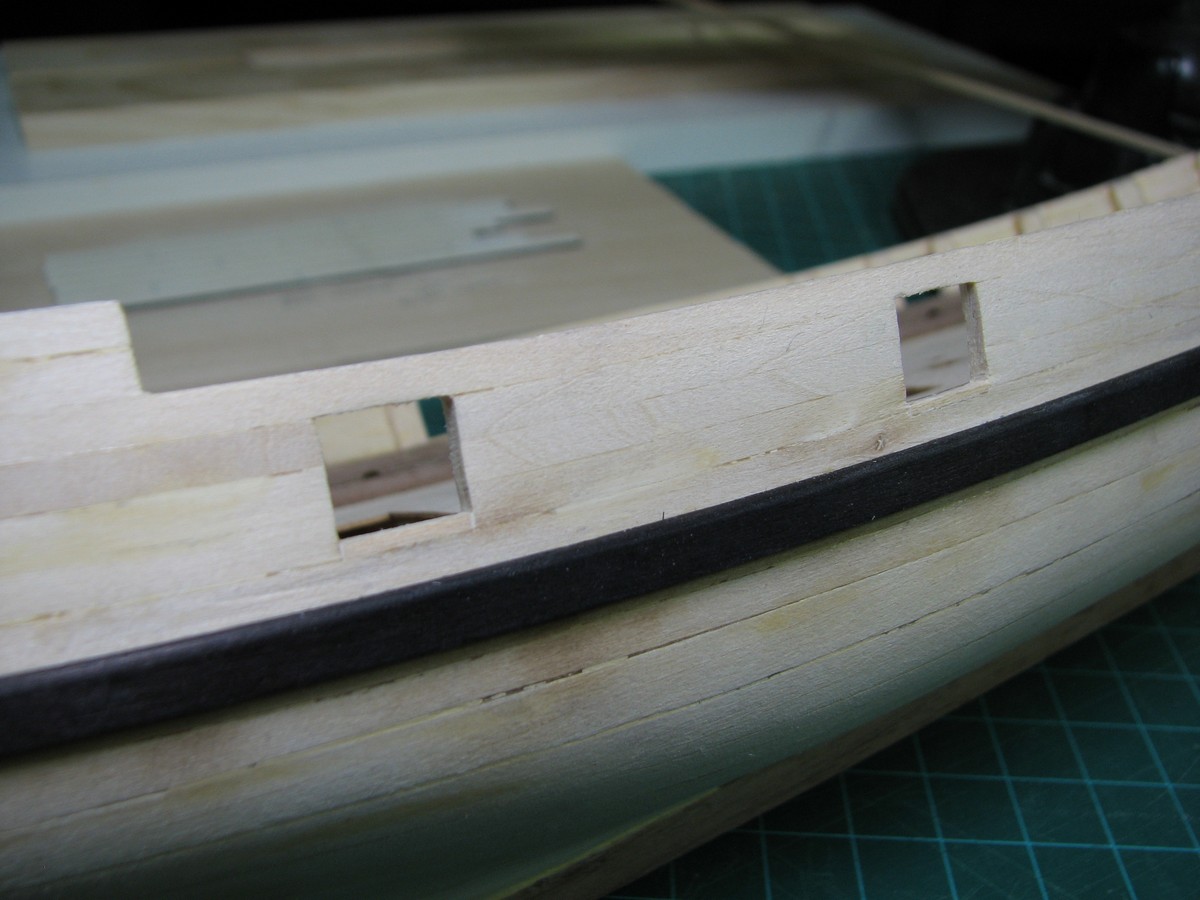
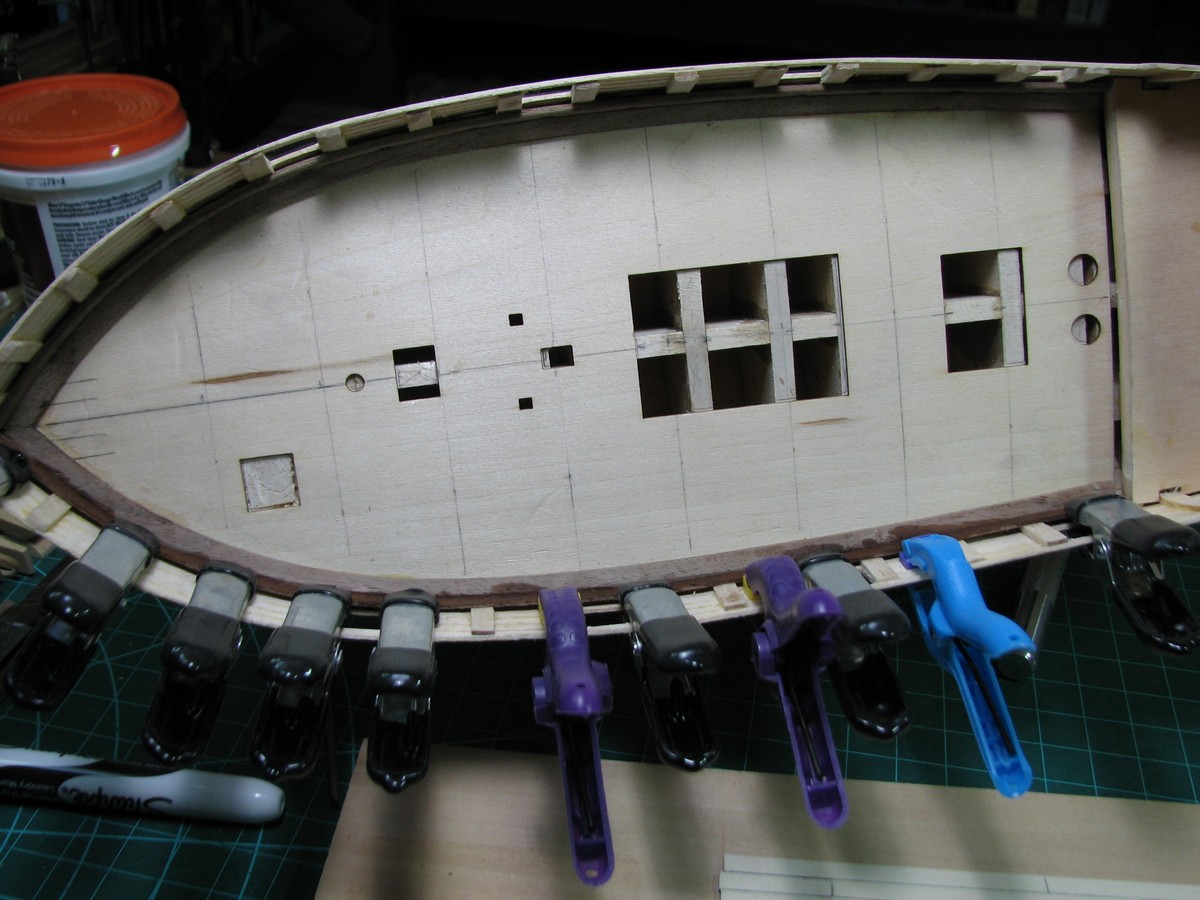
Next up was gun port sills. When I got to the point of doing this, I realized that at some point in the build I've managed to screw up, probably way back at the deck fairing, as the spirketing plank is not at an even height along all the gunports. In one case it's very far off and I'm not really sure what I'm going to do about it. The starboard side wasn't nearly as bad as the port, so I started on the sills there. I decided that I could use the sills themselves to 'fix' the problem with the spirketing plank not matching up to the gunports correctly, by installing the sills to the outside of the outer planking instead of just installing them between the outer planks and the spirketing plank like you are supposed to.
I began by taking a 1/8" x 3/32" piece of basswood and cutting it to the proper width for each gunport, and then using small files, shaping the piece into an "L" shape to fit into the gap between the two layers of planking while also extending outside of the outer layer of planking.
Once placed, the sill is both too high, extending above the spirketing plank, and too wide, extending outside of the outer plank layer.

I then filed/sanded the outside down to match the outside planking layer, so that it's the right width, but still too high.

Then, I filed the sill down to match the top of the spirketing plank, leaving it fit to the port, and making the top of the spirketing plank even with the outside planking.
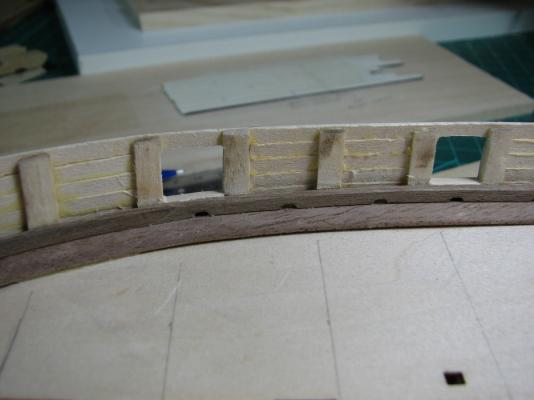
Did this for all 4 ports on the starboard side.

As none of the ports on the starboard side are terribly out of alignment with the top of the spirketing plank, this worked out quite well, but the port side is worse, so I'm going to have to think about what is going to happen on that side to even things out. One port in particular is low (or the plank is high) by 1/2 the height of the spirketing plank (so about 1/16"). I may be able to lower the spirketing plank a little bit by sanding it down to take up part of this discrepancy, and sort of blend it in well enough that it won't be noticed later.
-
Well, I got on Model Expo and tried several different codes I had found (before I got usedtosail's post) and none of them worked. So, I ended up pulling the trigger somewhere else and paid right at $400 shipped. Should be here around Nov. 7th.
For future reference, Model Expo's web site is terrible at showing the prices until the very last step where you are confirming everything after putting in your payment method, as that is where they apply the discount.
On the main page, when you click on the "Specials" section, it currently shows the Connie at $299 still and gives the code to use when you land on that screen. So you can apply the code at any step in the process, but the discount only applies right at the end.
- GLakie and Starboard III
-
 2
2
-
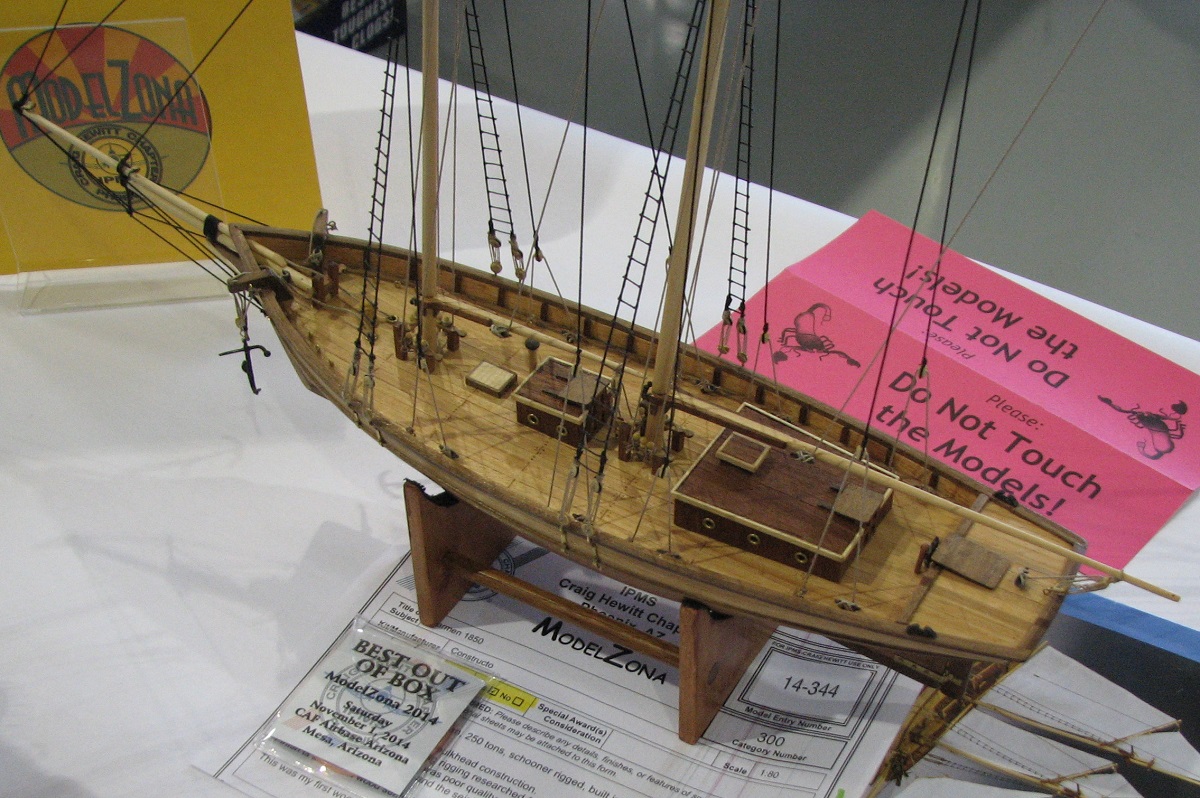
Thanks everyone. I created a Flickr album of all the ships that were entered into the contest, and you can look at them if you are interested here: https://www.flickr.com/photos/128316399@N05/sets/72157649024073426/
All of these are plastic (except for the Carmen). The other sailing ship was made by someone who actually reads this forum, although I don't remember his handle here as I'm terrible with names. His ship took 2nd place in the non-out of box ships. The little tiny ship took first place, which befuddles me.
- themadchemist, drtrap, egkb and 2 others
-
5
-
So today was a pretty good day. The model show was fantastic. So much amazing skill on display, and the venue was just as good, with some awesome warbirds on display. I took 470+ photo's.
I got a very nice surprise at the end of the day.


To be fair, there wasn't much competition for out of the box, but it made me happy anyway.
- Ol' Pine Tar, NMBROOK, canoe21 and 10 others
-
13
-
I envy those of you that have local clubs. Such a great resource. For both help and friendship.
The club just started and at the moment it's 6 of us. I'm the young whippersnapper of the group and the only one with a real job, the rest are all slackers without any visible means of support.

If I had found all four pieces of the plank when I first tried to glue it then it might have come out ok, but after I had already glued the wrong pieces together and broke them again, I didn't try to fit in that 'lost' piece when I found it since I'd sanded the bad glue section to make it smooth and in the process had made it quite a bit thinner than it started out. Another round of gluing and sanding would have just been too much I think, so I tossed it at that point and made a new piece. I fitted it last night actually, and it came out very good, possibly even better than the first one, and I managed to do it without breaking it, so that's a plus!
I'm heading to a model show today (which is where I expect to see Frank). This will be the first model show I've ever been to, and I think I'm going to stop by the office and grab the Carmen and enter the show just to see how that entire process works (it only costs $4 to enter a model, so hey, why not), and what sort of things the judges look for and comment on, etc. I figure it will be a learning experience. As a bonus the show is held inside the CAF museum hanger, so I'll get to see some cool warbirds at the same time!
- egkb, riverboat and themadchemist
-
3
-
Thanks Frank - I'll chat with you tomorrow, I may come by after you get back from vacation and take you up on that for getting the cherry planks to size for the aft deck.

-
that's cool of them. wish AL would replace the ply pieces for these old kits. stuff just falls apart in your hands.
If you look back near the beginning of this log, I had a mis-cut bulkhead. I submitted an inquiry through the MS customer service form/link thing on a Sunday night. The following day (Monday) they responded and said they would replace it. The following Monday I received a brand new bulkhead sheet (not just the bad bulkhead).
---------
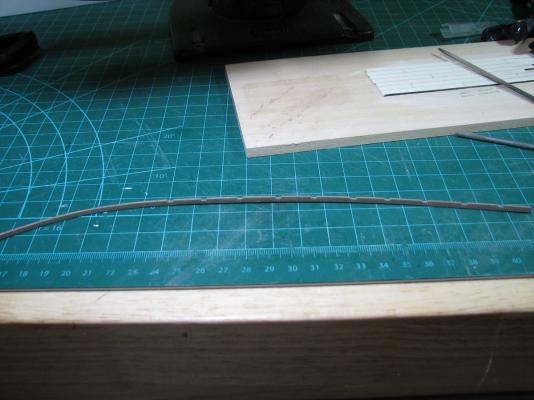
So I figured out why the spirketing plank break looked weird/wrong where my glue repair failed. When I was measuring a new one, by laying the old broken parts on it, I came up way short, so I started looking around, and realized that the first plank didn't break into 3 parts, it broke into 4 parts and the last piece was shot across the room. In any case, I cut out a new piece and it's soaking now. I probably should have cut the scuppers before the wetting bending, but I sort of forgot, so I'll do it tomorrow night.
-
Yes Keith, they did a great job replacing the mis-cut bulkhead. If I figure out that I need this wood later I'll drop them a note.
-
So I got home and unclamped it, and as I feared the 'odd' break didn't glue very well. I went ahead and sanded it down smooth at both breaks, but the odd break ended up with a slight kink, and as soon as I tried to test fit the plank it snapped at that break again, so I'll have to fashion a new piece. This isn't a huge deal, except that the kit doesn't actually supply the walnut I'm using for this purpose, the plans show a different size of walnut, so I'm afraid that I'm going to now be short three pieces of this walnut I'm using for something else. It might actually be the poop deck planking walnut, in which case it's probably not a huge deal, as I'm seriously considering planking that deck (more of a roof really) with cherry.
Oh well, I'll deal with that hurdle when I come to it.
-
I haven't got the faintest idea Dale. The black is some kind of a coating, and when you cut the wire the end shows the copper, so I assume you could solder it, but the black coating probably wouldn't do well in the area of the solder, but since I haven't gotten into the soldering part of this hobby yet, I don't know.
According to this page - http://www.firemountaingems.com/shop/zebra-wire it's made by using 7 coats of a colored enamel.
-
Keith - I did glue and clamp it. I won't know until after work this evening if it's useable. One of the breaks was quite clean and I think will be fine, but the other did something really strange, not even sure how to describe it, but the pieces didn't fit together at all, so I'm not sure how it will come out.
David - I guess it's times like this that I pay for not drinking!
-
Alistair certainly set a high bar for first builds with this one. It's really not fair at all.

- aliluke and themadchemist
-
2
-
Brian,
I had a look at that web site. I think I will order a bunch from them myself. I like that the wire is already black.
I certainly can't promise the same service, since I only have the single point of reference, but when I ordered my wire I just ordered it with whatever the standard shipping was. They shipped it the next morning, and I had it 2 days after I placed the order.
-
I have had a hard time locating spools of wire locally where I live, to augment what comes in kits. It seems that often the wire / rigging is never enough.
- Tim
Tim - for just a few dollars a spool, I just got one spool of every size from 18 guage to 30 guage from here:
I figure I'll never need to search for black wire again except for specific uses that require something harder possibly.
-
-
-
Thanks for the kind words.
So last night I clamped the piece for the port spirketing plank in place and kept is soaked for a couple hours, and then this morning before leaving for work I wet it again. This evening I worked late, but wanted to finish this plank, so I marked the scupper locations and unclamped it, and it held shape beautifully, so I went ahead and clamped it in the vice and cut all the scuppers in and shaped them. I then added the beveling and rounded the upper inside edge and sanded everything and it looked really good. I test fit and it dropped into place perfectly, so much so that only one spot even needed a clamp to hold it against the waterway. Woo!
So I pulled it out, and being the nit-picky person I am got out the 320 grit sandpaper for one final sanding to get the finish perfect before gluing in place. Just as I was about done, the sandpaper 'caught' on one of the scuppers, and....

Welp..

Oh well, I'll cut a new piece tomorrow and start over on this one.
-
Thanks for the feedback gents. I hope to not need anything like 'filler' for gaps in the deck, I was only using filler to plug the tree nail holes to simulate them.
Treenails are one of those things that I think are something everyone will have a different opinion on as far as visibility goes. While the photos from Keith show treenails that are all but invisible, there are photos from the Endeavor in Australia that show the exact opposite:
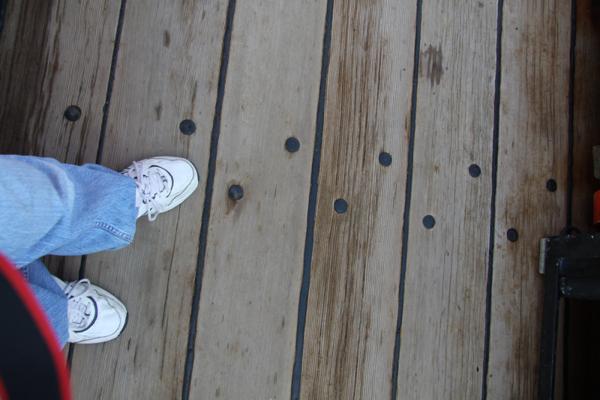
While I don't want glaring black treenails, I think I want somewhere in the middle. I may use this exact same method, but simply use larger holes, as I think that would come close to the visibility seen on Dubz Syren, which I find visually quite appealing. While they aren't high contrast with the deck, they do add a detail that I think really makes the overall effect striking.
As for the Holly, both Holly and Boxwood are incredibly nice woods that I really like. Since the spirketing planks are going to be painted, I almost made them out of Boxwood, but I ended up using the Walnut out of laziness, as the correct size was already cut for me.
Jeff was kind enough to send a few extra pieces that he probably ended up with after cutting my planks that are less than full length with a rough end, so I chopped up a couple of those for my fake deck sample. The lengths of the individual planks are obviously cut way too short to get the butt-shift pattern visible on such a small sample to play with the look.
Depending on what sort of look I'm going for, I may use Boxwood for deck planking in future builds, if I want a more muted tone.
Off to work, thanks again for the feedback gentlemen, I value your opinions and ideas as I progress further into this hobby. Have a great day!
Edit: Forgot to include - the photo above is from this post by hornet - http://modelshipworld.com/index.php/topic/8317-to-treenail-or-not-to-treenail/?p=246825
- hornet, Ol' Pine Tar, NMBROOK and 1 other
-
4
-
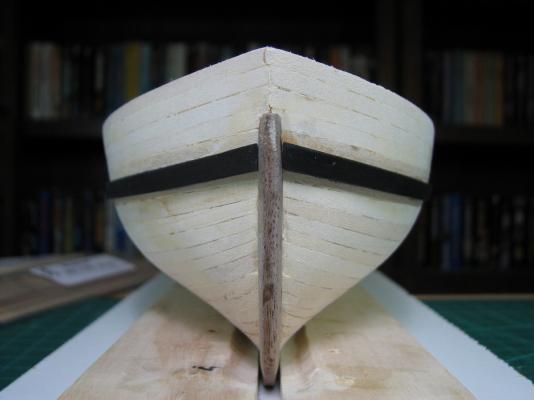
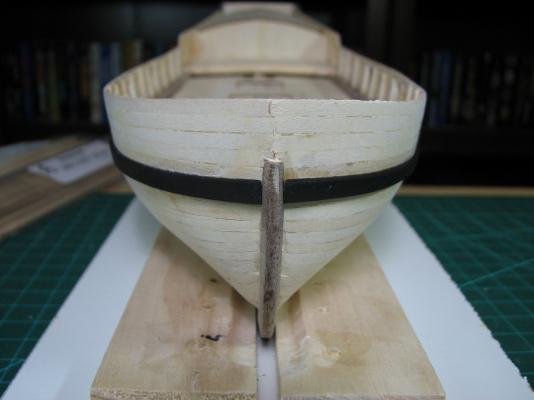
A little bit of progress. Moving quite slowly at the moment between work and some car trouble I just haven't spent much time working on the ship.
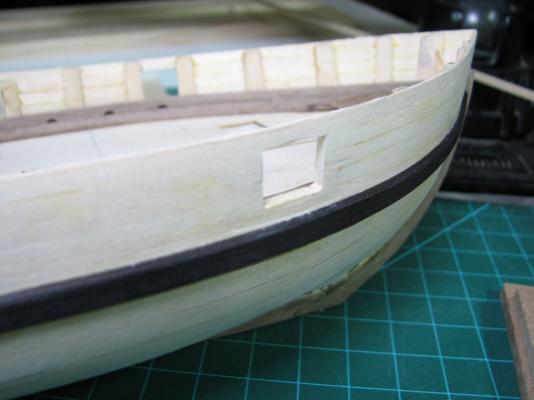
I got the second wale on, and only after editing the pictures to post here did I see the gap I left at the stem. Close up photo's are the harshest critic. I used a batch resizer for this group of photo's, so hopefully they come out at least reasonably close to the previous photo's for quality.
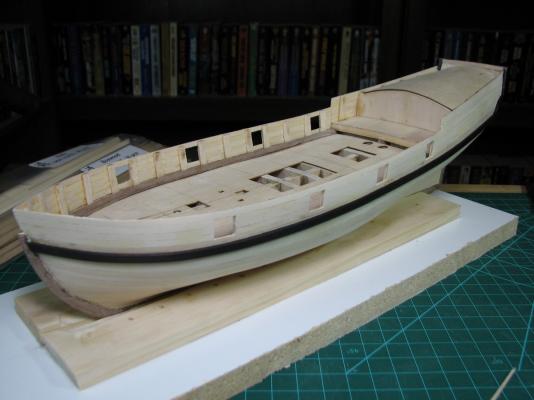
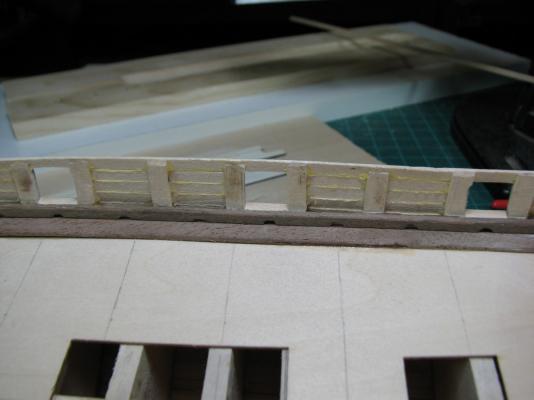
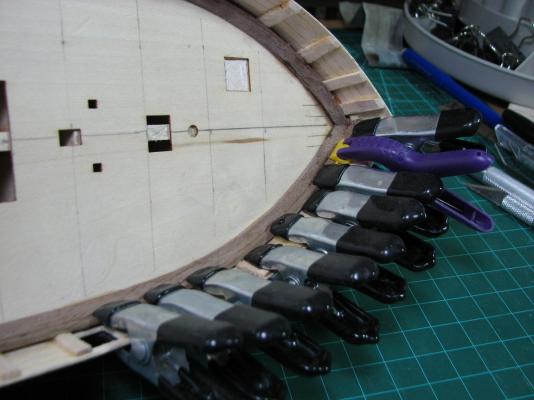
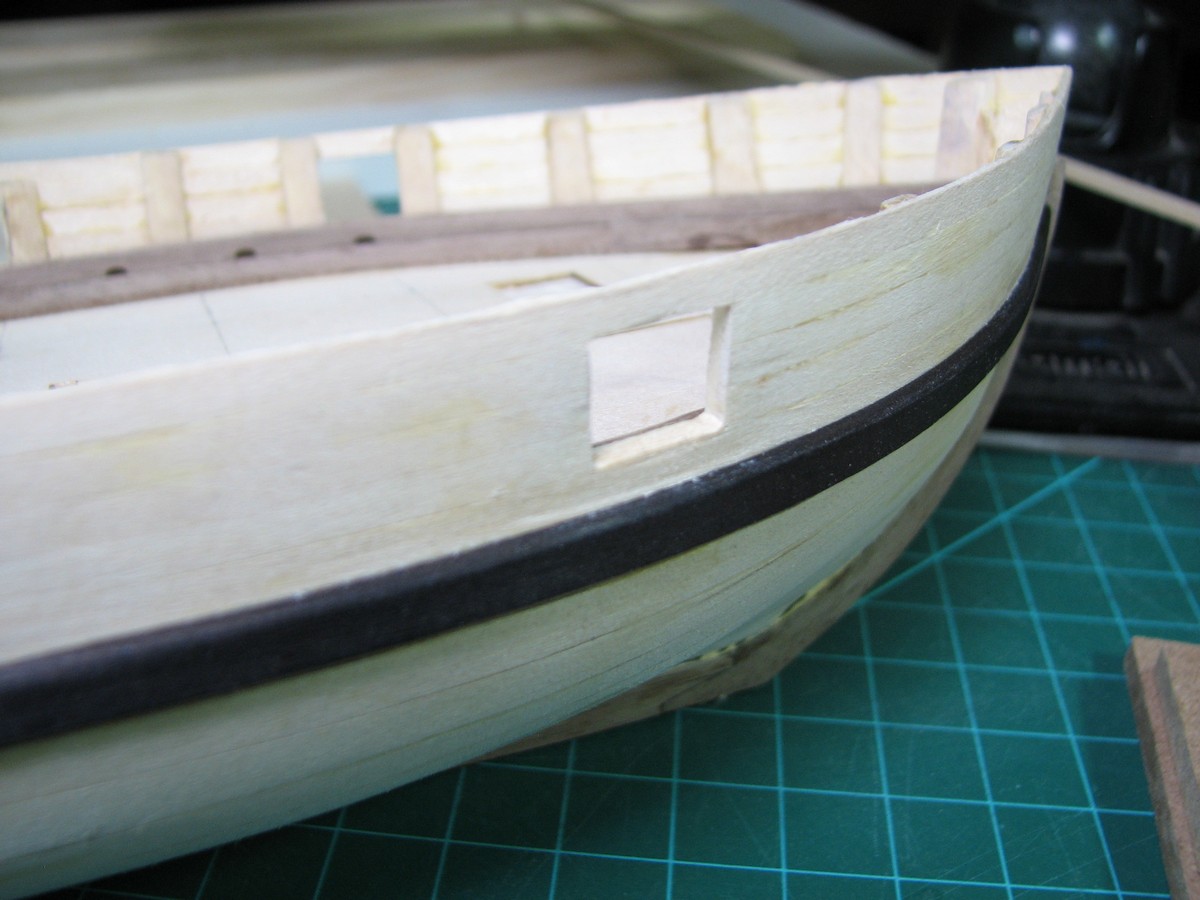
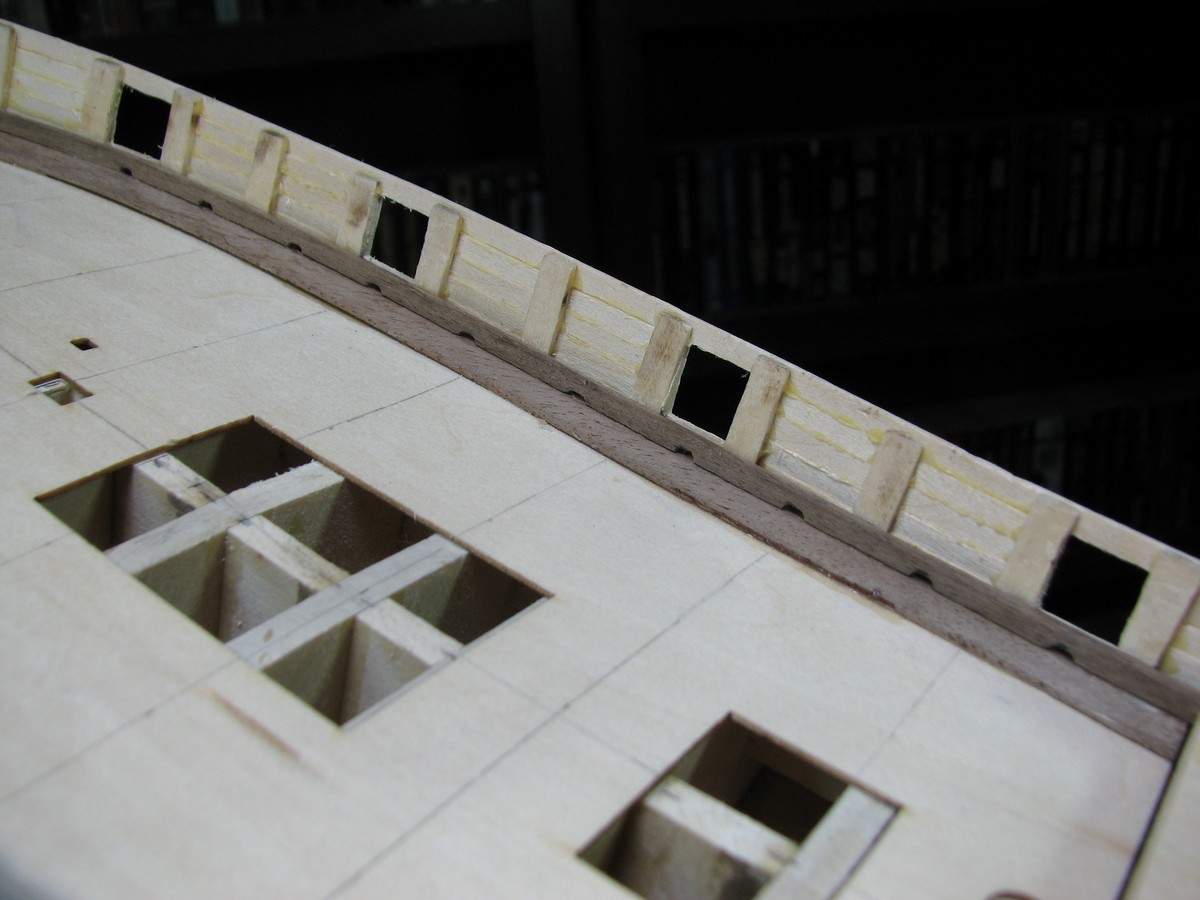
Next is the spirketing plank, which includes the scuppers that were discussed here over the last week. I've decided to just build them in per the plans and not worry about the water sloshing around on the deck for the non-existant tiny sailor-men. Given the type of ship, chances are fairly high that if it was taking enough water over the bulwarks to need the scuppers, it would be heeled over pretty good and the water would drain over the waterway anyhow.
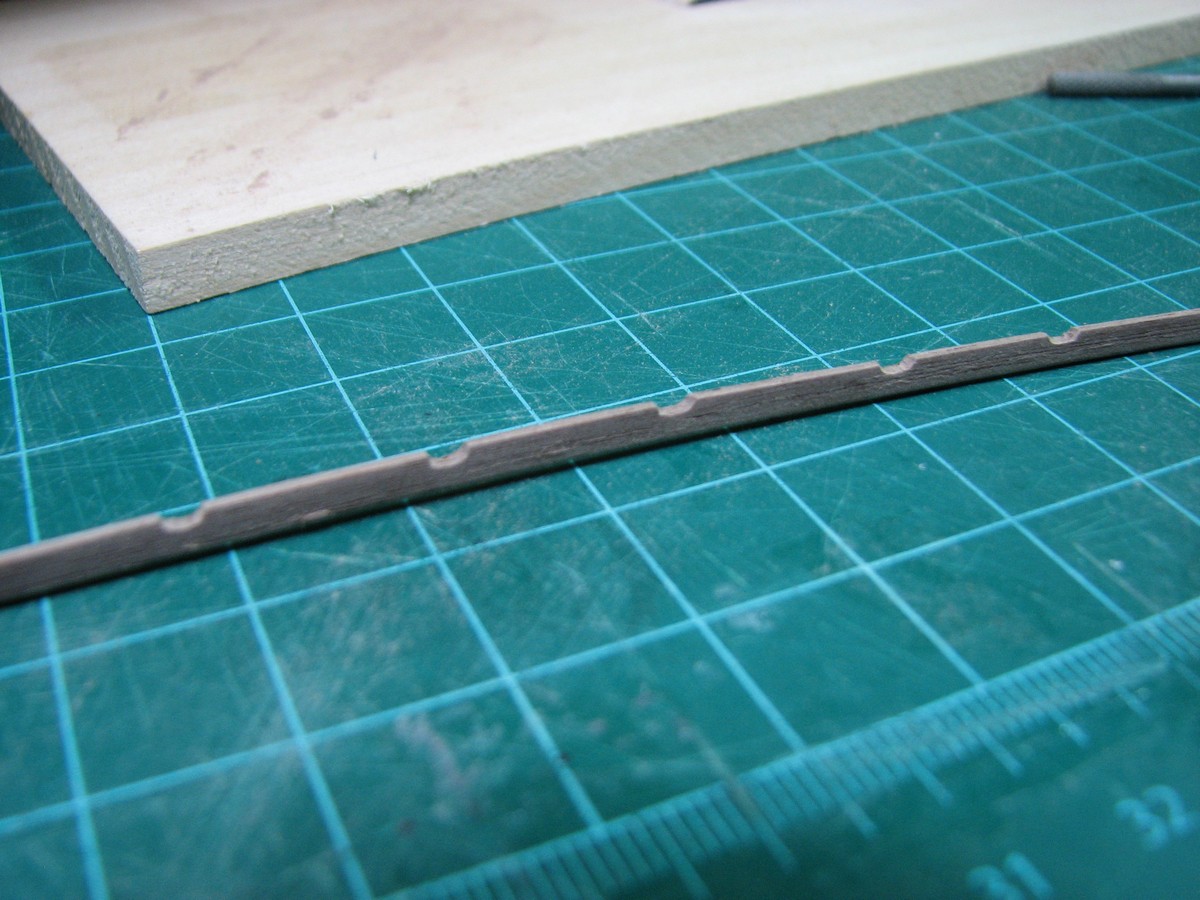
I started by fitting the wood to the top of the waterway, and getting it cut to size and sanded properly (rounded the inside edge, and put a slight bevel on the bulwark side for fitment, as well as getting the angle against the stem right). I clamped it down with a whole bunch of clamps after soaking it, and then continued to use an eye-dropper to add water in the areas that had the most severe bend, and then left it overnight. The next day while it was still in place, made marks in the center of each section where a scupper needed to go, and then removed the plank from the model and used a compass to mark the height of the scuppers, and marked 1/16" on either side of my center marks to define the basic location of each scupper. I was pretty worried about trying to trim these little guys out with a razor knife, as they are really tiny and I am not that great with depth control when using a knife - I tend to overdo it.
Luckily, as I was playing with different tools I discovered that I had a small square file that was exactly 1/8" wide to the outside of the cutting edges. Bam, solution! I cut the basic rectangle to depth with the square file while the plank was clamped in a vise, and then used the smallest round file I have to shape the scuppers.
Pretty happy with how they came out. Next of course, I had to get the thing back in place and glued. I used regular PVA from a syringe to get the glue along the back and edges of the plank without getting any into the areas of the scuppers, and then clamped the crud out of it again and left it to dry.
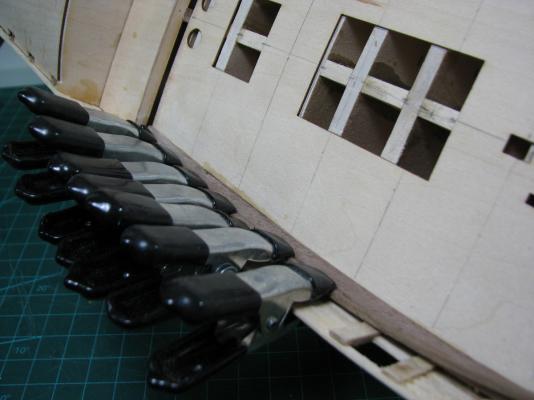
After it dried, I removed the clamps, and it's pretty decent. I would have liked to have it fit perfectly against the waterway, but there is a small gap there. It snugs up against the bulwark extensions nicely though.

I am now doing the same thing for the other side. I've got the plank cut to size, and it's currently soaked and clamped in place. I'll keep it wet for a bit longer until I head to bed.
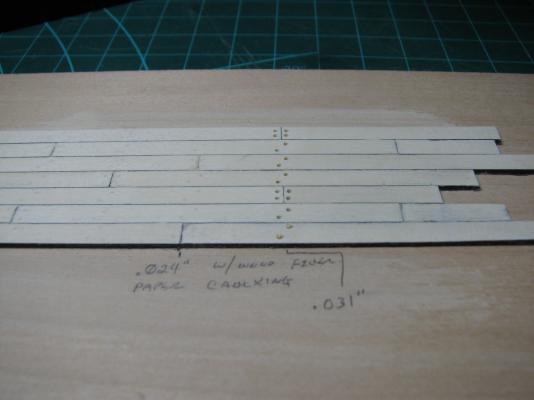
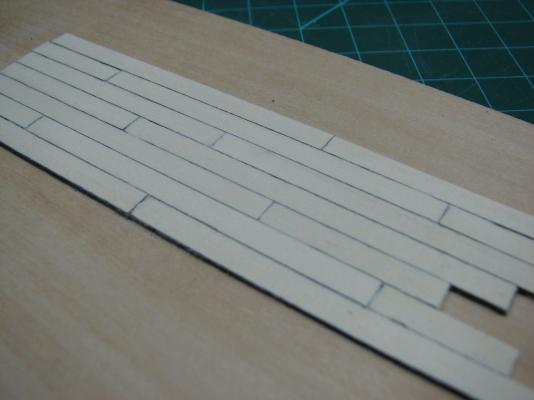
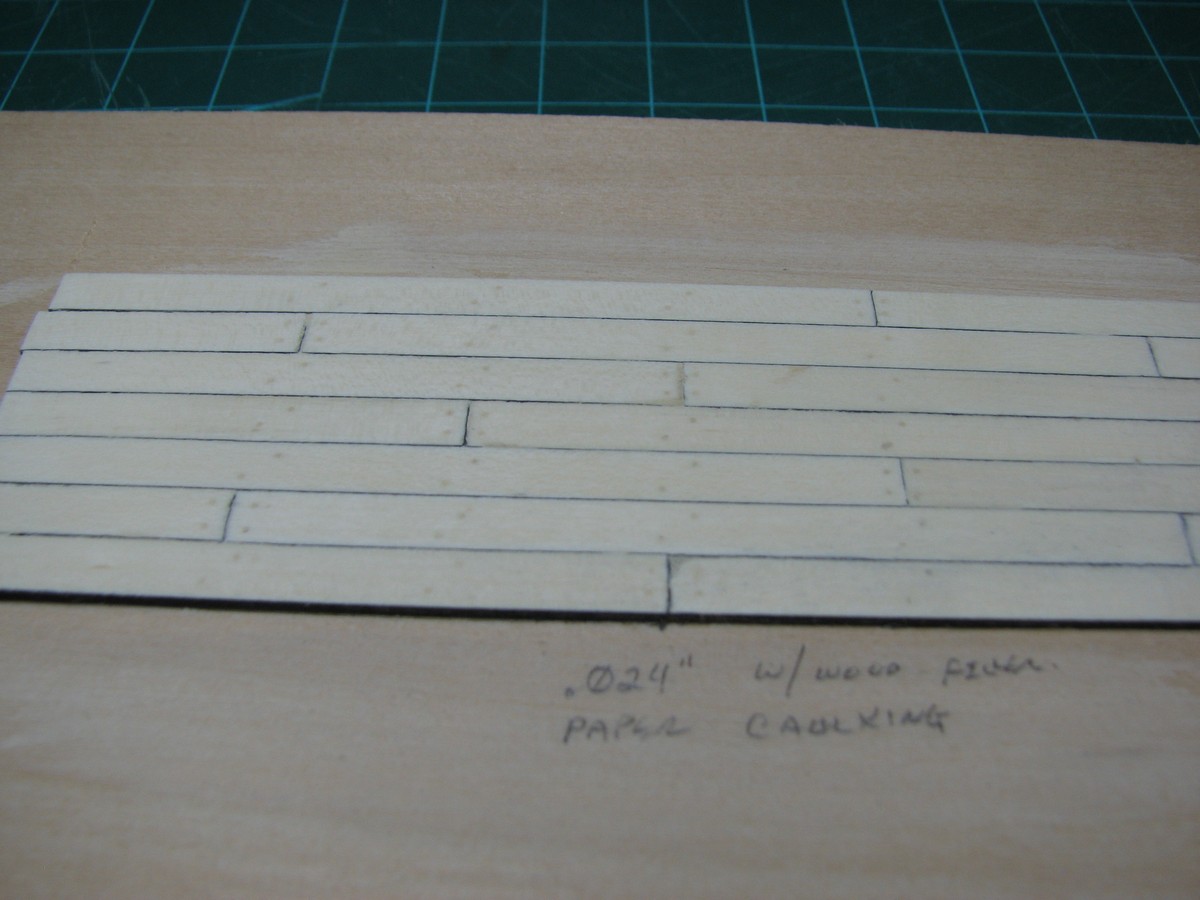
While I was waiting for things to dry (either water or glue) I also embarked on a bit of a planking experiment to try out two things:
1 - caulking with the method outlined in a thread by Nigel (found here: http://modelshipworld.com/index.php?/topic/7445-plank-caulking-using-tissue-paper-tutorial-by-nigel-brook/) using tissue paper.
2 - Tree nails.
I made a huge mess with the tissue paper and glue, but the results were surprisingly good given my first try, and how much of a mess I made. Note that as can be seen in the photo, I didn't measure anything for this experiment, so the butt's don't really line up very well.
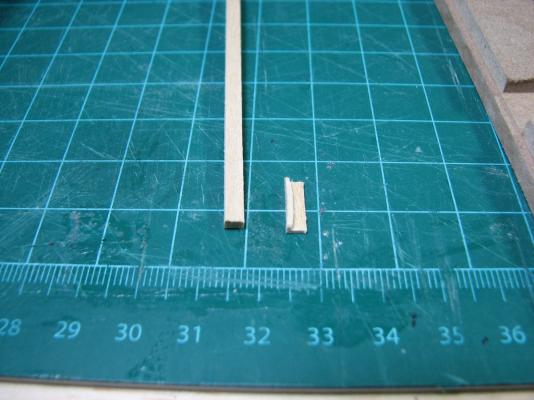
Tree nails on the other hand, were a bit of a failure. I drilled 0.024" holes, which are about 1.15" in scale, and then tried to draw bamboo to the correct size, and failed badly at the hole 3 sizes above what I needed to get them down to. I don't know if the draw plate is bad, or if that's just the smallest I can get with the materials I have. The draw plate is from the Reno trip and I have no idea of it's source - the size that failed is the size he was using for his final size on the Hannah model, so maybe it's just worn out? I may get another plate (Byrns?) or try it with another material later.
Since the actual tree nails failed, I fell back to the method that Alistair (I think) said he used, and tried my wood filler putty. It worked, but I'm not happy with how well it fades into the holly deck.
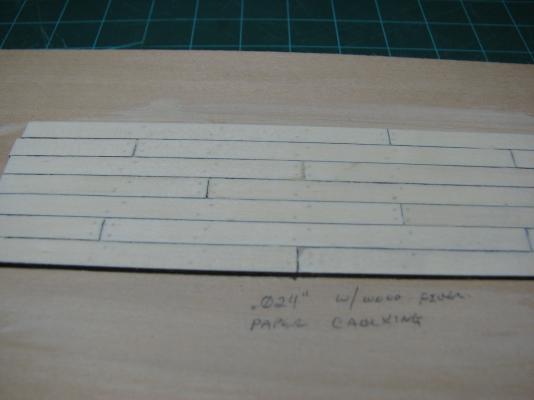
I think I'll use larger holes than these, even though they are already slightly over scale, and then try to get real tree nails to work down to the size I need, or use a darker filler of some kind, or possibly go with the mono-filament line that's been mentioned by other builders here. Either way, I do plan to tree nail the deck, and while I don't want them to be obnoxious, I do want them to be visible when looking at the deck from a couple feet.
Until next time, cheers!

-
Welcome to MSW Fletch. I've only been here since the middle of August, but I couldn't agree more with your comments about build logs. I'm pretty sure I've learned more from the build logs than everything else combined since I started this hobby just over a couple months ago.
I've also learned a great deal by posting my own log, where plenty of amazing people have given me excellent feedback, and also the simple act of taking the pictures, putting what I've done into words, and then looking at what I've done in the photo's (close ups are an unforgiving mistress) has been an awesome learning tool, so I absolutely recommend starting your own log whenever you get started.
- GLakie, Starboard III, CaptainSteve and 2 others
-
5
-
-


USS Constitution by robnbill (Bill) - FINISHED - Mamoli - 1:93 kit - First Build - Bashed
in - Kit build logs for subjects built from 1751 - 1800
Posted
I've only done the single build so far, but I found it helpful to have the belaying pins loose when I was doing the rigging, as it was much easier to properly loop the rigging rope around a belaying pin without the other pins in the holes next to it. I would belay a line to a single pin, and then secure it with glue, and the fact that the line was properly belayed around the pin and glued has the pins pretty securely placed - I'm not worried about them coming out at least.
Just need to be careful not to block off the next hole with the rigging line.