


GuntherMT
-
Posts
2,213 -
Joined
-
Last visited
Content Type
Profiles
Forums
Gallery
Events
Posts posted by GuntherMT
-
-
Great research of the subject, and representation on your model. The complete model is going to be fantastic with all of these details when you are done.
-
That's a great technique for making that look on the mouse. Did you secure all the ends with CA or something before trimming them back, or do you have some other way of dealing with the ends and blending them into the rope at both ends of the mouse?
Can you explain in detail how you worked the threads around the mouse to get that final 'weaving' effect, did you actually weave another thread into all those?
-
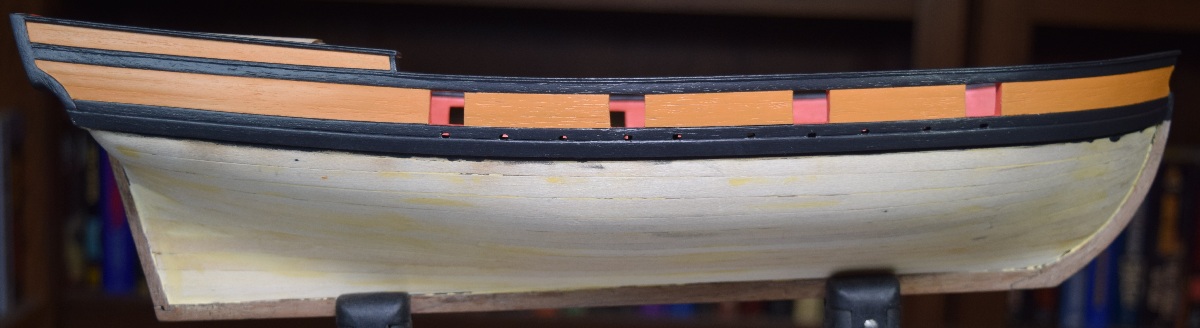
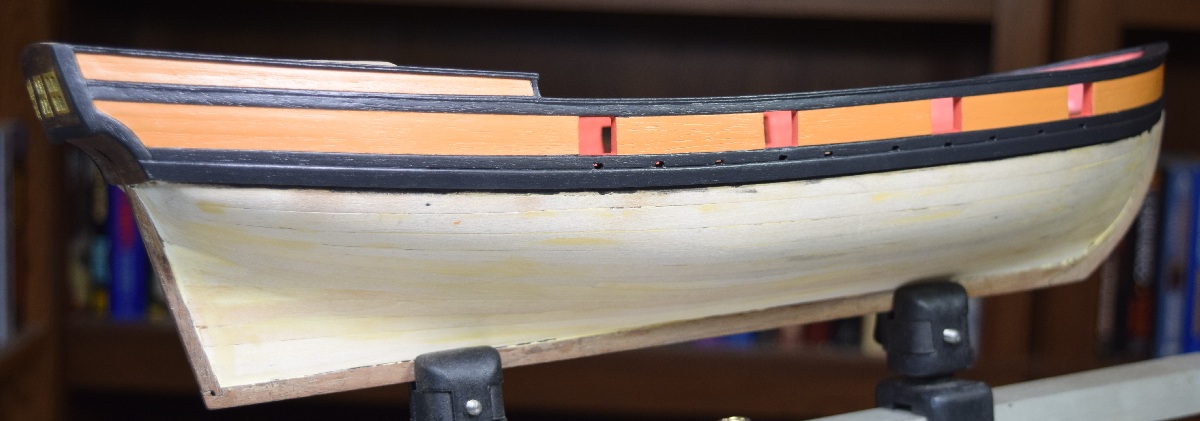
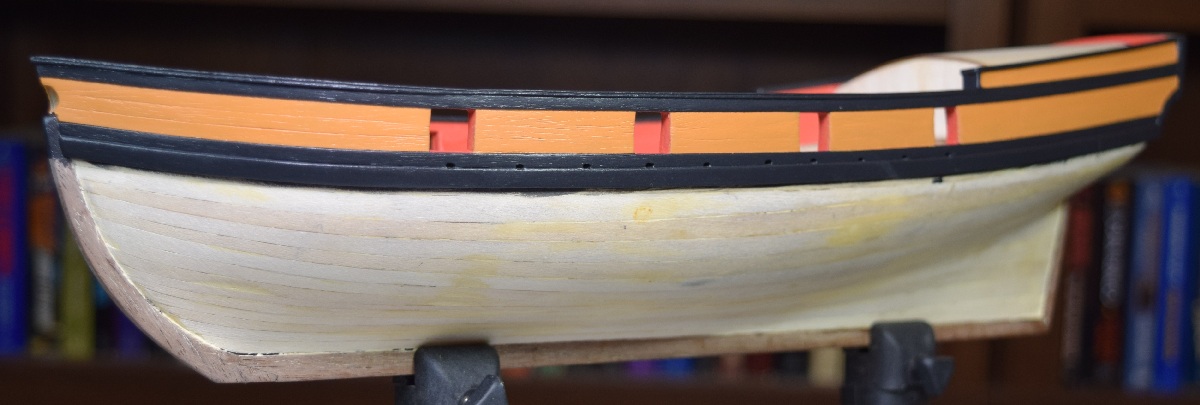
So I decided that good is good enough, and I'm tired of painting black layers. So, I decided tonight would be the night for the 'big reveal'. How well did my masking work? Was all of this a huge waste of time because the black bled all over the yellow ochre? (insert drum roll here)


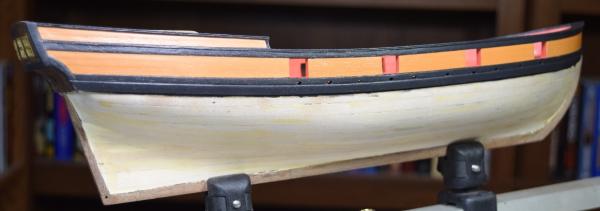
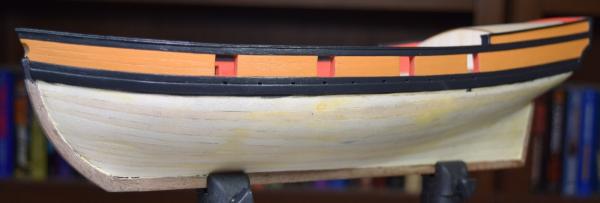
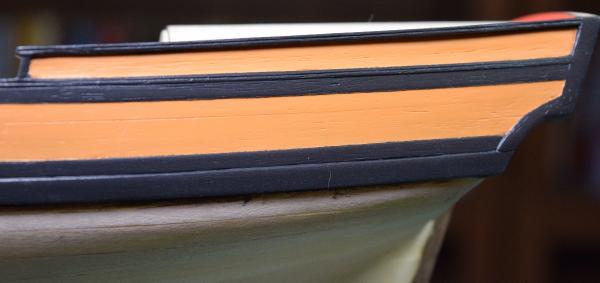
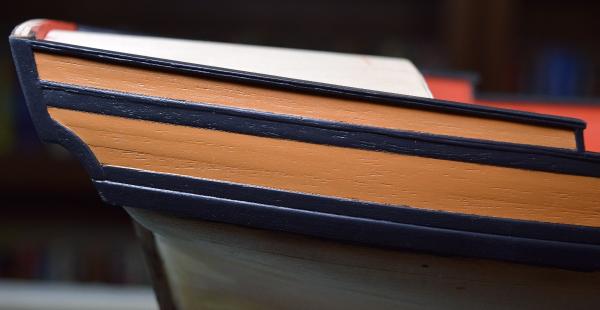
I can live with this. This is prior to buffing (not fully dry on the final coat of black) and adding a couple layers of clear poly. Needs a bit of touch up here and there, especially in the bottom and top of the gun ports, but certainly a paint job I can live with for my first run at wood painting.
As far as colors go, I painted 4 different color strips (3 different blues and a green) and laid them up against the hull to eyeball, and while the blue certainly adds a nice splash of color, I think I'm going to be different from every other AVS build I've seen, and leave the sheer strake black. In the instruction manual, painting the sheer strake blue, red, or green is 'optional', and I'm kind of fond of the black right now.
Tomorrow I can put the taffrail on, and then apply a couple coats of poly to protect the paint, then it's time to start the 2nd planking of the hull!

-
Congratulations on the milestone achieved!
-
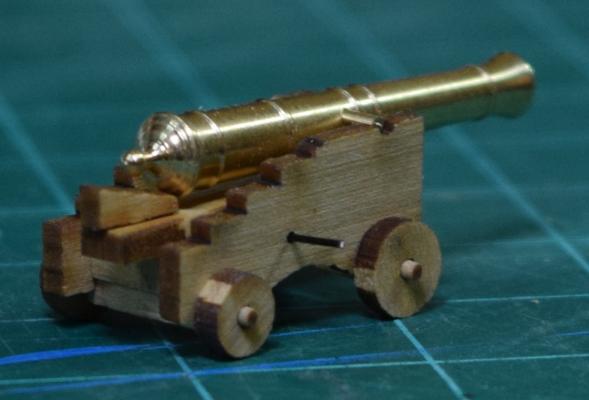
Here you go Keith.
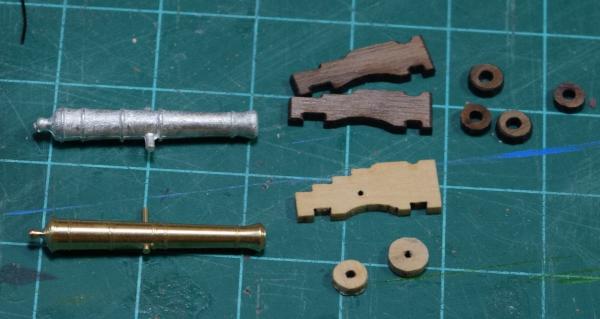
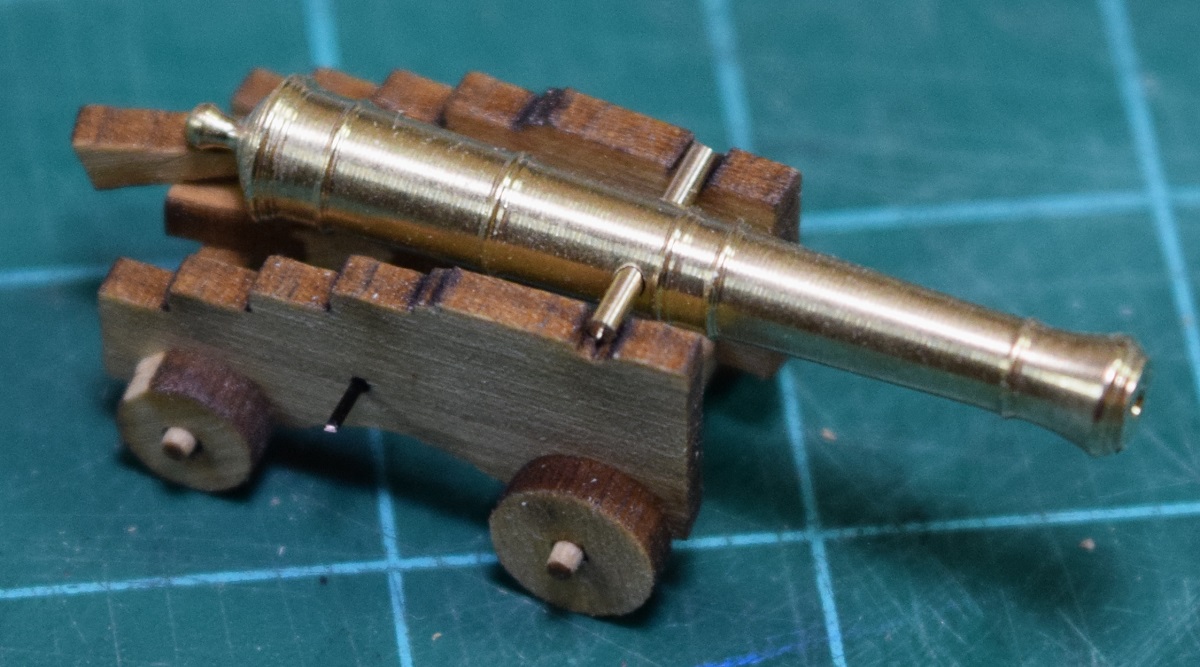
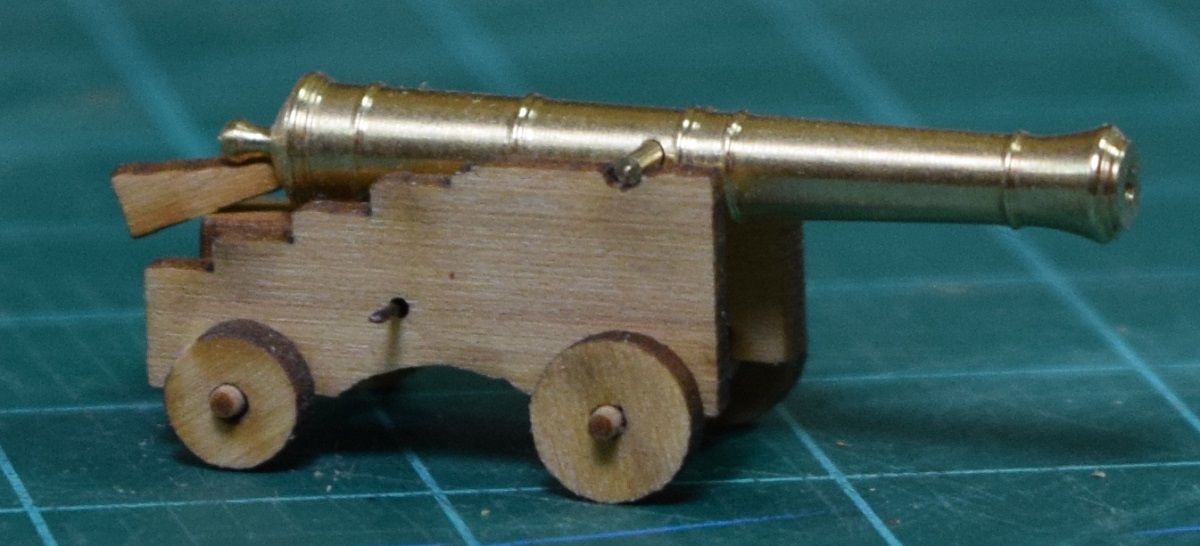
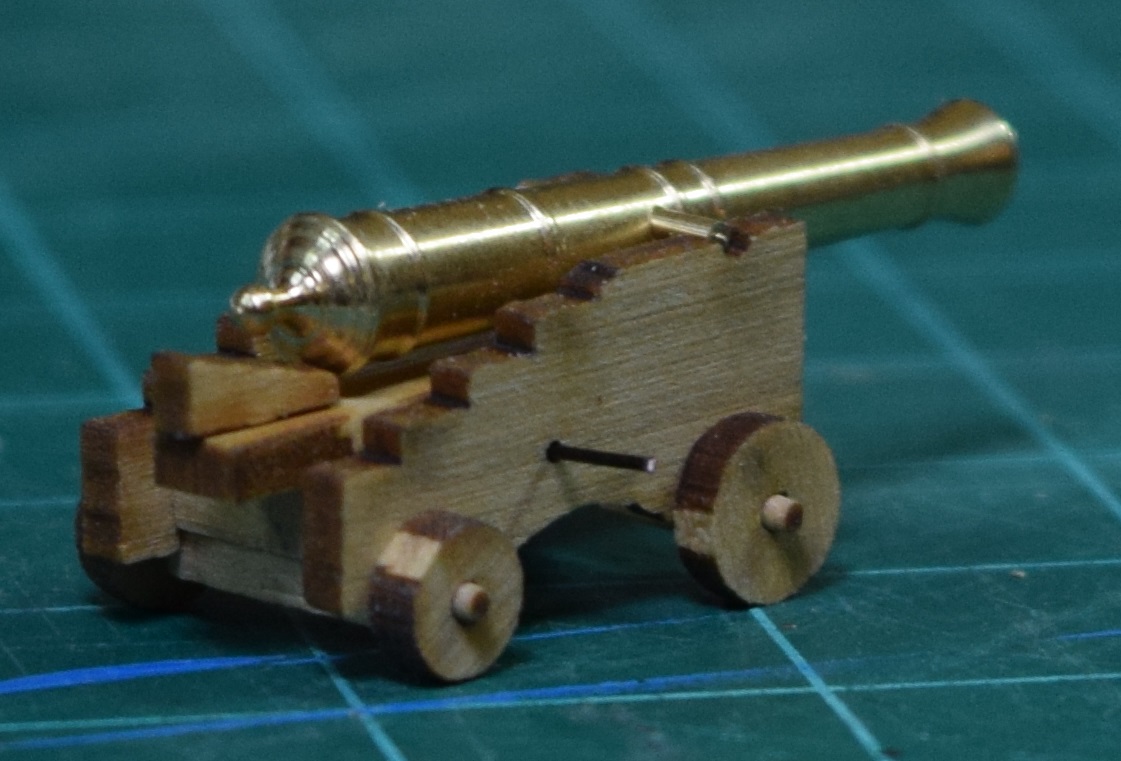
The kit guns are really not bad at all. They are a bit 'fatter' than the brass guns, but are reasonably clean and wouldn't have needed a great deal of clean up. The Syren carriages come with far more parts, everything other than what you see here would have been made from various pieces of walnut (I presume - haven't actually read that part of the instructions) in the kit, rather than getting all of them nicely pre-cut. I'd have had to drill out the barrels in the kit guns as well, as they are only indented slightly.
The Syren guns & carriages are actually 1:64 scale 6 pounders, but I printed out the plans from Chucks site at 1:1 scale and laid the kit barrels on top of them before I ordered them, and they are almost identical in length to the kit 4 pounders.
-
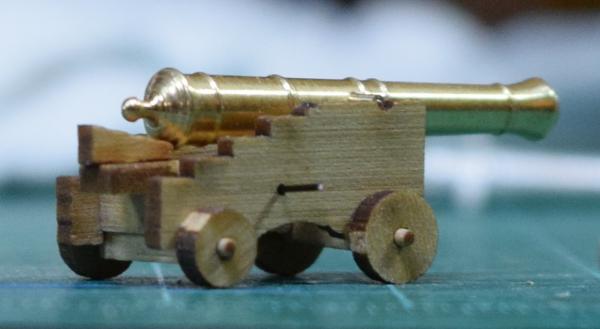
I'll get a picture of the kit guns and carriage parts for comparison. The kit guns are britannia cast, and the carriages are walnut laser cut.
So far for the AVS I have (or will) replaced guns, carriages, all rigging and blocks (using kit dead eyes), and have holly for the deck planking. The wale was replaced with boxwood, but that is only because the kit walnut was complete trash. If that walnut had been like all the other walnut in the kit I would have used it I'm sure. I may use some different wood for deck furniture, and I think I'm going to plank the poop (or quarter) deck with cherry instead of walnut, but that's not a sure thing yet either.
As far as revisiting the Carmen, I suppose it's always a possibility, but there are so many other kits out there that interest me (3 of which are already sitting here next to my workbench) that I don't see that as something I would do anytime in the near future. I do look at it when I'm in the office and think about what I could have done to make it better, even finishing stuff like rope coils, or completing the running rigging for the jib sails, etc., but ultimately I'm pretty pleased with how it came out, and at this time plan to leave it as it was completed since it was my first wooden ship, and there will never be another first one.
-
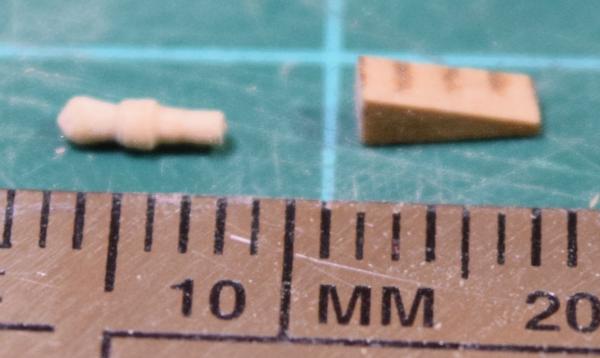
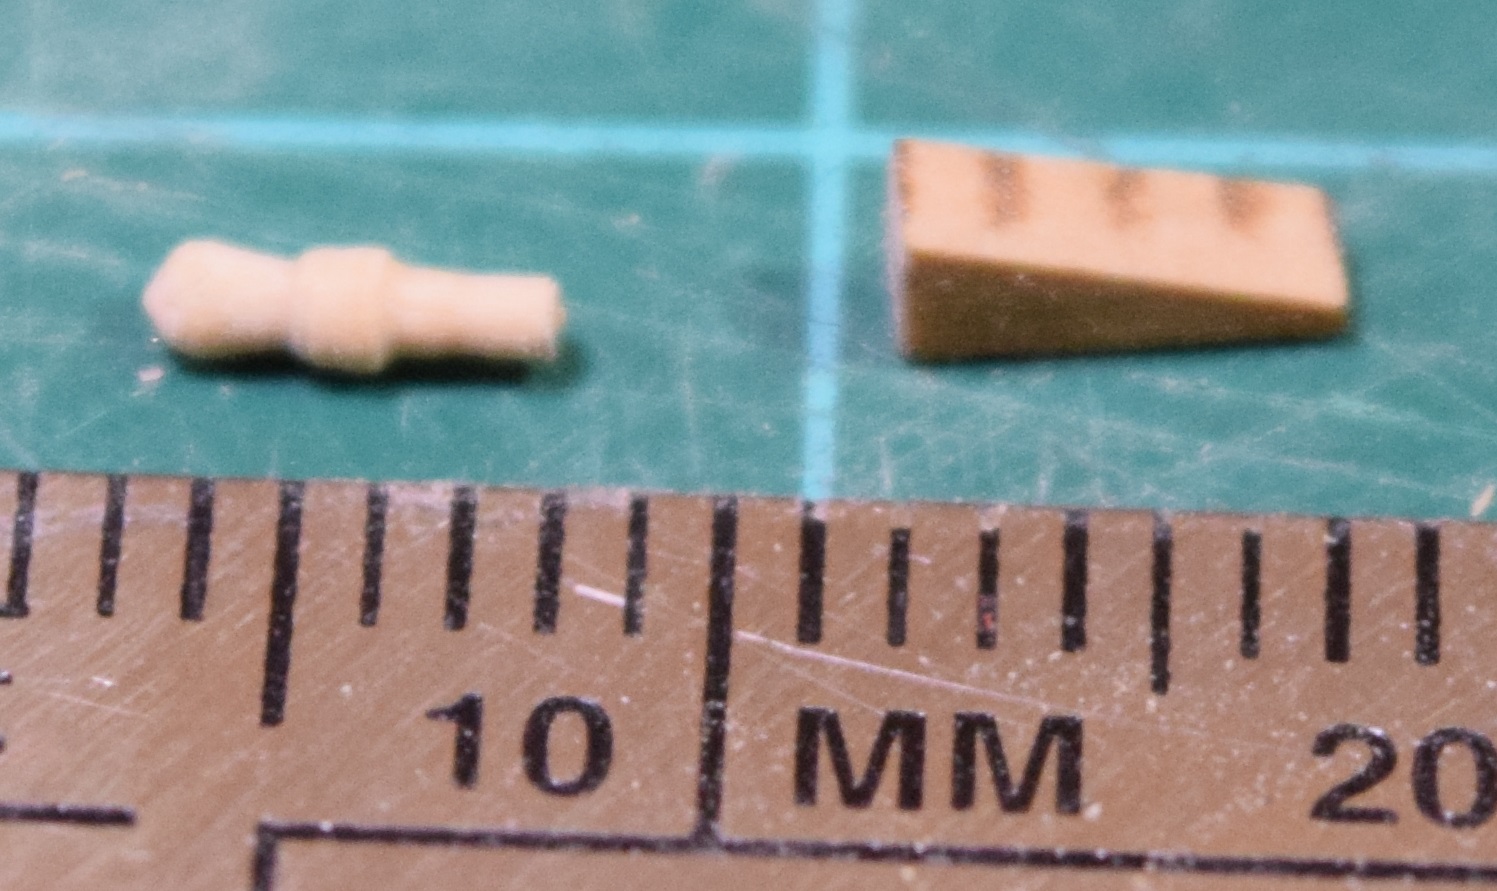
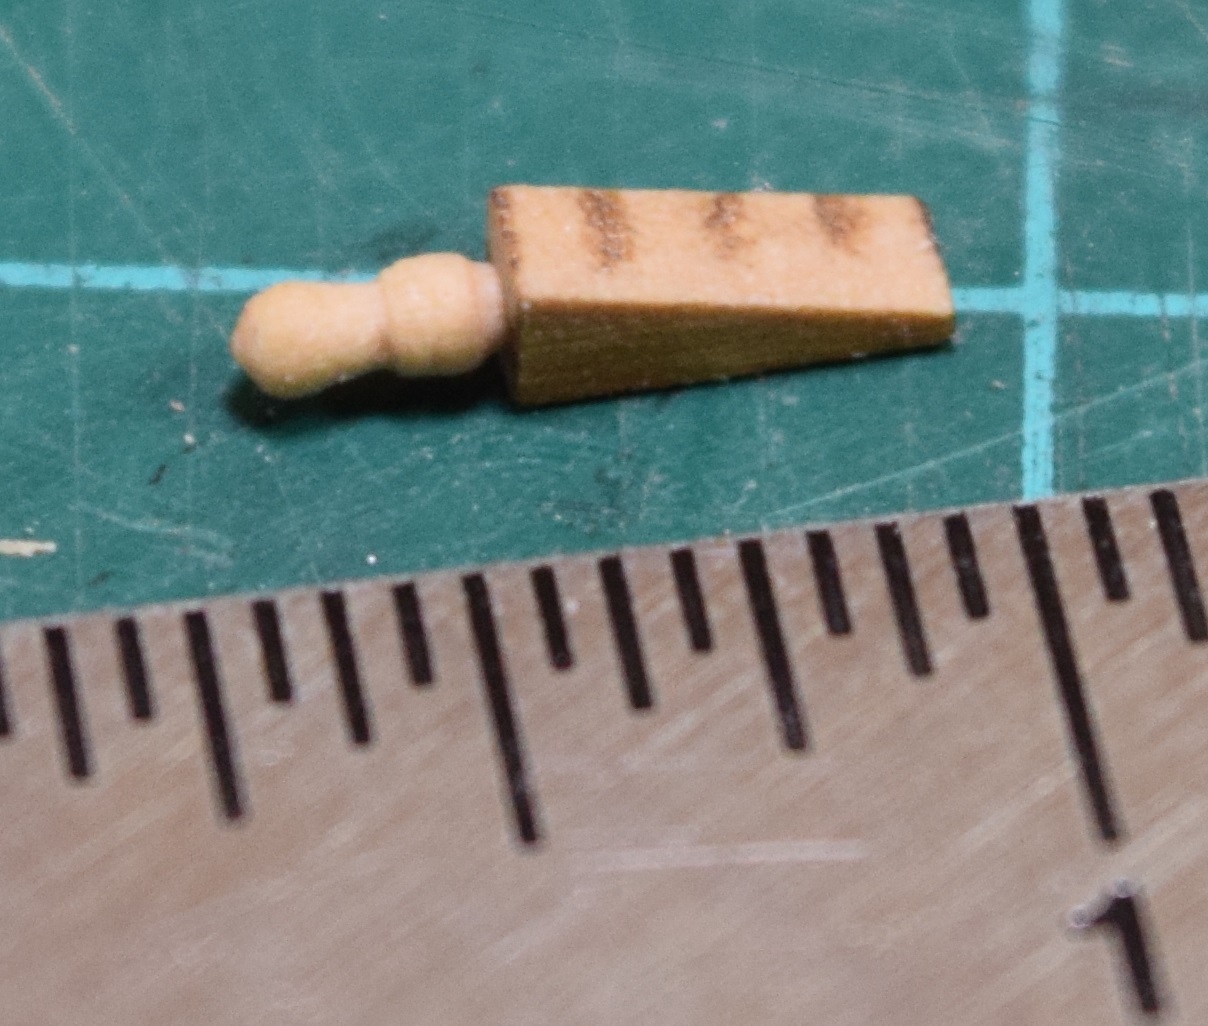
I made a tiny little handle for that tiny little quoin, and then drilled a tiny little hole in the quoin.

-
So for the last few weeks I've been spending a great deal of time watching paint dry. I may have mentioned in passing (or a lot more than that) that I'm not a terribly patient person, so this has been a fair trial for me. Due to my extremely limited work space I really haven't wanted to jump ahead and work on other bits and pieces because I don't have a reasonable place to put those pieces until they are needed later.
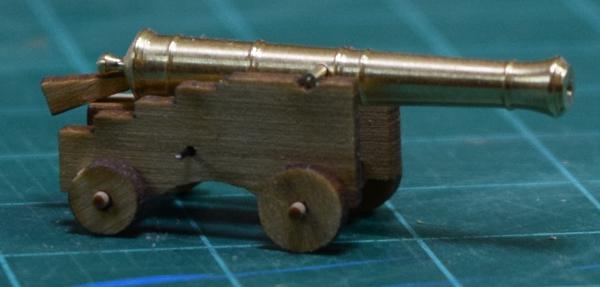
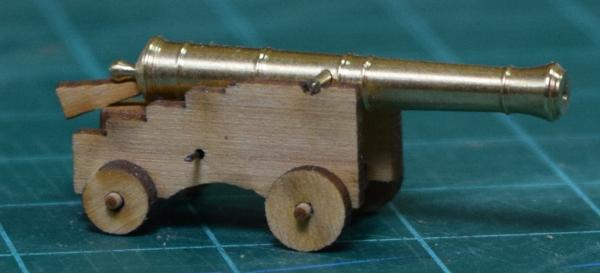
Tonight after putting another coat of black on the AVS and setting it back down to dry, I decided that I would look at assembling (but not gluing, so I can put it back in the package) a gun carriage so that I could make sure that it would work height-wise with the gun ports.
I am not using the kit carriages, and the ones I am using (from Syren) are taller than the kit ones when looking at just the side pieces, so I was concerned about the fitment.
Test fitment was a success, making me really wonder if the kit assemblies would have been too low!
The carriages and guns from Chuck are .. well, I'll just let the pictures speak for themselves.


- Dimitris71, KenW, Captain Slog and 8 others
-
 11
11
-
That's a bit of a bummer. One of the joy's of having a puppy I suppose. On the other hand, that puppy should grow into a wonderful companion that will last for (hopefully) many years past the point where you'll have replaced this unfortunate disaster and gone on to build many other ships.
Best of luck with the next build, whether it's a restart of this one, or something else. Also good luck with the puppy training.

-
Good morning all,
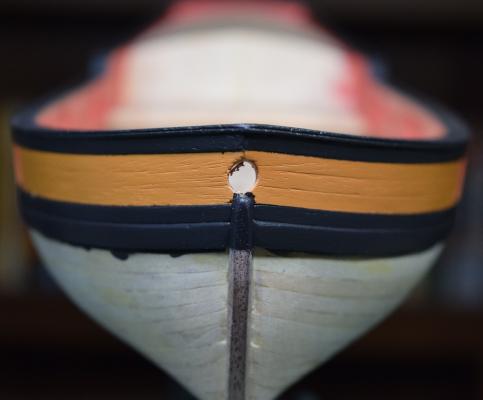
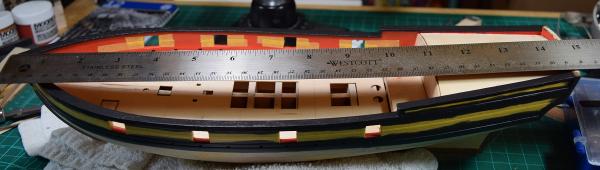
I received a PM from someone this morning who was researching kits for future builds, and he asked about something that's a personal 'beef' of mine - How long is the hull of the AVS?
This seems like something that should be made available on all kits by all the manufacturers, yet it's extremely rare in a non-admiralty model to find that measurement. Instead they use the largest measurement they can get, from the tip of the bowsprit to the trailing tip of the gaff boom, and print that on all the literature. While it's nice to know that the AVS will be 31" (787mm) long using that measurement, it really does not give the shopper who is browsing through the kits a very good idea of the real size of the hull, especially when the bowsprit and boom have ridiculously large proportions to the hull like the AVS does.
In any case, I figured I would share the measurements here, so that anyone else who is following along and is considering this kit for a future build would have that information as well as the gentleman who asked for this.
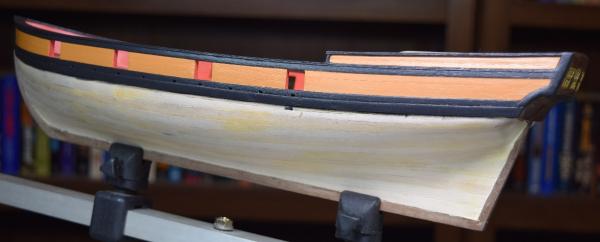
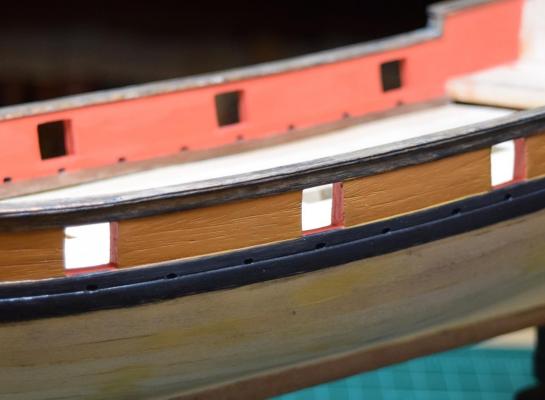
The hull of the AVS (at least mine!) from the tip of the stem to the back edge of the stern bulkhead is 14 - 27/32" long (377mm for the non-Yanks). That's measured at the top of the cap rail as seen below, so it's the max length, not along the deck to the insides of the bulkheads.
- NMBROOK, Captain Slog, themadchemist and 1 other
-
4
-
-
Quick Google search on the Mamoli kit shows:
$500 on Amazon + $19 shipping.
$473 from Cornwell Model Boats in the UK + ?? shipping.
$459 from Model Expo (Special Order) + $25 shipping.
$475 from Modeller's Workshop.
So I'd say that $449 is pretty reasonable. Certainly it's not overpriced based on what I found.
-
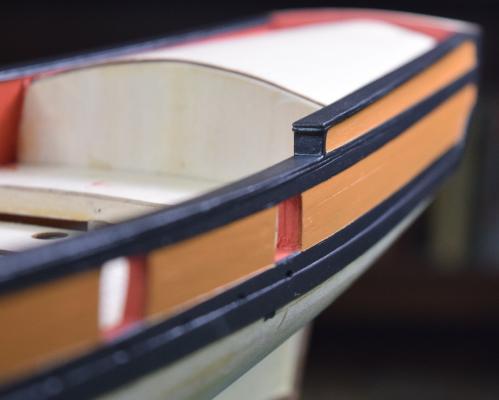
It's part of my "illusion" of a great fighting ship. I can't do any better. The chainplates will have a fake bolt head added later to make it appear like it has two. Tried drilling the extra hole.....way to tedious.
I think he is just referring to the angle of the chain plate Rich, not the extra hole. The chain plate should continue the 'line' drawn by the angle of the shroud, something like this:

Although I'm not sure what you are supposed to do about the interference with the gun port lid.
I do like the way your 'fake' chain plates work though, no way to tell from looking that it's not actually connected to the brass holding the dead eye, nice execution of your idea.
-
-
You look to be doing a fantastic job, and truly amazing work for a first build, especially as such a small scale!
-
Rich, so far I'd say the results look just fine, and I certainly don't have a problem with your different approach at all (of course I'm also a newbie, not a 'master modeller' by any stretch) - I was concerned with doubling the number of loops around the mast, and look forward to seeing how it works out!
I imagine that you could use zip seizings at the masts to make securing the top of the shrouds much easier (if you aren't already doing that).
-
The tail of that brass ring is 0.55mm so I drill a 0.50mm hole ane slip the tail into it with a dab of CA. The shroud tops are attached individually to the mast with seizings. My masts are permanently glued.
Rich, might want to make some tests with rigging rope - by doing it that way you'll have twice as many loops of shroud rope around the mast as you should, and my concern would be whether you can get it all to fit by doing it that way instead of in pairs on a single continuous line.
If it works like you expect, seems like you should have nice results as far as consistency goes, by using the jigs and doing all your adjustment at the top instead of the bottom. Good luck!
-
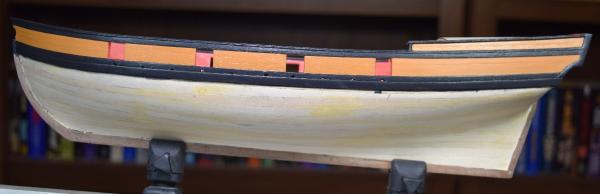
Not a huge amount of progress, as I'm working on paint which is of course very time consuming because of the need to wait between coats before sanding and repeating. I did play with the camera a bit this morning, and think that it's going to allow me to take some pretty neat shots later on as I get used to what it can do and how to take advantage of it.
This was taken using a tripod with the camera about 6' away from the ship and then cropped. No post-processing done at all, using some natural light from a window and a single LED lamp and the camera flash shut off.
Hrmm.. the forum apparently does some brutal image compression, as that is not as sharp as the original, and it's gone from a 551k original image to a 130k image as an attachment. Learn something new every day.
Link for uncompressed if you are curious - http://www.magetower.com/AVS/262OuterBulkheadsPaint.jpg
- NMBROOK, egkb, Ol' Pine Tar and 3 others
-
6
-
Do you have links to other suppliers than Shapeways? I've read of people having issues with delivery from Shapeways, and I'm wondering who you are using and whether you were happy with their service.
-
Interesting idea Rich, looks like they came out pretty well.
How are you attaching these to the masts since you didn't make them in pairs with a single line? Are you planning on serving the shrouds at the top? How are you securing the lower dead eye if the chain plates are false, just gluing them into the channels?
-
I've just been using Tite-bond Original wood glue, and holding the planks in place until they hold when I can't get a clamp in place. If you spread the glue very thin on both sides of the bond and let it 'tack' first, then press it in place with firm pressure, it bonds in place about as fast as medium CA. I'm planning to do the entire 2nd planking on the AVS like this without using any tacks/nails at all (time will tell if it works as well as it did on the bulkheads).
-
The only thing I can think of that might help you decide what order to go in if you aren't following a plan, is that if you are like me, whatever part is completed first will be getting a lot of 'mileage' and wear from handling while you do the other parts, so it might make sense to do the part that you are most concerned about wear/touch-ups, last. If you are going to be waiting to paint until after everything is done, then that wear and tear won't matter at all.
My inner bulwarks already need touchup work, and I haven't even started the lower hull. You can of course mitigate a lot of this by being more careful and less clumsy than I am!
Edit: Your scuppers look very uniform, nice.
-
Brian, there is less to the lathe work than it appears. My "transfer system" consists of a piece of paper with the precise column profile on it so that I can compare the length dimensions of the part in the lathe with the target dimensions at any time, and I frequently measure the thickness of the part in several key locations. The rest is eye balling.
Thomas
Guess that some times the simple way is the best way. In this case your simple system appears to have fantastic results! Thanks for the response - I hope to add a lathe to my workshop (after I actually get the workshop up and running) sometime in the future, and stuff like this makes me want it *now*, but I suppose I should have a place to actually put it first!
-
too bad. I rather like the look of the planks.
You replied while I was typing in my update. I do like the appearance of the natural wood, so I'm planning on a bit of a hybrid build. I am going to go with the kit painting scheme from the wale up, but plan to try to make the lower hull planking good enough to leave it natural. I'm also planning to leave the stern natural as well.
I do reserve the right to change my mind and leave the upper planking natural too though (or to just paint everything!).


Union Brigantine by Hawk42 - Constructo - 1:100
in - Kit build logs for subjects built from 1751 - 1800
Posted
Looks pretty small - I thought the Carmen was a bit of a pain at 1:80 scale. Does look like you've done a very nice job on it so far. What is the hull length on this?