


GuntherMT
-
Posts
2,213 -
Joined
-
Last visited
Content Type
Profiles
Forums
Gallery
Events
Posts posted by GuntherMT
-
-
So I got some 1000 grit sandpaper today (finest I've found so far) and used that instead of the steel wool after 4 coats, and it was 'peeling' the paint off instead of coming off in dust like it was with the steel wool. It's been over 24 hours since the last coat, so maybe I got them on too soon between coats when using the steel wool. I'll let it set for another 24 before trying the next coat and see if it does the same thing. Appearance wise it's back to about '2nd coat' now after that sanding. I may just be sanding too hard or aggressively.
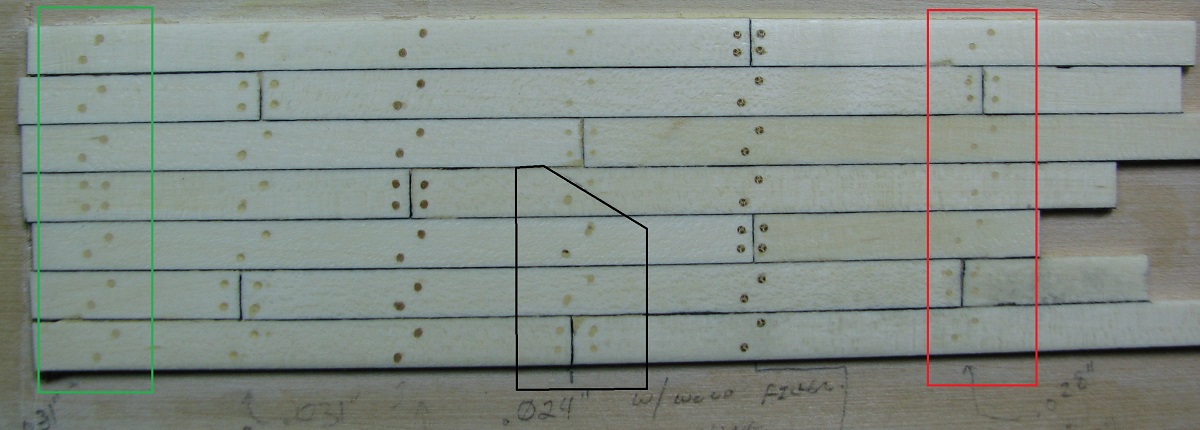
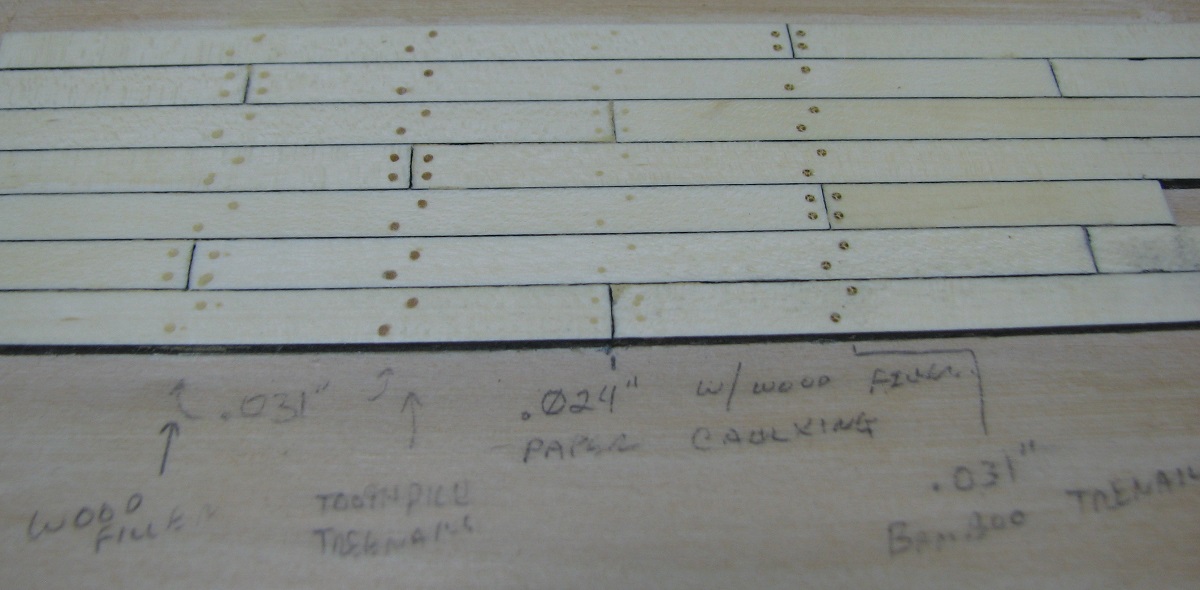
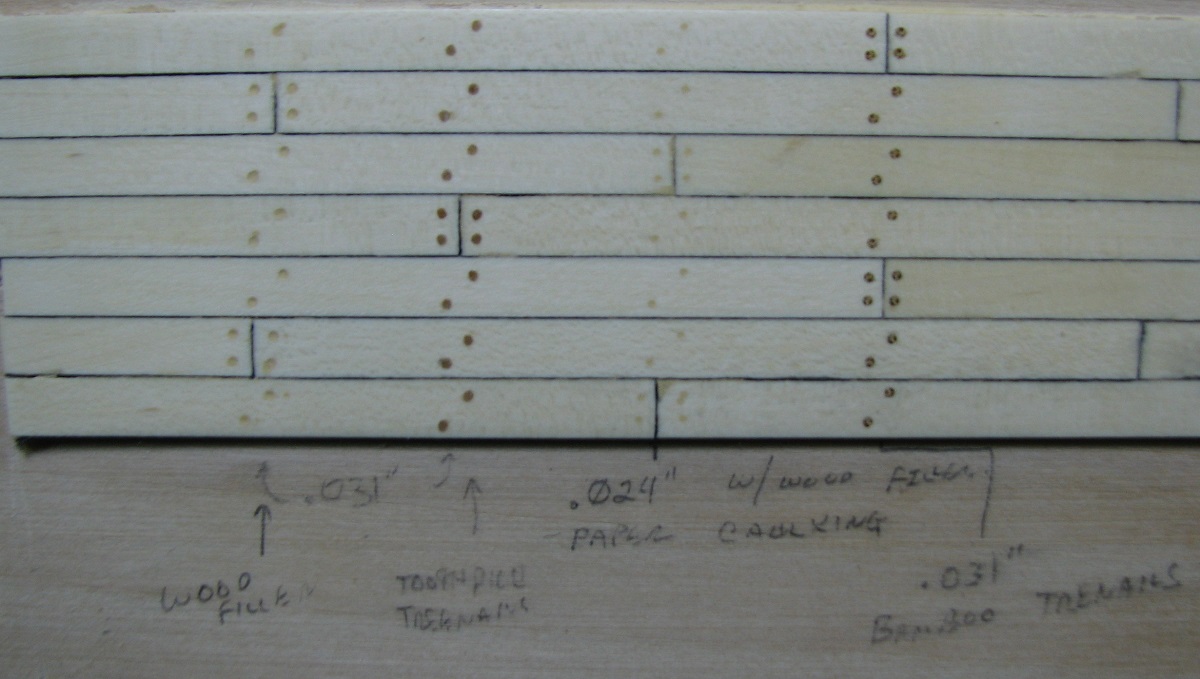
At the same place I got the sandpaper, I found some new wood filler, and thought I would try it out for the nails - it's a 'maple' filler, so pretty light. I drilled out another set of .031 holes, and then drilled half of the original .024 holes to .028, and then drilled out a set of .028 as well.
New test (Only a single coat of wipe on poly, and not buffed).
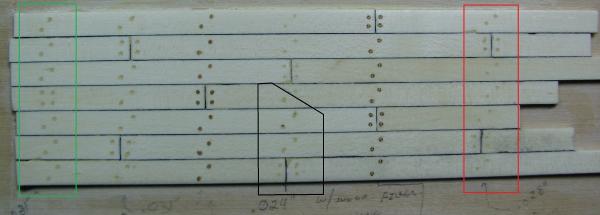
Left to right:
Green is .031" holes with the new maple filler.
Old filler in .031" holes.
Toothpicks .031" holes.
Top half is old filler in .024" holes - Black (bottom half) is old filler in .028" holes.
Bamboo in .031" holes.
Red is .028" holes with the new maple filler.
Difference between the old filler and new filler is very subtle.
- SawdustDave, NMBROOK, WackoWolf and 2 others
-
 5
5
-
Welcome back Rich, hope you had a wonderful vacation.
I agree that doing the deadeyes this way is going to make it more difficult. Consider mounting the lower ones in the chain plates and then using a jig to hold the upper ones in place while attaching the shrouds, and then doing the final lines.
I'd be happy to show you how I made a small jig (unfortunately only after the main mast was done unevenly) to do this. I'm at the office now so can't do pictures. Give me a call if you would like me to drive by after work, or I'll get some photos tonight.
-
Lots of Niagara's popping up all of the sudden. Looks like a great kit, happy building!
-
Finally starting my build log. I have spent a good hour or so going through the kit and counting out the parts. Not too much missing, a few double blocks and 1 casting of a carronade roller assembly. Not too major but surprising. Being that it is a small part I will just try and carve one out of scrap wood when I get to it.
Just send a note to Model Expo via their support link on the website, they'll send out replacement parts. Unless of course you just want to make your own part for the challenge!
Good luck, will be following along on this one.
-
Alistair - do you recall how many coats of red you used on your AVS bulwarks? I know you used different paint than I am (I'm using the MS bulwarks red), but you reference in your painting tips using many thin coats, and I'm sort of wondering how many 'many' was in this case.
Thanks!
-
-
Thanks all,
A note of care from my point of view. Don't try to get it too perfect. Reading the planks and their joints and grain through the paint is a better outcome than solid colour. It is a juggling act but imperfections can add up to a more authentic looking model.I intentionally made the plank joints stand out on my AVS and I'm glad I did so.
Alistair - thanks, I actually like the idea of having the plank lines showing, my problem was that the planks that are ever so slightly higher than the next planks were showing through the paint much darker, because on the final primer sanding most of the white primer was removed from those planks. It just didn't look right to me, and the layers of paint were building up to the point where I was going to lose the appearance of wood completely other than the darker plank spots. I just needed to do a final primer coat and instead of sanding it, buff it with the steel wool, so that there is a full layer of the white primer beneath the red, thus allowing me to use fewer coats of red paint, which in turn should allow the planking joints to show through while still having a fairly consistent red color in the end.
I guess I'll know when I'm done if it was the right move!
-
Thank you Frank, and yes, I got some nice stuff from that journey.
So I thought I had the inner bulwarks well prepared for paint after two coats of primer, but I was wrong. After three coats of red it still had clearly defined light and dark planks and just didn't look nice and even to me (I failed to take any photo's of this), so to finish the day off, I stripped all the paint and tomorrow I'll sand and prep again. I knew there was a good reason to take a day off of work tomorrow!
This time I will use a small bit of filler in some gaps that were annoying me when it was painted, and do a more thorough job of painting. I also think that I need to simply buff the final coat of primer with some steel wool, instead of sanding it, as I believe the uneven finish of the primer will show through far too many layers of the red paint due to the extreme contrast between the white primer and the dark walnut that I tried to paint over the first go-round.
This painting stuff is also reminding me that I need to add an airbrush to my list of things for the future workshop, I'm not a great brush painter.
-
-
Gerty, Lawrence and Alistair, thank you very much.
Frank - That's the exact post that caused me to purchase this saw and mitre-box, so I guess it's you I have to thank! For some reason I thought that post was in the traders sub-forum, which is why I couldn't find it, although there is a post in there that's more generic about UMM as a company from the recent NRG show.

Sanded the first layer of primer and cleaned it off, and have applied the 2nd layer of primer. It's this part of the builds that makes me wish I had my dedicated work room completed so I had the room to be one of those crazy people with multiple builds going so that I could continue to work on modeling during the 'waiting' steps when I'm still in the mood for it. I could work on furniture or gun carriages, but I still run into the 'room' problem as when I finished the other bits I currently have no place to safely store them. Oh well, many people in the world have a lot worse troubles than this.
Guess this is a good time to go continue work on that other room!
-
That's beautiful carving work.
-
Jason, hi again.
Have you any pics to attach to enable me to understand those steps better (especially about the false splice, do you use any custom made jig to serve only the line to make the initial loop?
Sorry for disturbing again your time!

Take a look at this post by Gil Middleton - it's amazing and may answer every question you ever had about this part of rigging. It shows the shrouds served over the masts in great detail, and explains how to do a false splice (he calls it a simulated tapered splice).
http://modelshipworld.com/index.php/topic/485-hms-victory-by-gil-middleton-jotika-172/?p=9951
- Beef Wellington and drtrap
-
2
-
It looks good as far as technique goes, but I think your seizing should be much smaller diameter rope - like thread sized probably, or very small rope - and it would look better. When you look at photographs of real seizings (for example Google search images for the Constitution rigging) the seizing rope is very small in diameter compared to the line being seized.
Here's a nice photo (linking to a Flickr page) - https://www.flickr.com/photos/ghrs47/14580207322/in/pool-old_ironsides
Make sure to click on the image to expand it to full size and you can then scroll around the image by moving your mouse.
If you look at that full size, it's still difficult to make out the seizings on the shrouds, but they are visible. You can also see numerous other seizings on the other rigging lines, and they can all be seen to be very small rope relative to the main line being seized.
- mort stoll and drtrap
-
2
-
Wow, it's been a full week since I've updated this. Vacation from my posting for everyone!
Thanks to everyone for the likes and comments on last weeks update, I do read and appreciate every one of them.
The reason for no updates this last week is really that I'm in a phase of the building where very little visibly changes from day to day as I was working on completing all of the gunport sills which took me several days, and then another couple days to fit the inner bulwark planking and prepare it for painting. This morning I put the first coat of primer on, and it's now drying so with nothing I can really do on the ship, time for an update here!
Let me start out this update with a bit of commentary on two of the most useful tools for this segment of the build, and really I see them being some of the more heavily used items in my inventory going forward.
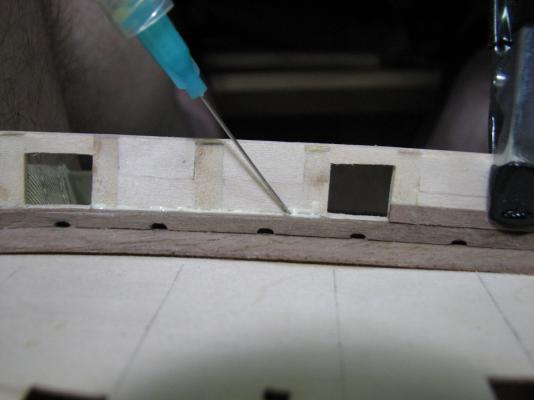
1) The common disposable syringe with a 23 gauge industrial (not sharpened) tip. I got these from Amazon because I'm an Amazon junkie.
100 Syringes and 50 tips are about $20 bucks to my door, which makes them pretty darned cheap individually, and I find that I can use a single syringe and tip for weeks before needing to replace the tip or syringe. I cover the tip with masking tape in between uses, and when it gets clogged up, a #78 micro-drill is a perfect fit to clean it out and keep on trucking.
http://www.amazon.com/gp/product/B001889SBA/ref=oh_aui_detailpage_o07_s01?ie=UTF8&psc=1
http://www.amazon.com/gp/product/B0021M3NSQ/ref=oh_aui_detailpage_o06_s00?ie=UTF8&psc=1
The syringe allows for very precise placement of very small amounts of glue in places that would be very difficult to get into with the regular glue dispenser (especially with CVA), and it is not messy and wasteful like using a toothpick, and I don't have to deal with the CVA bottle tip cleaning constantly.
2) The UMM Micro saw pack - http://umm-usa.com/onlinestore/product_info.php?cPath=21_28&products_id=37
and the UMM micro mitre box - http://umm-usa.com/onlinestore/product_info.php?cPath=21_28&products_id=3340
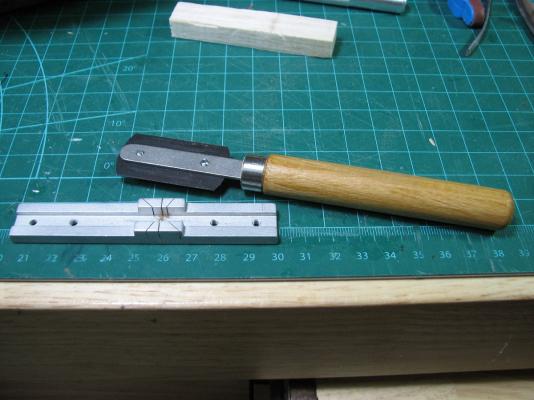
This has rapidly become my go-to tool for cutting of pieces to length. It's fantastic for trimming overhanging pieces very closely and very precisely, and with the mitre-box it's much more accurate than the X-acto aluminum mitre-box and razor saw and has a much finer cut with less splintering. I found this on a post on here, but I can't seem to find it now. Whoever recommended this a couple months ago, thank you, it's an awesome tool.
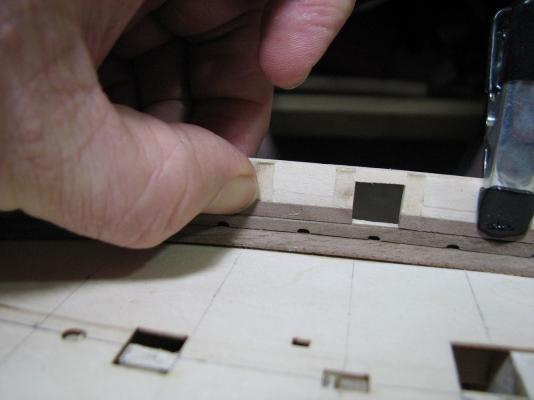
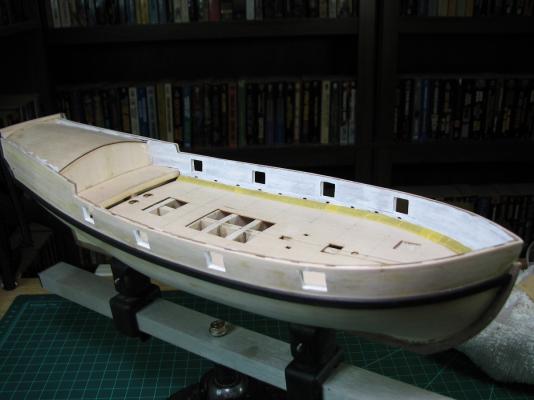
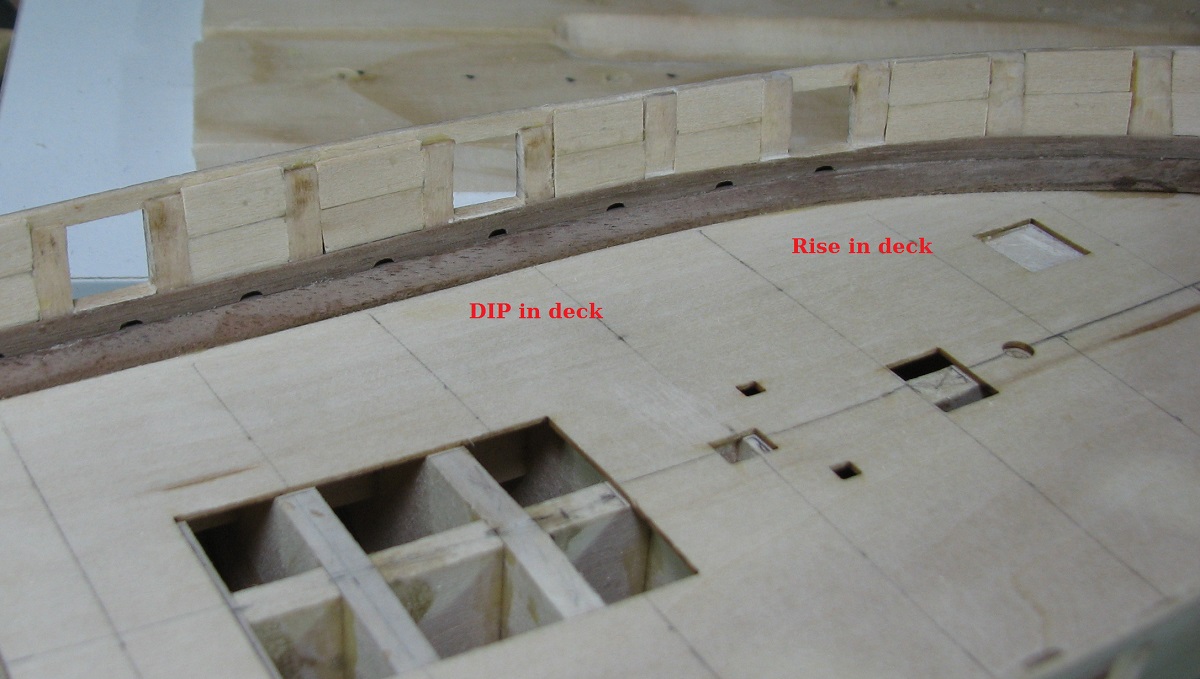
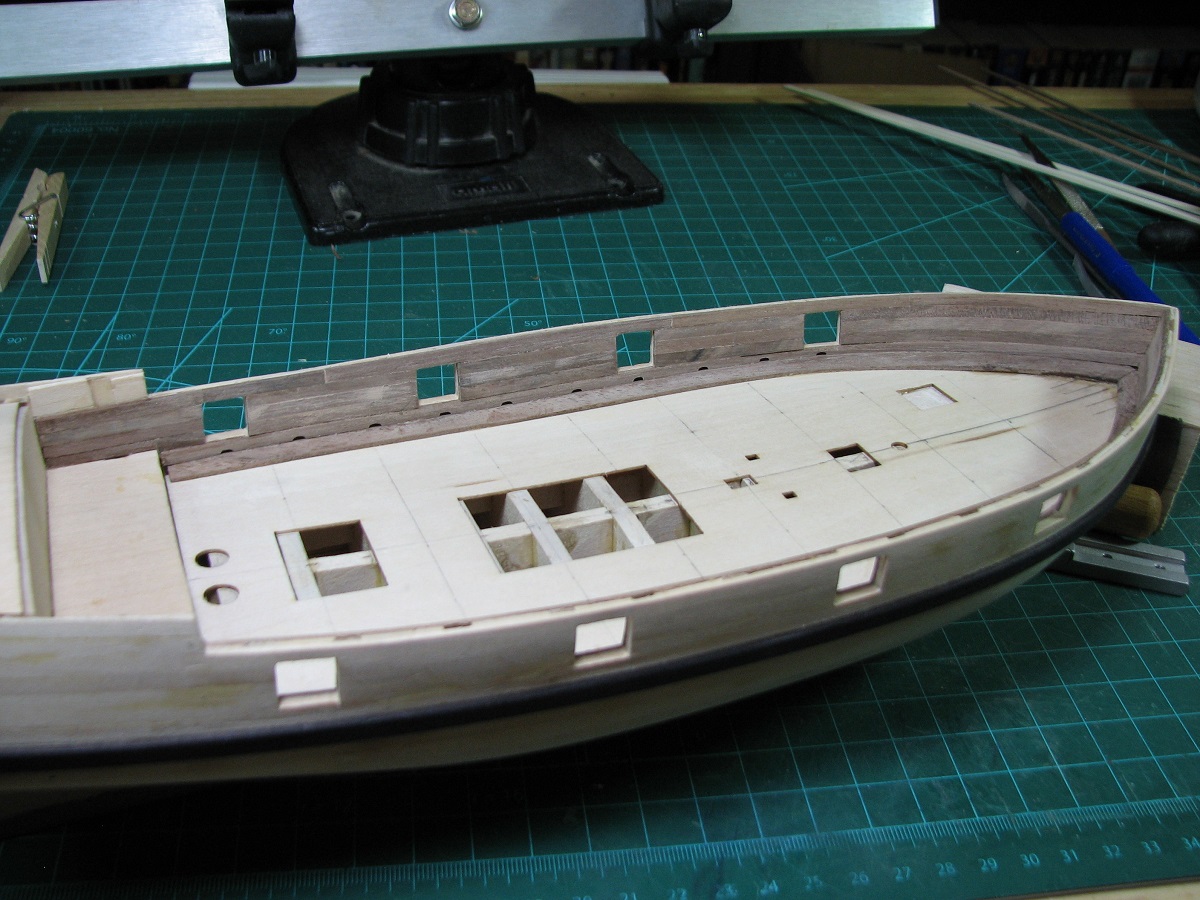
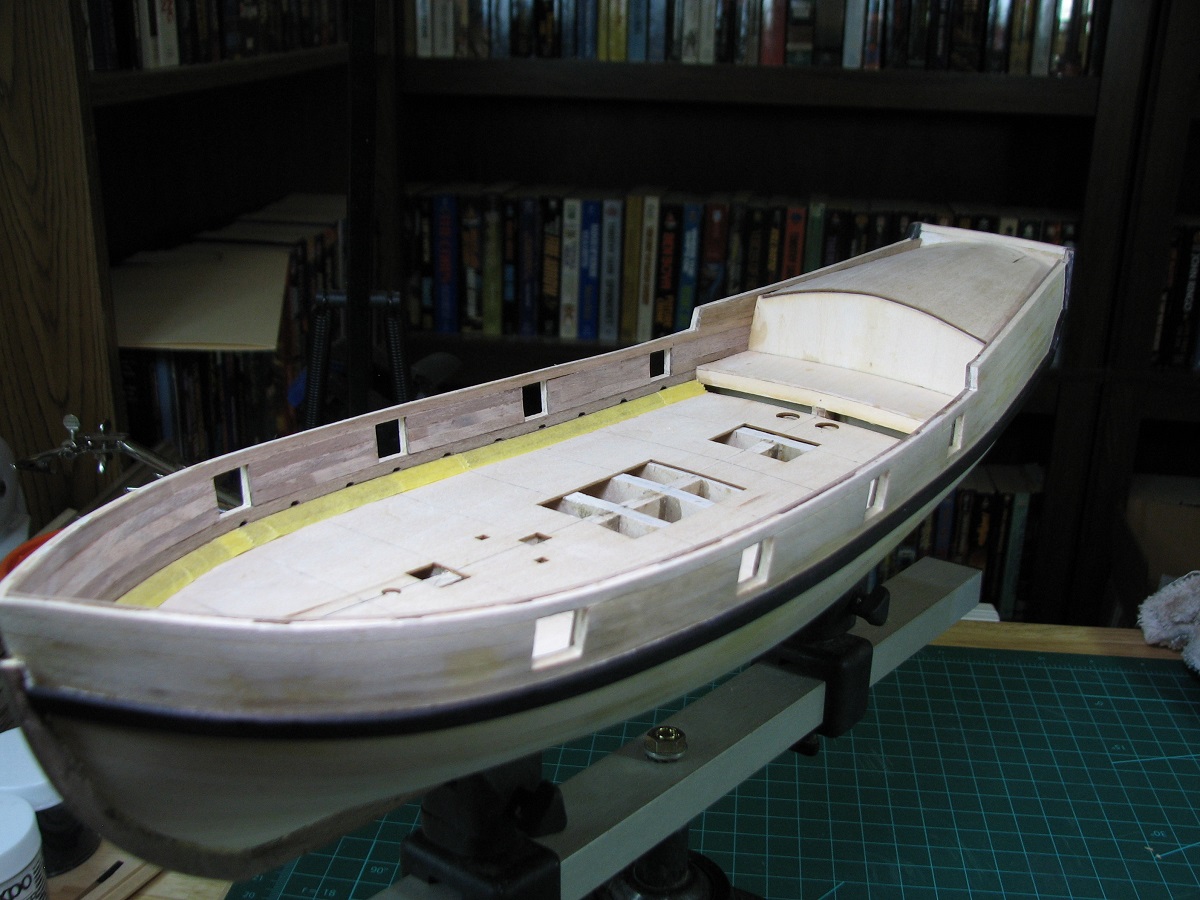
On to the actual update. My deck on the port side has some issues that I did not realize until last week when installing the spirketing planks and seeing how badly out of whack the gun ports were with the top of the plank. The photo doesn't really show it very well, but the deck has a significant dip, and then a corresponding rise at the forward two gun port locations.
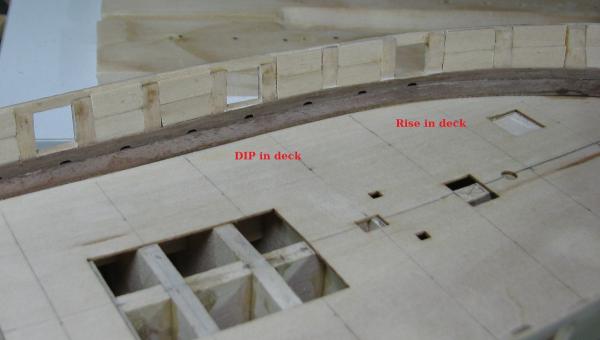
I spent a lot of time trying to figure out how I could fix this, and I sanded down the spirketing plank at the forward gun port in order to make the sill be at approximately the correct height on the outer hull. Other than that I finally went with the "Congress" solution, and stuck my head in the sand, pretended it didn't exist and went on. I don't think it's fixable at this point, as the core issue has to be in the bulkhead tops under the false deck, so I'm just going to work around it as I go and see what happens. Chalk this up to lessons and try to figure out how to better detect this at the fairing step on future builds.
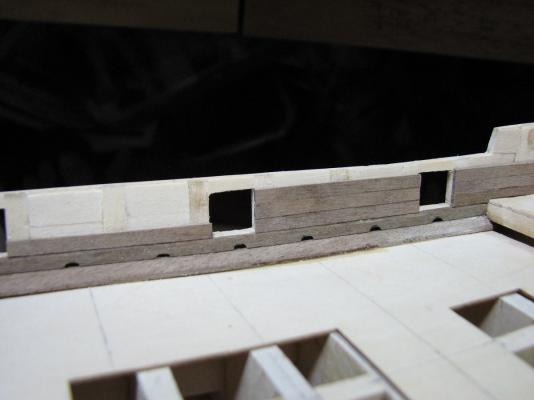
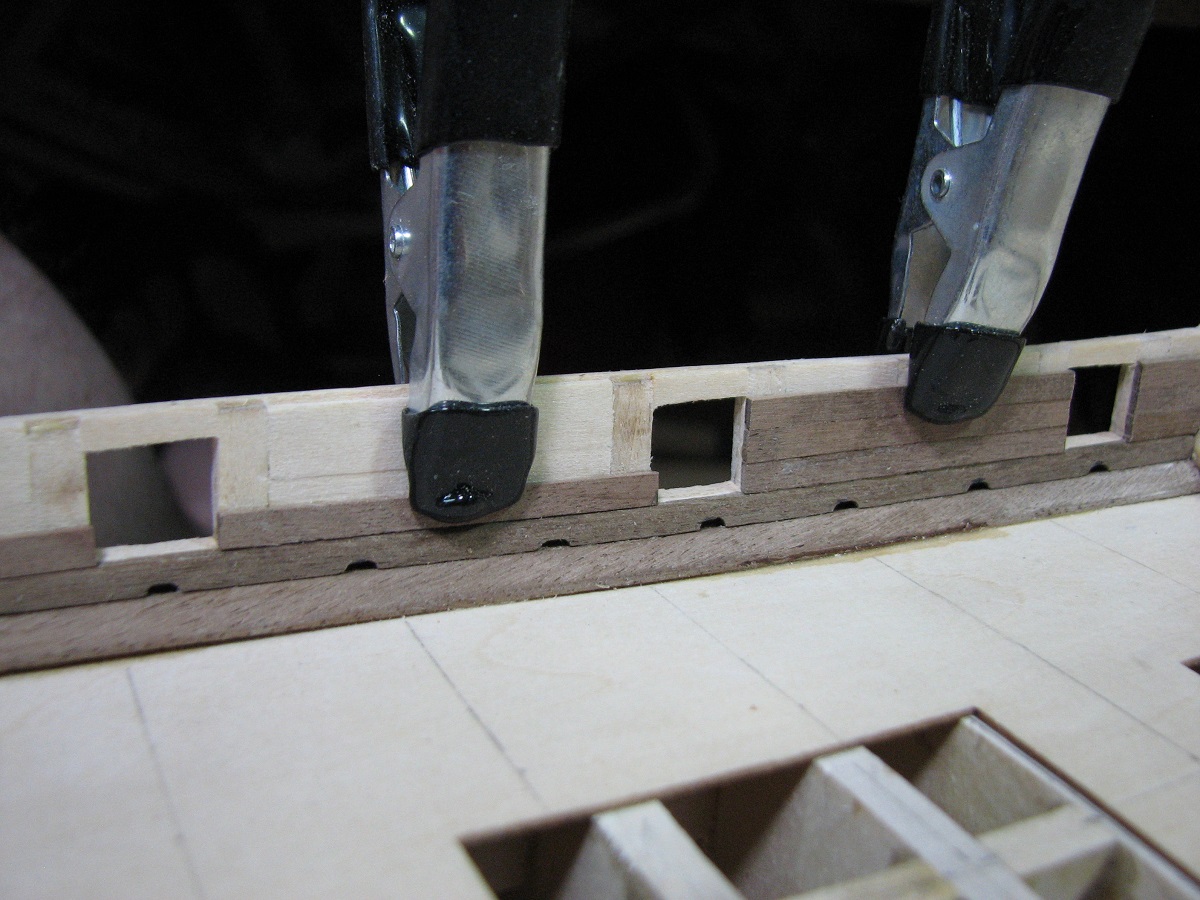
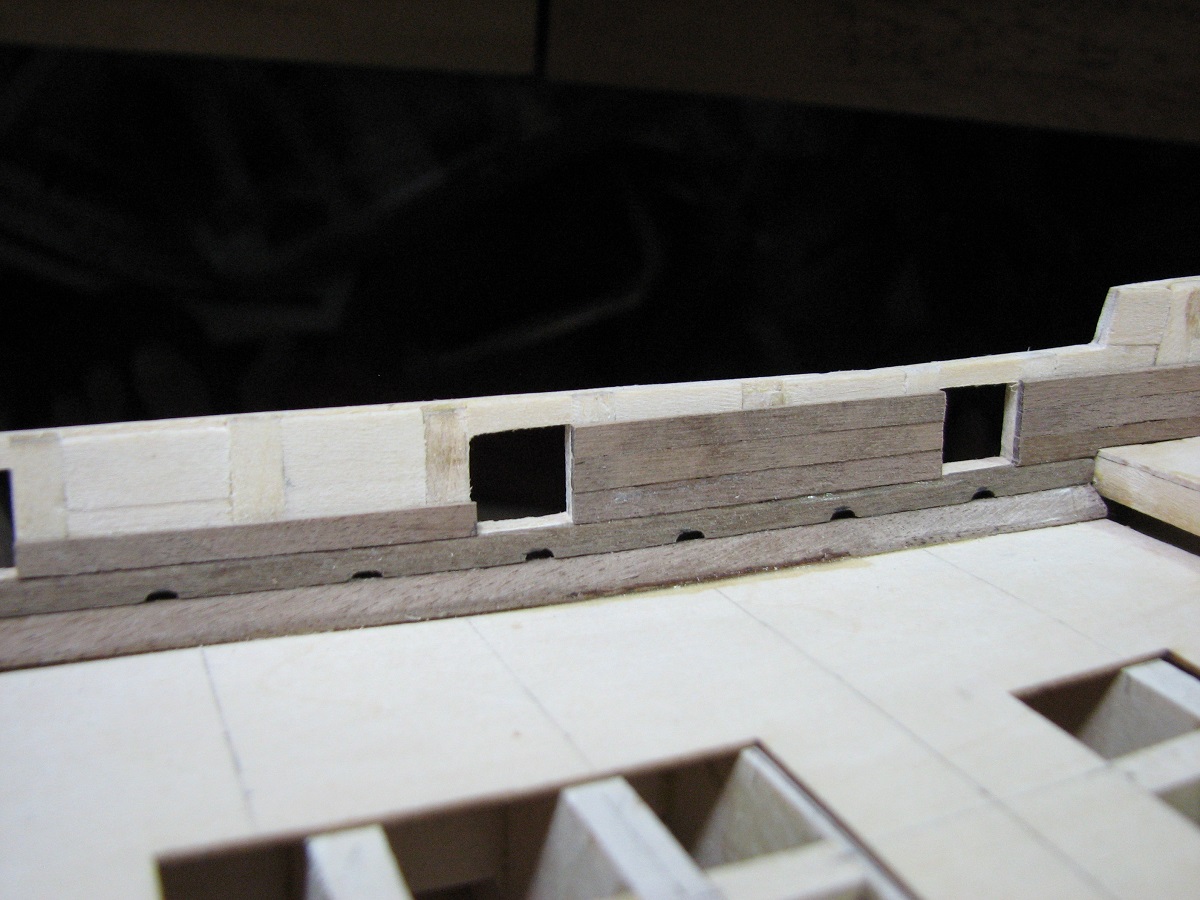
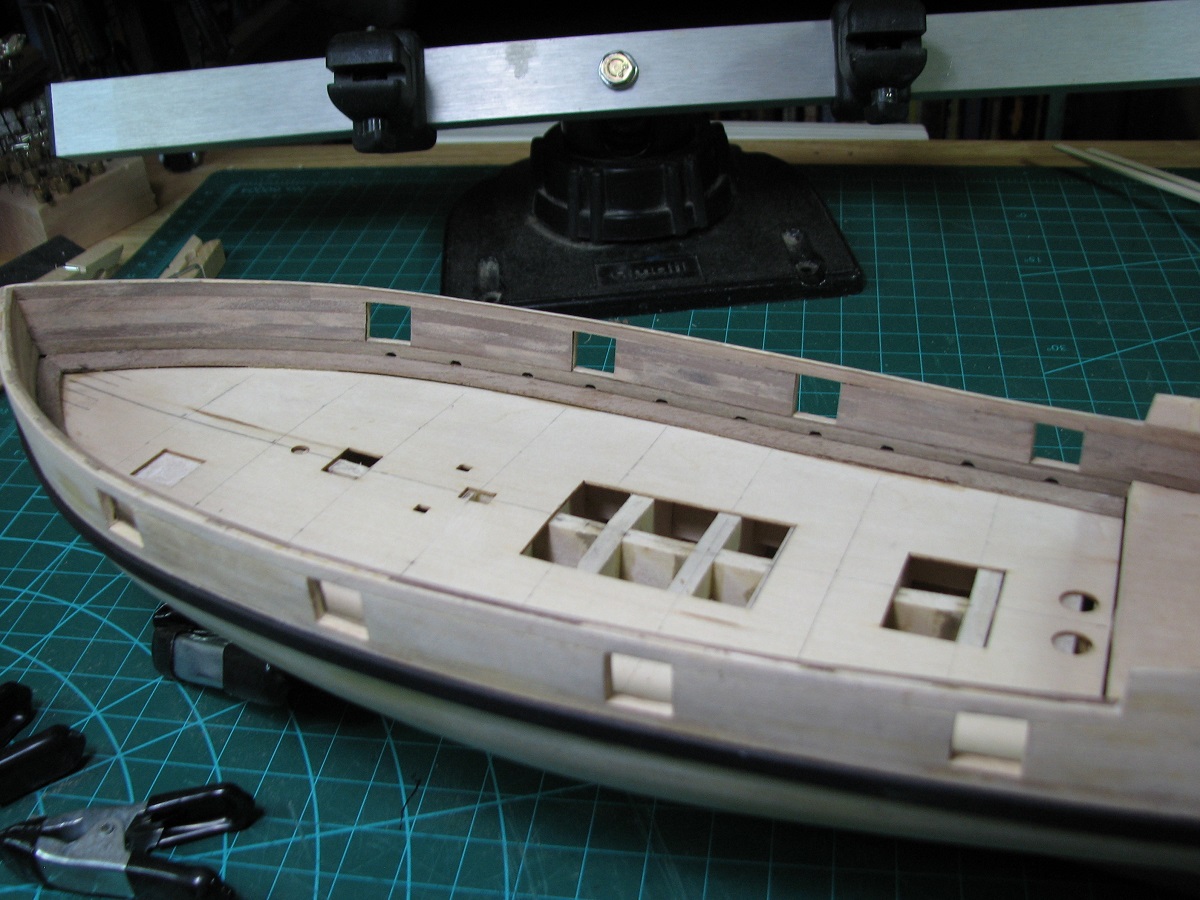
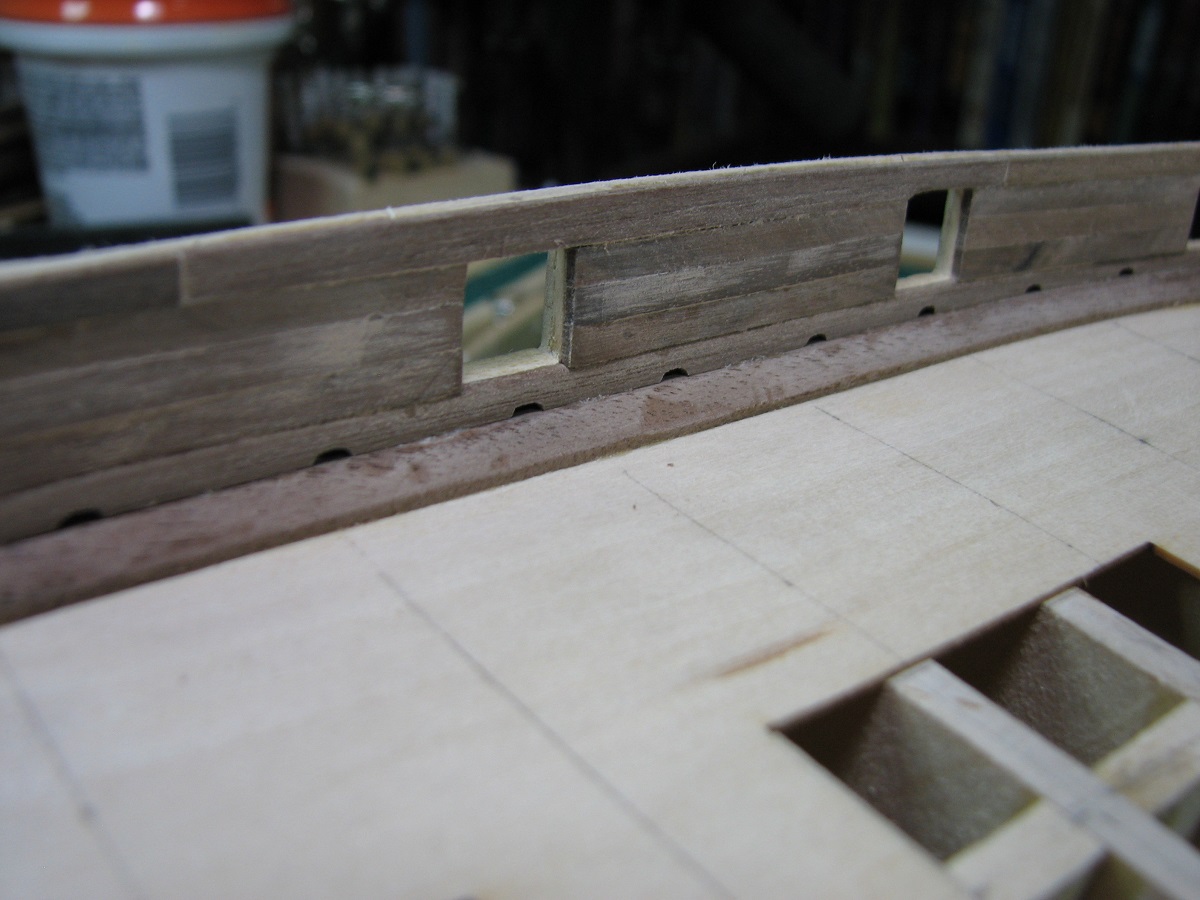
Adding the inner bulwark planking was fairly straight forward, just cutting pieces to length, edge beveling to get a nice close fit to the previous plank, and gluing them in place.
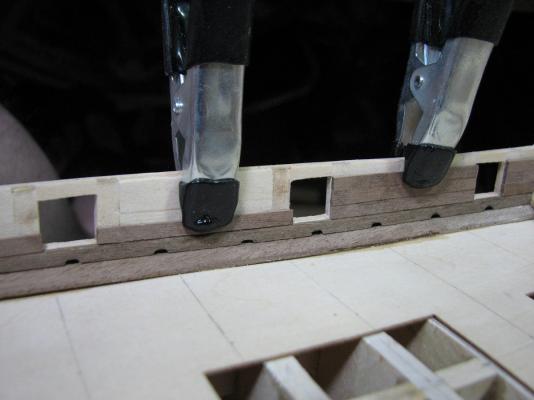


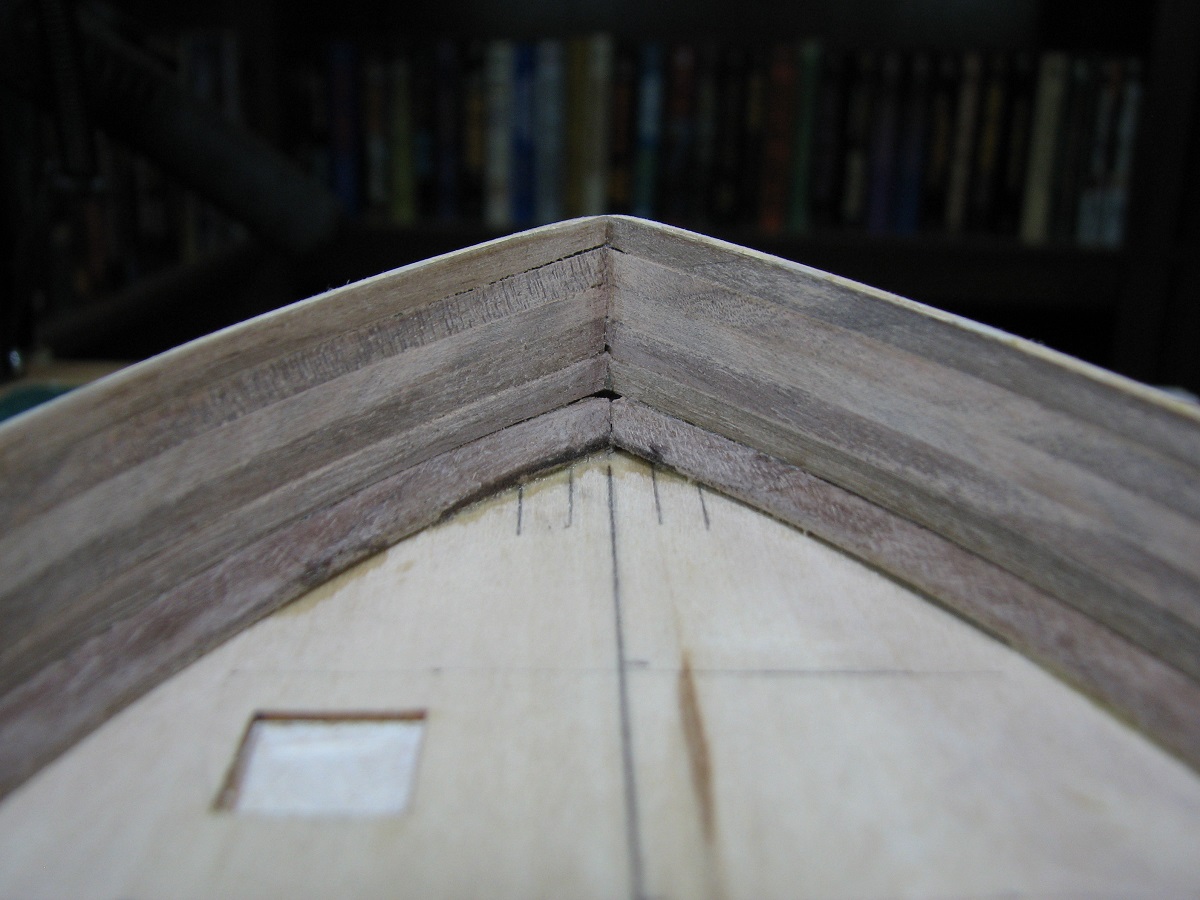
At the bow, even though everything will get wiped out by the hole for the bow-sprit in the future, I decided to try a technique I've seen in a couple other builds, and rather than bevel the ends to try to get a perfect alignment with the other side, I 'criss-crossed' them. I put the first plank on the starboard side all the way to the bass-wood on the other side, then butted the port side plank up against that one, and then put the next port side plank all the way to the bass-wood and on top of the first plank from the starboard side, repeat to the top. I really like the results, and will probably use this technique in the future for places where planks join at an angle like this.

The poop deck area required quite a bit of work and trimming before I had both sides pretty equal and the inner planking fitting correctly, but in the end I think it came out well.
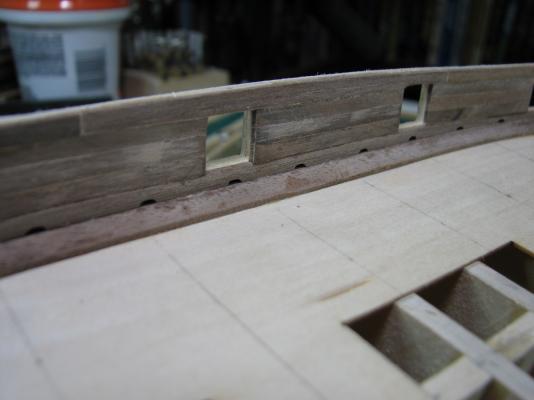
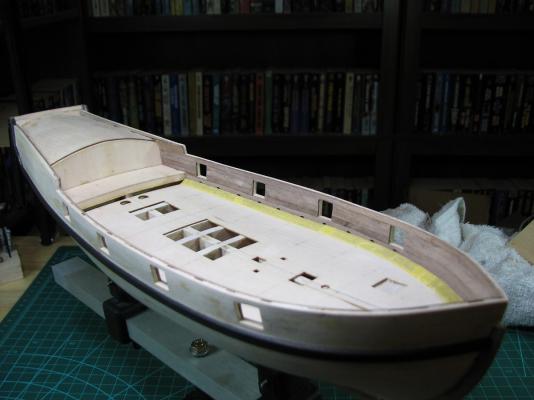

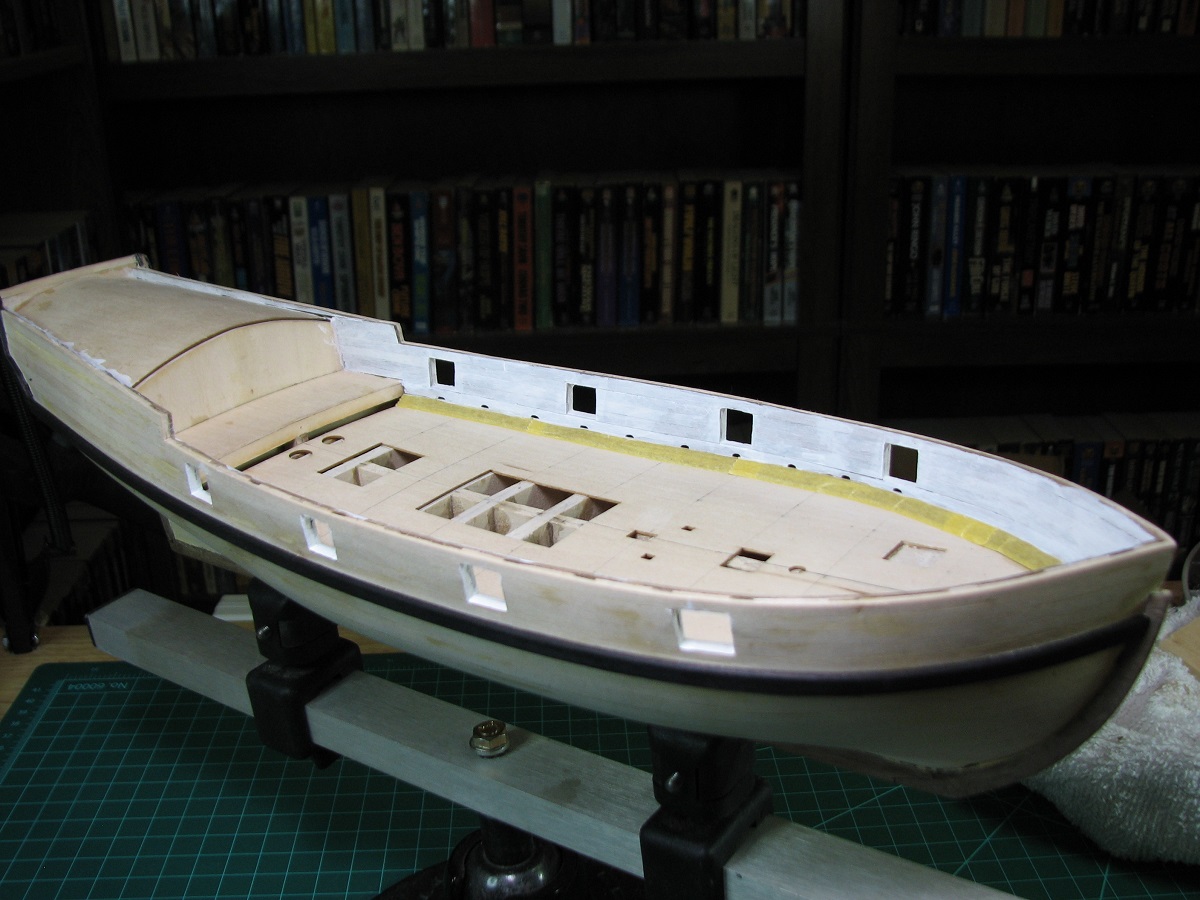
After sanding (going to need to make myself some oddly shaped sanding tools/sticks in the future for working on the 'inside' of things like this), I thinned Model Shipways primer - 1 part water to 4 parts primer, and applied the first coat of primer.
And that's where I'm at now. I did however, between various things do a bit more experimentation with my Holly decking. I increased my drill size to .031" from the original .024", so the holes are now oversized for scale, but I'm going for 'appearance' vs. accuracy here. I made some tree nails out of round toothpicks, as I wasn't happy with the bamboo. I think I'm even less happy with the toothpicks, they get very dark when sanded down flush with the deck. I also tried wood filler in the larger holes. Still wasn't all that happy, but when I applied the wipe-on poly, something magical happened, and the wood filler got just slightly darker!
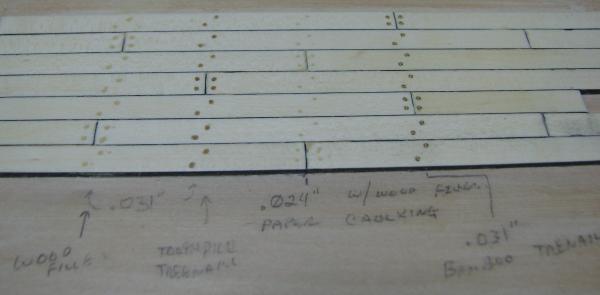
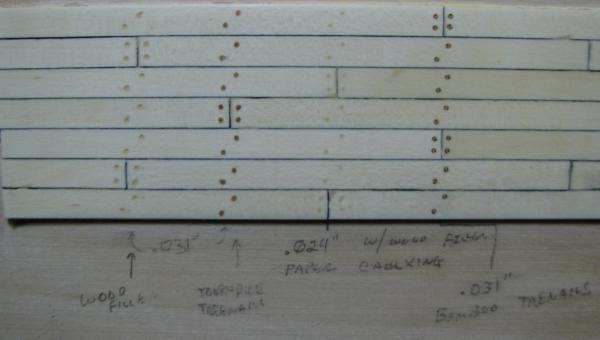
Above shots are with 3 coats of Min-Wax wipe on Poly with a steel wool wiping between coats. For the final deck I believe I will split the difference in hole sizes and go with a .028" hole and use the wood filler. I will test this on my test deck first, but based on the appearance of the wood filler in the .024 & .031 holes I am fairly certain this will get to the appearance that I'm looking for.
Whew.. if I was talking I'm sure I'd be all out of breath now! Until next time, take care all, and happy ship building.
-
-
Beautifully done Jerry, congratulations!
-
Well done, and looking forward to the Caroline!
-
-
-
You mean the rope that you are doing the serving on? That rope should be the standard rigging - so if you are serving the top of your shrouds for example, you would use the regular rigging supplied (or something like Chuck's rope if you are replacing the kit rope) and then 'serve' that line with thread or very small rope, much like you would seize the normal rigging with thread.
Since the served rigging is typically not served for the entire length (with some exceptions), it wouldn't work to use a thin thread as you would then need to somehow attach the thicker rope for the non-served part. The served part should appear thicker anyway, since it's been wrapped with another smaller rope.
Back to shrouds as an example, most shrouds were served where they go over the masthead (I think that's what it's called. At the top of the shroud in any case) for a short distance, but were not served from there down to the dead eye. The exception is the trailing shroud where it might be exposed to sails which is often fully served, but even in that case, you would use the full sized shroud line and serve it.
-
I've never done serving (yet), but everything I've read indicates that it is done with a much smaller rope or thread around the larger rope.
Watch the video from the Alexey on Youtube - http://youtu.be/o5gZQRN6yoU?t=7m22s
You can see in the video how he uses what appears to me to be thread, or possibly very fine rope.
-
Those masts look really thick. Do they stay that diameter?
-
I don't think you can really plank based on the plans, as your specific hull will never be exactly like the plans so the plan planking scheme won't match it.
Instead, look in the planking sub-forum here and there is a sticky with a bunch of different planking tutorials, all with excellent information in them. Each plank has to be cut and shaped to lay correctly. It's nice (and I certainly have been trying on mine) to get them to match up nicely at the stem, but ultimately, keeping the surface good for the 2nd layer is more important.
Once you are done filling and sanding, if the 2nd layer of planking has a good smooth surface that allows you to make a great 2nd layer, then the first layer has done it's job!
-
MSW member Tim I just started a build log on MS Sultana and mentioned he had a practicum from Chuck Passaro. You might check with Tim and get the details. Here's the link to his Sultana build:
Chuck's practicum is what is available for download on Model Expo's site as well.
- augie and thibaultron
-
2


Armed Virginia Sloop by GuntherMT - FINISHED - Model Shipways - scale 1:48
in - Kit build logs for subjects built from 1751 - 1800
Posted · Edited by GuntherMT
Tom - of course I don't mind you following along, happy to have you.
Keith, Alistair & Augie - thank you for the input. I'm still not completely sure which way I'll go, I may do another small planking section to test on fresh wood that wasn't already poly coated like the latest samples to make sure that had no effect. Keith, .024" is 1.15" in scale, so it's actually not far off from actual size in scale, as I've seen anything from 1" to 1.5" for the size of the deck plugs. .028" works out to 1.34" in scale.
Grimber - There will be no varnish, only the clear Poly which is already present, just a single coat after the newest additions to the test board. I did not notice a change between the first and 3rd coats as far as color of the nails in the previous experiments, but as I mentioned above I will probably do one last completely 'fresh' set prior to my final determination of what way to go.
Randy - The bamboo does have a unique look to it, but it's really not a look I like for this model. They stand out far too much for the effect that I have in mind for this deck, but I'm glad that I did those, as I now know what to expect from bamboo and can keep it in mind for future use.
Edit: Thanks Lawrence, you posted while I was posting!