Keith_W
-
Posts
1,145 -
Joined
-
Last visited
Content Type
Profiles
Forums
Gallery
Events
Everything posted by Keith_W
-
 Thanks for the remarks and the likes, everyone. Vince, I will be adding a double layer of first planking above the main deck level - AFTER I cut the gunports out. I wasn't too sure how rigid the structure would be after doing that - rather than risk it, I thought I would complete the first planking below the waterline first. There is after all, no disadvantage in doing that. I'm not even worried that I will scuff up the planks and make them ugly, because any scuff marks, or even deep gouges, will be repaired and hidden by white paint. Thanks Pat, but I think that you have seen the basic skeleton at a meet a few months back. I have completed a bit more of the first planking now. All I can say is that the pear is a real pleasure to use, a really nice upgrade over the kit supplied wood. I have also been thinking of how to make the stanchions for the staircase and the rear railings. Commercial stanchions are much too thick and seem out of scale, so I have been trying to turn my own. Toothpicks make awful looking stanchions, the wood flakes off too easily and my hit rate is very low. Bamboo picks are even worse - I think they are only good for making treenails. And it's not easy finding Boxwood dowels ... how I wish I ordered some when I bought my planks off Jeff! I have tried making them out of Sculpey and I don't like the results - too inconsistent. I have tried threading beads and painting over them with liquid Sculpey but they look silly. Now I am thinking of 3D printing them (hence my other thread). We'll see.
 -
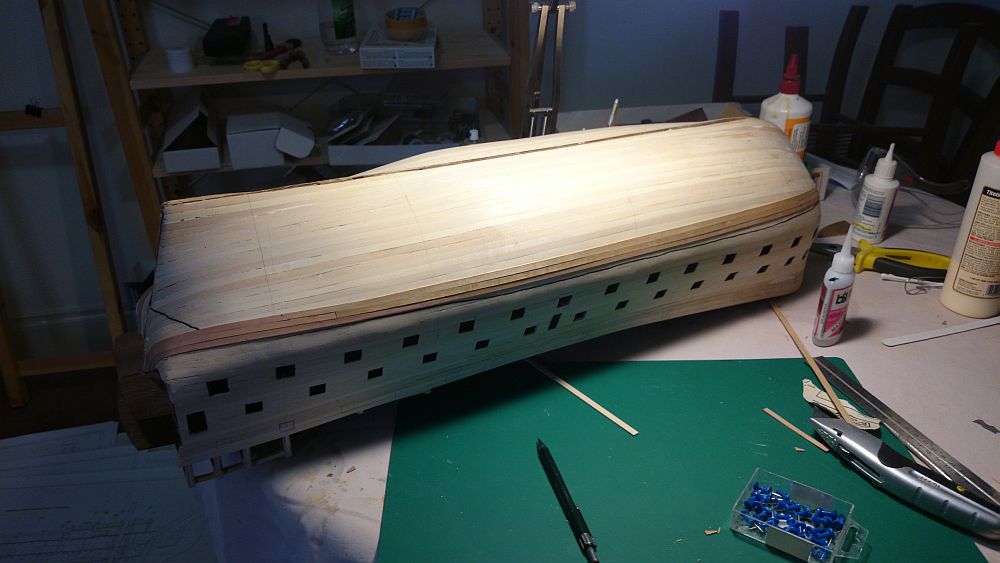
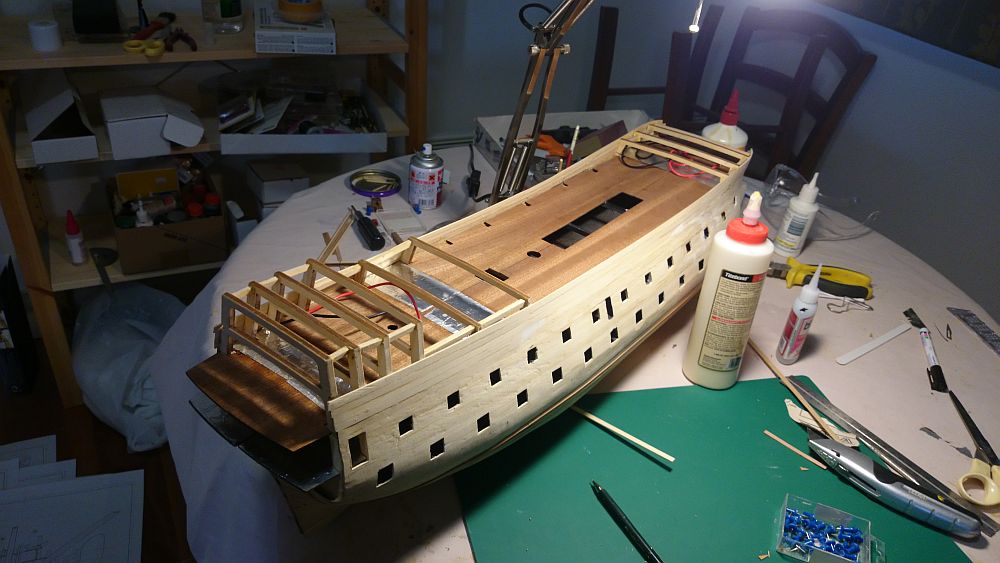
I have been giving a great deal of thought as to how to proceed with this build. I have now completed the first planking up to the main deck level. To my immense relief, the planks are still straight, which means that each deck installed so far is exactly parallel with respect to the others. Other builders of the RW on MSW have decided to continue the first planking upwards, but I am nervous about doing this. Any planking above the main deck is unsupported by frames, and thus potentially vulnerable if the ship is turned upside down. I have therefore decided to start my second planking at the waterline and work downwards and upwards. These photos show that the waterline has been drawn with a thick black marker. If you look closely, you will note that I am using pear strips which I bought from Jeff at Hobbymill for the planks above the waterline, and the Euromodel supplied strips below the waterline. The reason is to save cost by saving the expensive pear strips for planking which will actually be visible. The planks below the waterline will be hidden by white paint. (EDIT) I forgot to mention - the 2013 edition of "SHIPWRIGHT" magazine has a feature by Mr. Yankovitch who scratchbuilt the 1:36 scale Royal William. It is well worth reading, he talks about his technique and how he overcame various problems. I bought my copy on Kindle. Amazon link is here: http://www.amazon.com/Shipwright-2013-International-Maritime-Modelmaking-ebook/dp/B00GZ8EPPM/ref=sr_1_1?s=books&ie=UTF8&qid=1416144214&sr=1-1&keywords=shipwright+2013


-
I have been doing some research on 3D printers. I am planning to make some rail stanchions. Question is - do I feel like turning 100 of these on my lathe, or would it be easier to draw up a design on CAD and either buy a printer or get someone to print it for me? I have looked around the market to see where 3D printers are at at the moment. There seem to be two main types which could be considered for home enthusiast. This is a quick run-down of the pros and cons I have learnt so far: - SLA (Stereolithography). A plate is immersed in liquid resin, then spots on the resin are hardened by focusing a laser on it. When one layer is done, the plate is re-coated in resin and the process is repeated. When the print is done, the piece is removed from the plate (supposedly it needs to be chiselled off), washed in alcohol to remove excess resin, and supports trimmed off. Pros: extremely high resolution, in the order of 20-30 microns. Very fast. Very quiet. Cons: the printers are expensive (the cheapest seems to be the FormLabs, at $3800), the resin is expensive, and it is really messy. Also, larger sized printers are very expensive, but that won't matter to us because we are mostly after small size and precision. - FFF (Fused Filament Fabrication) / FDM (Fused Deposition Modelling). By far the more common type. A plastic filament is fed into a heated nozzle, which moves around and deposits layers of plastic, building up the piece layer by layer. Pros: more affordable, machines as cheap as $1k. Filaments are cheap and available in many colours and textures. Cons: relatively low resolution, the best I have seen are 100 micron. Also, most inexpensive FFF printers require assembly, or are very small companies that received Kickstarter funding (I am quite wary of those), and I have read quite a few reports of unreliable printers that - if they are not producing misshapen prints, they suffer from hardware failure. There are a few other types of printer on the market but I have not listed them. Also note it is NOT my intention to sound like an expert, I am merely listing things I have learnt so far to put up for discussion! I would like to know if any members have ventured into 3D printing. It may be quite useful for making many copies of parts that we find annoying to fabricate. Going over my current build, I would use a 3D printer to make: - stanchions - window frames - boats - gun carriages and guns - ship's stove The number of potential applications seems fairly long, which is why I am thinking of buying a 3D printer for myself. Question - do people think that 3D printers are a mature enough technology for the non-enthusiast or professional market? Is 100 Micron resolution "good enough"?
-
Nice progress, Vince. BTW, I was looking through your pictures again. Did you forget to cut a hole for the side entrance door?
-
Hi Pops, I think the various build logs (including mine) will give you good pointers for things to watch out for. I'll be following your build. Curious to see what you do with this BTW, if you plan to vary your rigging from the plans, you will need to get yourself more rope.
-
I don't know why they elected to use cherry for the frames, given that they were meant to be painted over. If you plan to paint yours over, then by all means use another species of wood.
-
I see that your kit has the same problem as mine. Bulkheads "C" and "D" do not reach all the way down to the level of the false keel. I had to shim these prior to bevelling. I can also see the the top of bulkhead "F" does not sit level with bulkheads B-E. Same with mine
-
I have a question: does ammonia bleach wood?
-
Peter, with no disrespect to Keith Julier, I found your RW resource much more helpful. For a start, your Interpretive Info contains logs from other modellers, and thus more than one interpretation of how the build should go. I am not sure I agree with you in all respects, e.g. my interpretation of the plans slightly differ to yours and Julier's. In time, my model might end up looking like some horrible cobbled together matchstick monstrosity (which would be my punishment for striking out my own way instead of listening to more experienced modellers), and everyone on MSW will be able to see it But then again, it may not! Wombat, I am glad that my criticism of the kit has not dissuaded you. I would like to say again - I am not bashing Euromodel. Well, apart from my disappointment at some of the castings and parts. But those can be worked around. The subject of the kit is unique, and the model is beautiful. I had one look at Brian's, beheld the size of the thing and its sheer beauty (not to mention Brian's craftsmanship), and I was instantly smitten. You really need to see a well built model and you will be convinced.
-
Hi Vince, it looks as if my message yesterday never made it to the board. You are doing great work! I was wondering why you decided to construct the poop deck first? I was planning to build the stern from the bottom up, that way I can be sure that I don't extend the poop deck too far aft. Brian, as for Vince inspiring you ... you could do with a good dose of that right now! I would love to see you restart your build log!
-
Personal Messages
Keith_W replied to aliluke's topic in Using the MSW forum - **NO MODELING CONTENT IN THIS SUB-FORUM**
Check how full your inbox is. If it hits 100%, you won't be able to send or receive any more messages. Time to delete some old messages to free up inbox space. -
Louie, any scrap wood that you remove from your pear trunk can be used for smoking food. I often chuck pear chips into my Kamado smoker and get amazing ribs. I know this is REALLY off topic but here are some ribs I smoked with cherry wood: So if you cut up your pear branch, first dibs on the offcuts! I'll even drive up to Ballarat to collect it If you can't make a ship model out of the wood, you may as well use it to flavour your food, eh!!!
-
Thanks for your remarks, Tom. And thank you also for the link Kevin, but I already have that article
-
That's OK Brian, I know that you and others think that my assessment of this kit is overly harsh, and that I am being too critical - but I think it is important to point out where the pitfalls are for people who will follow. To me, I have always found the most helpful build logs are those which clearly point out "Beware of this! Don't make the same mistake as me!". If it wasn't for other build logs which have clearly identified problems and workarounds, my build would be even more sloppy than it already is!
-
Hi Wombat, interesting name for someone who lives in the UK Are you an Aussie expatriate by any chance? The kit is "all right". It is certainly not a kit in the same way that something provided with Amati is a kit. As mentioned, the instructions are so poor that they may as well not have bothered. It would have been helpful if the instructions gave you a suggested build order, but they don't even do that. If you look at the build logs on MSW, you'll see that each of us are building it in a slightly different order. VinceP has completed the first planking up to the top deck before starting second planking. I plan to start my second planking before I reach this stage to avoid having to invert the model and damaging deck features. Just one example. Things that you would expect to fit (e.g. all the laser cut parts) ... don't fit. This is a critical realization to make very early in your build because (if you are like most normal people), you would be taking reference and locating features off your laser cut parts. You need to accept that the laser cut parts are approximations, as shown by some examples I have highlighted during this build (e.g. the bow bulkheads not reaching down to the keel!). Instead, you absolutely MUST take reference off the plans. This in itself can sometimes be problematic, because the plans don't always clearly show where a feature should be located. A great deal of intuition, study of other builds, and prayer is needed. None of these problems are insurmountable. A much more difficult problem is what you are going to do about some of those fittings! Some (e.g. the gun carriages) can be fabricated. Some others (e.g. gunport hinges) will have to be replaced with third party parts. And some others (e.g. the windows supplied as metal plates) will have to be discarded and made anew. But yet some others are not so easy - e.g. the fine filigree work at the stern, the stanchions, etc. All this could be avoided if Euromodel replaced these parts with photo-etch. They say that Euromodel is more a scratch build than a kit build. That is certainly true, because some of the supplied parts are so substandard that you will need to scratch it yourself anyway. In any case, I am sure it will turn out to be a fine model. I just don't think it is such a great kit.
-
convertion fraction to mm
Keith_W replied to rafterrat_2005's topic in Modeling tools and Workshop Equipment
Australia uses metric. AFAIK the only country in the world to use Imperial units is the USA and maybe some US territories and colonies - e.g. Liberia, Guam, Marshall Islands (but i'm not even sure about those). -
convertion fraction to mm
Keith_W replied to rafterrat_2005's topic in Modeling tools and Workshop Equipment
Just go to google and type "1/32" into mm". That's it. -
Very hard to count how many drop planks you will need from a picture, Capt. Al. But it does look as if you will need a few. One thing I should have done with my Bounty was to paint the hull below the waterline white. Will you be doing this? If you plan to paint, it can hide all sorts of planking sins and you will be able to use filler.
-
I agree with Brian - Titebond is my favourite glue. There are a couple of issues with it though - first, it does not set clear. It is a tiny bit yellow. Won't be a problem if you sand it all off. The second issue is its setting time - about 30 minutes. It is perfect for me, but may be either too fast or too slow for you. For this reason I also stock a variety of other glues, including Aquadhere PVA (for when I want even slower setting times, or when set times is not an issue). I also stock Epoxy at home - I like Epoxy, but it is expensive and wasteful. Then there are the 10 packs of Super Glue you can buy from Asian $2 shops in Box Hill.
-
Love it, Von Kossa. If it wasn't for the pot plants in the background, you could almost convince me that we are looking down the deck of the ship in the museum. Great job!
-
She looks beautiful, Jack, thanks for sharing. BTW, I love your RRS ballhead and L-plate for your Canon as well I couldn't recognize the tripod though! Oh yes, that's a lot of cat food ...
-
Hi Steve and Julian, thanks for dropping in. This kit is clinker planked, which is a whole new challenge by itself. The other disappointment was the plywood that was supplied for the planking. The problem with plywood is that it tends to delaminate when it is soaked, so you have to be very careful when you bend the planks. You can not use plank nippers to bend the plank either, since you will be able to see both sides of the plank. Then there is the problem of how you are going to clamp the planks when you are assembling the kit! The frames are too thin to use clamping screws, and using nails will leave holes in the planks. Holes aren't so much of a problem if you plan to show the nails as a feature once the boat is built. I used super glue to avoid the clamping problem, but this left ugly stain marks on the finished boat which I had to spend much time sanding off. If I were to do it again, I would probably use small spots of super glue gel to avoid the likelihood of glue running all over the place with sprays of accelerant to set it quickly. Hopefully, more experienced modellers than me can come up with suggestions on how to clamp these planks.
-
You can buy a Dremel, but others on MSW also use Proxxon and Foredom. When purchasing a rotary tool, these are (IMHO) the most important considerations: - Price. Dremel is the cheapest and most available, Foredom costs the most. - Chuck diameter. Dremel has the smallest chuck (which limits the size of the tool you can hold). Foredom has the largest. - Flexible shaft. AN ABSOLUTE NECESSITY IMO. This allows you to hold the tool with a pencil grip and saves you from having to wrestle a large tool when performing delicate work. All three systems have flexible shafts as an accessory. With Foredom, you have a choice of many different shafts and heads. - Tool bits. All accessories are interchangeable between Dremel, Proxxon, and Foredom - with the notable exception that larger diameter shank tools will not fit if your chuck diameter is too small (see point #2). Just because Dremel has the largest and most available selection of tool bits should NOT influence your decision. You can easily use a Dremel tool bit on a Foredom if you so choose. - Smoothness. Proxxon and Foredom are said to be noticably smoother than Dremel with less rotational eccentricity. Important if you are carving very fine work but not so much if you are using your Dremel as a Drum sander or to cut bits of wood off. - Foot pedal. Only Foredom has a variable speed foot pedal. This is important because your tool is not rotating when you apply it to the workpiece - increasing your precision. Both Dremel and Proxxon can be adapted with an "on-off" pedal, but this does not give you the ability to adjust speed using foot pressure. I have a Dremel and I am happy with it. Good luck with your choice.
-
Thanks Brian. I will be in Brisbane next week, so I can't bring it to the meeting We have some house guests at the moment, so I haven't been able to work on the ship. Then when I get back from Brisbane, i'll be off to London - my first trip back there in 10 years. Quite looking forward to it. Might try to persuade the wife to let me go to Portsmouth and the NMM