HOLIDAY DONATION DRIVE - SUPPORT MSW - DO YOUR PART TO KEEP THIS GREAT FORUM GOING! (Only 36 donations so far out of 49,000 members - C'mon guys!)
×


Keith_W
-
Posts
1,145 -
Joined
-
Last visited
Content Type
Profiles
Forums
Gallery
Events
Everything posted by Keith_W
-
 You HAVE caught up! Crumbs, I think I am only two weeks ahead of you, despite several months head start!
 -
That's pretty amazing, Matt. I am in awe of people who are able to work metal in such small scales. You're not a jeweller by profession, are you? And congrats on getting your son back.
- 425 replies
-
- 3
-

-
- bounty launch
- model shipways
- (and 1 more)
-
Paint brush verses air brush
Keith_W replied to medic's topic in Painting, finishing and weathering products and techniques
Matter of taste. Some people say flat. Some say satin. I have finished 4 of my last ships in satin, the last was finished in tung oil - which is only a tiny bit more satin than flat. -
Need advice with Byrnes saw
Keith_W replied to bigcreekdad's topic in Modeling tools and Workshop Equipment
Hi Bigcreekdad, I am guessing that you have your strip against the fence - as you advance your plank, the strip gets stuck between the saw and the fence? The solution is to have the wide part of your plank against the fence so that the ripped strip falls freely away (i.e. the opposite of what you are doing). This is Bill Sorensen's table saw guide: http://modelshipworldforum.com/resources/MillingScaleLumberRev-01%20(1).pdf He describes your problem and a work-around on page 13. On page 17-20 there is another example of how to rip thin strips without experiencing the problem you describe. -
Paint brush verses air brush
Keith_W replied to medic's topic in Painting, finishing and weathering products and techniques
Yup, spray cans are great for applying large coats of paint. Here's a tip: immerse your spray cans in hot water for 10 minutes before using them. This causes the pressure in the cans to build up, so the spray that you get is finer. If you let your cans get cold / or let the pressure go down, the paint comes out in droplets and causes a blotchy effect. -
You have done a beautiful job! Any pictures taken prior to this point?
-
In my recent trip to the UK I stumbled across this. This is what I love about London - so much history, and the possibility you might happen upon somewhere where famous feet have trodden on! Looks like you will need to put a flatscreen TV and a reading lamp on your Bounty Launch, Cap'n!

-
Given that I paid for my DVD, I feel no guilt grabbing all the videos from that site. I recommend "Save From Net": http://en.savefrom.net/user.php Some of you may be wondering about the legitimacy of this browser extension. Well, I did a google search for it and it appears to be clean. It also got past my virus and malware scanner on my PC. Just a note - it does not appear to work with versions of Chrome above v35. I used Firefox to grab the videos.
-
Since Bob didn't post a link, here is the link to Bob Sorenson's article for table saw operation. http://modelshipworldforum.com/resources/MillingScaleLumberRev-01%20(1).pdf
-
The amount of work you have put into this is awe inspiring! What material did you use for treenailing the deck? Was it a contrasting wood, or did you use brass?
-
Geez you are moving along very quickly ... you have almost caught up with me!
-
Hi cathead, welcome to the Bounty Launch club!!! I advise you to check out the other builds on MSW for lots of handy tips and tricks. What to do with the "TRANS" ... I planked over it. I can't remember if it is low enough so that the thwarts cover it when it is turned around, I will have to go and check.
- 83 replies
-
- 1
-
-
- bounty launch
- model shipways
- (and 1 more)
-
If it is table salt you are talking about, it is not a base. The pH of NaCl is 7.
-
Really neat work Matt, and love the treenailing.
- 425 replies
-
- 1
-
-
- bounty launch
- model shipways
- (and 1 more)
-
Arr. I have contributeth mine own blood to mine project. But never mineth own follicles. Thine has truly setteth an example, Cap'n.
- 625 replies
-
- 2
-
-
- bounty launch
- model shipways
- (and 1 more)
-
I squeezed the boat together to accomodate the thwarts.
-
Arrrr, is the Cap'n planning to maketh a model of the seagull whom Bligh and his crewmates ateth raw, with Bligh gettingeth the head and the beak?
- 625 replies
-
- 2
-
-
- bounty launch
- model shipways
- (and 1 more)
-
Hey Ken, great to see another Bounty Launch model. No need to precondition the wood before using it. My only suggestion is to stain the wood prior to using, if you plan to stain and not paint.
-
The day the entire German fleet surrendered - moved by moderator
Keith_W replied to Kevin's topic in Nautical/Naval History
Thank you for the link! FWIW I don't see why it should offend anyone any more than the Spanish or French should be offended over Trafalgar, or the British should be offended for losing the War of Independence, etc. -
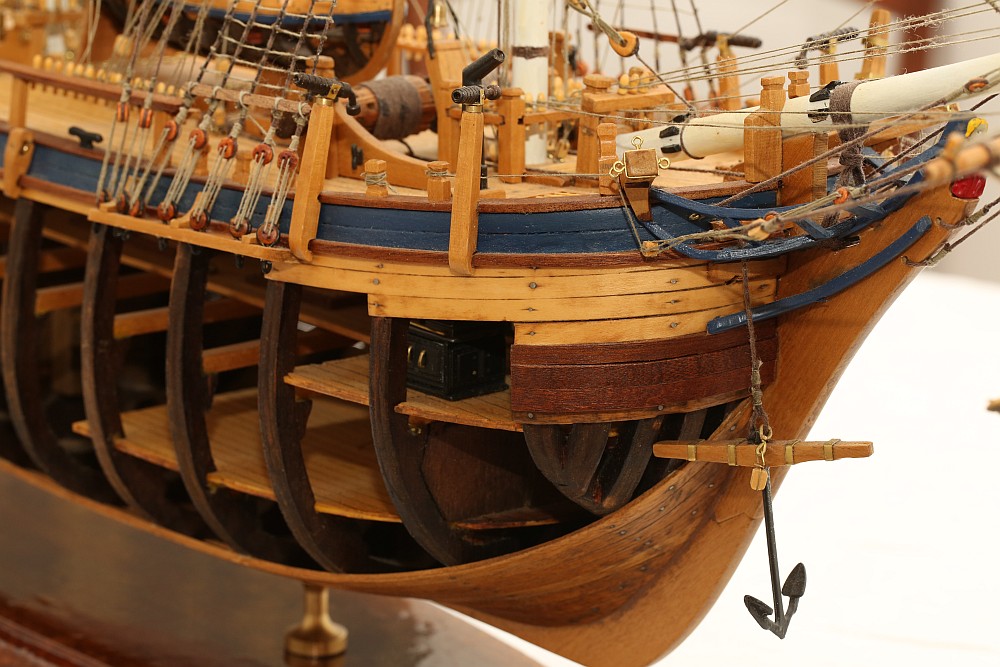
Very nice Al. Just a word of warning - on the unplanked side, I recommend that you extend the planking from the main deck further down by one plank. The channels for the deadeyes and the strops attach there. Study your plans carefully. As you can see from my build (picture below) the channels attach to the 3rd plank. Yours only goes down 2 planks. (edit) also for your reference here is Dan Vadas' build. Notice that his channels attach to the 3rd plank also: http://modelshipworld.com/index.php/gallery/image/1782-starboard/

- 265 replies
-
- 3
-
-
- finished
- artesania latina
- (and 1 more)
-
Good idea, Brian. I'll try that.
-
Thanks for pointing out that article, Kurt. I went to the NRG webpage but unfortunately the article you mention is not available for purchase or download. In fact, no volumes are available for download after Vol. 40, as per their download page here: http://www.thenrg.org/past-nautical-research-journals.php#!/Buy-and-download-articles-from-past-issues-of-the-Nautical-Research-Journal/c/8560300/offset=0&sort=normal I know that some NRG committee members frequent this site. Would it be possible to make this article available for purchase? I would really, really like to read it. Kurt, if the parts "not suitable for 3D printing" are not in the article, would you be able to give us a brief run-down as to what is, and what is not possible? I know that a complex 3D part (like a lantern) may not be possible, but surely it is possible to break down the lantern into parts and then assemble it later? Thank you also to everyone else for your input. I think buying a 3D printer may be the way to go. I can't sculpt, I can't carve, but I can certainly draw things on a computer and I don't mind cleaning up my models with a file.
-
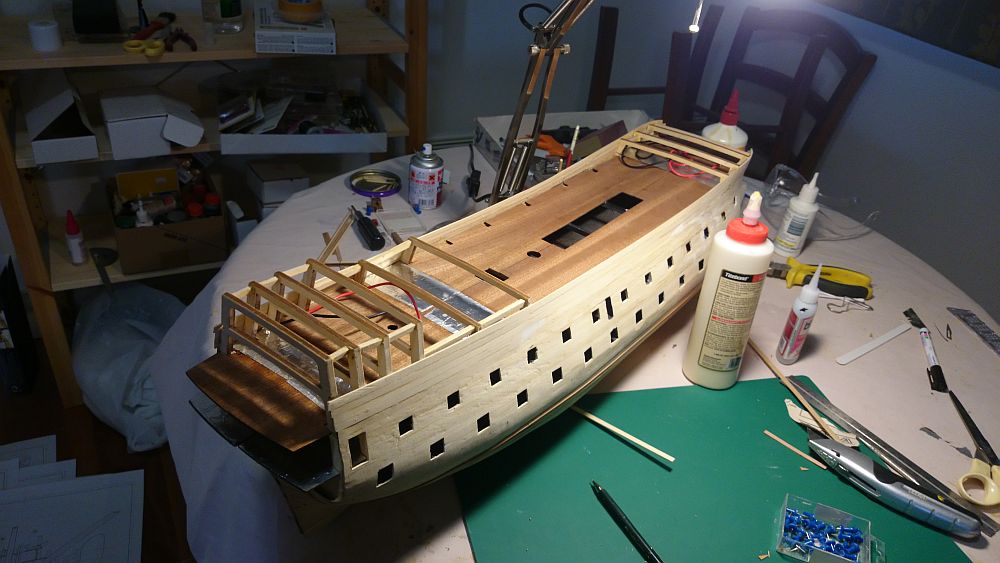
Thanks for the remarks and the likes, everyone. Vince, I will be adding a double layer of first planking above the main deck level - AFTER I cut the gunports out. I wasn't too sure how rigid the structure would be after doing that - rather than risk it, I thought I would complete the first planking below the waterline first. There is after all, no disadvantage in doing that. I'm not even worried that I will scuff up the planks and make them ugly, because any scuff marks, or even deep gouges, will be repaired and hidden by white paint. Thanks Pat, but I think that you have seen the basic skeleton at a meet a few months back. I have completed a bit more of the first planking now. All I can say is that the pear is a real pleasure to use, a really nice upgrade over the kit supplied wood. I have also been thinking of how to make the stanchions for the staircase and the rear railings. Commercial stanchions are much too thick and seem out of scale, so I have been trying to turn my own. Toothpicks make awful looking stanchions, the wood flakes off too easily and my hit rate is very low. Bamboo picks are even worse - I think they are only good for making treenails. And it's not easy finding Boxwood dowels ... how I wish I ordered some when I bought my planks off Jeff! I have tried making them out of Sculpey and I don't like the results - too inconsistent. I have tried threading beads and painting over them with liquid Sculpey but they look silly. Now I am thinking of 3D printing them (hence my other thread). We'll see.
-
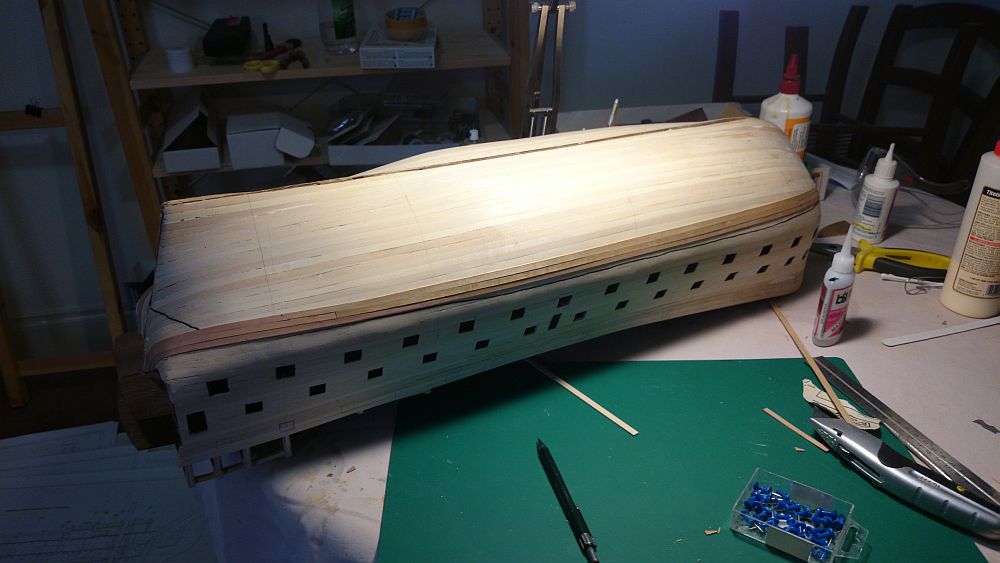
I have been giving a great deal of thought as to how to proceed with this build. I have now completed the first planking up to the main deck level. To my immense relief, the planks are still straight, which means that each deck installed so far is exactly parallel with respect to the others. Other builders of the RW on MSW have decided to continue the first planking upwards, but I am nervous about doing this. Any planking above the main deck is unsupported by frames, and thus potentially vulnerable if the ship is turned upside down. I have therefore decided to start my second planking at the waterline and work downwards and upwards. These photos show that the waterline has been drawn with a thick black marker. If you look closely, you will note that I am using pear strips which I bought from Jeff at Hobbymill for the planks above the waterline, and the Euromodel supplied strips below the waterline. The reason is to save cost by saving the expensive pear strips for planking which will actually be visible. The planks below the waterline will be hidden by white paint. (EDIT) I forgot to mention - the 2013 edition of "SHIPWRIGHT" magazine has a feature by Mr. Yankovitch who scratchbuilt the 1:36 scale Royal William. It is well worth reading, he talks about his technique and how he overcame various problems. I bought my copy on Kindle. Amazon link is here: http://www.amazon.com/Shipwright-2013-International-Maritime-Modelmaking-ebook/dp/B00GZ8EPPM/ref=sr_1_1?s=books&ie=UTF8&qid=1416144214&sr=1-1&keywords=shipwright+2013


-
I have been doing some research on 3D printers. I am planning to make some rail stanchions. Question is - do I feel like turning 100 of these on my lathe, or would it be easier to draw up a design on CAD and either buy a printer or get someone to print it for me? I have looked around the market to see where 3D printers are at at the moment. There seem to be two main types which could be considered for home enthusiast. This is a quick run-down of the pros and cons I have learnt so far: - SLA (Stereolithography). A plate is immersed in liquid resin, then spots on the resin are hardened by focusing a laser on it. When one layer is done, the plate is re-coated in resin and the process is repeated. When the print is done, the piece is removed from the plate (supposedly it needs to be chiselled off), washed in alcohol to remove excess resin, and supports trimmed off. Pros: extremely high resolution, in the order of 20-30 microns. Very fast. Very quiet. Cons: the printers are expensive (the cheapest seems to be the FormLabs, at $3800), the resin is expensive, and it is really messy. Also, larger sized printers are very expensive, but that won't matter to us because we are mostly after small size and precision. - FFF (Fused Filament Fabrication) / FDM (Fused Deposition Modelling). By far the more common type. A plastic filament is fed into a heated nozzle, which moves around and deposits layers of plastic, building up the piece layer by layer. Pros: more affordable, machines as cheap as $1k. Filaments are cheap and available in many colours and textures. Cons: relatively low resolution, the best I have seen are 100 micron. Also, most inexpensive FFF printers require assembly, or are very small companies that received Kickstarter funding (I am quite wary of those), and I have read quite a few reports of unreliable printers that - if they are not producing misshapen prints, they suffer from hardware failure. There are a few other types of printer on the market but I have not listed them. Also note it is NOT my intention to sound like an expert, I am merely listing things I have learnt so far to put up for discussion! I would like to know if any members have ventured into 3D printing. It may be quite useful for making many copies of parts that we find annoying to fabricate. Going over my current build, I would use a 3D printer to make: - stanchions - window frames - boats - gun carriages and guns - ship's stove The number of potential applications seems fairly long, which is why I am thinking of buying a 3D printer for myself. Question - do people think that 3D printers are a mature enough technology for the non-enthusiast or professional market? Is 100 Micron resolution "good enough"?